Rothenberger ROCAM 3 Multimedia Softwareinstallation: инструкция
Раздел: Техника
Тип:
Инструкция к Rothenberger ROCAM 3 Multimedia Softwareinstallation
ROCAM 3 Multimedia
ROCAM III
Anleitung zur Update Installation
Instructions for updating the installation
Instructions pour l‘installation de la mise à jour
Manual para la instalación de actualizaciones
Istruzioni per l‘installazione dell‘aggiornamento
1500000118
Instructies voor het installeren van updates
Introdução à instalação da actualização
1500000276
Installation af opdatering
1500000596
Instruktion för uppdatering av installation
Anvisning for oppdaterings-installasjon
1500000592
Päivityksen asentaminen
1500000593
Wprowadzenie do instalacji aktualizacji
Návod k instalaci aktualizací
1500000595
Kurulumu güncelleme talimatı
1500000681
A frissítés telepítésének ismertetése
1500000682
Ръководство за инсталиране на актуализации
Введение в установку обновлений
1500000683
1500000685
www.rothenberger.com
Intro
DEUTSCH - Originalanleitung! .............................................................................................................................................. Seite 3
ENGLISH .................................................................................................................................................................................. Page 6
FRANÇAIS ................................................................................................................................................................................ Page 9
ESPAÑOL ............................................................................................................................................................................... Page 12
ITALIANO ............................................................................................................................................................................ Pagina 15
NEDERLANDS ................................................................................................................................................................. Bladzijde 18
PORTUGUES ....................................................................................................................................................................... Pagina 21
DANSK .................................................................................................................................................................................... side 24
SVENSKA ................................................................................................................................................................................ sida 27
NORSK .................................................................................................................................................................................... Side 30
SUOMI ................................................................................................................................................................................ sivulta 33
POLSKI ................................................................................................................................................................................ strony 36
CESKY .............................................................................................................................................................................. Stránky 39
TÜRKÇE ................................................................................................................................................................................. sayfa 42
MAGYAR .......................................................................................................................................................................... oldaltól 45
БЪЛГАРСКИ ................................................................................................................................................................................ Страница 48
PУCCKИЙ .................................................................................................................................................................... Страница 51
2

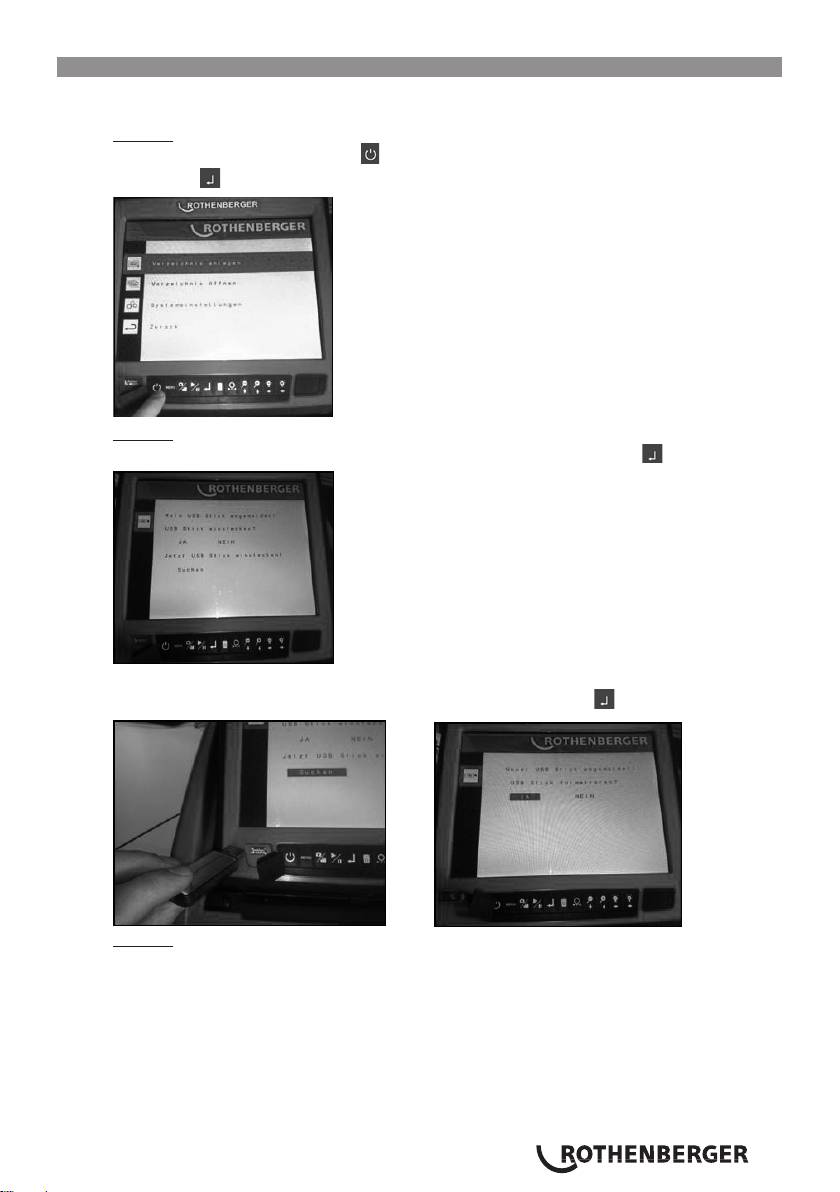
1. Formatierung
Bei Erstbenutzung des USB-Sticks, diesen unbedingt zuerst an die ROCAM 3 Multimedia anschlie-
ßen und formatieren lassen! Sollte dies schon geschehen sein, gehen Sie weiter zu Schritt 4.
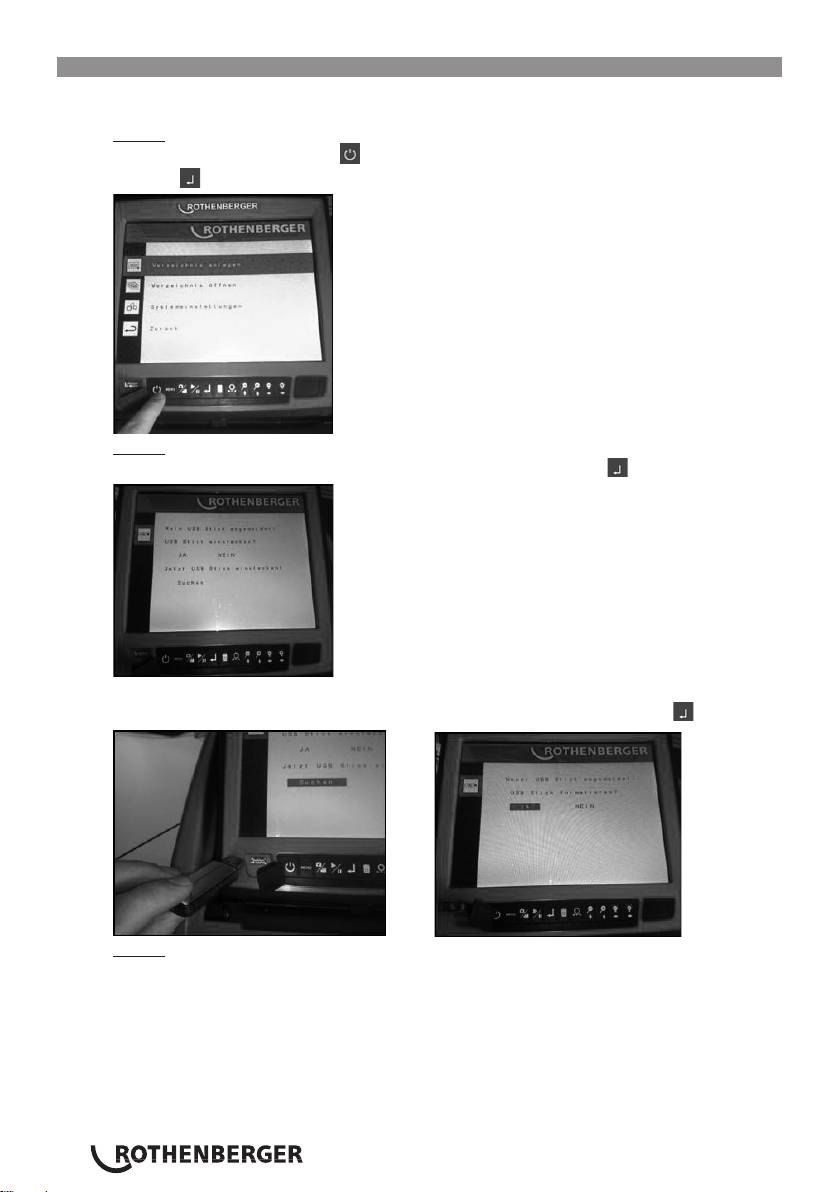
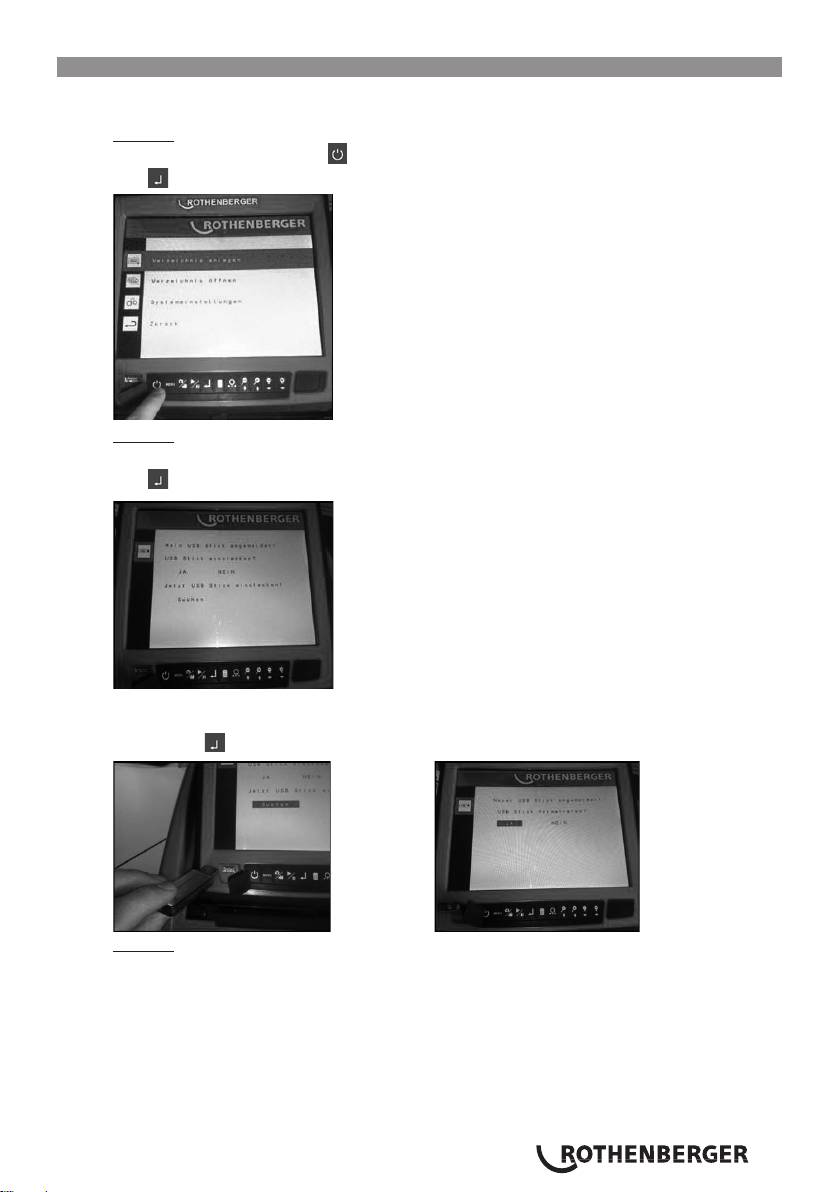
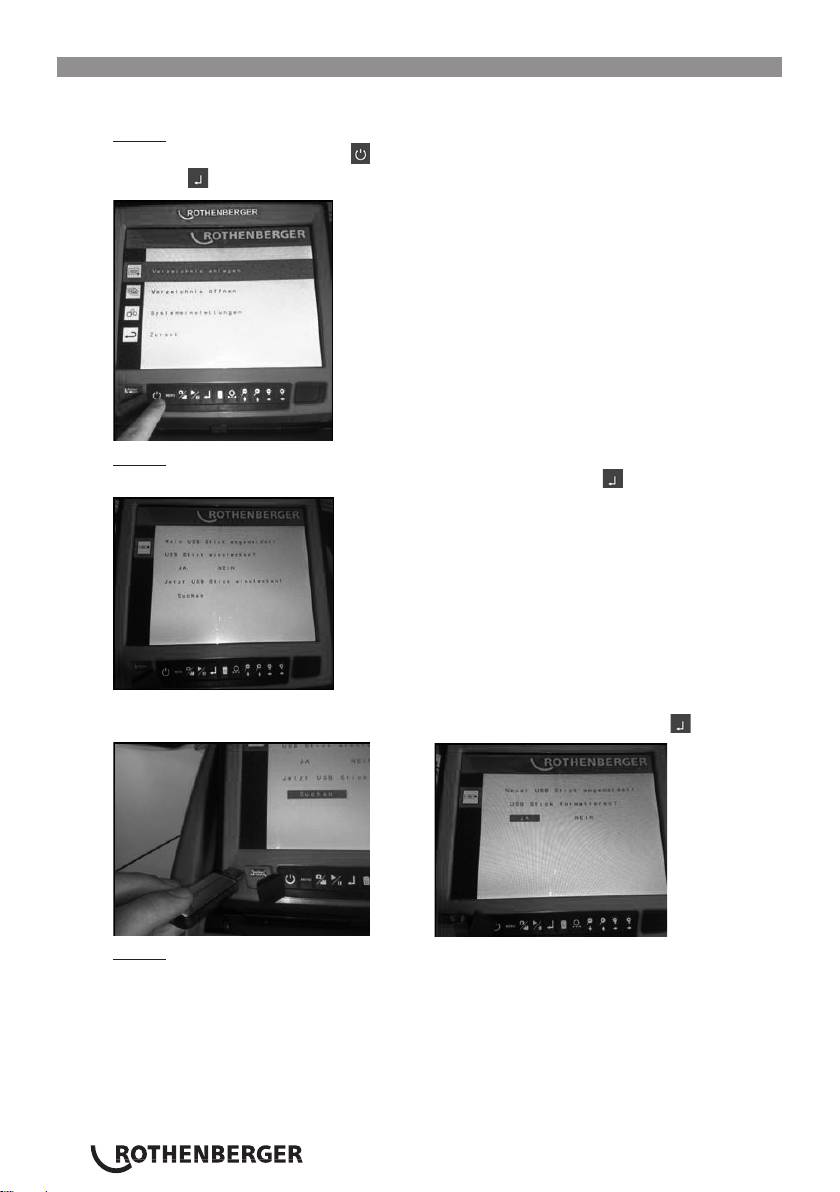
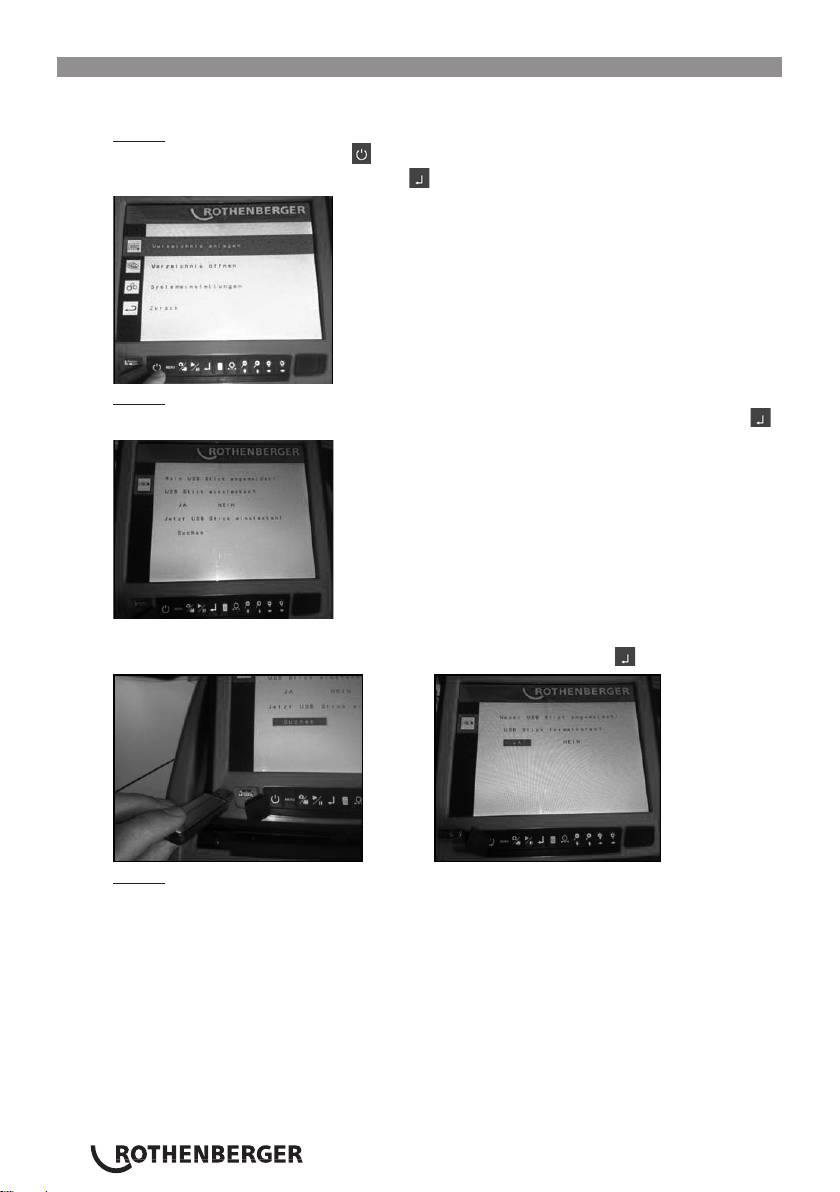
Schritt 1:
ROCAM 3 Multimedia anschalten
. Dann auf den Menü-Button und auf Verzeichnis anlegen
gehen (Bestätigen mit
).
Schritt 2:
Bestätigen Sie die Frage: „USB-Stick einstecken?“ mit „JA“ (Bestätigen mit
).
Nun stecken Sie den USB-Stick in die links dafür vorgesehene Schnittstelle. Sobald das System Sie
fragt, „USB-Stick formatieren?“, bestätigen Sie erneut mit „JA“. (Bestätigen mit
).
Schritt 3:
Anschließend gehen Sie wieder zurück in das Menü und wählen den Menüpunkt „USB-Stick
entfernen“ und bestätigen mit „JA“. Ihr USB-Stick ist formatiert und Sie können ihn nun an den
PC anschließen.
DEUTSCH 3
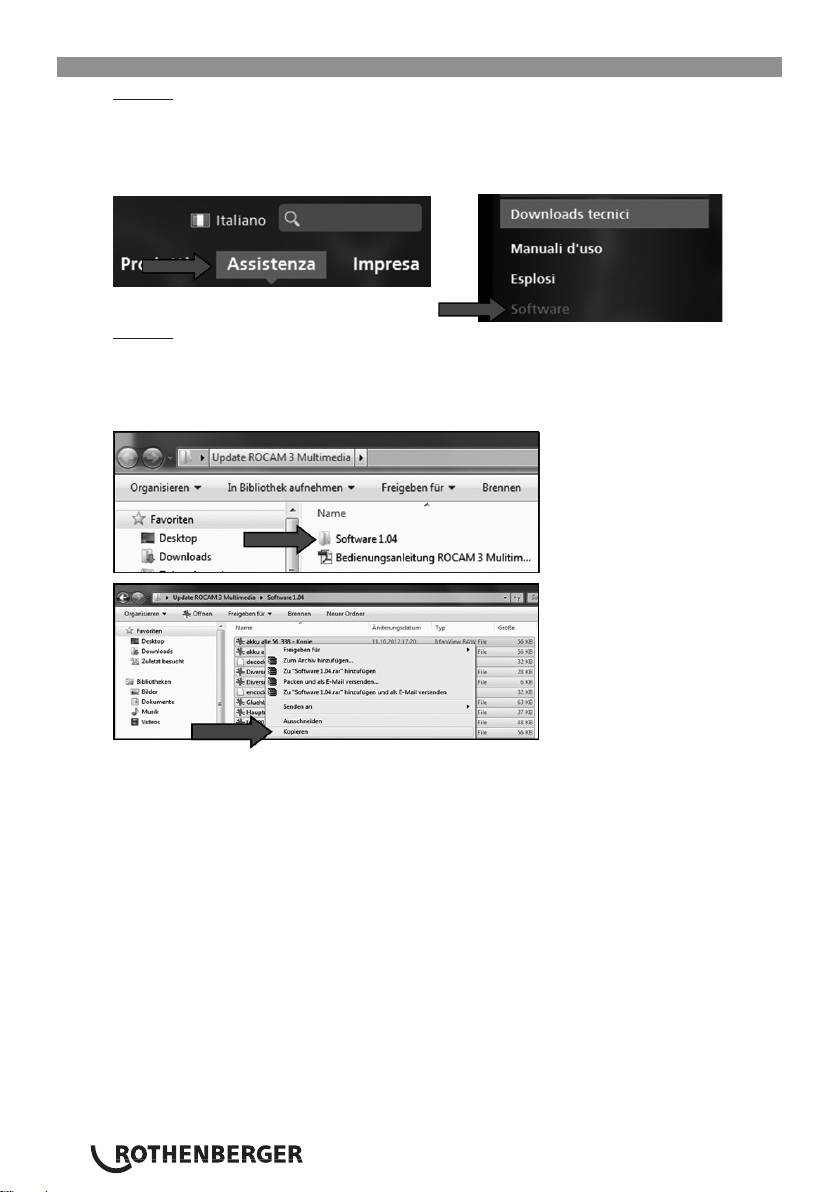
2. Software Download
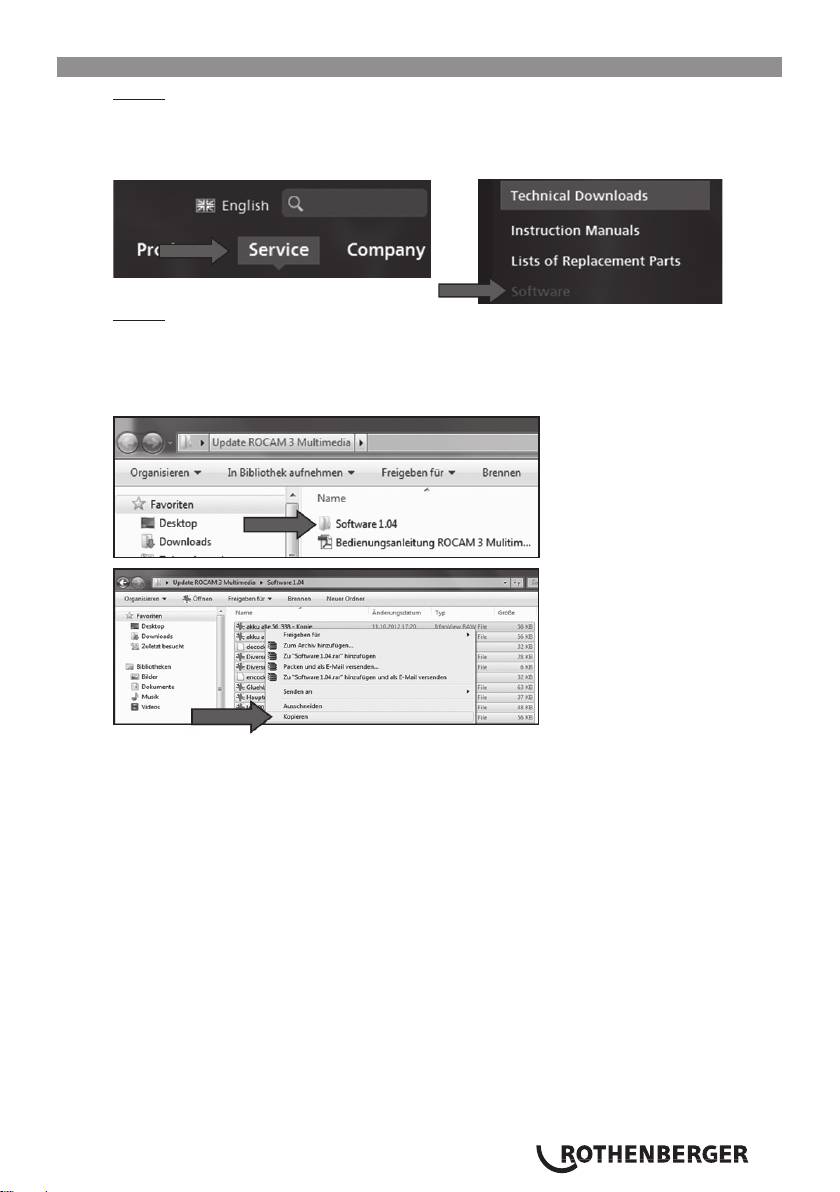
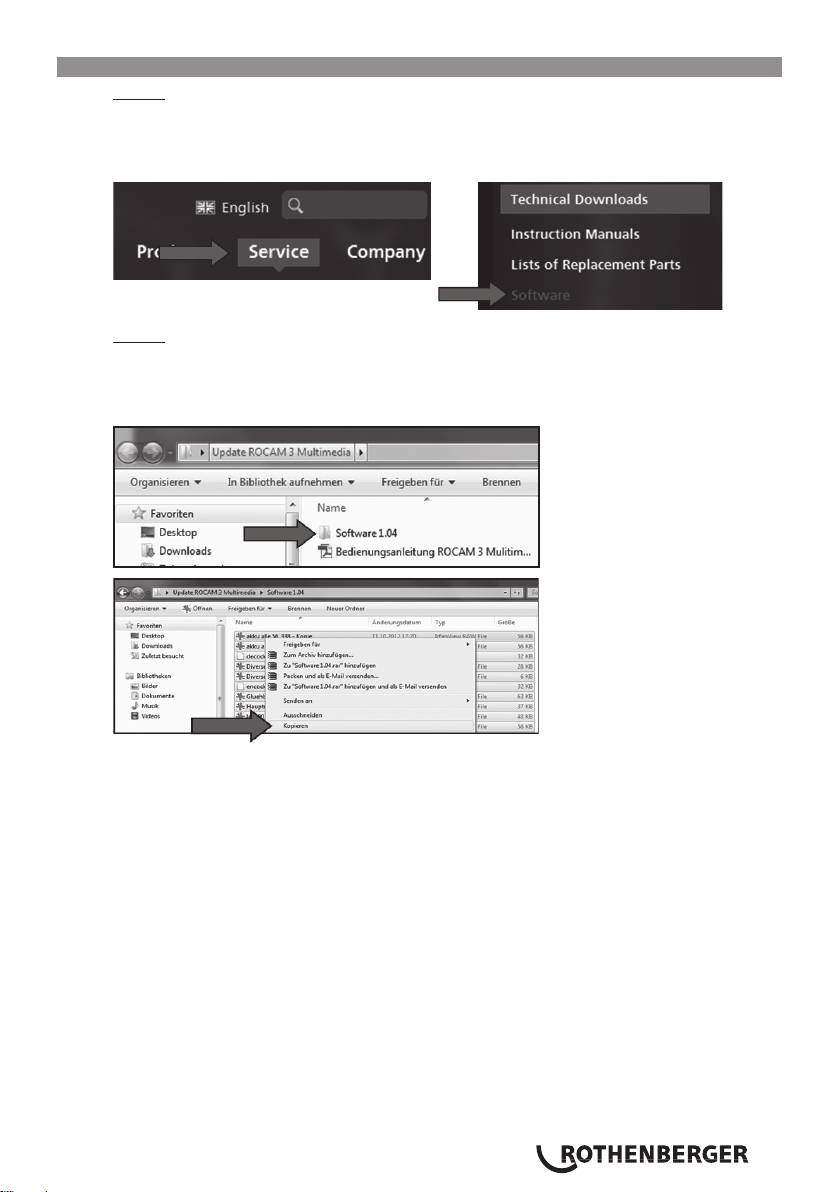
Schritt 4:
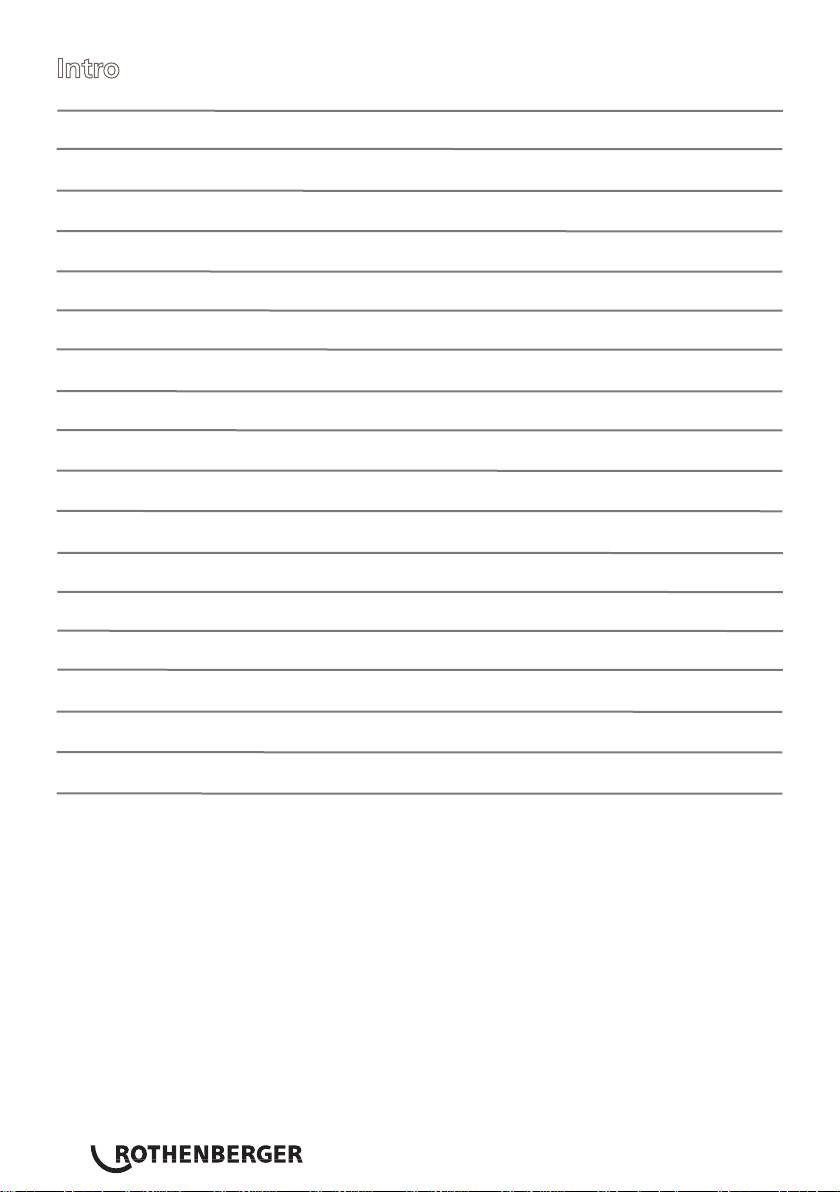
Gehen Sie auf die ROTHENBERGER Homepage (www.rothenberger.com). Dann fahren Sie wie
folgt fort:
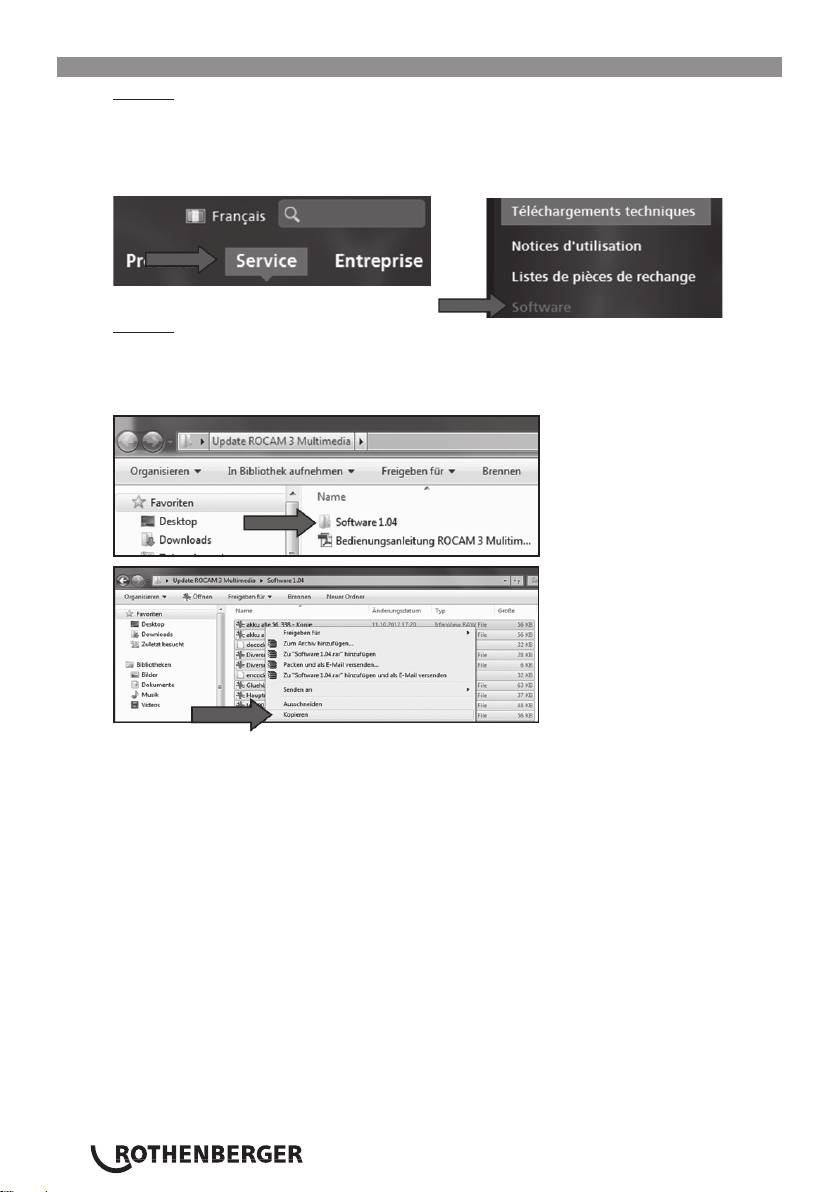
Service Technische Downloads Software Rocam 3 Multimedia Update
Wählen sie das Update aus und laden Sie es herunter.
Schritt 5:
Entpacken Sie die heruntergeladene Datei und speichern diese auf Ihrer Festplatte (Desktop).
In dem heruntergeladenen Ordner befindet sich die Bedienungsanleitung als PDF und ein Ordner
mit dem Update.
Öffnen Sie den Ordner mit dem Update und kopieren Sie die Dateien.
DEUTSCH4
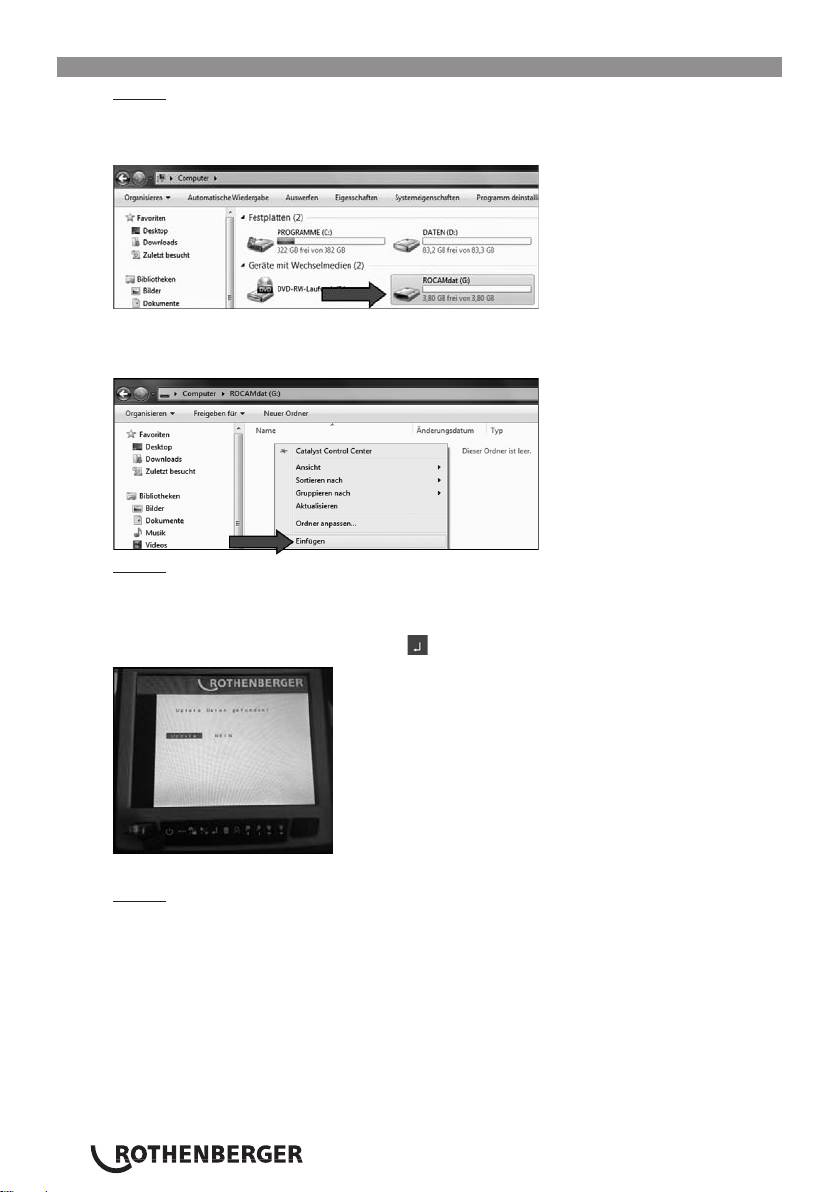
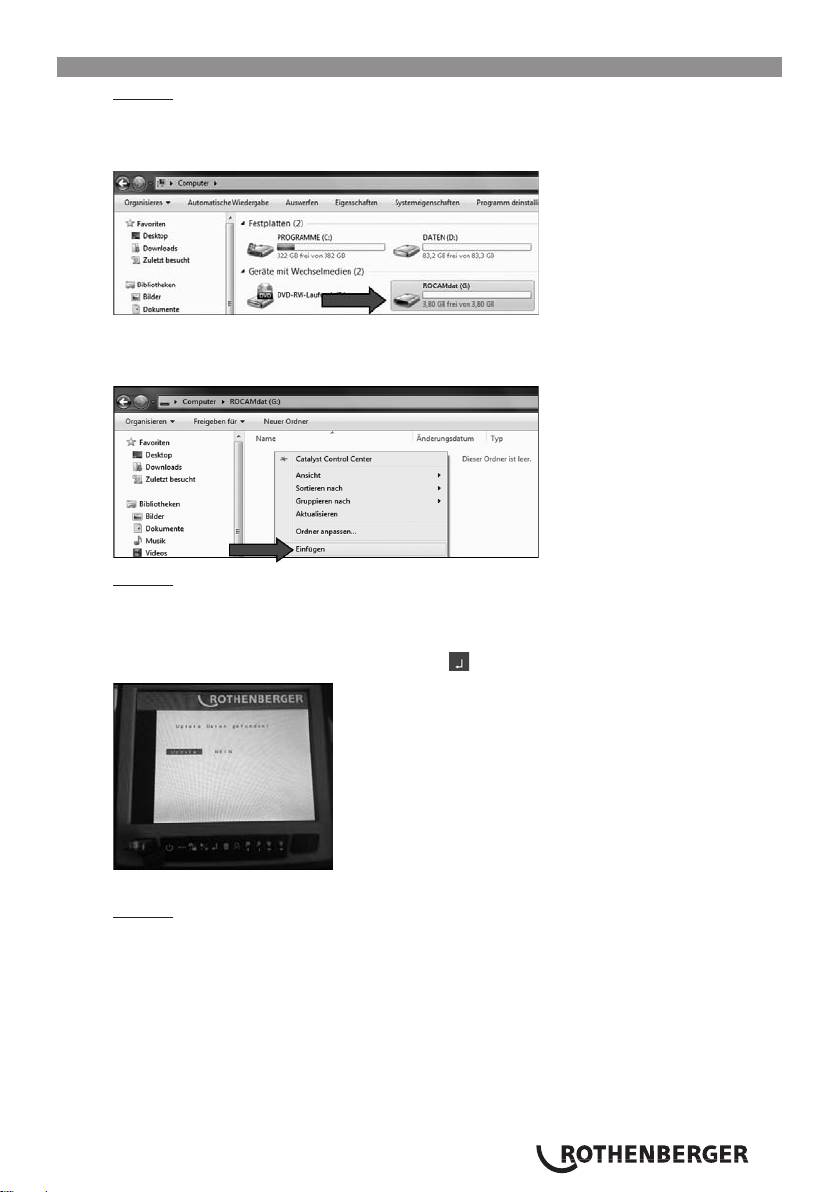
3. Software Update
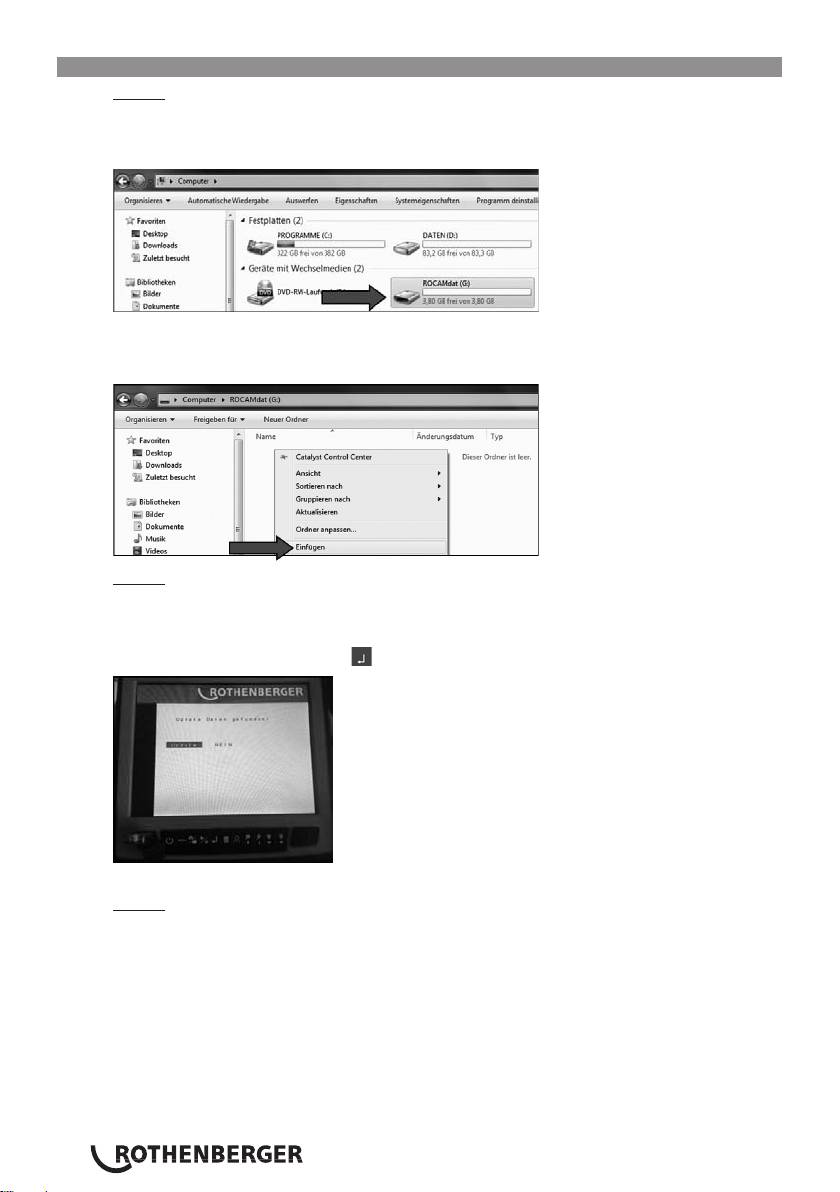
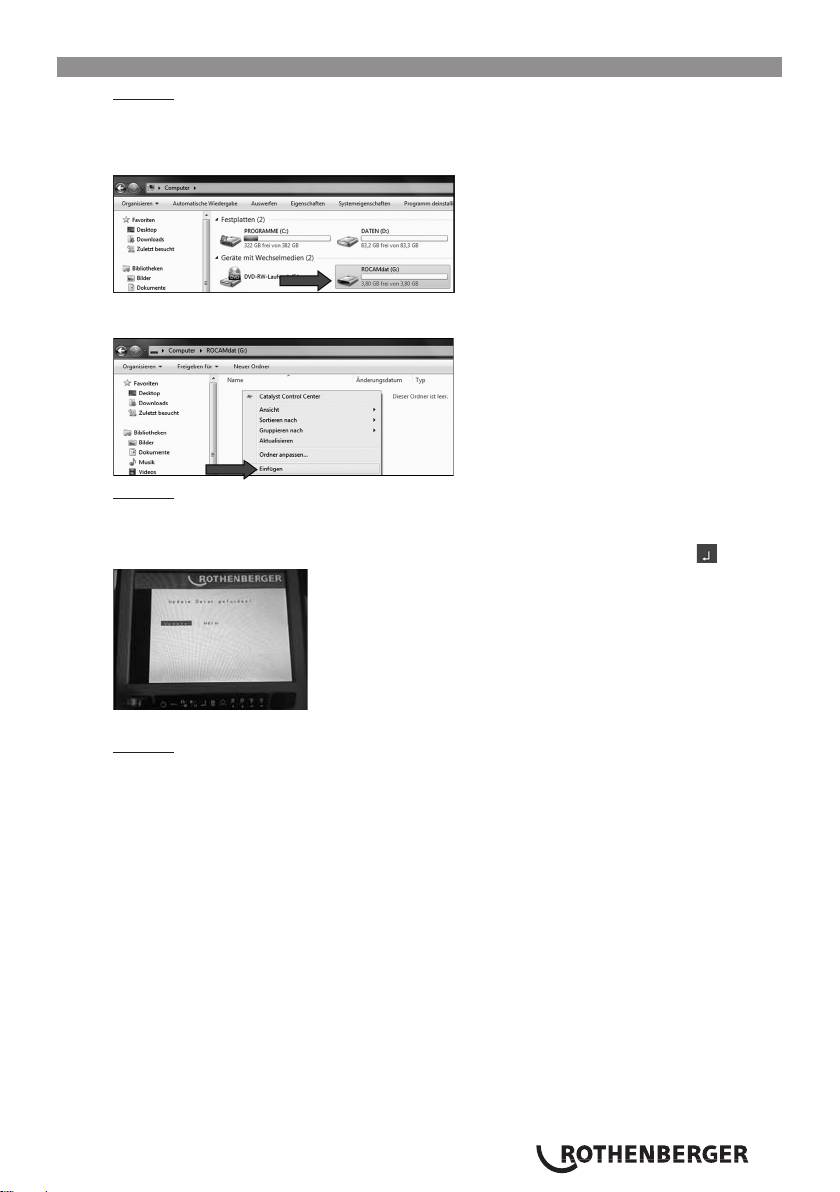
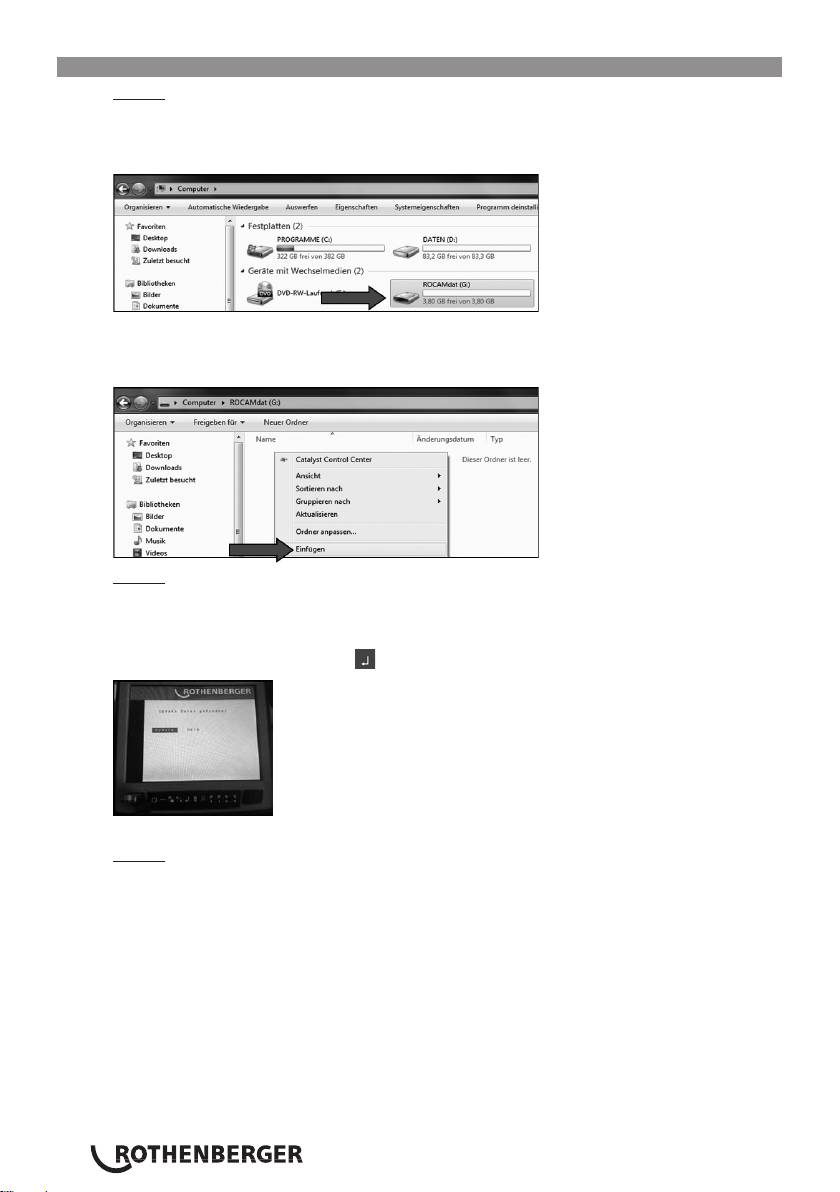
Schritt 6:
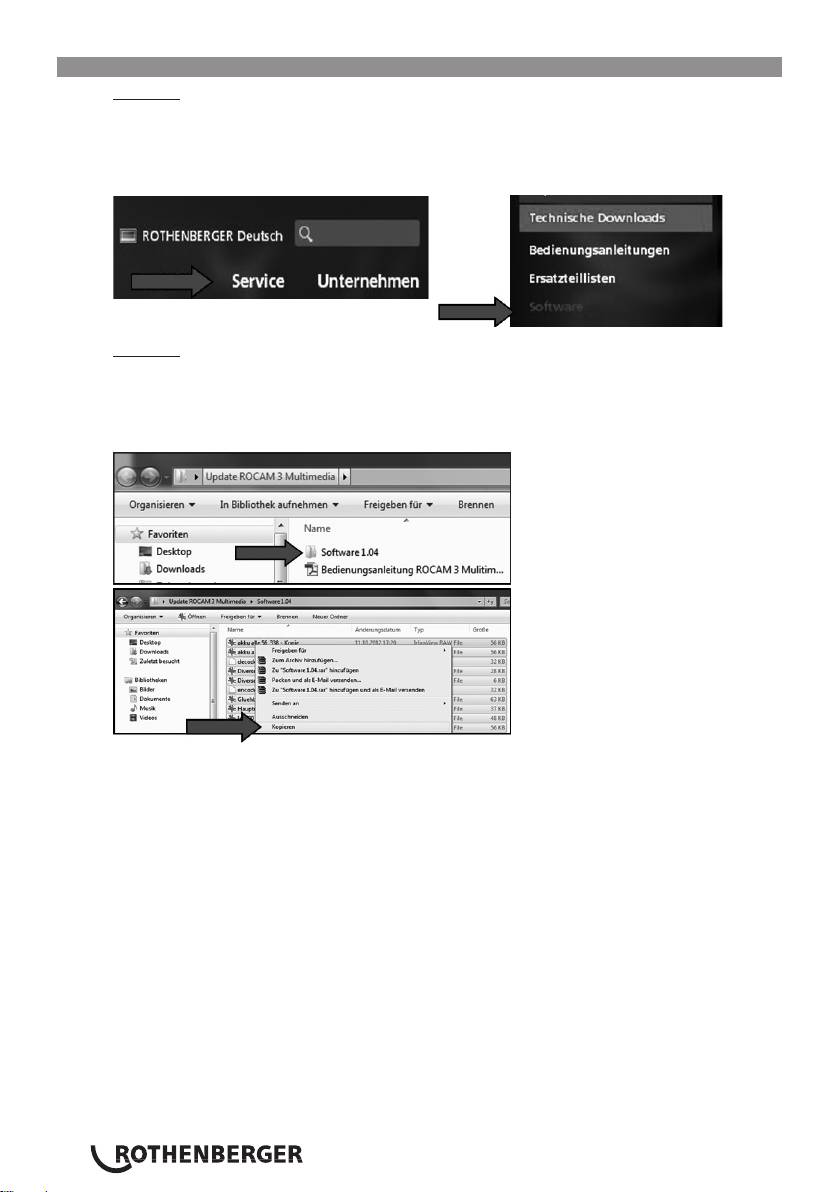
Schließen Sie den USB-Stick an Ihren PC an, gehen Sie auf den Arbeitsplatz und öffnen Sie den
USB-Stick. Achten Sie darauf, dass der USB-Stick „ROCAMdat“ heißt. Ist dies nicht der Fall, ist der
Stick noch nicht formatiert. Um den Stick zu formatieren befolgen Sie bitte Schritt 1 - 3.
Die zuvor kopierten Dateien aus dem Ordner „Software 1.05“ fügen Sie jetzt mit einem Rechts-
klick auf den USB-Stick ein. Das Update befindet sich nun auf Ihrem USB-Stick. Entfernen Sie den
USB-Stick anschließend von Ihrem PC.
Schritt 7:
Um das Update auf die ROCAM 3 Multimedia aufzuspielen, verfahren Sie wie Schritt 1 - 3. Die
Kamera erkennt das Update automatisch. Sie fragt nun nicht mehr, ob der Stick formatiert wer-
den soll, sondern ob Sie das Update aufspielen möchten.
Wählen Sie „Update“ aus und bestätigen mit
.
Die Kamera führt jetzt das Update aus und schaltet sich anschließend automatisch aus.
Schritt 8:
Ziehen Sie den USB-Stick heraus und löschen am PC alle Dateien auf dem Stick.
Der Stick kann nun wieder für Foto- und Video-Aufnahmen mit Ihrer ROCAM 3 Multimedia
verwendet werden.
DEUTSCH 5
1. Formatting
For first use of a USB stick it is essential that this is first connected to the ROCAM 3 Multimedia
and formatted! Please proceed to Step 4 if this has already been done.
Step 1:
Switch on ROCAM 3 Multimedia
. Then go to the menu button and the directory create (con-
firm with
).
Step 2:
Confirm the question: „Insert the USB stick?“ with „YES“ (confirm with
).
Now insert the USB stick in the interface socket provided on the left. As soon as the system pre-
sents the question „Format USB stick?“, confirm again with „YES“. (confirm with
).
Step 3:
You then return afterwards into the menu and select the menu point „Remove USB stick“ and
confirm with „YES“. Your USB stick is formatted and you can now connect it to your PC.
ENGLISH6
2. Downloading software
Step 4:
Go to the ROTHENBERGER homepage (www.rothenberger.com). Then proceed as follows:
Service Technical Downloads Software ROCAM 3 Multimedia Update
Select the update and download it.
Step 5:
Unpack the downloaded fi le and save this on the hard-disk (desktop).
There is an operating manual available as a pdf in the downloaded fi les folder and a folder with
update fi les in it.
Open the folder with the update fi les in it and copy these fi les.
ENGLISH 7
3. Updating the software
Step 6:
Connect the USB stick to your PC, go to the workplace and open the USB stick. Ensure that the
USB stick is called „ROCAMdat“. If this is not the the case then the stick is not formatted yet.
Please follow steps 1 - 3 to format the stick.
You now insert the previously copies files from the folder „Software 1.05“ onto the USN stick
using a right click on the the mouse. The update is now present on your USB stick. Remove the
USB stick from your PC.
Step 7:
Proceed as described in steps 1 - 3 to copy the update onto the ROCAM 3 Multimedia. The
camera recognises the update automatically. It does not question whether the stick should be
formatted but instead whether you wish to load the update.
Select „Update“ and confirm with
.
The camera now performs the update and then switches itself off automatically.
Step 8:
Pull out the USB stick and delete all of the files which are on the stick from the PC.
The stick can be used again for recording photographs and videos using your ROCAM 3 Multime-
dia.
ENGLISH8
1. Formatage
Lors de la première utilisation de la clé USB, il faut impérativement la connecter d‘abord à la RO-
CAM 3 Multimedia et la formater. Si cela a déjà été fait, continuez à l‘étape 4.
Étape 1:
Allumez ROCAM 3 Multimedia
. À l‘aide du bouton Menu, allez sur Créer un dossier et validez
avec
.
Étape 2:
Confirmez la question : « USB-Stick einstecken? » (Connecter la clé USB) par « Ja » (Oui, validez
avec
).
Connectez à présent la clé USB dans le port prévu à cet effet, sur la gauche. Dès que le système
demande « USB-Stick formatieren? » (Formater la clé USB?), validez une nouvelle fois avec « Ja ».
(Validez avec
).
Étape 3:
Ensuite, revenez au menu et sélectionnez l‘option de menu « USB-Stick entfernen » et validez
avec « Ja ». Votre clé USB est formatée et vous pouvez à présent la connecter sur un PC.
FRANÇAIS 9
2. Téléchargement du logiciel
Étape 4:
Rendez-vous sur le site Internet ROTHENBERGER (www.rothenberger.com). Procédez ensuite
comme suit:
Service Téléchargements techniques Software ROCAM 3 Multimedia Update
Sélectionnez la mise à jour et téléchargez-la.
Étape 5:
Décompressez le fi chier téléchargé et enregistrez-le sur votre disque dur (Bureau).
Dans le dossier téléchargé, il y a un manuel d‘utilisation en PDF et un dossier avec la mise à jour.
Ouvrez le dossier qui contient la mise à jour et copiez les fi chiers.
FRANÇAIS10
3. Mise à jour du logiciel
Étape 6:
Connectez la clé USB sur votre ordinateur, allez sur le poste de travail et ouvrez la clé USB. Veillez
bien à ce que la clé USB soit intitulée « ROCAMdat ». Si cela n‘est pas le cas, c‘est que la clé n‘a
pas encore été formatée. Pour formater la clé, suivez les étapes 1 à 3.
À présent, copiez les fichiers copiés du dossier « Software 1.05 » en cliquant droit sur la clé USB.
La mise à jour se trouve alors sur votre clé USB. Retirez ensuite la clé USB de votre PC.
Étape 7:
Pour installer la mise à jour sur ROCAM 3 Multimedia, procédez comme aux étapes 1 à 3. La ca-
méra reconnaît automatiquement la mise à jour. Elle ne demande plus si la clé doit être formatée,
mais si vous souhaitez installer la mise à jour. Sélectionnez « Update » et validez avec
.
La caméra exécute la mise à jour et s‘éteint ensuite automatiquement.
Étape 8:
Retirez la clé USB et sur le PC, effacez tous les fichiers présents sur la clé. La clé peut désormais
être à nouveau utilisée pour enregistrer des images et des vidéos avec votre ROCAM 3 Multime-
dia.
FRANÇAIS 11
1. Formateo
Cuando utilice por primera vez el stick USB, ¡primero tiene que conectarlo a la ROCAM 3 Multi-
media y formatearlo! Si esto ya se hubiera realizado, siga con el paso 4.
Paso 1:
Conectar la ROCAM 3 Multimedia
. Entonces fíjese en el botón del menú y el directorio (con-
firmar con
).
Paso 2:
Confirme la pregunta: „¿Conectar stick USB?“ con „SÍ“ (confirmar con
).
Ahora conecte el stick USB en la interfaz prevista para ello a la izquierda. En cuanto el sistema le
pregunte „¿Formatear el stick USB?“, vuelva a confirmar con „Sí“. (confirme con
).
Paso 3:
A continuación vuelva al menú y seleccione la opción de menú „Retirar el stick USB“ y confirme
con „SÍ“. Su stick USB está formateado y ahora puede conectarlo al PC.
ESPAÑOL12
2. Descarga del software
Paso 4:
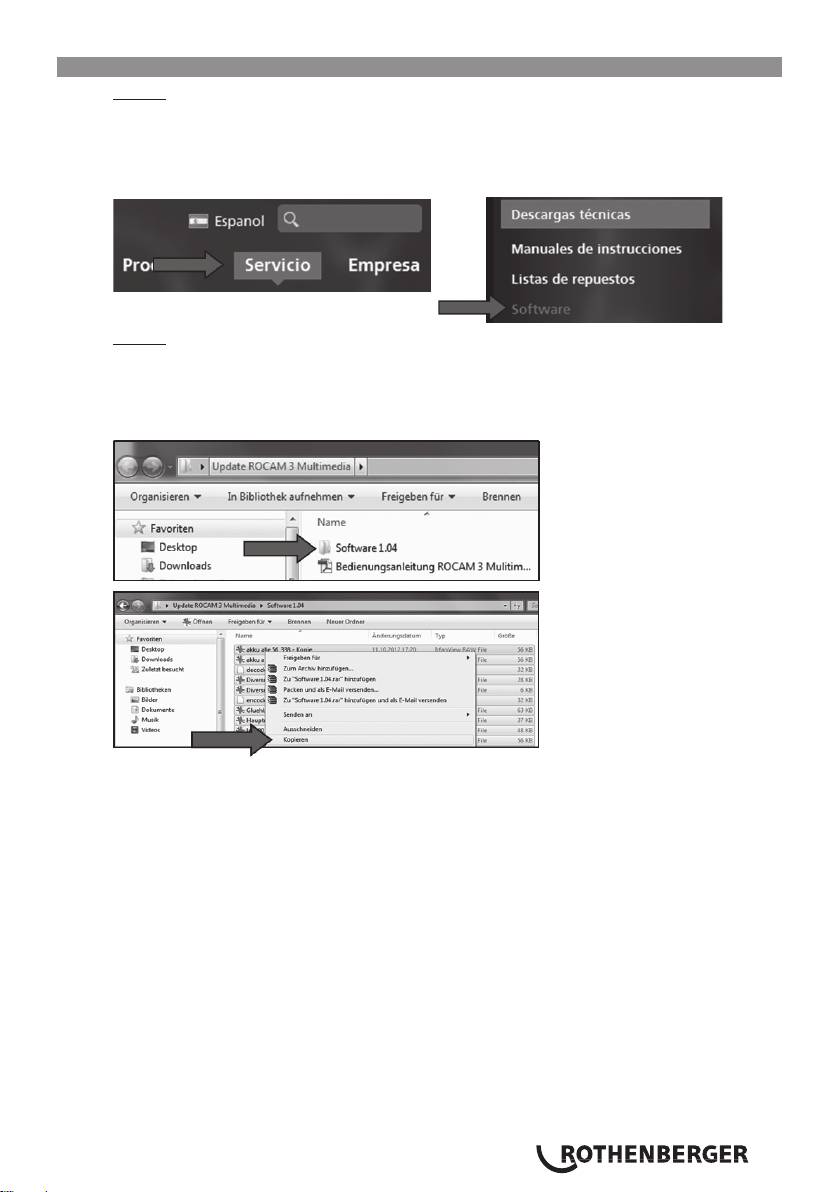
Vaya a la página web de ROTHENBERGER (www.rothenberger.com). Entonces continúe de la
siguiente forma:
Servicio Descargas técnicas Software ROCAM 3 Multimedia Update
Seleccione la actualización y descárguela.
Paso 5:
Desempaquete el fi chero descargado y guárdelo en su disco duro (desktop).
En la carpeta descargada se encuentra el manual de instrucciones en PDF y una carpeta con la
actualización.
Abra la carpeta con la actualización y copie los fi cheros.
ESPAÑOL 13
3. Actualización de software
Paso 6:
Conecte el stick USB en su PC, vaya al lugar de trabajo y abre el stick USB. Tenga en cuenta que
el stick USB se llama „ROCAMdat“. Si no es así, el stick todavía no se ha formateado. Para forma-
tear el stick, siga los pasos 1 - 3.
Añada ahora en el stick USB los ficheros copiados anteriormente de la carpeta „Software 1.05“
haciendo clic en el botón derecho. La actualización se encuentra ahora en el stick USB. A continu-
ación retire el stick USB de su PC.
Paso 7:
Para hacer funcionar la actualización en ROCAM 3 Multimedia, proceda como en los pasos 1 - 3.
La cámara reconoce la actualización automáticamente. Ahora ya no pregunta si se debería forma-
tear el stick, sino si desea hacer funcionar la actualización.
Seleccione „Actualización“ y confirme con
.
Ahora la cámara realiza la actualización y acto seguido se desconecta automáticamente.
Paso 8:
Extraiga el stick USB y borre en el PC todos los ficheros del stick.
Ahora puede volver a utilizar el stick para guardar fotos y grabaciones de vídeo con su ROCAM 3
Multimedia.
ESPAÑOL14
1. Formattazione
Utilizzando per la prima volta la penna USB, essa deve essere assolutamente collegata e formatta-
ta prima con ROCAM 3 Multimedia! Dopo la conclusione di questa operazione passare al passo 4.
Passo 1:
Accendere la ROCAM 3 Multimedia
. Passare poi al pulsante di menu e a Crea percorso (con-
fermare con
).
Passo 2:
Confermare la domanda: „Inserire la penna USB?“ con „SÌ“ (confermare con
).
Inserire ora la penna USB nella porta apposita a sinistra. Non appena il sistema richiede „Format-
tare la penna USB?“, confermare di nuovo con „SÌ“. (Confermare con
).
Passo 3:
Ritornare poi nel menu e selezionare la voce di menu „Rimuovi penna USB“ e confermare con
„SÌ“. La penna USB è formattata e può essere collegata col PC dell‘utente.
ITALIANO 15
2. Scaricamento del software
Passo 4:
Andare all‘homepage ROTHENBERGER (www.rothenberger.com). Poi proseguire in modo seguen-
te:
Assistenza Downloads tecnici Software ROCAM 3 Multimedia Update
Selezionare l‘aggiornamento e scaricarlo.
Passo 5:
Scompattare il file scaricato e installarlo sul disco rigido dell‘utente (Desktop).
Nella cartella scaricata sono presenti le istruzioni per l‘uso in formato PDF e una cartella con
l‘aggiornamento.
Aprire la cartella con l‘aggiornamento e copiare lì i file.
ITALIANO16
3. Aggiornamento del software
Passo 6:
Collegare la penna USB sul PC dell‘utente, andare su Risorse del computer e aprire la penna USB.
Prestare attenzione al fatto che la penna USB deve avere il nome „ROCAMdat“. In caso contrario
la penna USB non è formattata. Per formattarla seguire i passi 1 - 3.
Inserire ora i file copiati prima dalla cartella „Software 1.05“ con un clic sul tasto destro del
mouse sulla penna USB. L‘aggiornamento è ora presente sulla penna USB. Rimuovere poi la
penna USB dal PC.
Passo 7:
Per lanciare l‘aggiornamento su ROCAM 3 Multimedia, procedere come i passi 1 - 3. La camera
riconosce automaticamente l‘aggiornamento. Ora essa non chiede più se la penna debba essere
formattata, ma se si vuole caricare l‘aggiornamento.
Selezionare „Aggiornamento“ e confermare con
.
La camera esegue ora l‘aggiornamento e poi si spegne automaticamente.
Passo 8:
Estrarre la penna USB e cancellare dal PC tutti i dati sulla penna.
La penna può essere ora di nuovo utilizzata per le riprese foto e video con la ROCAM 3 Multime-
dia dell‘utente.
ITALIANO 17
1. Formattering
Wanneer u de USB-stick voor de eerste keer gaat gebruiken, moet u deze eerst in de ROCAM 3
Multimedia steken en formatteren! Als dit al gebeurt is, gaat u verder naar stap 4.
Stap 1:
ROCAM 3 Multimedia inschakelen
. Druk vervolgens op de menu-knop en op ‚Verzeichnis
anlegen‘ (Map aanmaken). Bevestigen met
.
Stap 2:
Beantwoord de vraag: ‚USB-Stick einstecken?‘ (USB-stick plaatsen?) met ‚JA‘ en bevestig met
.
Steek nu de USB-stick in de linker USB-poort. Zodra het systeem vraagt, ‚USB-Stick formatieren?‘
(USB-stick formatteren?) antwoordt u opnieuw met ‚JA‘. (Bevestigen met
).
Stap 3:
Daarna gaat u weer terug naar het menu en selecteert u de menukeuze ‚USB-Stick entfernen‘
(USB-stick verwijderen) en bevestigt u met ‚JA‘. Uw USB-stick is geformatteerd en u kunt deze nu
in de pc steken.
NEDERLANDS18
2. Software downloaden
Stap 4:
Ga naar de internetsite van ROTHENBERGER (www.rothenberger.com). Ga dan als volgt te werk:
Service Technical Downloads Software ROCAM 3 Multimedia Update
Selecteer de update en download deze.
Stap 5:
Pak het gedownloade bestand uit en sla het op uw harde schijf op (desktop).
In de gedownloade map vindt u de gebruiksaanwijzing als PDF en een map met de update.
Open de map met de update en kopieer de bestanden.
NEDERLANDS 19
3. Software update
Stap 6:
Steek de USB-stick in uw pc, ga naar ‚Deze computer‘ en open de USB-stick. Let erop, dat de
naam van de USB-stick ‚ROCAMdat‘ is. Als dat niet het geval is, dan is de stick nog niet geformat-
teerd. Om de stick te formatteren dient u de stappen 1 - 3 uit te voeren.
De eerder gekopieerde bestanden uit de map ‚Software 1.05‘ kopieert u nu door op de rechter-
muisknop te klikken naar de USB-stick. De update bevindt zich nu op uw USB-stick. Haal vervol-
gens de USB-stick uit uw pc.
Stap 7:
Om de update op de ROCAM 3 Multimedia te installeren, voert u de stappen 1 - 3 uit. De camera
herkent de update automatisch. Er wordt nu niet meer gevraagd of de stick geformatteerd moet
worden, maar of u de update wilt installeren.
Selecteer ‚Update‘ en bevestig met
.
De camera voert nu de update uit en schakelt daarna automatisch uit.
Stap 8:
Verwijder de USB-stick en wis via de pc alle bestanden op de stick.
De stick kan nu weer voor foto- en video-opnamen met uw ROCAM 3 Multimedia worden gebru-
ikt.
NEDERLANDS20
