Dell Precision M20: инструкция
Раздел: Компьютерная техника, комплектующие, аксессуары
Тип: Ноутбук
Инструкция к Ноутбуку Dell Precision M20
Оглавление

DellPrecision™MobileWorkstationM20User'sGuide
For a complete list of abbreviations and acronyms, see the Glossary.
IfyoupurchasedaDell™nSeriescomputer,anyreferencesinthisdocumenttoMicrosoft®
Windows®operating systems are not applicable.
Information in this document is subject to change without notice.
©2004–2005DellInc.Allrightsreserved.
Reproduction in any manner whatsoever without the written permission of Dell Inc. is strictly forbidden.
Trademarks used in this text: Dell, the DELL logo, Inspiron, Dell Precision, Dimension, OptiPlex, Latitude, Dell TravelLite, PowerEdge, PowerVault, PowerApp, Strikezone, and Dell
OpenManage are trademarks of Dell Inc.; Intel, Intel SpeedStep, and Pentium are registered trademarks of Intel Corporation; Microsoft, MS-DOS, Outlook, and Windows are registered
trademarks of Microsoft Corporation; Bluetooth is a registered trademark owned by Bluetooth SIG, Inc. and is used by Dell Inc. under license; ENERGY STAR is a registered
trademark of the U.S. Environmental Protection Agency. As an ENERGY STAR partner, Dell Inc. has determined that this product meets the ENERGY STAR guidelines for energy
efficiency, EMC is the registered trademark of EMC Corporation.
Other trademarks and trade names may be used in this document to refer to either the entities claiming the marks and names or their products. Dell Inc. disclaims any
proprietary interest in trademarks and trade names other than its own.
Model PP11L
March2005P/NW7411Rev.A01
Finding Information
Travelling With Your Computer
About Your Computer
Passwords
Using Microsoft®Windows®XP
Solving Problems
Dell™QuickSetFeatures
Dell Diagnostics
Using the Keyboard and Touch Pad
Cleaning Your Computer
Using the Display
Reinstalling Software
Using the Module Bay
Adding and Replacing Parts
Using CDs, DVDs, and Other Multimedia
Using the System Setup Program
Using a Battery
Alert Standard Format (ASF)
Power Management
Getting Help
Connecting to a Wireless Local Area Network
Specifications
Using PC Cards
Appendix
Using Smart Cards
Glossary
NOTE: A NOTE indicates important information that helps you make better use of your computer.
NOTICE: A NOTICE indicates either potential damage to hardware or loss of data and tells you how to avoid the problem.
CAUTION: A CAUTION indicates a potential for property damage, personal injury, or death.
NOTE: Some features may not be available for your computer or in certain countries.
Back to Contents Page
About Your Computer
DellPrecision™MobileWorkstationM20User'sGuide
Front View
Left View
Right View
Back View
Bottom View
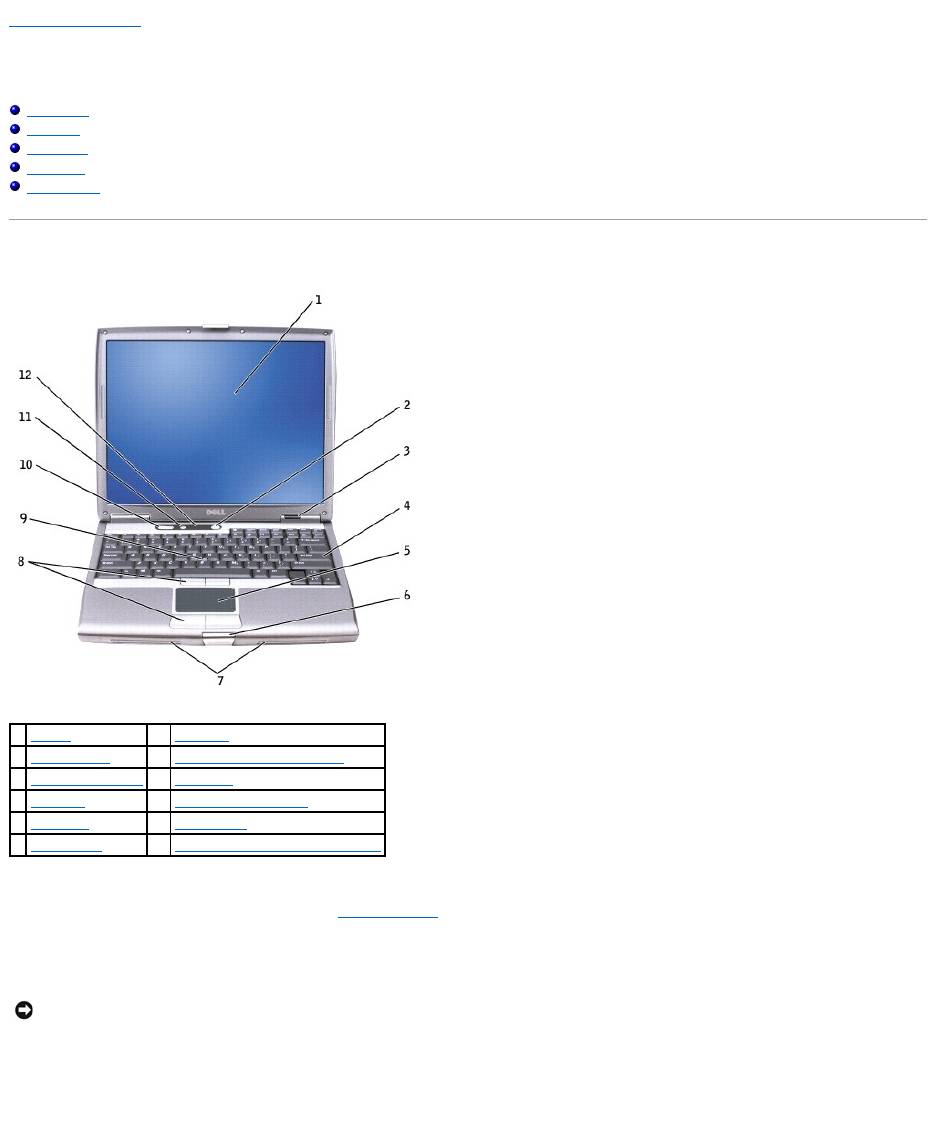
Front View
display — For more information about your display, see "Using the Display."
power button — Press the power button to turn on the computer or exit a power management mode.
If the computer stops responding, press and hold the power button until the computer turns off completely (which may take several seconds).
device status lights
1
display
7
speakers (2)
2
power button
8
track stick/touch pad buttons
3
device status lights
9
track stick
4
keyboard
10
volume control buttons
5
touch pad
11
mute button
6
display latch
12
keyboard and wireless status lights
NOTICE: To avoid losing data, turn off your computer by performing a Microsoft®Windows®operating system shutdown rather than by pressing the
power button.
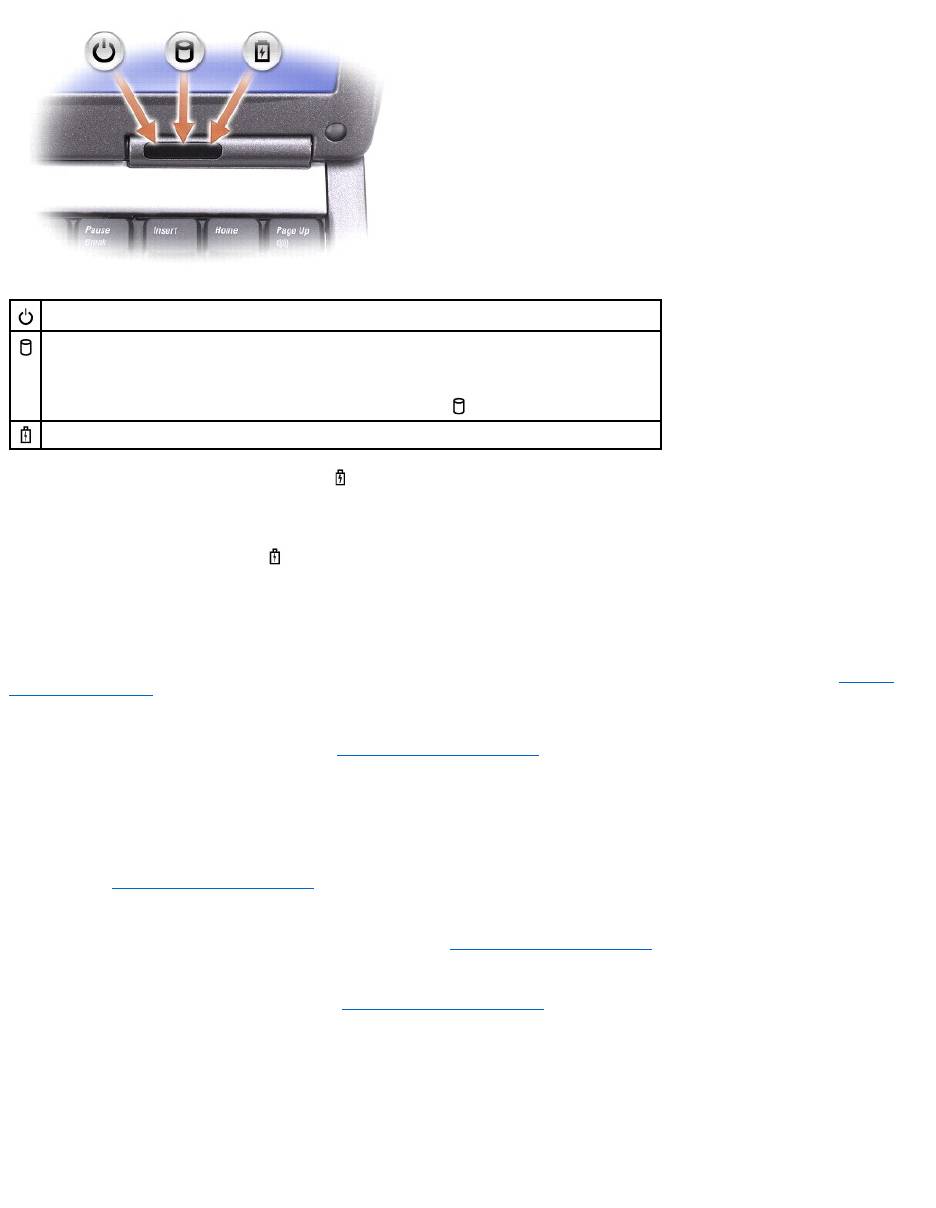
If the computer is connected to an electrical outlet, the light operates as follows:
¡ Solid green: The battery is charging.
¡ Flashing green: The battery is almost fully charged.
If the computer is running on a battery, the light operates as follows:
¡ Off: The battery is adequately charged (or the computer is turned off).
¡ Flashing orange: The battery charge is low.
¡ Solid orange: The battery charge is critically low.
keyboard — The keyboard includes a numeric keypad as well as the Windows logo key. For information on supported keyboard shortcuts, see "Using the
Keyboard and Touch Pad."
touch pad — Provides the functionality of a mouse. See "Using the Keyboard and Touch Pad" for more information.
display latch — Keeps the display closed.
speakers — To adjust the volume of the integrated speakers, press the volume control buttons, mute button, or volume-control keyboard shortcuts. For more
information, see "Using the Keyboard and Touch Pad."
track stick/touch pad buttons — Provide the functionality of a mouse. See "Using the Keyboard and Touch Pad" for more information.
track stick — Provides the functionality of a mouse. See "Using the Keyboard and Touch Pad" for more information.
volume control buttons — Press these buttons to adjust the volume.
mute button — Press this button to turn off the volume.
keyboard and wireless status lights
Turns on when you turn on the computer and blinks when the computer is in a power management mode.
Turns on when the computer reads or writes data.
NOTICE: To avoid loss of data, never turn off the computer while the light is flashing.
Turns on steadily or blinks to indicate battery charge status.
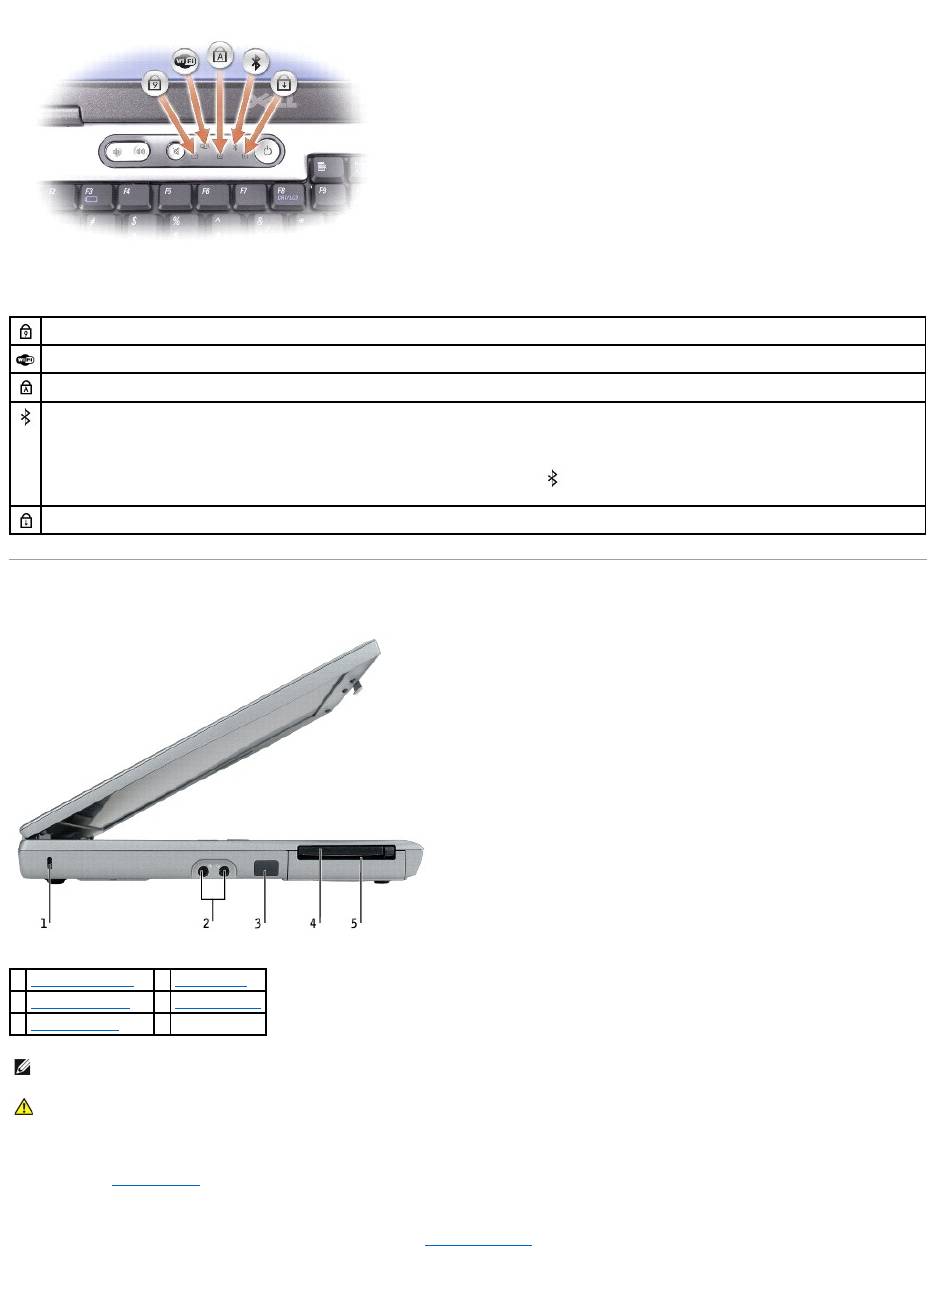
The green lights located above the keyboard indicate the following:
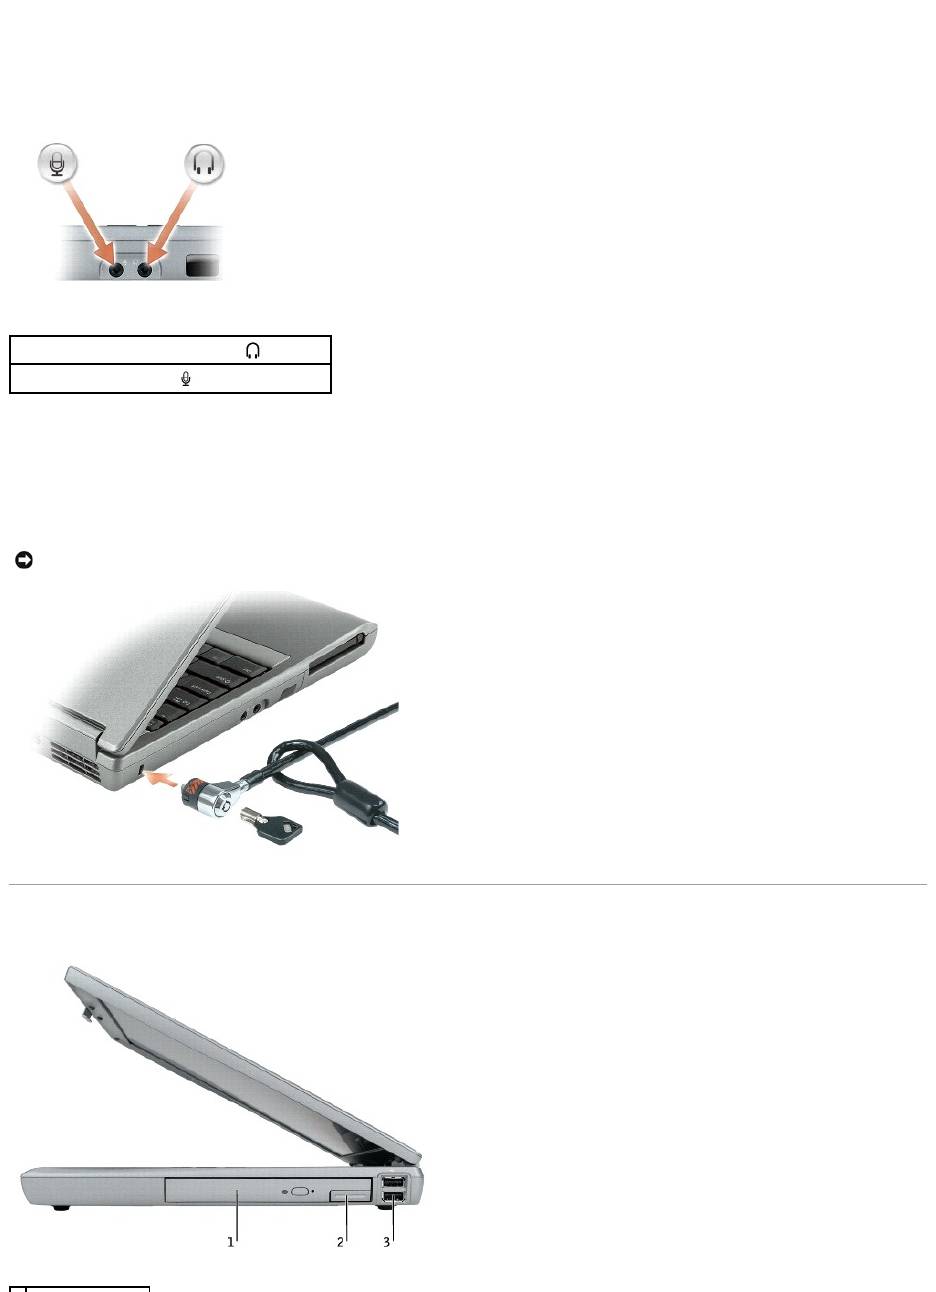
Left View
PC Card slot — Supports one PC Card, such as a modem or network adapter. The computer ships with a plastic blank installed in the slot. For more
information, see "Using PC Cards."
smart card slot — Supports one smart card. For more information, see "Using Smart Cards."
Turns on when the numeric keypad is enabled.
Turns on when wireless devices are enabled.
Turns on when the uppercase letter function is enabled.
Turns on when Bluetooth® wireless technology is enabled. To enable or disable Bluetooth wireless technology, press <Fn><F2>.
NOTE: Bluetooth wireless technology is an optional feature on your computer, so the icon turns on only if you ordered Bluetooth wireless
technology with your computer. For more information, see the documentation that came with your Bluetooth wireless technology.
Turns on when the scroll lock function is enabled.
1
security cable slot
4
PC Card slot
2
audio connectors (2)
5
smart card slot
3
infrared sensor
NOTE: The computer turns on the fan when the computer gets hot. Fan noise is normal and does not indicate a problem with the fans or the computer.
CAUTION: Donotblock,pushobjectsinto,orallowdusttoaccumulateintheairvents.DonotstoreyourDell™computerinalow-airflow
environment, such as a closed briefcase, while it is running. Restricting the airflow can damage the computer or cause a fire.
infrared sensor — Lets you transfer files from your computer to another infrared-compatible device without using cable connections.
When you receive your computer, the sensor is disabled. You can use the system setup program to enable the sensor. For information on transferring data,
see Windows Help, the Help and Support Center, or the documentation that came with your infrared-compatible device.
audio connectors
hard drive — Stores software and data.
security cable slot — Lets you attach a commercially available antitheft device to the computer. For more information, see the instructions included with the
device.
Right View
Attach headphones or speakers to the connector.
Attach a microphone to the connector.
NOTICE: Before you buy an antitheft device, ensure that it will work with the security cable slot.
module bay — YoucaninstalldevicessuchasanopticaldriveoraDellTravelLite™moduleinthemodulebay.Formoreinformation,see"Using the Module
Bay."
device latch release — Releases the module bay device. See "Using the Module Bay" for instructions.
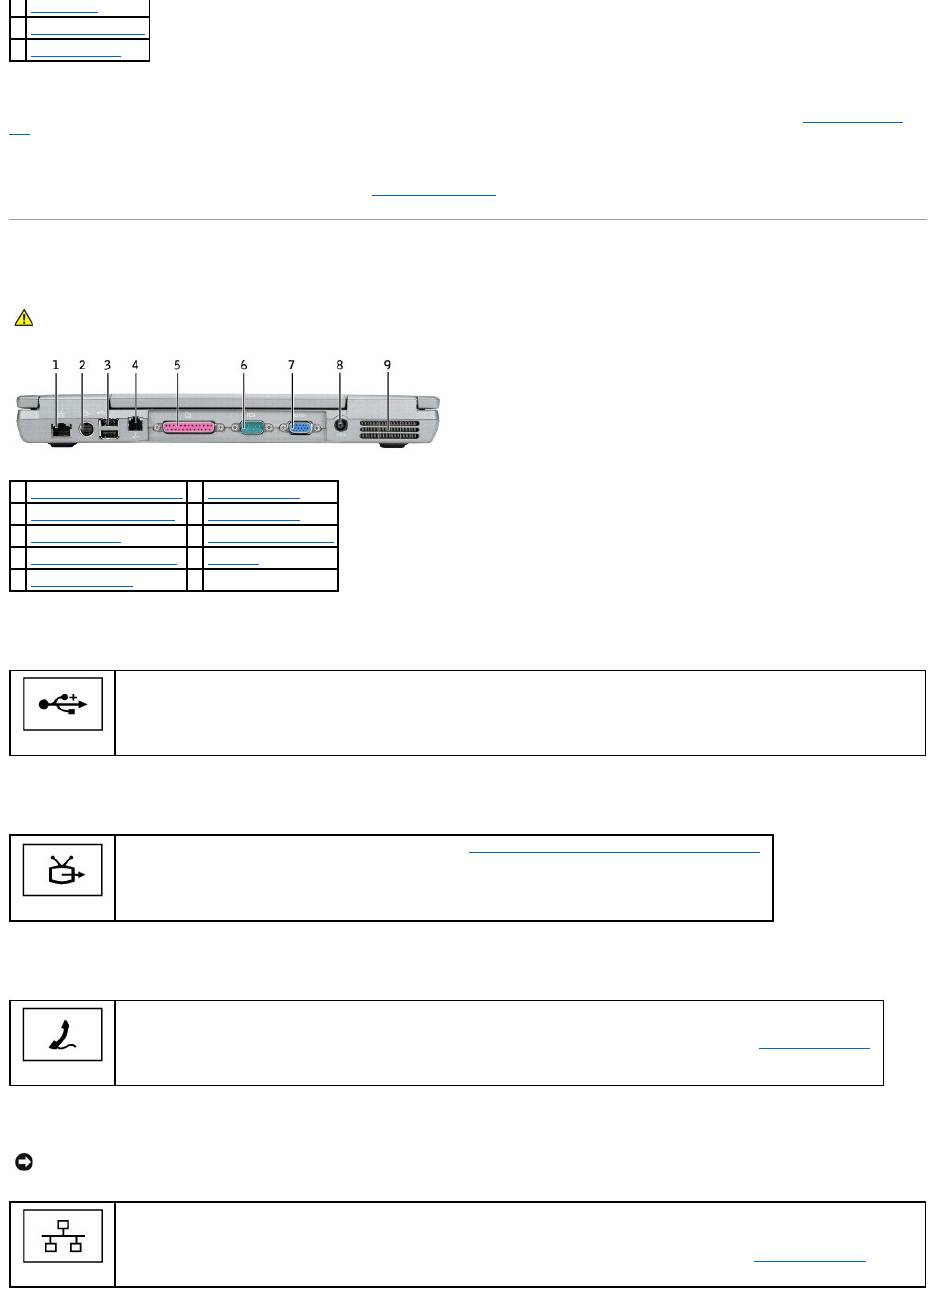
Back View
USB connectors
S-video TV-out connector
modem connector (RJ-11)
network connector (RJ-45)
1
module bay
2
device latch release
3
USB connectors (2)
CAUTION: Do not block, push objects into, or allow dust to accumulate in the air vents. Do not store your computer in a low-airflow environment,
such as a closed briefcase, while it is running. Restricting the airflow can damage the computer or cause a fire.
1
network connector (RJ-45)
6
serial connector
2
S-video TV-out connector
7
video connector
3
USB connectors (2)
8
AC adapter connector
4
modem connector (RJ-11)
9
air vents
5
parallel connector
Connect USB devices, such as a mouse, keyboard, or printer. You can also connect the optional floppy drive directly to a USB connector
using the optional floppy drive cable.
Connects your computer to a TV. For more information, see "Connecting Your Computer to a TV or Audio Device."
If you ordered the optional internal modem, connect the telephone line to the modem connector.
For information on using the modem, see the online modem documentation supplied with your computer. See "Finding Information."
NOTICE: The network connector is slightly larger than the modem connector. To avoid damaging the computer, do not plug a telephone line into the
network connector.
Connects the computer to a network. The two lights next to the connector indicate the status of both the connection and the transfer of
information for wired network communications.
For information on using the network adapter, see the device user's guide supplied with your computer. See "Finding Information."
parallel connector
video connector
serial connector
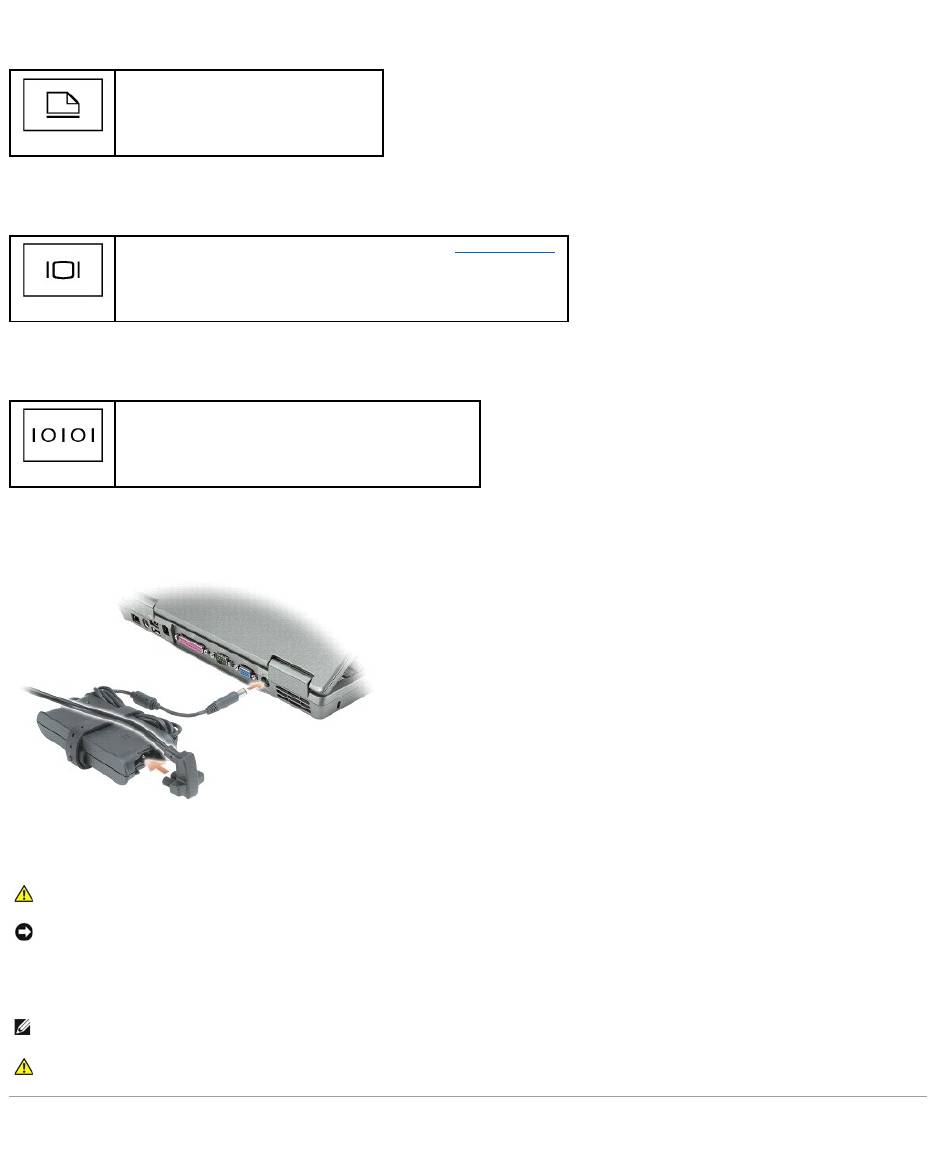
AC adapter connector — Attach an AC adapter to the computer.
The AC adapter converts AC power to the DC power required by the computer. You can connect the AC adapter with your computer turned either on or off.
air vents — The computer uses an internal fan to create airflow through the vents, which prevents the computer from overheating.
Bottom View
Connects a parallel device, such as a printer.
Connects an external monitor. For more information, see "Using the Display."
Connects serial devices, such as a mouse or handheld device.
CAUTION: The AC adapter works with electrical outlets worldwide. However, power connectors and power strips vary among countries. Using an
incompatible cable or improperly connecting the cable to the power strip or electrical outlet may cause fire or equipment damage.
NOTICE: When you disconnect the AC adapter cable from the computer, grasp the connector, not the cable itself, and pull firmly but gently to avoid
damaging the cable.
NOTE: The computer turns on the fan when the computer gets hot. Fan noise is normal and does not indicate a problem with the fan or the computer.
CAUTION: Do not block, push objects into, or allow dust to accumulate in the air vents. Do not store your computer in a low-airflow environment,
such as a closed briefcase, while it is running. Restricting the airflow can damage the computer or cause a fire.

memory module cover — Covers the compartment that contains the memory module(s). See "Adding and Replacing Parts."
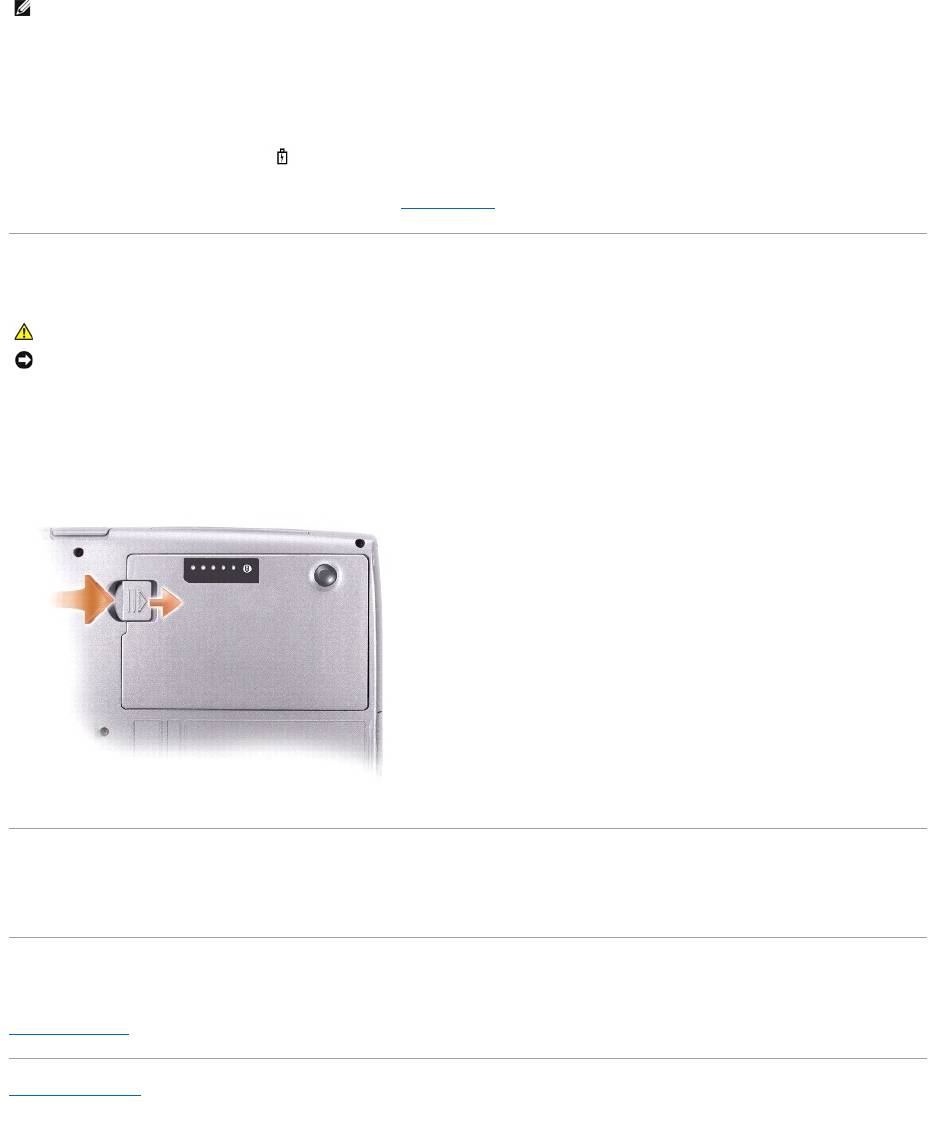
battery-bay latch release — Releases the battery. See "Using a Battery" for instructions.
battery charge gauge — Provides information on the battery charge. See "Using a Battery."
battery — When a battery is installed, you can use the computer without connecting the computer to an electrical outlet. See "Using a Battery."
docking device slot — Lets you attach your computer to a docking device. See the documentation that came with your docking device for additional
information.
fan — The computer uses an internal fan to create airflow through the vents, which prevents the computer from overheating.
Mini PCI card/modem cover — Covers the compartment that contains the Mini PCI card and modem. See "Adding and Replacing Parts."
hard drive — Stores software and data.
Back to Contents Page
1
memory module cover
5
docking device slot
2
battery-bay latch release
6
fan
3
battery charge gauge
7
Mini PCI card/modem cover
4
battery
8
hard drive
NOTE: The computer turns on the fan when the computer gets hot. Fan noise is normal and does not indicate a problem with the fans or the computer.
CAUTION: Do not block, push objects into, or allow dust to accumulate in the air vents. Do not store your computer in a low-airflow environment,
such as a closed briefcase, while it is running. Restricting the airflow can damage the computer or cause a fire.

Back to Contents Page
Appendix
DellPrecision™MobileWorkstationM20User'sGuide
Macrovision Product Notice
FCC Notices (U.S. Only)
Macrovision Product Notice
This product incorporates copyright protection technology that is protected by method claims of certain U.S. patents and other intellectual property rights
owned by Macrovision Corporation and other rights owners. Use of this copyright protection technology must be authorized by Macrovision Corporation, and is
intended for home and other limited viewing uses only unless otherwise authorized by Macrovision Corporation. Reverse engineering or disassembly is
prohibited.
FCC Notices (U.S. Only)
Most Dell computers are classified by the Federal Communications Commission (FCC) as Class B digital devices. To determine which classification applies to
your computer, examine all FCC registration labels located on the bottom, side, or back panel of your computer, on card-mounting brackets, and on the cards
themselves. If any one of the labels carries a Class A rating, your entire computer is considered to be a Class A digital device. If all labels carry an FCC Class B
rating as distinguished by either an FCC ID number or the FCC logo, ( ), your computer is considered to be a Class B digital device.
Once you have determined your computer's FCC classification, read the appropriate FCC notice. Note that FCC regulations provide that changes or
modifications not expressly approved by Dell could void your authority to operate this equipment.
This device complies with Part 15 of the FCC Rules. Operation is subject to the following two conditions:
l This device may not cause harmful interference.
l This device must accept any interference received, including interference that may cause undesired operation.
Class A
This equipment has been tested and found to comply with the limits for a Class A digital device pursuant to Part 15 of the FCC Rules. These limits are designed
to provide reasonable protection against harmful interference when the equipment is operated in a commercial environment. This equipment generates, uses,
and can radiate radio frequency energy and, if not installed and used in accordance with the manufacturer's instruction manual, may cause harmful
interference with radio communications. Operation of this equipment in a residential area is likely to cause harmful interference, in which case you will be
required to correct the interference at your own expense.
Class B
This equipment has been tested and found to comply with the limits for a Class B digital device pursuant to Part 15 of the FCC Rules. These limits are designed
to provide reasonable protection against harmful interference in a residential installation. This equipment generates, uses, and can radiate radio frequency
energy and, if not installed and used in accordance with the manufacturer's instruction manual, may cause interference with radio communications. However,
there is no guarantee that interference will not occur in a particular installation. If this equipment does cause harmful interference to radio or television
reception, which can be determined by turning the equipment off and on, you are encouraged to try to correct the interference by one or more of the following
measures:
l Reorient or relocate the receiving antenna.
l Increase the separation between the equipment and the receiver.
l Connect the equipment into an outlet on a circuit different from that to which the receiver is connected.
l Consult the dealer or an experienced radio/television technician for help.
FCC Identification Information
The following information is provided on the device or devices covered in this document in compliance with FCC regulations:
l Model number: PP11L
Company name:
Dell Inc.
One Dell Way
Round Rock, Texas 78682 USA
512-338-4400
Back to Contents Page


Back to Contents Page
Alert Standard Format (ASF)
DellPrecision™MobileWorkstationM20User'sGuide
Alert Standard Format (ASF) is a Distributed Management Task Force (DMTF) management standard that specifies "pre-operating system" or "operating system
absent" alerting techniques. The standard is designed to generate an alert on potential security and fault conditions when the operating system is in a sleep
state or the system is turned off. ASF is designed to supersede previous operating system-absent alerting technologies.
Your computer supports the following ASF alerts and remote capabilities:
For more information about Dell's ASF implementation, see ASF for Dell Portable Computers and the ASF Administrator's Guide for Dell Portable Computers, which
are available on the Dell Support website at support.dell.com.
Back to Contents Page
Alert
Description
Chassis Intrusion – Physical Security Violation/Chassis Intrusion – Physical
Security Violation Event Cleared
The docking device has been opened and the PCI slot has
been compromised.
Failure to Boot to BIOS
The BIOS did not complete loading upon initiation.
System Password Violation
The system password is invalid (alert occurs after three failed
attempts).
Entity Presence
Periodic heartbeats have been transmitted to verify system
presence.
Back to Contents Page
Using a Battery
DellPrecision™MobileWorkstationM20User'sGuide
Battery Performance
Checking the Battery Charge
Charging the Battery
Removing a Battery
Installing a Battery
Storing a Battery
Battery Performance
ForoptimalcomputerperformanceandtohelppreserveBIOSsettings,operateyourDell™portablecomputerwiththemainbatteryinstalledatalltimes.Use
a battery to run the computer when it is not connected to an electrical outlet. One battery is supplied as standard equipment in the battery bay.
Battery operating time varies depending on operating conditions. You can install an optional second battery in the module bay to significantly increase
operating time.
Operating time is significantly reduced when you perform operations including, but not limited to, the following:
l Using optical drives
l Using wireless communications devices, PC Cards, or USB devices
l Using high-brightness display settings, 3D screen savers, or other power-intensive programs such as 3D games
l Running the computer in maximum performance mode
You can check the battery charge before you insert the battery into the computer. You can also set power management options to alert you when the battery
charge is low.
Checking the Battery Charge
The Dell QuickSet Battery Meter, the Microsoft®Windows®Power Meter window and icon, the battery charge gauge and health gauge, and the low-
battery warning provide information on the battery charge.
Dell™QuickSetBatteryMeter
If Dell QuickSet is installed, press <Fn><F3> to display the QuickSet Battery Meter.
The Battery Meter window displays status, charge level, and charge completion time for the battery in your computer.
In addition, when your computer is connected to a docking device (docked), the Battery Meter window includes a Dock Battery tab, which displays the charge
level and current status of the docking device battery.
CAUTION: Before you begin any of the procedures in this section, follow the safety instructions in the Product Information Guide.
NOTE: For information about the Dell warranty for your computer, see the Product Information Guide or separate paper warranty document that shipped
with your computer.
NOTE: Battery operating time (the time the battery can hold a charge) decreases over time. Depending on how often the battery is used and the
conditions under which it is used, you may need to purchase a new battery during the life of your computer.
NOTE: It is recommended that you connect your computer to an electrical outlet when writing to a CD or DVD.
CAUTION: Using an incompatible battery may increase the risk of fire or explosion. Replace the battery only with a compatible battery purchased
from Dell. The lithium-ion battery is designed to work with your Dell computer. Do not use a battery from other computers with your computer.
CAUTION: Do not dispose of batteries with household waste. When your battery no longer holds a charge, call your local waste disposal or
environmental agency for advice on disposing of a lithium-ion battery. See "Battery Disposal" in the Product Information Guide.
CAUTION: Misuse of the battery may increase the risk of fire or chemical burn. Do not puncture, incinerate, disassemble, or expose the battery to
temperaturesabove65°C(149°F).Keepthebatteryawayfromchildren.Handledamagedorleakingbatterieswithextremecare.Damaged
batteries may leak and cause personal injury or equipment damage.
NOTE: You can use your docking device to charge a computer battery. However, a battery in a docking device does not power the docking device or
computer.
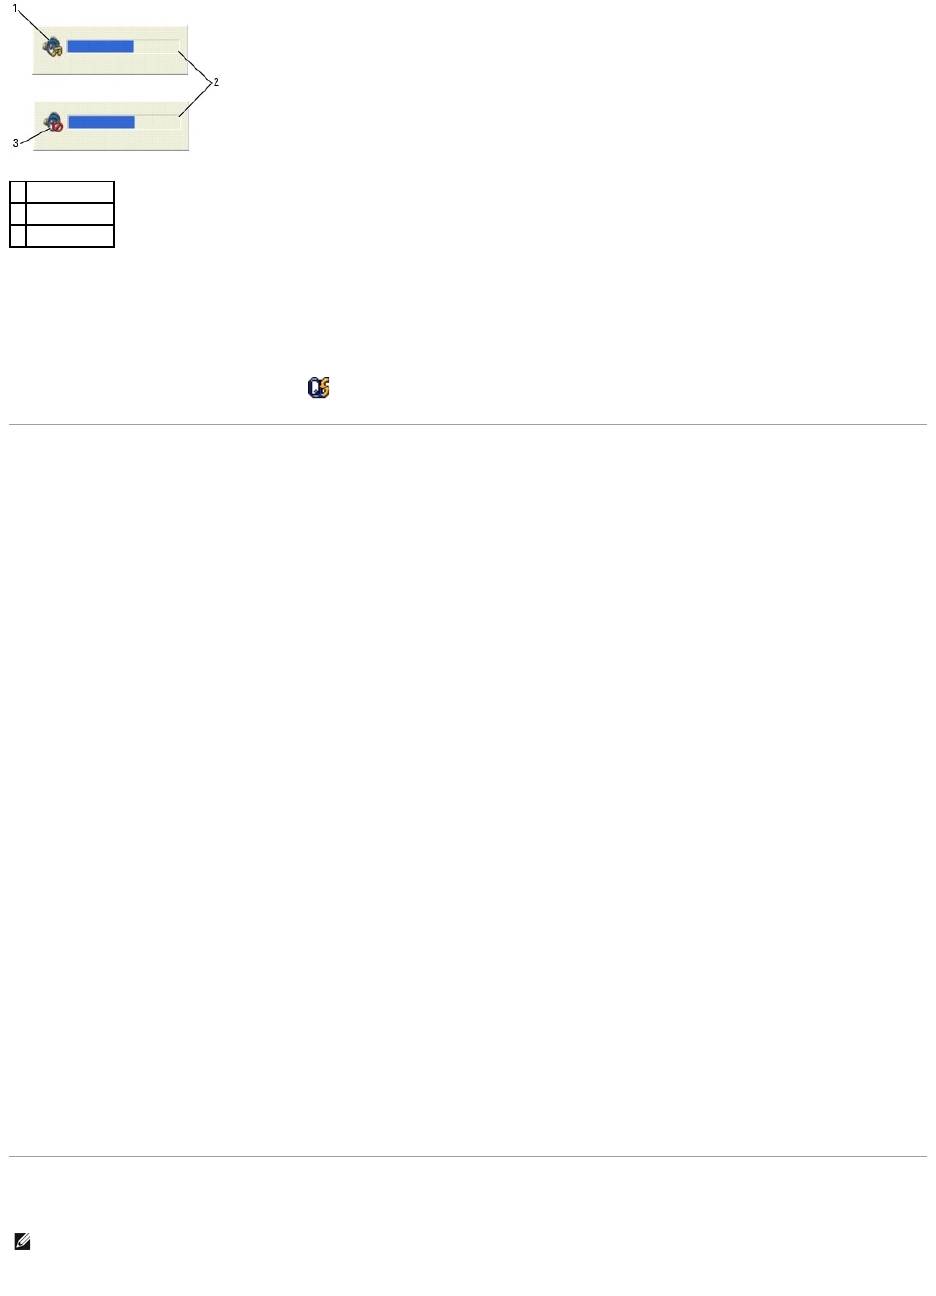
The following icons appear in the Battery Meter window:
For more information about QuickSet, right-click the icon in the taskbar, and click Help.
Microsoft®Windows®Power Meter
The Windows Power Meter indicates the remaining battery charge. To check the Power Meter, double-click the icon on the taskbar. For more information
about the Power Meter tab, see "Power Management."
If the computer is connected to an electrical outlet, a icon appears.
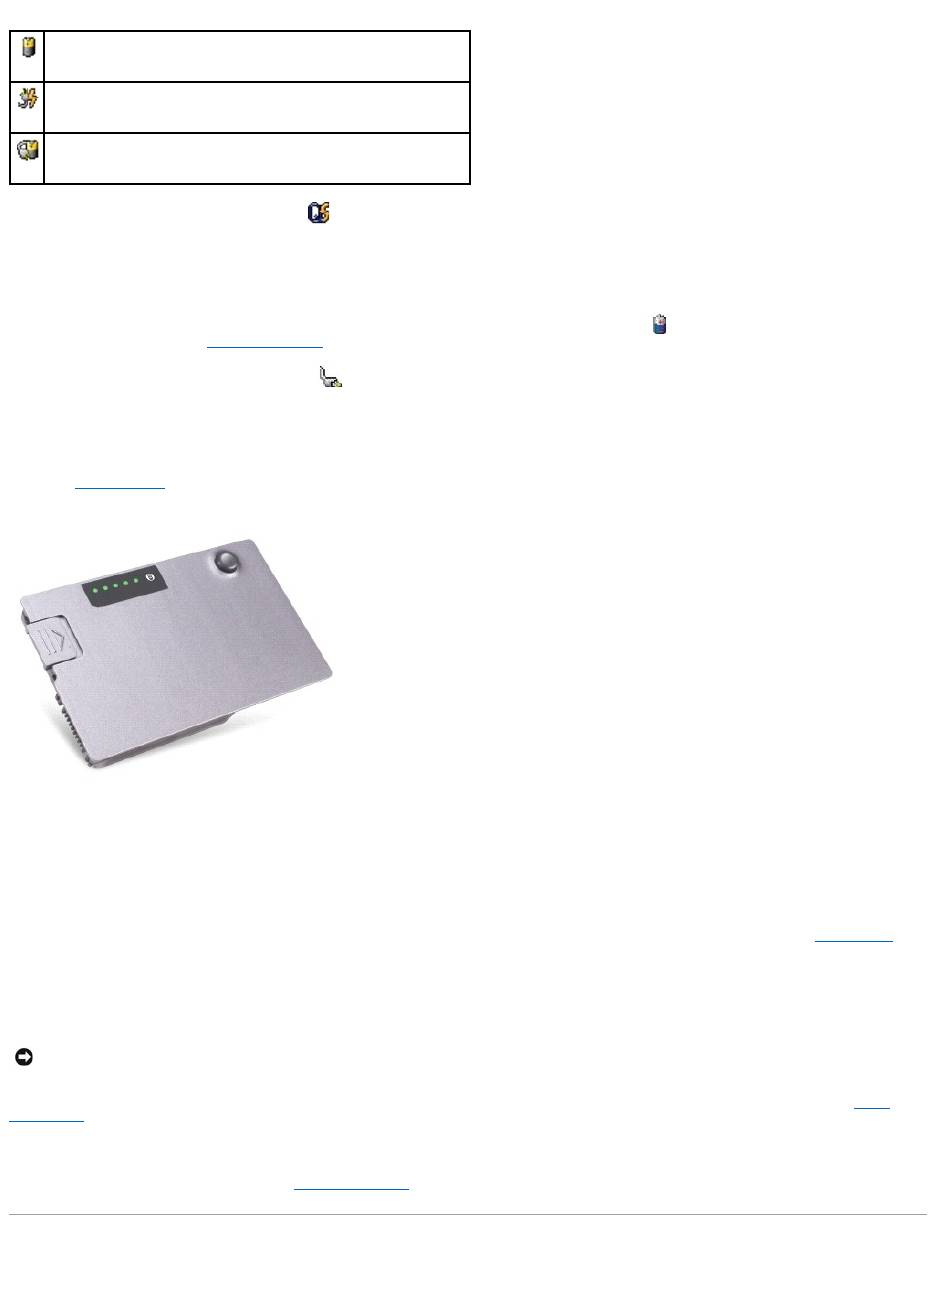
Charge Gauge
Before you insert a battery, press the status button on the battery charge gauge to illuminate the charge-level lights. Each light represents approximately 20
percent of the total battery charge. For example, if the battery has 80 percent of its charge remaining, four of the lights are on. If no lights appear, the battery
has no charge.
Health Gauge
The battery operating time is largely determined by the number of times it is charged. After hundreds of charge and discharge cycles, batteries lose some
charge capacity, or battery health. To check the battery health, press and hold the status button on the battery charge gauge for at least 3 seconds. If no
lights appear, the battery is in good condition, and more than 80 percent of its original charge capacity remains. Each light represents incremental
degradation. If five lights appear, less than 60 percent of the charge capacity remains, and you should consider replacing the battery. See "Specifications" for
more information about the battery operating time.
Low-Battery Warning
A pop-up window warns you when the battery charge is approximately 90 percent depleted. For more information about low-battery alarms, see "Power
Management."
A low-batterywarningoccurswhenthebatterychargeisapproximately90percentdepleted.Thecomputerbeepsonce,indicatingthatminimalbattery
operating time remains. During that time, the speaker beeps periodically. If two batteries are installed, the low-battery warning means that the combined
charge of both batteries is approximately 90 percent depleted. The computer enters hibernate mode when the battery charge is at a critically low level. For
more information about low-battery alarms, see "Power Management."
Charging the Battery
The computer or docking device is running on battery power.
The computer is connected to AC power and the battery is charging.
The computer is connected to AC power and the battery is fully charged.
NOTICE: To avoid losing or corrupting data, save your work immediately after a low-battery warning. Then connect the computer to an electrical outlet,
or install a second battery in the module bay. If the battery runs completely out of power, hibernate mode begins automatically.
When you connect the computer to an electrical outlet or install a battery while the computer is connected to an electrical outlet, the computer checks the
battery charge and temperature. If necessary, the AC adapter then charges the battery and maintains the battery charge.
If the battery is hot from being used in your computer or being in a hot environment, the battery may not charge when you connect the computer to an
electrical outlet.
The battery is too hot to start charging if the light flashes alternately green and orange. Disconnect the computer from the electrical outlet and allow the
computer and the battery to cool to room temperature. Then connect the computer to an electrical outlet to continue charging the battery.
For more information about resolving problems with a battery, see "Power Problems."
Removing a Battery
1. Ensure that the computer is turned off, suspended in a power management mode, or connected to an electrical outlet.
2. If the computer is connected to a docking device (docked), undock it. See the documentation that came with your docking device for instructions.
3. Slide and hold the battery-bay (or module-bay) latch release on the bottom of the computer, and then remove the battery from the bay.
Installing a Battery
Slide the battery into the bay until the latch release clicks.
Storing a Battery
Remove the battery when you store your computer for an extended period of time. A battery discharges during prolonged storage. After a long storage period,
recharge the battery fully before you use it.
Back to Contents Page
NOTE: The AC adapter charges a completely discharged battery in approximately 1 hour with the computer turned off. Charge time is longer with the
computer turned on. You can leave the battery in the computer as long as you like. The battery's internal circuitry prevents the battery from
overcharging.
CAUTION: Before performing these procedures, disconnect the modem from the telephone wall jack.
NOTICE: If you choose to replace the battery with the computer in standby mode, you have up to 1 minute to complete the battery replacement before
the computer shuts down and loses any unsaved data.
Back to Contents Page
Using the Module Bay
DellPrecision™MobileWorkstationM20User'sGuide
About the Module Bay
About the Device Security Screw
Removing and Installing Devices While the Computer Is Turned Off
Removing and Installing Devices While the Computer Is Running
About the Module Bay
You can install devices such as a floppy drive, CD drive, CD-RW drive, DVD drive, CD-RW/DVD drive, DVD+RW, second battery, or second hard drive in the
module bay.
About the Device Security Screw
YourDell™computershipswithaCD/DVDdriveinstalledinthemodulebayandadevicesecurityscrew,whichisnotinstalledintheCD/DVDdrivebut
packaged separately. When you install a module in the bay, you can install the device security screw to prevent the module from being easily removed.
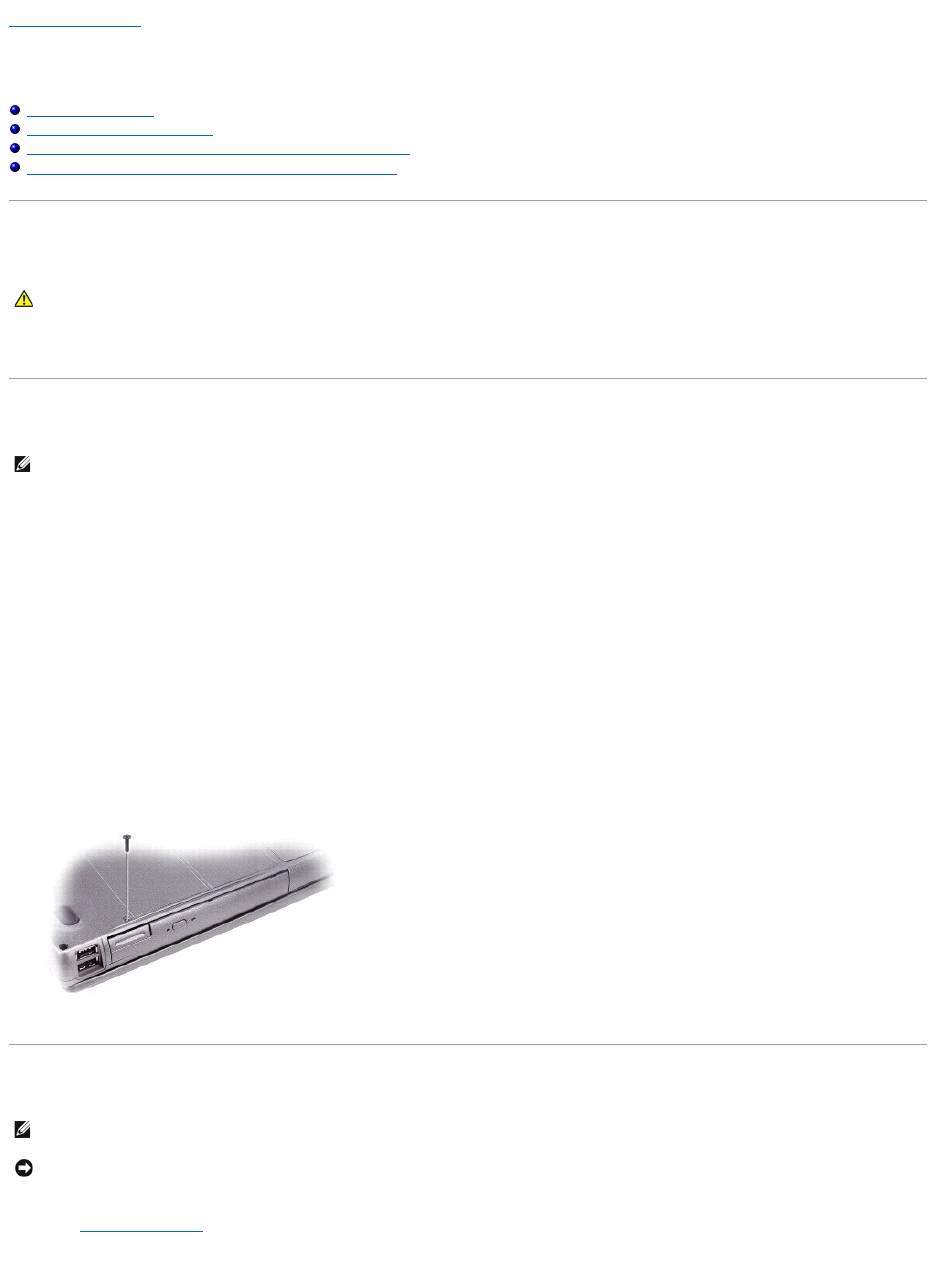
Removing the Device Security Screw
If the device security screw is installed, you must remove the screw to remove the module from the bay:
1. Save and close any open files, exit any open programs, and shut down the computer.
2. If the computer is connected to a docking device (docked), undock it. See the documentation that came with your docking device for instructions.
3. Close the display and turn the computer over.
4. Use a #1 Phillips screwdriver to remove the device security screw from the bottom of the computer.
Removing and Installing Devices While the Computer Is Turned Off
1. If the device security screw is installed, remove it.
2. Press the device latch release.
CAUTION: Before you begin any of the procedures in this section, follow the safety instructions in the Product Information Guide.
NOTE: You do not need to install the device security screw unless you want to prevent the module from being easily removed.
NOTE: If the device security screw is not installed, you can remove and install devices while the computer is running and connected to a docking device
(docked).
NOTICE: To prevent damage to devices, store them in a safe, dry place when they are not installed in the computer. Avoid pressing down on them or
placing heavy objects on top of them.
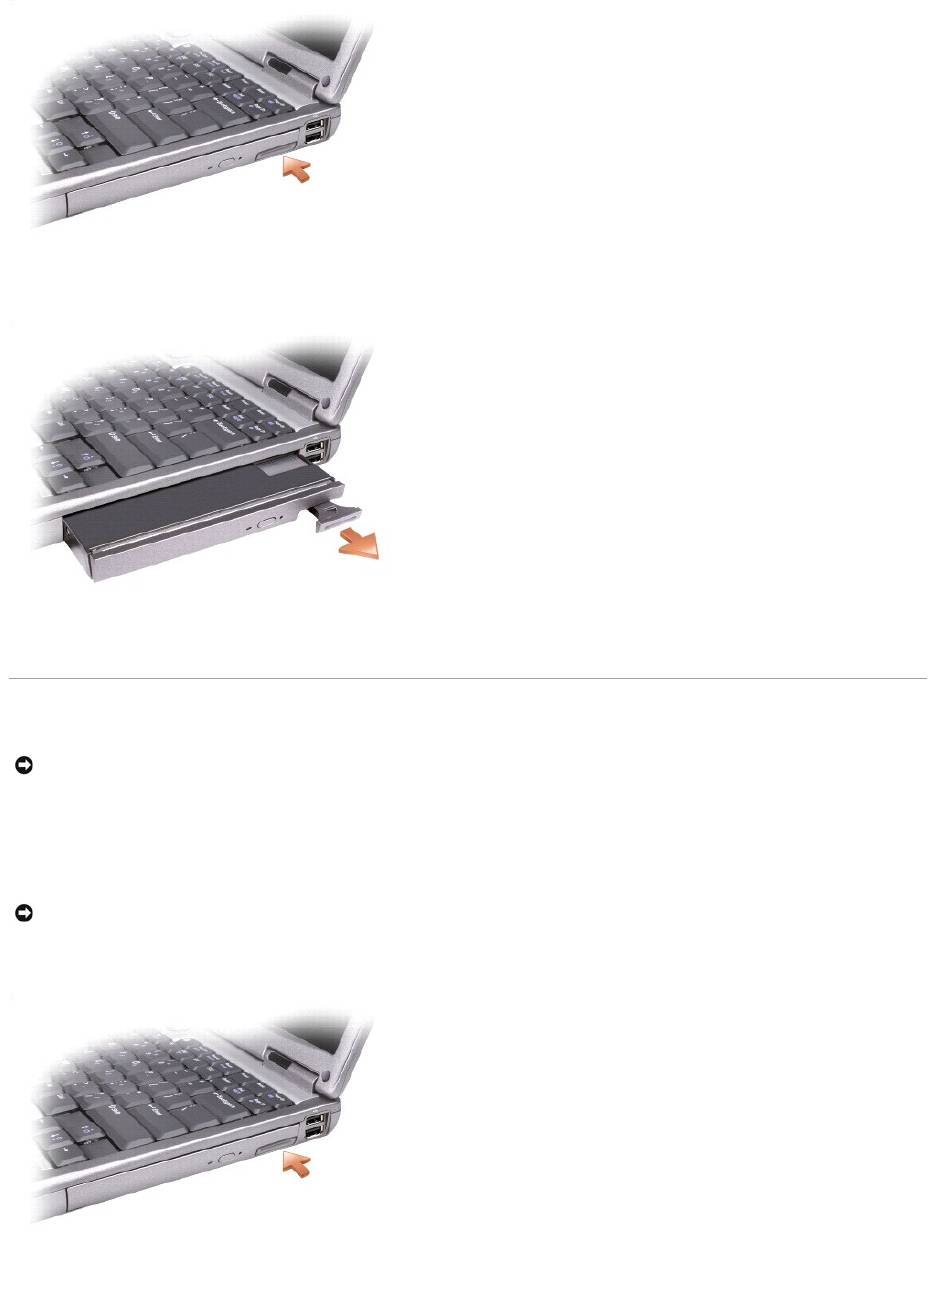
3. Pull the device out of the module bay.
4. Push the new device into the bay until it clicks.
Removing and Installing Devices While the Computer Is Running
1. Before ejecting the device:
®
®
l In Microsoft
Windows
XP, double-click the Safely Remove Hardware icon on the taskbar, click the device you want to eject, and click Stop.
l In Windows 2000, click the Unplug or Eject Hardware icon on the taskbar, click the device you want to eject, and click Stop.
2. Press the device latch release.
NOTICE: If the device security screw is installed, you must turn off the computer before removing the screw.
NOTICE: To prevent damage to devices, store them in a safe, dry place when they are not installed in the computer. Avoid pressing down on them or
placing heavy objects on top of them.

3. Pull the device out of the module bay.
4. Push the new device into the bay until it clicks.
The operating system automatically recognizes the device.
5. Click Close (in Windows 2000).
6. If necessary, enter your password to unlock your computer.
Back to Contents Page
Back to Contents Page
Using CDs, DVDs, and Other Multimedia
DellPrecision™MobileWorkstationM20User'sGuide
Playing a CD or DVD
Adjusting the Volume
Adjusting the Picture
Connecting Your Computer to a TV or Audio Device
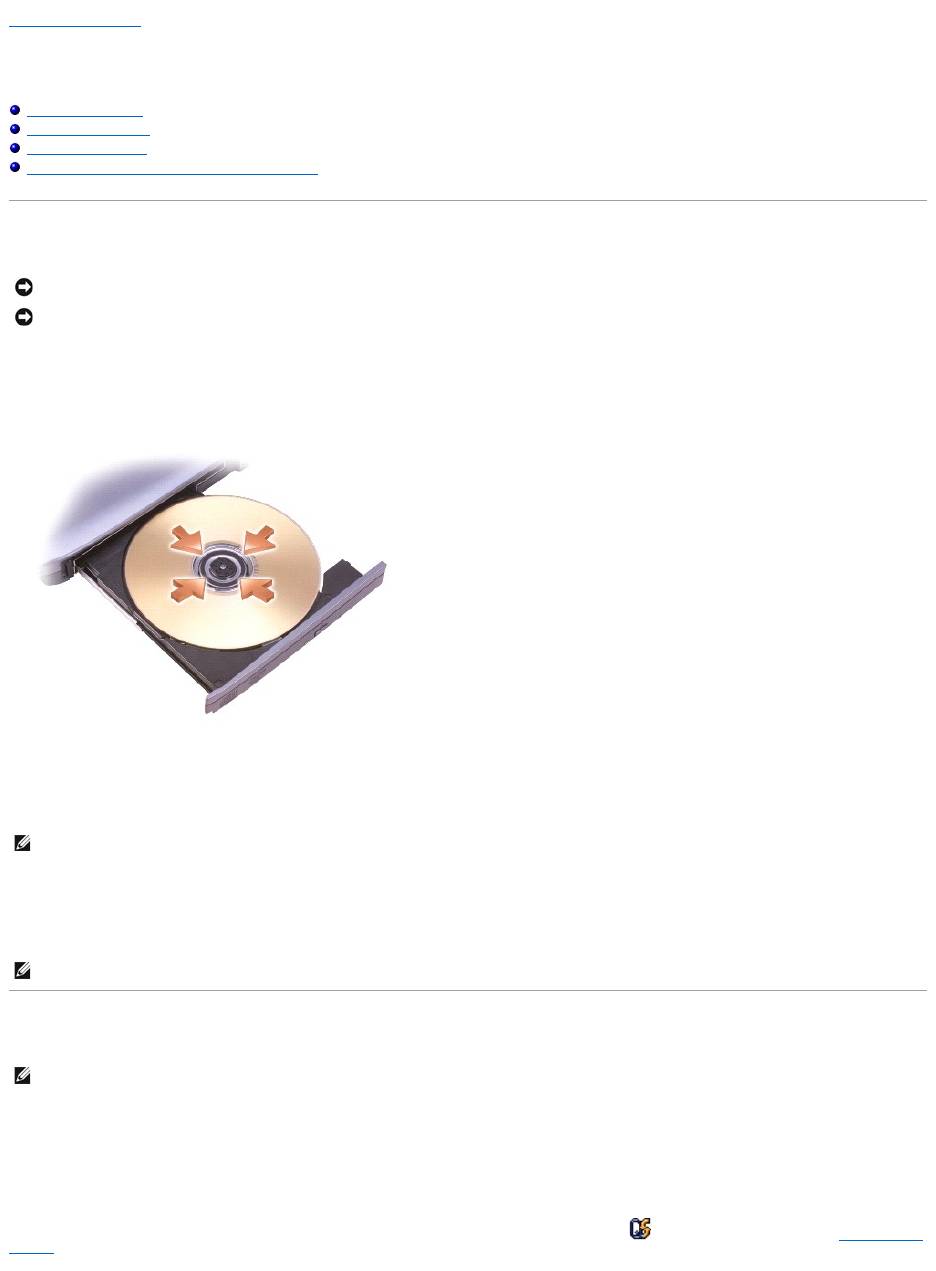
Playing a CD or DVD
1. Press the eject button on the front of the drive.
2. Pull the tray out.
3. Place the disc, label side up, in the center of the tray and snap the disc onto the spindle.
4. Push the tray back into the drive.
To format CDs for storing data, to create music CDs, or to copy CDs, see the CD software that came with your computer.
Adjusting the Volume
1. Click the Start button, point to All Programs (or Programs)® Accessories® Entertainment (or Multimedia), and then click Volume Control.
2. In the Volume Control window, click and drag the bar in the Volume Control column and slide it up or down to increase or decrease the volume.
For more information on volume control options, click Help in the Volume Control window.
The Volume Meter displays the current volume level, including mute, on your computer. Either right-click the icon in the taskbar or press the volume control
buttons to enable or disable the Volume Meter on the screen.
NOTICE: Do not press down on the CD or DVD tray when you open or close it. Keep the tray closed when you are not using the drive.
NOTICE: Do not move the computer when you are playing CDs or DVDs.
NOTE: If you use a module that shipped with another computer, you need to install the drivers and software necessary to play DVDs or write data. For
more information, see the Drivers and Utilities CD.
NOTE: Ensure that you follow all copyright laws when you create CDs.
NOTE: When the speakers are muted, you do not hear the CD or DVD playing.
When the meter is enabled, adjust the volume with the volume control buttons or by pressing the following keys:
l Press <Fn> <PageUp> to increase volume.
l Press <Fn> <PageDn> to decrease volume.
l Press <Fn> <End> to mute volume.
For more information about QuickSet, right-click the icon in the taskbar and click Help.
Adjusting the Picture
If an error message notifies you that the current resolution and color depth are using too much memory and preventing DVD playback, adjust the display
properties.
Microsoft®Windows®XP
1. Click the Start button and click Control Panel.
2. Under Pick a category, click Appearance and Themes.
3. Under Pick a task..., click Change the screen resolution.
4. In the Display Properties window, click and drag the bar in Screen resolution to change the setting to 1024 by 768 pixels.
5. Click the drop-down menu under Color quality, and then click Medium (16 bit).
6. Click OK.
Windows 2000
1. Click the Start button, point to Settings, and then click Control Panel.
2. Double-click the Display icon and click the Settings tab.
3. Click and drag the bar in Screen area to change the setting to 1024 by 768 pixels.
4. Under Color quality, click the drop-down menu and click High Color (16 bit).
5. Click Apply.
6. Click OK to save the settings and close the window.
Connecting Your Computer to a TV or Audio Device
Your computer has an S-video TV-out connector that, together with a standard S-video cable (available from Dell), enables you to connect the computer to a
1
volume icon
2
Volume Meter
3
mute icon
NOTE: Video and audio cables for connecting your computer to a TV or other audio device are not included with your computer and are not available in
certain countries. If available in your country, cables may be purchased at most consumer electronics stores or from Dell.
TV.
Your TV has either an S-video input connector or a composite video-input connector. Depending on what type of connector is available on your TV, you can use
a commercially available S-video cable or composite video cable to connect your computer to your TV.
It is recommended that you connect video and audio cables to your computer in one of the following combinations.
l S-video and standard audio
l Composite video and standard audio
When you finish connecting the video and audio cables between your computer and your TV, you must enable your computer to work with the TV. See
"Enabling the Display Settings for a TV in Microsoft® Windows® XP" to ensure that the computer recognizes and works properly with the TV.
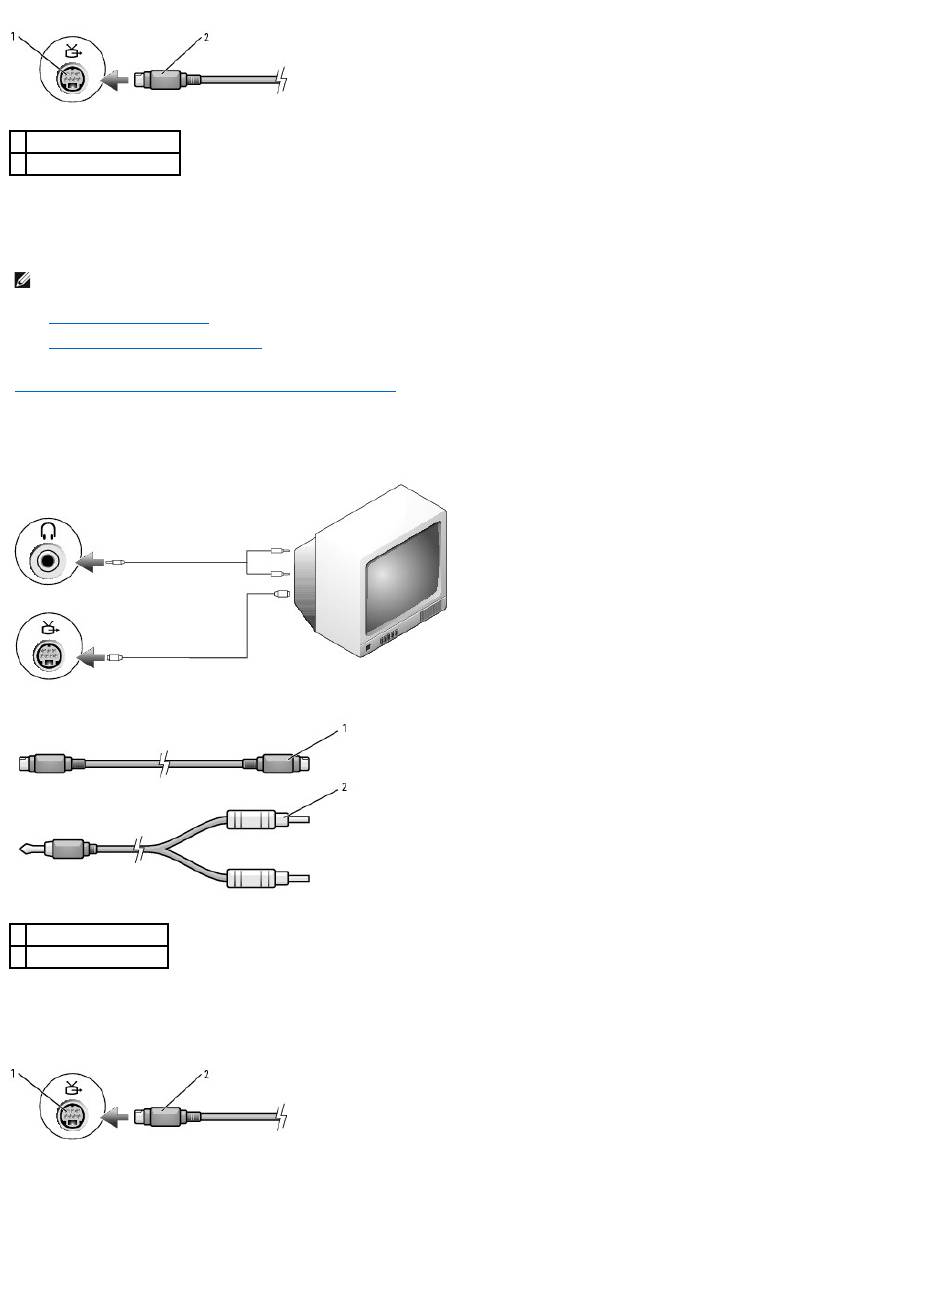
S-Video and Standard Audio
1. Turn off the computer and the TV and/or audio device that you want to connect.
2. Plug one end of the S-video cable in to the S-video input connector on the computer.
3. Plug the other end of the S-video cable in to the S-video input connector on your TV.
4. Plug the single-connector end of the audio cable in to the audio connector on your computer.
5. Plug the two RCA connectors on the other end of the audio cable in to the audio input connectors on your TV or other audio device.
1
S-video TV-out connector
2
S-video connector
NOTE: See the diagrams at the beginning of each subsection to help you determine which method of connection you should use.
1
standard S-video cable
2
standard audio cable
