Dell PowerVault MD3600i: Setting Up and Using Your Computer
Setting Up and Using Your Computer: Dell PowerVault MD3600i
Setting Up and Using Your Computer
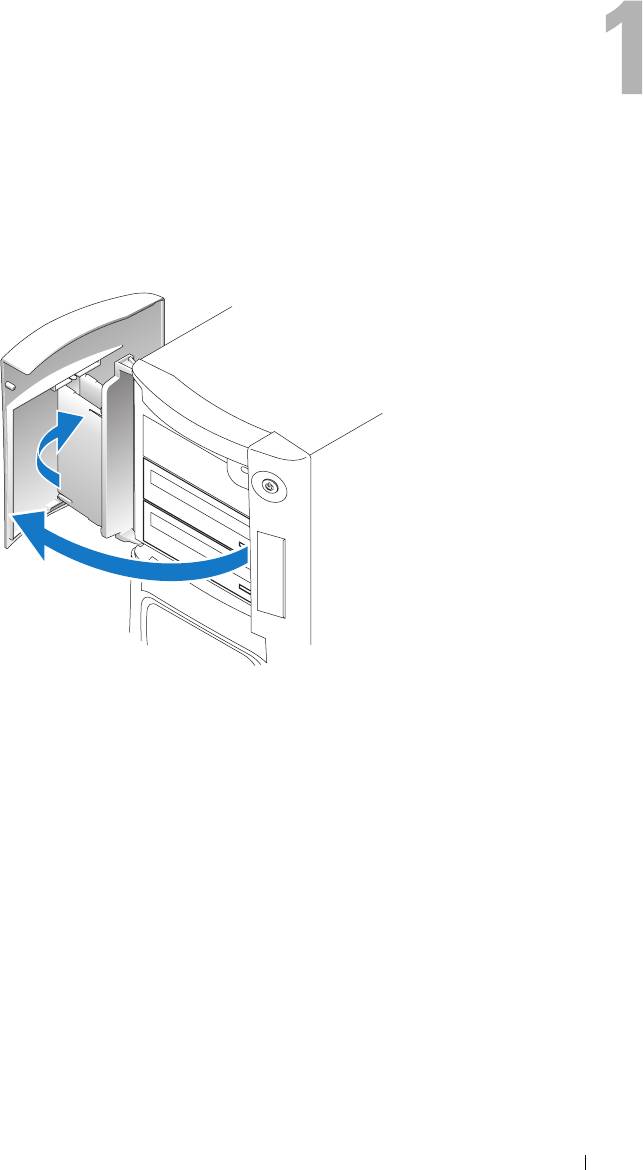
Opening the Drive Door
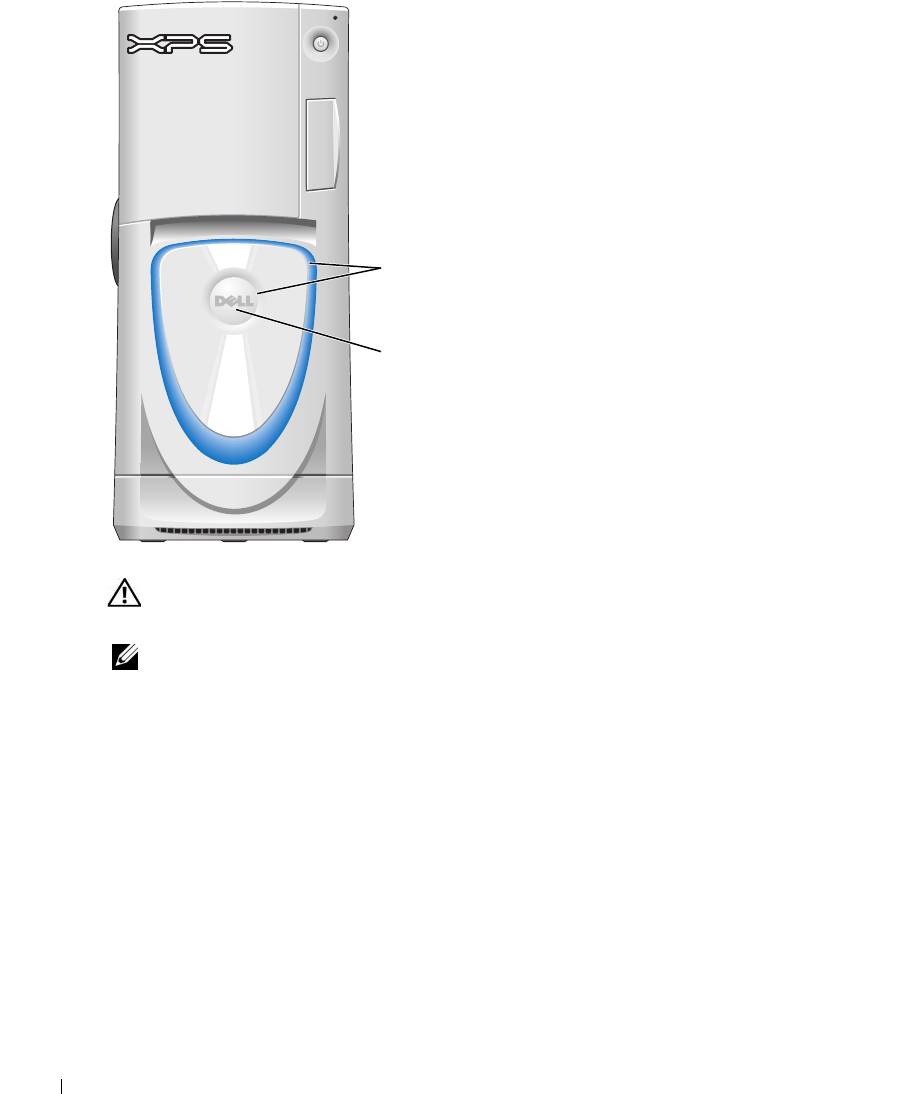
Changing the Front-Panel Light Color
You can use this exclusive Dell™ XPS feature either to change the color of the front-panel light
that illuminates the Dell name and displays around the badge on the front of your computer, or
to turn off the front-panel light entirely.
Setting Up and Using Your Computer 15
You can choose from several color choices:
•Off
•Ruby
•Emerald
•Sapphire (default)
•Amber
•Amethyst
•Topaz
front-panel
www.dell.com | support.dell.com
light
•Diamond
badge
CAUTION: Before you begin any of the procedures in this section, follow the safety instructions
located in the Product Information Guide.
NOTE: The front-panel light is not for diagnostic purposes.
1
Follow the procedures in "Before You Begin" on page 69.
2
Turn on (or restart) your computer.
3
Enter system setup by pressing <F2>. (See "Entering System Setup" on page 131 for details
about entering system setup).
4
Select the
Onboard Devices
option.
5
Select
Front LED Color
, and press <Enter>.
6
Press the left- and right- arrow keys to scroll through the color options. The front-panel light
color changes as you scroll through the options.
7
Select the color you want, and press <Enter>.
8
Press
<
Esc
>
, and press
Save and Exit
to save the new front-panel light color setting.
16 Setting Up and Using Your Computer
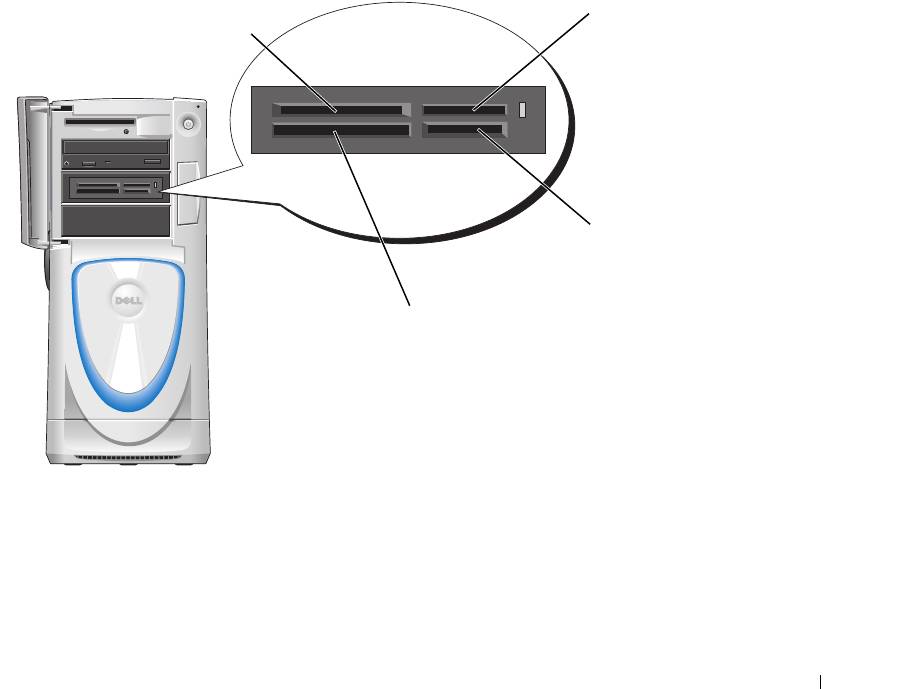
Using a Media Card Reader (Optional)
Use the media card reader to transfer data directly to your computer.
The media card reader supports the following memory types:
• xD-Picture card
• SmartMedia (SMC)
• CompactFlash Type I and II (CF I/II)
• MicroDrive card
• SecureDigital card (SD)
• MultiMediaCard (MMC)
• Memory Stick (MS/MS Pro)
For information on installing a media card reader, see "Installing a Media Card Reader" on
page 106.
xD-Picture card
Memory Stick
and SmartMedia (SMC)
(MS/MS Pro)
SecureDigital card (SD)/
MultiMediaCard (MMC)
CompactFlash Type I
and II (CF I/II) and
MicroDrive card
To use the media card reader:
1
Check the media or card to determine the proper orientation for insertion.
2
Slide the media or card into the appropriate slot until it is completely seated in the connector.
If you encounter resistance, do not force the media or card. Check the card orientation and
try again.
Setting Up and Using Your Computer 17
Connecting Monitors
CAUTION: Before you begin any of the procedures in this section, follow the safety instructions
located in the Product Information Guide.
NOTE: Dependent upon options selected when you purchased your computer, your video card may have
either two DVI ports or one DVI port and one VGA port.
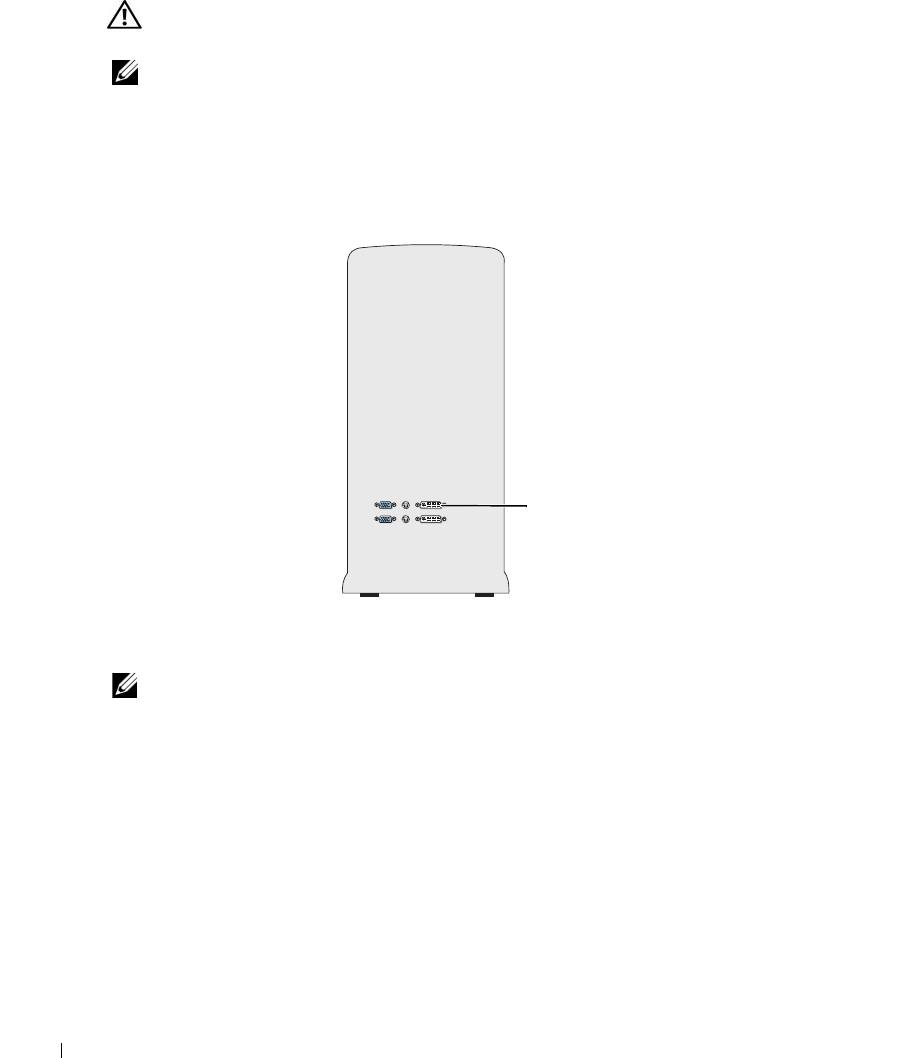
Connecting a Monitor to a PCI Express Graphics Card Dual Configuration
If you are using PCI Express graphics cards in a dual configuration, only a single monitor is
supported. Connect the monitor to the primary video card or the monitor will not function.
www.dell.com | support.dell.com
primary video card
Connecting Two Monitors
NOTE: Your graphics card and configuration must support dual monitors for you to connect and enable
two monitors using the instructions in this section.
The graphics card that came with your computer has an S-video port and either two DVI ports
and a DVI-to-VGA adapter, or one DVI port and one VGA port.
To connect a monitor by attaching the DVI or VGA connector of the monitor directly to the
DVI or the (optional) VGA port on your computer, see "Connecting Two Monitors (Without an
Adapter)" on page 19. If you purchased a graphics card that has two DVI ports instead of a VGA
port and need to use a VGA monitor, see "Connecting Two Monitors (With the Use of an
Adapter)" on page 20.
18 Setting Up and Using Your Computer
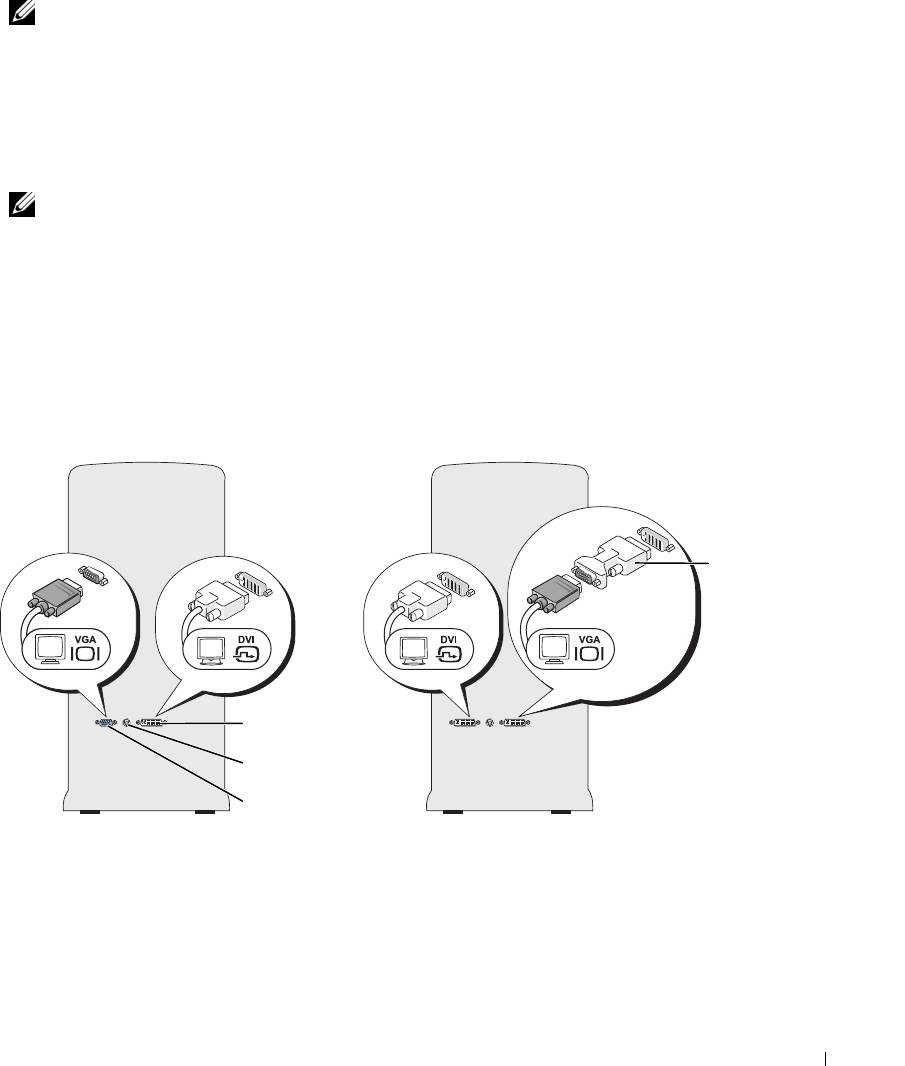
Connecting Two Monitors (Without an Adapter)
NOTE: Dependent upon options selected when you purchased your computer, your video card may have
either two DVI ports or one DVI port and one VGA port.
Follow these instructions if you are connecting two monitors with DVI connectors to the two
optional DVI ports on your computer, or if you are connecting one monitor with a DVI
connector and one VGA monitor to the DVI and optional VGA ports on your computer.
If you have a monitor with a VGA connector, but your computer has two DVI ports, follow the
instructions in "Connecting Two Monitors (With the Use of an Adapter)" on page 20.
NOTE: If you are using PCI Express graphics cards in a dual configuration, only a single monitor is
supported.
1
Follow the procedures in "Before You Begin" on page 69.
2
Connect each of the monitors to a the appropriate connector on the back of the computer.
If your monitor has a DVI connector, use the white DVI port on your computer.
If your monitor has a VGA connector, use the (optional) blue VGA port on your computer.
3
Change the display settings to support both monitors (see "Changing the Display Settings to
Support Two Monitors" on page 20).
DVI-to-VGA
adapter
DVI (white) connector
TV-OUT connector
VGA (blue) connector
(optional)
Setting Up and Using Your Computer 19

Connecting Two Monitors (With the Use of an Adapter)
Follow these instructions if you purchased a graphics card that has two DVI ports instead of a
VGA port and need to use a VGA monitor.
NOTE: If you are using PCI Express graphics cards in a dual configuration, only a single monitor is
supported.
1
Follow the procedures in "Before You Begin" on page 69.
2
Attach the DVI connector on the appropriate monitor to the white DVI port on the back of
the computer.
NOTE: Your graphics card must support a VGA monitor being connected to the DVI port.
3
Connect the DVI-to-VGA adapter to the VGA connector on the other monitor, then connect
www.dell.com | support.dell.com
the adapter to the white DVI port on the back of the computer.
4
Change the display settings to support both monitors (see "Changing the Display Settings to
Support Two Monitors" on page 20).
Connecting a TV
NOTE: If you are connecting a TV, you may connect only one monitor (VGA or DVI) in addition to the TV.
NOTE: See the documentation that came with your TV to ensure that you properly configure and connect
the TV.
To connect a TV to your computer, you must purchase an S-video cable, which is available at
most consumer electronics stores. An S-video cable is not included with your computer.
1
Follow the procedures in "Before You Begin" on page 69.
2
Connect one end of the S-video cable to the TV-OUT connector on the back of the computer.
3
Connect the other end of the S-video cable to the S-video input connector on your TV.
4
Connect one VGA or DVI monitor as described in the preceding subsection, "Connecting
Two Monitors (Without an Adapter)" on page 19.
Changing the Display Settings to Support Two Monitors
1
After you connect the monitors, turn on the computer.
®
®
The Microsoft
Windows
desktop displays on the primary monitor.
2
Enable clone mode or extended desktop mode in the display settings.
• In clone mode, both monitors display the same image.
• In extended desktop mode, you can drag objects from one screen to the other, effectively
doubling the amount of viewable work space.
For information on changing the display settings for your graphics card, see the user’s guide in
the Help and Support Center (click the
Start
button, click
Help and Support
, click
User and
system guides
, click
Device guides
, and then click the guide for your graphics card).
20 Setting Up and Using Your Computer

About Serial ATA Drives
Your computer supports up to three serial ATA hard drives. Serial ATA drives provide the
following benefits by transferring data using serial technology and flexible cables that are
thinner and longer than IDE cables:
• Improved cable routing facilitates more efficient airflow inside the chassis.
• Compact cable connectors save space on the system board and on the hard drive. Combined
with the improved cable routing, this allows a more efficient utilization of space inside the
chassis.
See "Hard Drive" on page 97 for information on serial ATA drive connections.
About Your RAID Configuration
NOTICE: If you might ever decide to migrate to a RAID array, before loading the operating system onto a
hard drive, set up that drive as a single drive RAID 0 array. See "Creating an Array using the Nvidia
MediaShield ROM Utility" on page 23 for instructions.
This section provides an overview of the RAID configuration that you might have selected when
you purchased your computer. Dell offers either a RAID level 0 configuration or a RAID level 1
configuration on your Dell™ XPS computer. A RAID level 0 configuration is recommended for
high-performance gaming, and a RAID level 1 configuration is recommended for the data
integrity requirements of digital photography and audio.
NOTE: RAID levels do not represent a hierarchy. A RAID level 1 configuration is not inherently better or
worse than a RAID level 0 configuration.
The drives in an array should be the same size in order to ensure that the larger drive does not
contain unallocated (and therefore unusable) space.
RAID Level 0 Configuration
A RAID level 0 configuration uses a storage technique known as "data striping" to provide a high
data access rate. Data striping is a method of writing consecutive segments, or stripes, of data
sequentially across the physical drives to create a large virtual drive. Data striping allows one of
the drives to read data while the other drive is searching for and reading the next block.
Setting Up and Using Your Computer 21
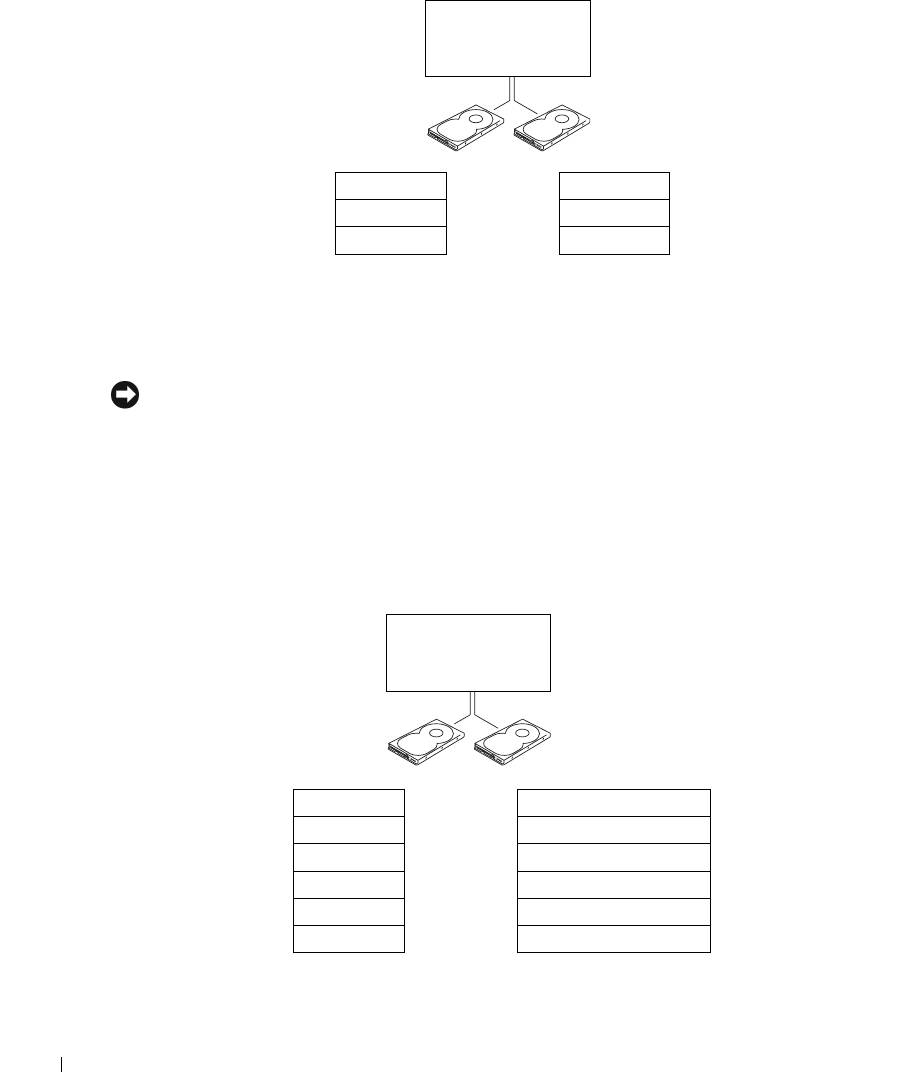
serial ATA RAID
configured for
RAID level 0
segment 1
segment 2
segment 3
segment 4
segment 5
segment 6
www.dell.com | support.dell.com
hard drive 1
hard drive 2
Another advantage of a RAID level 0 configuration is that it utilizes the full capacities of the
drives. For example, if you have two 120-GB drives installed, you have 240 GB on which to store
data.
NOTICE: Because RAID level 0 configurations provide no data redundancy, if one drive fails, then the
data on the other drive is also inaccessible. Therefore, ensure that you perform regular backups when
you use a RAID level 0 configuration.
RAID Level 1 Configuration
RAID level 1 uses a data-redundancy storage technique known as "mirroring." When data is
written to the primary drive, it is then duplicated, or mirrored, on the other drive. A RAID
level 1 configuration sacrifices high data-access rates for its data redundancy advantages.
serial ATA RAID
configured for
RAID level 1
segment 1
segment 1 duplicated
segment 2
segment 2 duplicated
segment 3
segment 3 duplicated
segment 4
segment 4 duplicated
segment 5
segment 5 duplicated
segment 6
segment 6 duplicated
hard drive 1
hard drive 2
22 Setting Up and Using Your Computer

If a drive failure occurs, subsequent read and write operations are directed to the surviving drive.
A replacement drive can then be rebuilt using the data from the surviving drive. Also, because
data is duplicated on both drives, a RAID level 1 configuration using two 120-GB hard drives
collectively has a maximum of 120 GB on which to store data.
Configuring Your Hard Drives for RAID
NOTICE: If you might ever decide to migrate to a RAID array, before loading the operating system onto a
hard drive, set up that drive as a single drive RAID 0 array. See "Creating an Array using the Nvidia
MediaShield ROM Utility" on page 23 for instructions.
At some point you may want to configure your computer for RAID if you did not select a RAID
configuration when you purchased your computer. You must have at least two hard drives
installed in your computer to set up a RAID configuration. For instructions on how to install a
hard drive, see "Installing a Hard Drive" on page 98.
You can use one of two methods to configure RAID hard drive volumes. One method uses the
Nvidia MediaShield ROM utility and is performed before you install the operating system onto
the hard drive. The second method uses Nvidia MediaShield, and this method is performed
after you have installed the operating system with the Nvidia RAID drivers.
Both methods require that you set your computer to RAID-enabled mode before starting any of
the RAID configuration procedures in this document.
Setting Your Hard Drives to RAID-Enabled Mode
1
Enter system setup (see "Entering System Setup" on page 131).
2
Press the up- and down-arrow keys to highlight
Drives
, and press <Enter>.
3
Press the up- and down-arrow keys to highlight the applicable SATA drive, and press
<Enter>.
4
Press the left- and right-arrow keys to highlight
RAID On
, press <Enter>, and then
press <Esc>.
NOTE: For more information about RAID options, see "System Setup Options" on page 132.
5
Press the left- and right-arrow keys to highlight
Save/Exit
, and press <Enter> to exit system
setup and resume the boot process. Repeat the process as necessary for each SATA hard drive.
Creating an Array using the Nvidia MediaShield ROM Utility
NOTICE: You will lose any data on your hard drives when you create a RAID configuration using the
following procedure. Back up data you want to keep before continuing.
NOTICE: If you might ever decide to migrate to a RAID array, before loading the operating system onto a
hard drive, set up that drive as a single drive RAID 0 array. See "Creating an Array using the Nvidia
MediaShield ROM Utility" on page 23 for instructions.
NOTE: Use the following procedure only if you are reinstalling your operating system. Do not use the
following procedure to migrate an existing storage configuration to a RAID configuration.
Setting Up and Using Your Computer 23

Although any size drives may be used to create a RAID configuration, ideally the drives should
be of equal size. In a RAID level 0 configuration, the size of the configuration will be the size of
the smaller drive multiplied by the number (two) of drives in the configuration. In a RAID level
1 configuration, the size of the configuration will be the smaller of the two drives used.
1
Enable RAID on your hard drives (see "Setting Your Hard Drives to RAID-Enabled Mode" on
page 23).
2
Press <Ctrl-n> when prompted to enter the RAID BIOS.
NOTICE: If you do not press <Ctrl-n> before the window closes, restart your computer and wait for
the prompt to appear again.
The
Define a New Array
window appears.
www.dell.com | support.dell.com
3
Press <Tab> to navigate to the
RAID Mode
field.
To create a RAID 0 configuration, use the arrow keys to select
Striping
.
To create a RAID 1 configuration, use the arrow keys to select
Mirroring
.
4
Press <Tab> to navigate to the
Free Disks
field.
5
Use the right- and left-arrow keys to select the hard drive or drives to include in your RAID
array; move the listed hard drives from the
Free Disks
field to the
Array Disks
field.
NOTE: Your computer supports a maximum of two drives per RAID1 array and three per RAID0
array.
6
After assigning hard drives to an array, press <F9>.
NOTICE: You will lose all data on the selected drives in the next step.
7
Press <Y> to clear all data from the selected drives.
The
Array Detail
window appears.
8
To specify the array as bootable, use the arrow keys to select the array and press <B>.
9
To review the details of the array that you set up, use the arrow keys to highlight the array in
the
Array Detail
window and press <Enter>.
To delete an array, navigate to the array using the arrow keys and press <D>.
Press <Enter> to return to the previous screen.
10
Press <Ctrl><X> to exit the RAID BIOS.
Using Nvidia MediaShield
Nvidia MediaShield
allows you to create, view, and manage RAID configurations. If you already
have one hard drive with the operating system installed on it, and you want to add a second hard
drive and reconfigure both drives into a RAID volume without losing the existing operating
system and any data, you need to use the morphing option (see "Morphing from a Single Drive
RAID 0 Configuration to a Dual Drive RAID Configuration" on page 26).
24 Setting Up and Using Your Computer

Create a RAID level 0 volume or RAID level 1 volume only when you are adding two new drives
to an existing single-drive computer configured as a single-drive level 0 RAID array, and you
want to configure the two new drives into a RAID array.
Although any size drives may be used to create a RAID configuration using Nvidia MediaShield,
ideally the drives should be of equal size. In a RAID level 0 configuration, the size of the
configuration will be the size of the smallest drive multiplied by the number (two) of drives in
the configuration. In a RAID level 1 configuration, the size of the configuration will be the
smaller of the two drives used.
Creating a RAID Array
NOTICE: You will lose any data on your hard drives when you create a RAID configuration using the
following procedure. Back up data you want to keep before continuing.
NOTE: Do not use the following procedure to migrate an existing storage configuration to RAID level 0
configuration.
1
Enable RAID on your hard drives (see "Setting Your Hard Drives to RAID-Enabled Mode" on
page 23).
2
After rebooting your computer, launch Nvidia MediaShield.
3
Click
Create Array
in the
System Tasks
pane.
The
Create Array Wizard
appears.
4
Use the drop-down box to select
Striping
(for RAID 0) or
Mirroring
(for RAID 1).
5
Click
Next
.
6
Click to select the drives that will make up the RAID configuration.
NOTE: Your computer supports a maximum of two drives per RAID1 array and three per RAID0
array.
7
Select desired options.
NOTICE: The Clear System Data option will delete all data on the selected drive.
8
Click
Next
.
9
Click
Finish
to create the RAID configuration.
The array and any other installed hard drives should be visible in the NVRAID management
utility window.
Deleting a RAID Array
NOTE: While this procedure deletes the RAID 1 volume, it also splits the RAID 1 volume into two non-
RAID hard drives with a partition, and leaves any existing data files intact. Deleting a RAID 0 volume,
however, destroys all data on the volume.
Setting Up and Using Your Computer 25

NOTE: If your computer currently boots to RAID and you delete the RAID volume, your computer will
become unbootable.
1
Launch Nvidia MediaShield.
2
Click to select an array.
3
Click
Delete Array
in the
System Tasks
pane.
The
Delete Array Wizard
appears.
4
Click
Next
.
A confirmation screen will appear with the name and size of the array that you have marked
for deletion.
5
Click
Finish
to delete the RAID configuration.
www.dell.com | support.dell.com
Any other arrays and installed hard drives should be visible in the NVRAID management
utility window.
Morphing from a Single Drive RAID 0 Configuration to a Dual Drive RAID Configuration
Follow this procedure if you have added a new hard drive to your computer and want to
reconfigure it and your old hard drive into a RAID level 1 configuration without losing any data.
1
Launch Nvidia MediaShield.
NOTE: Select your pre-existing hard drive as your source drive (it should be the hard drive containing the
data or operating system files that you want to keep on the RAID volume).
2
Click to select an array.
3
Click
Convert Array
in the
System Tasks
pane.
The
Convert Array Wizard
appears.
4
Click
Next
.
5
Select
Mirroring
or
Striping
from the drop-down menu.
6
Click
Next
.
NOTICE: In the following step, you will lose all data contained on the target member drive.
7
Select the new hard drive by clicking the checkbox beside it.
8
Click
Finish
.
Rebuilding a Degraded RAID Level 1 Configuration
If your computer has reported a degraded RAID level 1 volume, you can manually rebuild the
computer’s redundancy mirror to a new hard drive by performing the following steps:
1
Launch Nvidia MediaShield.
2
Click
Mirroring
in the management utility window.
26 Setting Up and Using Your Computer

3
Select
Rebuild Array
in the
System Tasks
pane.
The
Rebuild Array Wizard
appears.
4
Click
Next
.
5
Click to select the hard drive that you want to rebuild.
6
Click
Finish
.
You can use your computer while the computer is rebuilding the RAID level 1 volume.
Transferring Information to a New Computer
®
®
The Microsoft
Windows
XP operating system provides a Files and Settings Transfer wizard to
move data from the source computer to the new computer. You can move data such as:
•E-mails
• Toolbar settings
• Window sizes
• Internet bookmarks
You can transfer the data to the new computer over a network or serial connection, or you can
store it on a removable medium, such as a writable CD or floppy disk.
To prepare the new computer for the file transfer:
1
Click the
Start
button, point to
All Programs
→
Accessories
→
System Tools
, and then click
Files and Settings Transfer Wizard
.
2
When the
Files and Settings Transfer Wizard
welcome screen appears, click
Next
.
3
On the
Which computer is this?
screen, click
New Computer
and click
Next
.
4
On the
Do you have a Windows XP CD?
screen, click
I will use the wizard from the
Windows XP CD
and click
Next
.
5
When the
Now go to your old computer
screen appears, go to your old or source computer.
Do not
click
Next
at this time.
To copy data from the old computer:
1
On the old computer, insert the Windows XP
Operating System
CD.
2
On the
Welcome to Microsoft Windows XP
screen, click
Perform additional tasks
.
3
Under
What do you want to do?
, click
Transfer files and settings
.
4
On the
Files and Settings Transfer Wizard
welcome screen, click
Next
.
5
On the
Which computer is this?
screen, click
Old Computer
and click
Next
.
6
On the
Select a transfer method
screen, click the transfer method you prefer.
Setting Up and Using Your Computer 27
7
On the
What do you want to transfer?
screen, select the items you want to transfer and click
Next
.
After the information has been copied, the
Completing the Collection Phase
screen appears.
8
Click
Finish
.
To transfer data to the new computer:
1
On the
Now go to your old computer
screen on the new computer, click
Next
.
2
On the
Where are the files and settings?
screen, select the method you chose for transferring
your settings and files and click
Next
.
The wizard reads the collected files and settings and applies them to your new computer.
www.dell.com | support.dell.com
When all of the settings and files have been applied, the
Finished
screen appears.
3
Click
Finished
and restart the new computer.
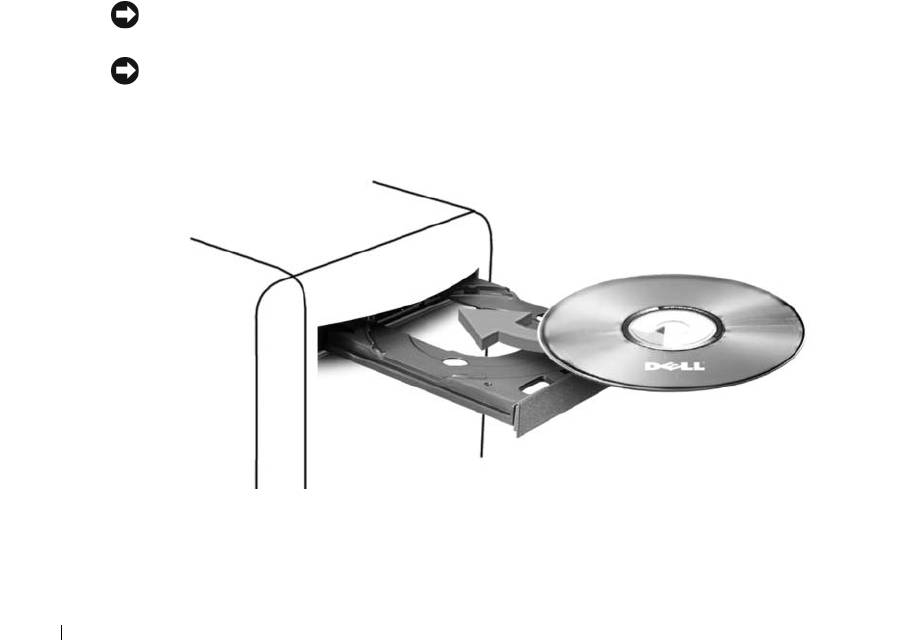
Playing CDs and DVDs
Playing a CD or DVD
NOTICE: Do not press down on the CD or DVD tray when you open or close it. Keep the tray closed when
you are not using the drive.
NOTICE: Do not move the computer when you are playing CDs or DVDs.
1
Press the eject button on the front of the drive.
2
Place the disc, label side up, in the center of the tray.
3
Press the eject button or gently push in the tray.
To format CDs for storing data, to create music CDs, or to copy CDs, see the CD software that
came with your computer.
28 Setting Up and Using Your Computer
NOTE: Ensure that you follow all copyright laws when you create CDs.
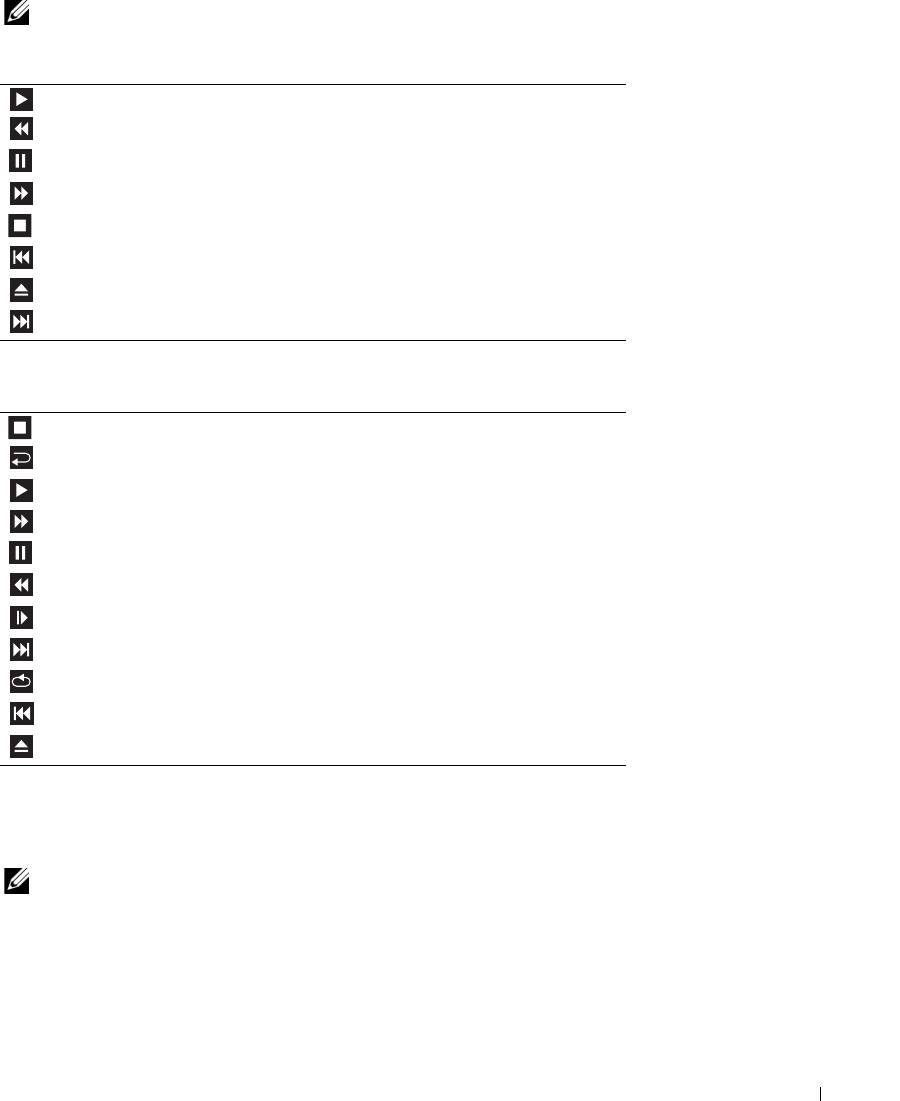
A CD player includes the following basic buttons:
Play
Move backward within the current track
Pause
Move forward within the current track
Stop
Go to the previous track
Eject
Go to the next track
A DVD player includes the following basic buttons:
Stop
Restart the current chapter
Play
Fast forward
Pause
Fast reverse
Advance a single frame while in pause mode
Go to the next title or chapter
Continuously play the current title or chapter
Go to the previous title or chapter
Eject
For more information on playing CDs or DVDs, click Help on the CD or DVD player (if available).
Adjusting the Volume
NOTE: When the speakers are muted, you do not hear the CD or DVD playing.
1
Click the
Start
button, point to
All Programs
→
Accessories
→
Entertainment
, and then click
Volume Control
.
2
In the
Volume Control
window, click and drag the bar in the
Volume Control
column and
slide it up or down to increase or decrease the volume.
For more information on volume control options, click Help in the Volume Control window.
Setting Up and Using Your Computer 29

Adjusting the Picture
If an error message notifies you that the current resolution and color depth are using too much
memory and preventing DVD playback, adjust the display properties.
1
Click the
Start
button and click
Control Panel
.
2
Under
Pick a category
, click
Appearance and Themes
.
3
Under
Pick a task...
, click
Change the screen resolution
.
4
In the
Display Properties
window, click and drag the bar in
Screen resolution
to change the
setting to
800 by 600 pixels
.
5
Click the drop-down menu under
Color quality
, and then click
Medium (16 bit)
.
6
Click
OK
.
www.dell.com | support.dell.com
Copying CDs and DVDs
NOTE: Ensure that you observe all copyright laws when creating CDs or DVDs.
This section applies only to computers that have a CD-RW, DVD+/-RW, or CD-RW/DVD
(combo) drive.
NOTE: The types of CD or DVD drives offered by Dell™ may vary by country.
The following instructions explain how to make an exact copy of a CD or DVD. You can also use
Sonic DigitalMedia for other purposes, such as creating music CDs from audio files stored on
your computer or backing up important data. For help, open Sonic DigitalMedia and then click
the question mark icon in the upper-right corner of the window.
How to Copy a CD or DVD
NOTE: CD-RW/DVD combo drives cannot write to DVD media. If you have a CD-RW/DVD combo drive
and you experience recording problems, check for available software patches on the Sonic support
website at www.sonic.com.
The DVD-writable drives installed in Dell computers can write to and read DVD+/-R,
DVD+/-RW and DVD+R DL (dual layer) media, but cannot write to and may not read
DVD-RAM or DVD-R DL media.
NOTE: Most commercial DVDs have copyright protection and cannot be copied using Sonic
DigitalMedia.
1
Click the
Start
button, point to
All Programs
→
Sonic
→
DigitalMedia Projects
, and then
click
Copy
.
2
Under the
Copy
tab, click
Disc Copy
.
30 Setting Up and Using Your Computer

3
To copy the CD or DVD:
•
If you have one CD or DVD drive
, ensure that the settings are correct and click the
Disc
Copy
button. The computer reads your source CD or DVD and copies the data to a
temporary folder on your computer hard drive.
When prompted, insert a blank CD or DVD into the drive and click
OK
.
•
If you have two CD or DVD drives
, select the drive into which you have inserted your
source CD or DVD and click the
Disc
Copy
button. The computer copies the data from
the source CD or DVD to the blank CD or DVD.
Once you have finished copying the source CD or DVD, the CD or DVD that you have
created automatically ejects.
Using Blank CDs and DVDs
CD-RW drives can write to CD recording media only (including high-speed CD-RW) while
DVD-writable drives can write to both CD and DVD recording media.
Use blank CD-Rs to record music or permanently store data files. After creating a CD-R, you
cannot write to that CD-R again (see the Sonic documentation for more information). Use
blank CD-RWs to write to CDs or to erase, rewrite, or update data on CDs.
Blank DVD+/-Rs can be used to permanently store large amounts of information. After you
create a DVD+/-R disc, you may not be able to write to that disc again if the disc is "finalized" or
"closed" during the final stage of the disc creation process. Use blank DVD+/-RWs if you plan
to erase, rewrite, or update information on that disc later.
CD-Writable Drives
Media Type Read Write Rewritable
CD-R Yes Yes No
CD-RW Yes Yes Yes
DVD-Writable Drives
Media Type Read Write Rewritable
CD-R Yes Yes No
CD-RW Yes Yes Yes
DVD+R Yes Yes No
DVD-R Yes Yes No
DVD+RW Yes Yes Yes
DVD-RW Yes Yes Yes
DVD+R DL Yes Yes No
Setting Up and Using Your Computer 31

Media Type Read Write Rewritable
DVD-R DL Maybe No No
DVD-RAM Maybe No No
Helpful Tips
®
®
• Use Microsoft
Windows
Explorer to drag and drop files to a CD-R or CD-RW only after
you start Sonic DigitalMedia and open a DigitalMedia project.
• Use CD-Rs to burn music CDs that you want to play in regular stereos. CD-RWs do not play
in most home or car stereos.
• You cannot create audio DVDs with Sonic DigitalMedia.
www.dell.com | support.dell.com
• Music MP3 files can be played only on MP3 players or on computers that have MP3 software
installed.
• Commercially available DVD players used in home theater systems may not support all
available DVD formats. For a list of formats supported by your DVD player, see the
documentation provided with your DVD player or contact the manufacturer.
• Do not burn a blank CD-R or CD-RW to its maximum capacity; for example, do not copy a
650-MB file to a blank 650-MB CD. The CD-RW drive needs 1–2 MB of the blank space to
finalize the recording.
• Use a blank CD-RW to practice CD recording until you are familiar with CD recording
techniques. If you make a mistake, you can erase the data on the CD-RW and try again. You
can also use blank CD-RWs to test music file projects before you record the project
permanently to a blank CD-R.
• See the Sonic website at
www.sonic.com
for additional information.
Network Setup Wizard
®
®
The Microsoft
Windows
XP operating system provides a Network Setup Wizard to guide you
through the process of sharing files, printers, or an Internet connection between computers in a
home or small office.
1
Click the
Start
button, point to
All Programs
→
Accessories
→
Communications
, and then
click
Network Setup Wizard
.
2
On the welcome screen, click
Next
.
3
Click
Checklist for creating a network
.
NOTE: Selecting the connection method This computer connects directly to the Internet enables the
integrated firewall provided with Windows XP SP1.
4
Complete the checklist and required preparations.
Return to the Network Setup Wizard and follow the instructions on the screen.
32 Setting Up and Using Your Computer

Power Management
Overview
®
®
The Microsoft
Windows
XP power management features can reduce the amount of
electricity your computer uses when it is on and you are not using it. You can reduce power to
just the monitor or the hard drive, or you can use standby mode or hibernate mode to reduce
power to the entire computer. When the computer exits from a power conservation mode, the
Windows desktop is restored to the state it was in before it entered the mode.
NOTE: Windows XP Professional includes security and networking features not available in
Windows XP Home Edition. When a Windows XP Professional computer is connected to a network,
different options related to security and networking appear in certain windows.
NOTE: Depending on your operating system, the procedures to activate the standby and hibernate
modes may be different.
Standby Mode
Standby mode conserves power by turning off the display and the hard drive after a time-out.
When the computer exits from standby mode, it returns to the operating state it was in before it
entered standby mode.
To set standby mode to automatically activate after a defined period of inactivity:
1
Click the
Start
button and click
Control Panel
.
2
Under
Pick a category
, click
Performance and Maintenance
.
3
Under
or pick a Control Panel icon
, click
Power Options
.
To immediately activate standby mode without a period of inactivity, click the Start button,
click Turn Off Computer, and then click Stand by.
To exit from standby mode, press a key on the keyboard or move the mouse.
NOTICE: If your computer loses power while in standby mode, it may lose data.
Hibernate Mode
Hibernate mode conserves power by copying system data to a reserved area on the hard drive
and then completely turning off the computer. When the computer exits from hibernate mode,
the desktop is restored to the state it was in
before it entered hibernate mode.
To activate hibernate mode:
1
Click the
Start
button and click
Control Panel
.
2
Under
Pick a category
, click
Performance and Maintenance
.
3
Under
or pick a Control Panel icon
, click
Power Options
.
4
Define your hibernate settings on the
Power Schemes
tab,
Advanced
tab, and
Hibernate
tab.
Setting Up and Using Your Computer 33

To exit from hibernate mode, press the power button. The computer may take a short time to
exit from hibernate mode. Pressing a key on the keyboard or moving the mouse does not bring
the computer out of hibernation, because the keyboard and the mouse do not function when
the computer is in hibernate mode.
Because hibernate mode requires a special file on your hard drive with enough disk space to
store the contents of the computer memory, Dell creates an appropriately sized hibernate mode
file before shipping the computer to you. If the computer’s hard drive becomes corrupted,
Windows XP recreates the hibernate file automatically.
Power Options Properties
Define your standby mode settings, hibernate mode settings, and other power settings in the
www.dell.com | support.dell.com
Power Options Properties window.
To access the Power Options Properties window:
1
Click the
Start
button and click
Control Panel
.
2
Under
Pick a category
, click
Performance and Maintenance
.
3
Under
or pick a Control Panel icon
, click
Power Options
.
4
Define your power settings on the
Power Schemes
tab,
Advanced
tab, and
Hibernate
tab.
Power Schemes Tab
Each standard power setting is called a scheme. If you want to select one of the standard
Windows schemes installed on your computer, choose a scheme from the Power schemes drop-
down menu. The settings for each scheme appear in the fields below the scheme name. Each
scheme has different settings for starting standby mode or hibernate mode, turning off the
monitor, and turning off the hard drive.
The Power schemes drop-down menu displays the following schemes:
•
Always On
(default) — If you want to use your computer with no power conservation.
•
Home/Office Desk
— If you use your computer as a home or office computer and you require
minimal power conservation.
•
Portable/Laptop
— If your computer is a portable computer that you use for traveling.
•
Presentation
— If you want your computer to run without interruption (using no power
conservation).
•
Minimal Power Management
— If you want your computer to run with minimal power
conservation.
•
Max Battery
— If your computer is a portable computer and you run your computer from
batteries for extended periods of time.
34 Setting Up and Using Your Computer

If you want to change the default settings for a scheme, click the drop-down menu in the Tu rn
off monitor, Turn off hard disks, System stand by, or System hibernates field, and then select a
time-out from the displayed list. Changing the time-out for a scheme field permanently changes
the default settings for that scheme, unless you click Save As and enter a new name for the
changed scheme.
NOTICE: If you set the hard drive to time-out before the monitor does, your computer may appear to be
locked up. To recover, press any key on the keyboard or click the mouse. To avoid this problem, always
set the monitor to time-out before the hard drive.
Advanced Tab
The Advanced tab allows you to:
• Place the power options icon in the Windows taskbar for quick access.
• Set the computer to prompt you for your Windows password before the computer exits from
standby mode or hibernate mode.
• Program the power button to activate standby mode, activate hibernate mode, or turn off the
computer.
To program these functions, click an option from the corresponding drop-down menu and
click OK.
Hibernate Tab
The Hibernate tab allows you to enable hibernate mode. If you want to use the hibernate
settings you defined on the Power Schemes tab, click the Enable hibernate support check box
on the Hibernate tab.
For more information on power management options:
1
Click the
Start
button and click
Help and Support
.
2
In the
Help and Support
window, click
Performance and maintenance
.
3
In the
Performance and maintenance
window, click
Conserving power on your computer
.
Setting Up and Using Your Computer 35

www.dell.com | support.dell.com
36 Setting Up and Using Your Computer
Оглавление
- Contents
- Setting Up and Using Your Computer
- Optimizing Performance
- Solving Problems
- Advanced Troubleshooting
- Removing and Installing Parts
- Appendix
- Index
