Brother JS 23 – страница 2
Инструкция к Швейной Машиной Brother JS 23
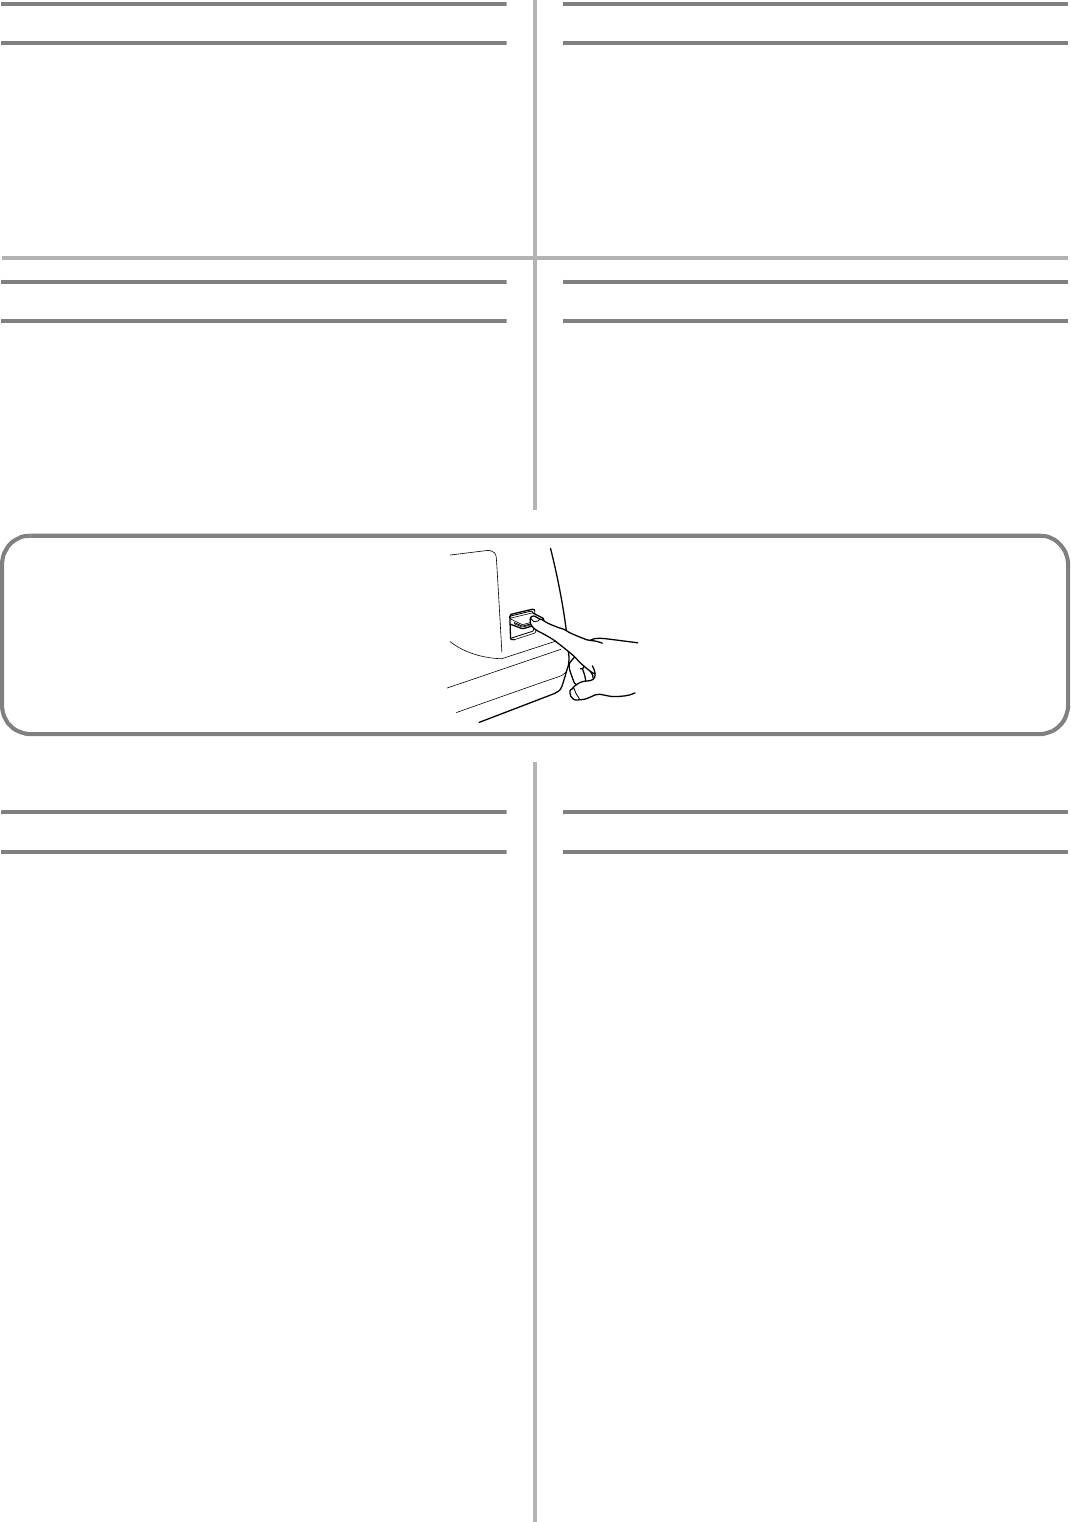
Reverse Sewing Lever
Levier de couture en marche arrière
To sew in reverse, press down the reverse sewing lever as far as
Pour coudre en arrière, abaisser au maximum le levier de couture
possible and hold it in that position while lightly stepping on the
en marche arrière, et le maintenir dans cette position tout en
foot controller. To sew forward, release the reverse sewing lever.
appuyant légèrement sur la pédale. Pour coudre à nouveau vers
Reverse sewing is used for locking and reinforcing seams.
l’avant, relâcher le levier. Utiliser la couture en marche arrière
pour arrêter ou renforcer une couture.
Palanca de retroceso
Клавиша шитья в обратном направлении
Para coser hacia atrás, baje completamente la palanca de retroceso y
Для шитья в обратном направлении нажмите до упора
manténgala en esa posición mientras presiona ligeramente el pedal.
клавишу шитья в обратном направлении и удерживайте ее в
Para volver a coser hacia adelante, vuelva a subir la palanca de
данном положении, слегка нажимая в это время на педаль.
retroceso. La costura hacia atrás se usa para terminar y reforzar
Для шитья в прямом направлении отпустите клавишу шитья в
costuras.
обратном направлении. Шитьё в обратном направлении
используется для закрепления и усиления швов.
THREADING THE MACHINE
ENFILAGE DE LA MACHINE
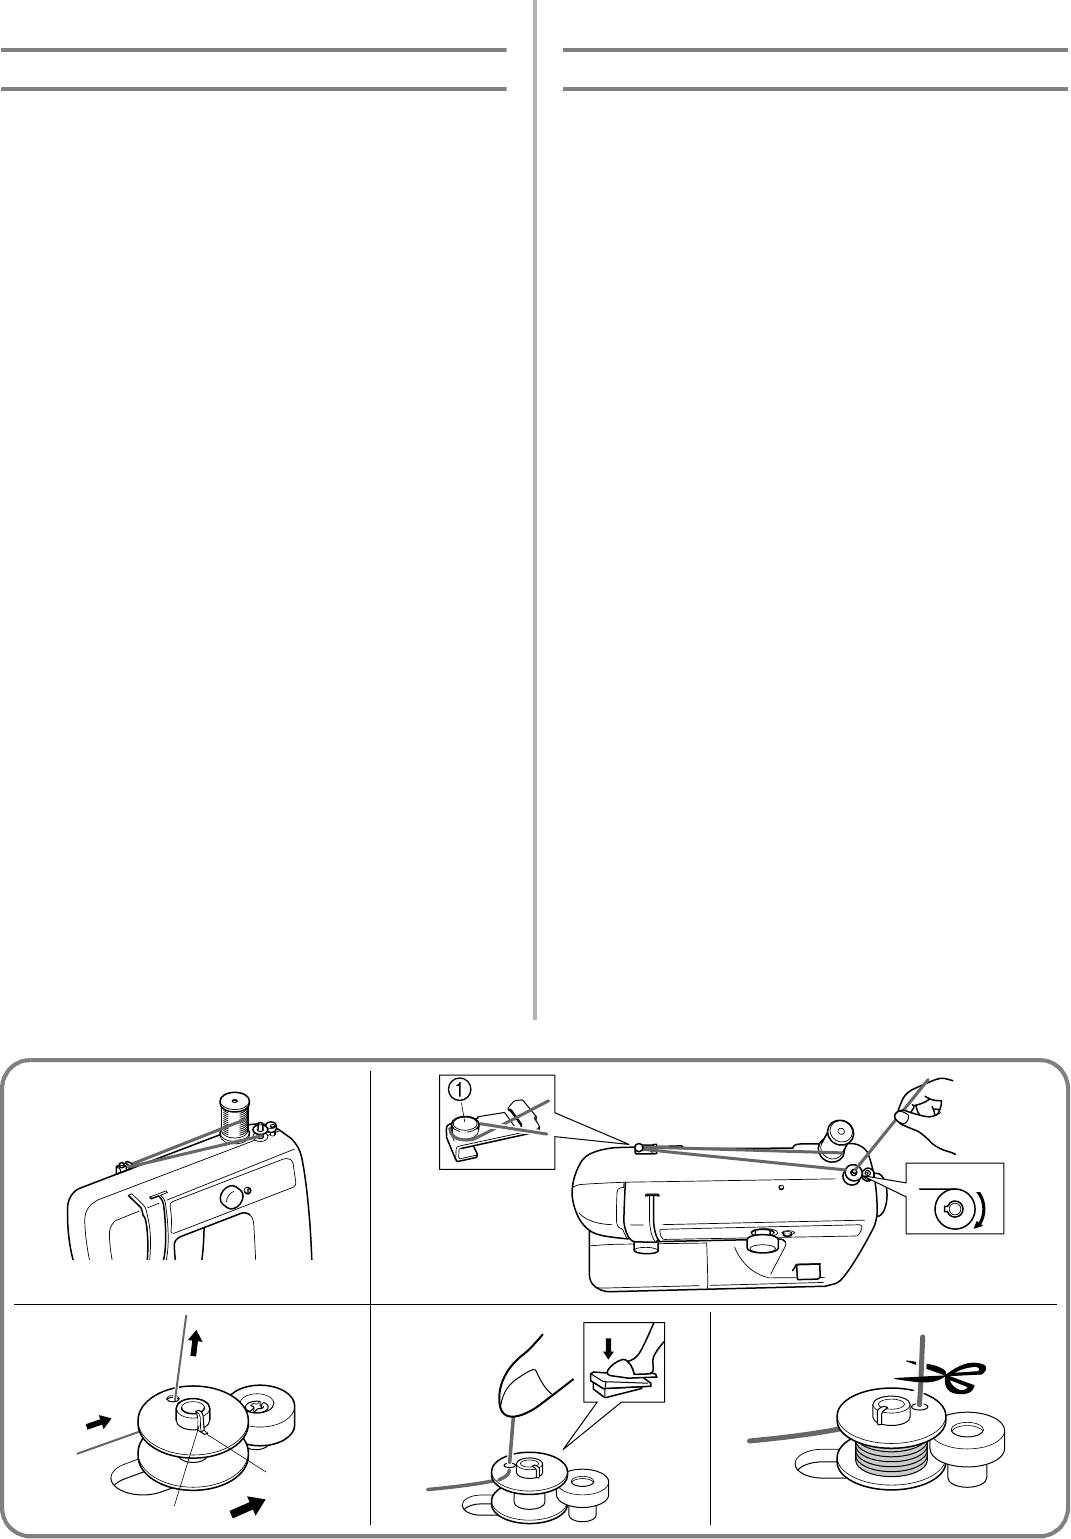
Winding the Bobbin
Remplissage de la canette
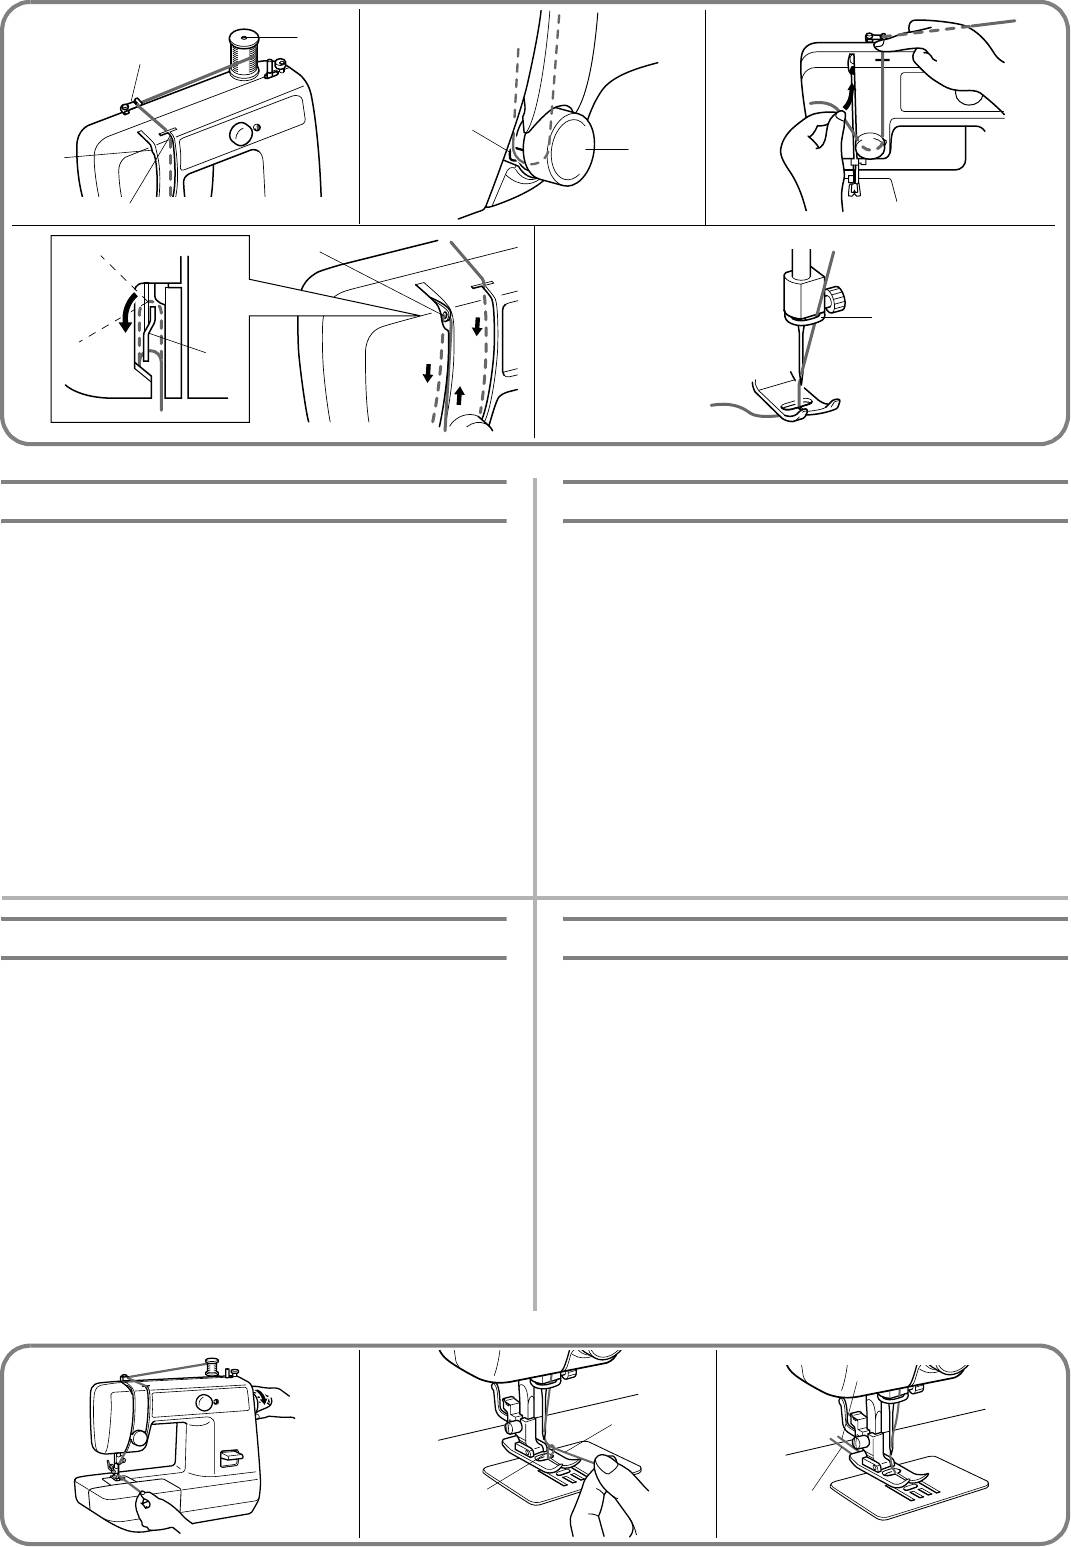
1. Place the spool of thread on the spool pin and pass the thread
1. Placer la bobine de fil sur le porte-bobine et faire passer le fil
around the bobbin winding tension disc.
par le disque de tension du dévidoir.
a Bobbin winding tension disc
a Disque de tension du dévidoir
b Bobbin winding
b Remplissage de la canette
2. Pass the end of the thread through the hole in the bobbin from
2. Passer l’extrémité du fil dans l’orifice de la canette, par
the inside.
l’intérieur.
2. Place the bobbin onto the bobbin winding shaft and slide the
3. Placer la canette sur le dévidoir et glisser celui-ci vers le
shaft to the right. Turn the bobbin clockwise, by hand, until
droite. Tourner la canette dans le sens des aiguilles d’une
the spring on the shaft slides into the slit on the bobbin.
montre, à la main, jusqu’à ce que le ressort de la broche se
c Spring
place dans la rainure de la canette.
d Slit
c Ressort
4. While holding the end of the thread, gently press on the foot
d Rainure
controller to wind the thread around the bobbin a few times,
4. Tout en tenant l’extrémité du fil, appuyer doucement sur la
then stop the machine.
pédale pour enrouler le fil autour de la canette. Arrêter la
3. Trim the excess thread sticking out from the top of the bobbin
machine au bout de quelques tours.
and continue winding the thread onto the bobbin by pressing
5. Couper le bout de fil dépassant au-dessus de la canette puis
down on the foot controller.
continuer à enrouler le fil sur la canette en appuyant sur la
pédale du rhéostat.
NOTE:
The machine stops automatically when the bobbin is full.
REMARQUE:
La machine s’arrête automatiquement lorsque la canette est pleine.
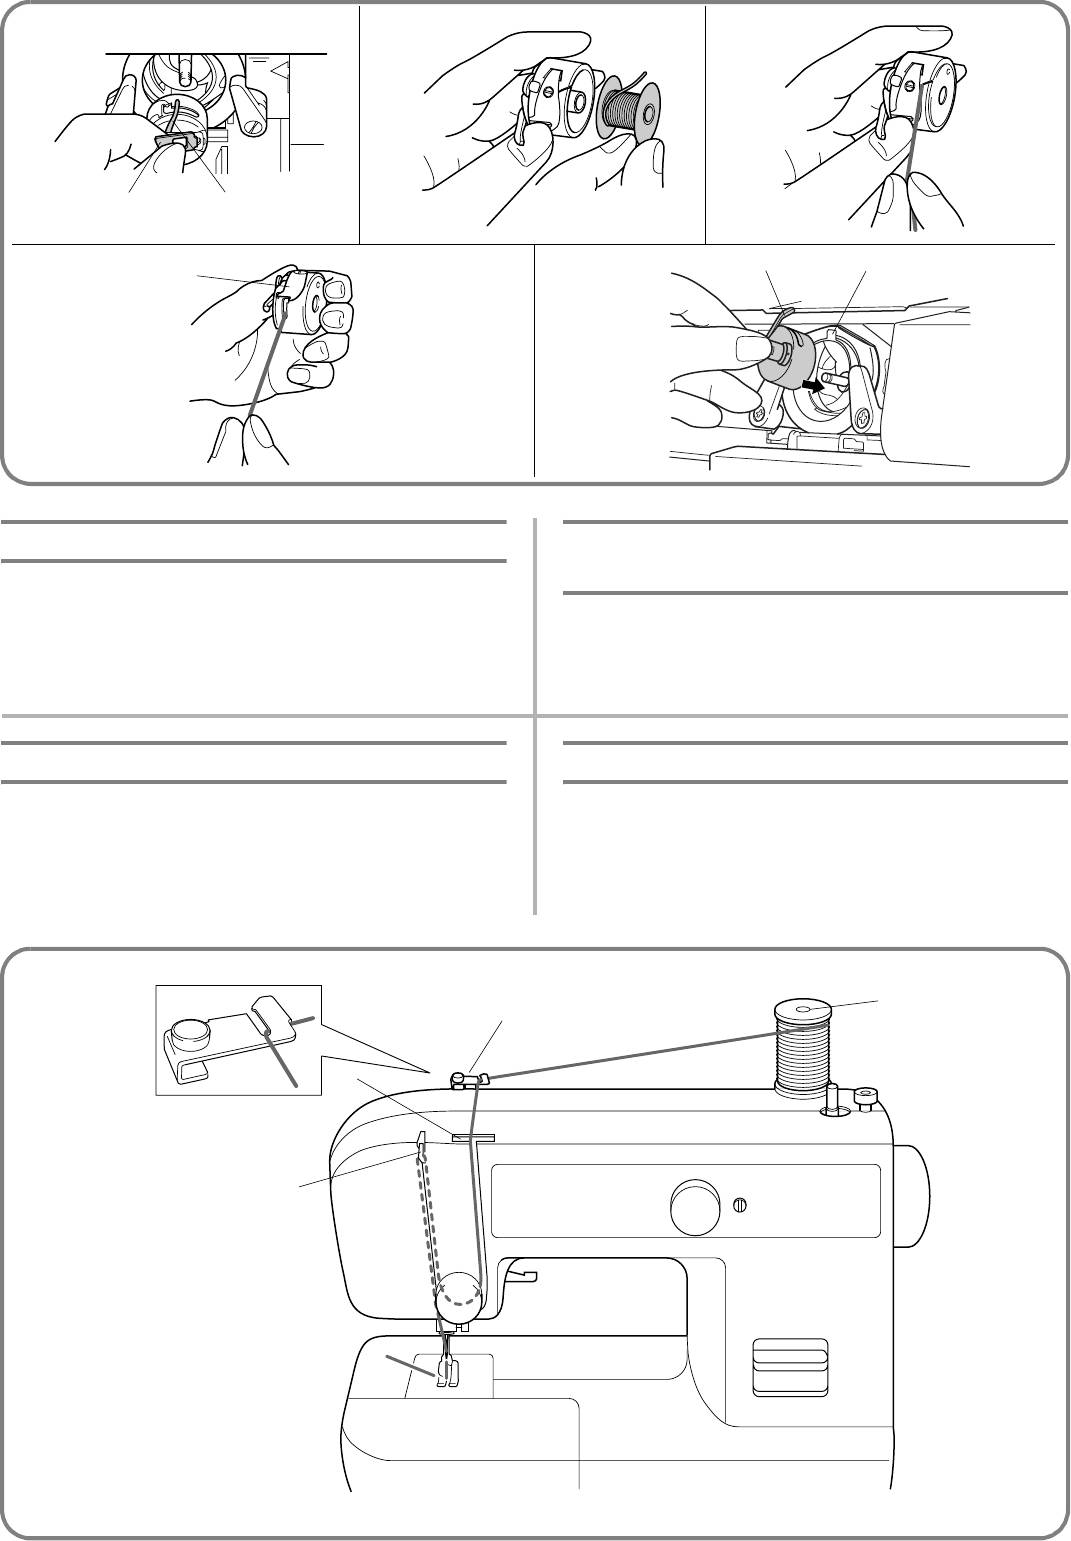
6. When the machine stops, cut the thread between bobbin and
6. Lorsque la machine s’arrête, couper le fil entre la canette et la
spool, push the shaft to the left and remove the full bobbin
bobine, pousser le dévidoir vers la gauche et en retirer la
from the shaft.
canette pleine.
CAUTION:
PRECAUTION:
Although the needle bar does not move when the bobbin
Bien que la barre à aiguille ne fonctionne pas lorsque la broche
winding shaft is slid toward the bobbin presser, the balance
du dévidoir est glissée pour maintenir la canette, le volant à main
wheel will continue to turn. Therefore, do not touch the balance
va continuer à tourner. Dès lors, éviter de toucher le volant lors
wheel while the bobbin is being wound.
du remplissage de la canette.
12
ENHEBRADO DE LA MÁQUINA
ЗАПРАВКА НИТИ В МАШИНУ
Bobinado de la canilla
Намотка шпульки
1. Coloque un carrete de hilo en el porta carretes y pase el hilo por el
1. Установите катушку с нитью на предназначенный для нее
disco de tensión de bobinado de la canilla
стержень и проведите нить вокруг регулятора натяжения
a Disco de tensión de bobinado de la canilla
нити при намотке на шпульку.
b Bobinado de la canilla
a Регулятор натяжения нити при намотке на шпульку
2. Pase el extremo del hilo por el orificio de la canilla a partir del
b Намотка шпулек
interior.
2. Пропустите конец нити сквозь отверстие в шпульке с
3. Coloque la canilla en el eje de bobinado y deslice dicho eje hacia
внутренней ее стороны.
la derecha. Gire la canilla con la mano en el sentido de las
3. Установите шпульку на вал устройства намотки и сдвиньте
manillas de un reloj, hasta que el muelle impulsor del eje se
вал вправо. Вручную вращайте шпульку по часовой
deslice dentro de la ranura de la canilla.
стрелке до тех пор, пока пружина на валу не попадет в
c Muelle
предназначенный для нее паз на шпульке.
d Ranura
c Пружина
4. Sujetando el extremo del hilo, presione suavemente el pedal para
d Паз
que el hilo dé un par de vueltas alrededor de la canilla y pare la
4. Удерживая конец нити, плавно нажмите на педаль, чтобы
máquina.
несколько оборотов нити намотались на шпульку. Затем
5. Deshaga el exceso de hilo arriba de la canilla. Siga bobinando el
остановите машину.
hilo en la canilla presionando el pedal.
5. Обрежьте излишек нити над шпулькой и, нажимая на
педаль, продолжите намотку нити на шпульку.
NOTA:
La máquina se para automáticamente cuando la canilla está llena.
ПРИМЕЧАНИЕ:
6. Cuando la máquina se pare, corte el hilo entre la canilla y el
Когда шпулька заполняется нитью, машина автоматически
carrete, empuje el eje hacia la izquierda y retire la canilla llena
останавливается.
del eje.
1. После остановки машины разрежьте нить между шпулькой
и катушкой, сдвиньте вал влево и снимите намотанную
ATENCIÓN:
шпульку с вала.
Aunque la barra de la aguja no se desplaza cuando el eje de bobinado
de la canilla está empujado hacia el apretador de canilla, la
ВНИМАНИЕ:
ruedecilla va a seguir girando. Por lo tanto, no se puede tocarla
Когда вал устройства намотки шпульки сдвинут в сторону
mientras la canilla está bobinando.
прижимного ролика, игловодитель неподвижен, но маховик
продолжает вращаться. Поэтому не прикасайтесь к маховику
во время намотки шпульки.
2
4
3
13
Lower (bobbin) Threading
Mise en place du fil inférieur (canette)
Turn power switch to “O”.
Mettre l’interrupteur principal sur “O”.
1. Raise the needle to its highest position by turning the balance
1. Remonter complètement l’aiguille en tournant le volant vers
wheel toward you (counterclockwise) and raise the presser
soi (dans le sens opposé aux aiguilles d’une montre) et relever
foot lifter.
le levier du pied-de-biche.
2. Open the shuttle cover behind the extension table on the front
2. Ouvrir le couvercle de la navette, derrière la table
of the machine and remove the bobbin case by pulling its
d’extension, à l’avant de la machine, et retirer le boîtier de la
latch toward you and pulling it out from the shuttle race (fig.
canette en tirant la languette métallique vers soi pour le sortir
A).
de la coursière. (fig. A)
3. Unwind about 10 cm (4") of thread from a full bobbin and
3. Dévider environ 10 cm de fil de la canette pleine et insérer la
insert the bobbin into the bobbin case. (See fig. B-1.) Pull the
canette dans le boîtier (voir fig. B-1). Faire passer le fil qui
trailing thread into the slot, down and to the left, as shown in
dépasse dans la fente, en bas et vers la gauche, comme illustré
fig. B-2, until it enters the delivery eye under the tension
sur la fig. B-2, jusqu’à ce qu’il s’insère dans l’orifice de sortie
spring (fig. B-3).
sous le ressort de tension (fig.B-3).
4. Holding the bobbin case by the latch, fully insert the bobbin
4. Tout en tenant le boîtier par le loquet métallique, l’enfoncer à
case into the shuttle race and release the latch. Make sure the
fond dans la navette et relâcher la languette métallique. Bien
bobbin case finger fits into the notch at the top of the race as
veiller à ce que la languette métallique du boîtier s’introduise
shown in fig. C.
dans l’encoche en haut de la glissière, comme le montre la
fig. C ci-dessous.
NOTE:
If the bobbin case is not properly placed back into the machine, it
REMARQUE:
will fall out from the shuttle immediately after starting to sew.
Si le boîtier n’est pas placé correctement, il va s’échapper de la
a Bobbin case latch
navette dès qu’on commence à coudre.
b Bobbin case finger
a Loquet du boîtier
c Tension spring
b Languette du boîtier
d Notch
c Ressort tenseur
d Encoche
Enhebrado inferior (de la canilla)
Заправка нижней нити (шпульки)
Coloque el interruptor principal en “O”.
Переведите сетевой выключатель в положение «О»
1. Levante la aguja a su posición más alta, girando la ruedecilla
1. Поднимите иглу в крайнее верхнее положение, повернув
hacia usted (en el sentido contrario al de las manecillas de un
маховик на себя (против часовой стрелки), затем
reloj) y levante la palanca del prensatelas.
поднимите рычаг прижимной лапки.
2. Abra la tapa del soporte para accesorios, en la parte delantera de
2. Откройте крышку челночного устройства за столиком*
la máquina, y retire el portacanillas de la máquina, tirando la uña
приставкой с передней стороны машины, извлеките
metálica (pestillo) hacia usted y sacándola de la lanzadera (fig.
шпульный колпачок, потянув его защелку на себя и
A).
извлекая его из челнока (рис. A).
3. Tire unos 10 cm (4") de hilo de una canilla llena e inserte la
3. Отмотайте приблизительно 10 см нити с полностью
canilla en el portacanillas. (Véase fig. B-1.) Tire del hilo suelto y
намотанной шпульки и вставьте шпульку в шпульный
páselo por la hendidura, abajo y hacia la izquierda, tal como se
колпачок. (См. рис. B1.) Проденьте отмотанный конец
indica en la fig. B-2, hasta que quepa dentro del fleja de presión.
нити в щель, затем вниз и влево, как показано на рис. B2,
(fig. B-3).
до тех пор, пока нить не попадет в отверстие под пружиной
4. Sujetando el portacanillas por la uña metálica, introdúzcalo en la
регулировки натяжения (рис. B3).
lanzadera y suelte el pestillo. Asegúrese de que la uñeta metálica
4. Держа шпульный колпачок за защелку, вставьте его до
del portacanillas se encaje en la ranura arriba tal como se indica
упора в челнок, после чего отпустите защелку. Следите за
en la fig. C a continuación.
тем, чтобы палец шпульного колпачка вошел в
предназначенный для него паз в верхней части челнока,
NOTA:
как показано на рис. C.
Si el portacanillas no se encuentra bien colocado en la máquina, se
saldrá de su alojamiento inmediatamente después de empezar a coser.
ПРИМЕЧАНИЕ:
a Pestillo del portacanillas
Если неправильно вставить шпульный колпачок в машину, то
b Uñeta del portacanillas
сразу после начала шитья он выпадет из челнока.
c Resorte tensor
a Защелка шпульного колпачка
d Hendidura
b Палец шпульного колпачка
c Пружина регулировки натяжения нити
d Паз
14
AB-1B-2
1
2
24
3
C
B-3
Upper (Needle) Threading Mise en place du fil supérieur
(fil de l’aiguille)
Enhebrado superior (de la aguja) Заправка верхней нити (в иглу)
1
2
3
4
15

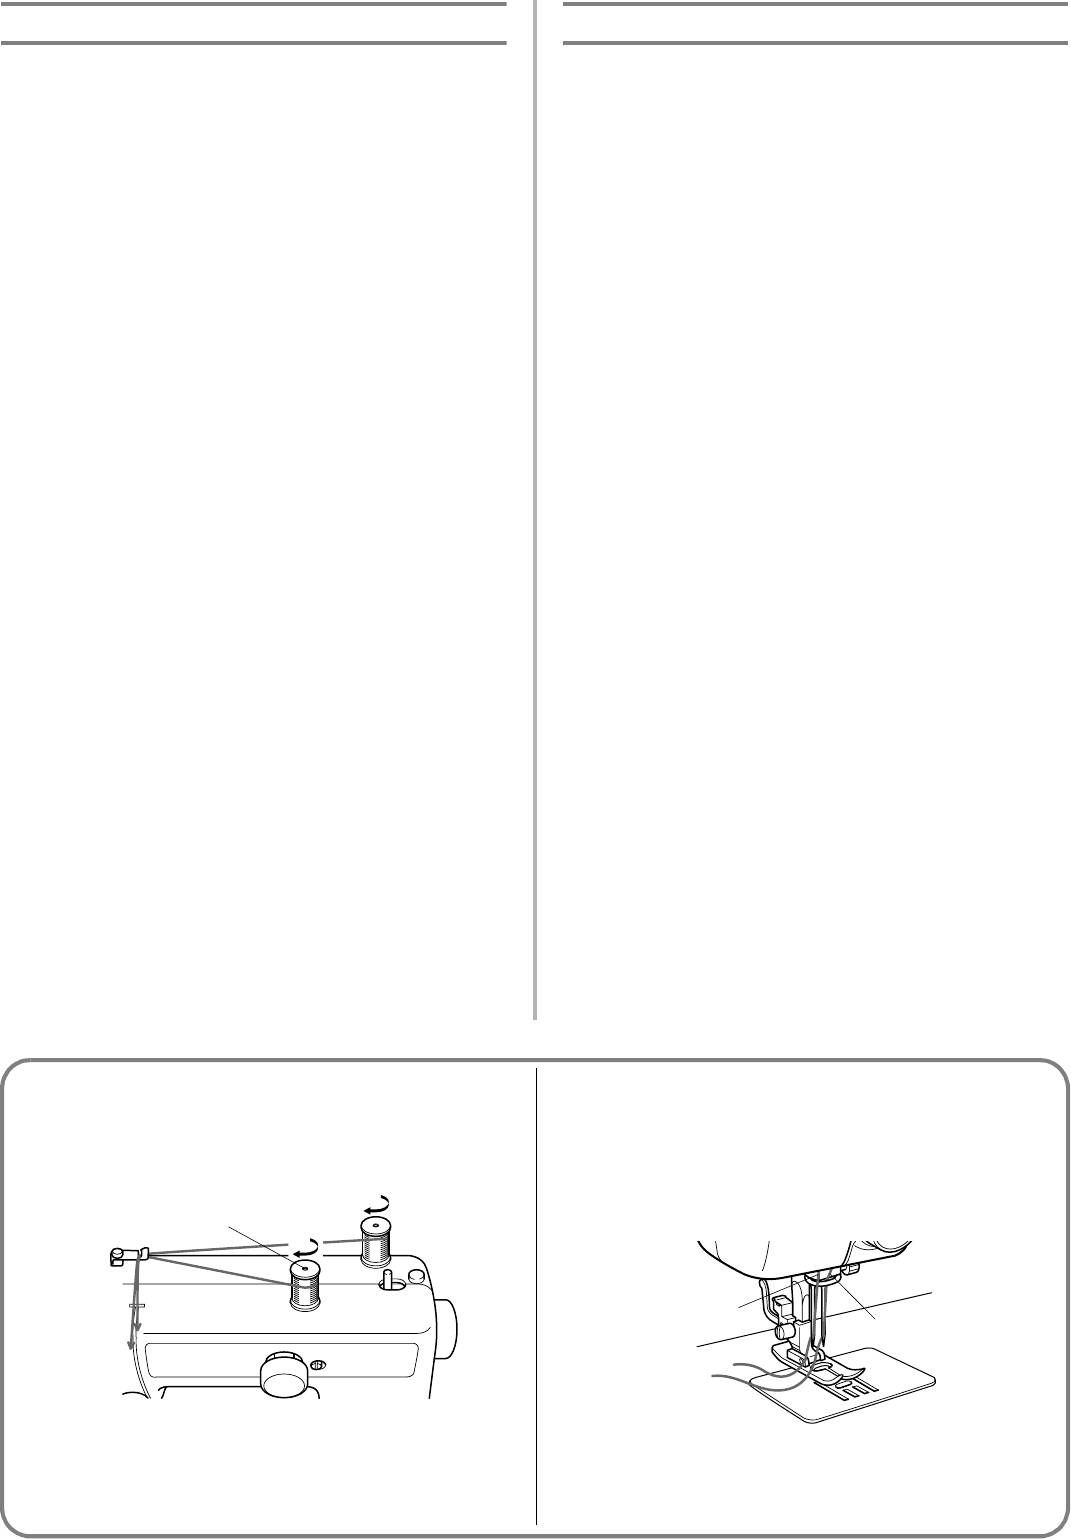
1. Raise the presser foot using the presser foot lifter and turn the
1. Lever le pied-de-biche à l’aide du levier correspondant et
balance wheel toward you (counterclockwise) to raise the
tourner le volant à main vers soi (dans le sens contraire aux
thread take-up lever to its highest position.
aiguilles d’une montre) pour remonter complètement le levier
2. Pull up the spool pin and place a spool of thread on this pin.
releveur.
3. Pass the thread through both thread guides: the rear one first,
2. Lever le porte-bobine et y placer une bobine de fil.
then the front one. (fig. A)
3. Faire passer le fil par les deux guide-fils: d’abord l’arrière puis
a Spool pin
l’avant. (fig. A)
b Thread guide (rear)
a Porte-bobine
c Thread guide (front)
b Guide-fils (arrière)
d Thread take-up lever
c Guide-fils (avant)
4. Pull the thread down and around the upper tension control
d Levier releveur de fil
dial from the right to the left so the thread picks up the thread
4. Tirer le fil vers le bas et le faire passer par le disque de
check spring. (See fig. B.) While holding the thread as shown
contrôle de tension supérieure de droite à gauche afin que le
in fig. C, pull it between the tension discs.
fil attrape le ressort de vérification (voir fig. B). Tirer le fil entre
e Upper tension control dial
les disques de tension, tout en le tenant comme le montre la
f Thread check spring
fig. C.
5. Guide the thread to the back of the thread take-up lever and
e Disque de tension du fil
around to the left (fig. D). Bring the thread through the slit by
f Ressort de vérification du fil
pulling it toward you and into the eyelet.
5. Guider le fil vers l’arrière du levier releveur puis autour vers la
g Thread take-up lever
gauche (fig. D). Amener le fil vers la fente en le tirant vers soi
6. Bring the thread down and pass it behind the thread guide.
et le faire passer par le chas.
h Thread guide
g Levier releveur
7. Thread the needle from front to back and pull out about 5 cm
6. Tirer le fil vers le bas et le faire passer derrière le guide-fils.
(2") of thread as shown in fig. E.
h Guide-fils
7. Enfiler l’aiguille de l’avant vers l’arrière et tirer environ 5 cm
NOTE:
(2") de fil comme le montre la fig. E.
If the thread is incorrectly fed, the thread may break, cause
stitches to be skipped or cause the fabric to wrinkle.
REMARQUE:
Si le fil n’est pas installé correctement, il peut se rompre, causer
des sauts de points ou des fronces dans le tissu.
1. Levante el prensatelas con la palanca y gire la ruedecilla hacia
1. Поднимите рычаг прижимной лапки, пользуясь
usted (en el sentido contrario al de las manecillas de un reloj)
соответствующим рычагом, и поверните маховик на себя
para subir la palanca tirahilos a su posición más alta.
(против часовой стрелки), чтобы поднять рычаг
2. Levante el porta carretes y coloque un carrete en el eje.
нитепритягивателя в крайнее верхнее положение.
3. Pase el hilo a través de ambas guías: la de atrás primero y luego la
2. Выяните вверх стержень для катушки и наденьте на него
de delante. (fig. A)
катушку с нитью.
a Porta carretes
3. Пропустите нить через оба нитенаправителя: сначала через
b Guía hilo (trasera)
задний, а потом через передний. (рис. A.)
c Guía hilo (delantera)
a Стержень для установки катушки
d Palanca tirahilos
b Нитенаправитель (задний)
4. Tire del hilo hacia abajo, pasando por el disco de control de la
c Нитенаправитель (передний)
tensión superior de derecha a izquierda de tal forma que el hilo
d Рычаг нитепритягивателя
enganche el resorte de comprobación del hilo. (Véase fig. B).
4. Протяните нить вниз и вокруг регулятора натяжения
Mientras sujeta el hilo tal como indica la fig. C, páselo por los
верхней нити справа налево так, чтобы нить зацепила
discos de tensión.
ограничительную пружину. (См. рис. B.) Придерживая
e Disco de tensión del hilo
нить, как показано на рис. C, протяните ее между
f Resorte de comprobación del hilo.
натяжными дисками.
5. Guíe el hilo por detrás de la palanca tirahilos y por la izquierda
e Дисковый регулятор натяжения верхней нити
(fig. D). Lleve el hilo por la ranura, tirándolo hacia usted y
f Ограничительная пружина
pasándolo por el agujero.
5. Направьте нить к задней части рычага нитепритягивателя
g Palanca tirahilos
и далее вокруг него справа налево. Проведите нить через
6. Baje el hilo y páselo por detrás de la guía.
прорезь, вытянув ее на себя, до попадания ее в ушко
h Guía
нитепритягивателя (cм. рис. D.).
7. Enhebre la aguja de delante hacia atrás y saque unos 5 cm (2") de
g Рычаг нитепритягивателя
hilo tal como indica la fig. E.
6. Опустите нить вниз и проведите ее за нитенаправителем.
h Нитенаправитель
NOTA:
7. Заправьте нить в ушко иголки спереди назад и вытяните
Si el hilo está mal enhebrado, puede romperse, saltar puntadas o
около 5 см нити, как показано на рис. E.
fruncir el tejido.
ПРИМЕЧАНИЕ:
Если нить заправлена неправильно, она может оборваться, а
также могут пропускаться стежки или морщиться ткань.
16
A
CB
1
2
6
5
4
3
D
7
E
8
7
Drawing Up Lower (bobbin) Thread
Remontée du fil inférieur (canette)
1. Raise the presser foot and the needle to their highest positions.
1. Lever au maximum le pied-de-biche et l’aiguille.
2. With your left hand, hold the end of the upper thread. With
2. Avec la main gauche, tenir l’extrémité du fil supérieur. Avec
your right hand, turn the balance wheel toward you
la main droite, tourner le volant vers soi (dans le sens
(counterclockwise) until the needle moves down and back up
contraire aux aiguilles d’une montre) jusqu’à ce que l’aiguille
again to its highest position.
descende puis remonte à nouveau complètement.
3. The upper thread should have caught the lower thread in a
3. Le fil supérieur doit alors former une boucle avec le fil
loop. Pull the upper thread toward you and the lower thread
inférieur. Tirer vers soi le fil supérieur: le fil inférieur va se
will come up from the bobbin in a large loop.
dérouler de la canette et former une boucle de plus en plus
4. Pull out about 15 cm (6") of both threads and place them
large.
toward the back of the machine straight behind the presser
4. Tirer environ 15 cm de chacun des deux fils et les placer vers
foot. The upper thread should pass between the toes of the
l’arrière de la machine, juste derrière le pied-de-biche. Le fil
presser foot.
supérieur doit passer entre les branches du pied-de-biche.
a Upper thread
a Fil supérieur
b Lower thread loop
b Boucle du fil inférieur
c Lower thread
c Fil inférieur
Para sacar el hilo de la canilla
Вытягивание нижней (шпульной) нити
1. Levante el prensatelas y la aguja a sus posiciones más elevadas.
1. Поднимите прижимную лапку и иглу в крайнее верхнее
2. Con la mano izquierda, sujete el extremo del hilo superior. Con la
положение.
mano derecha, gire la ruedecilla hacia usted (en el sentido
2. Левой рукой удерживайте конец верхней нити. Правой
рукой вращайте маховик по направлению к себе (против
contrario al de las manecillas de un reloj) hasta que la aguja vaya
часовой стрелки), пока игла не опустится вниз и вновь не
hacia abajo y suba a su posición más alta.
займет крайнее верхнее положение.
3. El hilo superior debe haber enganchado el hilo inferior y hacer
3. Верхняя нить должна захватить нижнюю нить в петлю.
una lazada. Tire del hilo superior hacia usted y el hilo inferior
Потяните верхнюю нить на себя, и нижняя нить вытянется
saldrá de la canilla en una baga larga.
из шпульки в виде большой петли.
4. Tire unos 15 cm (6") de ambos hilos y colóquelos hacia la parte
4. Вытяните порядка 15 см обеих нитей и разместите их
atrás de la máquina, justo detrás del prensatelas. El hilo superior
прямолинейно по направлению к задней части машины за
debe pasar entre los salientes del prensatelas.
прижимной лапкой. Верхнюю нить следует пропустить в
a Hilo superior
прорезь в прижимной лапке.
b Bagas en el hilo inferior
a Верхняя нить
c Hilo inferior
b Петля нижней нити
c Нижняя нить
1
1
2
3
17
Twin-Needle Sewing
Couture avec l’aiguille jumelée
Your sewing machine is designed for twin-needle sewing which
Cette machine à coudre a été conçue pour pouvoir être utilisée
allows you to sew using two upper threads. You can use the same
avec une aiguille jumelée, permettant ainsi de coudre avec deux
color or two different colors of thread for decorative stitches.
fils supérieurs. Il est possible d’utiliser la même couleur de fil ou
Twin-needle sewing works well with these stitches: the Straight
deux fils de couleurs différentes pour obtenir des points fantaisie
Stitch (6-10)-and the Zigzag Stitch (2). Be sure that the two upper
décoratifs. Les coutures à l’aide d’une aiguille jumelée donnent
threads used for threading the twin needle have the same weight.
d’excellents résultats avec les points suivants: le point droit (6-10)
If the threads do not have the same weight, the stitching may not
et le point zigzag (2). S’assurer que les deux fils supérieurs utilisés
be consistent.
avec l’aiguille jumelée sont de la même épaisseur. Dans le cas
contraire, les points ne seronts pas nécessairement égaux.
INSERTING THE TWIN NEEDLE
Insert the twin needle in the same way that a single needle is
MISE EN PLACE DE L’AIGUILLE JUMELEE
inserted. (Refer to page 6.) The flat side of the needle should face
Introduire l’aiguille comme pour une aiguille normale (veuillez
toward the back and the rounded side should face toward you.
vous référer à la page 6). Le côté plat de l’aiguille doit être tourné
vers l’arrière et l’arrondi doit se situer face à l’utilisateur.
SETTING THE EXTRA SPOOL PIN
Place the extra vertical spool pin in the hole found on the top
MISE EN PLACE DU PORTE-BOBINE SUPPLEMENTAIRE
right-hand side of the machine. Place the second spool of thread
Placer le porte-bobine vertical supplémentaire dans l’orifice qui
on this pin as shown in fig. A.
se trouve au-dessus de la machine, du côté droit. Placer la
a Extra spool pin
seconde bobine de fil sur cet axe comme le montre la fig. A.
a Porte-bobine supplémentaire
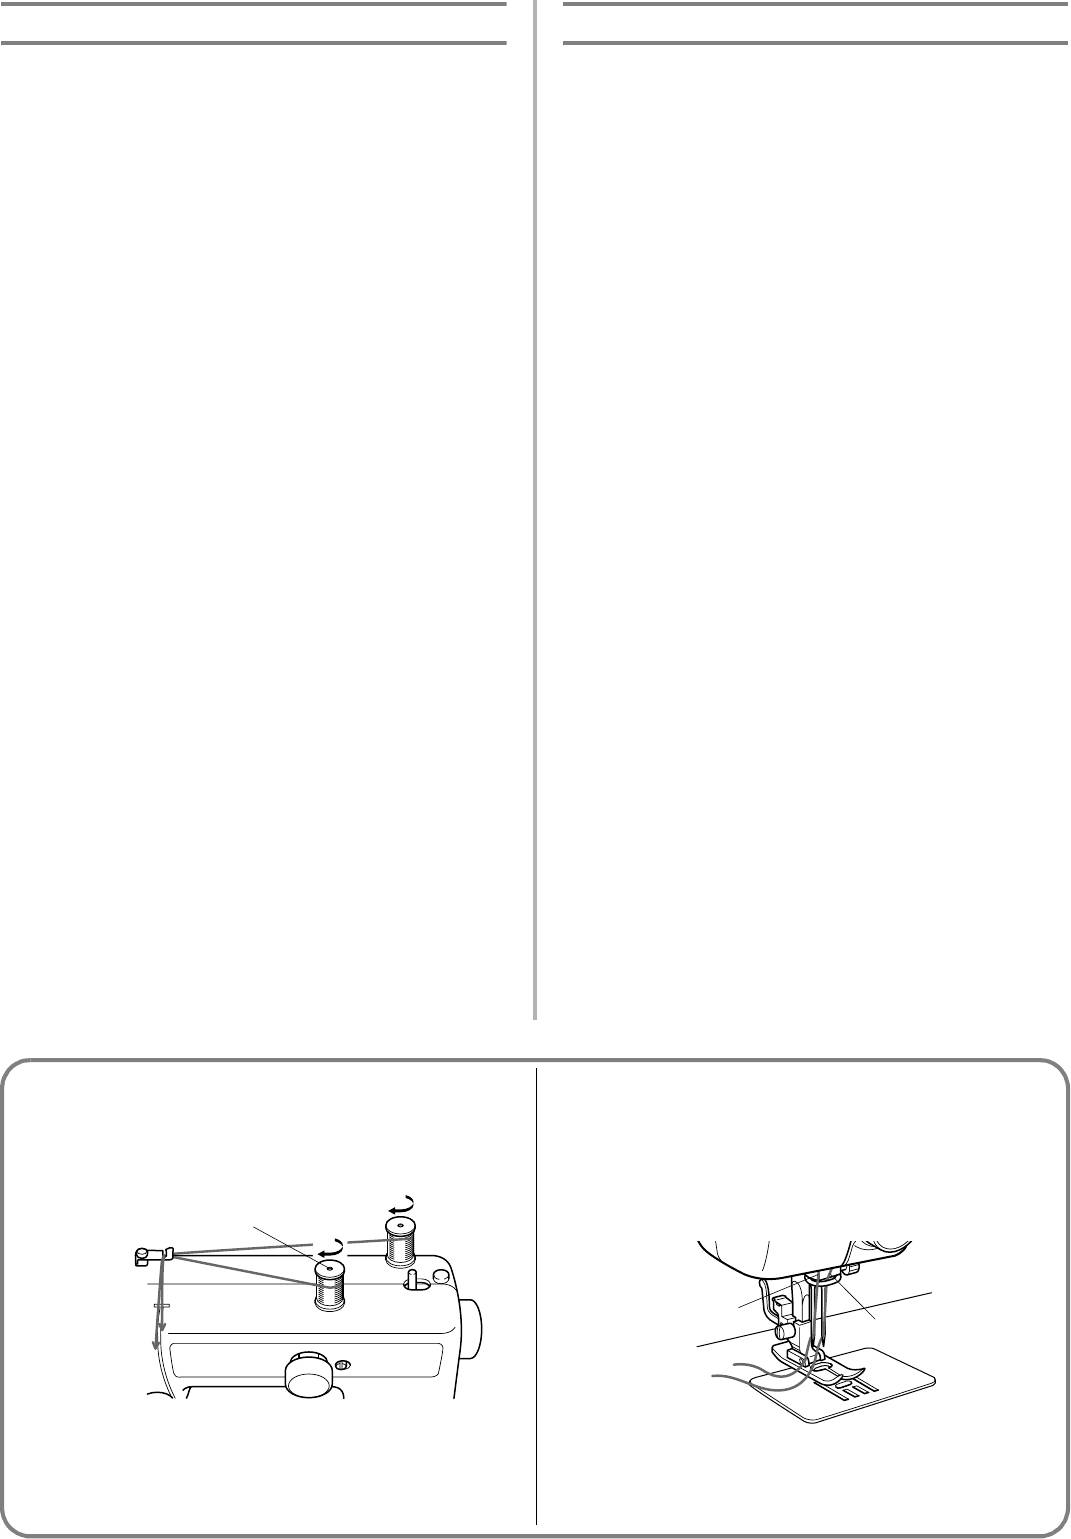
TWIN NEEDLE THREADING
Each needle should be threaded separately.
ENFILAGE DE L’AIGUILLE JUMELEE
1. Threading the Right Needle
Chaque aiguille doit être enfilée séparément.
Follow the same instructions for single needle threading. See
1. Enfilage de l’aiguille de droite
page 15 for more details.
Suivre les mêmes instructions que pour l’enfilage d’une
2. Threading the Left Needle
aiguille normale. Voir page 15 pour de plus amples détails.
Thread the left needle in the same way as the right needle was
2. Enfilage de l’aiguille de gauche
threaded, but do not pass the thread through the thread guide
Enfiler l’aiguille de gauche de la même manière que l’aiguille
above the needle before passing it through the eye of the left
de droite mais sans passer le fil par le guide-fils situé au-
needle as shown in fig. B.
dessus de l’aiguille. Passer directement le fil par le chas de
b Right needle thread passes through this guide.
l’aiguille gauche, comme le montre la fig. B.
c Left needle thread passes in front of this guide.
b Le fil de l’aiguille droite passe par le guide-fils.
c Le fil de l’aiguille gauche passe devant le guide-fils.
AB
1
3
2
18
Costura con aguja doble
Шитье двойной иглой
Su máquina de coser ha sido concebida para poder utilizar una aguja
Швейная машина поддерживает шитье двойной иглой, то есть
doble y permitir la costura con dos hilos superiores. Puede usar el
можно шить с использованием двух верхних нитей. Можно
mismo color de hilo o dos hilos de colores distintos para puntadas
использовать нити одинаковых или двух разных цветов для
decorativas. Las costuras con aguja doble dan muy buenos resultados
выполнения декоративных строчек. Шитьё двойной иглой
con las siguientes puntadas: la puntada recta (6-10) y la puntada
подходит для следующих строчек: прямая строчка (6*10) и
zigzag (2). Sin embargo, debe asegurarse de que los dos hilos usados
строчка «Зигзаг» (2). Обе верхние нити, используемые для
para enhebrar la aguja doble sean del mismo peso. Si los hilos son de
заправки двойной иглы, должны иметь одинаковый номер
pesos distintos, las puntadas resultarán erróneas.
(толщину). В противном случае трудно обеспечить требуемое
качество строчки.
PARA INTRODUCIR LA AGUJA DOBLE.
Introdúzcala de la misma manera que una aguja simple (véase página
УСТАНОВКА ДВОЙНОЙ ИГЛЫ
6). La parte plana de la aguja debe estar cara hacia atrás mientras
Установите двойную иглу тем же способом, которым
que la parte redonda está cara a usted.
устанавливалась одиночная игла. (Подробную информацию
см. на стр.6.) Плоская сторона иглы должна быть повернута к
PARA INSTALAR EL PORTA CARRETES EXTRA
задней стороне машины, а полукруглая – к Вам.
Coloque el porta carretes vertical extra en el orificio previsto arriba
de la máquina, en la parte derecha. Coloque el segundo carrete de
УСТАНОВКА ДОПОЛНИТЕЛЬНОГО СТЕРЖНЯ
hilo en el eje tal como indica la fig. A.
КАТУШКИ
a Porta carretes extra
Вставьте дополнительный стержень для катушки в
предназначенное для него отверстие, расположенное сверху в
ENHEBRADO DE LA AGUJA DOBLE
правой части машины. На этот стержень наденьте вторую
Cada una de las agujas debe ser enhebrada por separado.
катушку с нитью, как показано на рис. A.
1. Enhebrado de la aguja derecha
a Дополнительный стержень для установки катушки
Siga las mismas instrucciones que para el enhebrado de una sola
aguja (véase página 15 para mayores detalles al respecto).
ЗАПРАВКА ДВОЙНОЙ ИГЛЫ НИТЬЮ
2. Enhebrado de la aguja izquierda
Каждую нить следует заправлять в иглу по отдельности.
Enhebre la aguja izquierda de la misma manera que la aguja
1. Заправка правой нити в иглу
derecha. Sin embargo, no hay que pasar el hilo por la guía que se
Следуйте тем же инструкциям, что и для заправки нити в
sitúa arriba de la aguja. Conviene pasarlo directamente por el ojo
одиночную иглу. Подробную информацию см. на стр. 15.
de la aguja izquierda, tal como ilustrado arriba en la fig. B.
2. Заправка левой нити в иглу
b El hilo de la aguja derecha pasa por la guía.
Заправляйте левую нить в иглу так же, как и правую, но
c El hilo de la aguja izquierda pasa delante de la guía.
при этом не надо пропускать нить через нитенаправитель
над иглой перед тем как продеть её в ушко левой иглы
(см рис. B).
a Нить правой иглы пропущена через нитенаправи*
тель.
b Нить левой иглы проходит перед нитенаправителем.
AB
1
3
2
19
Thread Tension
Tension des fils
Thread tension will affect the quality of your stitches. It may need
La tension des fils va affecter directement la qualité des points et
to be adjusted when you change fabric or thread type.
il se peut qu’elle doive être réglée lors du changement de tissu
ou de fil.
NOTE:
It is recommended that a test sample be made on a fabric scrap
REMARQUE:
before sewing on your project.
Il est conseillé d’effectuer une couture d’essai sur une chute de
The basic thread tension setting is “5”.
tissu avant de coudre sur l’ouvrage proprement dit.
La tension du fil est réglée par défaut sur “5”.
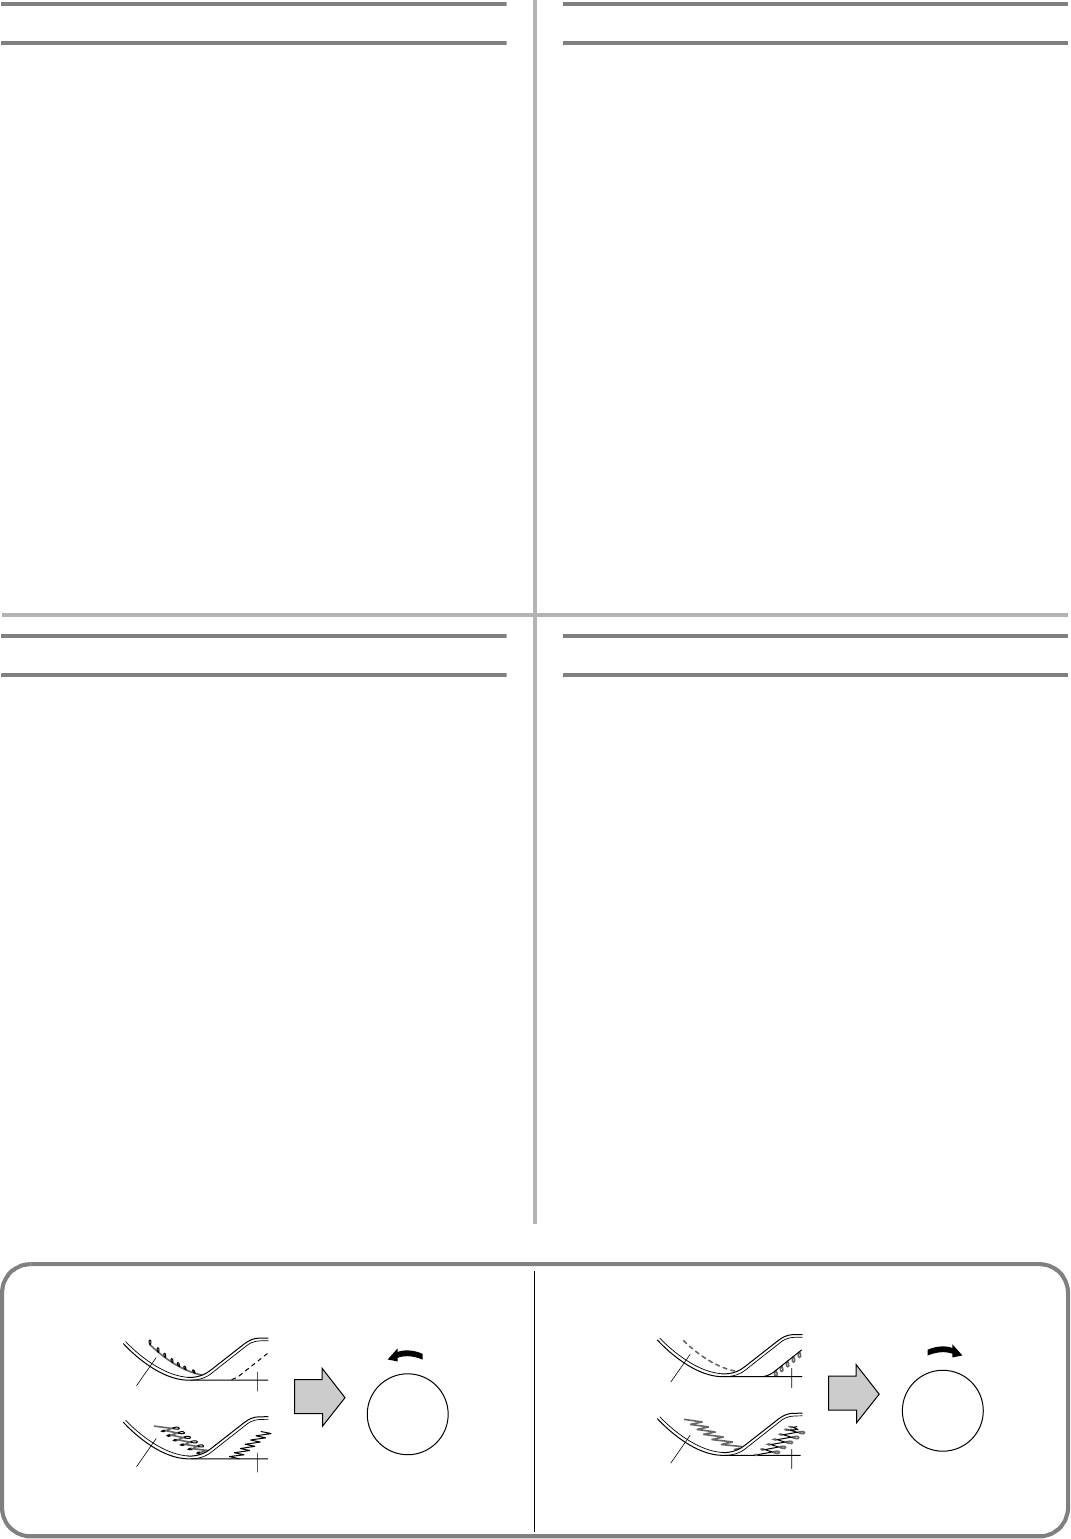
Possible problems and how to correct them.
Problèmes possibles et leurs remèdes.
A Upper tension is too tight.
Locks appear on the surface of the fabric.
A La tension supérieure est excessive.
A-1 Upper tension control dial
Formation de boucles sur l’endroit du tissu.
Decrease the tension by turning the dial to a lower number.
A-1 Sélecteur de tension supérieure
B Upper tension is too loose.
Diminuer la tension en mettant le sélecteur sur un chiffre
inférieur.
Locks appear on the reverse side of the fabric.
B La tension supérieure est insuffisante.
B-1 Upper tension control dial
Formation de boucles sur l’envers du tissu.
Increase the tension by turning the dial to a higher number.
a Reverse
B-1 Sélecteur de tension supérieure
b Surface
Augmenter la tension en plaçant le sélecteur sur un chiffre
plus élevé.
a Envers
b Endroit
Tensión de los hilos
Натяжение нитей
La tensión de los hilos es muy importante para la calidad de las
Натяжение нитей оказывает воздействие на качество строчки.
puntadas y puede requerir cierto ajuste al cambiar de tejido o de hilo.
При смене ткани или нити может потребоваться настройка
натяжения нитей.
NOTA:
Le recomendamos hacer una prueba en un pedazo de tela antes de
ПРИМЕЧАНИЕ:
empezar a coser con el tejido de trabajo.
Рекомендуется до начала работы над изделием осуществлять
El parámetro inicial de tensión del hilo es “5”.
пробную строчку на лоскуте аналогичной ткани.
Базовая позиция натяжителя нити – «5».
Problemas posibles y sus soluciones
Возможные затруднения и методы их разрешения.
A El hilo superior esta demasiado tirante
A Слишком сильное натяжение верхней нити
Aparecen bagas en la superficie del tejido.
На поверхности ткани появляются петли.
A-1 Disco de control de la tensión superior
A1 Дисковый регулятор натяжения верхней нити
Disminuya la tensión al poner el disco en un número inferior.
Уменьшите натяжение, повернув регулятор к меньшей
B La tensión superior es insuficiente
цифре.
Aparecen bagas en el revés del tejido.
B Слишком слабое натяжение верхней нити
B-1 Disco de control de la tensión superior
На обратной стороне ткани появляются петли.
Aumente la tensión al poner el disco en un número superior.
B1 Дисковый регулятор натяжения верхней нити
a Revés
b Derecho
Увеличьте натяжение, повернув регулятор к большей
цифре.
a Изнаночная сторона ткани
b Лицевая сторона ткани
A-1A
B-1B
5
5
4
2
6
4
2
6
1
3
1
3
7
7
2
2
8
8
1
9
1
9
0
0
2
2
1
1
20
NOTE:
REMARQUE:
The bobbin thread tension has already been adjusted at the
La tension du fil inférieur a déjà été réglée d’usine pour une
factory for general use. For most sewing applications, no
utilisation normale. Pour la plupart des applications de couture, il
adjustment is needed.
ne sera dès lors pas nécessaire de la régler.
When sewing with thin thread on thin fabrics, the thread tension
Cependant, lors de la couture avec du fil fin sur des tissus légers,
may not be adjusted adequately with the upper tension control
les réglages de tension du fil effectués à l’aide du disque de
dial. Therefore, the thread tension must be adjusted according to
contrôle de la tension supérieure sont insuffisants. Dans ce cas,
the procedure described below.
régler la tension du fil selon la méthode décrite ci-dessous.
C Bobbin tension is too loose.
C La tension inférieure est insuffisante.
Locks appear on the surface of the fabric.
Formation de boucles à l’endroit du tissu.
Decrease the thread tension by turning the dial to a lower
Diminuer la tension du fil en mettant le disque sur un chiffre
number. If the result is still not satisfactory, then adjust the
inférieur. Si le résultat n’est pas encore concluant, régler la
bobbin thread tension as explained in C-1
tension du fil de la canette comme expliqué au point C-1.
C-1 Bobbin
C-1 Canette
Increase the tension in the bobbin by turning the screw with
A l’aide d’un petit tournevis, augmenter la tension de la
a small screwdriver in a clockwise direction. However, do
canette en tournant la vis dans le sens des aiguilles d’une
not turn the screw more than one full turn.
montre, sans effectuer plus d’un tour complet.
Remember to return the screw to its original setting before
Ne pas oublier de remettre la vis à sa position originale avant
starting your next project.
d’entamer un nouvel ouvrage.
D Correct tension
D Tension correcte
Correct tension is important since too much or too little tension
Il est essentiel de procéder à un réglage correct de la tension du
will weaken your seams or cause puckers in your fabric.
fil pour avoir des coutures solides sans que le tissu ne fronce.
a Reverse
1 Envers
b Surface
2 Endroit
NOTA:
ПРИМЕЧАНИЕ:
La tensión del hilo inferior ya se ha ajustado en fábrica para los usos
Натяжение нижней нити уже настроено на заводе*
comunes. Por lo tanto, para la mayoría de las costuras, no se
изготовителе для общих задач шитья. Для большинства
швейных применений настройка натяжения не требуется.
requerirá ningún ajuste adicional.
При шитье тонкой нитью тонких тканей натяжение нитей не
Sin embargo, al coser con hilo delgado en tejidos finos, no se puede
может быть адекватно настроено с помощью дискового
ajustar correctamente la tensión del hilo mediante el disco de control
регулятора верхней нити. В этом случае натяжение нитей
de la tensión superior. En esos casos, la tensión del hilo ha de ser
необходимо настроить в соответствии с описанной ниже
ajustada de acuerdo con el proceso descrito a continuación.
процедурой
C La tensión del hilo inferior es insuficiente.
C Слишком слабое натяжение нижней нити.
Aparecen bagas en la superficie del tejido.
На поверхности ткани появляются петли.
Disminuya la tensión del hilo al girar el disco hacia un número
Уменьшите натяжение верхней нити, повернув регулятор к
inferior. Si el resultado no le conviene aún, ajuste la tensión del
меньшей цифре. Если не удается добиться
удовлетворительного результата, то настройте натяжение
hilo de la canilla tal como se indica en C-1.
нити шпульки (нижней нити) в соответствии с пунктом
C1
.
C-1 Canilla
DШпулька
Aumente la tensión en la canilla girando el tornillo, con un pequeño
Увеличьте натяжение в шпульке, повернув маленькой
destornillador, en el sentido de las manecillas de un reloj. Sin
отверткой регулировочный винт в направлении по
embargo, no conviene dar más de una vuelta completa al tornillo.
часовой стрелке. Однако не проворачивайте винт более
No olvide volver a colocar el tornillo en su posición original
чем на один полный оборот.
antes de empezar otro tipo de costura.
Перед началом своего следующего швейного проекта не
забудьте вернуть этот винт в первоначальное положение.
D Tensión correcta
E Правильное натяжение
Es importante tener una tensión correcta dado que una tensión
Правильное натяжение нитей является очень важным
insuficiente o demasiada tirante va a debilitar sus costuras o
фактором, поскольку слишком сильное или слишком
fruncir el tejido.
слабое натяжение приводит к ослаблению швов или к
a Revés
образованию сборок на ткани.
b Derecho
a Изнаночная сторона ткани
b Лицевая сторона ткани
D
2
1
2
1
21

RELATIVE CHART OF SEWING FABRICS, NEEDLES AND THREADS
COMBINATIONS
SEWING FABRICS NEEDLE SIZES THREAD SIZES
Cotton: 80
Fine tricot, Fine lace, Thin linen, Silk,
VERY THIN
#65/9
Synthetic/ Polyester Long Fiber
Organza, Chiffon
Fine Mercerized Cotton
Cotton: 60-80
Silk: “A”
LIGHTWEIGHT Voile, Taffeta, Synthetics, Silk, Batiste #75/11
Synthetic/ Polyester Long Fiber
Mercerized 50
Cotton: 50-60
Cotton, Gingham, Poplin, Percale, Pique,
#90/14
Silk: “A”
MEDIUM WEIGHT
Satin, Velvet, Lightweight wool,
(Supplied with your
Synthetic/ Polyester Long Fiber
Fine corduroy, Suitings, Linen, Muslin
machine.)
Mercerized 50-60
Cotton: 40-50
Denim, Gabardine, Tweed, Corduroy,
HEAVYWEIGHT
#100/16
Mercerized Heavy Duty
Canvas, Duck
Polyester Long Fiber
#90/14
Cotton Wrapped Polyester
KNITS Single knit, Double knit, Jersey, Tricot
(Ball point)
Polyester Long Fiber
NOTE:
1.Select the correct needle and thread size from the above chart.
2.Use the same size thread for the upper (spool) and lower (bobbin) threads.
TABLEAU DES COMBINAISONS TISSU/AIGUILLE/FIL
CALIBRES
TISSUS
TAILLES DE FILS
D’AIGUILLES
Coton: 80
Tricot léger, passementerie fine, lin délicat,
TRES FINS
#65/9
Synthétiques/ Polyester longues
soie, tulle, crêpe
fibres Coton mercerisé fin
Coton: 60-80
Soie: “A”
LEGERS Voile, taffetas, synthétiques, soie, batiste #75/11
Synthétiques/ Polyester longues
fibres Mercerisé calibre 50
Coton: 50-60
Coton, vichy, popeline, percale, piqué, satin,
#90/14
Soie: “A”
MOYENS
velours, laine légère, velours côtelé fin, tissus
(Livrés avec la
Synthétiques/ Polyester longues
de confection, lin, mousseline
machine)
fibres Mercerisé calibre 50-60
Coton : 40-50
Jeans, gabardine, tweed, velours côtelé,
LOURDS
#100/16
Mercérisé très résistant
canevas, coutil
Polyester longues fibres
#90/14
Polyester guipé coton
TRICOTS Tricot simple, double, jersey, tricot en général
(Pointe arrondie)
Polyester longues fibres
REMARQUE:
1.Sélectionner selon le tableau ci-dessus la taille de fil et le calibre d’aiguille adéquats.
2.Utiliser la même taille de fil pour les fils inférieur (canette) et supérieur (bobine).
22

TABLA DE RELACIÓN ENTRE TEJIDOS, HILOS Y AGUJAS
TAMAÑO DE
TEJIDOS
TAMAÑO DE HILO
AGUJA
Algodón: 80
Punto fino, Encaje fino, Lino fino, Seda, Tul,
MUY FINO
n° 65/9
Sintético/ Fibra larga de poliéster
Gasa
Algodón fino.
Algodón: 60-80
Seda: “A”
LIGERO Velo, Tafetán, Sintéticos, Seda, Batista n° 75/11
Sintético/ Fibra larga de poliéster
Mercería 50.
Algodón: 50-60
Algodón, Vichy, Popelin, Percal, Piqué, Satén,
n° 90/14
Seda “A”
MEDIO
Terciopelo, Lana ligera, Pana fina, Forros, Lino,
(Provista con la
Sintético/ Fibra larga de poliéster
Muselina
máquina)
Mercería 50-60
Algodón: 40-50
PESADO Tejano, Gabardina, Tweed, Pana, Toldo, Dril n° 100/16
Hilo Mercería gruesa.
Fibra larga de poliéster
PRENDAS DE
Prendas de punto simple, Prendas de punto
n° 90/14
Poliéster envuelto de algodón
PUNTO
doble, Jersey, Tricot
(Punta de bola)
Fibra larga de poliéster
NOTA:
1.Elija la aguja y el hilo correctos en la tabla arriba.
2.Utilice el mismo tamaño de hilo para los hilos superior (carrete) e inferior (canilla).
ТАБЛИЦА РЕКОМЕНДУЕМЫХ КОМБИНАЦИЙ ТКАНЕЙ,
ИГЛ И НИТЕЙ
ТКАНИ РАЗМЕР ИГЛЫ ПАРАМЕТРЫ НИТИ
Хлопок: 80
Синтетика/длинноволоконный
Тонкий трикотаж, кружево, тонкий лён,
ОЧЕНЬ ТОНКИЕ
#65/9
полиэстер
шёлк, органза, шифон
Тонкий мерсеризованный
хлопок
Хлопок: 60*80Шелк: «A»
Синтетика/длинноволоконный
ЛЁГКИЕ Вуаль, тафта, синтетика, шёлк, батист #75/11
полиэстер
Мерсеризованная 50
Хлопок: 50*60
Хлопок, миткаль, поплин, перкаль, пике,
#90/14
Шелк: «A»
атлас, вельвет, тонкая шерсть,
СРЕДНИЕ
(Входит в комплект
Синтетика/длинноволоконный
тонкий вельвет, костюмная ткань, лён,
Вашей машины.)
полиэстер
муслин
Мерсеризованная 50*60
Хлопок: 40*50
Джинсовая ткань, габардин, твид, вельвет,
Мерсеризованная, высокой
ТЯЖЕЛЫЕ
#100/16
брезент, парусина
прочности
Длинноволоконный полиэстер
#90/14
Хлопок, армированный
ТРИКОТАЖ Одинарный, двойной, джерси, трико
(Закруглённое
полиэстером
остриё)
Длинноволоконный полиэстер
ПРИМЕЧАНИЕ:
1.Подбирайте соответствующие друг другу иглу и нить исходя из приведённой выше таблицы.
2.Верхняя нить (нить катушки) и нижняя нить (нить шпульки) должны быть одинакового размера.
23
Straight Stitching
Point droit
Pattern
Modèle
6-10 (Center needle position)
6-10 (Aiguille au centre)
11 (Left needle position)
11 (Aiguille à gauche)
The Straight Stitch (6-10 or 11) is used for top stitching and
Le point droit (modèle 6-10 ou 11) sert pour la “haute couture” et
sewing lightweight fabrics.
pour coudre sur des tissus légers.
Starting Sewing (fig. A)
Pour commencer à coudre (fig. A)
1. Set the pattern selection dial to the appropriate Straight Stitch
1. Régler le sélecteur de modèle sur le point droit approprié (6-
(6-10 or 11) with the desired length.
10 ou 11), avec la longueur souhaitée.
2. Raise the needle to its highest position and lift the presser foot lifter.
2. Remonter complètement l’aiguille et relever le levier du pied-de-biche.
3. Pull up the bobbin thread by turning the balance wheel
3. Remonter le fil inférieur en tournant le volant vers soi (dans le
toward you (counterclockwise) and place both the upper and
sens opposé aux aiguilles d’une montre) et tirer les deux fils,
lower threads toward the back behind the presser foot.
inférieur et supérieur, vers l’arrière du pied-de-biche.
4. Place the fabric under the presser foot and position the needle
4. Placer le tissu sous le pied-de-biche et mettre l’aiguille à 1 cm
1 cm (3/8") from the edge of the fabric.
du bord du tissu.
5. Lower the presser foot.
5. Abaisser le pied-de-biche.
6. To backtack, press the reverse sewing lever down as far as
6. Pour arrêter la couture, abaisser complètement le levier de
possible and lightly touch the foot controller. Sew 5 to 10
couture en marche arrière et appuyer légèrement sur la
stitches in the reverse direction.
pédale. Faire 5 à 10 points en marche arrière.
7. Release the reverse sewing lever and start sewing in the
7. Relâcher le bouton de couture en marche arrière et
forward direction by applying pressure to the foot controller.
commencer à coudre en avant en appuyant sur la pédale.
NOTE:
REMARQUE :
The backtack or reverse sewing is used for locking the end of
La couture en marche arrière sert à terminer les coutures et à
seams and reinforcing stitches.
consolider les points.
Changing Sewing Direction (fig. B)
Pour modifier le sens de la couture (fig. B)
1. Stop the machine at the point where you wish to change directions with the
1. Arrêter la machine à l’endroit souhaité pour le changement de
direction, en laissant l’aiguille piquée dans le tissu. Si l’aiguille est en
needle still in the fabric. If the needle ends in the up position, turn the balance
position relevée, tourner le volant vers soi (dans le sens opposé aux
wheel toward you (counterclockwise) until the needle enters the fabric.
aiguilles d’une montre) jusqu’à ce que l’aiguille pénètre dans le tissu.
2. Raise the presser foot and turn the fabric to line up its new
2. Relever le pied-de-biche et faire pivoter le tissu autour de l’axe
direction using the needle as a pivot point.
formé par l’aiguille, pour l’orienter dans la nouvelle direction.
3. Lower the presser foot and start sewing in the new direction.
3. Abaisser le pied-de-biche et commencer à coudre dans le nouveau sens.
NOTE:
REMARQUE:
For twin needle sewing, raise the needle when changing the
Pour la couture avec une aiguille jumelée, relever l’aiguille pour
sewing direction.
changer de direction de couture.
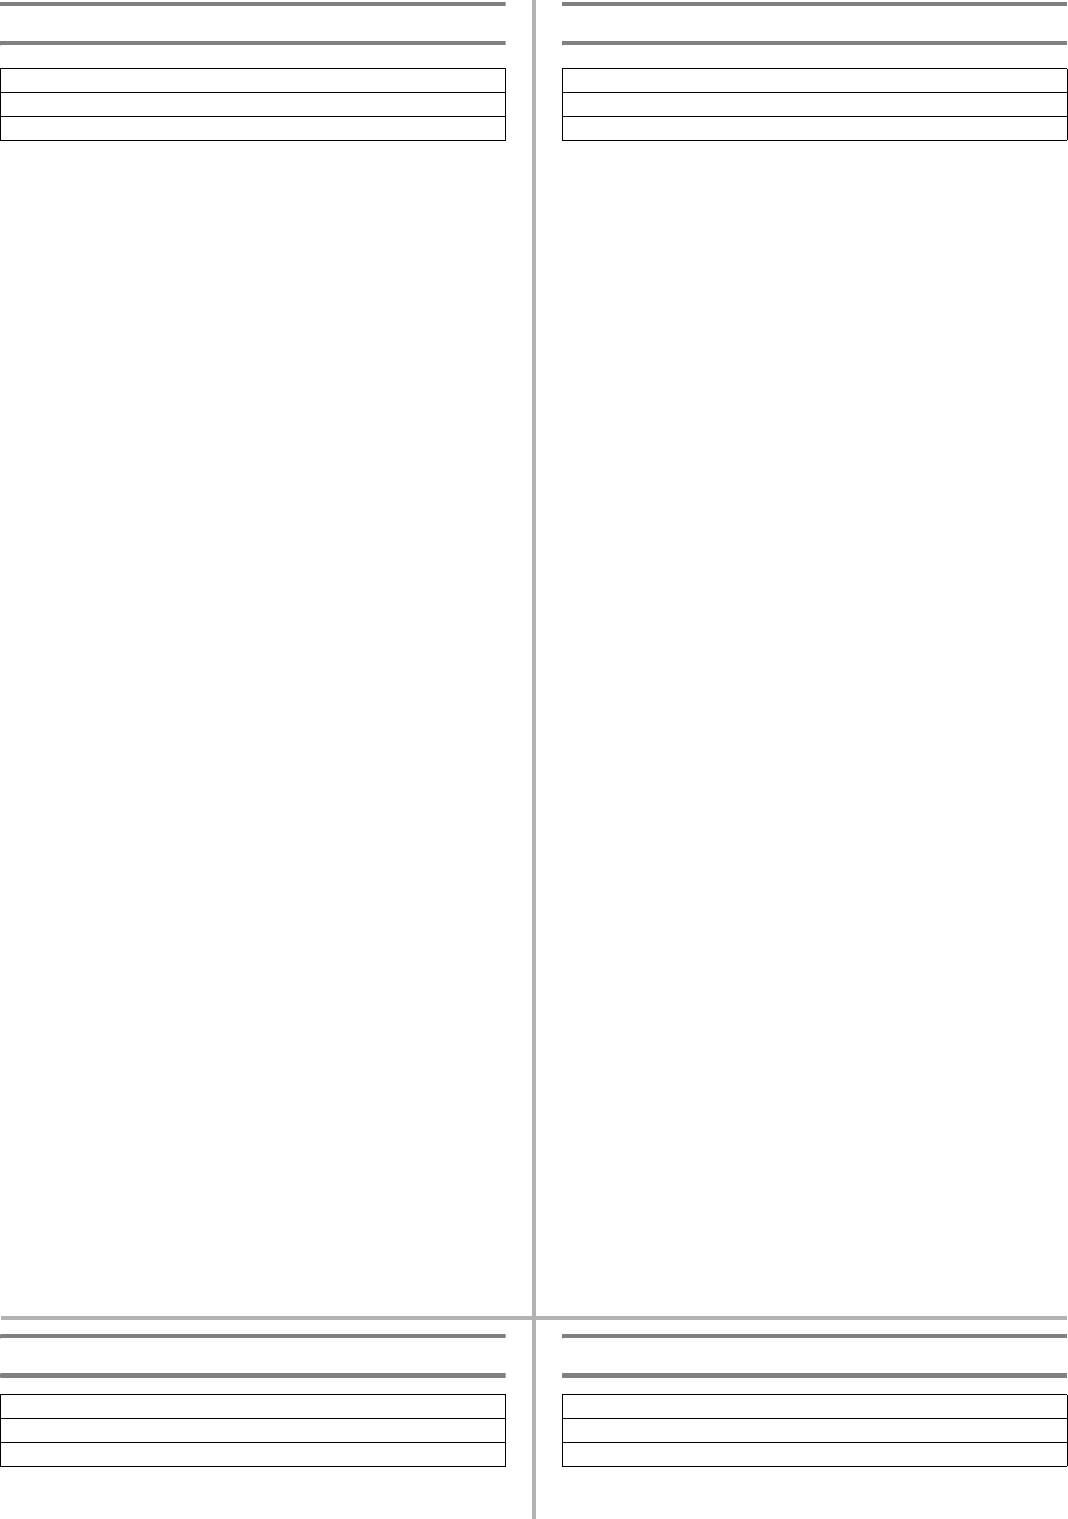
Finishing Sewing (fig. C)
Pour terminer la couture (fig. C)
Reverse stitching is used to lock the threads at the end of the
Utiliser la couture en marche arrière pour faire un noeud à la fin
seam or wherever reinforcement is needed.
d’une couture ou consolider des points.
1. Stitch to the end of the seam and stop.
1. Piquer jusqu’au bout de la couture puis arrêter la machine.
2. Abaisser le levier de couture en marche arrière et appuyer
2. Press the reverse sewing lever down and lightly touch the foot
légèrement sur la pédale pour coudre sur 1 cm en arrière à
controller to stitch backwards for 1 cm (3/8") from the end of
partir du bord du tissu et recouvrir les points existants.
the fabric over the top of the existing stitch.
Pour retirer le tissu de la machine (fig. D)
Removing the Fabric From the Machine (fig. D)
1. Arrêter la machine.
1. Stop the machine.
2. Tourner le volant vers soi (dans le sens contraire des aiguilles d’une
2.
Turn the balance wheel toward you (counterclockwise) to bring
montre) pour remonter complètement l’aiguille et le levier releveur de fil.
the needle and thread take-up lever to their highest position.
3. Relever le pied-de-biche et dégager doucement le tissu vers la gauche.
3. Lift the presser foot and pull the fabric out gently to the left side.
4. Couper les deux fils à l’aide du coupe-fils situé derrière la
4. Cut both threads using the thread cutter located on the back of
barre du pied-de-biche.
the presser foot bar.
a Coupe-fils
a Thread cutter
5. Afin de préparer la machine pour la couture suivante, tirer environ
10 cm des deux fils et les placer vers l’arrière de la machine. Le fil
5. To prepare the machine for the next seam, pull about 10 cm (4") of
supérieur doit passer entre les branches du pied-de-biche.
both threads and place them toward the back of the machine. The
upper thread should pass between the toes of the presser foot.
Puntada recta
Прямая строчка
Número de puntada
Положение ручки выбора вида строчки
6-10 (Aguja en el centro)
6*10 (Центральное положение иглы)
11 (Aguja a la izquierda)
11 (Левое положение иглы)
La puntada recta (No 6-10 ó 11) se usa para costuras de remate y
Прямая строчка (6*10 или 11) используется для отделки
para coser materiales ligeros.
деталей одежды и шитья лёгких тканей.
24
Para empezar a coser (fig. A)
Начало шитья (рис. A)
1. Colocar el selector de puntadas en la puntada derecha adecuada
1. Установите ручку выбора строчки в положение,
(6-10 ó 11), con el largo deseado.
соответствующее прямой строчке (6*10 или 11) с
требуемой длиной стежка.
2. Levante la aguja a su posición más alta y suba la palanca del prensatelas.
2. Поднимите иглу в крайнее верхнее положение, а затем
3. Saque el hilo inferior girando la ruedecilla hacia usted (en el
поднимите рычаг прижимной лапки.
sentido contrario al de las manecillas de un reloj) y tire los hilos
3. Поворотом маховика к себе (против часовой стрелки)
superior e inferior hacia la parte atrás del prensatelas.
вытяните нижнюю нить и положите верхнюю и нижнюю
4. Coloque el tejido debajo del prensatelas y posicione la aguja a 1
нити за прижимной лапкой в направлении задней части
cm (3/8") de la orilla del tejido.
машины.
4. Разместите ткань под прижимной лапкой таким образом,
5. Baje el prensatelas.
чтобы игла расположилась в 1 см от края ткани.
6. Para retroceder, baje completamente la palanca de retroceso y
5. Опустите прижимную лапку.
presione ligeramente el pedal para coser 5 ó 10 puntadas hacia atrás.
6. Для закрепления строчки нажмите до упора клавишу
7. Suelte la palanca de retroceso y vuelva a coser hacia adelante,
шитья в обратном направлении и слегка нажмите на
presionando el pedal.
педаль. Прошейте 5–10 стежков в обратном направлении.
7. Отпустите клавишу шитья в обратном направлении и
NOTA:
начните шить в прямом направлении, нажав на педаль.
El retroceso o costura hacia atrás sirve para finalizar una costura y
ПРИМЕЧАНИЕ:
reforzar las puntadas.
Закрепление строчки (шитьё в обратном направлении) используется
для фиксации концов шва и для усиления стежков.
Cambio de sentido de costura (fig. B)
Изменение направления шитья (рис. В)
1.
Pare la máquina en donde quiera cambiar de dirección, con la aguja
1. Остановите машину в точке, в которой Вы желаете
picada en el tejido. Si la aguja termina la puntada en la posición
изменить направление шитья, при этом игла должна
levantada, gire la ruedecilla hacia usted (en el sentido contrario al de
находиться в ткани. Если игла находится над тканью,
поворачивайте маховик на себя (против часовой стрелки)
las manecillas de un reloj) hasta que la aguja vuelva a penetrar el tejido.
до тех пор, пока игла не войдёт в ткань.
2. Levante el prensatelas y gire el tejido en la dirección que debe
2. Поднимите прижимную лапку и поверните ткань в
seguir, usando la aguja como placa giratoria.
положение для нового направления шитья, используя иглу
3. Baje el prensatelas y empiece a coser en la nueva dirección tal como ilustrado.
как ось поворота.
3. Опустите прижимную лапку и начинайте шить в новом
NOTA:
направлении.
Para las costuras con una aguja doble, debe levantarse la aguja para
ПРИМЕЧАНИЕ:
cambiar de sentido de costura.
При шитье двойной иглой поднимайте иглу при изменении
направления шитья.
Para terminar las costuras (fig. C)
Завершение шитья (рис. С)
La puntada de retroceso se usa para trabar los hilos al final de una
Для закрепления нитки в конце шва, а также если требуется
costura o en cualquier punto donde sea necesario reforzarla.
усиление шва, используется шитьё в обратном направлении.
1. Cosa hasta el final de la costura y pare.
1. Прошейте шов до конца и остановите машину.
2. Нажмите до упора вниз клавишу шитья в обратном
2. Baje la palanca de retroceso y presione suavemente el pedal para
направлении и слегка нажмите на педаль, чтобы сделать
coser hacia atrás sobre 1 cm (3/8") a partir de la orilla del tejido,
обратный шов на расстояние порядка 1 см от края изделия
cubriendo así las puntadas existentes.
поверх существующих стежков.
Para retirar el tejido de la máquina (fig. D)
Удаление изделия с машины (рис. D)
1. Остановите машину.
1. Pare la máquina.
2. Поворачивайте маховик на себя (против часовой стрелки)
2. Gire la ruedecilla hacia usted (en el sentido contrario al de las
для приведения иглы и рычага нитепритягивателя в
manecillas de un reloj) para levantar la aguja y la palanca
крайнее верхнее положение.
tirahilos a su posición más alta.
3. Поднимите прижимную лапку и аккуратно вытяните ткань
3.
Levante el prensatelas y saque suavemente el tejido por la izquierda.
в левую сторону.
4. Оборвите обе нити, используя приспособление для
4. Corte ambos hilos usando el cortador que se encuentra detrás de
обрезки нити, расположенное на задней стороне стержня
la barra del prensatelas.
прижимной лапки.
a Cortador de hilos
a Приспособление для обрезки нити
5. Con el fin de dejar la máquina preparada para la próxima costura, tire
5. Для подготовки машины к выполнению следующего шва
unos 10 cm (4") de ambos hilos y páselos hacia la parte atrás de la
вытяните приблизительно 10 см нитей и проведите их в
máquina. El hilo superior debe pasar entre los salientes del prensatelas.
прорезь прижимной лапки в направлении задней стороны
машины. Верхнюю нить следует пропустить в прорезь в
прижимной лапке.
A B
1
CD
25
Zigzag Stitching
Points zigzag
Pattern
Modèle
2 (Zigzag Stitch)
2 (Point zigzag)
3 (Zigzag Stitch)
3 (Point zigzag)
4 (Zigzag Stitch)
4 (Point zigzag)
POINT ZIGZAG
ZIGZAG STITCH
Régler le sélecteur de modèle de point sur le point zigzag
Set the pattern selection dial to the appropriate Zigzag Stitch (2, 3
approprié (2,3 ou 4), avec la largeur souhaitée.
or 4) with the desired width.
Il est recommandé de faire quelques points droits d’arrêt au début
It is recommended to sew using the Straight Stitch at the
et à la fin d’une couture en points zigzag.
beginning and end of the Zigzag Stitches.
Modèle
Pattern
5 (Point zigzag (point de bourdon)
5 (Zigzag (Satin) Stitch)
POINT ZIGZAG (POINT DE BOURDON)
ZIGZAG (SATIN) STITCH
Le point de bourdon peut servir comme point fantaisie décoratif.
The Satin Stitch can be used for making decorative stitches. Set
Régler le sélecteur de modèle de point sur le point zigzag (point
the pattern selection dial to the Zigzag (Satin) Stitch (5).
de bourdon) (5).
Puntadas zigzag
Шитьё строчкой «зигзаг»
Número de puntada
Положение ручки выбора вида строчки
2 (Puntada zigzag)
2(Строчка «зигзаг»)
3 (Puntada zigzag)
3(Строчка «зигзаг»)
4 (Puntada zigzag)
4(Строчка «зигзаг»)
PUNTADA ZIGZAG
СТРОЧКА «ЗИГЗАГ»
Coloque el selector de puntadas en la posición de puntada zigzag
1. Установите ручку выбора строчки в положение,
adecuada (2,3 ó 4), con el ancho deseado.
соответствующее строчке «зигзаг» (2, 3 или 4) с требуемой
Se recomienda coser con puntada recta al principio y al final de una
шириной строчки.
costura de zigzag.
2. Рекомендуется в начале и в конце строчек «зигзаг»
использовать шитьё прямой строчкой.
Número de puntada
Положение ручки выбора вида строчки
5 Costuras zigzag (de realce)
5 (Строчка «зигзаг» (атласная))
PUNTADA ZIGZAG (DE REALCE)
СТРОЧКА «ЗИГЗАГ» (АТЛАСНАЯ)
Las puntadas de realce pueden servir como puntadas decorativas.
Атласная строчка может использоваться для выполнения
Coloque el selector de puntadas en la puntada zigzag (de realce) (5).
декоративных строчек. Установите ручку выбора строчки в
положение «Зигзаг» (атласная) (5).
26
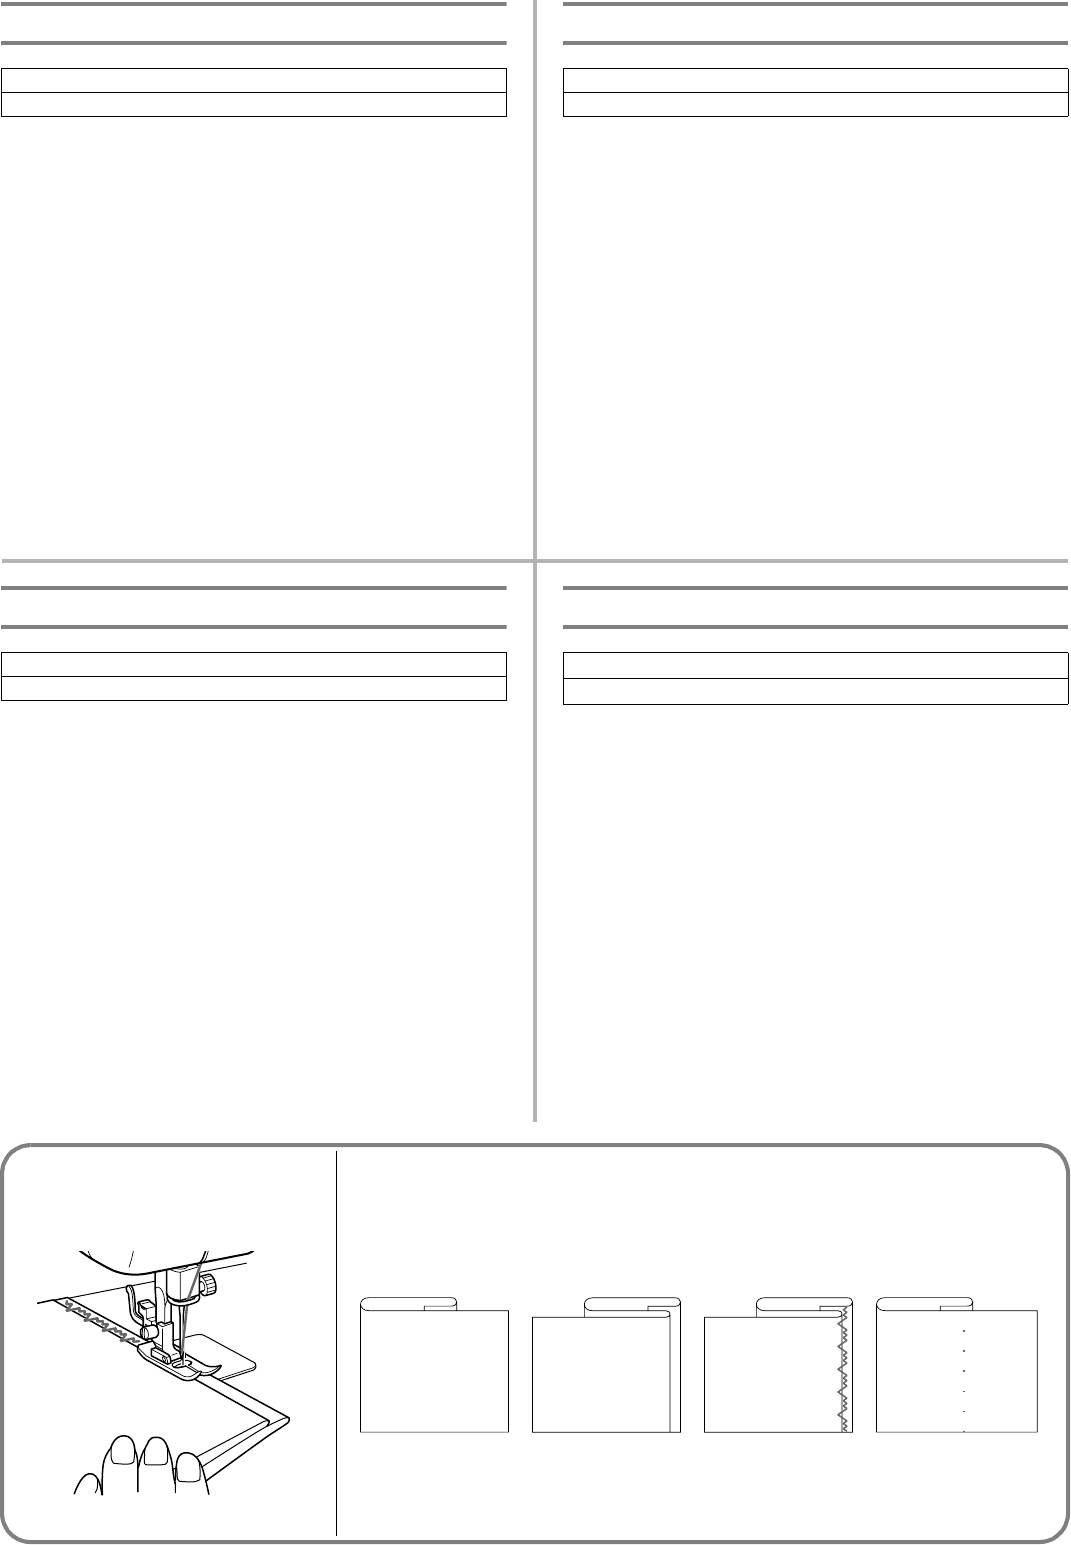
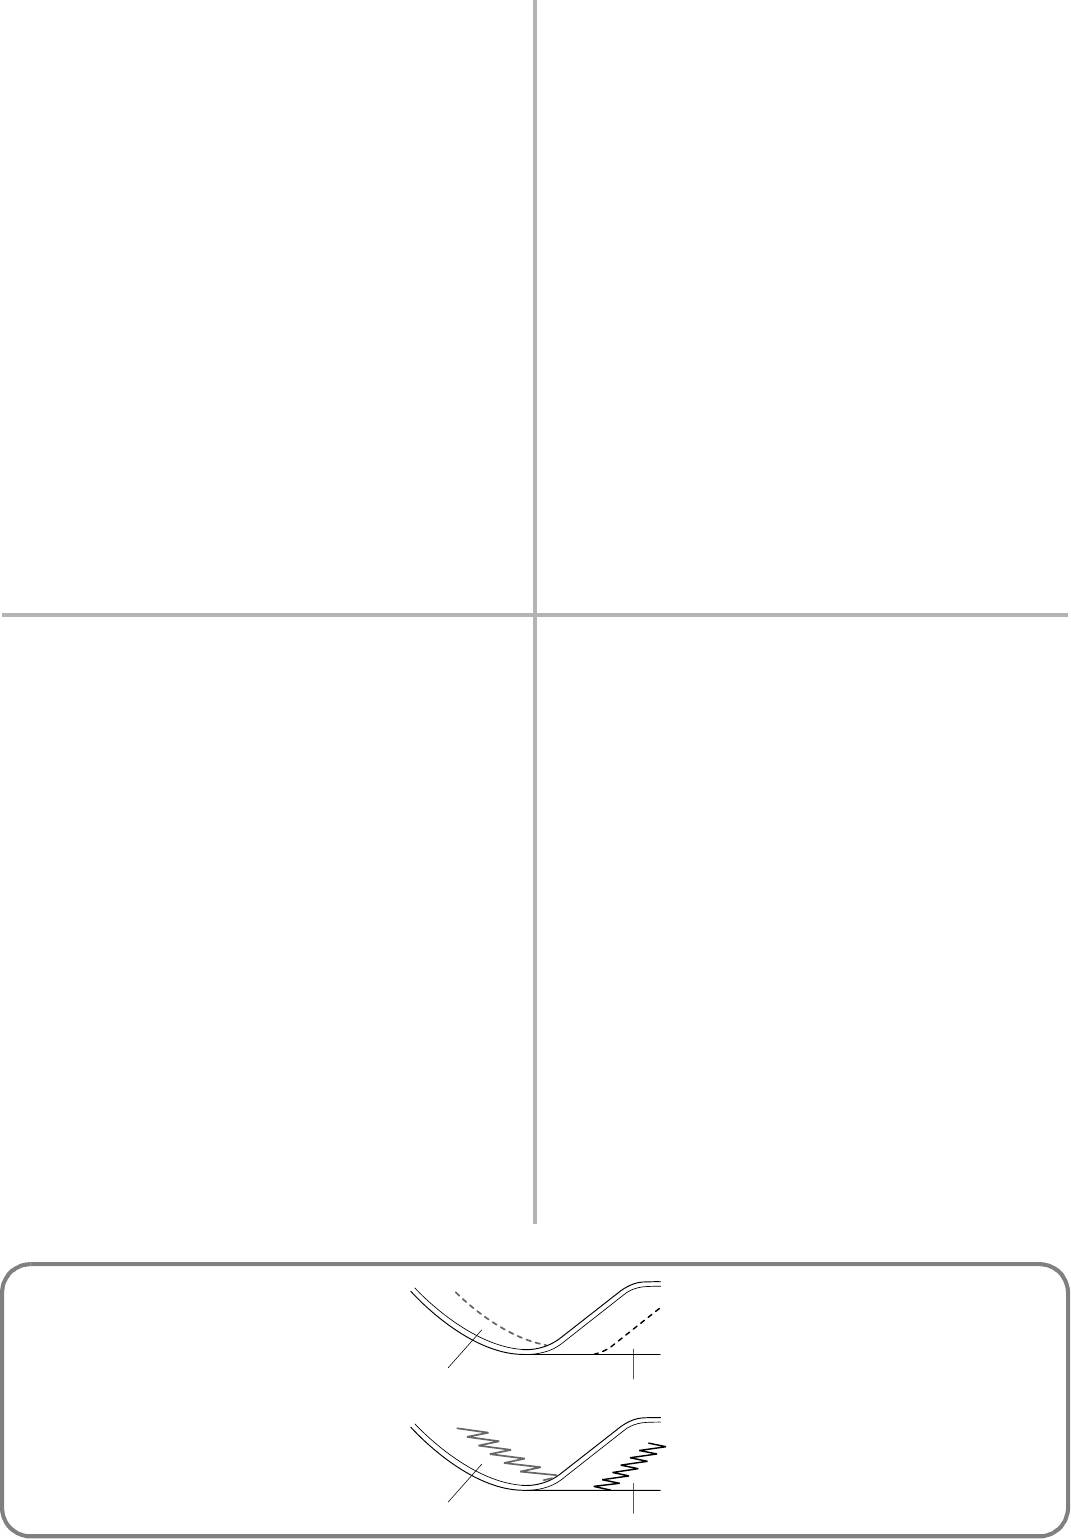
Blind Hem Stitching
Point élastique invisible
Pattern
Modèle
12 (Stretch Blind Stitch)
12 (Point élastique invisible)
The Stretch Blind Stitch is used to finish the edge of projects made
Le point élastique invisible sert à terminer le bord d’ouvrages
with stretch fabrics without the stitch showing.
réalisés sur des tissus élastiques (extensibles) sans que les points
1. Set the pattern selection dial to 12.
n’apparaissent.
2. Both the threads should be the same color as the fabric.
1. Mettre le sélecteur de modèle de point sur 12.
3. Fold back the fabric to the desired location of the hem as
2. Les deux fils utilisés doivent être de la même couleur que le
shown in fig. A. Then, fold the edge of the fabric as in fig. B.
tissu à coudre.
Leave a 6 mm (1/4") overlap at the edge.
3. Plier le tissu à la taille souhaitée pour l’ourlet, (comme le
4. Sew on the fold as in fig. C.
montre la fig. A) puis replier le bord en faisant chevaucher de
5. When the fabric is unfolded you will have a Stretch Blind
6 mm (voir fig. B.)
Stitch hem as shown in fig. D.
4. Coudre sur le repli (comme le montre la fig.C.).
5. Lorsque le tissu est déplié, on obtient un ourlet extensible
invisible, tel qu’indiqué dans la fig.D.
Puntadas invisibles
Потайная строчкамережка
Número de puntada
Положение ручки выбора вида строчки
12 (Puntada invisible elástica)
12 (Эластичная потайная строчка)
La puntada invisible elástica se usa para terminar la orilla de una
Эластичная потайная строчка используется для обработки
prenda realizada en un tejido elástico, sin que se vean las puntadas.
краёв изделий, выполненных из эластичной ткани, таким
1. Ponga el selector de puntadas en 12.
образом, чтобы стежки были не заметны.
2. Ambos hilos deben ser del mismo color que el tejido.
1. Установите ручку выбора строчки в положение «12».
3. Doble el tejido según la orilla que desee hacer tal como ilustra la
2. Обе нити должны быть того же цвета, что и ткань.
fig. A. Luego, déle la vuelta tal como indica la fig. B. Deje unos 6
3. Подверните изделие таким образом, чтобы кромка заняла
mm (1/4") sin coser para esconderlos.
желаемое положение, как показано на рис. A. Затем
4. Cosa en el pliegue tal como muestra la fig. C.
отогните край изделия, как показано на рис. B. Оставьте на
5. Al desdoblar el tejido, tendrá un dobladillo con puntada invisible
конце перекрытие порядка 6 мм.
elástica tal como lo muestra la fig. D.
4. Прошейте отвернутую кромку, как показано на рис. C.
5. После того как ткань будет развёрнута, вы получите
подрубленный эластичным потайным швом край, как
показано на рис. D.
ABCD
27
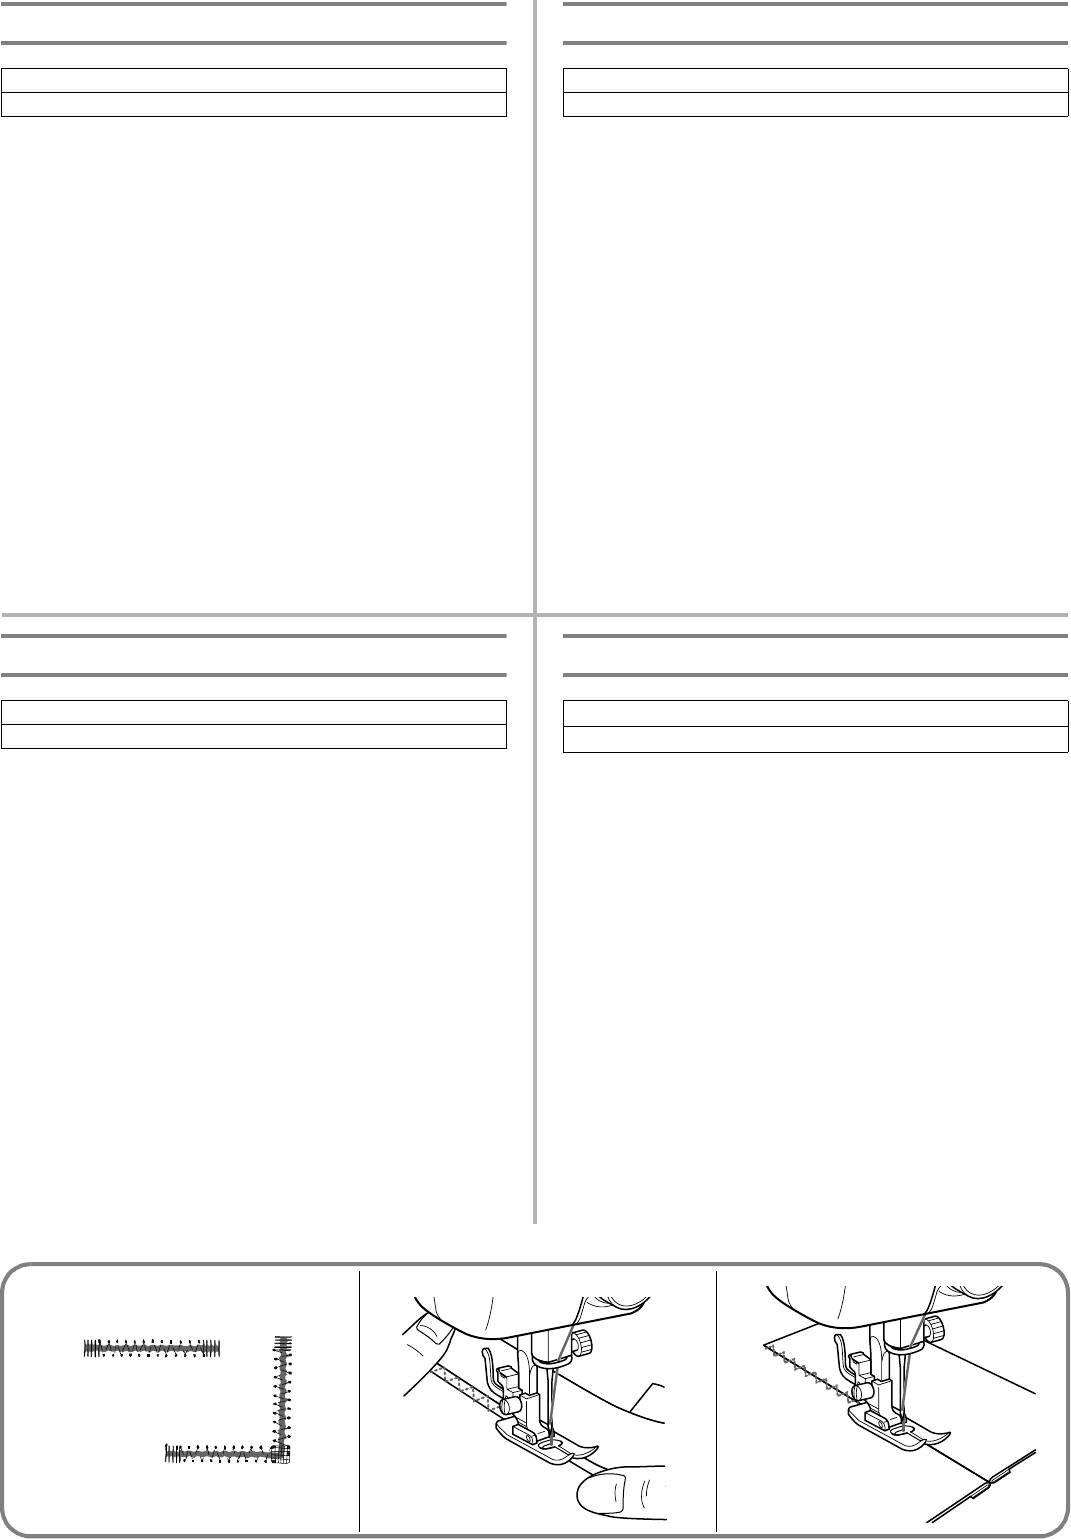
Elastic Stitching
Point élastique
Pattern
Modèle
14 (Elastic Stitch)
14 (Point élastique)
The Elastic Stitch can be used in 3 ways: mending, sewing elastic
Le point élastique possède trois fonctions principales: le
or joining fabric. Each is explained below.
raccommodage, la couture d’élastiques ou l’assemblage de tissus.
Set the pattern selection dial to 14.
Chacune de ces trois fonctions se trouve détaillée ci-dessous.
Mettre le sélecteur de modèle sur 14.
MENDING
REPRISAGE
1. Place the reinforcement fabric under the tear to be mended.
1. Placer une pièce de renfort sous la déchirure à réparer.
2. Following the line of the tear, sew using the Elastic Stitch as
2. Coudre en suivant la ligne de la déchirure. Coudre au point
illustrated in fig. A.
élastique comme le montre la fig. A.
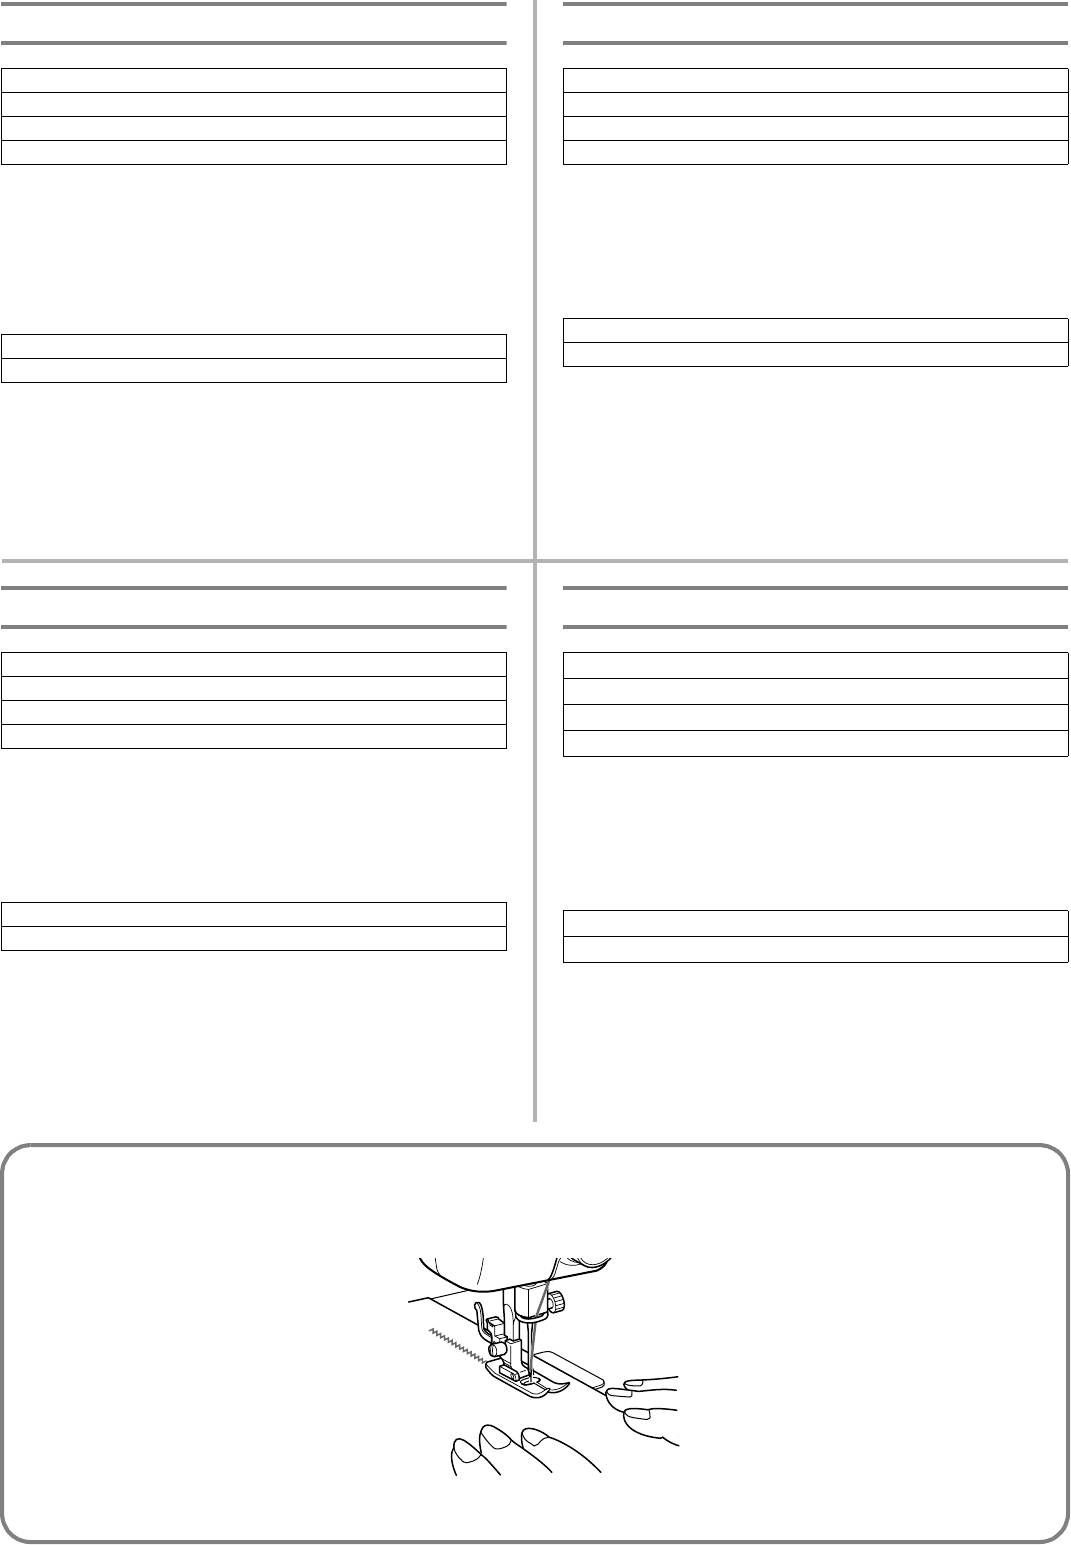
SEWING ELASTIC
COUTURE D’ELASTIQUES
1. Placer l’élastique sur le tissu.
1. Place the elastic on the fabric.
2. A mesure que l’on coud, tendre l’élastique de part et d’autre
2. As you sew, stretch the elastic both in the front and behind the
du pied-de-biche (voir fig. B).
presser foot as shown in fig. B.
ASSEMBLAGE DE TISSUS
JOINING FABRIC
Le point élastique peut servir à assembler deux morceaux de
The Elastic Stitch can be used to join two pieces of fabric together
tissu. Il s’avère particulièrement efficace pour la couture de
and is very effective when sewing knitted fabrics. When nylon
tricots. Avec du fil nylon, la couture sera invisible.
1. Placer bord à bord les deux pièces de tissu et les centrer sous
thread is used, the stitch will not be visible.
le pied-de-biche.
1. Place the edge of the two pieces of fabric together and center
2. Les assembler avec le point élastique, en prenant bien soin de
them under the presser foot.
garder les deux pièces bord à bord, comme le montre la fig.C.
2. Sew them together using the Elastic Stitch taking care to keep
the two fabric edges close together as shown in fig. C.
Puntada elástica
Эластичная строчка
Número de puntada
Положение ручки выбора вида строчки
14 (puntada elástica)
14 (Эластичная строчка)
Se puede usar la puntada elástica para tres operaciones: los remiendos, la
Эластичная строчка может быть использована в трёх случаях:
inserción de gomas elásticas y como puntada de unión para juntar dos tejidos.
ремонт повреждённой ткани, пришивание эластичной тесьмы
Cada una de estas operaciones se detalla a continuación.
или стачивание кусков ткани. Каждое из этих применений
объяснено ниже.
Ponga el selector de puntadas en 14.
Установите ручку выбора строчки в положение «14».
REMIENDOS
РЕМОНТ ТКАНИ
1. Coloque una tela de refuerzo debajo de la parte a remendar.
1. Под место разрыва, требующее ремонта, поместите
2. Siguiendo la línea de la rasgadura, cosa con la puntada elástica
подходящий по размеру укрепляющий кусок ткани.
tal como ilustrado en la fig. A.
2. Шейте по линии разрыва, используя эластичную строчку,
INSERCIÓN DE GOMAS ELÁSTICAS
как показано на рис. А.
1. Ponga la goma sobre el tejido.
ПРИШИВАНИЕ ЭЛАСТИЧНОЙ ТЕСЬМЫ
2. A medida que esté cosiendo, estire el elástico tanto delante como
1. Положите эластичную тесьму (резинку) на ткань.
detrás del prensatelas tal como se muestra en la fig. B.
2. В процессе шитья растягивайте резинку одновременно
спереди и сзади прижимной лапки как показано на рис. B.
PUNTADA DE UNIÓN
СТАЧИВАНИЕ ТКАНЕЙ
La puntada elástica puede servir para unir dos trozos de tejido y
Эластичный шов может быть использован для стачивания
resulta muy eficiente para la costura de prendas de punto. Si se usa un
двух кусков ткани и очень эффективен при работе с вязаными
hilo de nylón, la puntada resultará invisible.
полотнами. При использовании нейлоновой нити шов будет
1. Junte las orillas de ambos trozos de tejido y céntrelas debajo del
незаметным.
prensatelas.
1. Сложите кромками два полотна ткани и разместите место
2. Cósalas juntas con la puntada elástica, teniendo sumo cuidado en mantener
их стыка под прижимной лапкой.
las dos orillas de los tejidos muy juntas, tal como se aprecia en la
fig. C
.
2. Сшейте их, используя эластичный шов, стараясь сохранять
кромки кусков ткани сомкнутыми, как показано на рис. C.
AB C
28
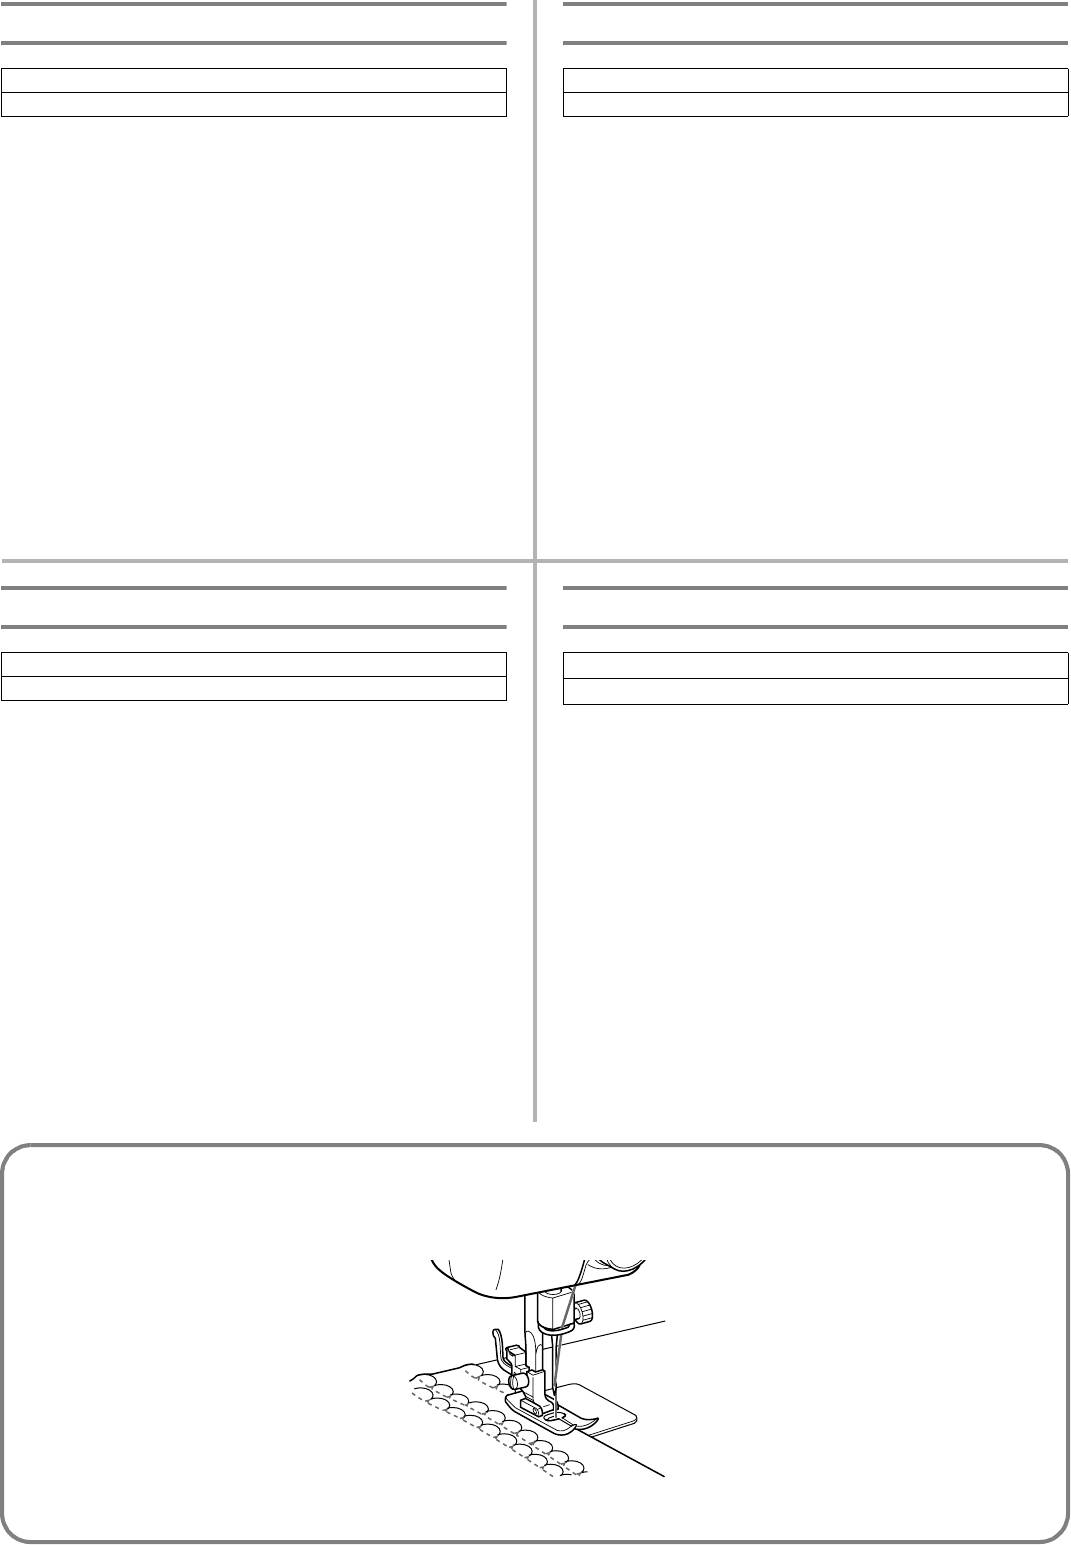
Shell Tuck Stitching
Point picot
Pattern
Modèle
13 (Shell Tuck Stitch)
13 (Point picot)
Utiliser ce point pour réaliser une lisière à picot (semblable à de
The Shell Tuck Stitch can be used to sew a picot (lace-like) edge
la dentelle) sur un tissu léger.
on a lightweight fabric.
1. Mettre le sélecteur de modèle de point sur 13.
1. Set the pattern selection dial to 13.
2. La tension du fil supérieur doit être légèrement plus forte que
2. Use a tighter thread tension than normal.
la normale.
3. At a slow speed, sew the fabric on the bias, placing it under
3. Coudre lentement le tissu sur le biais après l’avoir placé sous
the presser foot so that the straight stitches are sewn on the
le pied-de-biche de sorte que la machine puisse coudre des
seamline and the zigzag stitches are sewn slightly over the
points droits sur la ligne de couture et des points zigzag
folded edge.
légèrement au-dessus du bord replié.
Puntada ondas
Строчкаракушка
Número de puntada
Положение ручки выбора вида строчки
13 (Puntada ondas)
13 (Строчка*ракушка)
La puntada ondas puede usarse para coser una puntilla (como encaje)
Строчка*ракушка может использоваться для шитья зубчатого
en un tejido fino.
(похожего на кружево) края на тонких тканях.
1. Ponga el selector de puntadas en 13.
1. Установите ручку выбора строчки в положение «13».
2. Este trabajo requiere aumentar un poco más la tensión de hilo que
2. Настройте натяжение нити таким образом, чтобы оно
en condiciones normales.
было несколько сильнее обычного
3. Cosa lentamente el tejido en el sesgo, situándolo debajo del
3. На небольшой скорости шейте ткань, сложенную по
prensatelas de tal forma que las puntadas rectas se cosan en la
косой, размещая её под прижимной лапкой таким
línea de la costura y que las puntillas de las puntadas zigzag
образом, чтобы прямые стежки были расположенными
sobrepasen ligeramente el borde doblado.
вдоль шва, а зигзагообразные стежки слегка заходили за
край сгиба.
29
Making a Buttonhole
Création d’une boutonnière
Pattern Foot
Modèle Pied-de-biche
1(b ac d) Buttonhole foot
1(b ac d) Pied pour boutonnières
NOTE:
REMARQUE:
1. It is recommended to practice making a buttonhole on a scrap
1. Il est vivement conseillé de s’entraîner au préalable sur une
piece of fabric before attempting it on the actual garment.
chute de tissu avant de faire la boutonnière sur l’ouvrage
2. When making buttonholes on soft fabrics, place stabilizer
souhaité.
material on the underside of the fabric.
2. Lors de la réalisation de boutonnières sur des tissus doux et
légers, placer une pièce de renfort à l’envers du tissu.
Buttonhole-making is a simple process that provides reliable
results.
Facile à réaliser, la couture automatique de boutonnières à la
machine donne des résultats très fiables.
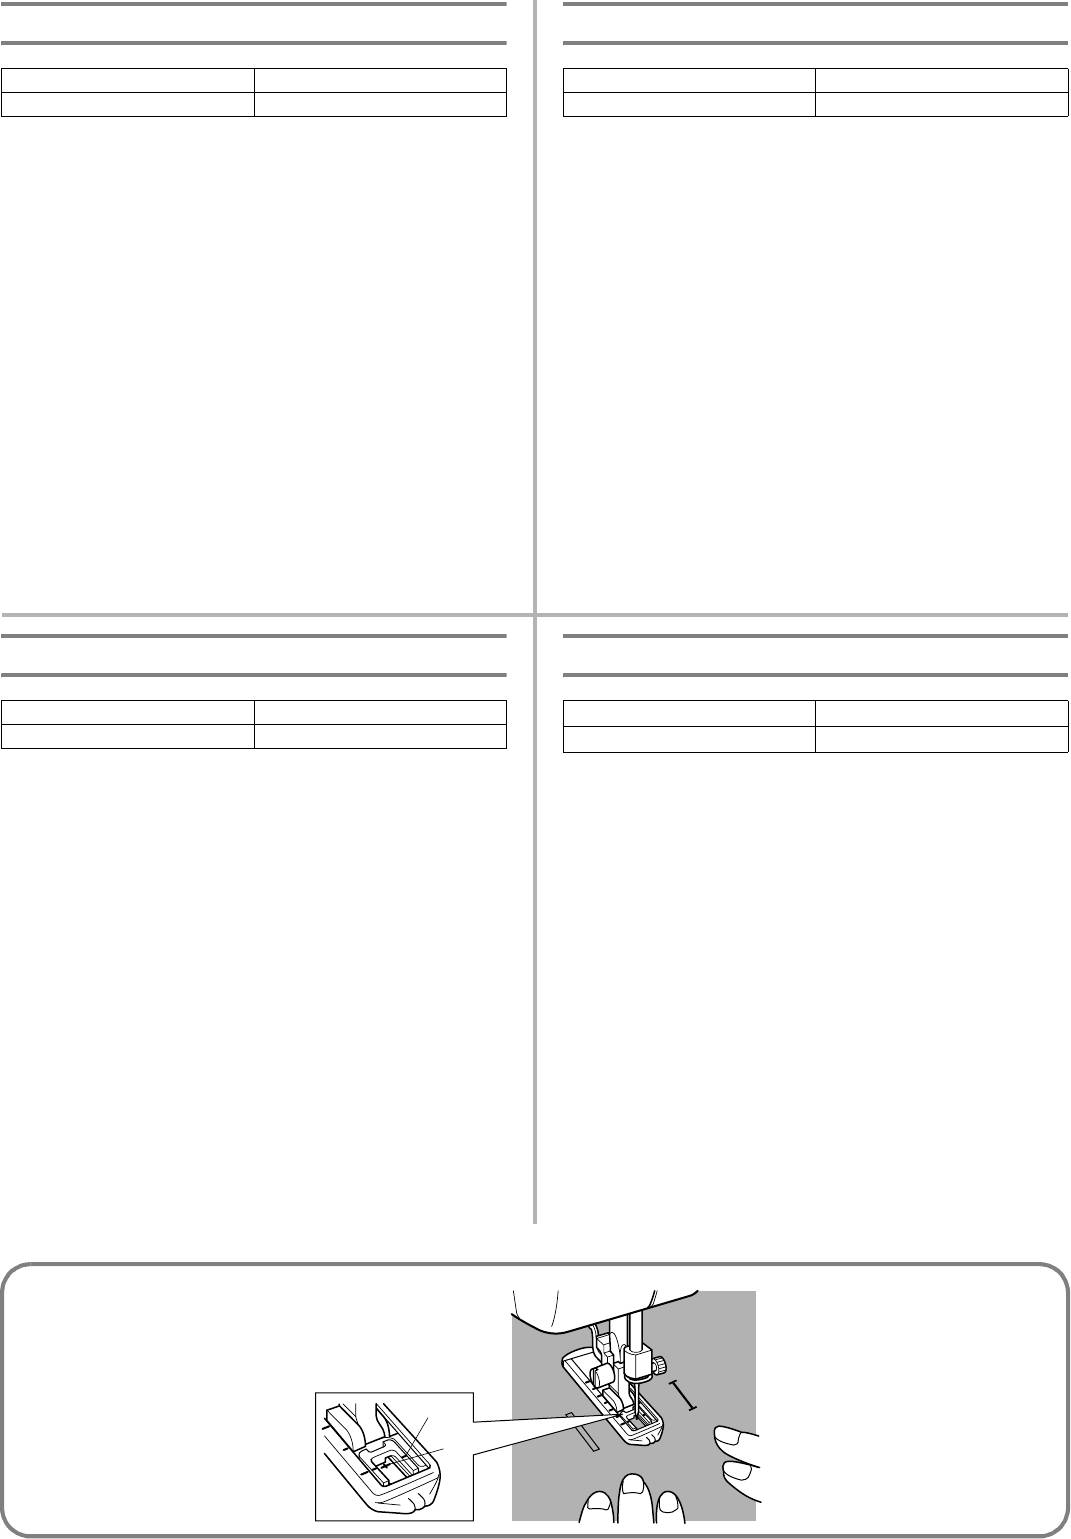
MAKING A BUTTONHOLE
1. Using tailor’s chalk, mark the position and length of the
POUR FAIRE UNE BOUTONNIERE
buttonhole on the fabric.
1. A l’aide d’une craie de tailleur, marquer sur le tissu
2. Attach the buttonhole foot and push the outside frame back
l’emplacement et la longueur désirée de la boutonnière.
until the sliding insert is in the front.
2. Installer le pied pour boutonnière et pousser le cadre extérieur vers
l’arrière, jusqu’à.ce que l’insertion à glissière se trouve devant.
3. The front bar tack will be sewn first. Place the fabric under the
3. La partie avant de la bride d’arrêt doit être cousue en premier.
presser foot so that the middle of the front of the tailor’s chalk
Placer le tissu sous le pied-de-biche de telle manière que le
line is directly in the center of the presser foot and aligned
milieu de la ligne de craie avant se trouve au centre du pied-
with the two red lines on the insert as shown below.
de- biche, alignée avec les deux lignes rouges, comme le
a Front of chalk mark
montre la fig. A.
b Red lines
a Partie avant de la marque à la craie
b Lignes rouges
Para coser ojales
Выметывание петель
Pattern Foot
Положение ручки выбора строчки
Лапка
1(b ac d) Buttonhole foot
1 (b ac d) Лапка для выметывания петель
NOTA:
ПРИМЕЧАНИЕ:
1. Se recomienda probar los ojales en un pedazo de tejido antes de
1. Перед выметыванием петель на реальном изделии
hacerlo realmente en las prendas.
рекомендуется сначала попрактиковаться на кусочке
2. Para hacer ojales en telidos muy finos, coloque entretela debajo
ткани.
2. При выметывании петель на мягких тканях подложите под
del tejido.
ткань стабилизирующий материал.
La función que le permite coser ojales es un proceso simple que
Выметывание петель – простой процесс, обеспечивающий
ofrece increíbles resultados.
надежный результат.
COSIDO DEL OJAL
ВЫПОЛНЕНИЕ ВЫМЕТЫВАНИЯ ПЕТЕЛЬ
1. Con jaboncillo, marque la posición y el largo del ojal en el tejido.
1. При помощи портновского мелка обозначьте
2. Instale el prensatelas para ojales y vuelva a empujar el marco
расположение и длину петли на ткани.
2. Установите лапку для вымётывания петель и нажимайте на
exterior hasta que la inserción corredera se encuentre delante.
её внешнюю рамку по направлению назад до тех пор, пока
3. Primero, se cose el remate de la parte delantera del ojal. Coloque
сдвижная вставка не окажется спереди.
el tejido debajo del prensatelas de tal manera que la marca del
3. Вначале выполняется передняя закрепка петли. Поместите
centro de la línea de jaboncillo esté directamente en el centro del
ткань под прижимной лапкой таким образом, чтобы
prensatelas y quede alineada con las dos líneas rojas de la
середина меловой отметки, соответствующей переднему
inserción, tal como se ilustra.
краю петли, оказалась прямо по центру лапки и была
a Parte delantera de la marca con jaboncillo.
совмещена с двумя красными рисками на вставке, как
b Líneas rojas
показано ниже.
a Передняя часть метки, нанесенной мелком на ткань
b Красные риски
A
2
1
30
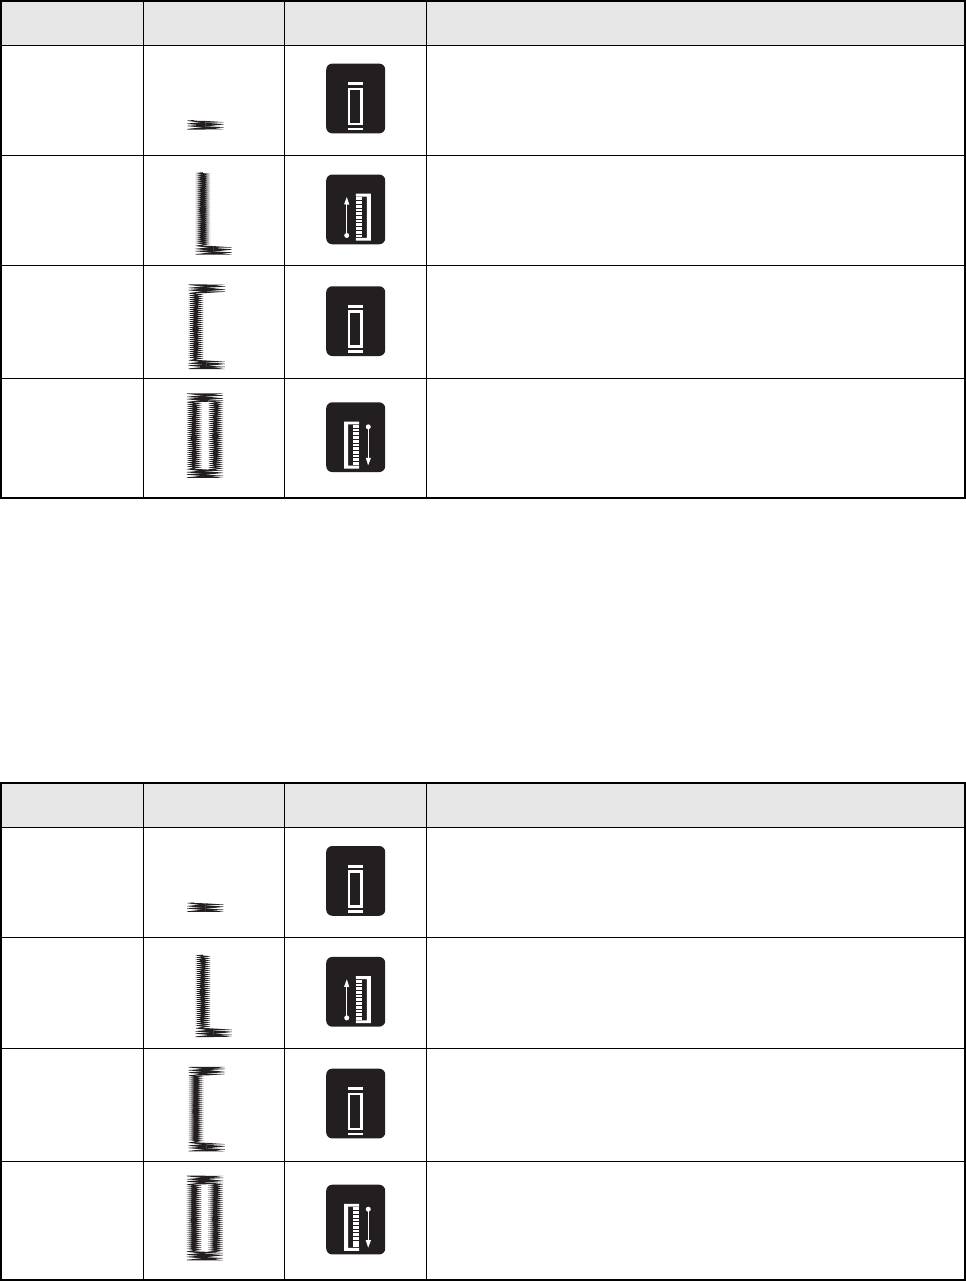
MAKING A BUTTONHOLE
Step Sewn Portion Pattern How to Sew
Step a
ac
1. Set the pattern selection dial to a.
c
2. Lower the presser foot and sew 5 to 6 stitches.
(Front end of
3. Stop the machine when the needle is at the left side of the stitches and
buttonhole)
a
a
raise the needle from the fabric.
b
b
1. Turn the pattern selection dial to b.
Step b
2. Sew the predetermined length of the tailor’s chalk line.
(Left side)
3. Stop the machine when the needle is at the left side of the stitch and
raise the needle.
c
1. Turn the pattern selection dial to c (same as a).
Step c
ac
c
2. Lower the presser foot and sew 5 to 6 stitches.
(Back end of but-
3. Stop the machine when the needle is at the right side of the stitch and
tonhole)
a
raise the needle from the fabric.
d
Step d
1. Set the pattern selection dial to d.
(Right side)
2. Sew the right side until the needle reaches the stitches formed in step a.
d
MARCHE A SUIVRE POUR FAIRE UNE BOUTONNIERE
Step Sewn Portion Pattern Comment coudre
1er temps
ac
1. Mettre le sélecteur de modèle sur a.
(barre d’arrêt
c
2. Abaisser le pied-de-biche et coudre 5 ou 6 points.
avant de la
3. Arrêter la machine lorsque l’aiguille se trouve à gauche des points et
boutonnière)
a
a
relever l’aiguille du tissu.
b
b
1. Mettre le sélecteur de modèle sur b.
2ème temps
2. Coudre la longueur de la ligne pré-définie à la craie.
(côté gauch)
3. Arrêter la machine lorsque l’aiguille se trouve à gauche des points et
lever l’aiguille.
3ème temps
c
1. Mettre le sélecteur de modèle sur c (même position que pour a).
ac
(barre d’arrêt
c
2. Abaisser le pied-de-biche et coudre 5 à 6 points.
arrière de la
3. Arrêter la machine lorsque l’aiguille se trouve à droite des points et lever
boutonnière)
a
l’aiguille du tissu.
d
1. Mettre le sélecteur de modèle sur d.
4ème temps
2. Coudre la lèvre droite jusqu’à ce que l’aiguille atteigne les points formés
(côté droit)
à la phase a.
d
31


