Brother JS 23 – страница 3
Инструкция к Швейной Машиной Brother JS 23
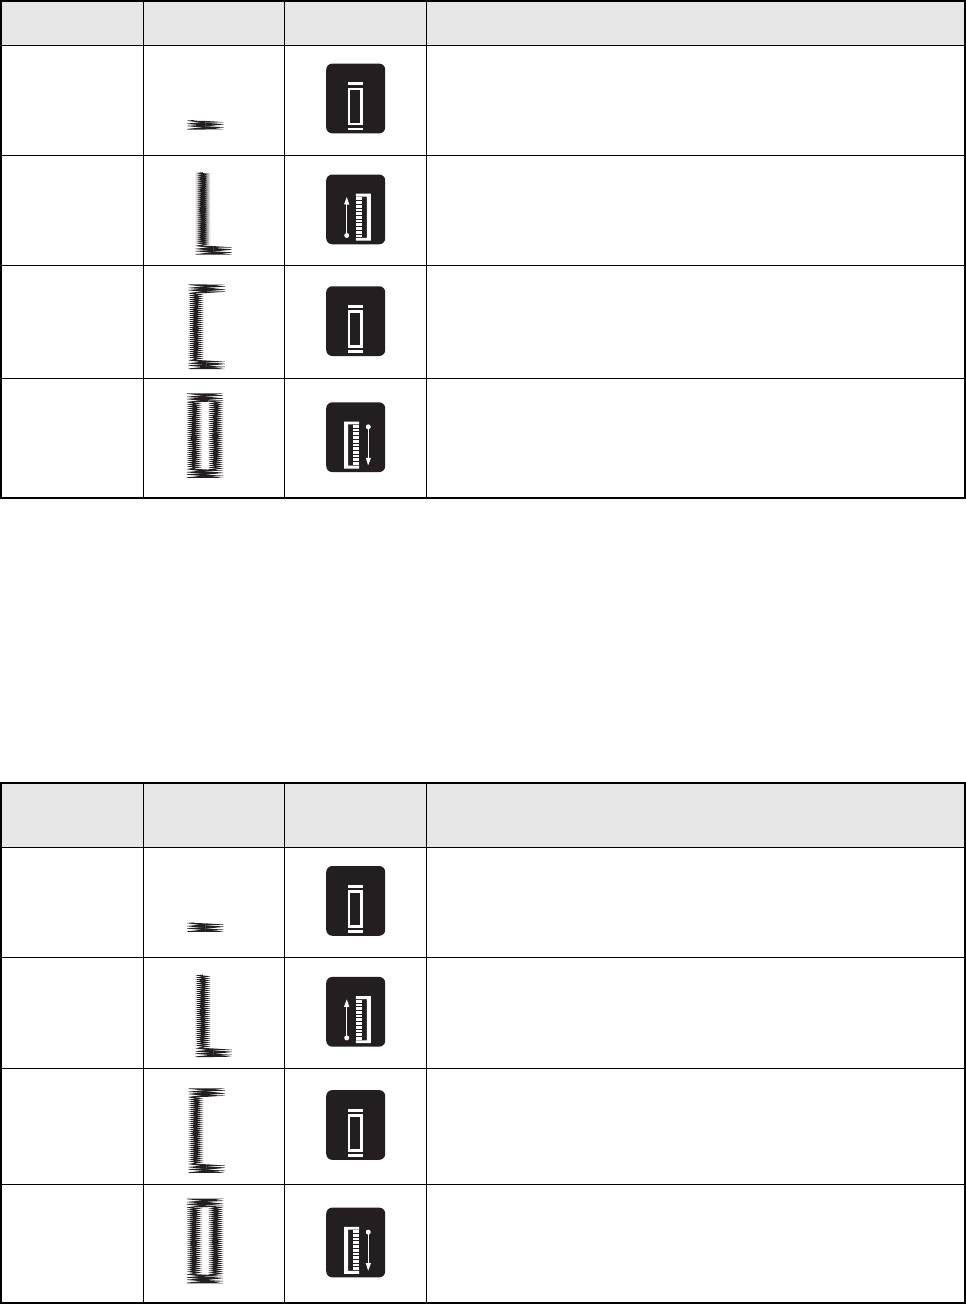
COSIDO DE UN OJAL
Pasos Zona de cosido Diseño Como coser
Paso a
ac
1. Ponga el selector de diseño en a.
(remate de la
c
2. Baje el prensatelas y cosa 5 ó 6 puntadas.
parte delantera
3. Pare la máquina cuando la aguja se encuentre a la izquierda de las puntadas
del ojal)
a
a
y levante la aguja del tejido.
b
b
1. Ponga el selector de diseño en b.
Paso b
2. Cosa el largo pre-definido de la línea con jaboncillo.
(lado izquierdo)
3. Pare la máquina cuando la aguja se encuentre a la izquierda de la puntada y
levántela.
Paso c
c
1. Ponga el selector de diseño en c (como para a).
ac
(remate de la
c
2. Baje el prensatelas y cosa 5 ó 6 puntadas.
parte atrás del
3. Pare la máquina cuando la aguja se encuentre a la derecha de las puntadas y
ojal)
a
levántela del tejido.
d
1. Ponga el selector de diseño en d.
Paso d
2. Cosa el lado derecho hasta que la aguja alcance las puntadas cosidas en el
(lado derecho)
primer paso (Paso a).
d
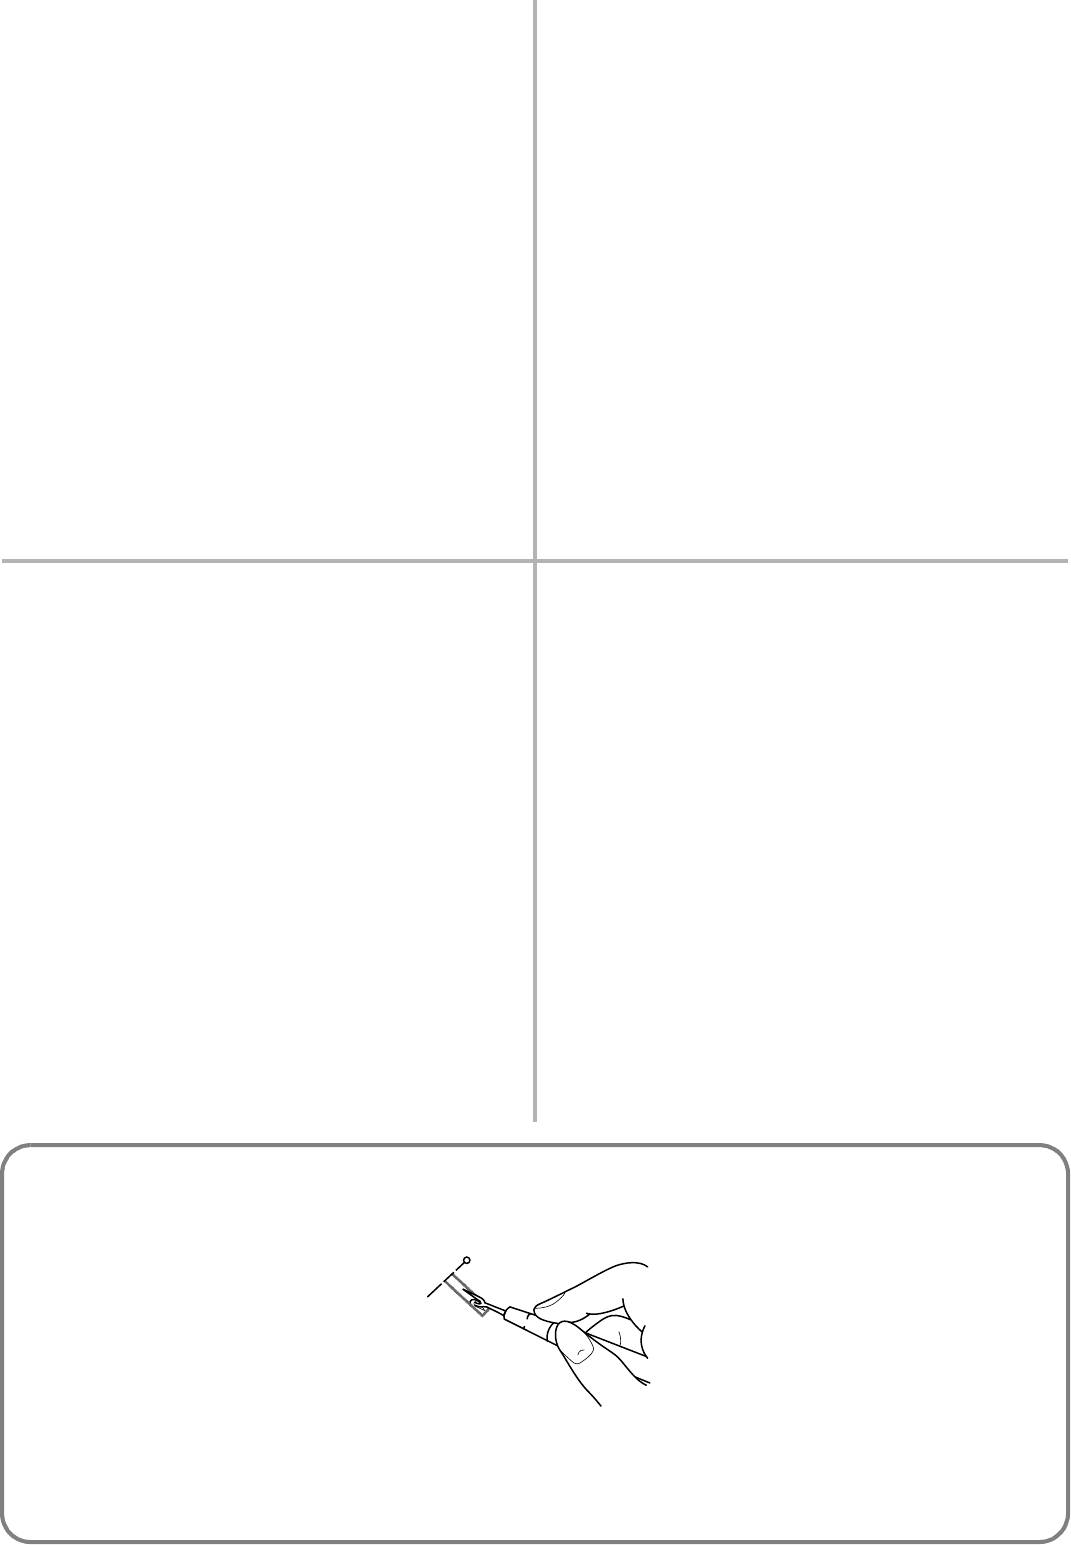
ВЫПОЛНЕНИЕ ВЫМЕТЫВАНИЯ ПЕТЕЛЬ
Выполненная
Шаг
Рисунок Порядок выполнения
часть
ac
1. Установите ручку выбора вида строчки в положение «а».
Шаг а
c
1. Опустите прижимную лапку и прошейте 5 или 6 стежков.
(Передний
1. Остановите машину, когда игла будет находиться на левой стороне
конец петли)
a
a
строчки, а затем поднимите иглу из ткани.
b
1. Поверните ручку выбора вида строчки в положение «b».
Шаг b
b
1. Прошейте строчку длиной, соответствующей меловой разметке.
(Левая
1. Остановите машину, когда игла будет находиться на левой стороне
сторона)
строчки, и поднимите иглу из ткани.
1. Переведите ручку выбора строчки в положение «с» (совпадающее
c
Шаг c
ac
с«а»)
c
(Задний конец
1. Опустите прижимную лапку и прошейте 5 или 6 стежков.
петли)
1. Остановите машину, когда игла будет находиться на правой стороне
a
строчки, а затем поднимите иглу из ткани.
Шаг d
d
1. Установите ручку выбора вида строчки в положение «d».
(Правая
1. Прошейте правую сторону до тех пор, пока игла не достигнет
сторона)
стежков, выполненных в шаге 1.
d
32
SECURING THE STITCHING AND CUTTING THE
COMMENT ARRETER LA COUTURE ET OUVRIR LA
BUTTONHOLE
BOUTONNIERE
1. To secure the stitching, turn the material 90 degrees
1. Pour arrêter la couture, tourner le tissu de 90 degrés dans le
counterclockwise, set the pattern selection dial to the Straight
sens inverse des aiguilles d’une montre, mettre le sélecteur de
Stitch (6-10) with the desired length and sew to the edge of the
modêle de point sur le point droit (6-10), réglé sur la longueur
front bar tack.
souhaitée, et coudre jusqu’au bout de la bride d’arrêt avant.
2. Remove the fabric from the machine. It is recommended that
2. Retirer le tissu de la machine. Il est vivement conseillé de
pins be placed across both ends of the buttonhole as
placer des épingles à chaque extrémité de la boutonnière afin
protection against cutting the stitches.
de ne pas couper les barrettes.
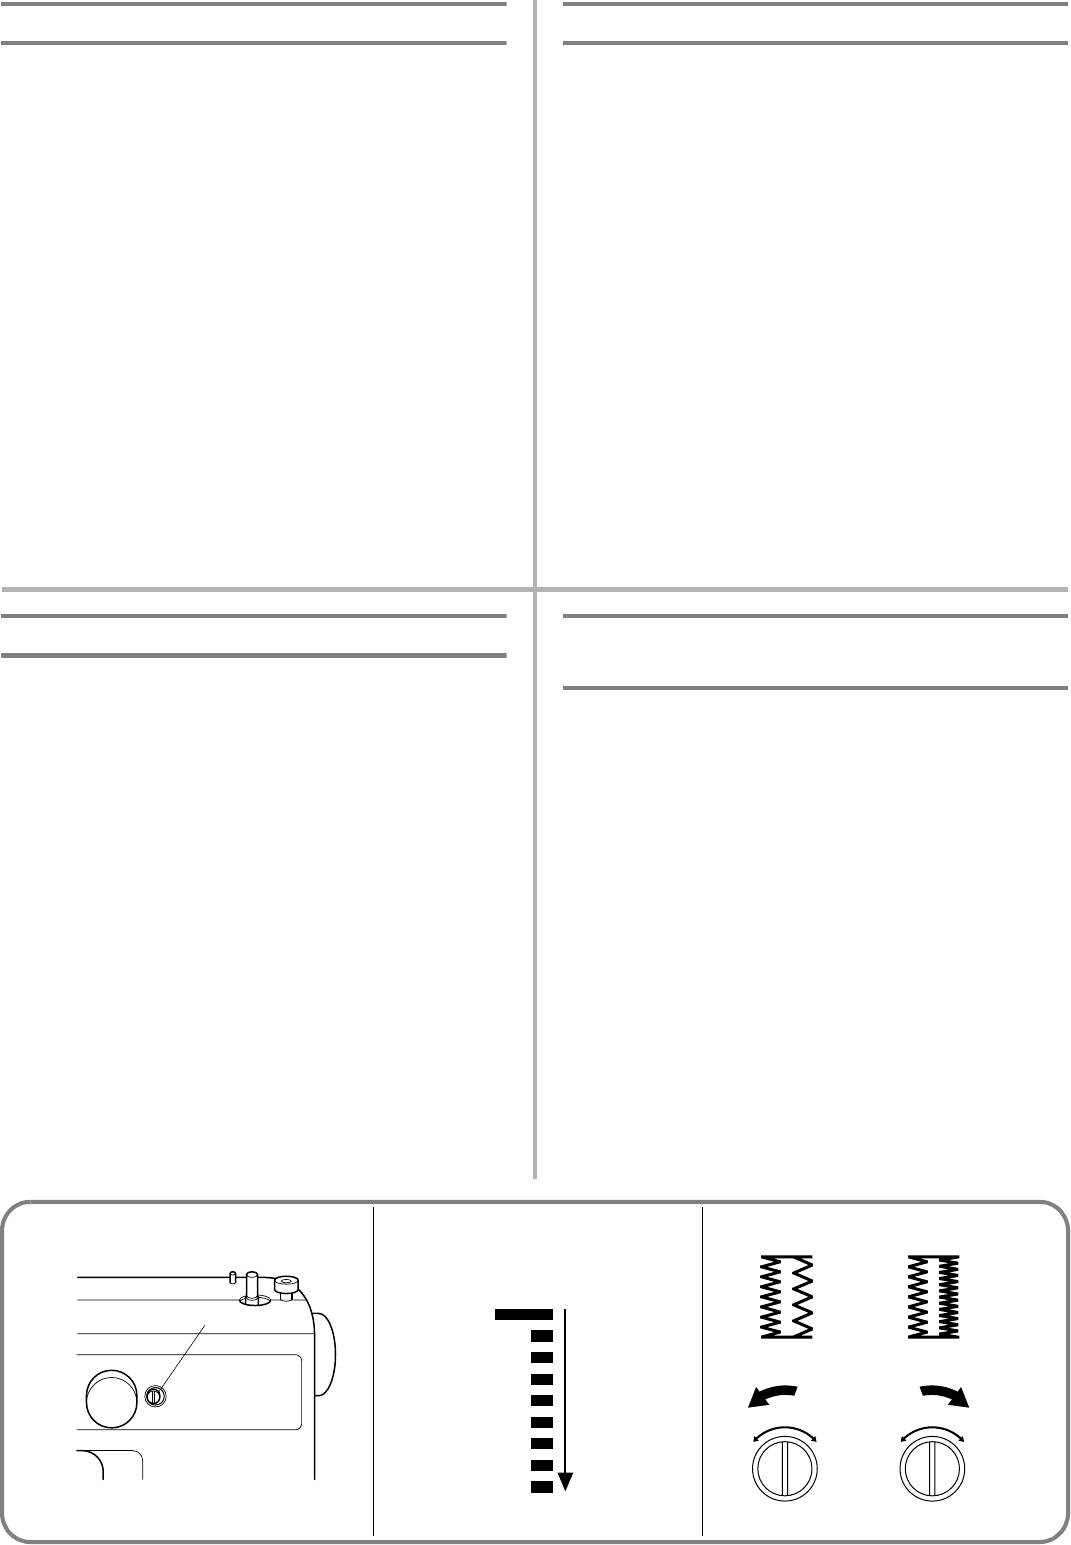
3. Cut an opening in the middle of the buttonhole with a seam
3. Couper une ouverture au milieu de la boutonnière à l’aide du
ripper tool. Be careful not to cut through any stitches.
découd-vite, en veillant bien à ne couper aucune couture.
PARA COMPLETAR LAS PUNTADAS Y CORTAR EL OJAL
ЗАКРЕПЛЕНИЕ СТРОЧКИ И ПРОРЕЗКА ПЕТЛИ
1. Para asegurar las puntadas, gire el tejido de 90 grados en el
1. Для закрепления строчки поверните материал на
sentido contrario al de las manecillas de un reloj, coloque el
90 градусов против часовой стрелки, установите ручку
selector de puntadas en la puntada recta (6-10) del largo deseado
выбора вида строчки на «Прямую строчку» (6*10) в
y cosa hasta el final del remate de la parte delantera.
соответствии с требуемой длиной стежка и прошейте до
2. Retire el tejido de la máquina. Se recomienda colocar alfileres en
конца закрепки переднего края петли.
ambos extremos del ojal para evitar el corte de las puntadas.
2. Снимите изделие с машины. Для защиты строчки от
3. Corte una apertura en el medio del ojal con la cuchilla especial
прорезания рекомендуется вставить по булавке поперёк
que sirve para abrir costuras. Tenga cuidado en no cortar ninguna
обоих концов петли.
puntada.
3. С помощью приспособления для вспарывания петель
прорежьте отверстие посередине петли.
Будьте осторожны – не прорежьте стежки.
33
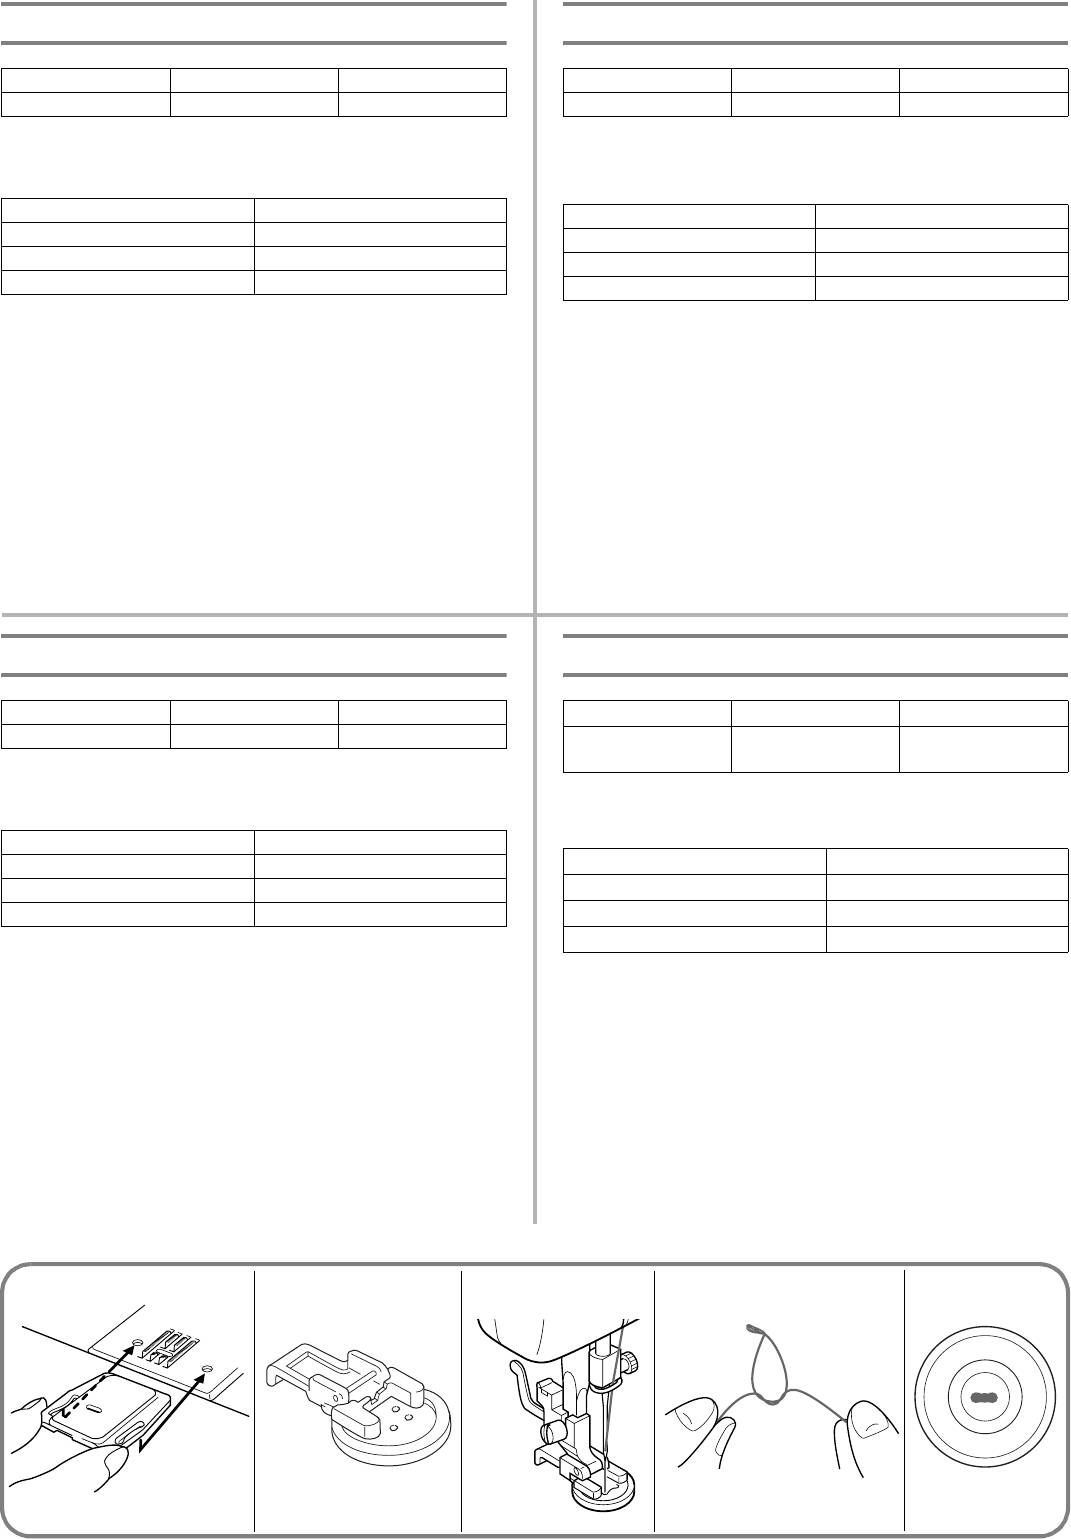
Buttonhole Fine Adjustment
Equilibrage des boutonnières
If the stitching on the two sides of the buttonhole do not appear
Si les points de chaque côté de la boutonnière sont
uniform, the following adjustments can be made.
dissemblables, procéder aux réglages suivants:
1. After sewing the left side of the buttonhole, stitch the right side
1. Lorsque l’on obtient un entraînement satisfaisant pour la lèvre
and observe the feeding.
gauche, coudre la lèvre droite de la boutonnière et observer
2. If the right side is too coarse or fine compared to the left side,
l’entraînement.
adjust the buttonhole fine-adjusting screw as described
2. Si la lèvre droite est trop dense ou trop espacée par rapport à
below.
la lèvre gauche, régler la vis d’équilibrage des boutonnières,
comme indiqué ci-dessous.
If the right side is too coarse, turn the buttonhole fine-adjusting
screw with the enclosed large screwdriver in the – direction.
Si le côté droit est trop dense, à l’aide du grand tournevis fourni,
If the right side is too fine, turn the buttonhole fine-adjusting
tourner la vis d’équilibrage des boutonnières dans le sens du -.
screw with the enclosed large screwdriver in the + direction.
Si le côté droit est trop fin, à l’aide du grand tournevis fourni,
tourner la vis d’équilibrage des boutonnières dans le sens du +.
This adjustment allows both sides of the buttonhole to appear
uniform.
Ce réglage rend les deux lèvres de la boutonnière uniformes.
a Buttonhole fine-adjusting screw
a Vis d’équilibrage des boutonnières
b Right row
b Lèvre droite
c Too coarse
c Trop dense
d Too fine
d Trop fin
Ajuste fino de los ojales
Точная настройка при выметывании
петель
Si las puntadas en ambos lados del ojal no parecen ser uniformes, se
pueden hacer los siguientes ajustes.
Если строчка на двух сторонах петли выглядит неодинаково,
1. Después de coser la parte izquierda del ojal, cosa la parte derecha
может быть произведена следующая регулировка:
y mire la alimentación del tejido.
1. После вымётывания левой части петли начинайте
2. Si la parte derecha del ojal es demasiada gruesa o fina con
выметывание правой части и наблюдайте за подачей
relación a la parte izquierda, apriete o suelte el tornillo para
ткани.
ajuste fino del ojal tal como se describe a continuación.
2. Если правая сторона слишком рыхлая или слишком
плотная по сравнению с левой, выполните регулировку с
Si la parte derecha es demasiada gruesa, con el destornillador que se
помощью винта точной настройки, как описано ниже.
incluye, gire el tornillo en el sentido del -.
Si la parte derecha es demasiada fina, con el grande destornillador
Если правая сторона слишком рыхлая, то большой отверткой
incluido, gire dicho tornillo en el sentido del +.
поверните винт точной настройки выметывания петель в
направлении «–».
Este ajuste permite que ambos lados del ojal parezcan uniformes.
Если правая сторона слишком плотная, то большой отверткой
a Tornillo de ajuste fino de ojal
поверните винт точной настройки выметывания петель в
b Lado derecho
направлении «+».
c Demasiado grueso
Эта регулировка позволяет добиться того, чтобы обе стороны
d Demasiado fino
петли выглядели одинаково.
a Винт точной настройки выметывания петель
b Правый ряд
c Слишком рыхло
d Слишком плотно
2
3
4
1
+–
+–
34
Button Sewing
Pour coudre un bouton
Pattern Foot Other
Modèle Pied-de-biche Autre
2, 3 or 4 Button Sewing Foot Darning Plate
2, 3 ou 4 Pied pour boutons Plaque à repriser
1. Measure the distance between the buttonholes and set the
1. Mesurer la distance entre les orifices et régler le sélecteur de
pattern selection dial to the Zigzag Stitch (2, 3 or 4) with the
modèle de point sur le point zigzag (2,3 ou 4) ayant la largeur
desired width.
appropriée.
Distance between holes Pattern
Distance entre les orifices Modèle
1.6mm (1/16") 2
1,6 mm 2
3.2 mm (1/8") 3
3,2 mm 3
4.8 mm (3/16") 4
4,8 mm 4
2. Attach the button sewing foot.
2. Fixer le pied pour boutons.
3. Place the darning plate on the needle plate as shown in fig. A.
3. Placer la plaque à repriser sur la plaque à aiguille comme le
4. Place a button between the foot and the fabric, turn the
montre la fig. A.
balance wheel and make sure that the needle enters the holes
4. Placer un bouton entre le pied et le tissu, tourner le volant et
without hitting the button. If it hits, see step 1.
veiller à ce que l’aiguille pique dans les trous sans heurter le
5. At a slow speed, sew approximately 10 stitches.
bouton. Si jamais elle heurte le bouton, veuillez vous reporter
6. Remove the material from the machine. Cut the upper and
au point 1.
lower threads leaving 15cm (6") lengthes. Use a hand-sewing
5. Coudre environ 10 points à faible vitesse.
needle to draw the upper thread to the back of the material.
6. Retirer le tissu de la machine. Couper les fils inférieur et
Tie the two threads together to secure.
supérieur en laissant à chacun une longueur de 15 cm.
Utiliser une aiguille à coudre normale pour faire passer le fil
supérieur à l’envers du tissu. Nouer les deux fils pour éviter
que la couture ne se défasse.
Coser botones
Пришивание пуговиц
Número de puntada Prensatelas Otros
Вид строчки Лапка Прочее
2, 3 ó 4
Prensatelas para botones
Placa de zurcir
2, 3 или 4 Лапка для
Штопальная
пришивания пуговиц
пластина
1. Mida la distancia entre los distintos agujeros del botón y ponga el
selector de puntadas en la puntada zigzag (2, 3 ó 4) con el ancho
1. И
змерьте расстояние между отверстиями пуговицы и
deseado.
установите ручку выбора вида строчки в положение Строчка
«зигзаг» (2, 3 или 4) в соответствии с требуемой шириной.
Distancia entre los agujeros Número de puntada
1,6mm 2
Расстояние между отверстиями Вид строчки
3,2 mm 3
1,6 мм 2
4,8 mm 4
3,2 мм 3
4,8 мм 4
2. Instalar el prensatelas para botones.
3. Instale la placa de zurcir sobre la placa de agujas tal como se
2. Установите лапку для пришивания пуговиц.
ilustra en la fig. A.
3. Поместите штопальную пластину на игольную пластину
как показано на рис. A.
4. Coloque un botón entre el prensatelas y el tejido, gire la ruedecilla
4. Положите пуговицу между лапкой и тканью; вращая
y asegúrese de que la aguja pase por los agujeros sin picar el
маховик машины, убедитесь, что игла при шитье точно
botón. Si golpea el botón, véase el punto 1.
входит в отверстия и не попадает по пуговице. Если игла
5. Cosa unas 10 puntadas a baja velocidad.
ударяет по пуговице, повторите шаг 1.
6. Retire el tejido de la máquina. Corte los hilos inferior y superior
5. Прошейте приблизительно 10 стежков на небольшой скорости.
dejando unos 15 cm de hilos sueltos. Utilice una aguja de coser
6. Снимите материал с машины. Обрежьте верхнюю и
normal para pasar el hilo superior en el revés del tejido y haga un
нижнюю нити, оставляя концы длиной 15 см. Используйте
nudo con ambos hilos para asegurar la costura.
иглу для ручного шитья, чтобы протащить верхнюю нить
на изнаночную сторону материала. Свяжите обе нитки для
закрепления.
35
Zipper Insertion
Insertion de fermeture à glissière
Pattern
Modèle
6-10 (Straight Stitch)
6-10 (Point droit)
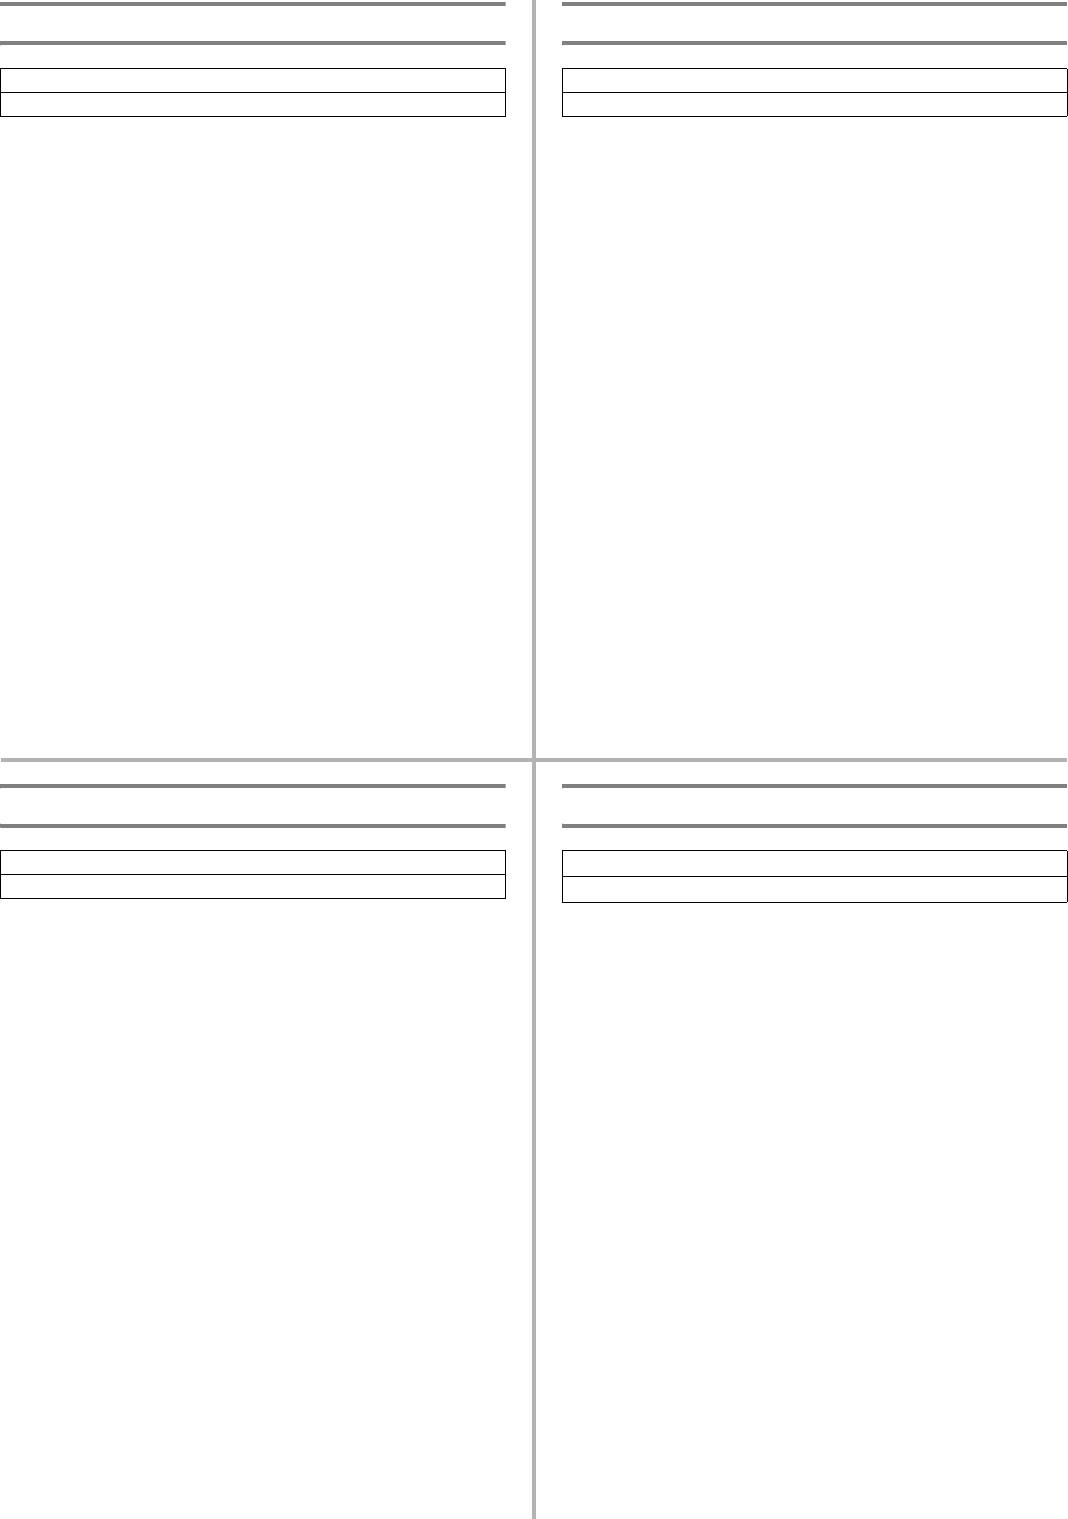
The zipper foot is used to sew on various types of zippers and can
Le pied à semelle étroite permet de coudre de nombreux types de fermetures
easily be positioned to the right or left side of the needle.
à glissière et peut aisément être installé à droite ou à gauche de l’aiguille.
When sewing the right side of the zipper, attach the shank to the
Lors de la couture de la partie droite de la fermeture à glissière, fixer la
left pin of the zipper foot. When sewing the left side of the zipper,
semelle à la partie gauche du pied approprié. Lors de la couture du côté
attach the shank to the right pin of the zipper foot. See fig. A.
droit, installer la semelle à la partie droite du pied. Voir
fig. A
.
1. Set the pattern selection dial to the Straight Stitch (6-10) with
1. Mettre le sélecteur de modèle sur le point droit (6-10) avec la
the desired length.
longueur souhaitée.
2. Lower the presser foot lever and attach either the left or right
2. Abaisser le levier du pied-de-biche et fixer la partie gauche ou
pin of the zipper foot onto the shank.
droite du pied pour fermetures à glissière dans l’encoche.
3. Fold the edge of the fabric 2 cm (3/4") back and place the
3. Plier le bord du tissu à 2 cm et placer la fermeture à glissière
zipper under the folded portion.
sous la partie pliée.
4. Lower the needle into the notch located on the side of the
4. Abaisser l’aiguille et la faire passer dans l’encoche située sur
zipper foot.
le côté du pied pour fermetures à glissière.
5. Sew from the bottom of the zipper toward the top on both
5. Coudre la fermeture à glissière de bas en haut, des deux côtés.
sides. The needle should be positioned on the zipper side of
Pour obtenir les meilleurs résultats, il est recommandé de placer
the foot for best results. See fig. B. Sew through the fabric
l’aiguille du côté de la fermeture à glissière par rapport au pied.
close to the edge of the zipper guiding the zipper foot along
Voir
fig. B
. Coudre le tissu près du bord de la fermeture en guidant
the zipper teeth.
le pied-de-biche pour fermetures le long des dents de la fermeture.
6. To sew the opposite side of the zipper, release the foot by
6. Pour coudre le côté opposé de la fermeture à glissière, libérer le
raising the lever located at the back of the presser foot holder
pied en relevant le levier situé à l’arrière du support, installer le
assembly, install the zipper foot on the other side of the zipper
pied pour fermeture à glissière de l’autre côté de la fermeture et
and continue sewing using the other side notch.
continuer à coudre en faisant passer l’aiguille par l’autre encoche.
a Zipper foot
a Pied pour fermetures à glissière
b Right pin for sewing the left side of the zipper
b
Axe de droite pour coudre le côté gauche de la fermeture à glissière.
c Left pin for sewing the right side of the zipper
c
Axe de gauche pour coudre le côté droit de la fermeture à glissière.
d Lower the needle into the notch
d Abaisser l’aiguille et la faire glisser dans l’encoche.
Poner de cremalleras
Вшивание застежки «молния»
Número de puntada
Вид строчки
6-10 (Puntada recta)
6*10 (Прямая строчка)
La pata de cremalleras sirve para coser varios tipos de cremalleras y
Лапка для «молний» применяется при вшивании различных видов
puede colocarse fácilmente hacia la izquierda o derecha de la aguja.
застёжек*«молний» и может быть легко позиционирована как к
Cuando la cremallera se cose por el lado derecho, instale la pata
правостороннему, так и к левостороннему положению иглы.
deslizándola hacia la izquierda. Cuando se cose la cremallera por el
При вшивании правой стороны застежки «молния» следует
присоединить к адаптеру прижимной лапки левый стерженек
lado izquierdo, instale la pata deslizándola hacia la derecha, tal como
лапки для вшивания застежки «молния». При вшивании
lo muestra la fig. A.
левой стороны застежки «молния» следует присоединить к
1. Ponga el selector de puntadas en la puntada recta (6-10) con el
адаптеру прижимной лапки правый стерженек лапки для
largo deseado.
вшивания застежки «молния». См. рис. A..
2. Baje la palanca del prensatelas y coloque el eje izquierdo o
1. Установите ручку выбора вида строчки на «Прямую
derecho de la pata de cremalleras en el soporte.
строчку» (6*10 или 11) с желаемой длиной стежка.
2. Опустите рычаг прижимной лапки и зафиксируйте либо
3. Doble la orilla del tejido a 2 cm (3/4") y coloque la cremallera
левый, либо правый стерженек лапки для вшивания
debajo de la parte doblada.
застежки «молния» в адаптере.
4. Baje la aguja en la hendidura situada en el lado de la pata de
3. Подверните край материала шириной 2 см и положите
cremalleras.
застежку «молния» под загнутую кромку.
5. Cosa a partir de la parte inferior de la cremallera hacia la parte
4. Опустите иглу в паз, расположенный сбоку лапки для
superior, por ambos lados. Para mejores resultados, se debe colocar
вшивания застежки «молния».
5. Прошейте обе стороны застежки «молния» в направлении
la aguja del lado de la pata y de la cremallera. Véase
fig. B
para
снизу вверх. Для получения наилучшего результата, игла
mayores detalles. Cosa el tejido cerca de la orilla de la cremallera,
должна располагаться по ту же сторону от лапки, по
guiando la pata a lo largo de los dientes de la cremallera.
которую находится и застежка «молния». См. рис. B.
6. Para coser el lado opuesto de la cremallera, suelte la pata al subir
Ведите шов по ткани близко к кромке «молнии»,
la palanca situada en la parte posterior del soporte, instale la pata
направляя лапку вдоль зубцов застёжки.
en el otro lado de la cremallera y siga cosiendo, pasando la aguja
6. Для пришивания противоположной стороны застежки
por la hendidura del otro lado.
«молния» отсоедините лапку, подняв рычаг, расположен*
ный на задней стороне адаптера прижимной лапки,
a Pata de cremalleras
разместите лапку на другой стороне «молнии» и
b Eje derecho para coser la parte izquierda de la cremallera
продолжите вшивание, используя паз на другой стороне.
c Eje izquierdo para coser la parte derecha de la cremallera.
a
Лапка для вшивания застежки «молния»
d Baje la aguja dentro de la ranura.
b
Правый стерженек для вшивания левой стороны застежки «молния»
c
Левый стерженек для вшивания правой стороны застежки «молния»
d
Вхождение иглы в паз.
36
A
B
1
2
4
4
3
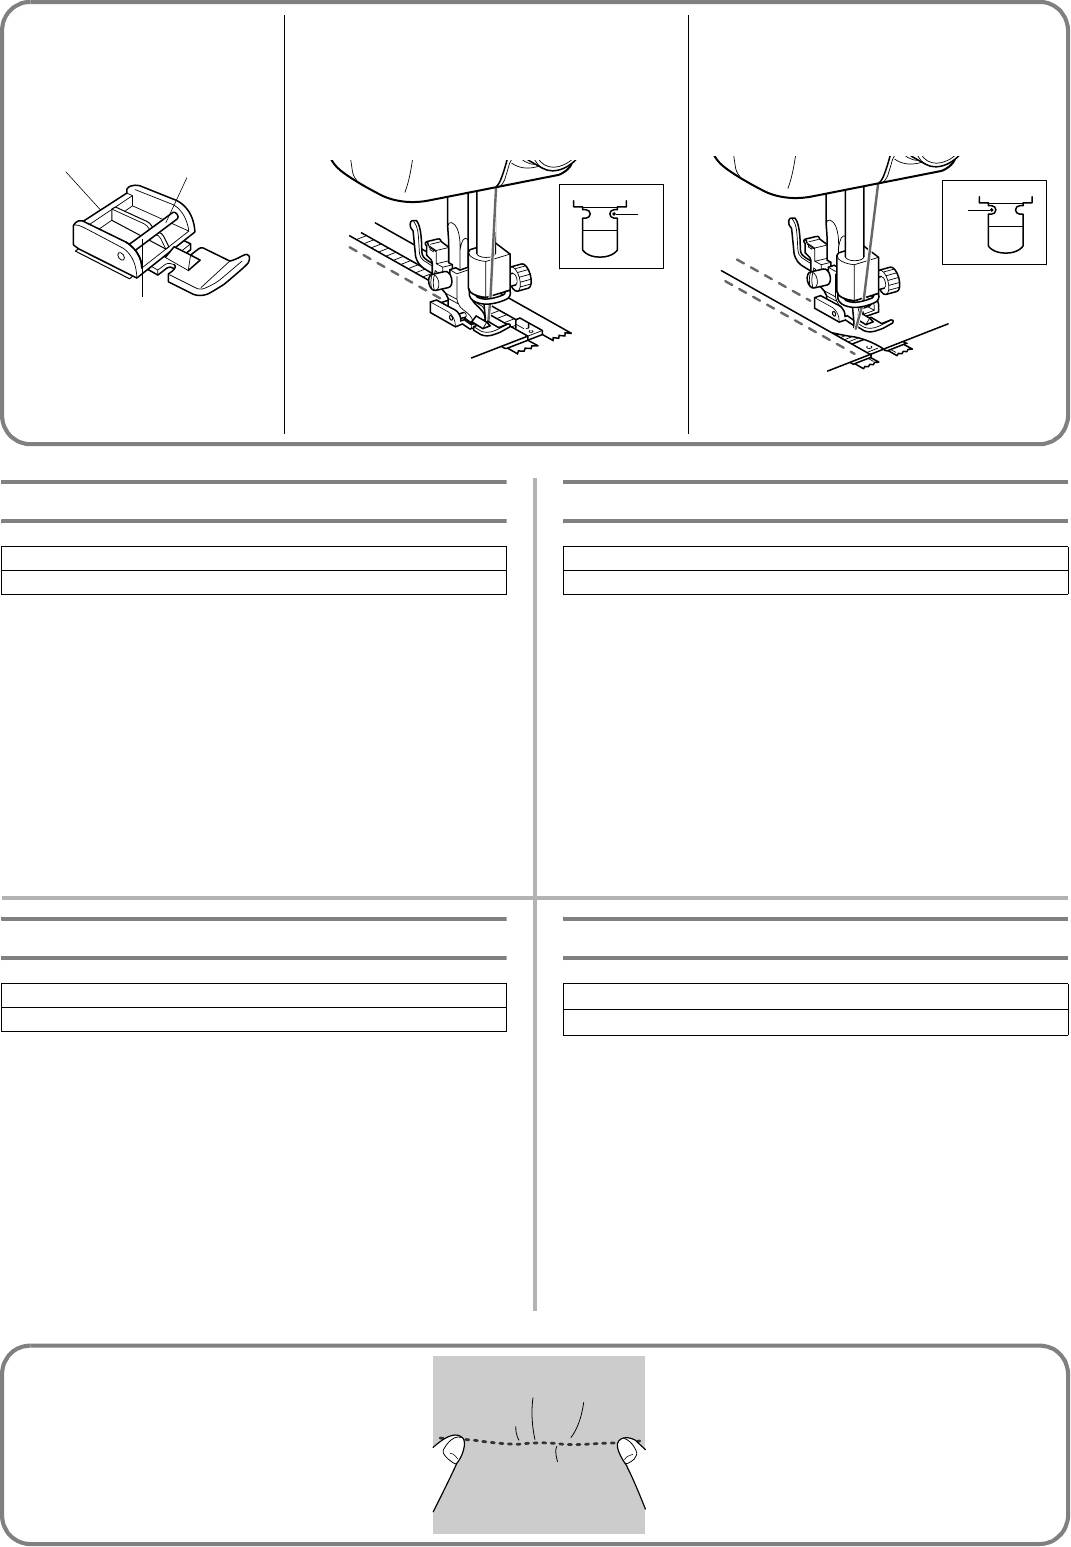
Gathering
Pour froncer un tissu
Pattern
Modèle
6-10 (Straight Stitch)
6-10 (Point droit)
1. Set the pattern selection dial to the Straight Stitch (6-10) with
1. Mettre le sélecteur de modèle sur le point droit (6-10) avec la
the desired length.
longueur souhaitée.
2. Loosen the tension of the upper thread (to about 2) so that the
2. Relâcher la tension du fil supérieur (mettre sur 2 environ) afin
lower thread lies on the underside of the fabric.
que le fil inférieur reste tendu à l’envers du tissu.
3. Sew a single row or evenly-spaced multiple rows of Straight
3. Faire une seule ligne ou plusieurs lignes de points droits à
Stitches.
intervalles égaux.
4. Pull the lower thread(s) to gather the fabric.
4. Tirer sur le ou les fils inférieurs pour froncer le tissu.
Fruncido
Выполнение сборок
Número de puntada
Вид строчки
6-10 (Puntada recta)
6*10 (Прямая строчка)
1. Ponga el selector de puntadas en la puntada recta (6-10) con el
1. Установите ручку выбора вида строчки на «Прямую
largo deseado.
строчку» (6*10) с желаемой длиной стежка.
2. Suelte la tensión del hilo superior (hasta alrededor de 2) para que
2. Ослабьте натяжение верхней нити (ориентировочно до
el hilo inferior se encuentre tirante en el revés del tejido.
значения 2), чтобы нижняя нить оставалась на нижней
3. Cosa una sola línea de puntadas rectas o distintas líneas a igual
стороне материала.
distancia las unas de las otras.
3. Прострочите один ряд или несколько равномерно
4. Tire del o de los hilos inferiores para fruncir el tejido.
расположенных рядов Прямой строчкой.
4. Подтяните нижнюю нить (нижние нити), чтобы создать
сборки на материале.
37
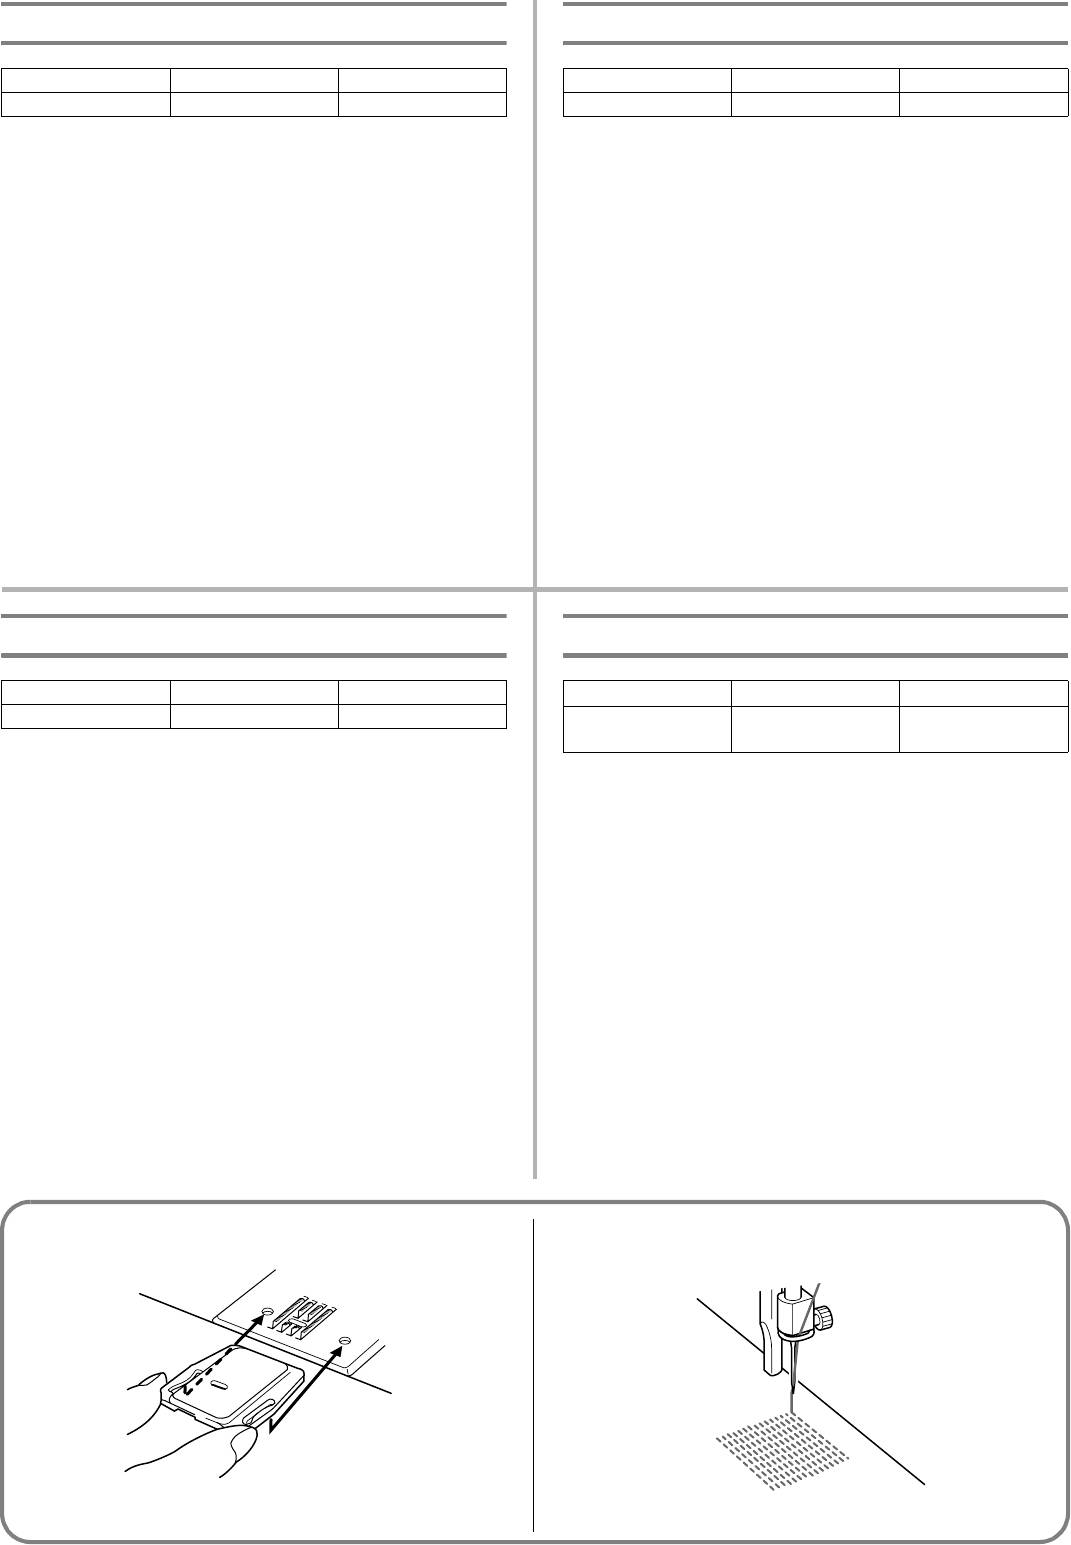
Darning
Reprisage
Pattern Foot Other
Modèle Pied-de-biche Autre
6-10 (Straight Stitch) None Darning Plate
6-10 (Point droit) Sans pied Plaque à repriser
1. Place the darning plate on the needle plate as shown in fig. A.
1. Placer la plaque à repriser sur la plaque à aiguille comme le
2. Set the pattern selection dial to the Straight Stitch (6-10) with
montre la fig. A.
the desired length.
2. Mettre le sélecteur de modèle sur le point droit (6-10) avec la
3. Place the portion to be darned under the presser foot together
longueur souhaitée.
with a fabric underlay for reinforcement.
3. Placer la partie à repriser et la pièce de renfort sous le pied-
4. Either remove both the presser foot and presser foot holder
de-biche.
assembly or use an embroidering presser foot (sold
4. Soit retirer le pied-de-biche et son support ou utiliser un pied
separately).
pour broderies (non fourni)
5. Begin sewing alternating between gently drawing the work
5. Commencer à coudre en donnant au tissu un mouvement de
away from you and pulling it toward you. With the darning
va-et-vient (en le poussant et en le tirant doucement). Lorsque
plate on the machine, the feed dogs will not move the fabric.
la plaque à repriser est installée sur la machine, les griffes
You control the fabric movement with your hands.
d’entraînement n’ont plus d’effet sur le tissu. Le tissu est
6. Repeat this motion until the portion to be darned is filled with
déplacé manuellement.
parallel lines of stitching. See fig. B.
6. Répéter l’opération jusqu’à ce que l’ensemble de la partie à
repriser soit couverte de lignes de piqûres parallèles. Voir fig.
B.
Zurcido
Штопка
Número de puntada Prensatelas Otros
Вид строчки Лапка Прочее
6-10 (Puntada recta)
Quitarlo, sin prensatelas
Placa de zurcir
6*10 (Прямая
Не применяется Штопальная
строчка)
пластина
1. Instale la placa de zurcir sobre la placa de agujas tal como se
ilustra en la fig. A.
1. Поместите штопальную пластину на игольную пластину
2. Ponga el selector de puntadas en la puntada recta (6-10) con el
как показано на рис. A.
largo deseado.
2. Установите ручку выбора вида строчки на «Прямую
3. Ponga el tejido a zurcir debajo del prensatelas con una pieza de
строчку» (6*10) с желаемой длиной стежка.
tela de refuerzo debajo.
3. Разместите участок ткани, который собираетесь штопать,
4. Quite el prensatelas y su soporte o use un prensatelas para
вместе с усилительной подложкой из ткани под
bordados (que se vende aparte).
прижимной лапкой.
5. Empiece a coser empujando y tirando alternativamente del tejido.
4. Либо снимите прижимную лапку вместе с адаптером, либо
Cuando la placa de zurcir está puesta en la máquina, los
используйте лапку для вышивания (продаётся отдельно).
alimentadores no tienen ningún efecto sobre el tejido. Su
5. Начните шить, осторожно подтягивая изделие поочередно
movimiento se controla únicamente con las manos.
от себя и к себе. При установленной на машине
6. Repita la operación hasta que se haya completado el zurcido
штопальной пластине гребёнка транспортёра не
cosiendo unas cuantas pasadas de puntadas paralelas. Véase fig.
протягивает ткань. Вы управляете перемещением ткани
B.
вручную.
6. Повторяйте это движение до тех пор, пока область штопки
не будет полностью покрыта параллельными линиями
строчек. См. рис. B.
AB
38
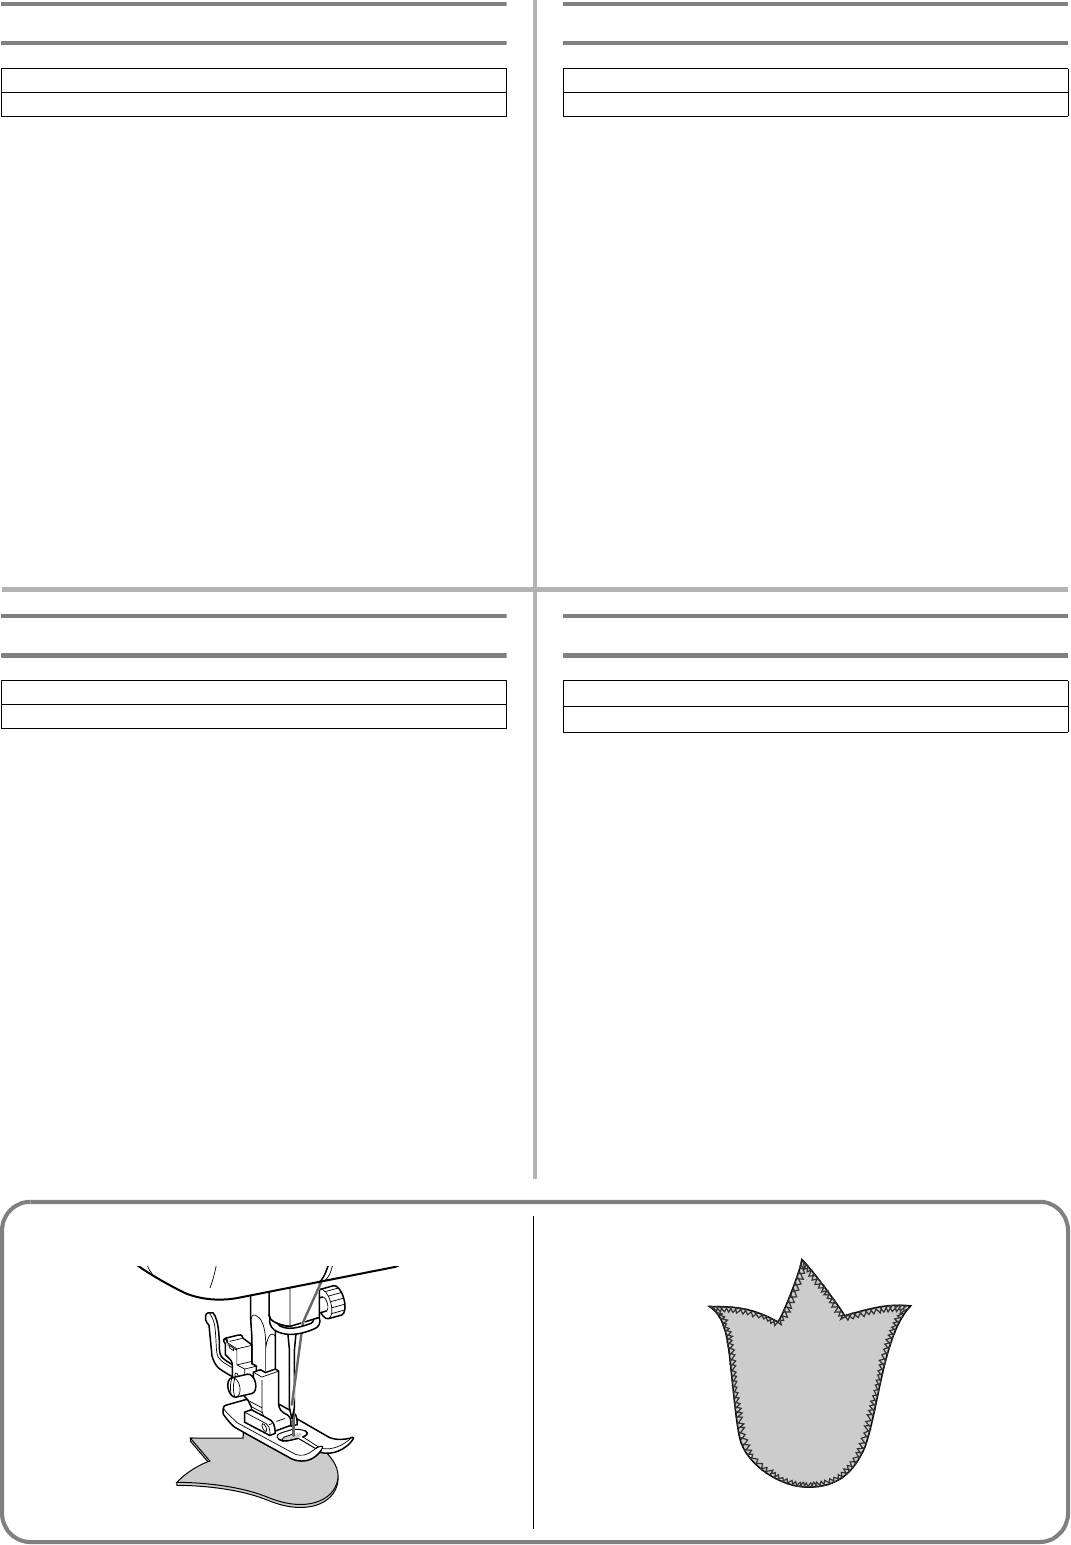
Appliques
Appliques
Pattern
Modèle
2, 3, 4, 5 (Zigzag Stitch)
2, 3, 4, 5 (Point zigzag)
An applique is created by cutting a contrasting piece of fabric
Pour créer une applique, il suffit de découper un morceau d’un
into a shape to be used as a decoration on a garment or project.
tissu contrastant et de lui donner la forme d’une décoration à
1. Baste the cut design to the fabric in the desired location where
appliquer sur un vêtement ou sur un ouvrage.
desired.
1. Faufiler le motif découpé à l’endroit souhaité.
2. Carefully sew around the edge of the cutout design with the
2. Coudre soigneusement le contour du motif avec le point
appropriate Zigzag Stitch (2, 3, 4 or 5).
zigzag approprié (2,3,4 ou 5).
3. Cut away the surplus fabric outside of the stitching.
3. Couper la partie de tissu dépassant de la couture.
4. Remove the basting, if necessary.
4. Défaufiler, si nécessaire.
NOTE:
REMARQUE:
Make reinforcing Straight Stitches at the beginning and end of the
Faire quelques points droits à chaque extrémité pour renforcer la
stitching to secure your work.
couture.
Aplicaciones
Аппликации
Número de puntada
Вид строчки
2, 3, 4, 5 (Puntada zigzag)
2, 3, 4, 5 (Строчка «зигзаг»)
Si queremos colocar un aplique de piel etc. que haga contraste, para
Аппликация создаётся путём вырезания различных форм из
utilizarla como decoración en una prenda.
ткани контрастного цвета для использования в качестве
1. Hilvane la aplicación recortada al tejido, en donde desee ponerla.
украшения швейного изделия.
2. Cosa cuidadosamente los bordes del diseño con la puntada zigzag
1. Приметайте вырезанный рисунок на полотно другой ткани
(2, 3, 4 ó 5) apropiada.
в требуемом положении.
3. Recorte el tejido sobrante que quede fuera del pespunte.
2. Аккуратно пристрочите по контуру вырезанный рисунок,
4. Quite los hilvanes, si fuera necesario.
используя подходящий шов «зигзаг» (2, 3, 4 или 5).
3. Обрежьте излишки ткани с внешней стороны шва.
NOTA:
4. При необходимости удалите наметку.
Cosa unas puntadas rectas como refuerzo al principio y al final de las
puntadas para que no puedan deshacerse.
ПРИМЕЧАНИЕ:
В начале и в конце строчки прошейте усилительные прямые
стежки для закрепления Вашей работы.
39
Monogramming and Embroidering
Monogrammes et broderies
Pattern Foot Other
Modèle Pied-de-biche Autre
2, 3, 4, 5 (Zigzag Stitch)
None Darning Plate
2, 3, 4, 5 (Point zigzag)
Sans pied Plaque à repriser
PREPARING FOR MONOGRAMMING AND EMBROIDERING
PREPARATION AVANT DE FAIRE DES MONOGRAMMES OU
1. Place the darning plate on the needle plate.
DES BRODERIES
2. Set the pattern selection dial to the appropriate Zigzag Stitch
1. Placer la plaque à repriser sur la plaque à aiguille.
(2, 3, 4 or 5).
2. Mettre le sélecteur de modèle sur le numéro de point zigzag
3. Draw the lettering (for monogramming) or design (for
adéquat (2,3,4 ou 5).
embroidering) on the surface of the fabric.
3. Dessiner les lettres (monogrammes) ou le motif (broderies) sur
4. Stretch the fabric in an embroidery hoops as firmly as possible
l’endroit du tissu.
with the underside of the fabric on the bottom of the inside
4. Tendre au maximum l’ouvrage sur le tambour, en maintenant
hoop.
l’envers du tissu dans le fond du cercle intérieur.
5. Place the work under the needle and lower the presser bar
5. Placer l’ouvrage sous l’aiguille et abaisser la barre du pied-de-
with both the presser foot and presser foot holder assembly
biche, sans pied et sans support.
removed.
6. Tirer le fil inférieur vers le haut à travers l’ouvrage à la
6. Pull the lower thread up through the work at the starting
position de départ en tournant le volant et faire quelques
position by turning the balance wheel to make a few stitches
points de maintien.
to hold the end of the thread.
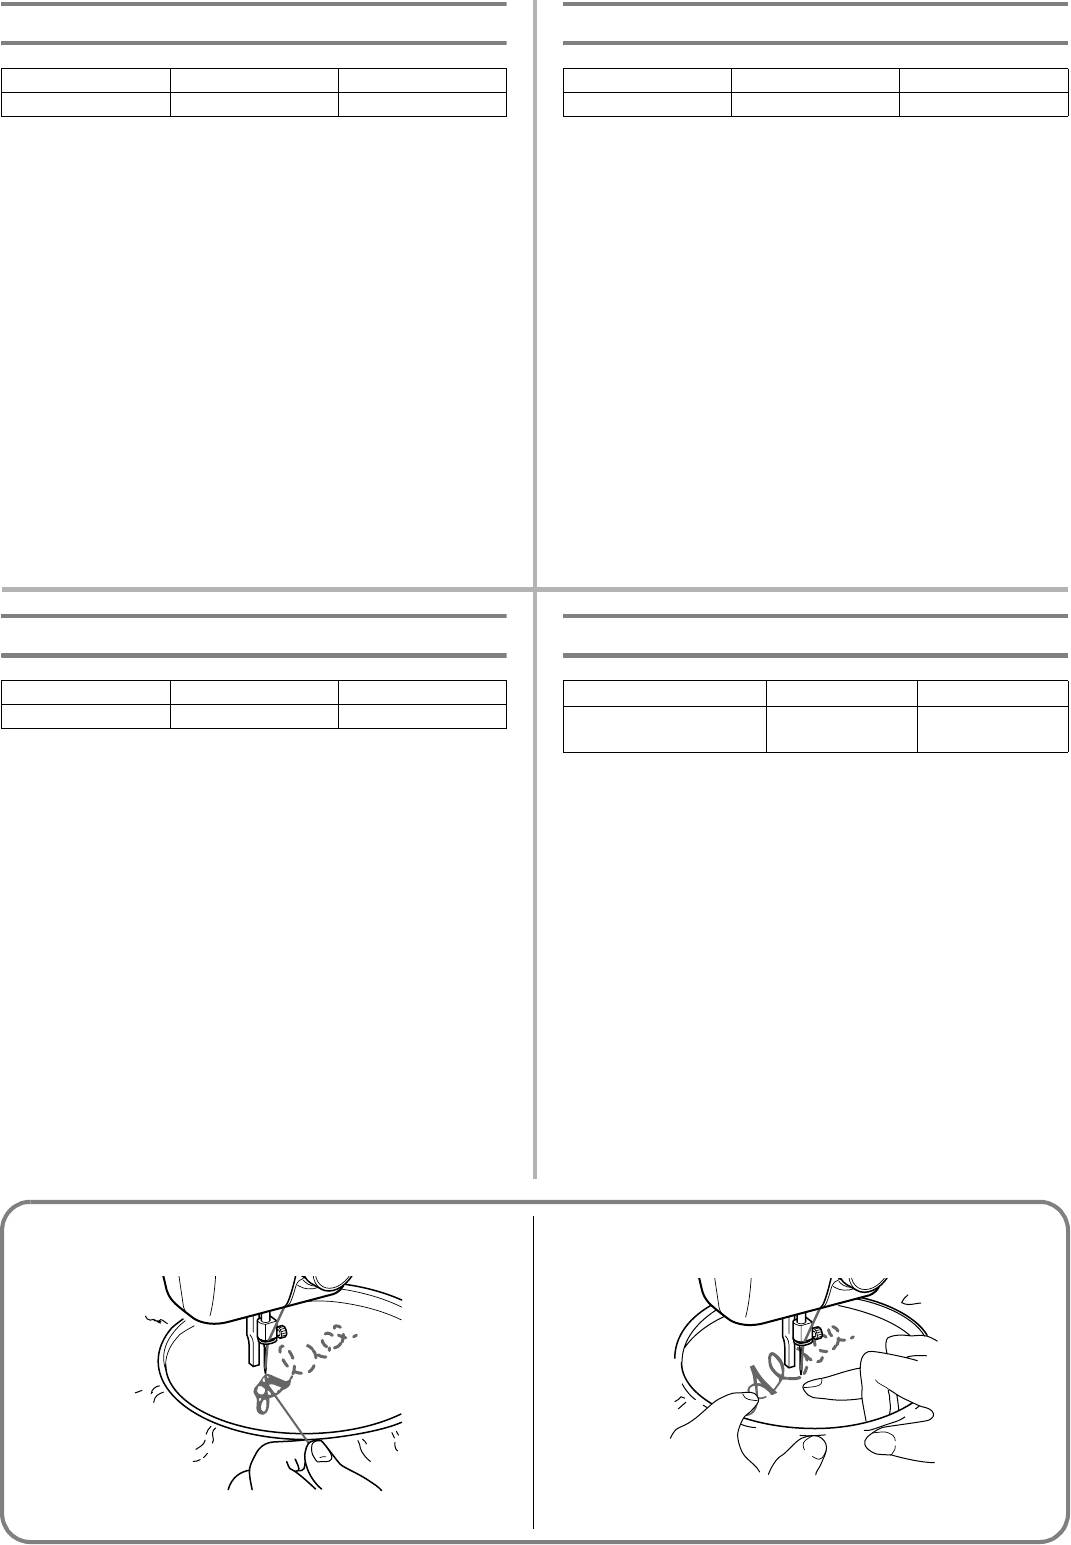
7. Saisir le tambour des deux mains, avec le pouce et l’index,
7. Grip the hoop with the thumb and forefingers of both hands
tout en appuyant sur le tissu avec le majeur et l’annulaire de
while pressing the fabric with the middle and third fingers and
chaque main. Les auriculaires serviront à tenir l’extérieur du
supporting the outside of the hoop with your smaller fingers.
tambour.
Monogramas y bordados
Выстрачивание монограмм и вышивание
Número de puntada Prensatelas Otros
Вид строчки Лапка Прочее
2, 3, 4, 5 (Puntada zigzag)
Quitarlo, sin prensatelas
Placa de zurcir
2, 3, 4, 5 (
Строчка «зигзаг»
) Не применяется Штопальная
пластина
PREPARACIÓN PARA MONOGRAMAS Y BORDADOS
ПОДГОТОВКА К ВЫСТРАЧИВАНИЮ МОНОГРАММ И
1. Instale la placa de zurcir sobre la placa de agujas.
ВЫШИВАНИЮ
2. Ponga el selector de puntadas en la puntada zigzag apropiada
1. Установите штопальную пластину на игольную пластину.
(2,3,4 ó 5).
2. Установите ручку выбора вида строчки на Строчку «зигзаг» с
3. Dibuje las letras (para monogramas) o el diseño (para bordados)
учетом Ваших потребностей (2, 3, 4 или 5).
en el derecho del tejido.
3. Напишите буквы (для выстрачивания монограмм) или
4. Estire el tejido en el bastidor tanto como pueda y si es posible con
начертите узор (для вышивания) на поверхности ткани.
el revés abajo del círculo interior.
4. Натяните ткань на пяльцы для вышивания настолько туго,
5. Coloque la tela debajo de la aguja y baje la barra del prensatelas,
насколько это возможно, причем нижняя сторона ткани должна
быть обращена к нижней стороне внутреннего кольца пялец.
aunque no haya ningún prensatelas o soporte puesto.
5. Разместите пяльцы под иглой и стержнем прижимной лапки
6. Girando la ruedecilla, pase el hilo inferior por el tejido donde
(и прижимная лапка, и адаптер прижимной лапки должны
quiera empezar y cosa unas puntadas para asegurar el extremo del
быть сняты).
hilo.
6. Вытяните нижнюю нить через ткань в том месте, откуда
7. Sujete el bastidor con el pulgar e índice de cada mano, presione el
начнёте вышивание, путём поворота маховика машины и
tejido con los dedos medios y anulares y aguante los exteriores del
выполните несколько стежков для закрепления конца нити.
bastidor con los meñiques.
7. Зажмите пяльцы большим и указательным пальцами обеих
рук, одновременно прижимая ткань средними и
безымянными пальцами и поддерживая внешнюю
поверхность пялец мизинцами.
40
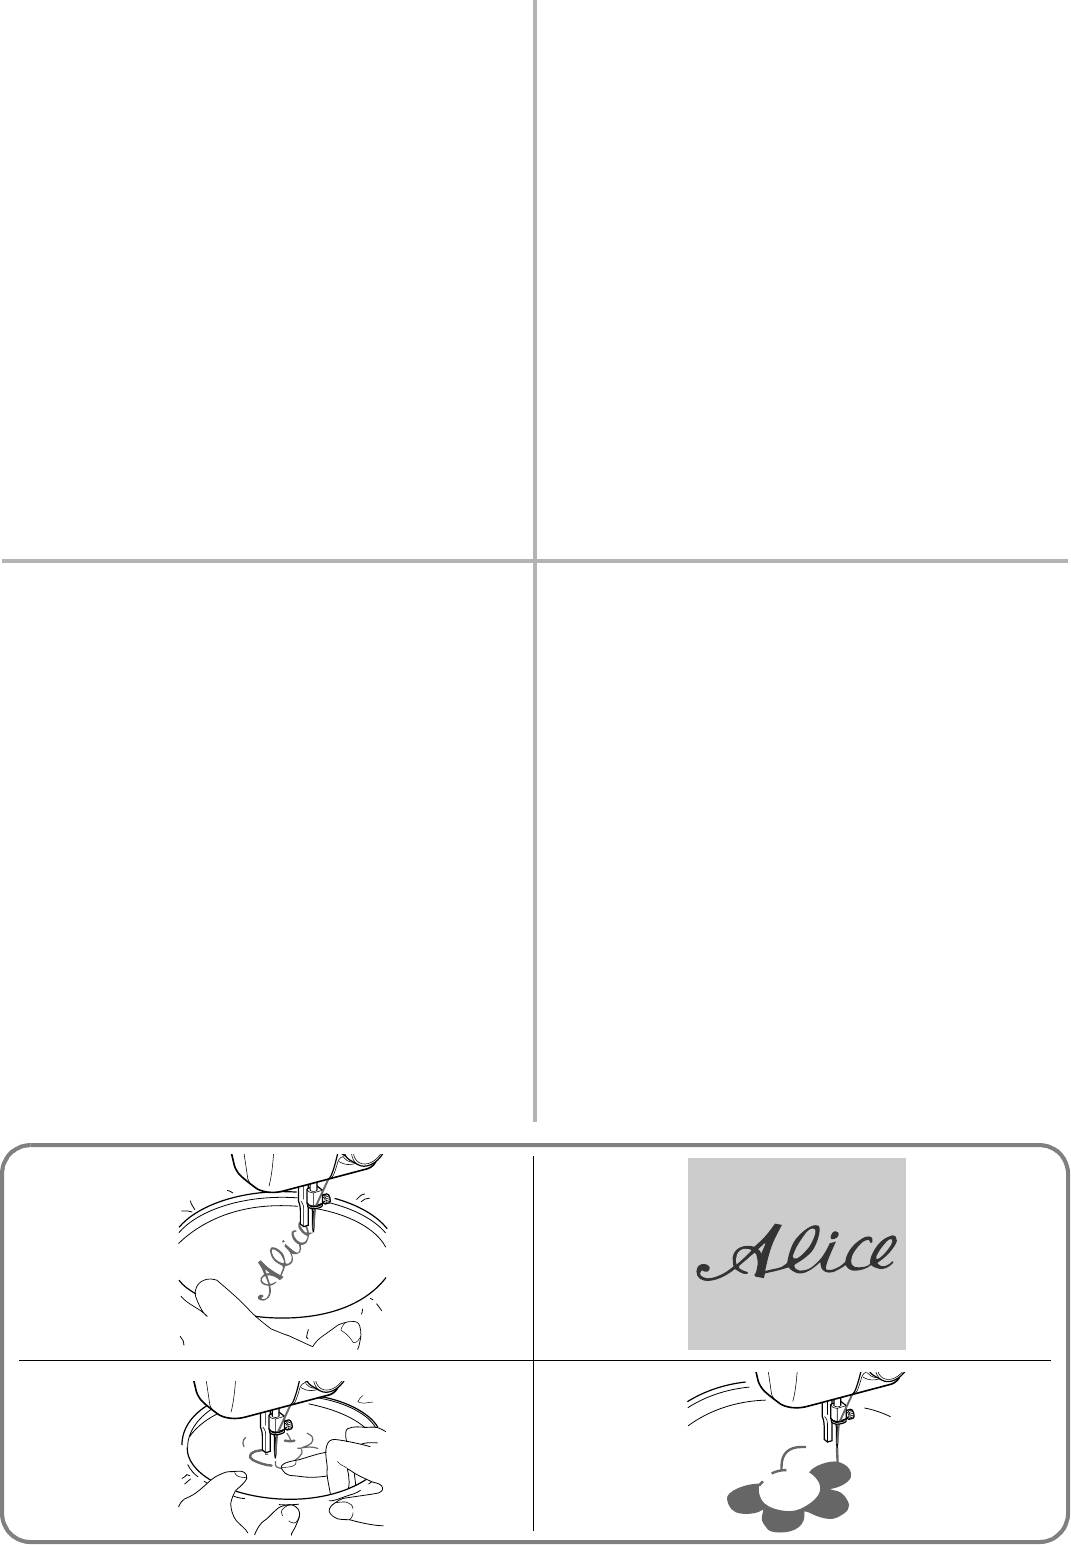
MONOGRAMMING (fig. A)
MONOGRAMMES (fig. A)
1. Sew moving the hoop slowly along the lettering at a constant
1. Coudre à une vitesse constante en déplaçant lentement le
speed.
tambour le long des lettres.
2. To secure the stitching, set the pattern selection dial to the
2. Pour arrêter la couture, régler le sélecteur de modèle de point
Straight Stitch (6-10) with the desired length and sew a few
sur le point droit (6-10) avec la longueur souhaitée et coudre
stitches at the end of the last letter.
quelques points à la fin de la dernière lettre.
EMBROIDERING (fig. B)
BRODERIES (fig. B)
1. Stitch the outline of the design by moving the embroidery
1. Piquer le contour du motif en déplaçant le tambour au fur et à
hoop.
mesure.
2. Fill in the design alternating from the outline of the design to
2. Remplir le motif en piquant alternativement à point serrés du
the inside and from the inside to the outline until the design is
contour vers le centre et du centre vers le bord jusqu’à ce que
completely filled in. Keep the stitching close together.
le dessin soit entièrement recouvert de points. Veiller à bien
rapprocher les rangées de points.
NOTE:
A long stitch is made by moving the embroidery hoop rapidly and
REMARQUE:
a short stitch is made by moving it slowly.
Pour obtenir de grands points, déplacer rapidement le tambour.
Pour faire un petit point, le déplacer lentement.
3. To secure the stitching, set the pattern selection dial to the
3. Pour arrêter la couture, régler le sélecteur de modèle de point
Straight Stitch (6-10) with the desired length and sew a few
sur le point droit (6-10) avec la longueur souhaitée et coudre
stitches at the end of the design.
quelques points droits à la fin du motif.
CAUTION:
PRECAUTION:
Keep fingers away from moving parts, especially needles.
Tenir les doigts à l’écart de tout élément mobile, en particulier
les aiguilles.
MONOGRAMAS (fig. A)
ВЫСТРАЧИВАНИЕ МОНОГРАММ (рис. A.)
1. Cosa moviendo el bastidor lentamente por las letras, a una
1. Выполните выстрачивание, медленно, с постоянной
velocidad constante.
скоростью перемещая пяльцы вдоль заранее написанных
2. Para asegurar las puntadas, ponga el selector de puntadas en la
букв.
2. В конце последней буквы для закрепления строчки
puntada recta (6-10) con el largo deseado y cosa unas puntadas al
выполните несколько прямых стежков, установив ручку
final de la última letra.
выбора вида строчки на Прямую строчку (6*10).
BORDADO (fig. B)
ВЫШИВАНИЕ (См. рис. B).
1. Remarque el contorno del diseño, moviendo el bastidor de acuerdo
1. Перемещая пяльцы для вышивания, прошейте контур
con el dibujo.
узора.
2. Rellene el dibujo de puntadas adelantando alternativamente del
2. Заполняйте узор стежками, поочередно перемещаясь от
contorno hacia el interior y del interior hacia el exterior hasta que
контура узора внутрь рисунка и от середины рисунка к
el dibujo quede completamente cubierto de puntadas, teniendo
краю контура до тех пор, пока узор не будет вышит
siempre cuidado en mantener las puntadas muy juntas.
полностью. Следите, чтобы строчки ложились вплотную
друг к другу.
NOTA:
ПРИМЕЧАНИЕ:
Se pueden realizar puntadas largas al mover el bastidor rápidamente
При быстром перемещении пялец для вышивания
y puntadas cortas al moverlo lentamente.
получаются длинные стежки, а при медленном – короткие.
3. Para asegurar las puntadas, ponga el selector de puntadas en la
1. В конце рисунка выполните несколько закрепляющих
puntada recta (6-10) con el largo deseado y cosa unas puntadas
стежков, установив ручку выбора вида строчки на Прямую
rectas al final del dibujo.
строчку с требуемой длиной стежка (6*10).
ATENCIÓN:
ВНИМАНИЕ:
Mantenga los dedos alejados de las piezas móviles, especialmente de
Держите пальцы вдали от движущихся частей машины, особенно
las de agujas.
от иглы.
A
B
41
Changing the Bulb
Remplacement de l’ampoule
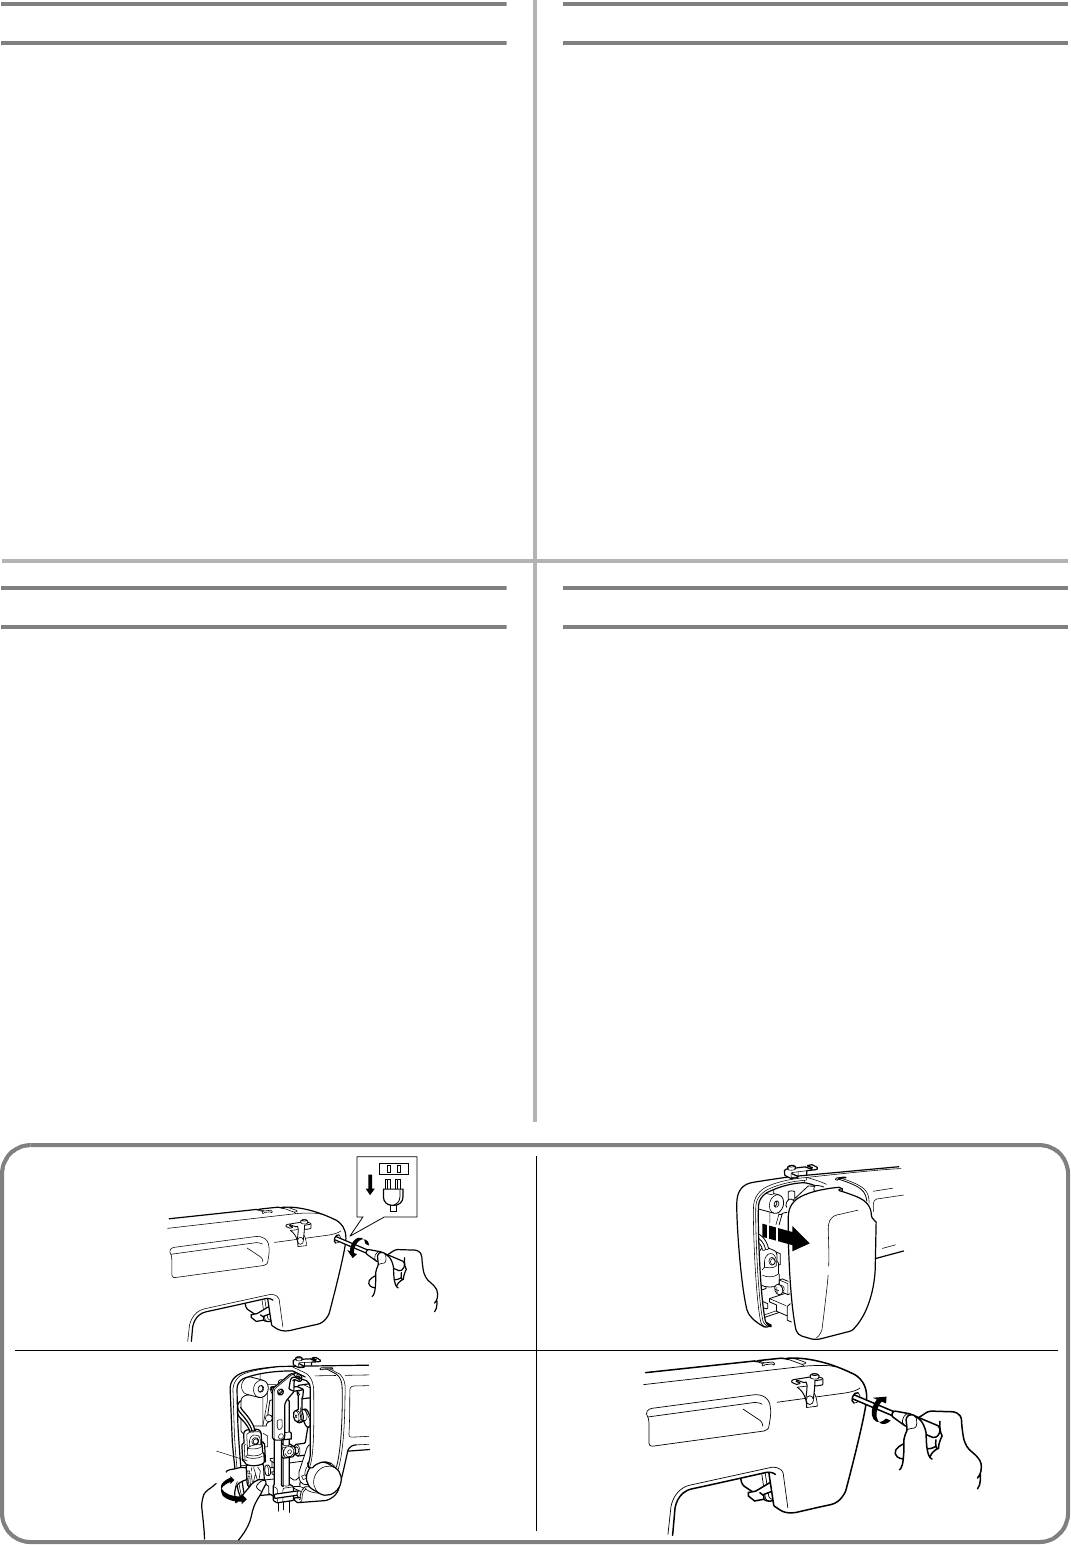
1. Remove the power supply plug from the electrical outlet.
1. Retirer la fiche d’alimentation de la prise de courant.
2. Loosen the face plate screw as shown in fig. A.
2. Desserrer la vis du capot de la machine comme indiqué à la
3. Remove the face plate from the machine as illustrated in fig.
fig. A.
B.
3. Retirer le capot comme le montre la fig. B.
4. Replace the sewing light bulb. See fig. C.
4. Remplacer l’ampoule de la lampe. Voir fig. C.
a Bulb
a Ampoule
b Loosen
b Desserrer
c Tighten
c Visser
5. Reattach the face plate and fasten the screw as shown in fig.
5. Rattacher le capot et resserrer la vis comme l’indique la fig. D.
D.
Cambio de la bombilla
Замена лампочки подсветки
1. Quite el enchufe de la máquina de la toma de corriente.
1. Выньте вилку сетевого шнура из электрической розетки.
2. Afloje el tornillo de la cubierta de la máquina tal como se indica
2. Отверните винт фронтальной крышки машины, как
en la fig. A.
показано на рис. A.
3. Retire la cubierta de la máquina tal como se indica en la fig. B.
3. Снимите фронтальную крышку с машины, как показано
4. Cambie la bombilla tal como se muestra en la fig. C.
на рис. B.
a Bombilla
4. Замените лампочку подсветки. См. рис. С.
b Aflojar
a Лампочка
c Apretar
b Вывёртывание
5. Vuelva a colocar la cubierta y apriete el tornillo tal como indica la
c Завёртывание
fig. D.
5. Заново установите фронтальную крышку и закрепите её
винтом как показано на рис. D.
A B
CD
1
2
3
42
Oiling
Graissage
1. Remove the power supply plug from the outlet.
1. Retirer la fiche d’alimentation de la prise de courant.
2. Put 2 to 3 drops of oil at each of the points indicated in fig. A.
2. Mettre 2 ou 3 gouttes d’huile sur chacun des points indiqués
3. After oiling, run the machine at a fast speed without thread
sur la fig. A.
installed for a short time.
3. Après le graissage, faire fonctionner la machine à grande
4. Be sure to wipe any excess oil off the machine.
vitesse, sans fil, pendant un court instant.
4. Essuyer tout excédent d’huile.
NOTE:
The machine should be oiled once a week if it is used more than
REMARQUE:
one hour a day. If the machine is used more often, oil every day.
Si la machine sert environ une heure par jour, elle doit être huilée
Sewing machine oil is available from your local sewing machine
une fois par semaine. Si elle sert plus souvent, elle doit être huilée
dealer or service center.
chaque jour.
Do not apply too much oil as it may get on your thread and
Vous trouverez de l’huile pour machine à coudre chez votre
fabric.
revendeur ou dans un centre technique.
Ne pad verser trop d’huile car celle-ci pourrait couler sur les dils
ou sur le tissu.
Engrasado
Смазка
1. Desenchufe la máquina de la toma de corriente.
1. Выньте вилку сетевого шнура из электрической розетки.
2. Ponga 2 ó 3 gotas de aceite en cada uno de los puntos señalados
2. Капните по 2–3 капли масла в каждую из точек,
en la fig. A.
отмеченных на рис. A.
3. После смазывания запустите машину на большой скорости
3. Después de lubricar la máquina, hágala funcionar rápidamente
на короткое время; нити при этом не должны быть
un instante y sin hilo.
заправлены.
4. Asegúrese de limpiar cualquier exceso de aceite de la máquina.
4. Сотрите излишки масла с машины.
NOTA:
ПРИМЕЧАНИЕ:
Lubricar la máquina una vez por semana si se usa más de una hora
Машину нужно смазывать раз в неделю, если она используется
diaria. Si se usa más a menudo, engrasarla cada día. Puede comprar
более одного часа в день. При более интенсивном
aceite para máquina de coser a su representante o en el centro técnico
использовании смазывайте машину каждый день.
local. No conviene aplicar demasiada aceite ya que podrîa correr por
Смазочное масло для швейной машины можно приобрести у
el hilo y el tejido.
региональных дилеров швейных машин или в сервисных
центрах.
Избегайте излишнего смазывания, поскольку масло может
попасть как на нить, так и на изделие.
A
Cleaning
Nettoyage
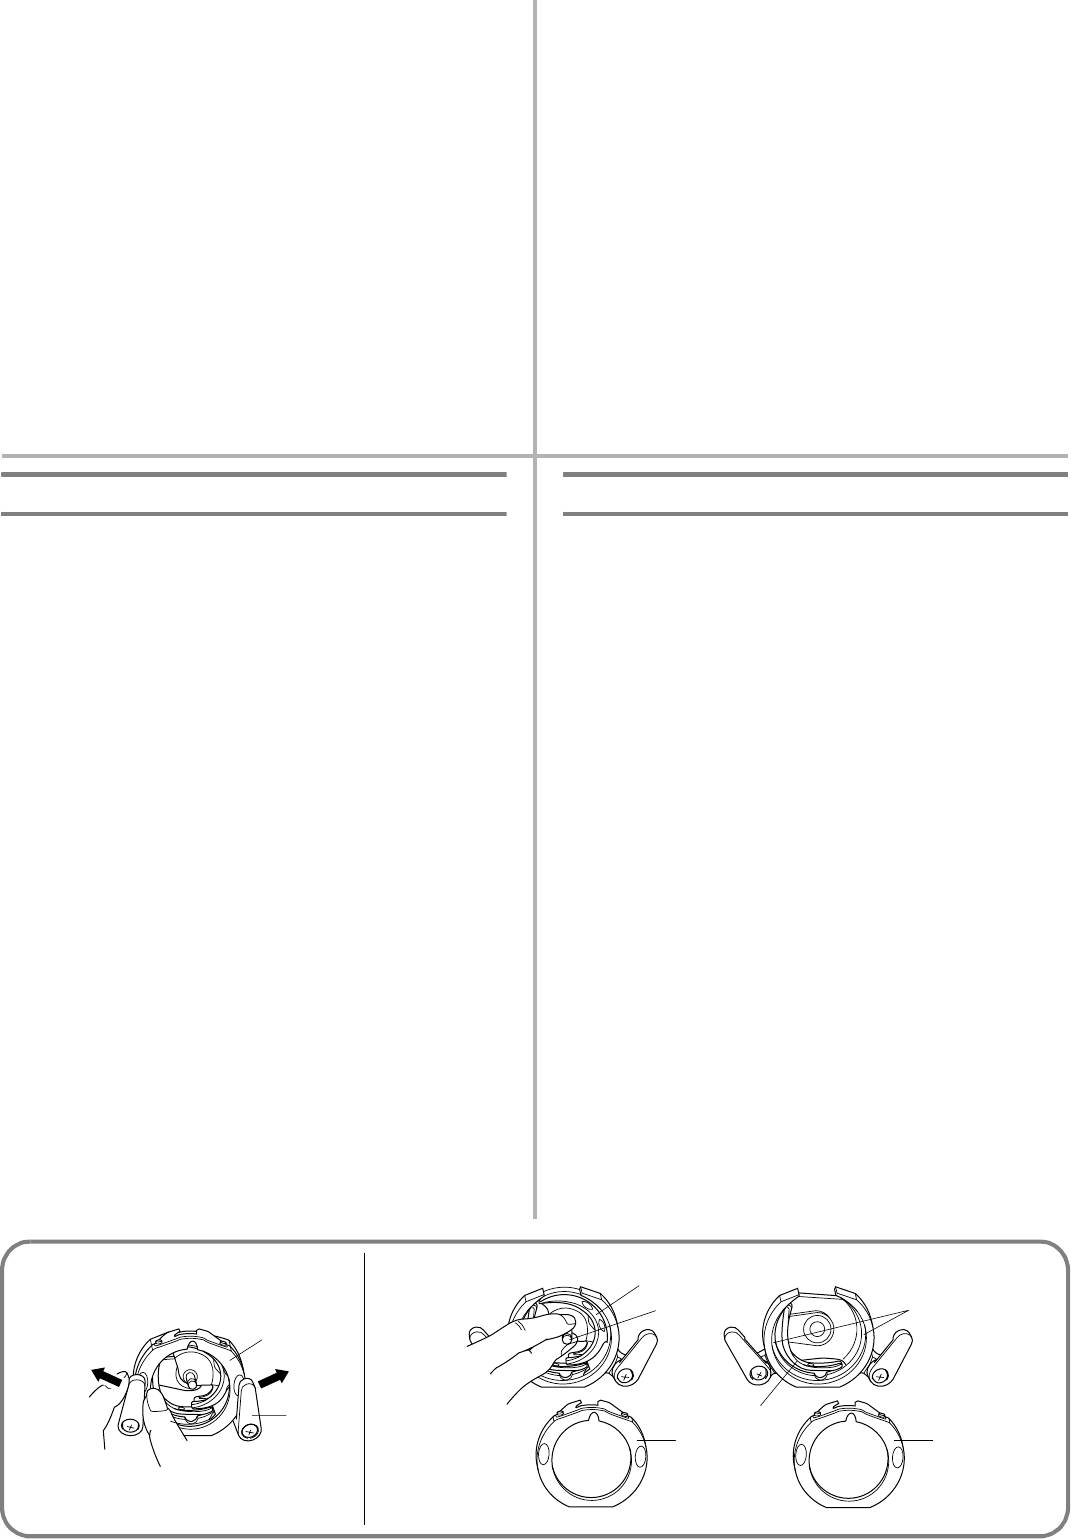
Removing the Shuttle Hook
Comment retirer le crochet de la navette
1. Remove the needle.
1. Retirer l’aiguille.
2. Remove the extension table and open the shuttle cover on the
2. Retirer la table d’extension et ouvrir le couvercle de la
front of the free arm.
navette, devant le bras libre.
3. Take out the bobbin case by opening its latch and pulling it
3. Sortir le boîtier de la canette en tirant sur la languette
out from the shuttle race.
métallique pour le sortir de la coursière.
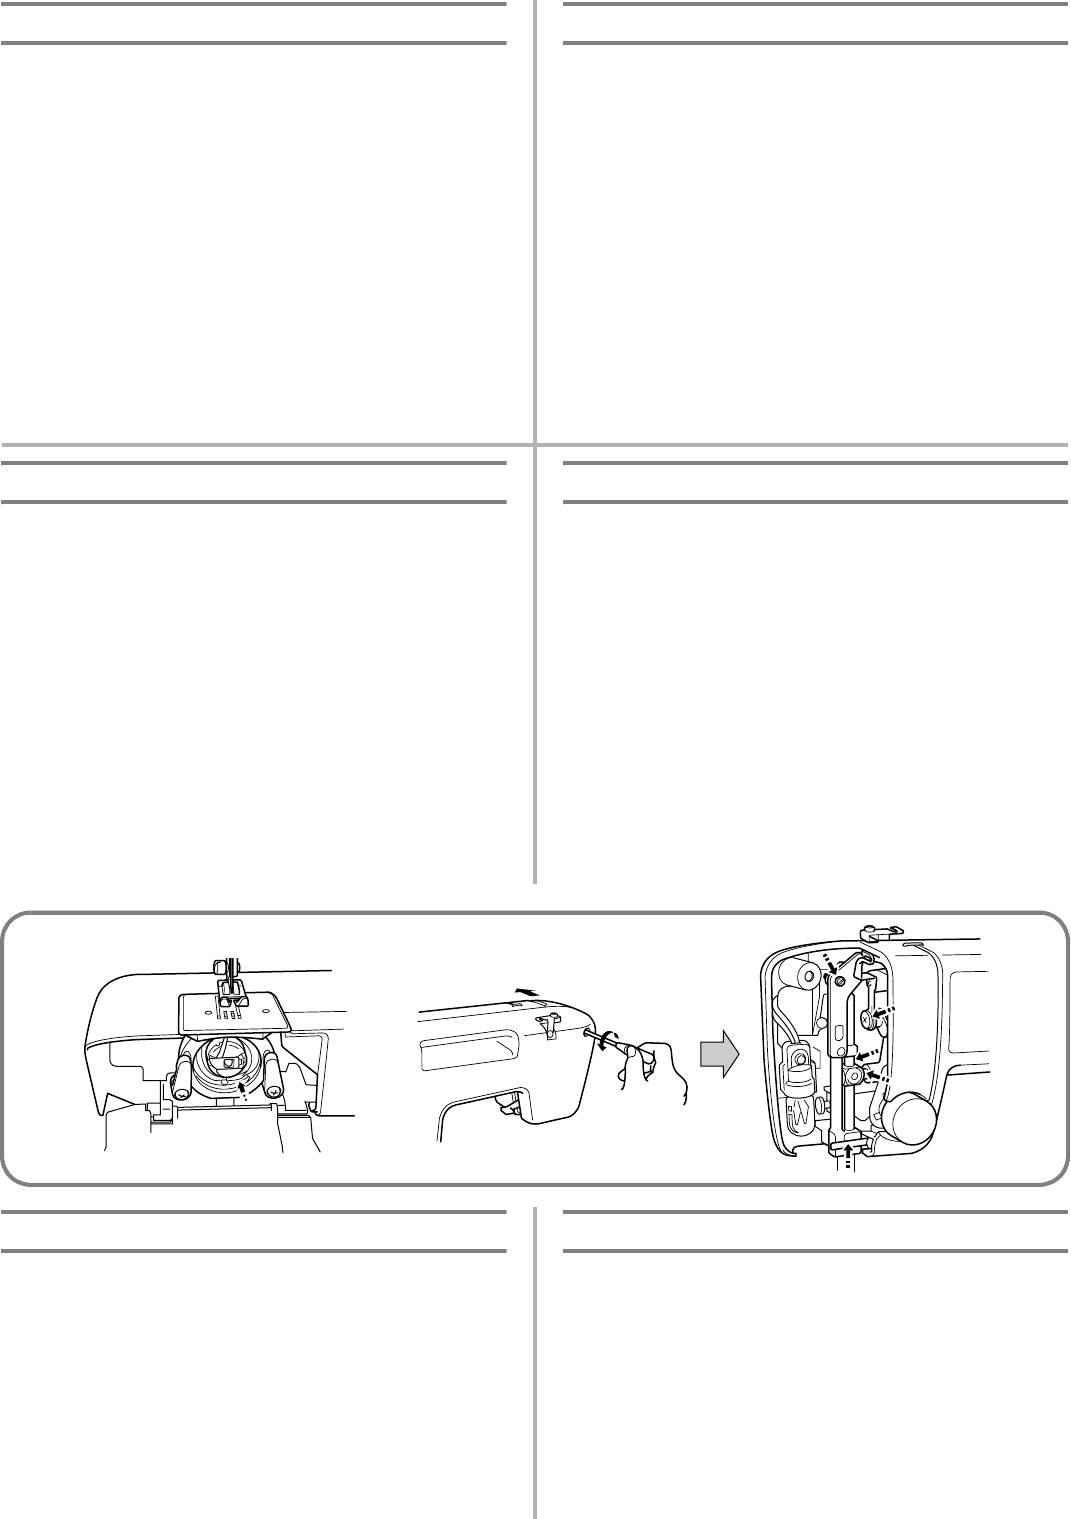
4. Slide the latch levers out from the retaining ring to remove the
4. Retirer les pattes de blocage de l’anneau de maintien pour
retaining ring. See fig. A.
l’ôter. Voir fig. A.
5. Remove the hook by grasping its center post of the hook and
5. Sortir le crochet en le saisissant par son axe central et en
pulling it out as shown in fig. B.
tirant, comme l’indique la fig. B.
43
NOTE:
REMARQUE:
When the needle is lowered, the shuttle hook cannot be
Il est impossible de retirer le crochet de la navette lorsque
removed.
l’aiguille est abaissée.
Cleaning the Shuttle Race
Nettoyage de la coursière de la navette
1. Remove any accumulated lint and thread with a brush from
1. A l’aide d’une petite brosse, enlever la bourre et le fil qui se
the retaining ring, hook, driver and race body.
sont accumulés dans l’anneau de maintien, sur le crochet,
2. A cloth dampened with machine oil should be used to wipe
dans l’entraînement et sur la coursière.
2. Nettoyer la coursière avec un chiffon imbibé d’huile pour machine.
the shuttle race clean of lint.
3. Nettoyer la bourre du crochet de la navette comme indiqué
3. Clean the lint from the shuttle hook in the same manner as
au point 2.
described in step 2.
4. Remonter le crochet avec l’encoche vers le haut et repousser
4. Reassemble the hook with the notch at the top and push the
les pattes de blocage en place, pour qu’elles maintiennent
latch levers back to their positions to hold the retaining ring in
l’anneau en place.
place.
a Anneau de maintien
a Retaining ring
b Patte de blocage
b Latch lever
c Crochet
c Hook
d Axe central du crochet
d Hook center post
e Entraînement
e Driver
f Coursière
f Race body
Limpieza
Чистка
Para sacar el garfio de la lanzadera
Извлечение челнока
1. Quite la aguja.
1. Снимите иглу.
2. Retire el soporte de los accesorios y abra la cubierta de la
2. Снимите столик*приставку и откройте крышку
lanzadera, enfrente del brazo libre.
челночного устройства в передней части рукавной
платформы.
3. Saque el portacanilla, abriendo su uñeta metálica (pestillo) y
3. Извлеките шпульный колпачок, открыв его защёлку и
retirándolo de la pista de la lanzadera.
вытащив его из обоймы челнока.
4. Retire las palancas que sujetan el anillo retenedor y saque dicho
4. Раздвиньте фиксирующие рычажки в стороны от
anillo. Véase fig. A.
стопорного кольца, чтобы вынуть его. См. рис. A.
5. Retire el garfio cogiéndolo de la barra central y sacándolo tal
5. Извлеките челнок, захватив его за центральный штырь,
como ilustra la fig. B.
как показано на рис. B.
NOTA:
ПРИМЕЧАНИЕ:
No puede quitarse el garfio cuando la aguja está abajo.
Когда игла находится в нижнем положении, челнок вынуть
невозможно.
Limpieza de la pista de la lanzadera
Очистка челночного устройства
1. Quite los hilos y polvo acumulados en el anillo retenedor, garfio,
1. С помощью щеточки очистите от скопившихся волокон
impulsor y pista con un cepillo.
ткани и нитей стопорное кольцо, челнок, поводок и гнездо
2. Limpie el polvo de la lanzadera con un trapo impregnado de aceite
челнока.
de máquina.
2. Для протирки челночного гнезда с целью очистки его от
3. Limpie los hilos y polvo del garfio tal como indicado en el punto 2.
ворса должна использоваться ветошь, смоченная
4. Vuelva a juntar el garfio con la hendidura arriba y empuje las
машинным маслом.
palancas en sus posiciones previas para que mantengan el anillo
3. Таким же образом, как описано в шаге 2, очистите от ворса
retenedor en su sitio.
челнок.
a Anillo retenedor
4. Соберите челнок в обратной последовательности и
верните фиксирующие рычажки, удерживающие
b Palanca de la uñeta
стопорное кольцо, в их исходное положение.
c Garfio
a Стопорное кольцо
d Eje central del garfio
b Фиксирующий рычажок
e Impulsor
c Челнок
f Pista de la lanzadera.
d Центральный штырь челнока
e Поводок
f Обойма
AB
3
4
6
1
2
5
1
1
44
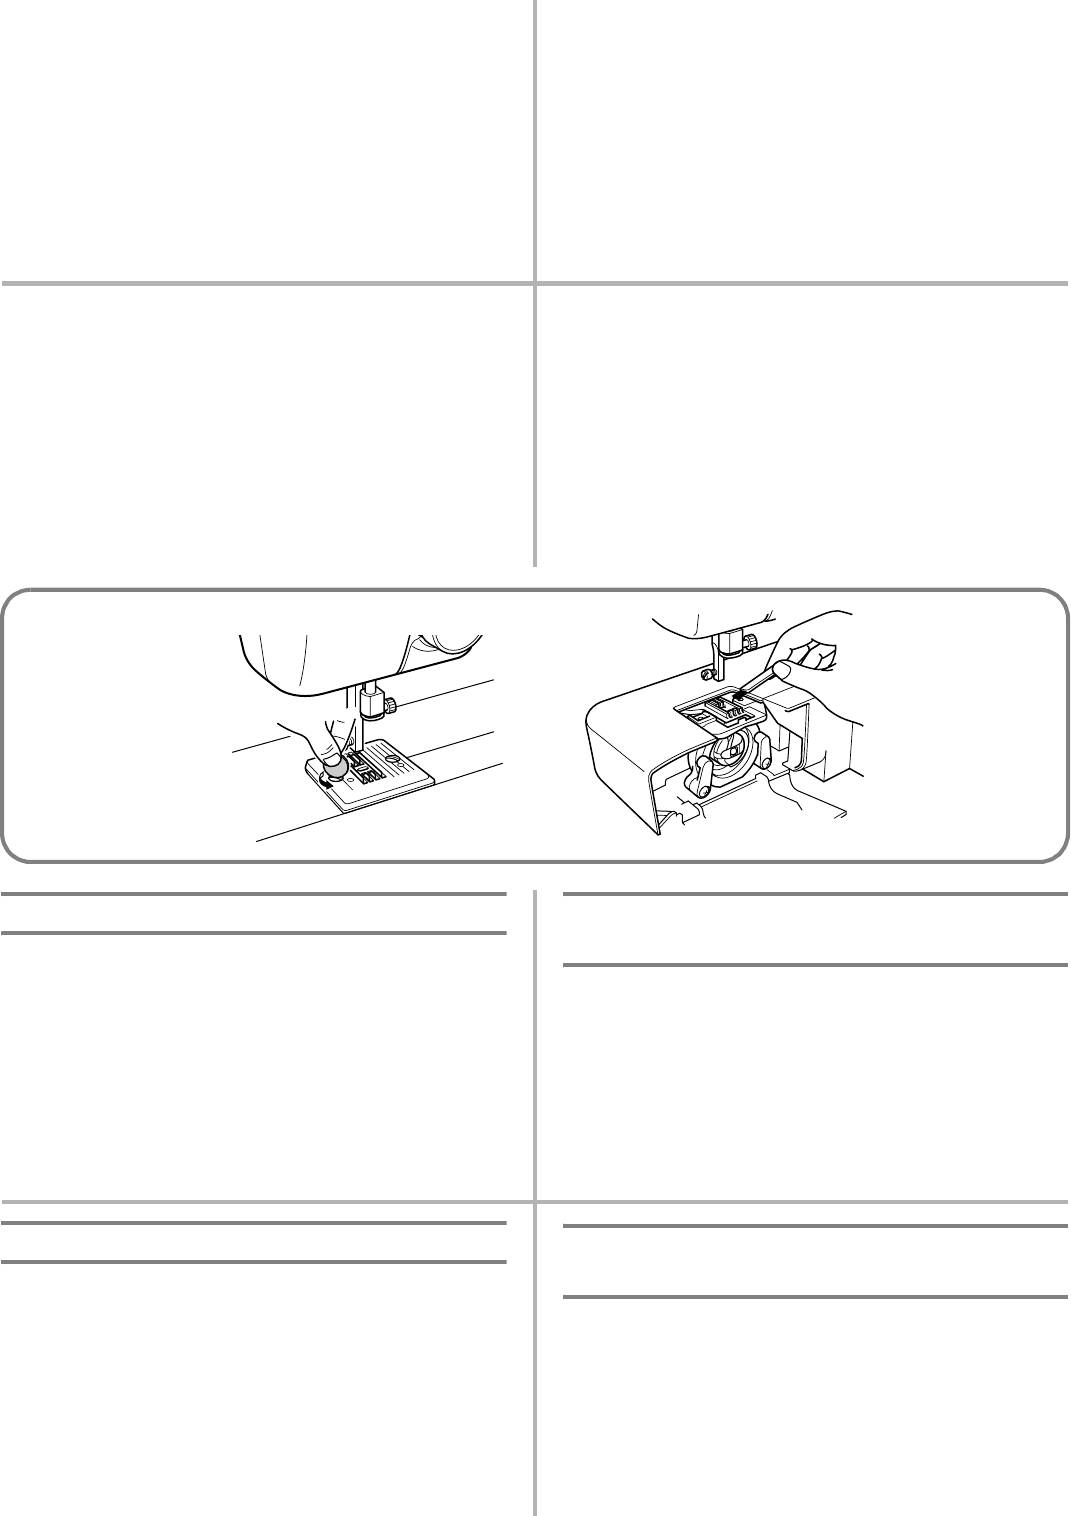
Cleaning the Feed Dogs
Nettoyage des griffes d’entraînement
1. Remove the presser foot holder and the needle.
1. Retirer le support de pied-de-biche et l’aiguille.
2. Remove the needle plate using a coin or screwdriver to take
2. Retirer la plaque à aiguille avec une pièce de monnaie pour
out the screws.
desserrer les vis.
3. Clean the lint from the upper part of the feed dogs and shuttle
3. Nettoyer la partie supérieure des griffes d’entraînement et de
race body with a brush.
la coursière de la navette à l’aide d’une brosse.
Limpieza de los alimentadores
Очистка гребенок транспортера
1. Quite el soporte del prensatelas y la aguja.
1. Снимите адаптер прижимной лапки и иглу.
2. Retire la placa de agujas con una moneda para aflojar los
2. Снимите игольную пластину, используя монету или
tornillos.
отвёртку для выворачивания винтов.
3. Limpie la parte superior de los dientes y el cuerpo de la lanzadera
3. Очистите щеточкой верхнюю часть гребенок транспортера
con un cepillo.
и обоймы челнока.
Performance Checklist
Liste de vérification en cas de
défaillances
Whenever sewing difficulties are encountered, review the section
in this instruction manual that details the operation you are
En cas de problème, consulter d’abord le chapitre voulu dans le
performing to make sure you are correctly using the machine. If
présent manuel pour s’assurer de la bonne utilisation de la
the problem continues, the following checklist may help you to
machine. Si le problème persiste, la liste de vérification suivante
improve the operation.
peut vous aider à y remédier.
If you still have difficulties, contact your nearest service center.
Si vous ne parvenez toujours pas à résoudre le problème, veuillez
contacter le centre technique le plus proche.
Listado de posibles incidencias
Таблица контрольных проверок
технических характеристик
Cada vez que encuentre dificultades al coser, vuelva a consultar la
parte de este manual de instrucciones que detalla la operación que
При возникновении каких*либо трудностей при шитье,
está realizando, para comprobar que usa correctamente la máquina.
сначала просмотрите раздел руководства, касающийся
Si el problema persiste, el siguiente listado le puede ayudar a mejorar
выполняемой операции, чтобы убедиться, что вы правильно
el funcionamiento.
используете машину. Если проблема остается, приведенная
Si a pesar de eso el problema persiste, póngase en contacto con el
ниже таблица контрольных проверок может помочь устранить
servicio técnico más cercano.
неисправность.
Если неисправность устранить самостоятельно не удается,
обратитесь в ближайший сервисный центр.
45
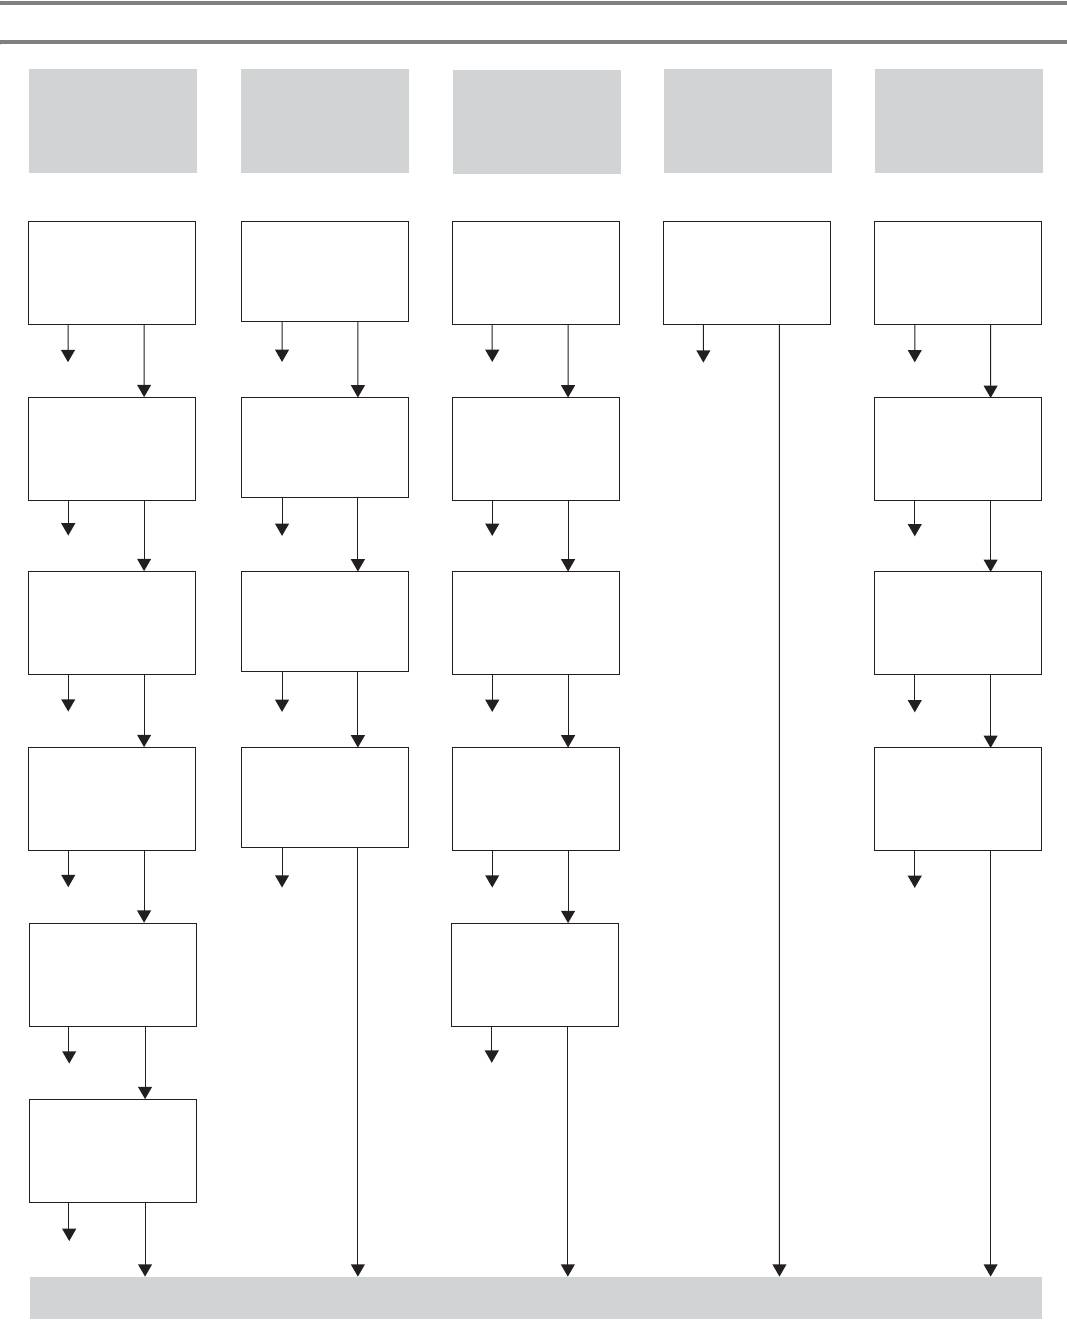
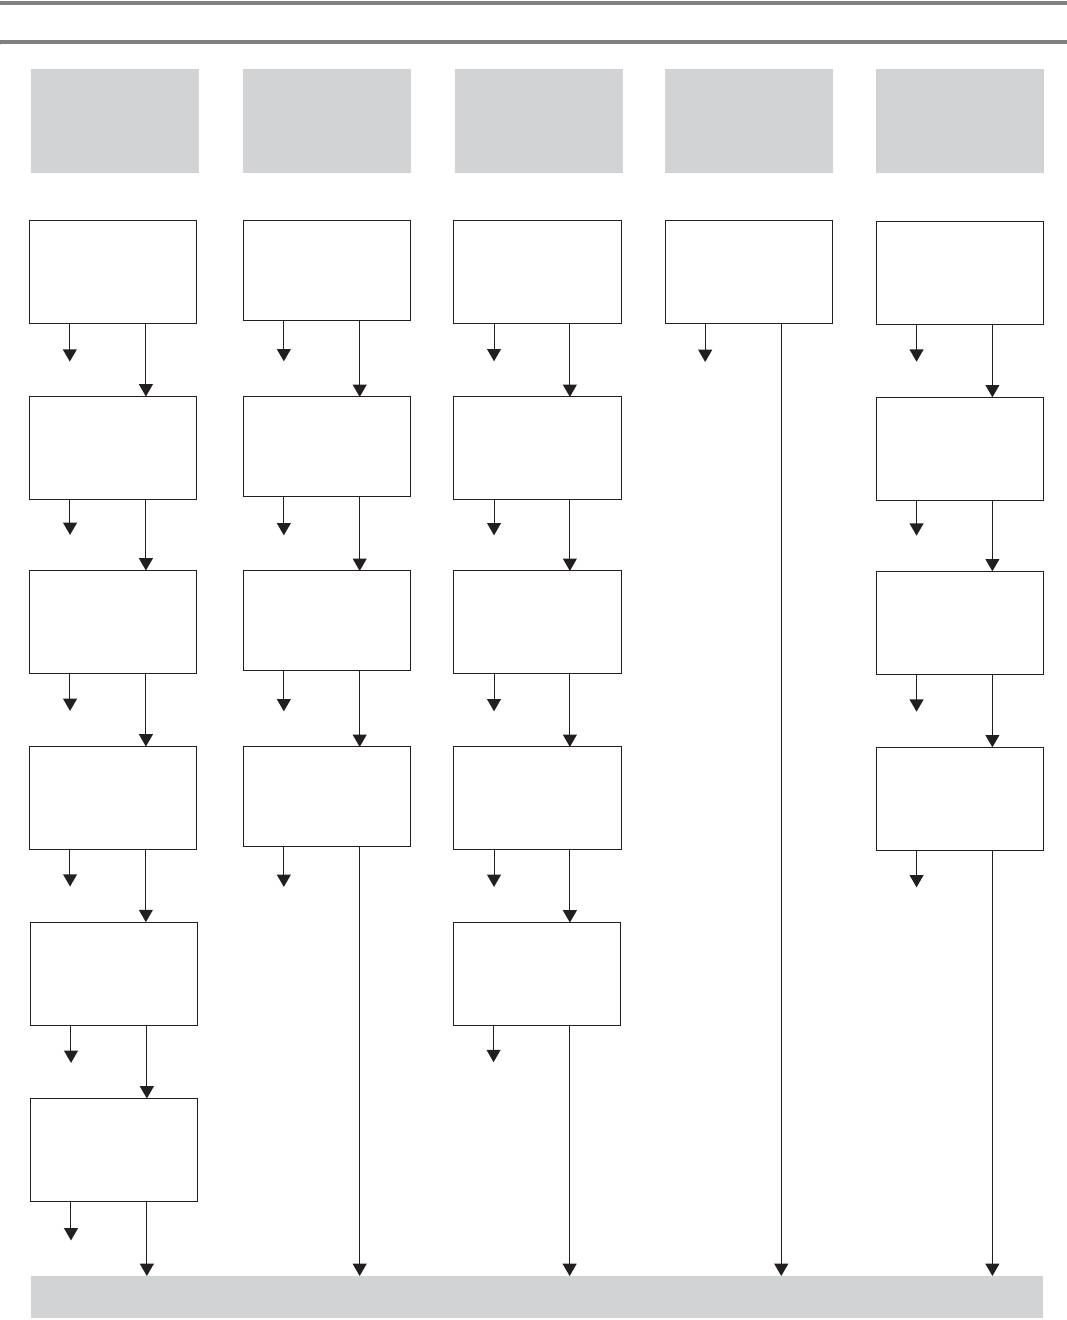
PERFORMANCE CHECK LIST
UPPER THREAD
LOWER (BOBBIN)
SKIPPED STITCHES LOOP IN SEAM FABRIC PUCKERS
BREAKS
THREAD BREAKS
Upper thread is
Needle is
Lower (bobbin)
Thread tension is
Thread tension is
not correctly
incorrectly
thread is tangled.
incorrect.
too tight.
installed.
inserted.
No
Page 17
No
No
Pages 20-21
No
No
Page 16
Page 6
Pages 20-21
Bobbin is not
Upper thread is
threaded
Damaged or worn
Threading is not
tangled.
properly in the
needle is used.
correct.
shuttle hook.
No
No
No
No
Page 16
Page 14
Page 6
Pages 12-17
The combination
Upper thread
Lower thread
of needle size/
Wrong needle is
tension is too
tension is too
thread size/fabric
used.
tight.
tight.
is incorrect.
No
Page 20
Page 21
No
No
Page 6
No
Page 22
The combination
Spool of thread
Lower threading
Lint is clinging to
of needle size/
is not correctly
is not correct.
the bottom of the
thread size/fabric
installed.
needle plate.
is incorrect.
No
Page 12
No
Page 14
Pages 43-45
No
Page 22
No
Needle is bent
Threading is not
or not sharp.
correct.
Page 6
No
Page 16
No
The combination
of needle size/
thread size/fabric
is incorrect.
Page 22
No
CONTACT YOUR LOCAL SERVICE CENTER
46
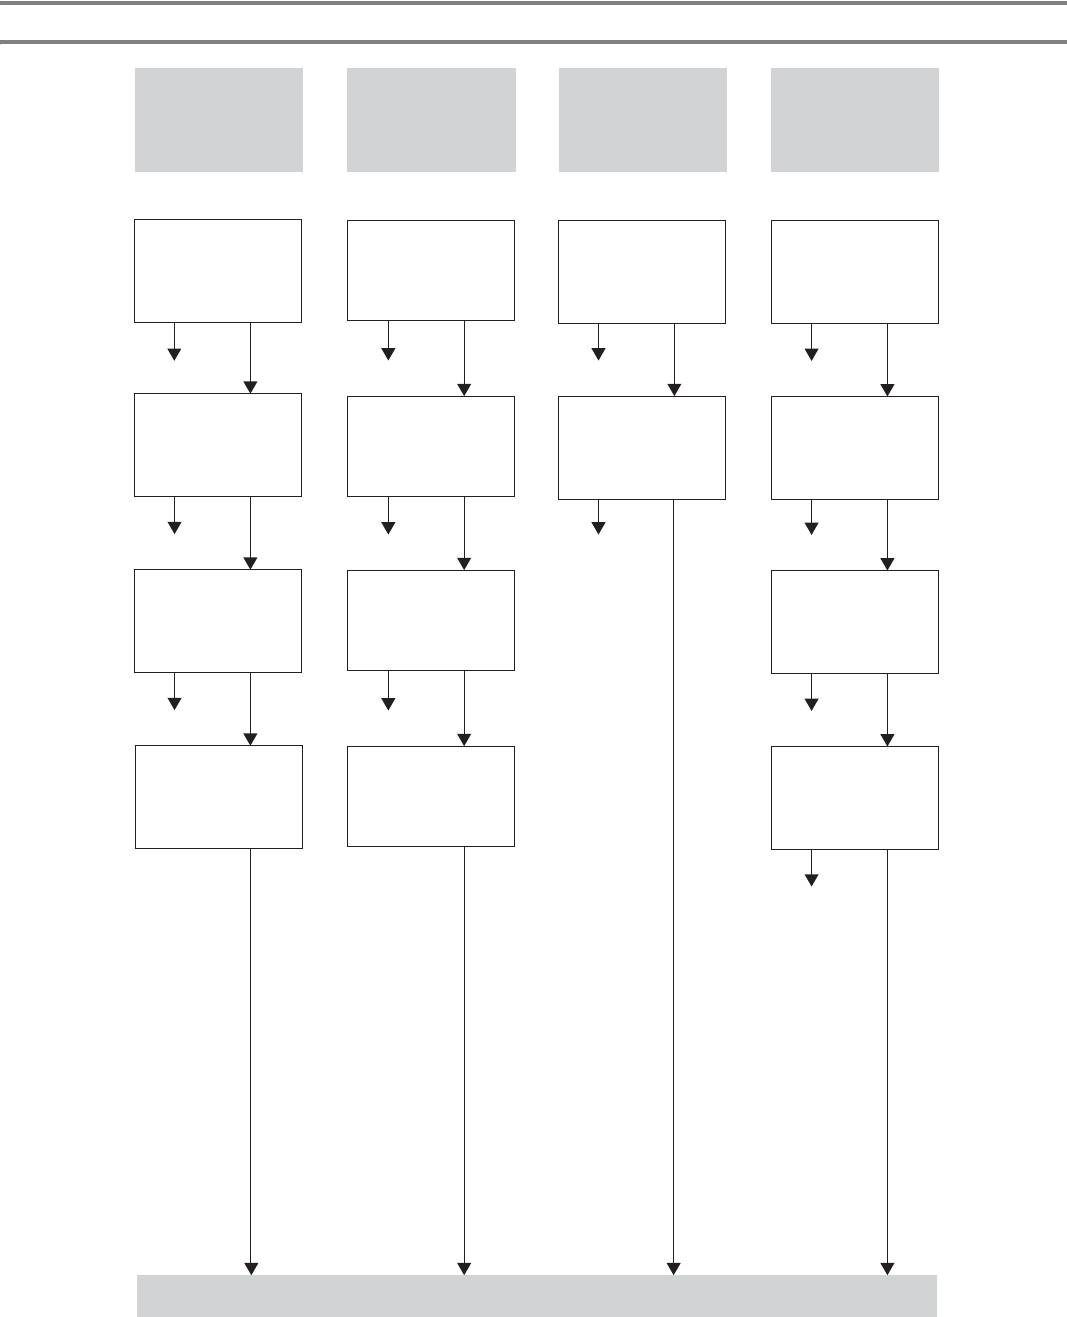
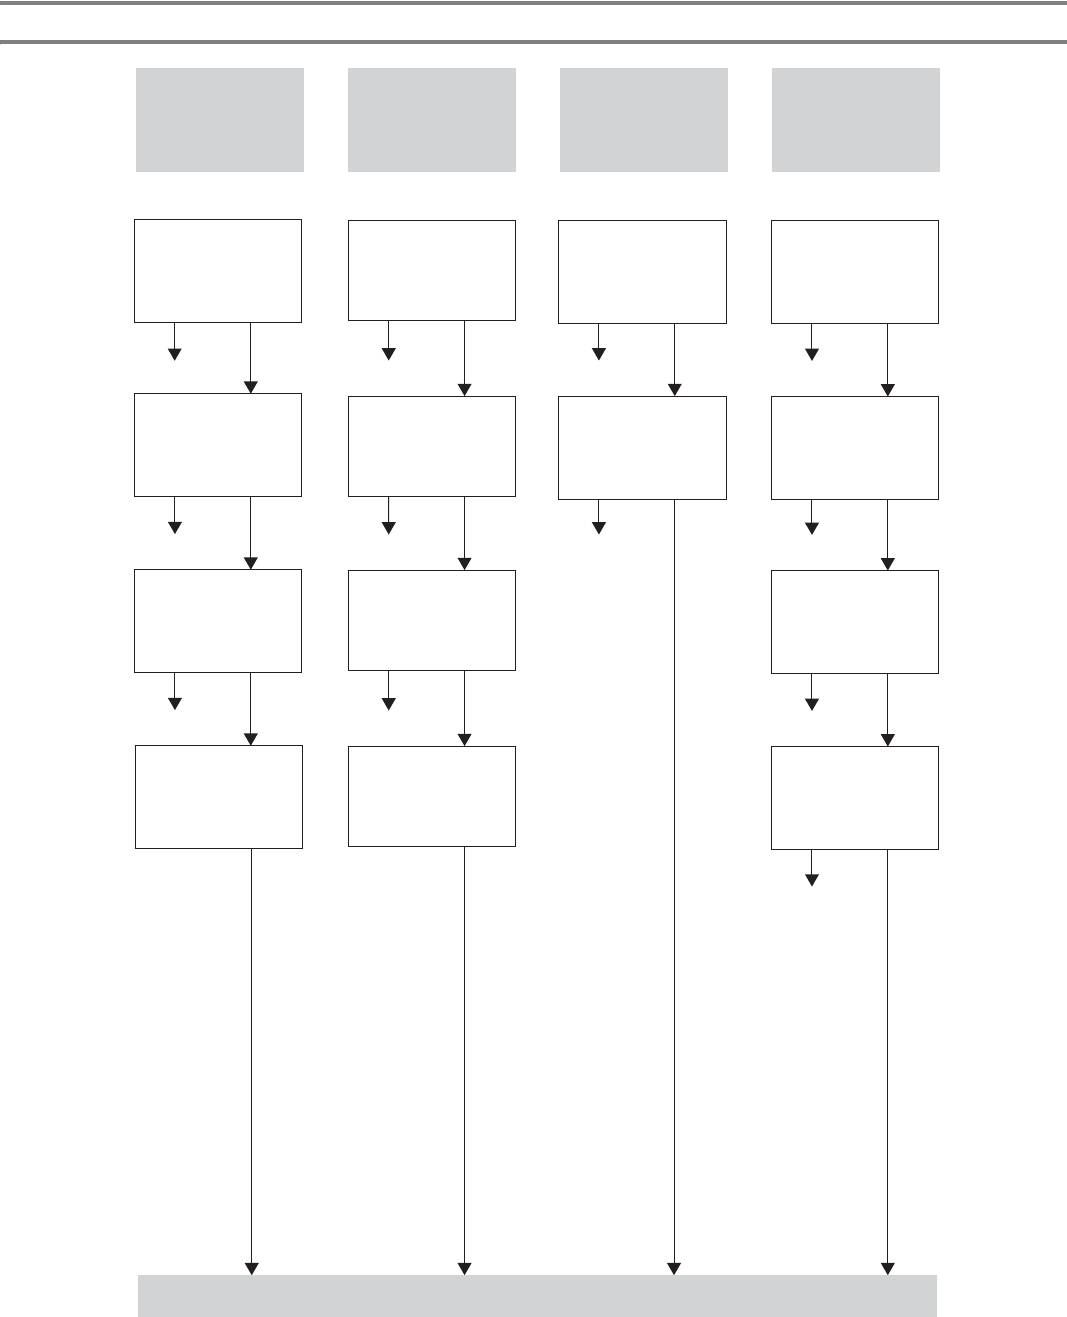
PERFORMANCE CHECK LIST
FABRIC DOES
MACHINE IS
MACHINE
NEEDLE
NOT FEED
NOISY OR
DOES NOT
BREAKS
PROPERLY
SLOW
START
The combination
Lint is clinging to
Power supply
of needle size/
Needle is not
the bottom of the
plug is removed
thread size/fabric
correctly inserted.
needle plate.
from outlet.
is incorrect.
Page 22
No
Page 6
No
No
Page 4
No
Pages 43-45
Main power
Damaged or worn
Damaged or worn
Insufficient
switch is turned
needle is used.
needle is used.
oiling.
off.
Page 6
No
Page 6
No
No
Page 5
No
Page 43
The combination
Foot controller is
Thread is
of needle size/
not used
tangled.
thread size/fabric
correctly.
is incorrect.
Pages 12-17
No
Page 22
No
Page 5
No
Fabric is pulled
The bobbin
Darning plate is
excessively. Let the feed
winding shaft is
installed.
dogs move the fabric.
slid toward the
Do not pull the fabric.
bobbin presser.
No
No
Page 12
No
CONTACT YOUR LOCAL SERVICE CENTER
47
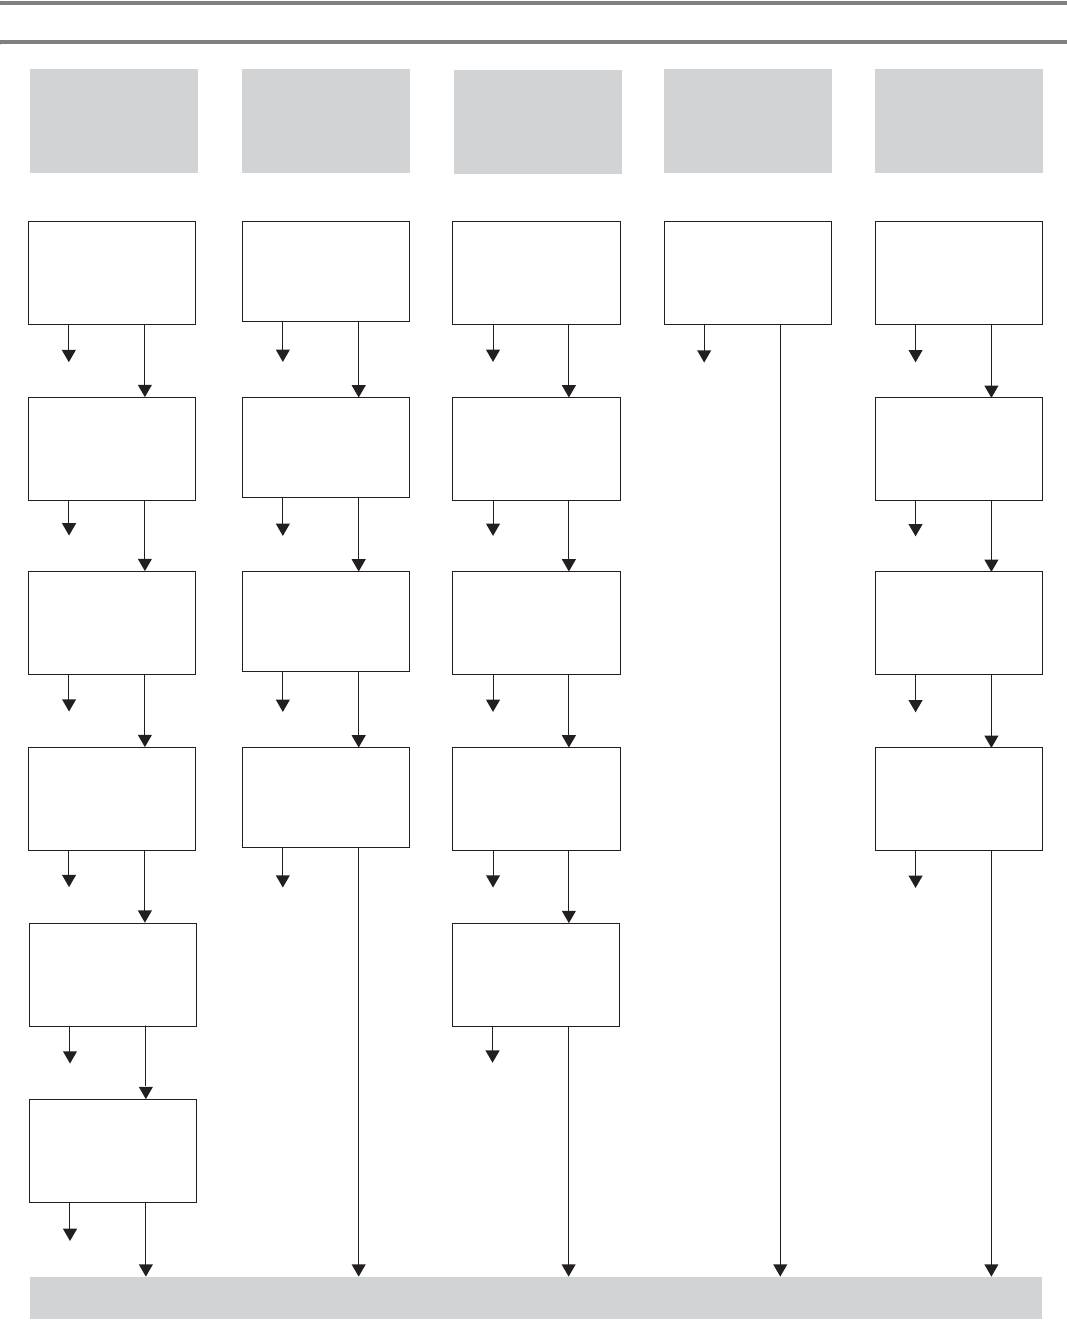
LISTE DE VERIFICATION EN CAS DE DEFAILLANCES
RUPTURE DU FIL
RUPTURE DU FIL
LA COUTURE FAIT
DES POINTS SAUTENT
LE TISSU FRONCE
SUPERIEUR
INFERIEURÅ (canette)
DES BOUCLES
Le fil supérieur n’est
Le fil inférieur (canette)
L’aiguille est mal
Mauvaise tension des
Le fil est trop tendu.
pas bien enfilé.
est emmêlé.
installée.
fils.
Page 16
Non
Page 17
Non
Non
Page 6
Non
Page 20-21
Non
Page 20-21
La canette est mal
Une aiguille
Le fil supérieur est
installée dans le
endommagée ou usée
L’enfilage est mauvais.
emmêlé.
crochet de la navette.
est utilisée.
Page 16
Non
Page 17
Non
Non
Non
Page 6
Page 12-17
La combinaison
Le fil supérieur est trop
Le fil inférieur est trop
Le calibre de l’aiguille
aiguille/fil/tissu est
tendu.
tendu.
est incorrect.
incorrecte.
Non
Page 21
Non
Page 20
Page 22
Non
Page 6
Non
Des peluches sont
La combinaison
La bobine de fil est
L’enfilage de la canette
accrochées à la plaque
aiguille/fil/tissu
mal installée.
est incorrect.
à aiguille.
n’est pas correcte.
Page 12
Non
Page 14
Non
Page 43-45
Non
Page 22
Non
L’aiguille est tordue ou
L’enfilage n’est pas
trop peu pointue.
correct.
Page 6
Non
Page 16
Non
La combinaison
aiguille/fil/tissu n’est
pas correcte.
Page 22
Non
CONTACTER LE CENTRE TECHNIQUE LE PLUS PROCHE
48
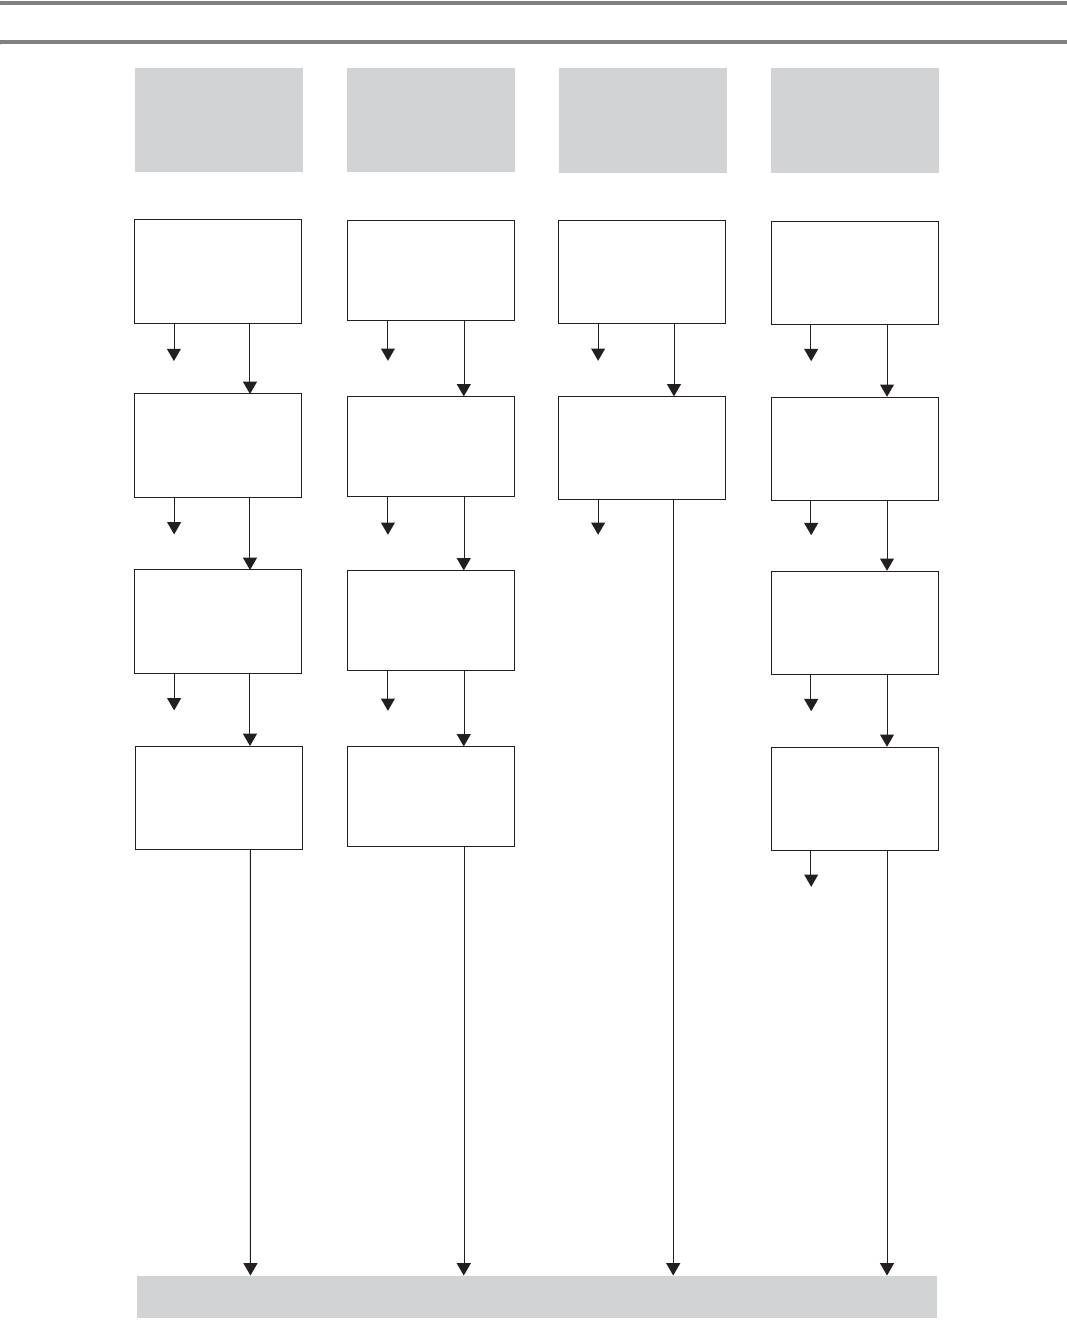
LISTE DE VERIFICATION EN CAS DE DEFAILLANCES
L’ENTRAINEMENT DU
LA MACHINE EST
LA MACHINE NE
TISSU N’EST PAS
L’AIGUILLE CASSE
BRUYANTE OU LENTE
DEMARRE PAS
CORRECT
La combinaison
Des peluches sont
L’aiguille est mal
La fiche d’alimentation
aiguille/fil/tissu est
accrochées sous la
installée.
est retirée de la prise.
incorrecte.
plaque à aiguille.
Non
Page 4
Non
Page 22
Page 6
Non
Page 43-45
Non
Une aiguille
Une aiguille
La machine manque
L’interrupteur principal
endommagée ou usée
endommagée ou usée
d’huile.
est éteint.
est utilisée.
est utilisée.
Non
Non
Page 6
Non
Page 6
Page 43
Non
Page 5
La combinaison
Le fil est emmêlé.
La pédale n’est pas uti-
aiguille/fil/tissu est
lisée correctement.
incorrecte.
Non
Page 22
Non
Page 5
Non
Page 12-17
Le tissu est tiré avec
L’axe de bobinage de
La plaque à repriser est
excès. Laisser les griffes
la canette est glissé
installée.
entraîner le tissu sans le
vers la position de
tirer.
bobinage.
Non
Non
Page 12
Non
CONTACTER LE SERVICE TECHNIQUE LE PLUS PROCHE
49
LISTADO DE POSIBLES INCIDENCIAS
ROTURA DEL HILO
ROTURA DEL HILO
SALTO DE
BAGAS EN LAS
ARRUGAS EN EL
INFERIOR
SUPERIOR
PUNTADAS
PUNTADAS
TEJIDO
(de la canilla)
El hilo inferior
ROTURA DEL HILO
La aguja está mal
La tensión de los hilos
La tensión de los hilos es
(de la canilla) está
SUPERIOR
colocada
no es correcta
demasiada fuerte
enredado
No
Página 17
No
No
Página 20-21
No
No
Página 16
Página 6
Página 20-21
El hilo superior está
La canilla no está bien
Se está usando una
Los hilos no están bien
enredado
enhebrada en el garfio
aguja dañada o gastada.
enhebrados
No
Página 17
No
No
Página 16
Página 6
Página 12-17
No
La combinación tamaño
El hilo superior es
El hilo inferior es
El tamaño de la aguja no
de aguja/grueso de hilo/
demasiado tirante
demasiado tirante
corresponde
tejido no es correcta
No
Página 20
Página 21
No
No
Página 6
No
Página 23
La combinación tamaño
El carrete está mal
El hilo inferior está mal
Hay polvo en el fondo de
de aguja/grueso de hilo/
colocado
enhebrado
la placa de agujas
tejido no es correcta
No
Página 12
No
Página 14
Página 43-45
No
Página 23
No
La aguja está doblada o
El hilo no está bien
gastada
enhebrado
Página 6
No
Página 16
No
La combinación tamaño
de aguja/grueso de hilo/
tejido no es correcta
Página 23
No
PONGASE EN CONTACTO CON EL SERVICIO TECNICO LOCAL
50
LISTADO DE POSIBLES INCIDENCIAS
LA MAQUINA ES
EL TEJIDO NO
LAAGUJA SE ROMPE
LA MAQUINA NO
RUIDOSA O FUNCIO-
ARRASTRA BIEN
ARRANCA
NA MUY DESPACIO
La combinaison
El enchufe de alimenta-
La aguja está mal
Hay polvo en la placa
aiguille/fil/tissu est
ción está desconectado
colocada
de agujas
incorrecte.
de la toma de corriente.
Página 23 Página 43-45
No
Página 6
No
No
Página 4
No
Se está usando una
Se está usando una aguja
El interruptor principal
Falta de aceite
aguja dañada o gastada.
dañada o gastada.
está apagado
No
No
No
Página 6
No
Página 6
Página 43
Página 5
La combinación tamaño
El hilo está enredado
de aguja/grueso de hilo/
No se usa bien el pedal
tejido no es correcta
No
Página 23
No
Página 5
No
Página 12-17
Se tira del tejido con
El eje de bobinado de la
La placa de zurcir está
demasiada fuerza. Deje
canilla se ha deslizado
instalada
que el arrastre lo aliment
hacia el presor de la
solos. No tire del tejido.
canilla.
No
No
Página 12
No
PONGASE EN CONTACTO CON EL SERVICIO TECNICO LOCAL
51


