Brother FAX 1170: Basic Fax Operation
Basic Fax Operation: Brother FAX 1170
33
Sending Faxes
Before you begin:
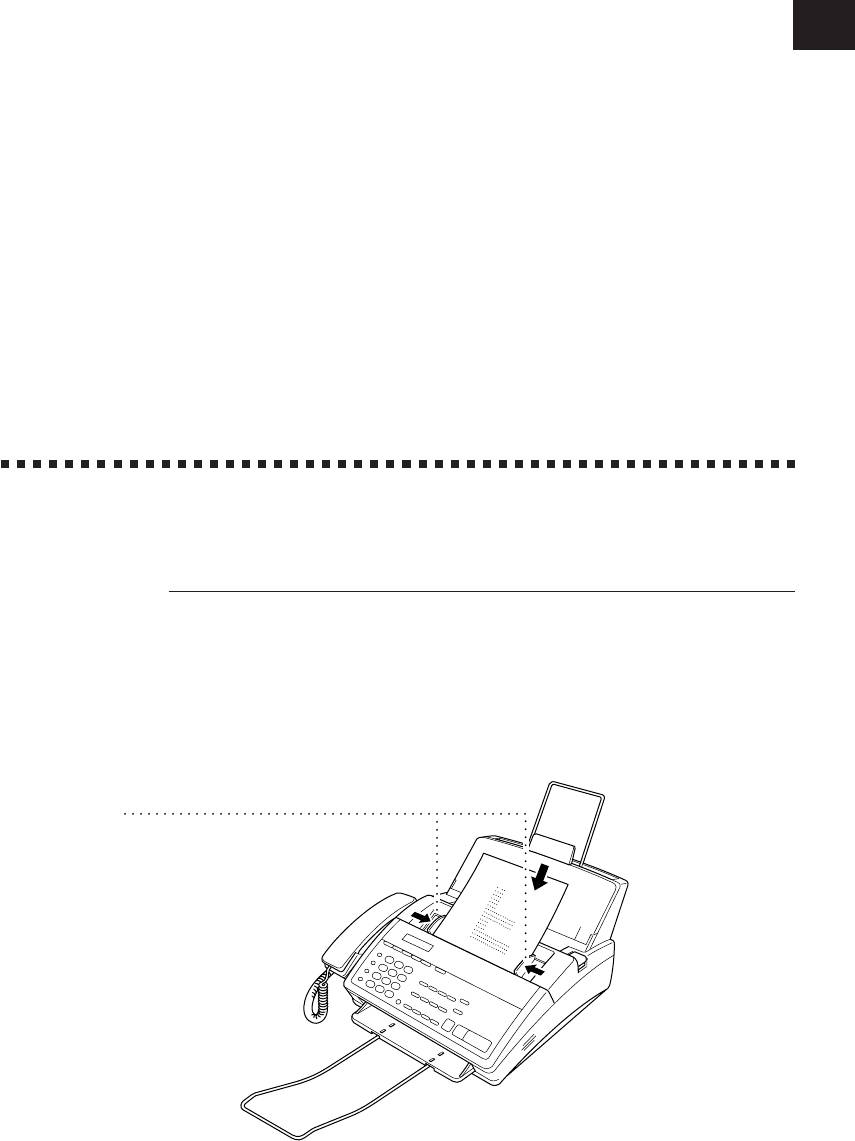
■ Documents must be between 5.8 and 8.5 inches wide, and 5.9 and 23.7
inches long. Your fax machine can only scan an image 8.2 inches wide,
regardless of how wide the paper is.
■ Make sure you insert documents face down, top edge first.
■ Adjust the paper guides to fit the width of your document.
Paper guides
■ The automatic document feeder (ADF) can hold up to 20 pages, feeding
each one individually through the fax machine. Use standard (20 lb.) paper
when using the ADF; if you’re using heavier paper, feed each sheet
individually to prevent paper jams.
5
CHAPTER FIVE
Basic Fax
Operation
CHAPTER FIVE
34
■
Press
Resolution
(before you send the fax)to select the resolution for the
document you’re sending.
Standard — suitable for most typed documents.
Fine — good for small print; transmits a little slower than standard
resolution.
Super Fine — good for small print or artwork; transmits slower than fine
resolution.
Photo — use when document has varying shades of gray; slowest
transmission time.
■ DO NOT use curled, wrinkled, folded, or ripped paper, or paper with staples,
paper clips, paste or tape attached. DO NOT use cardboard, newspaper, or
fabric.
■ Make sure documents written with ink are completely dry.
Contrast Setting
If your document is very light or very dark, you might want to set the contrast
accordingly. Use S.LIGHT to send a very light document. Use S.DARK to send a
very dark document.
1
Insert the document, face down, in the feeder.
2
Press
Function
,
1
,
4
.
3
Use or to select AUTO, S.LIGHT, or S.DARK.
4
When the screen displays your selection, press
Set
.
5
Press
Stop
to exit.
6
Enter a fax number and press
Start
to send a fax — OR — Press
Copy
to
make a copy.
Manual Transmission
Manual transmission lets you hear the dial tone, ringing, and fax receiving tones
before sending the fax.
See
1
Insert the document face down in the feeder.
One-Touch
2
Pick up the handset and listen for a dial tone
Dialing
p. 23
— OR — Press
Hook
and listen for a dial tone.
3
Enter the fax number you want to call (you can enter the digits using the
keypad, or you can enter a One Touch or Speed Dial number or you can
call from the Tel-index).
BASIC FAX OPERATION
35
4
When you hear the fax tone, press
Start
See
.
Speed Dial
p. 24
5
If you’re using the handset, hang up.
Automatic Transmission
This is the easiest way to send a fax. IMPORTANT: Do not pick up the handset
or press
Hook
.
1
Insert the document face down in the feeder.
2
Enter the fax number from One Touch or Speed Dial or Tel-index or keypad.
3
Press
Start
.
Manual and Automatic Fax Redial
If you’re sending a fax manually and the line is busy, press
Redial/Pause
to retry
the number.
If you’re sending a fax automatically, the machine will detect if the line is busy
and will automatically redial up to three times.
Receiving Faxes
Select Answer Mode
See
Manual — You must answer all calls yourself. If you hear fax tones, press
Start
Distinctive
to begin receiving the fax, then hang up. You must use this mode with
Ringing
Distinctive Ring.
p. 53
Fax Only — The fax machine automatically answers every call as a fax call.
You cannot receive a voice call, but you can dial out and make a voice call.
See
F/T — The fax machine automatically answers every call. If the call is a fax, it
F/T (Fax/Tel)
prints the fax. If the call is not a fax, it signals you with a double ring (ring-ring),
Mode Only
different from the phone company ringing, to alert you to pick up the call. If you
p. 52
select this setting, you’ll need to set the Ring Delay and F/T Ring Time features
(on the following pages). If you have extension phones on the same line as the
fax machine, set Ring Delay to 4.
CHAPTER FIVE
36
TAD — This is the only setting in which you can use an answering machine.
Your telephone answering device is connected to your fax machine, and answers
every call. Once the TAD answers, the fax machine listens for fax tones. If it
detects fax tones, it prints the fax.
The TAD setting works only with an external telephone answering device (TAD); it
does not work with telephone company voice mail. Ring Delay and F/T Ring
Time do not work in this setting.
Current
Answer Mode
MNL:
MANUAL
FAX:
09/06 15:25 FAX
FAX ONLY
F/T:
FAX/TEL
TAD:
EXTERNAL ANSWERING SYSTEM
Mode Q. ScanFunction Tel-index Resolution
Easy Receive
When you use this feature, you don’t have to press
Start
when you answer a fax
call and hear calling beeps. Just hold the handset and wait a few seconds. When
you see “RECEIVE” on the fax screen or when you hear “chirps” through the
handset of an extension phone connected to another wall jack, just replace the
handset, and the fax machine does the rest. Selecting ON allows the machine to
receive fax calls automatically, even if you lift the handset of an external or
extension phone. Selecting SEMI lets the fax machine receive the call only if
you’ve answered it at the fax machine. Selecting OFF means you’ll have to
activate the fax machine yourself, by pressing
Start
or by pressing
5
1
if
you are not at the fax machine.
In case Easy Receive does not work, because of a poor phone line connection, just
press
Start
or press the Activation Code
5
1
.
1
Press
Function
,
7
,
6
.
2
Use or to select ON, SEMI, or OFF.
3
Press
Set
when screen displays your selection.
4
Press
Stop
to exit.
If you’ve set the feature to ON, but your fax machine doesn’t automatically
connect a fax call when you lift the extension phone handset, press
5
1
.
At the fax machine, lift the handset and press
Start
See
Operation
from
Extension
Telephone
p. 52
and
For F/T
(Fax/Tel)
Mode Only
p. 52
.
If you send faxes from a computer on the same phone line and your fax machine
intercepts them, turn Easy Receive SEMI or OFF.

BASIC FAX OPERATION
37
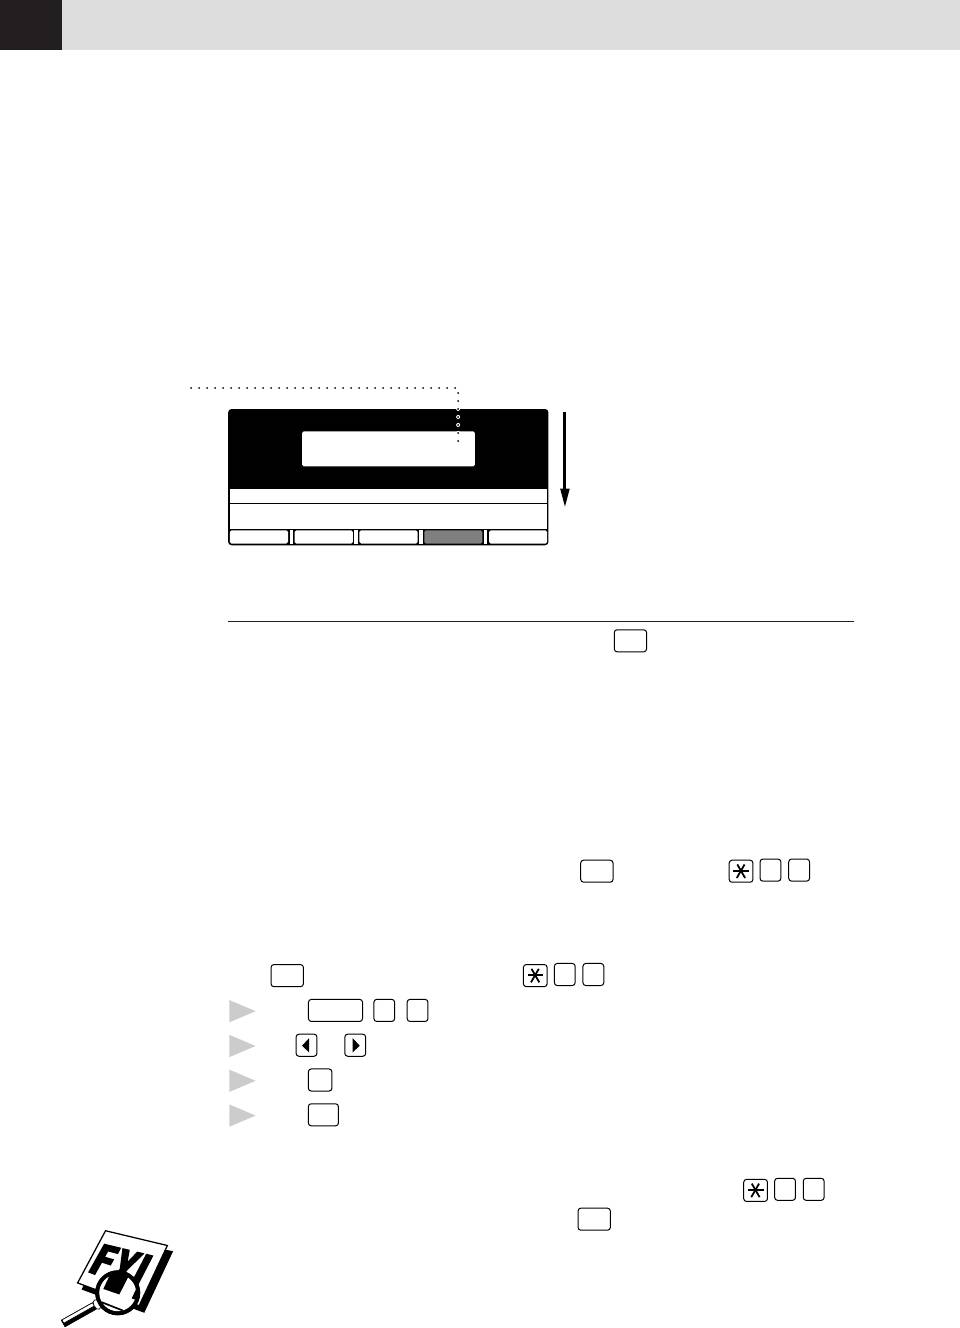
To select or change your Answer Mode
1
Press
Mode
. The screen displays your current selection.
FAX/TEL
MANUAL
FAX ONLY
TAD
2
Continue to press
Mode
until your new selection appears. After 2 seconds, the
screen returns to the date and time display, along with your new Answer
Mode setting.
If you’re changing Answer Mode while in another operation, the screen returns to
the current operation display.
Setting Ring Delay
The Ring Delay setting determines the number of times the fax machine rings
before it answers. If you have extension phones on the same line as the fax
machine, set the Ring Delay to 4.
1
Press
Function
,
6
,
2
.
See
2
Press or to select how many times the line rings before the fax
Operation
machine answers (00 – 04). If you select 00, the line doesn’t ring at all.
from
Extension
3
Press
Set
when the screen displays your selection.
Telephone
4
Press
Stop
to exit.
p. 52
and
For F/T
Setting F/T Ring Time
(Fax/Tel)
Mode Only
You need to determine how long the fax machine will send you its special double
p. 52
ring when you have a voice call. This ringing happens after the initial ringing
from your telephone company (Ring Delay). Only the fax machine rings, for 10,
20, 30, or 60 seconds; no other phones on that number will ring the special
double ring (F/T Ring Time). However, you can answer the call on any extension
phone on the same phone number as the fax machine.
1
Press
Function
,
6
,
4
.
2
Press or to select how long the fax machine will ring to alert you that
you have a voice call.
3
Press
Set
when the screen displays your selection.
RING TIME:XX SEC
CHAPTER FIVE
38
4
Press
Stop
to exit.
Now, when a call comes in and the machine is set to F/T Mode, all phones on this
line will ring the number of times you selected in Ring Delay.
You can let the fax machine pick up and detect if it’s a fax or voice call. If it’s a
fax call, the machine prints the fax. If it’s a voice call, the machine signals you
with a double ring for the length of time you selected in F/T Ring Time.
Even if the caller hangs up during the double ringing, the fax machine continues
for the set time.
Speaker Volume
You can set the volume of the fax machine speaker.
1
Press
Function
,
6
,
3
.
2
Press or to select your volume setting (OFF, LOW, MEDIUM, or
HIGH).
3
Press
Set
when the screen displays your selection.
4
Press
Stop
to exit.
Setting the Handset Volume
You can set the Hand Set volume to LOW, HIGH, AMPLIFY. The factory setting
LOW. AMPLIFY is the setting for a user who is hearing-impaired.
The AMPLIFY volume level complies with FCC standards.
1
Press
Function
,
6
,
8
.
2
Press or to select your setting.
3
When the screen displays the setting you want, press
Set
.
4
Press
Stop
to exit.
It is important that you do not choose AMPLIFY unless all the
users are hearing-impaired. Otherwise, the default setting of AMPLIFY may
damage the hearing of some users.
BASIC FAX OPERATION
39
Ring Volume
You can select how loudly, or if, the fax machine rings.
1
Press
Function
,
6
,
5
.
2
Press or to select OFF, LOW, MEDIUM, or HIGH.
3
Press
Set
when the screen displays your selection.
4
Press
Stop
to exit.
Even if you select OFF, the ring volume will remain LOW in F/T ringing (double
ringing), and LOW in Call Reservation.
Smoothing
When activated, this feature enhances the appearance of incoming faxes by
“smoothing” lines. It takes no longer to receive faxes in this setting, which comes
set to ON.
You cannot use “smoothing” for outgoing faxes, or for printing lists and reports.
1
Press
Function
,
5
,
1
.
2
Press or to choose ON or OFF.
3
Press
Set
.
4
Press
Stop
to exit.
Setting Recording Paper Size
You can use three sizes of paper for printing your faxes — letter, legal, and A4.
When you change the kind of paper you have loaded in the fax machine, you will
need to change the setting for recording paper size, so the fax machine will know
how to fit the incoming fax on the page. You can also select the level of page
reduction to fit on the paper in your fax machine.
1
Press
Function
,
5
,
6
. The screen displays
6.RCD PAPER
2
Use or to select LETTER, LEGAL or A4.
3
Press
Set
when the screen displays your selection.
4
Use or to select AUTO, 100%, 93%, 87% or 75%.
Press
Set
when the screen displays your selection.
5
Press
Stop
to exit.
6

CHAPTER FIVE
40
Printing a Reduced Incoming Document
You can always reduce the size of an incoming fax to a fixed percentage,
regardless of the size of the paper (up to legal) in your fax machine. If you choose
AUTO, the fax machine chooses the level of reduction for you.
1
Press
Function
,
5
,
5
. The screen displays
5.REDUCTION
2
Use or to select the reduction ratio you want — AUTO, 93%, 87%,
or 75%. Choose 100% if you don't want a reduction.
3
Press
Set
when the screen displays your selection.
4
Press
Stop
to exit.
Recommended Reductions
If your paper is letter size (8.5" x 11"), and the incoming fax is
letter size, select 93%
A4, select 87%
legal size, select 75%.
If your paper is A4 (8.2" x 11.6"), and the incoming fax is
letter size, select 100%
A4, select 93%
If your paper is legal size (8.5" x 14"), and the incoming fax is
letter size, select 100%
A4, select 100%
legal size, select 93%.
Оглавление
- Introduction
- Assembly and Connections
- Fax Settings
- On-Screen Programming
- Basic Fax Operation


