Brother FAX 1170: Assembly and Connections
Assembly and Connections: Brother FAX 1170

7
2
CHAPTER TWO
Assembly
and
Connections
Caution
1
Never install telephone wiring during a lightning storm.
2
We recommend that this product be used with a surge protection device to
protect the product against lightning storms.
3
Never install a telephone jack in a wet location unless the jack is specifically
designed for a wet location.
4
Never touch telephone wires or terminals that are not insulated unless the
telephone line has been disconnected at the network interface.
5
Use caution when installing or modifying telephone lines.
6
Avoid using a telephone (other than a cordless type) during an electrical
storm. There may be a remote risk of electric shock from lightning.
7
Do not use the telephone to report a gas leak in the vicinity of the leak.
8
For PLUGGABLE EQUIPMENT, the socket-outlet should be installed near the
equipment and should be easily accessible.
CHAPTER TWO
8
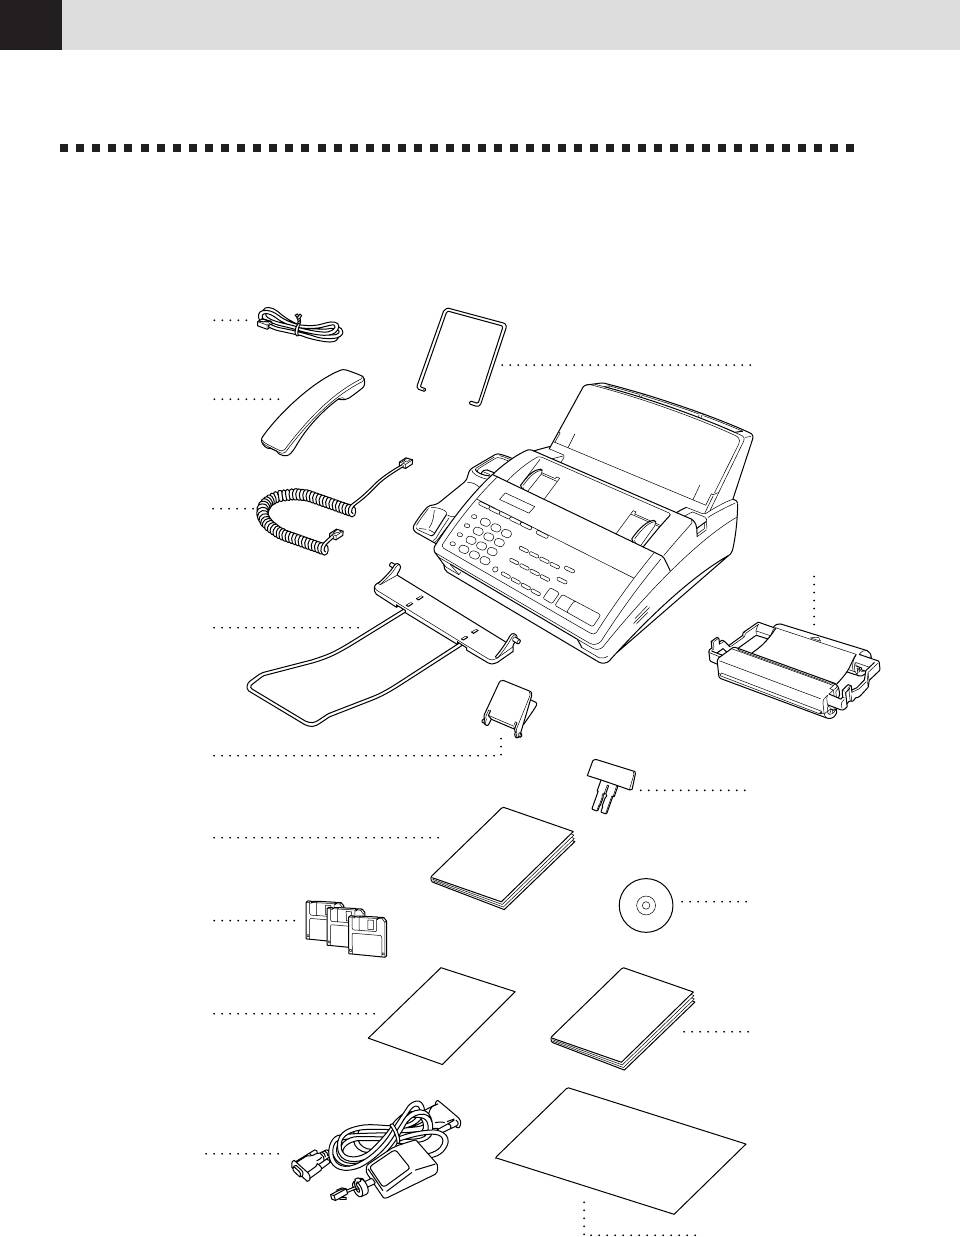
Packing List
Make sure you have the following items:
Telephone
Line Cord
Recording Paper
Wire Extension
Telephone
Handset
Handset
Starter
Curled Cord
Printing
Cartridge
(up to 100 pages)
Document
Wire Extension
Document
Support
Recording Paper
Support
Owner’s
Manual
Multi-Function
Multi-Function
®
Link
CD-ROM
Link Disks
(MFC1780)
(MFC1770)
Quick Reference
Multi-Function
Guide
®
Link
Manual
(FAX1170 and MFC1770)
(QuickStart Manual)
(MFC1770/1780)
Cable &
PC I/F Box
(MFC1770/1780)
Brother StartCard
(FAX1270 and MFC1780)
ASSEMBLY AND CONNECTIONS
9
Choosing a Location
Place your fax machine on a flat, stable surface, such as a desk. Select a place
that is free of vibration and shocks. Locate the fax machine near a telephone jack
and a standard, grounded power outlet.
Avoid placing your fax machine in a high-traffic area. Do not place near heaters,
air conditioners, water, chemicals, or refrigerators. Do not expose the fax machine
to direct sunlight, excessive heat, moisture, or dust. Do not connect your fax
machine to electrical outlets controlled by wall switches or automatic timers.
Disruption of power can wipe out information in the unit’s memory. Do not
connect your fax machine to electrical outlets on the same circuit as large
appliances or other equipment that might disrupt the power supply. Avoid
interference sources, such as speakers or the base units of cordless phones.
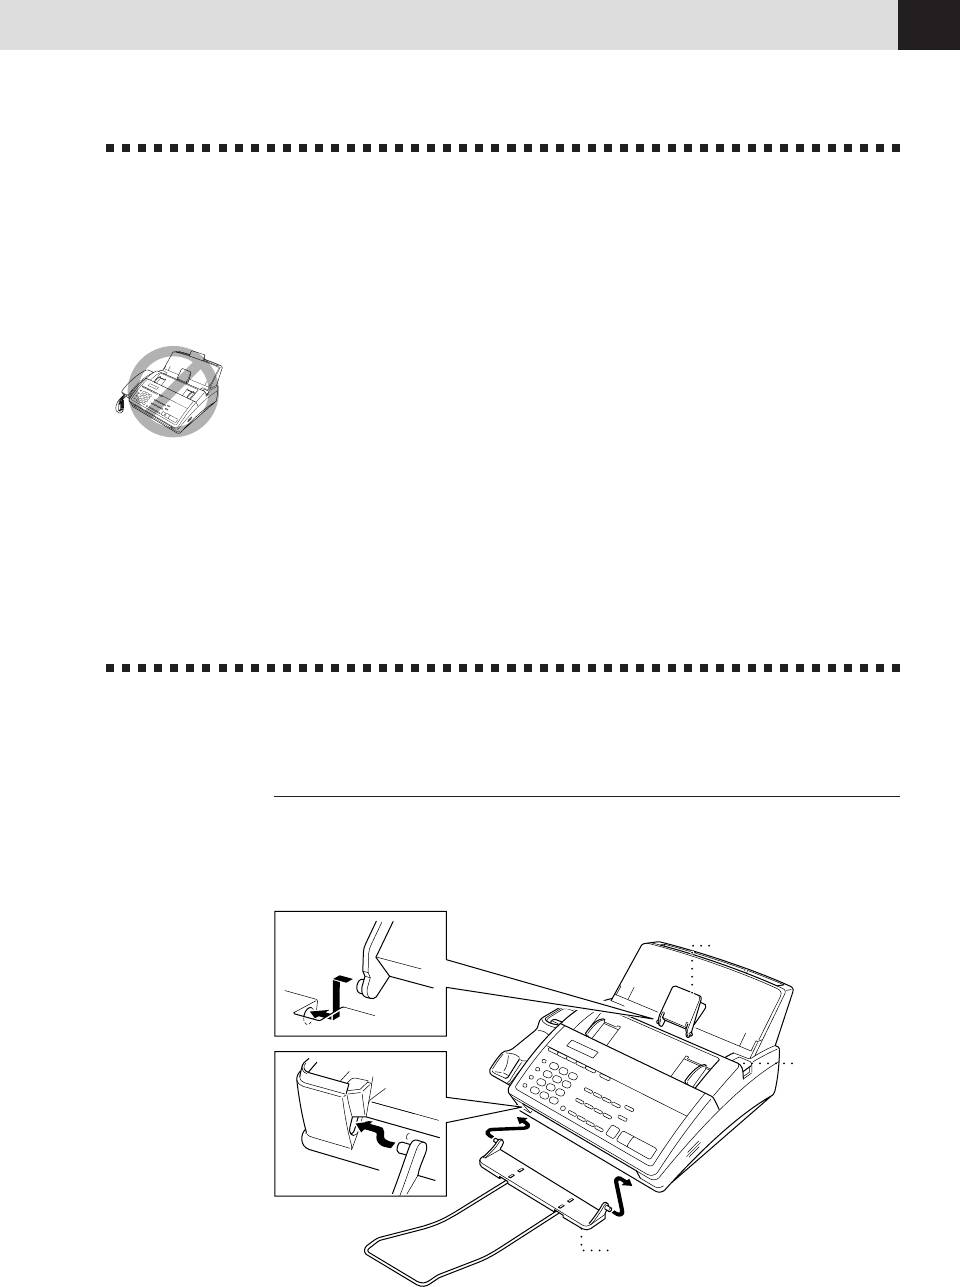
Assembly
Attach the document support
Attach the document support and the document wire extension as shown in the
illustration below.
Document Support
OPEN Button
Document Wire
Extension
CHAPTER TWO
10
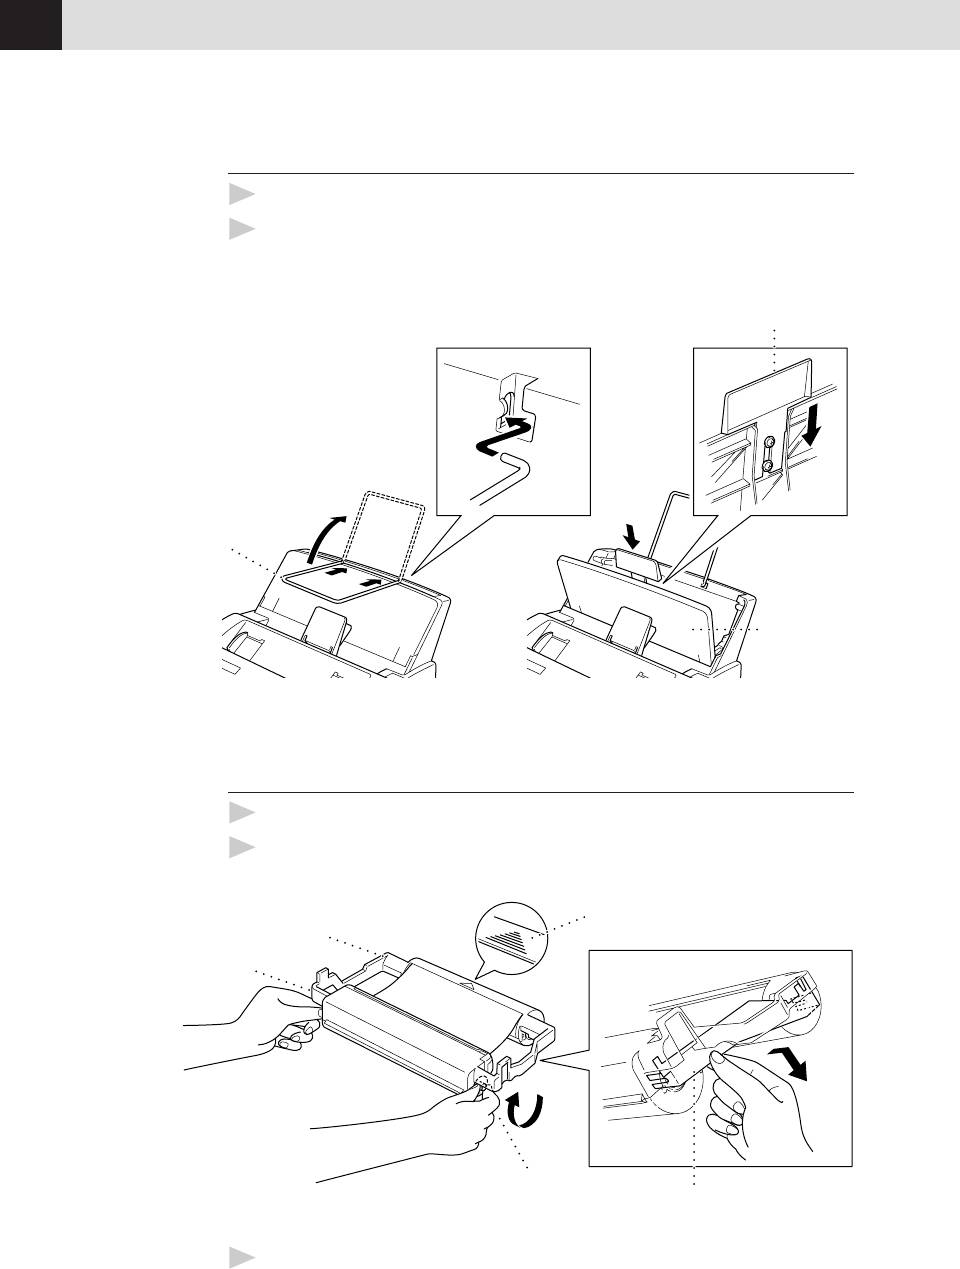
Attach recording paper support
1
Attach the recording paper wire extension.
2
Open the recording paper cover. Using the groove in the cover, insert the
recording paper support as shown.
Recording Paper Support
Recording Paper
Wire Extension
Recording
Paper Cover
Install the printing cartridge
1
Push the OPEN button to open the top cover.
2
Remove the stopper for the printing cartridge.
Indented arrow
White shaft
Blue shaft
Black Spool
Stopper
3
Turn the black spool on the right clockwise to tighten the ribbon, as shown.

ASSEMBLY AND CONNECTIONS
11
4
Install the printing cartridge by inserting the indented first and placing
the cartridge into its four holders.
OPEN button
Black Spool
Holder
I
ndented
5
Press down on both sides of the cover to close it securely.
The starter cartridge prints up to 100 pages.
Install recording paper
The paper cassette can hold about 200 sheets of 20-lb. paper.
1
Open the paper casette cover.
2
Place up to 200 sheets of paper in the casette. Do not allow level of paper to
pass the paper guide.
3
Close the paper casette cover.
Paper Guide
Paper
Casette
Cover
Paper
Casette
CHAPTER TWO
12
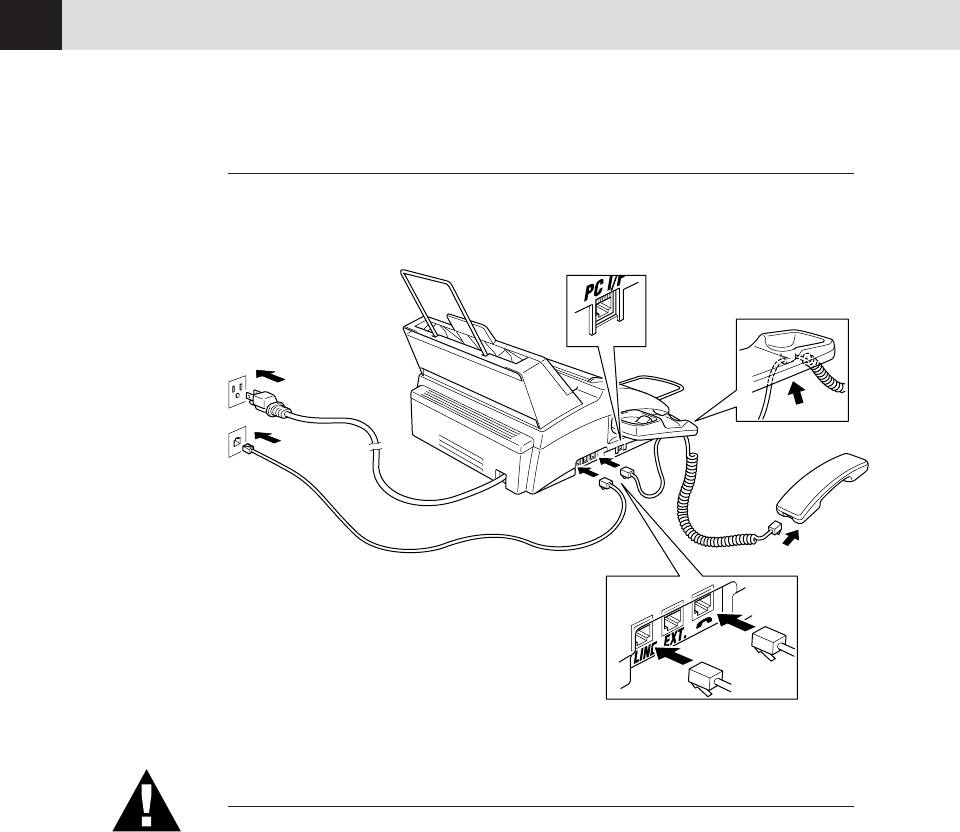
Connect the handset
Connect the curled handset cord to the bottom of the handset and the side of the
fax machine.
*
*PC I/F jack is for use only with Multi-Function
®
Link
, which is included with the MFC 1770/1780,
or with the Missing Link option. If you have not
®
purchased Missing Link or Multi-Function Link
for your FAX 1170/1270, then ignore this jack.
Connect the power cord
When you connect the power, the screen displays 01/01 00:00.
NOTICE:
1) This fax must be grounded using a 3-prong plug.
2) Since the machine is grounded through the power outlet, you can protect
yourself from potentially hazardous electrical conditions on the telephone
network by keeping the power to your fax machine on when you connect it to
a telephone line. Similarly, you can protect yourself when you want to move
your machine, by disconnecting the telephone line first, and then the power
cord.
3) Lightning and power surges can damage this product! We recommend that
you use a quality surge protection device on the AC power line as well as on
the telephone line, or unplug the lines during a lightning storm.

ASSEMBLY AND CONNECTIONS
13
Connect the telephone line
Connect one end of the telephone line cord to the jack labeled LINE on the left
side of the fax machine. Connect the other end to a modular wall jack.
Special Line Considerations
Roll Over Phone Lines
A roll over phone system is a group of two or more separate telephone lines that
pass incoming calls to each other if they are busy. The calls are usually passed
down or “rolled over” to the next available phone line in a preset order.
Your fax machine can work in a roll over system as long as it is the last number
in the sequence, so the call cannot roll away. Do not put the fax machine on any
of the other numbers; when the other lines are busy and a second fax call is
received, the fax call is transferred to a line that does not have a fax machine.
Your fax machine will work best on a dedicated line.
Two-Line Phone System
A two-line phone system is nothing more than two separate phone numbers on
the same wall outlet. The two phone numbers can be on separate jacks (RJ11) or
combined into one jack (RJ14). Your fax machine must be plugged into an RJ11
jack. RJ11 and RJ14 jacks may be equal in size and appearance and both may
contain 4 wires (black, red, green, yellow). To test the type of jack, plug in a
two-line phone and see if it can access both lines. If it can, you must separate the
line for your fax machine.
CHAPTER TWO
14
Converting Telephone Wall Outlets
There are three ways to convert to an RJ11 receptacle. The first two ways may
require assistance from the telephone company. You can change the wall outlets
from one RJ14 jack to two RJ11 jacks. Or, you can have an RJ11 wall outlet
installed and slave or jump one of the phone numbers to it.
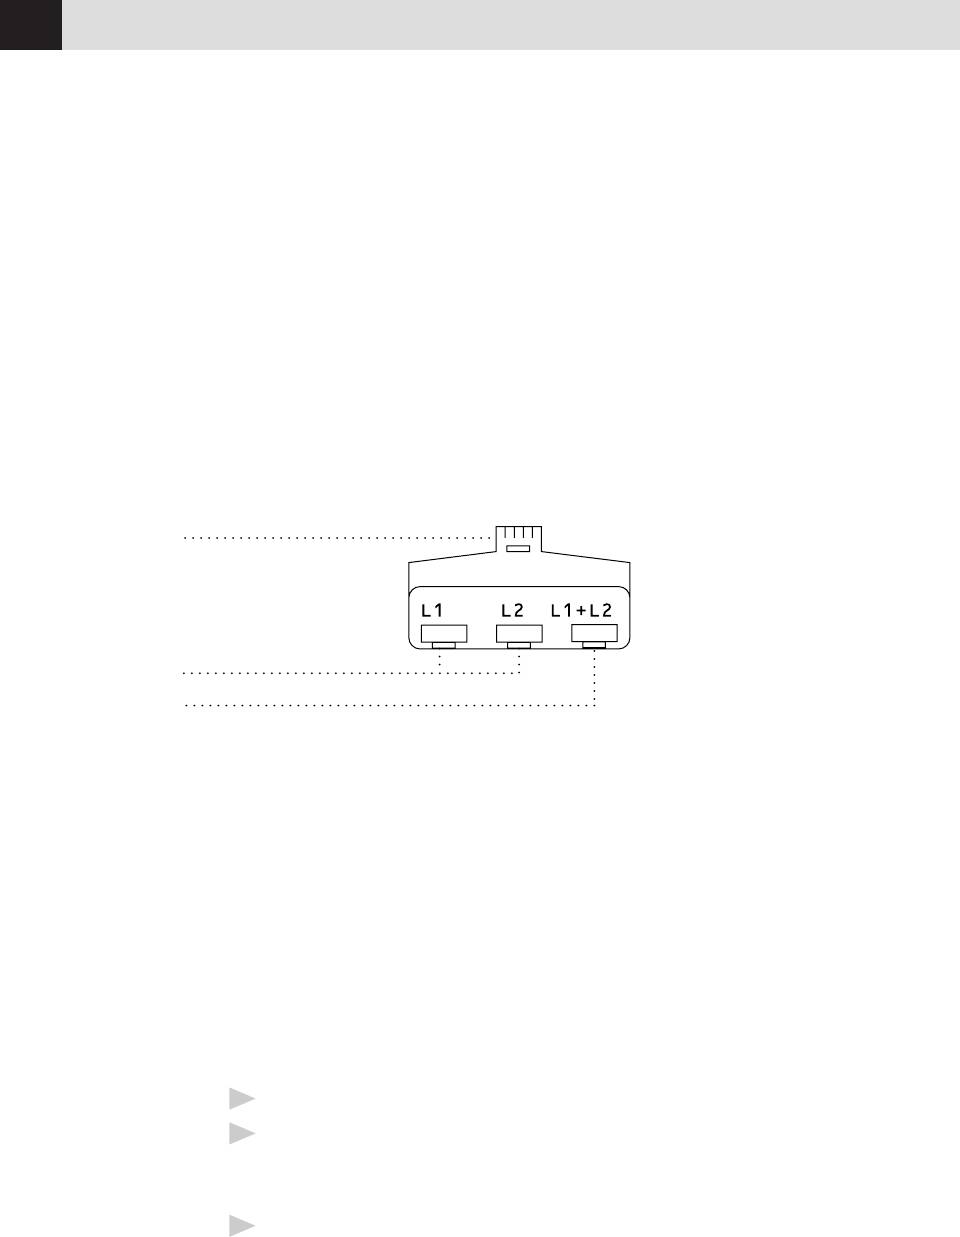
The third way is the easiest: Buy a triplex adapter. You can plug a triplex adapter
into an RJ14 outlet. It separates the wires into two separate RJ11 jacks (Line 1,
Line 2) and a third RJ14 jack (Lines 1 and 2). If your fax machine is on Line 1,
plug the fax machine into L1 of the triplex adapter. If your machine is on Line 2,
plug it into L2 of the triplex adapter.
Triplex Adapter
RJ14
RJ11
RJ14
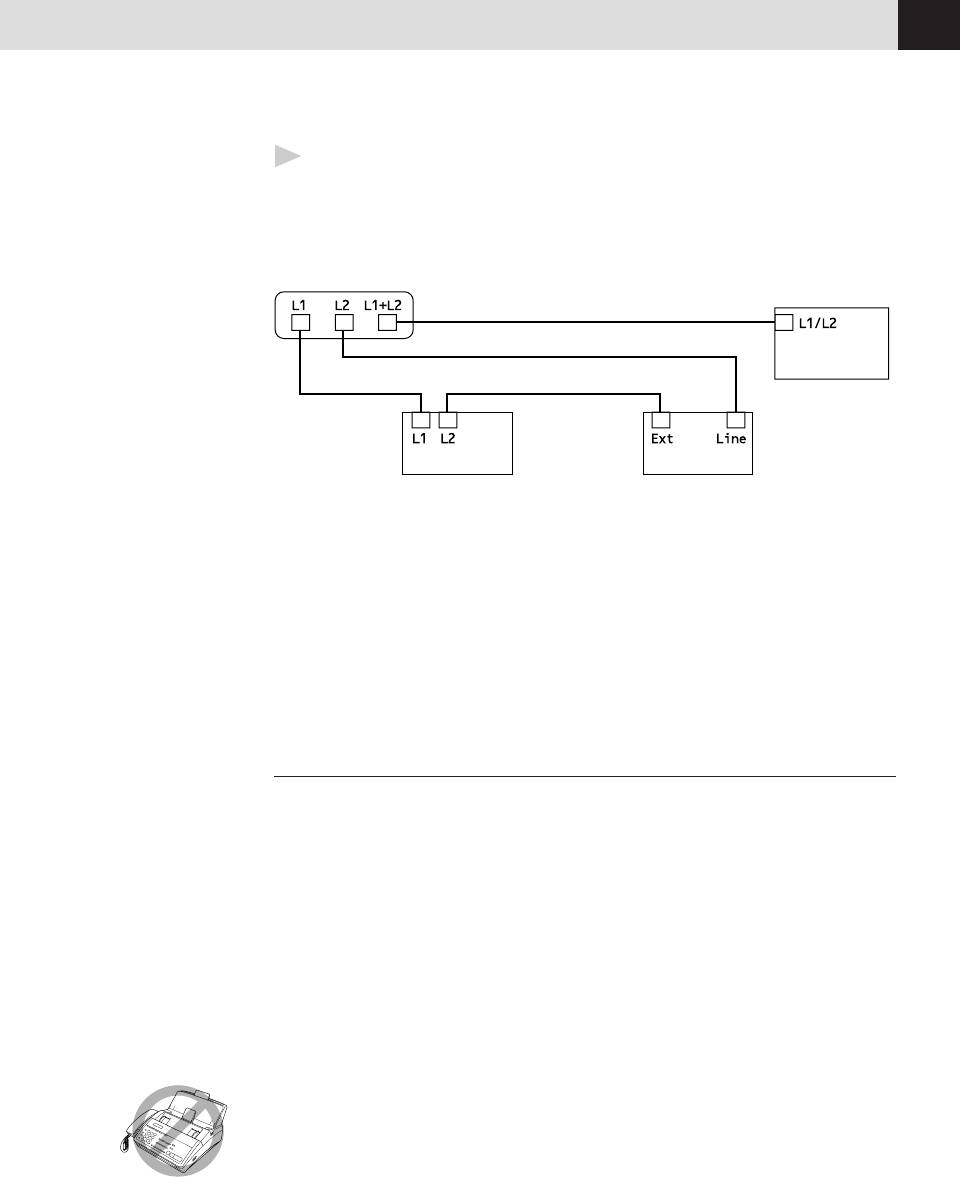
Installing Fax Machine, External Two-Line TAD,
and Two-Line Telephone
When you are installing an external two-line telephone answering device (TAD)
and a two-line telephone, your fax machine must be isolated on one line at both
the wall jack and at the TAD. The most common connection is to put the fax
machine on Line 2, which is our assumption in the following steps. The back
of the two-line TAD must have two telephone jacks: one labeled L1 or L1/L2, and
the other labeled L2. You will need at least three telephone line cords, the one that
came with your fax machine and two for your external two-line TAD. You will
need a fourth line cord if you add a two-line telephone.
1
Place the two-line TAD and the two-line telephone next to your fax machine.
2
Plug one end of the telephone line cord for your fax machine into the L2
jack of the triplex adapter. Plug the other end into the LINE jack on the left
side of the fax machine.
3
Plug one end of the first telephone line cord for your TAD into the L1 jack of
the triplex adapter. Plug the other end into the L1 or L1/L2 jack of the
two-line TAD.
ASSEMBLY AND CONNECTIONS
15
4
Plug one end of the second telephone line cord for your TAD into the L2 jack
of the two-line TAD. Plug the other end into the EXT. jack on the left side of
the fax machine.
Triplex Adapter
Two Line Phone
Two Line External TAD Fax Machine
You can keep two-line telephones on other wall outlets as always. There are two
ways to add a two-line telephone to the fax machine’s wall outlet. You can plug
the telephone line cord from the two-line telephone into the L1+L2 jack of the
triplex adapter. Or, you can plug the two-line telephone into the TEL jack of the
two-line TAD.
Multi-Line Connections (PBX)
Most offices use a central telephone system. While it is often relatively simple to
connect the machine to a key system or a PBX (Private Branch Exchange), we
suggest that you contact the company that installed your telephone system and
ask them to connect the fax machine for you. It is advisable to have a separate
line for the fax machine. You can then leave the machine in FAX ONLY Mode to
receive faxes any time of day or night.
See
If the fax machine is to be connected to a multi-line system, ask your installer to
Easy Receive
connect the unit to the last line on the system. This prevents the unit from being
p. 36
activated each time a telephone call is received.
As with all fax units, this machine must be connected to a two wire system. If
your line has more than two wires, proper connection of the fax machine cannot
be made.

CHAPTER TWO
16
If you are installing the machine to work with a PBX:
1
It is not guaranteed that the unit will operate correctly under all
circumstances with a PBX. Any cases of difficulty should be reported first to
the company that handles your PBX.
2
If all incoming calls will be answered by a switchboard operator, it is
recommended that the Answer Mode be set to MANUAL. All incoming calls
should initially be regarded as telephone calls.
3
The unit may be used with either pulse or tone dialing telephone service.
Custom Features on Your Phone Line
If you have Call Waiting, Ring Master, Voice Mail, an answering service, alarm
system or any other custom feature on your telephone line, it may create a
problem in the operation of your fax machine.
Connecting an External
Telephone Answering Device (TAD)
Sequence
You might choose to connect an additional answering system. When you have an
external TAD on the same telephone line as the fax machine, the TAD answers
all calls. The fax machine “listens” for fax calling (CNG) tones. If it hears them,
the fax machine takes over the call and receives the fax. If it doesn’t hear CNG
tones, the fax machine lets the TAD continue playing your outgoing message so
your caller can leave you a voice message.
The TAD must answer within 4 rings (the recommended setting is 2 rings). The
fax machine cannot hear CNG tones until the TAD has answered the call, and
with 4 rings there are only 8-10 seconds of CNG tones left for the fax
“handshake.” Make sure you carefully follow instructions in this manual for
recording your outgoing message. We do not recommend using the “toll-saver”
feature on your TAD if it exceeds 4 rings.
ASSEMBLY AND CONNECTIONS
17
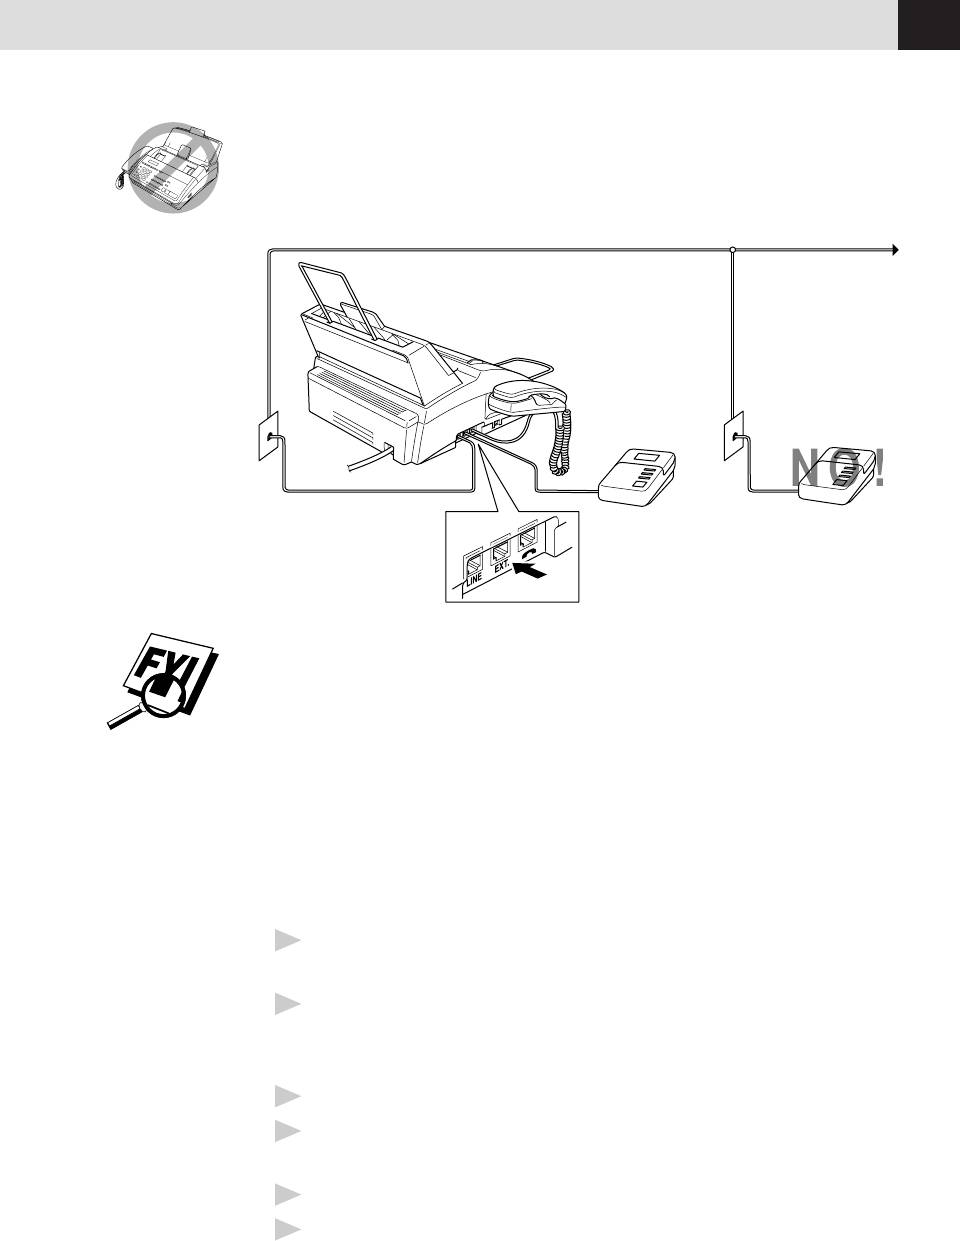
Do not connect a TAD elsewhere on the same phone line — your
fax machine and TAD will both try to control the line.
You may connect an external TAD to a separate wall jack only if you subscribe to
your telephone company’s Distinctive Ring Service, have registered the distinctive
ring pattern on your fax machine, use that number as a fax number and set your
machine’s Answer mode to MANUAL.
Connections
The external TAD must be plugged into the left side of the fax machine, into the
jack labeled EXT. Your fax machine cannot work properly if you plug the TAD into
a wall jack.
1
Plug the telephone line cord from the wall jack into the left side of the fax
machine, in the jack labeled LINE.
2
Plug the telephone line cord from your TAD into the left side of the fax
machine, in the jack labeled EXT. (Make sure this cord is connected to the
TAD at the TAD’s telephone line jack, and not its telephone set jack.)
3
Set the Answer Mode to TAD.
4
Set your external TAD to 4 rings or less. (The fax machine’s Ring Delay
setting does not apply).
5
Set the TAD to answer calls.
6
Record the outgoing message (see below).
CHAPTER TWO
18
Outgoing Message (OGM)
Timing is important in recording this message. The message sets up the ways to
handle both manual and automatic fax reception.
1
Record 5 seconds of silence at the beginning of your message. (This allows
your fax machine time to listen for the fax CNG tones of automatic
transmissions before they stop.)
2
Limit your speaking to 20 seconds.
3
End your 20-second message by giving your Remote Activation Code for
people sending manual faxes. For example:
“After the beep, leave a message or send a fax by pressing ✳ 5 1.”
We recommend beginning your OGM with an initial 5-second silence because the
Brother machine cannot hear fax tones over a resonant or loud voice. You may try
omitting this pause, but if your machine has trouble receiving, then you must
rerecord the OGM to include it.
Connecting an External Telephone
Your fax machine is equipped with a handset that you can use as a regular
phone. However, you can also connect a separate telephone (or telephone
answering device) directly to your fax machine.
Connect the modular plug on the telephone’s line cord to the jack labeled EXT. on
the left side of the fax machine.
Whenever this phone (or TAD) is in use, the screen displays “EXT. TEL IN USE,”
and, if the fax handset is lifted, an alarm sounds. To disconnect the call on the
external phone and switch to the fax, press
Hook
.
Оглавление
- Introduction
- Assembly and Connections
- Fax Settings
- On-Screen Programming
- Basic Fax Operation


