Brother 1034D – страница 2
Инструкция к Швейной Машиной Brother 1034D
1034D-ru.book Page 14 Monday, August 29, 2005 6:49 PM
Before Threading
Перед заправкой нити
Preparation before
Приготовления перед
threading
заправкой нити
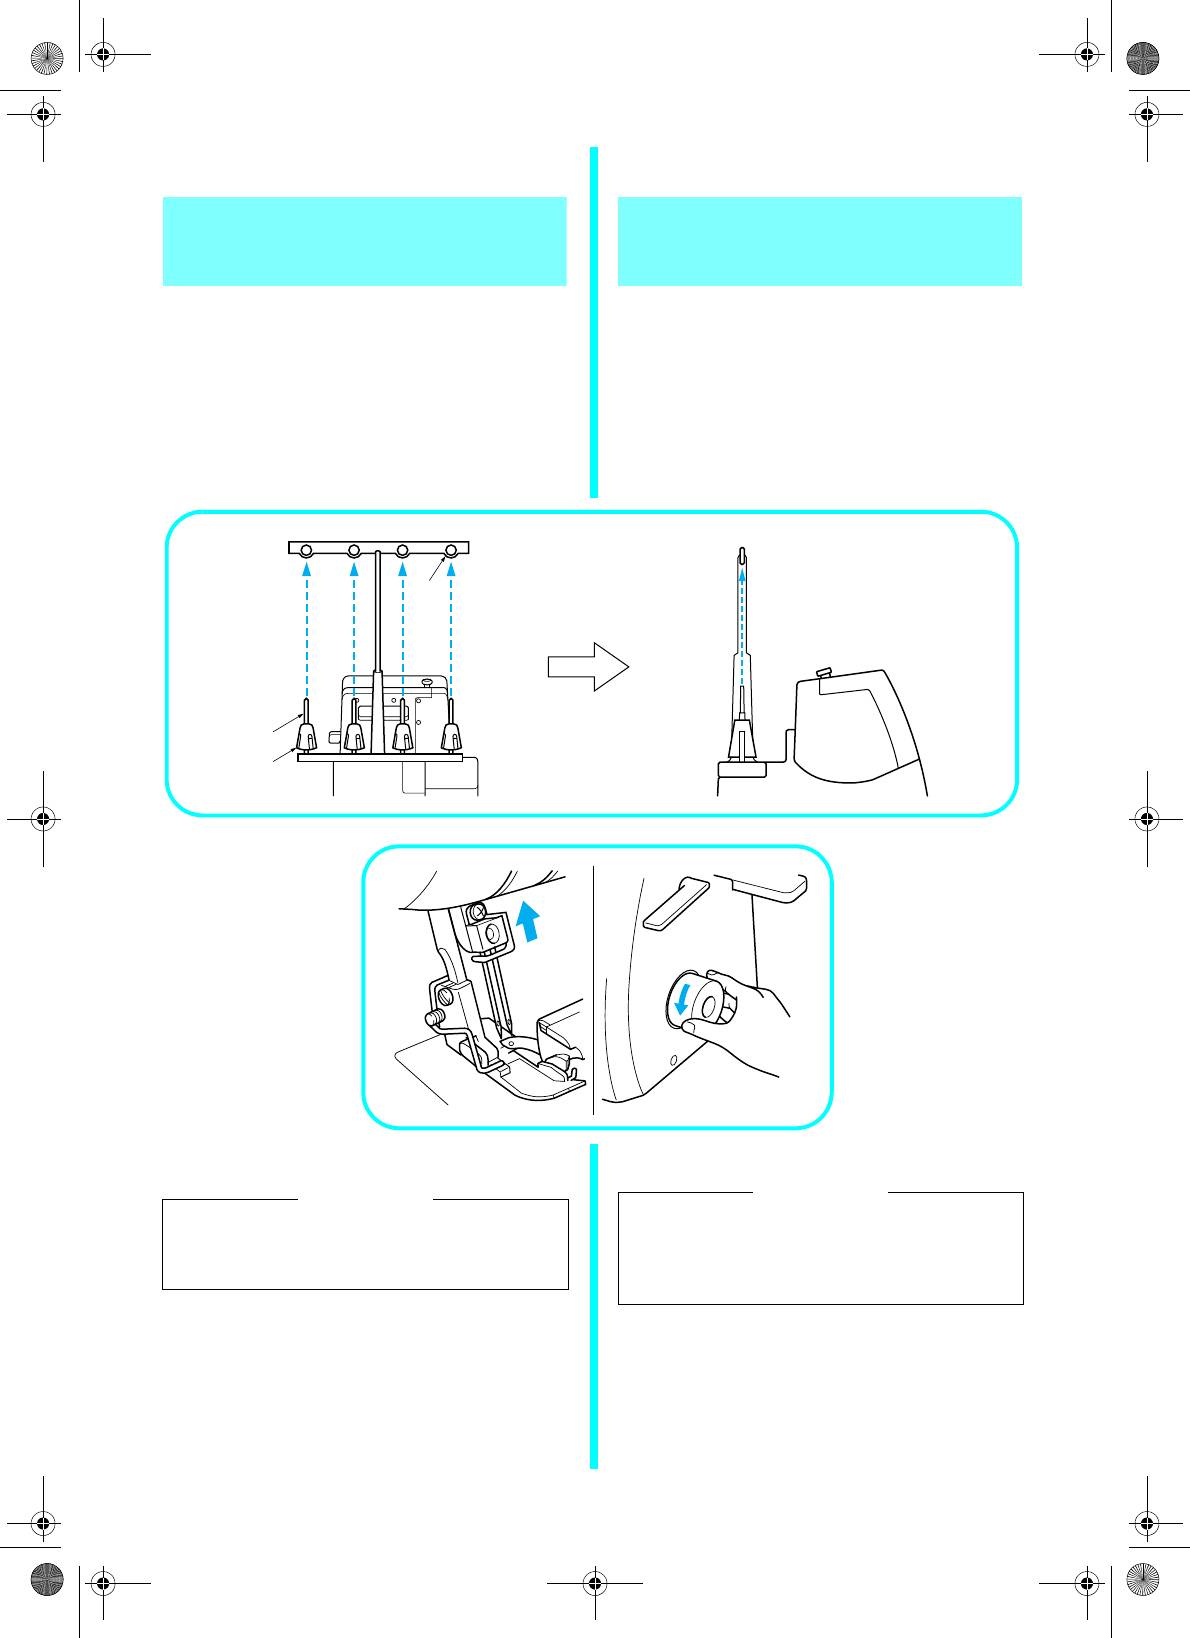
Поднимите телескопическую стойку с
Raise the telescoping thread tree to its highest
нитенаправителями в крайнее верхнее
position. Make sure that the thread holders are in
положение. Убедитесь, что нитенаправители
alignment above the spool pins as illustrated
выровнены над стержнями для установки
below.
катушек, как показано на рисунке.
1 Thread holder on thread tree
1 Нитенаправитель на стойке
2 Spool pin
2 Стержень для установки катушки
3 On Two-needle models
3 На моделях с двойной иглой
4 Correct position
4 Правильное положение
4
1
2
3
ВНИМАНИЕ
CAUTION
Всегда заправляйте нить в следующем
When threading, always thread in this
порядке: верхний петлитель, нижний
order: upperlooper, lowerlooper, right
петлитель, правая игла, затем левая
needle and then the left needle.
игла.
14
1034D-ru.book Page 15 Monday, August 29, 2005 6:49 PM
How to use the thread
Как использовать
spool cap
колпачок катушки с нитью
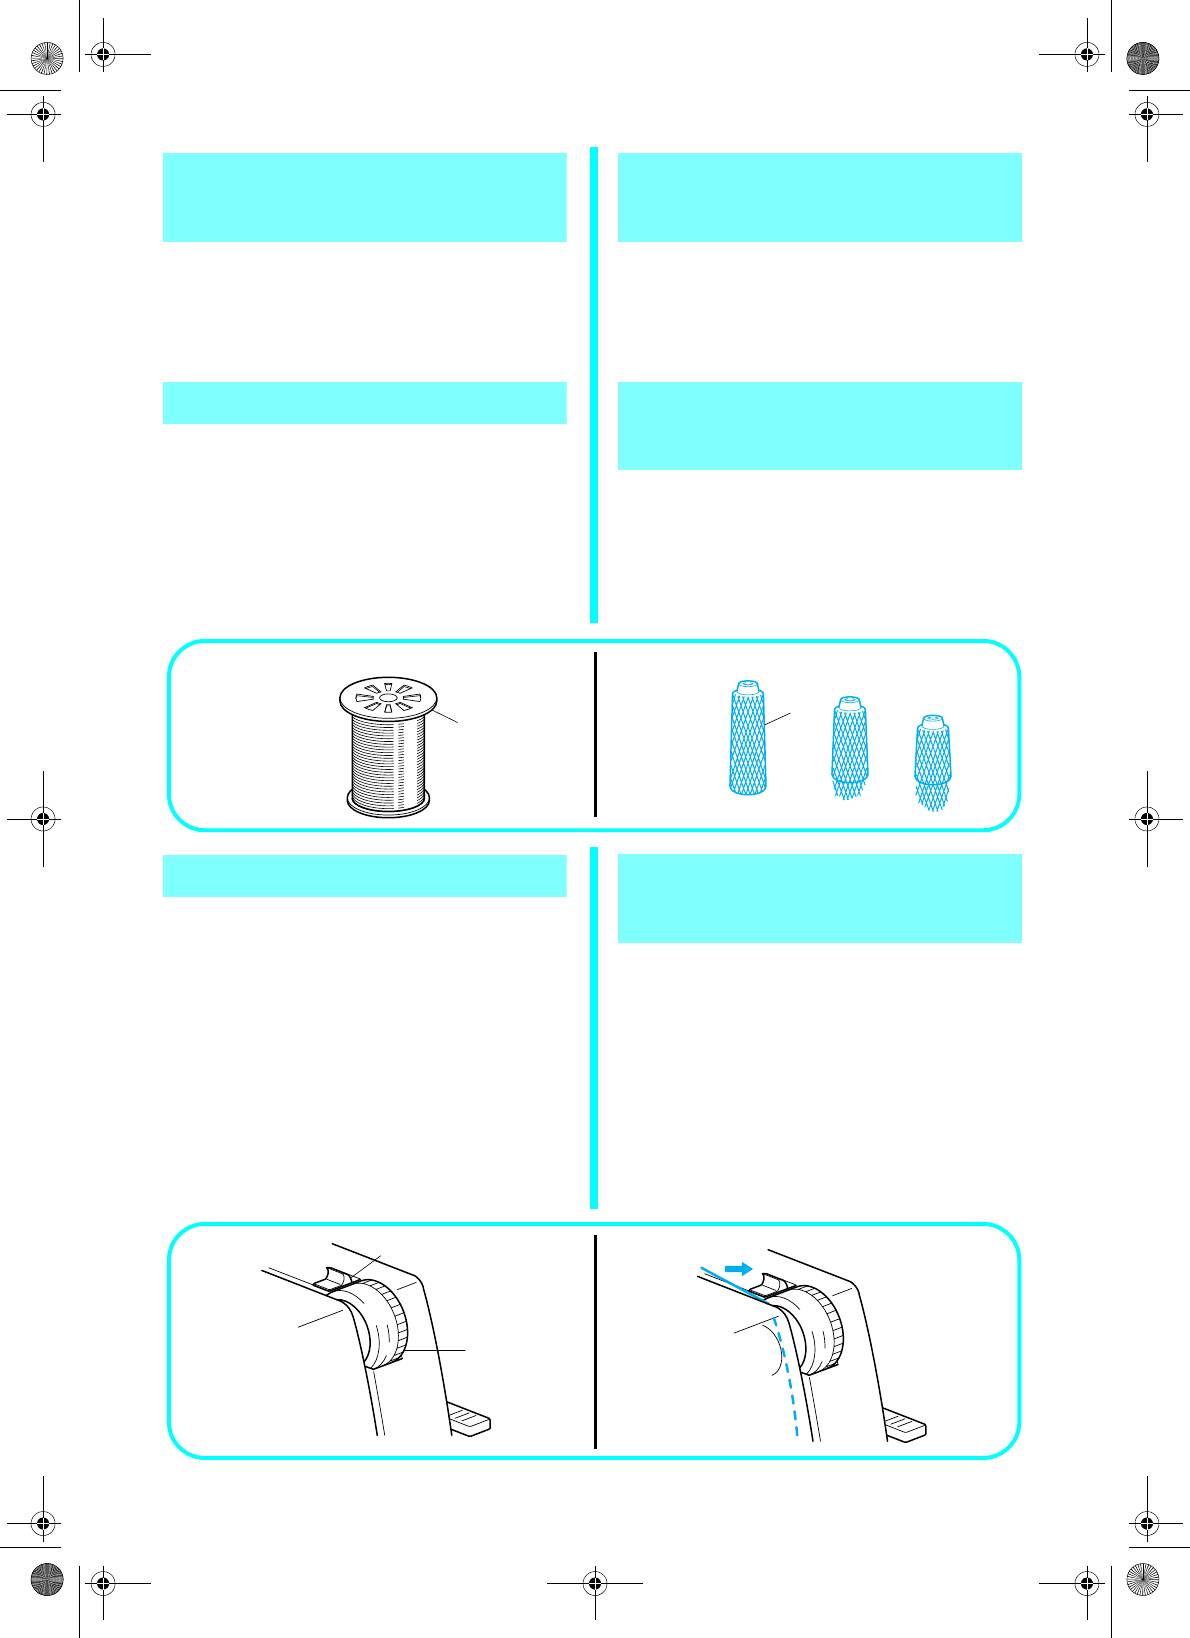
При использовании катушек с нитью
When using sewing thread spools, the thread
необходимо применять колпачок катушки, как
spool cap should be used as illustrated below.
показано на рисунке.
Make sure that the spool notch is on the bottom.
Убедитесь, что прорезь катушки находится
(See fig. A)
внизу. (См. рис. A)
1 Thread spool cap
1 Колпачок катушки
How to use the thread net
Как использовать сетку
для катушки с нитью
If you are sewing with loosely spun nylon thread,
we recommend that you cover the spool with the
При использовании свободно намотанной
net supplied to prevent the thread from slipping
скрученной нейлоновой нити рекомендуется
off the spool.
закрыть катушку сеткой, входящей в комплект
Adapt the net to the shape of the spool. (See fig.
поставки, чтобы предотвратить
B)
соскальзывание нити с катушки.
1
Net
Подберите сетку по форме катушки. (См. рис.
B)
1 Сетка
A B
1
1
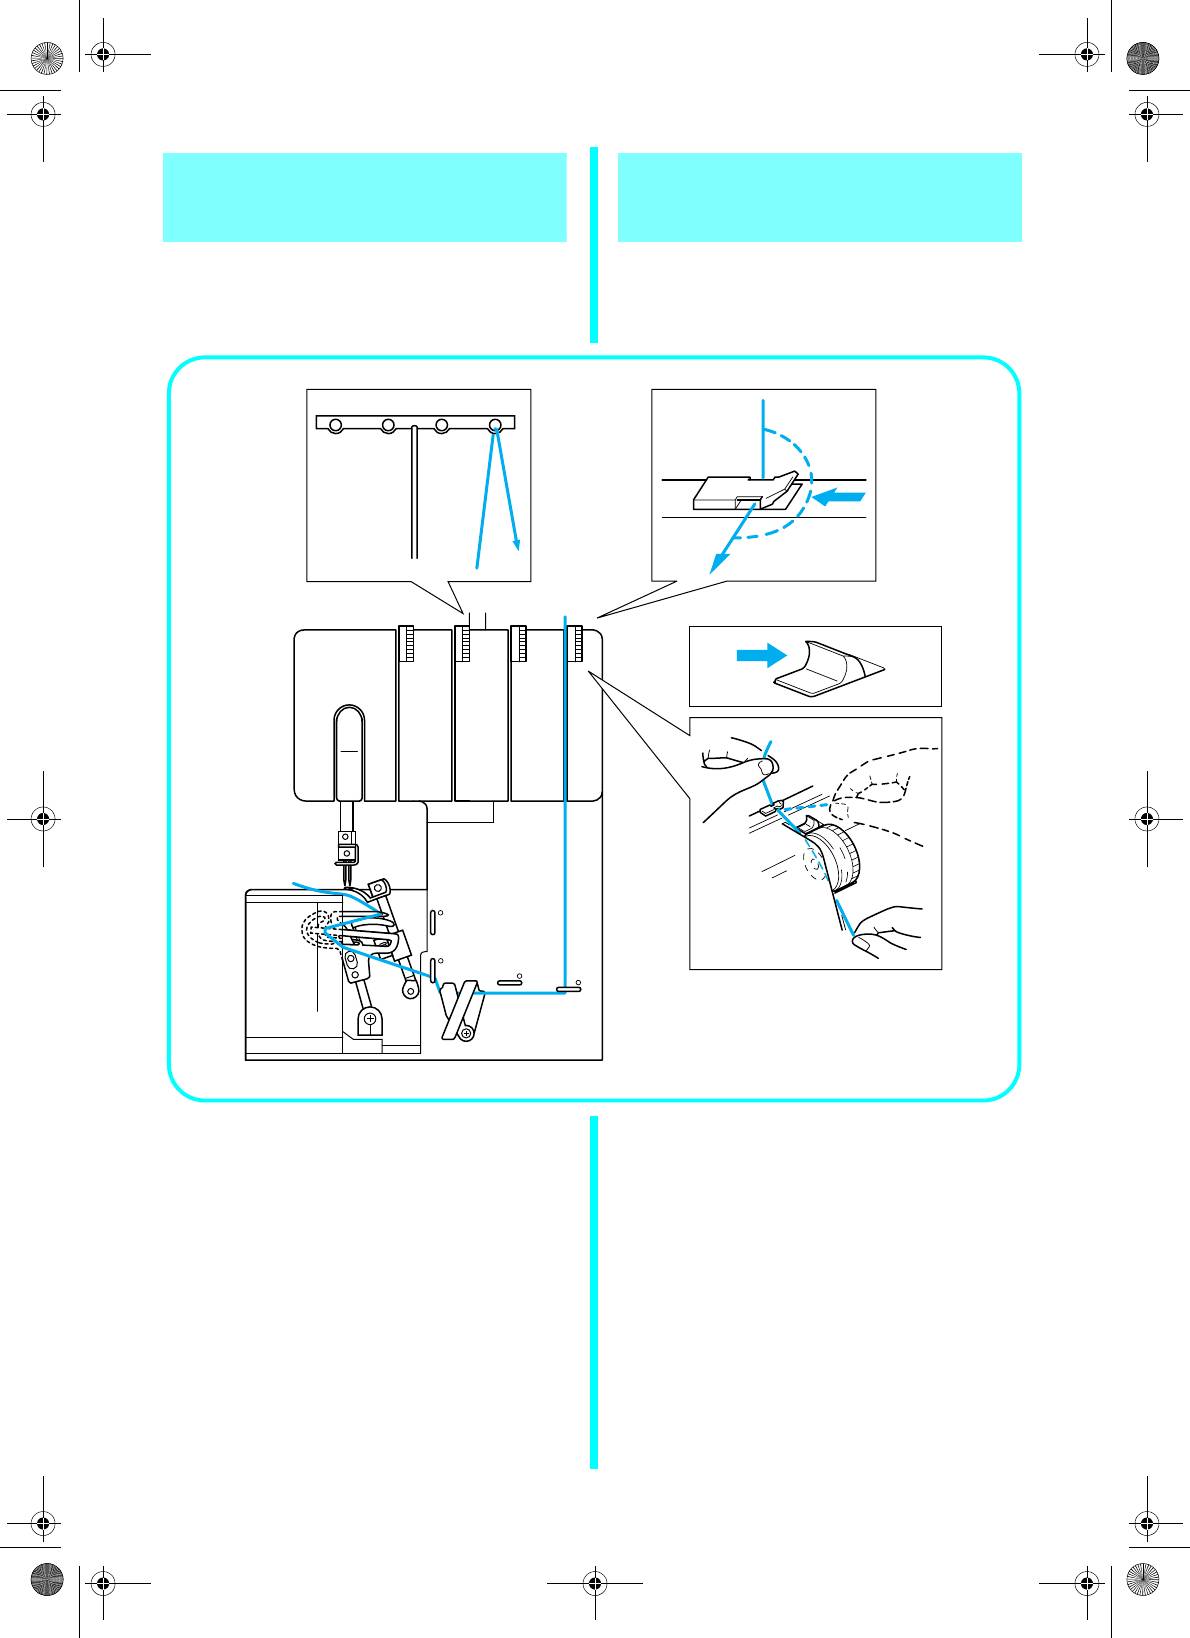
Tension release button
Кнопка освобождения
натяжения
This serger is equipped with a thread tension
release button. When threading, be sure to:
Данная машина имеет кнопку освобождения
(1) Hold the tension release button directly above
натяжения нити. При заправке нити:
the tension adjustment wheel to the right.
(1) Удерживайте кнопку освобождения
(2) Pass the thread through the tension disc
натяжения, находящуюся над дисковым
which is in the channel next to the tension
регулятором натяжения нити, в крайнем
правом положении.
adjustment dial.
(2) Пропустите нить через натяжной шкив
(3) Release the button.
нити, расположенный в выемке рядом с
1
Thread tension release button
регулятором натяжения нити.
2 Thread tension dial
(3) Отпустите кнопку.
3 Slide to the right.
1
Кнопка освобождения натяжения нити
2 Регулятор натяжения нити
3 Сдвинуть вправо.
1
3
6
6
5
5
4
2
4
15
1034D-ru.book Page 16 Monday, August 29, 2005 6:49 PM
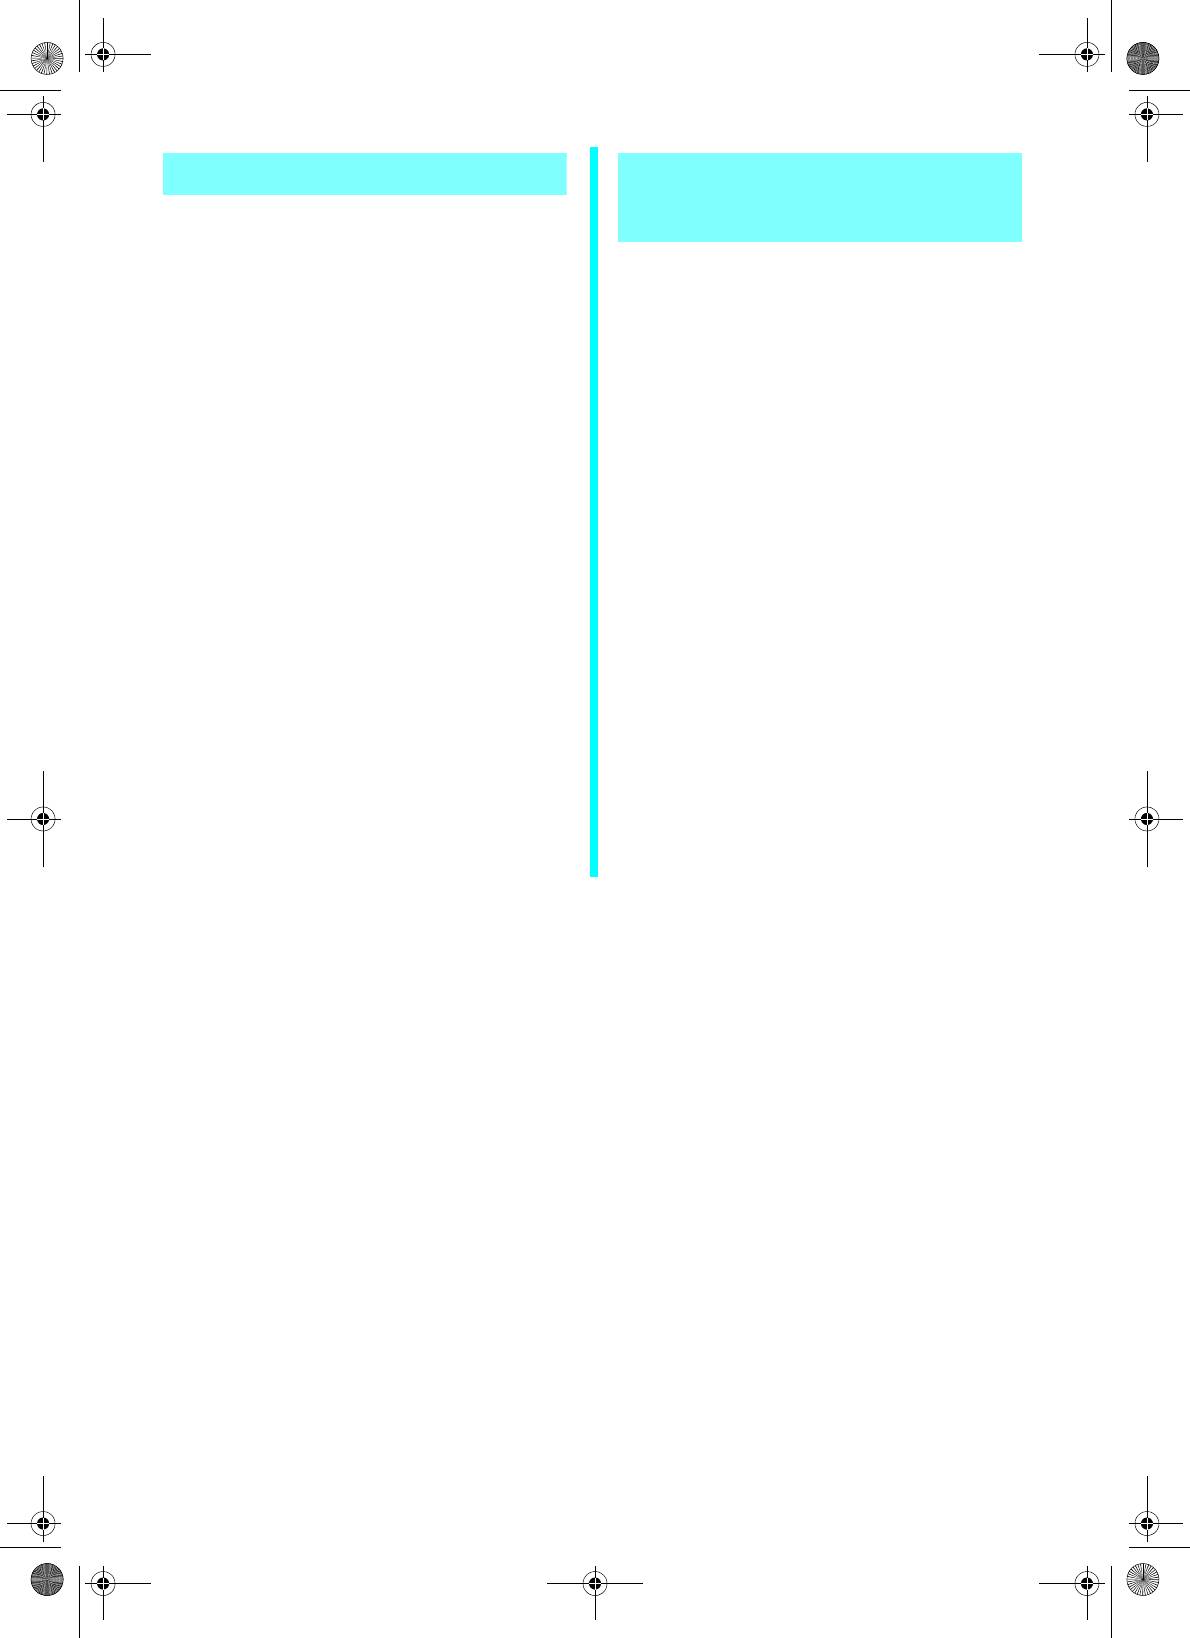
Before threading
Перед заправкой нити
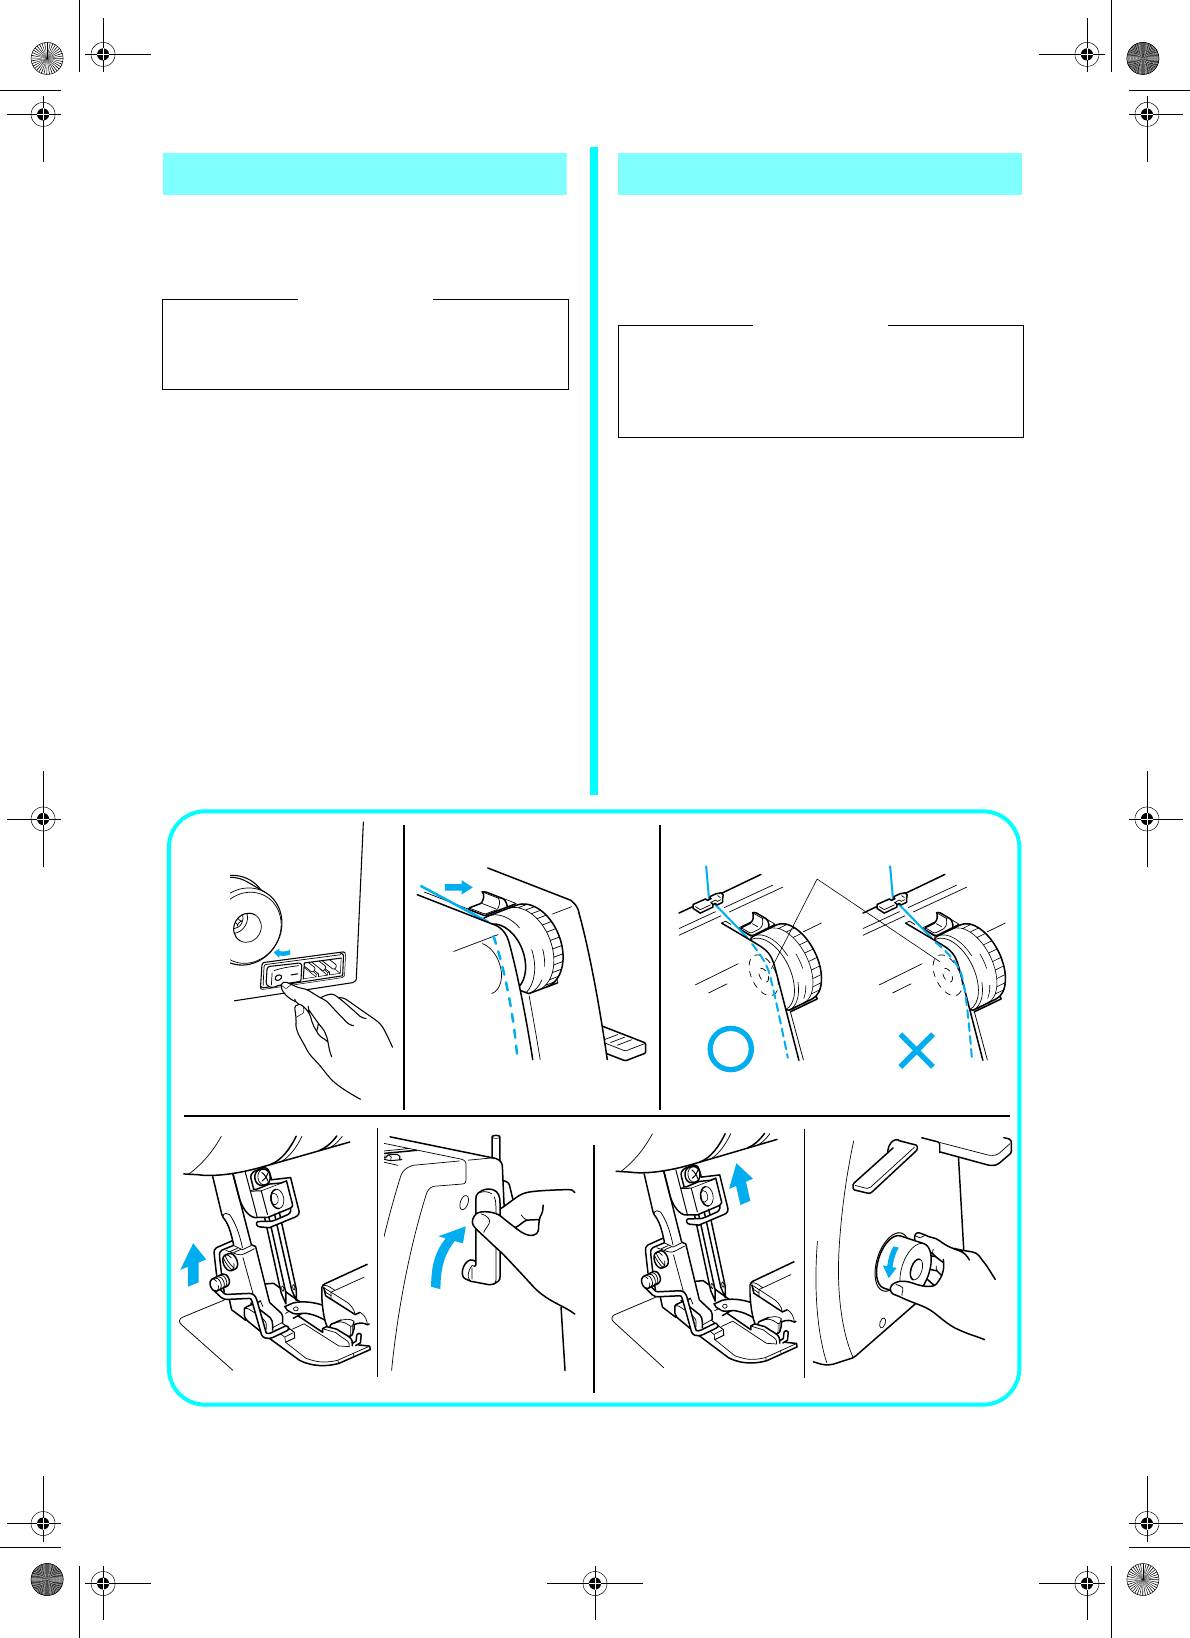
(1) В целях безопасности выключите питание
(1) Turn off the main power switch for safety.
машины.
(2) Raise the presser foot using presser foot lever.
(2) Поднимите прижимную лапку с помощью
рычага.
CAUTION
When threading the needle, always be sure
ВНИМАНИЕ
to lift the presser foot lever, and also take
При заправке нити в иглу убедитесь, что
care to thread in the proper order.
рычаг прижимной лапки поднят, а нить
заправляется в правильной
последовательностиr.
(3) Set the needle bar in its highest position by
turning the handwheel toward you.
Turn the handwheel to find the easiest position
(3) Поднимите иглодержатель в крайнее
for threading, and then thread the
верхнее положение, повернув маховик на
upperlooper thread, lowerlooper thread, right
себя.
needle thread and then the left needle thread.
Поворачивая маховик, найдите наиболее
The proper threading order for this serger is
удобное положение для заправки нити,
upperlooper, lowerlooper, right needle, and
затем заправьте нить в верхний петлитель,
then the left needle.
нижний петлитель, правую иглу, а затем в
1
Slide to the right
левую иглу. Правильная последователь-
2 Thread tension discs
ность заправки нити в машину: верхний
3 Correct
петлитель, нижний петлитель, правая игла,
затем левая игла.
4 Wrong
1
Сдвинуть вправо
2 Натяжной шкив нити
3 Правильно
4 Неправильно
1
2
6
6
6
5
5
5
4
4
4
34
16
1034D-ru.book Page 17 Monday, August 29, 2005 6:49 PM
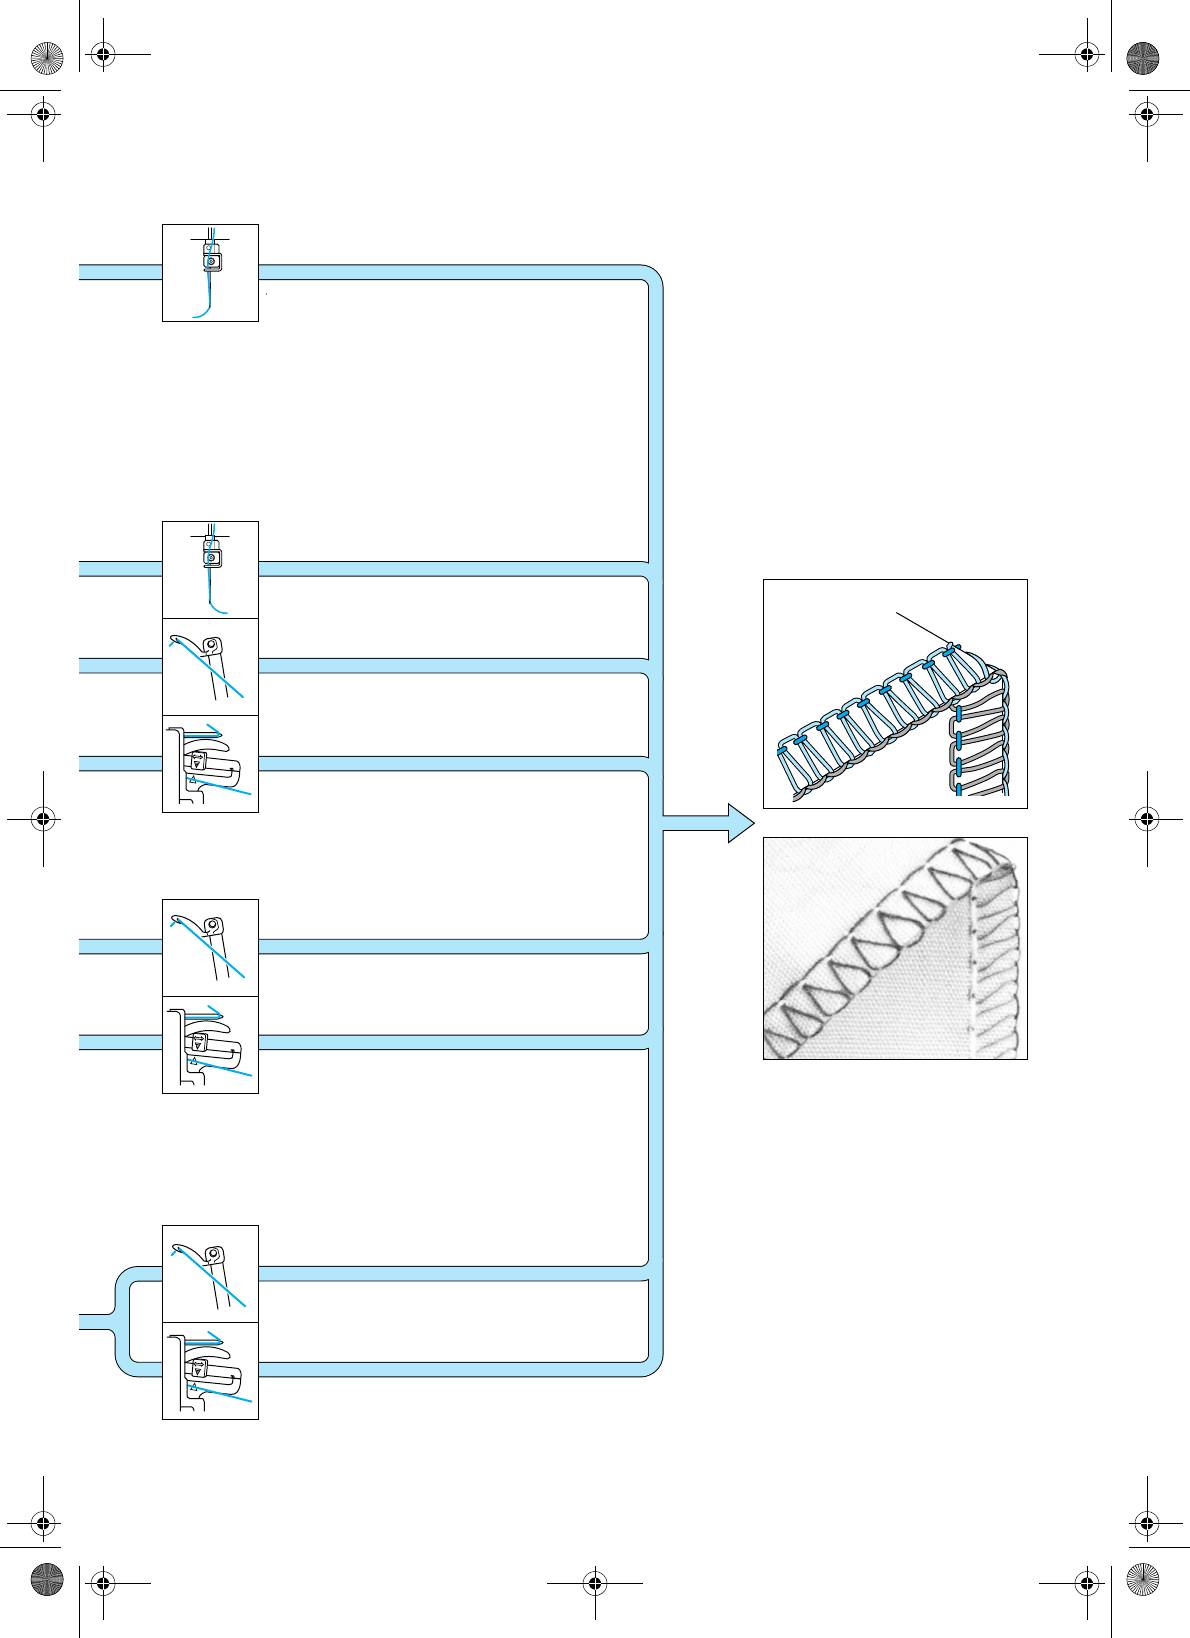
Threading the
Заправка нити в
upperlooper
верхний петлитель
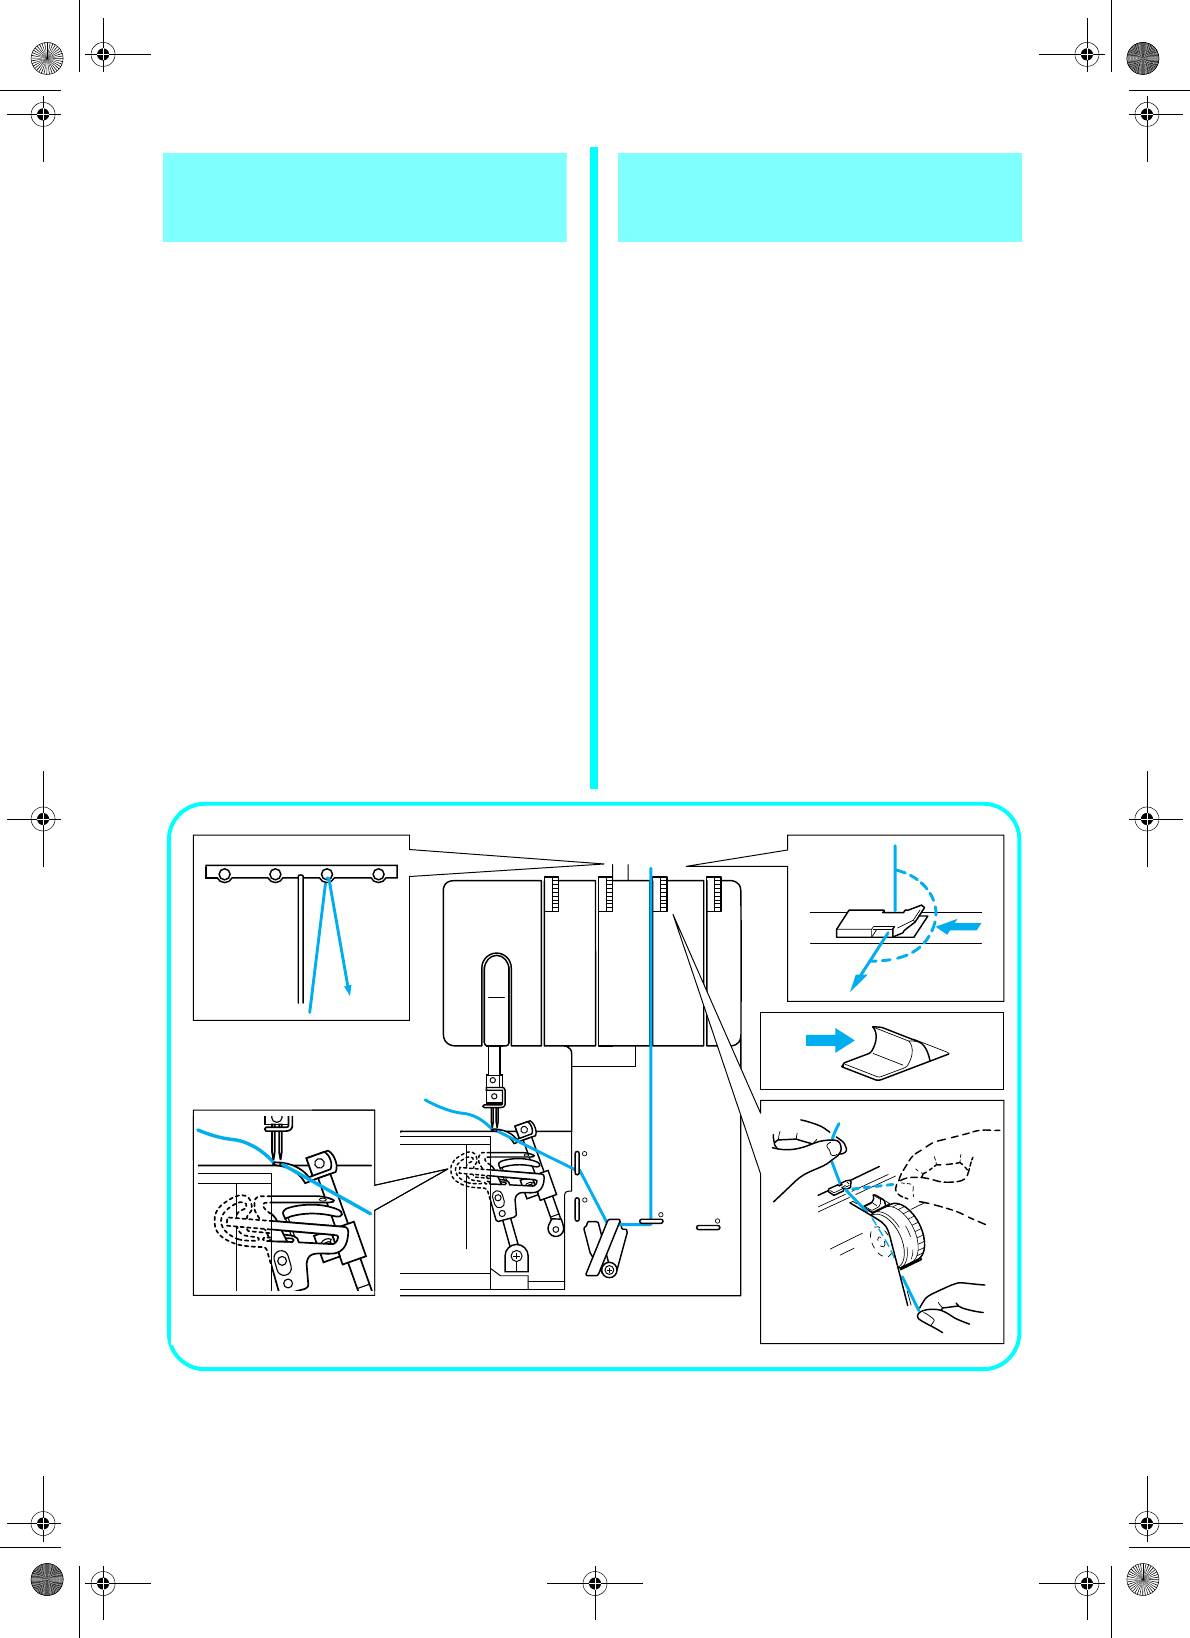
• Пропустите нить в последовательности,
• Run the thread in the sequence illustrated,
показанной на рисунке, следуя вдоль
following the green color and the numbers
зеленой линии в соответствии номерами у
next to each threading point.
каждого узла заправки.
1 Open the front cover by sliding to the
1
Откройте лицевую крышку, сдвинув
right and guiding the top toward you.
ее вправо и потянув верх крышки на
2 Pull the thread off the spool and directly
себя.
up through the thread guide on the
2 Протяните нить с катушки через
нитенаправитель на стойке в
thread tree from back to front.
направлении от задней стороны к
3 Pull the thread about an extra 15cm
передней.
(6 inches) through the front of the
3 Вытяните еще примерно 15 см нити с
thread tree.
лицевой стороны стойки.
4 Pass the thread through the proper
4 Пропустите нить через нужный
thread guide.
нитенаправитель.
5 Slide and hold the thread tension
5 Сдвиньте вправо и удерживайте
release button to the right, then pass
кнопку ослабления натяжения, затем
the thread through the tension disc
пропустите нить через натяжной
шкив, расположенный в выемке
which is in the channel next to the green
рядом с регулятором натяжения
tension adjustment dial. Release the
нити, выделенным зеленым.
button.
Отпустите кнопку.
6 Guide the thread down the channel and
6 Пропустите нить через выемку в
pass the thread through the threading
направлении вниз, следуя через
points next to the green color marks
узлы заправки, выделенные
following the numerical order in the
зеленым, в последовательности,
accompanying illustration.
указанной цифрами на рисунке.
1
2
3
2
4
8
2
7
6
6
5
5
3
4
17

1034D-ru.book Page 18 Monday, August 29, 2005 6:49 PM
8
7
8
7
6
5
NOTE:
ПРИМЕЧАНИЕ:
If the upperlooper thread breaks during
В случае обрыва нити во время шитья в
sewing
верхнем петлителе
This may be caused by the lowerlooper thread
Нить нижнего петлителя могла зацепиться за
getting caught on the upperlooper. If this
верхний петлитель. В этом случае опустите
happens, lower the upperlooper by turning the
верхний петлитель, повернув маховик,
hand wheel, remove the lowerlooper thread from
снимите нить нижнего петлителя с верхнего
the upperlooper, and re-thread the upperlooper
петлителя и заправьте верхний петлитель
from at least the tension disc.
заново, начиная с натяжного шкива.
18
1034D-ru.book Page 19 Monday, August 29, 2005 6:49 PM
Threading the
Заправка нити в нижний
lowerlooper
петлитель
• Пропустите нить в последовательности,
• Run the thread in the sequence illustrated,
показанной на рисунке, следуя вдоль
following the blue color and the numbers next
синей линии в соответствии номерами у
to each threading point.
каждого узла заправки.
1
2
2
3
4
2
6
5
4
3
B
9
0
A
8
5
7
6
1 Open the front cover by sliding to the
1 Откройте лицевую крышку, сдвинув
right and guiding the top toward you.
ее вправо и потянув верх крышки на
2 Pull the thread off the spool and directly
себя.
up through the thread guide on the
2 Протяните нить с катушки через
thread tree from back to front.
нитенаправитель на стойке в
3 Pull the thread about an extra 15cm (6
направлении от задней стороны к
inches) through the front of the thread
передней.
tree.
3 Вытяните еще примерно 15 см нити с
4 Pass the thread through the proper
лицевой стороны стойки.
thread guide.
4 Пропустите нить через нужный
нитенаправитель.
19
1034D-ru.book Page 20 Monday, August 29, 2005 6:49 PM
5 Slide and hold the thread tension
5 Сдвиньте вправо и удерживайте
release button to the right, then pass
кнопку ослабления натяжения, затем
the thread through the tension disc
пропустите нить через натяжной
шкив, расположенный в выемке
which is in the channel next to the blue
рядом с регулятором натяжения
tension adjustment dial. Release the
нити, выделенным синим. Отпустите
button.
кнопку.
6 Guide the thread down the channel and
6 Пропустите нить через выемку в
pass the thread through the threading
направлении вниз, следуя через
points next to the blue color marks
узлы заправки, выделенные синим, в
following the numerical order in the
последовательности, указанной
accompanying illustration up to the
цифрами на рисунке, вплоть до
lowerlooper threading lever.
рычажка устройства заправки нити в
нижний петлитель.
NOTE:
ПРИМЕЧАНИЕ:
If the lowerlooper thread breaks during
При обрыве нити нижнего петлителя во
sewing, cut and remove thread from both of
время шитья обрежьте и удалите нити из
the needles. Before re-threading the
обеих игл. Перед повторной заправкой
lowerlooper, make sure that the lowerlooper
нити в нижний петлитель убедитесь, что
re-threading is done exactly as diagrammed
заправка нити в нижний петлитель
above. The machine will not operate properly if
выполняется в точности, как указано
the threading is not done in the proper sequence.
выше. Если последовательность заправки
нити нарушена, машина не будет работать
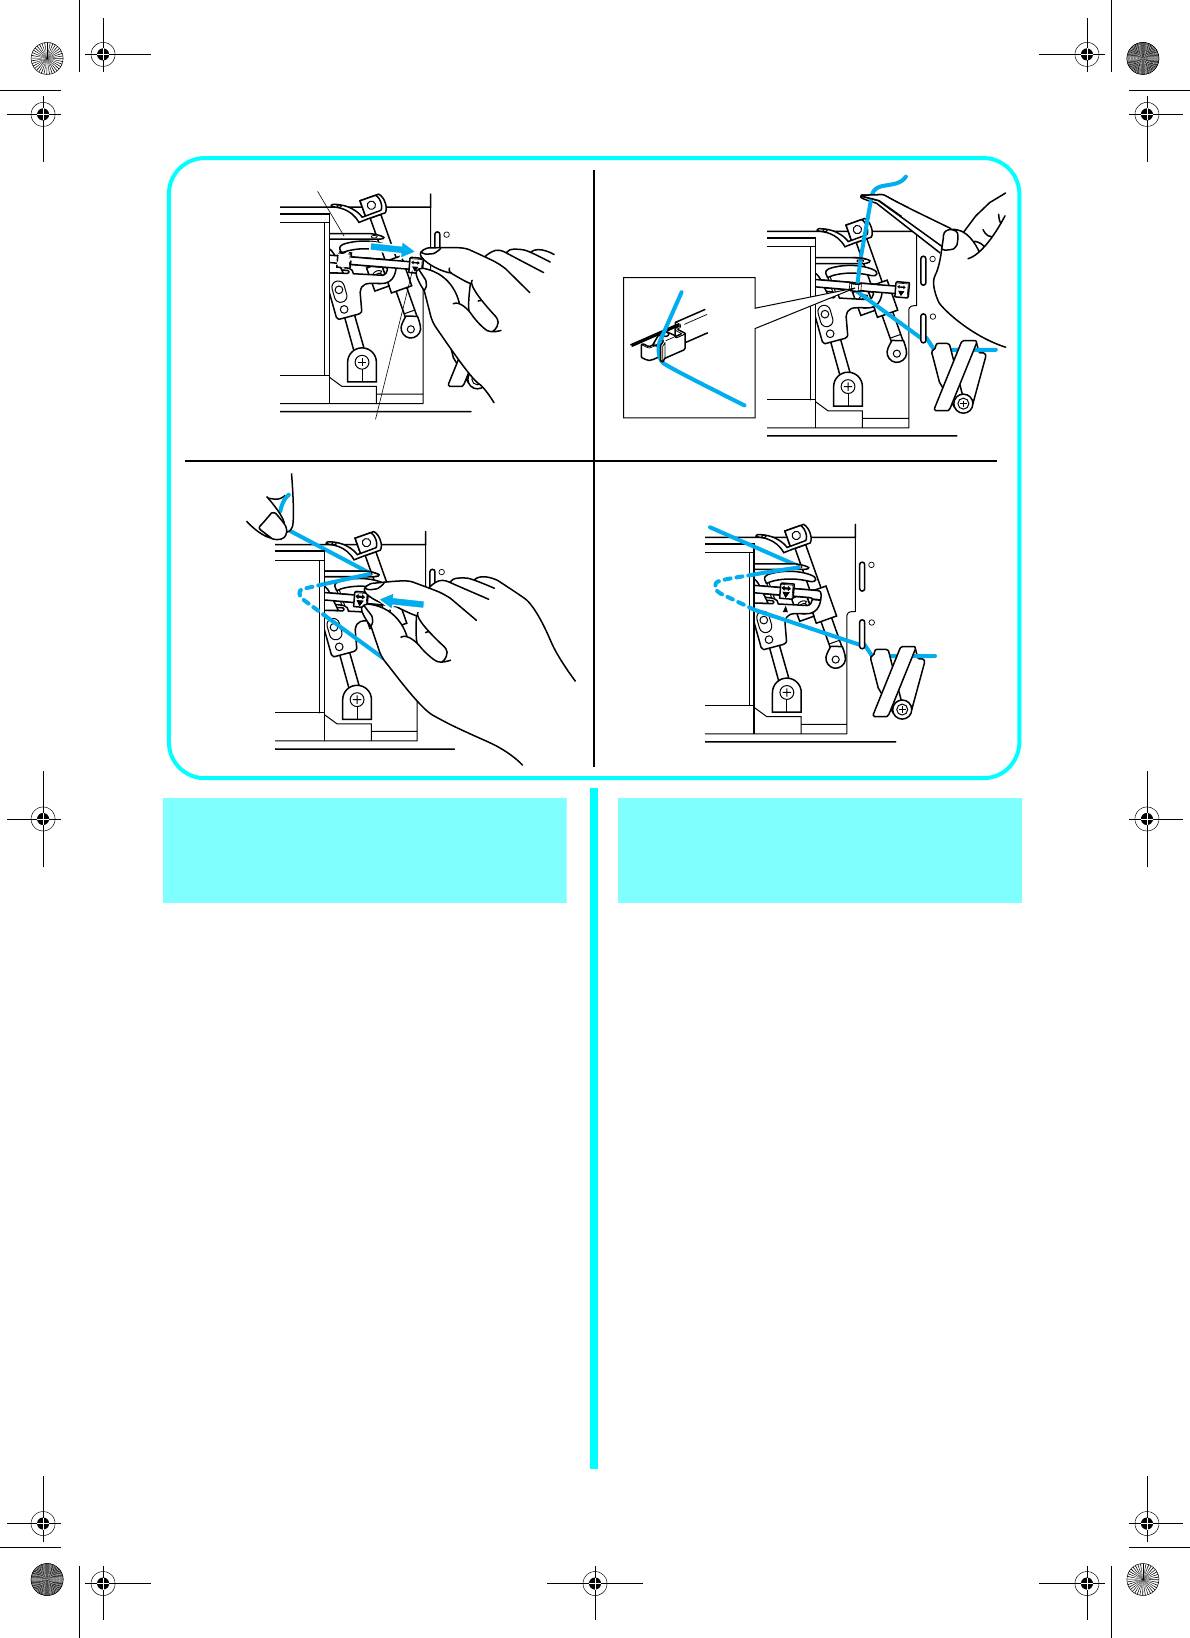
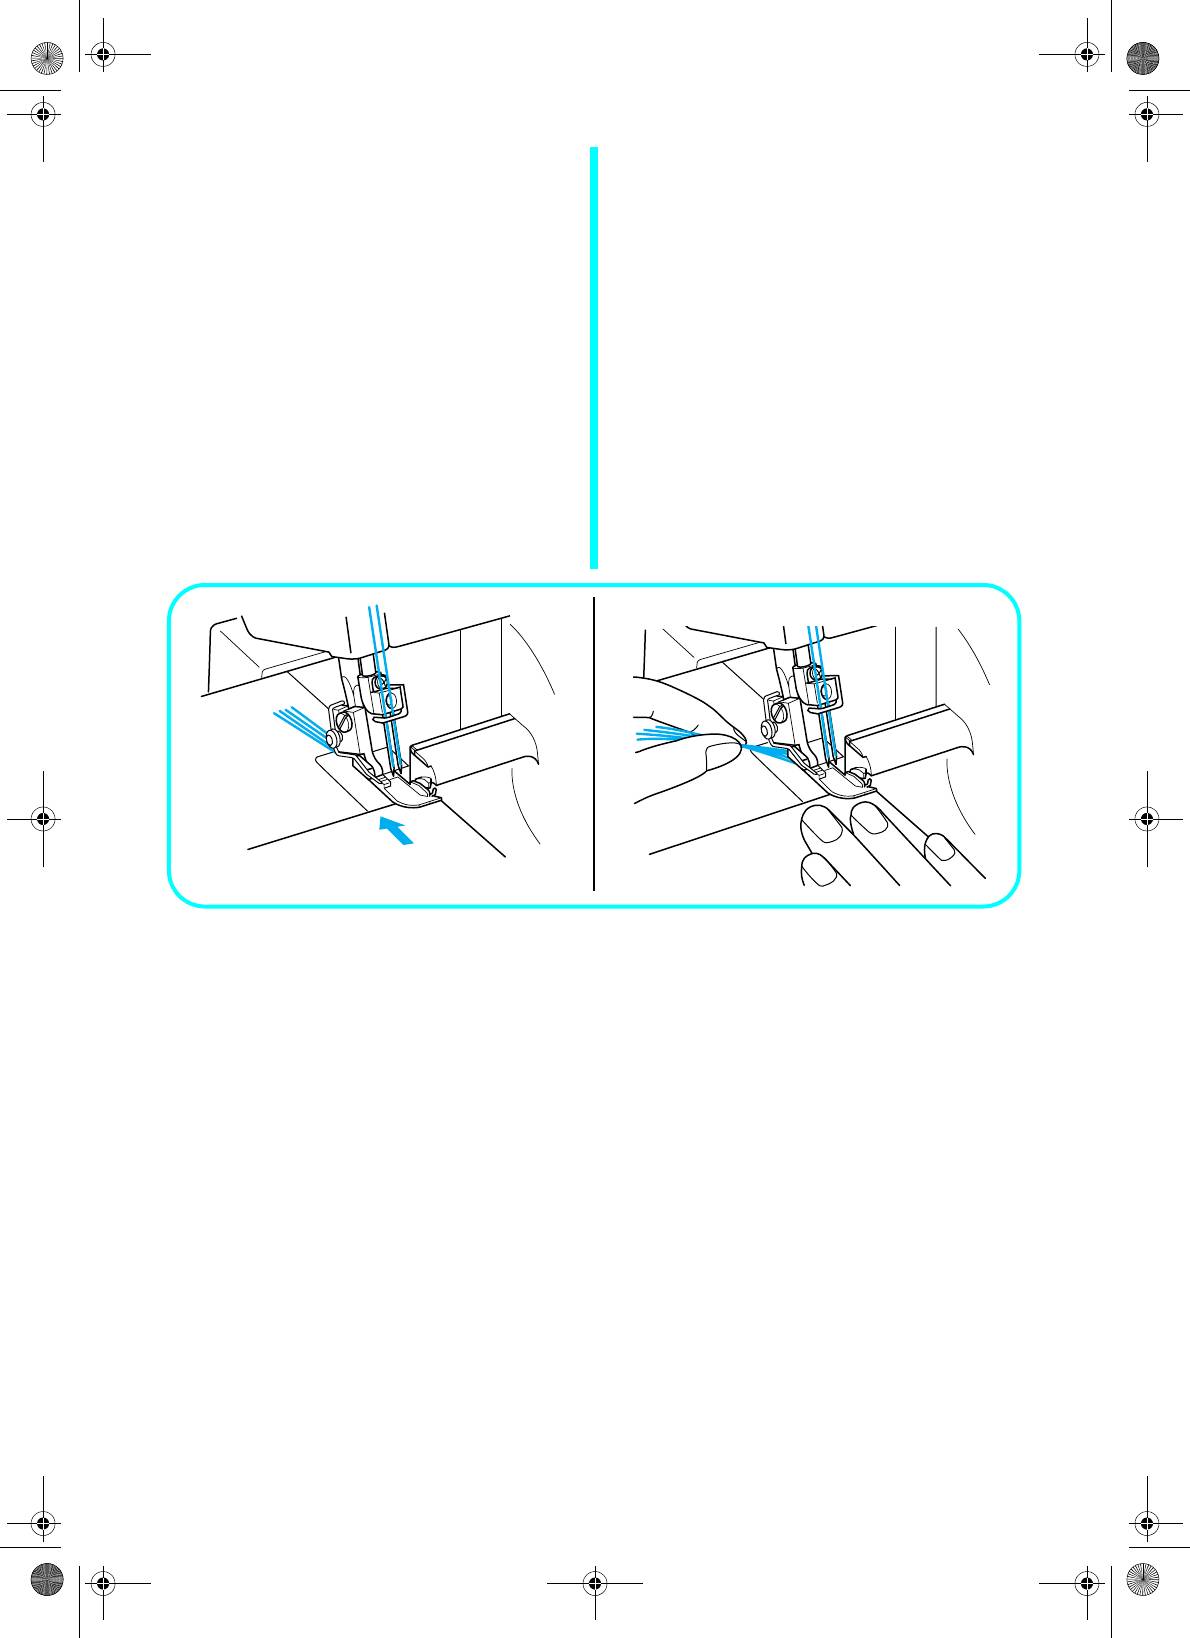
Lowerlooper Easy Threading Operation
надлежащим образом.
(Illustrated on page 21)
Упрощенная схема заправки нити в нижний
(1)Slide the lowerlooper threading lever to the
петлитель
right.
(Иллюстрация на стр. 21)
(2) Position the thread under the hook (left end)
(1) Сдвиньте рычажок устройства заправки
of the threading lever.
нижнего петлителя вправо.
(3) Place the thread through the eye of the
(2) Поместите нить под крючок (левый край)
lowerlooper.
рычажка устройства заправки.
(4) Holding the end of the thread, slide the
(3) Проденьте нить через ушко нижнего
lowerlooper threading lever to the left which
петлителя.
returns it to its standard position.
(4) Удерживая конец нити, верните рычажок
(5) Make sure that the pink triangular marks line
устройства заправки нижнего петлителя в
up.
стандартное положение, сдвинув его
CAUTION
влево.
(5) Убедитесь, что розовые треугольные
When sliding the lowerlooper threading
отметки выровнялись.
lever to the left, always make sure that the
two pink triangular marks line up as
ВНИМАНИЕ
illustrated.
Сдвигая рычажок заправки нижнего
петлителя влево, всегда проверяйте,
1
Lowerlooper
что розовые треугольные отметки
2 Lowerlooper threading lever
выровнены, как показано на рисунке.
CAUTION
1
Нижний петлитель
Thread the needles after the lowerlooper
2 Рычажок устройства заправки нити в
and upperlooper have been threaded.
нижний петлитель
ВНИМАНИЕ
CAUTION
Заправляйте нить в иглы только после
Slide the threading lever only in the
заправки нижнего и верхнего
directions shown by the arrow. Forcefully
петлителей.
moving the threading lever in any other
direction may damage it.
ВНИМАНИЕ
Двигайте рычажок устройства заправки
только в направлениях, указанных
стрелками. Перемещение рычажка с
усилием в любом другом направлении
может повредить его.
20
1034D-ru.book Page 21 Monday, August 29, 2005 6:49 PM
1
(1) (2) (3)
2
(4) (5)
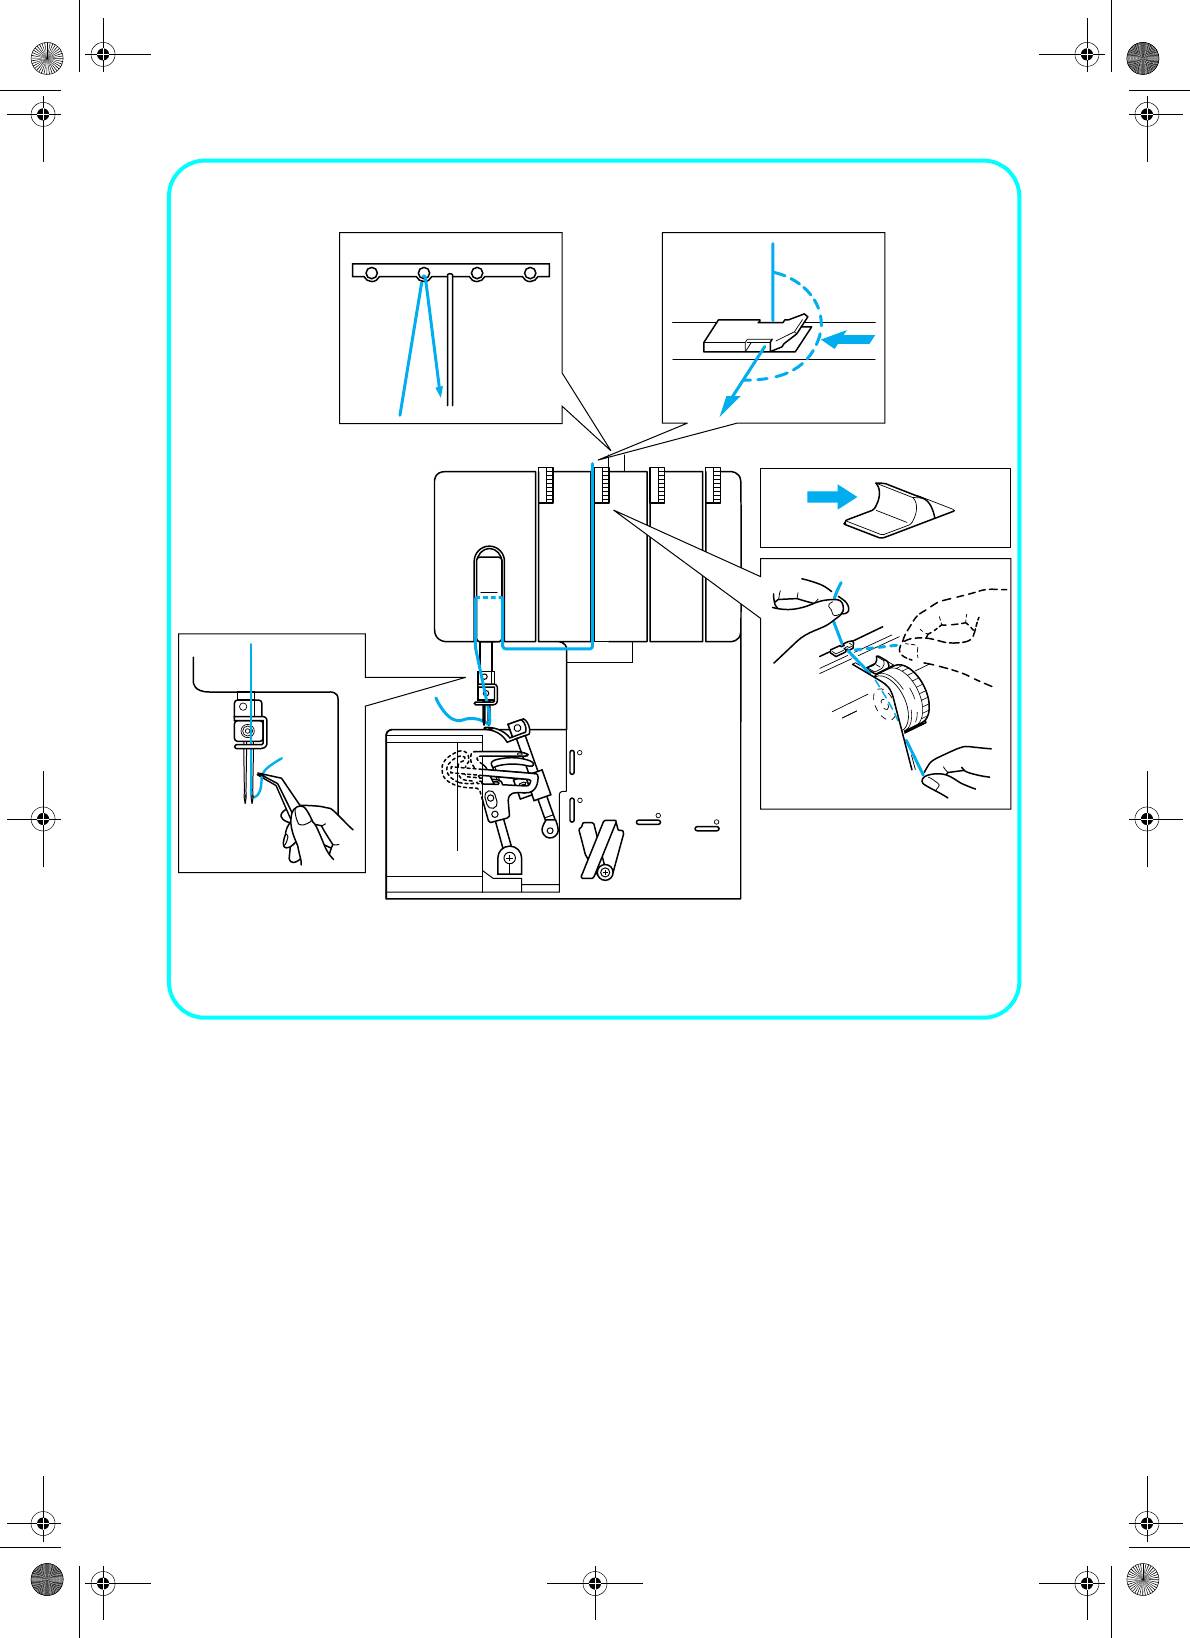
Threading the right
Заправка нити в правую
needle (on Two-needle
иглу (модели с двойной
models)
иглой)
• Run the thread in the sequence illustrated on
• Пропустите нить в последовательности,
page 22, following the pink color and the
показанной на стр. 22, следуя вдоль
numbers next to each threading point.
розовой линии в соответствии номерами у
каждого узла заправки.
1 Pull the thread off the spool and directly
1 Протяните нить с катушки через
up through the thread guide on the
нитенаправитель на стойке в
thread tree from back to front.
направлении от задней стороны к
2 Pull the thread about an extra 15cm (6
передней.
inches) through the front of the thread
2 Вытяните еще примерно 15 см нити с
tree.
лицевой стороны стойки.
3 Pass the thread through the proper
3 Пропустите нить через нужный
thread guide.
нитенаправитель.
4 Slide and hold the thread tension
4 Сдвиньте вправо и удерживайте
release button to the right, then pass
кнопку ослабления натяжения, затем
пропустите нить через натяжной
the thread through the tension disc
шкив, расположенный в выемке
which is in the channel next to the pink
рядом с регулятором натяжения
tension adjustment dial. Release the
нити, выделенным розовым.
button.
Отпустите кнопку.
5 Guide the thread down the channel and
5 Пропустите нить через выемку в
across through the threading points
направлении вниз, следуя через
next to the pink color marks following
узлы заправки, выделенные
the numerical order in the
розовым, в последовательности,
accompanying illustration.
указанной цифрами на рисунке.
6 Протяните нить вниз через
6 Bring the thread down through the
направляющую 7 над иглой, а затем
guide 7 above the needle and through
через правую иглу в направлении от
the right needle from front to back.
лицевой стороны к задней.
21
1034D-ru.book Page 22 Monday, August 29, 2005 6:49 PM
1
2
2
3
5
4
2
6
5
6
3
4
7
6
7
22
1034D-ru.book Page 23 Monday, August 29, 2005 6:49 PM
Threading the left needle
Заправка нити в левую
иглу
• Run the thread in the sequence illustrated,
following the yellow color and the numbers
• Пропустите нить в последовательности,
next to each threading point.
показанной на рисунке, следуя вдоль
1 Pull the thread off the spool and directly
желтой линии в соответствии номерами у
up through the thread guide on the
каждого узла заправки.
thread tree from back to front.
1 Протяните нить с катушки через
2 Pull the thread about an extra 15cm (6
нитенаправитель на стойке в
inches) through the front of the thread
направлении от задней стороны к
tree.
передней.
3 Pass the thread through the proper
2 Вытяните еще примерно 15 см нити
thread guide.
с лицевой стороны стойки.
4 Slide and hold the thread tension
3 Пропустите нить через нужный
release button to the right, then pass
нитенаправитель.
the thread through the tension disc
4 Сдвиньте вправо и удерживайте
which is in the channel next to the yellow
кнопку ослабления натяжения, затем
tension adjustment dial. Release the
пропустите нить через натяжной
button.
шкив, расположенный в выемке
5 Guide the thread down the channel and
рядом с регулятором натяжения
across through the threading points
нити, выделенным желтым.
next to the yellow color marks following
Отпустите кнопку.
the numerical order in the
5 Пропустите нить через выемку в
accompanying illustration.
направлении вниз, следуя через
6 Bring the thread down through the
узлы заправки, выделенные желтым,
guide 7 above the needle and through
в последовательности, указанной
the left needle from front to back.
цифрами на рисунке.
6 Протяните нить вниз через
направляющую 7 над иглой, а затем
через левую иглу в направлении от
лицевой стороны к задней.
23
1034D-ru.book Page 24 Monday, August 29, 2005 6:49 PM
1
2
2
2
6
5
3
3
4
5
4
43
6
7
6
6
7
7
24
1034D-ru.book Page 25 Monday, August 29, 2005 6:49 PM
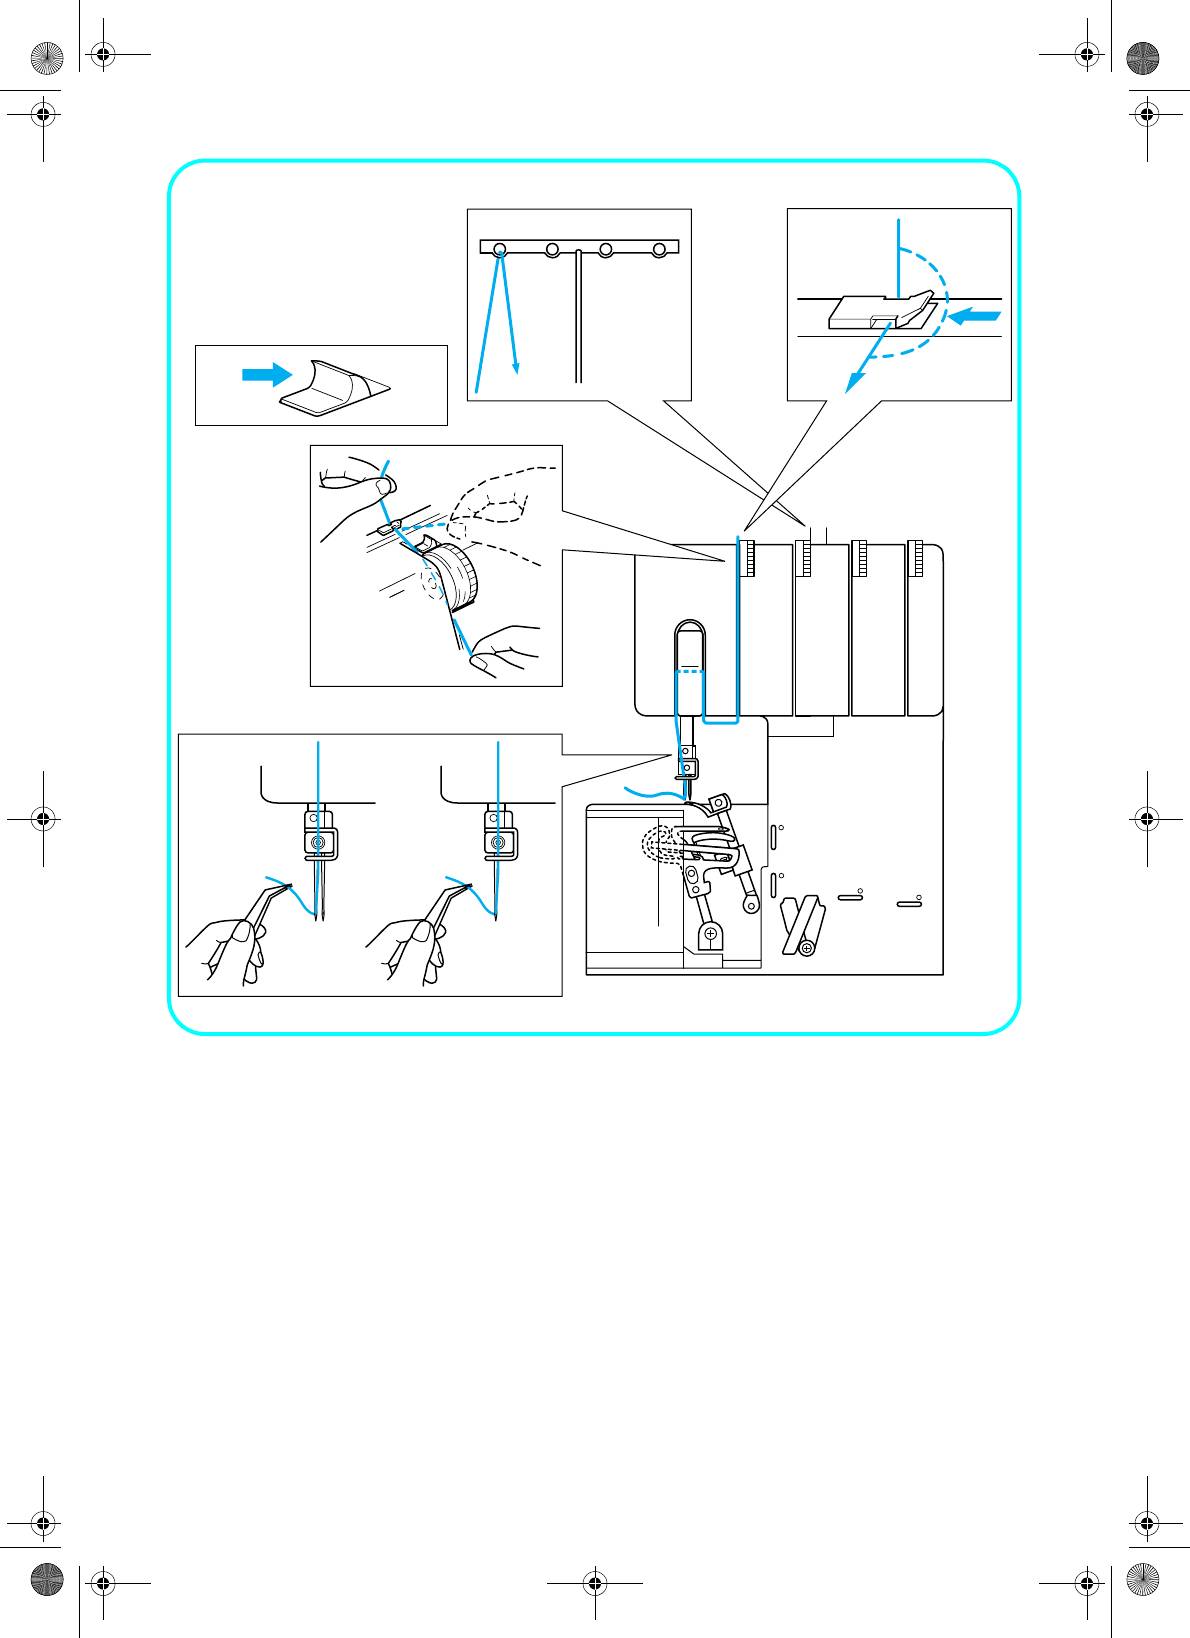
Comparison Chart of Sewing Materials,
Threads and Needles
Stitch Length
Material Stitch
Thread Needle
(mm)
Crepe de chine
SCHMETZ
Georgette
Spun : #80
Light
130/705H
Lawn
Overlock stitch 2.0 – 3.0
Cotton : #80 – 100
materials
#70
Organdy
Silk : #80 – 100
#80
Tricot
Needle thread
Polyester : #80
Crepe de chine
SCHMETZ
Nylon : #80
Light
Georgette
Narrow/rolled
Smaller than
130/705H
Looper thread
materials
Lawn
Hem stitch
2.0
#70
Polyester : #80
Organdy
#80
Nylon : #80
Woolly nylon thread
Poplin
Spun : #60 – 80
Gingham
SCHMETZ
Cotton : #60 – 80
Medium
Seersucker
130/705H
Overlock stitch 2.5 – 3.5
Silk : #50 – 80
materials
Gabardine
#80
Nylon : #50 – 80
Serge
#90
Polyester : #50 – 80
Knitted
Cashmere
Cotton : #40 – 60
SCHMETZ
Heavy
Tweed
Silk : #40 – 60
Overlock stitch 3.0 – 4.0
130/705H
materials
Denim
Polyester : #30 – 60
#90
Jersey
Nylon : #30 – 60
NOTE:
Decorative thread will work best in the upperlooper for fashion sewing.
25
1034D-ru.book Page 26 Monday, August 29, 2005 6:49 PM
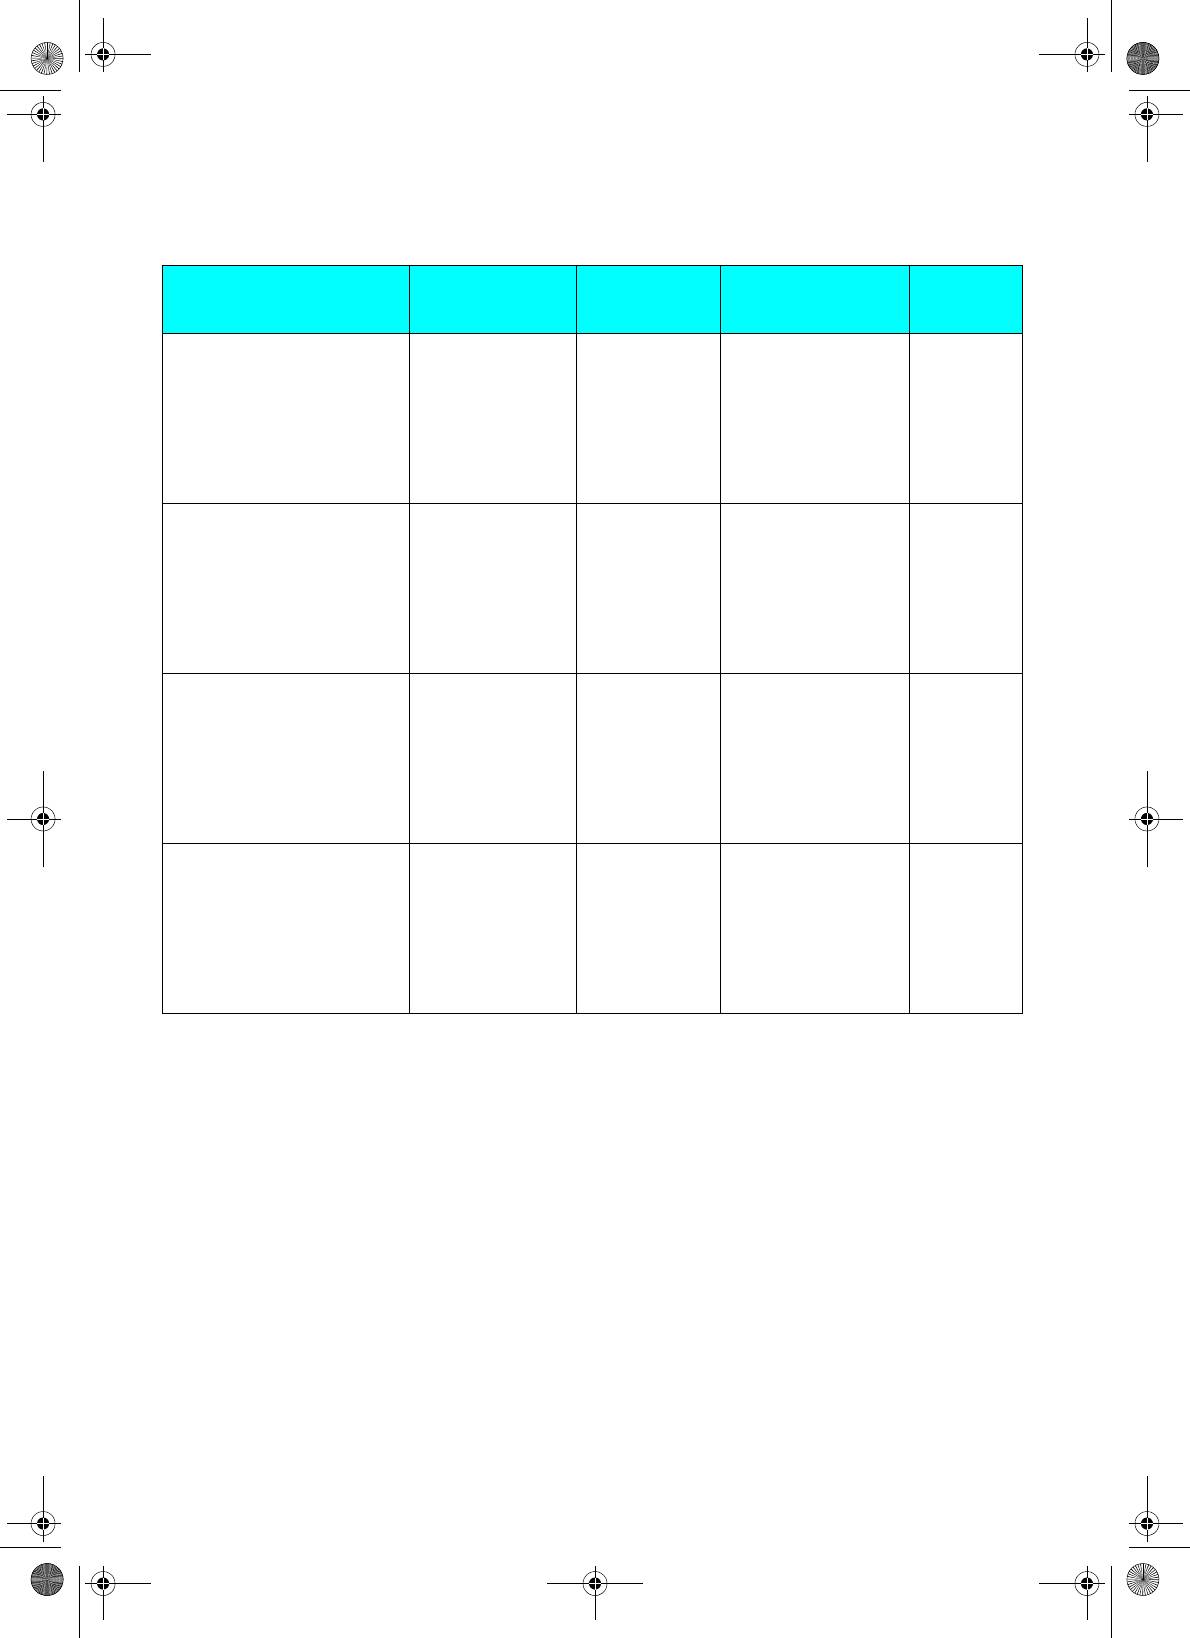
Сравнительная таблица материалов
для шитья, нитей и игл
Длина
Материал Строчка
Нить Игла
стежка (мм)
Крепдешин
Жоржет
Скручен-
SCHMETZ
Строчка для
Тонкие
Батист
ная : #80
130/705H
обметывания
2,0 – 3,0
материалы
Органди
Х/б : #80- 100
#70
(оверлок)
(тонкая кисея)
Шелковая : #80-1 00
#80
Трико
Нить в игле
Полиэфирная : #80
Крепдешин
Узкая/
Нейлоновая : #80
SCHMETZ
Жоржет
Тонкие
скрученная
Нить в петлителе
130/705H
Батист
Менее 2,0
материалы
Строчка-
Полиэфирная : #80
#70
Органди
мережка
Нейлоновая : #80
#80
(тонкая кисея)
Шерстяная
нейлоновая
Поплин
Гинэм
(клетчатая
х/б ткань)
Скрученная : #60-80
Сирсакер
SCHMETZ
Материалы
Строчка для
Х/б : #60-80
(льняная
130/705H
средней
обметывания
2,5 – 3,5
Шелковая : #50-80
полосатая
#80
плотности
(оверлок)
Нейлоновая : #50-80
ткань)
#90
Полиэфирная
: #50-80
Габардин
Саржа
Трикотажная
ткань
Кашемир
Х/б : #40-60
Твид
Строчка для
SCHMETZ
Плотные
Шелковая : #40-60
Джинсовая
обметывания
3,0 – 4,0
130/705H
материалы
Полиэфирная
: #30-60
ткань
(оверлок)
#90
Нейлоновая : #30-60
Джерси
ПРИМЕЧАНИЕ:
Декоративную нить для модного шитья лучше использовать в верхнем петлителе.
26
1034D-ru.book Page 27 Monday, August 29, 2005 6:49 PM
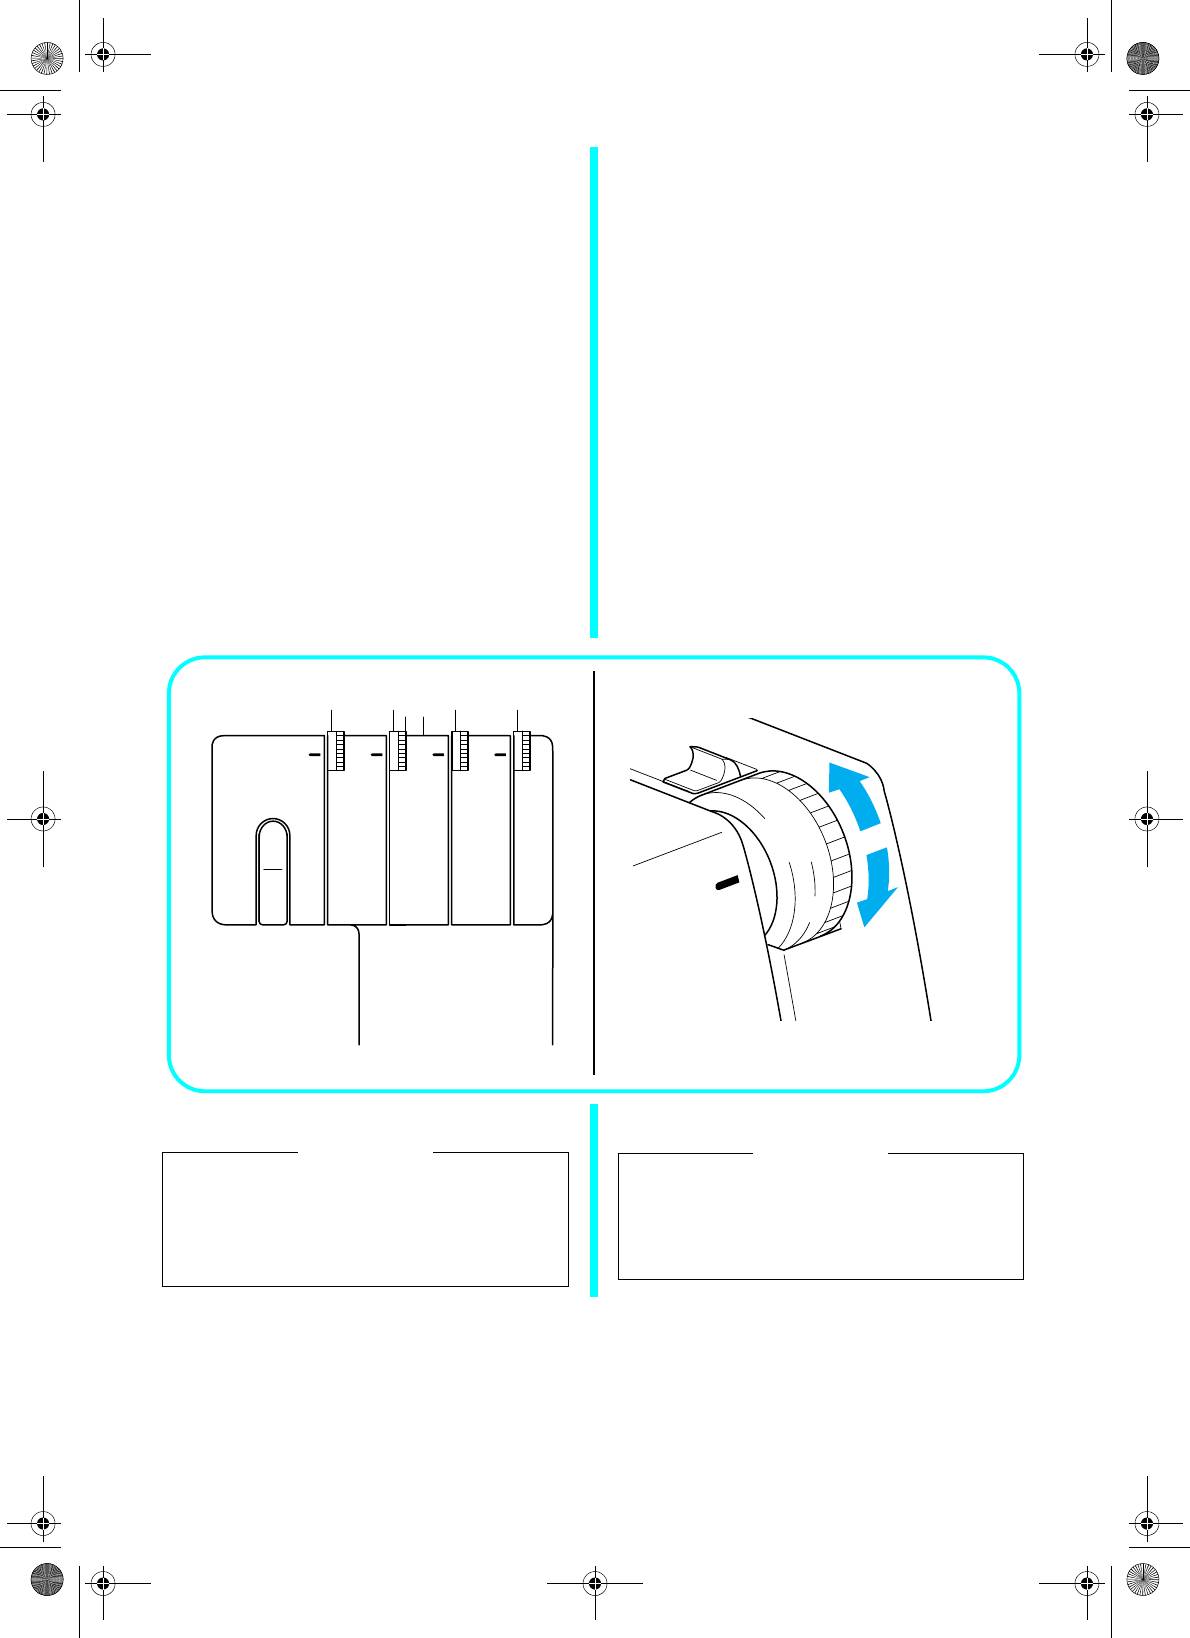
Thread Tension
Натяжение нитей
Thread tension dial
Регулятор натяжения нити
From the left to right:
Слева направо:
1 Yellow marked tension disc is for left
1 Дисковый регулятор натяжения,
needle.
отмеченный желтым цветом,
2 Pink marked tension disc is for right
предназначен для левой иглы.
needle.
2 Дисковый регулятор натяжения,
3 Green marked tension disc is for
отмеченный розовым цветом,
upperlooper.
предназначен для правой иглы.
4 Blue marked tension disc is for
3 Дисковый регулятор натяжения,
lowerlooper.
отмеченный зеленым цветом,
5 Tension selection mark.
предназначен для верхнего
петлителя.
6 Dial up to decrease tension.
4 Дисковый регулятор натяжения,
7 Dial down to increase tension.
отмеченный синим цветом,
предназначен для нижнего
петлителя.
5 Метка выбранного натяжения.
6 Поверните вверх для ослабления
натяжения.
7 Поверните вниз для увеличения
натяжения.
1 2 3 4
6
6
5
5
4
7
CAUTION
ВНИМАНИЕ
Make sure that the thread is properly
При заправке нити в натяжные шкивы
seated in the tension discs by holding the
удерживайте кнопку ослабления
tension release button to the right while
натяжения в крайнем правом положении
для обеспечения правильной установки
passing the thread through the tension
нитей.
discs.
27
1034D-ru.book Page 28 Monday, August 29, 2005 6:49 PM
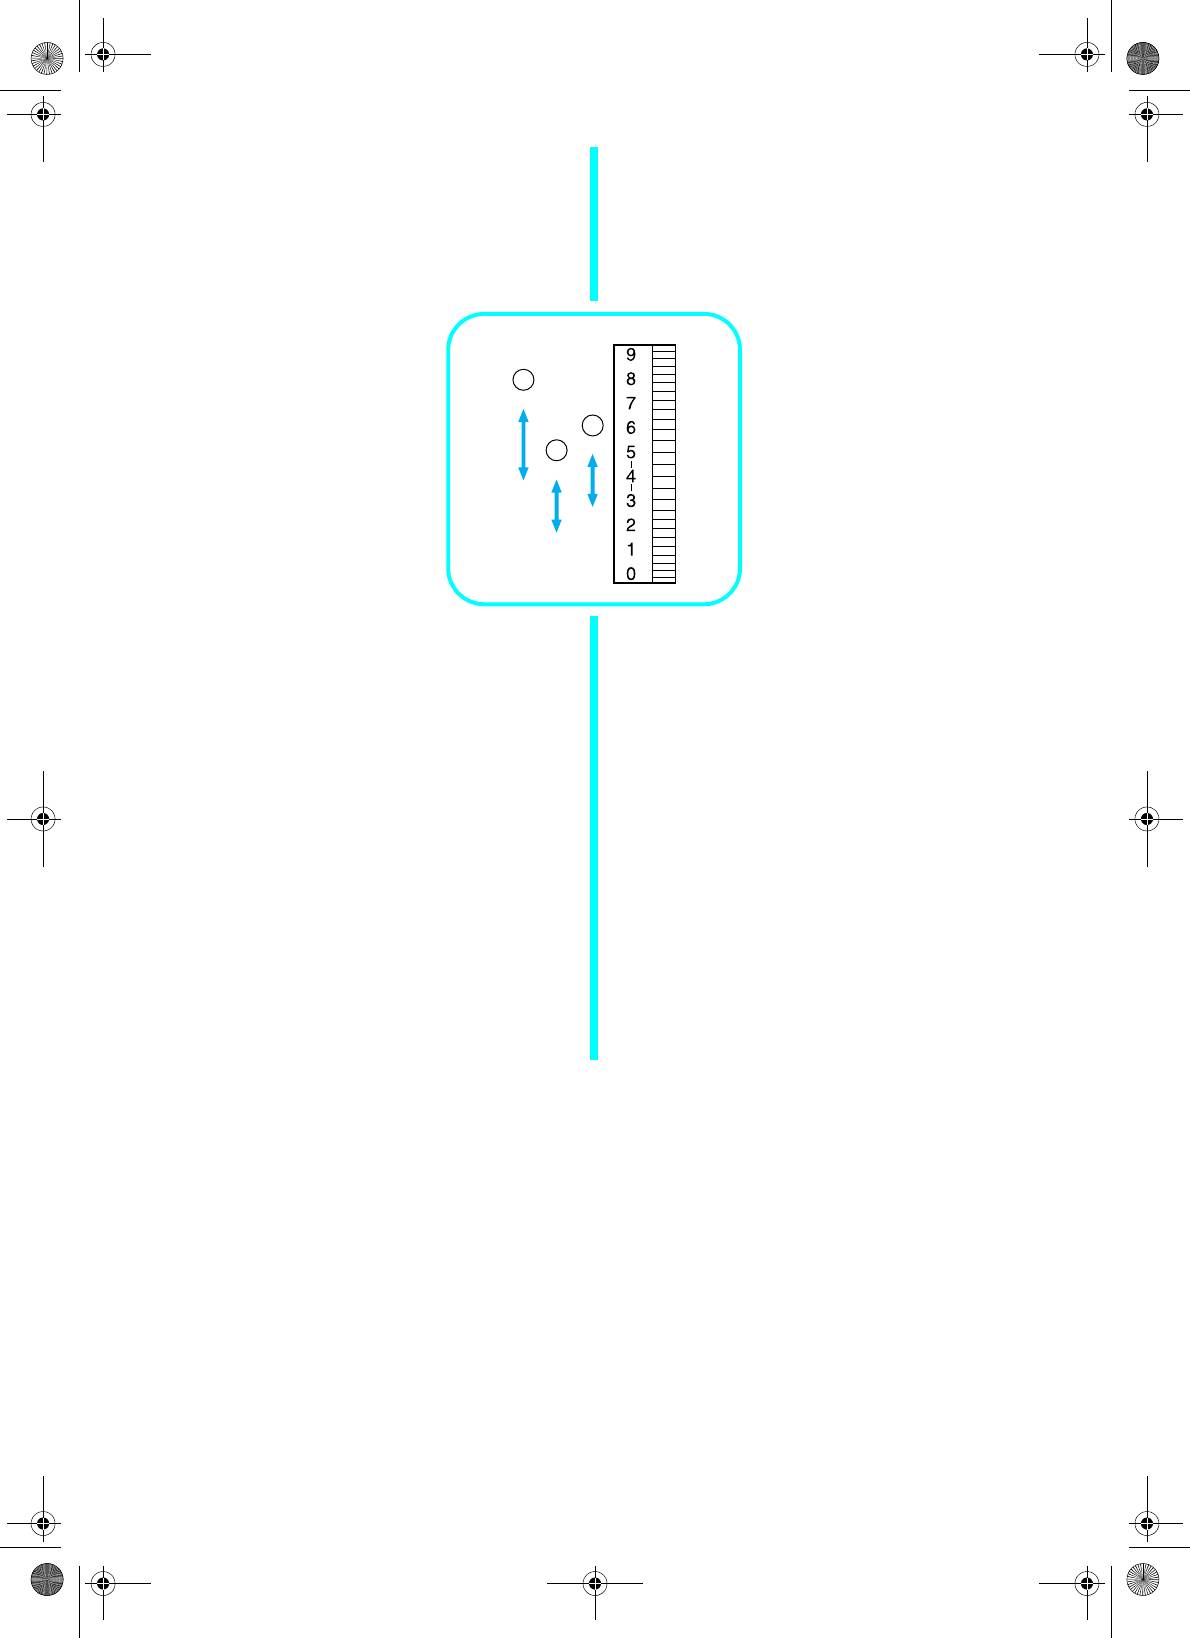
Tension control
Управление натяжением
Sewing is possible at position «4» for most
В большинстве случаев возможно шитье с
circumstances. If improper stitching occurs,
установкой значения натяжения «4». При
adjust the tension according to the drawing
появлении неправильной строчки настройте
below.
натяжение, как показано на рисунке ниже.
(Standard: SPAN 60/3Z)
(Стандарт: SPAN 60/3Z)
A для сильного натяжения
A
(установите значение
A for heavy tension
от 4 до 7)
(set from 4 to 7)
C
B для слабого натяжения
B for light tension
B
(установите значение
(set from 4 to 2)
от 4 до 2)
C for medium tension
C для средней величины
(set from 5 to 3)
натяжения
(установите значение
от 5 до 3)
• There is a thread tension adjustment dial for
• Для каждой из нитей (каждой иглы,
each needle thread, the lowerlooper thread
нижнего и верхнего петлителя) имеется
and the upperlooper thread. The correct
собственный регулятор натяжения.
thread tension may vary according to the type
Требуемое значение натяжения меняется в
and thickness of the fabric and the type of
зависимости от типа и толщины ткани, а
thread used. Thread tension adjustments may
также типа используемой нити. Настройка
be necessary for any change in sewing
натяжения нити необходима при любой
materials.
смене материала.
If the stitch quality is insufficient, select a
При недостаточном качестве строчки
different tension setting from the illustration
выберите другое значение натяжения, как
on the previous or following pages.
показано на рисунках на предыдущей и
следующих страницах.
Adjusting the thread tension
Настройка натяжения нити
(1) To select the correct tension, refer to the
(1) Для выбора правильного натяжения нити
illustration on the previous page.
см. рисунок на предыдущей странице.
(2) If you cannot find the correct tension, refer to
(2) Если выбрать подходящее натяжение не
the illustrations «In this case» on following
получается, см. рисунок «В данном случае»
pages.
на следующих страницах.
28
1034D-ru.book Page 29 Monday, August 29, 2005 6:49 PM
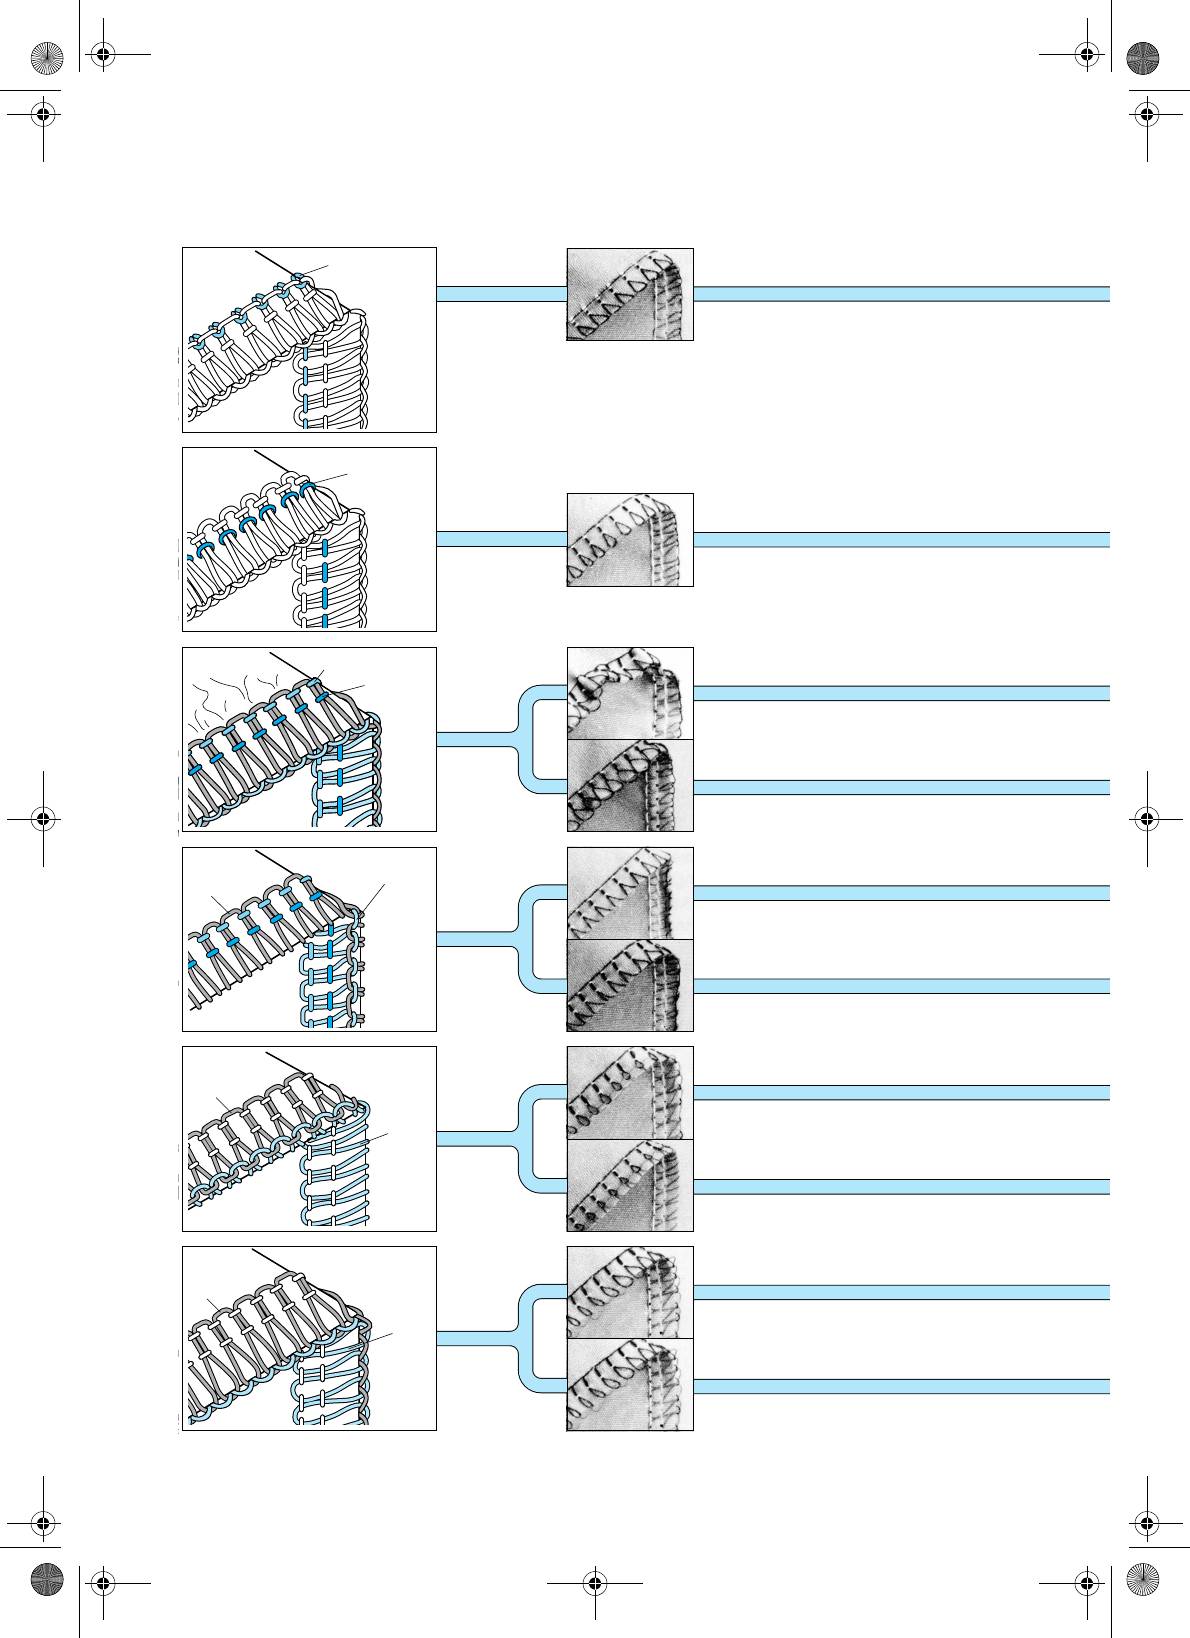
Chart of Thread Tension Adjustment
Two-needle (Four-thread)
A
C
Left needle thread is loose.
Нить в левой игле натянута слабо.
Left needle thread is loose.
A Reverse Изнаночная сторона ткани
A
Reverse
B Surface Обметываемый край
B
Surface
C Left needle thread Нить левой иглы
C
Left needle thread
B
D
Right needle thread
D Right needle thread Нить правой иглы
E
Upperlooper thread
E Upperlooper thread Нить верхнего петлителя
F
Lowerlooper thread
A
F Lowerlooper thread Нить нижнего петлителя
D
Right needle thread is loose.
Right needle thread is loose.
Нить в правой игле натянута слабо.
B
A
C
D
Left needle thread is tight.
Left needle thread is tight.
Нить в левой игле натянута сильно.
B
Right needle thread is tight.
Right needle thread is tight.
Нить в правой игле натянута сильно.
A
E
F
Upperlooper thread is tight.
Upperlooper thread is tight.
Нить в верхнем петлителе натянута сильно.
B
Lowerlooper thread is loose.
Lowerlooper thread is loose.
Нить в нижнем петлителе натянута слабо.
A
F
Upperlooper thread is loose.
Upperlooper thread is loose.
E
Нить в верхнем петлителе натянута слабо.
B
Lowerlooper thread is tight.
Lowerlooper thread is tight.
Нить в нижнем петлителе натянута сильно.
A
F
Upperlooper thread is loose.
Upperlooper thread is loose.
E
Нить в верхнем петлителе натянута слабо.
B
Lowerlooper thread is loose.
Lowerlooper thread is loose.
Нить в нижнем петлителе натянута слабо.
29
1034D-ru.book Page 30 Monday, August 29, 2005 6:49 PM
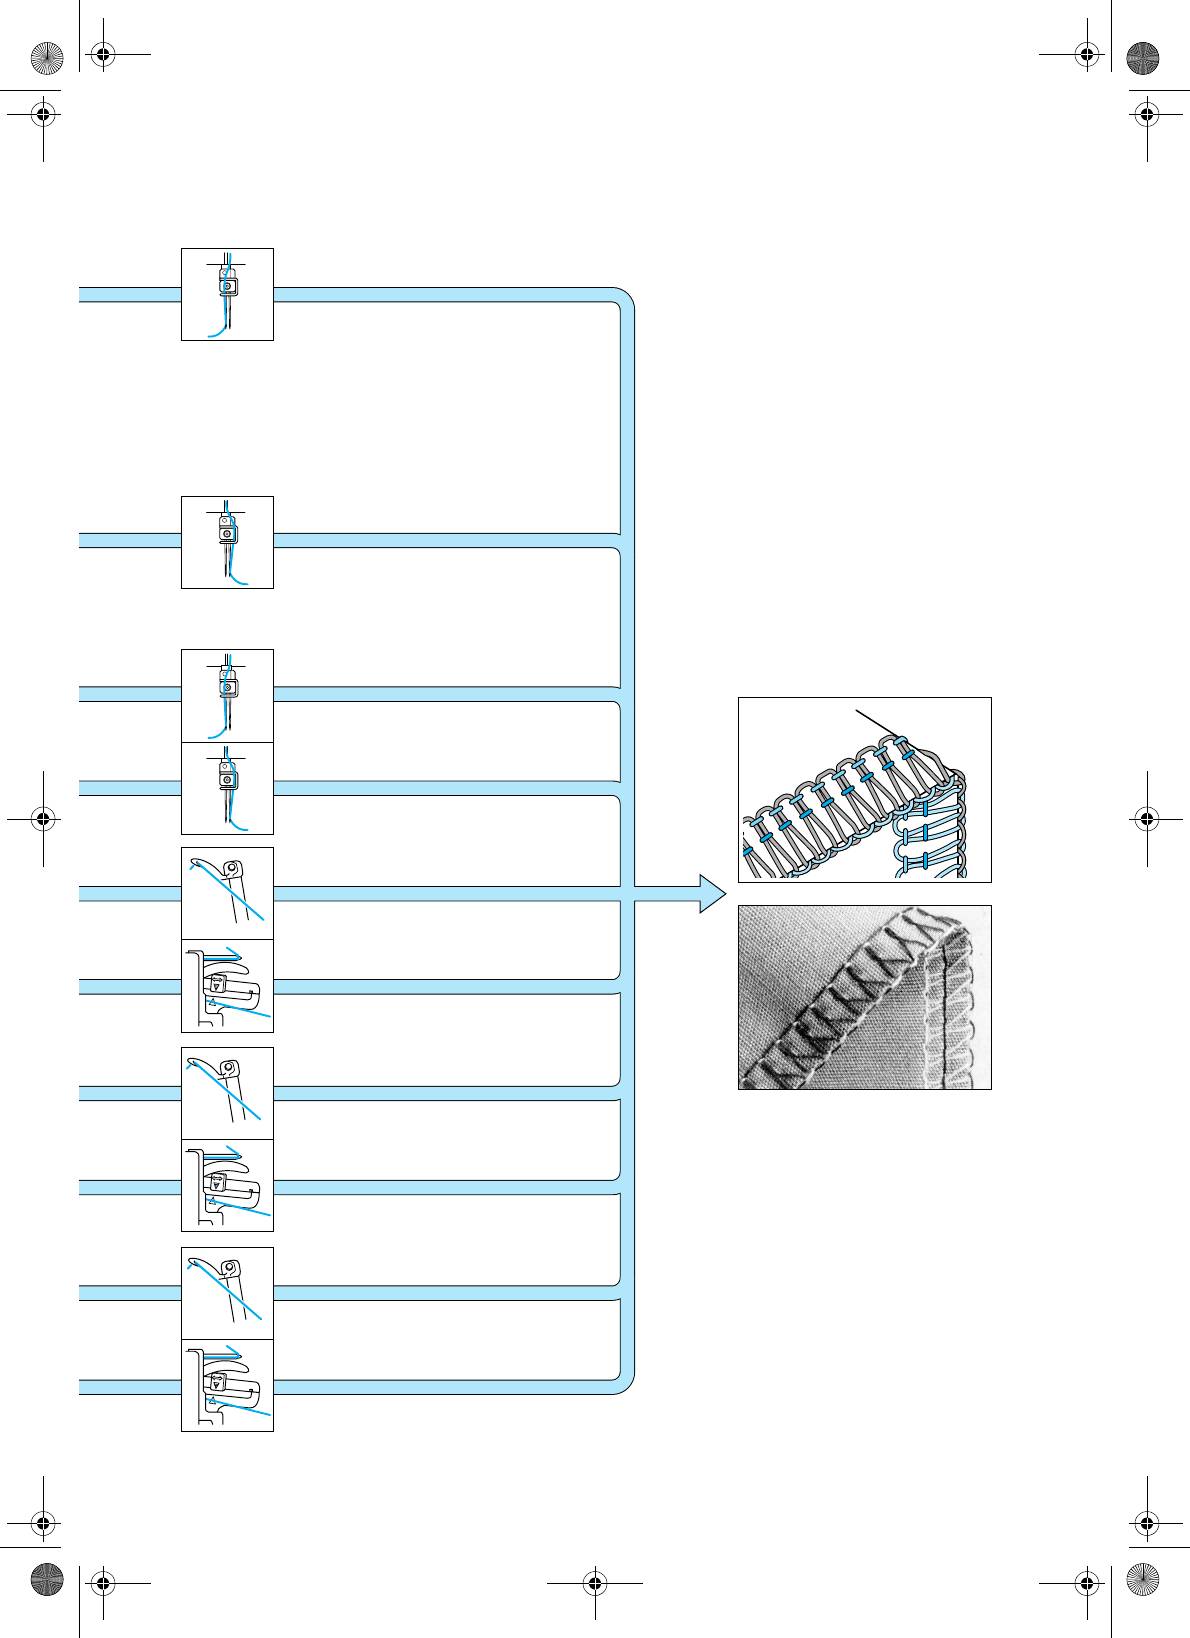
Таблица настройки натяжения нити
Двойная игла (четыре нити)
Tighten left needle thread (yellow).
Tighten left needle thread. (yellow)
Натяните нить левой иглы
(желтая).
NOTE:
NOTE:
Order of thread tension adjustment
Order of thread tension adjustment
When you adjust the thread tension, do it in the
When you adjust the thread tension, do it in the
following order:
following order:
(1) Left needle thread
Tighten right needle thread (pink).
(1)Left needle thread
Tighten right needle thread. (pink)
(2) Right needle thread
Натяните нить правой иглы
(2)Right needle thread
(3) Upperlooper thread
(розовая).
(3)Upperlooper thread
(4) Lowerlooper thread
(4)Lowerlooper thread
This is the easiest way to obtain the correct
This is the easiest way to obtain the correct
thread tension.
thread tension.
Loosen left needle thread (yellow).
Loosen left needle thread. (yellow)
Ослабьте нить левой иглы
(желтая).
Loosen right needle thread (pink).
Loosen right needle thread (pink)
Ослабьте нить правой иглы
(розовая).
Loosen upperlooper thread (green).
Loosen upperlooper thread (green)
Ослабьте нить верхнего петлителя
(зеленая).
Tighten lowerlooper thread (blue).
Tighten lowerlooper thread (blue)
Натяните нить нижнего петлителя
(синяя).
Tighten upperlooper thread (green).
Tighten upperlooper thread (green)
Натяните нить верхнего петлителя
ПРИМЕЧАНИЕ:
(зеленая).
Порядок настройки натяжения нити
Настраивайте натяжение нити в следующем
Loosen lowerlooper thread (blue).
Loosen lowerlooper thread (blue)
порядке:
Ослабьте нить нижнего петлителя
(1) Нить левой иглы
(синяя).
(2) Нить правой иглы
(3) Нить верхнего петлителя
(4) Нить нижнего петлителя
Tighten upperlooper thread (green).
Tighten upperlooper thread (green)
Это простейший способ получить
Натяните нить верхнего петлителя
правильное натяжение нити.
(зеленая).
Tighten lowerlooper thread (blue).
Tighten lowerlooper thread (blue)
Натяните нить нижнего петлителя (синяя).
30

1034D-ru.book Page 31 Monday, August 29, 2005 6:49 PM
One-needle (Three-thread)
C
Needle thread is loose.
Needle thread is loose.
Нить в игле натянута слабо.
A
A Reverse Изнаночная сторона ткани
A
Reverse
B Surface Обметываемый край
B
Surface
C
Needle thread
C Needle thread Нить в игле
D
Upperlooper thread
D Upperlooper thread Нить верхнего петлителя
E
Lowerlooper thread
B
E Lowerlooper thread Нить нижнего петлителя
E
Fabric puckers
Fabric puckers
Ткань морщится
A
Upperlooper thread is tight.
Upperlooper thread is tight.
Нить в верхнем петлителе натянута
D
сильно.
B
Lowerlooper thread is loose.
Lowerlooper thread is loose.
Нить в нижнем петлителе натянута
слабо.
E
A
Upperlooper thread is loose.
Upperlooper thread is loose.
Нить в верхнем петлителе натянута
слабо.
D
Lowerlooper thread is tight.
Lowerlooper thread is tight.
B
Нить в нижнем петлителе натянута
сильно.
E
Upperlooper thread is loose.
Нить в верхнем петлителе натянута
Upperlooper thread is loose.
A
слабо.
Lowerlooper thread is loose.
Lowerlooper thread is loose.
Нить в нижнем петлителе натянута
D
слабо.
B
31
1034D-ru.book Page 32 Monday, August 29, 2005 6:49 PM
Одинарная игла (три нити)
Tighten needle thread. (yellow)
Tighten needle thread (yellow).
Натяните нить иглы (желтая).
NOTE:
NOTE:
Order of thread tension adjustment
Order of thread tension adjustment
When you adjust the thread tension, do it in
When you adjust the thread tension, do it in
the following order:
the following order:
(1) Needle thread
(1)Needle thread
(2) Upperlooper thread
(2)Upperlooper thread
(3) Lowerlooper thread
(3)Lowerlooper thread
This is the easiest way to obtain the correct
This is the easiest way to obtain the correct
thread tension.
thread tension.
Loosen needle thread (yellow).
Loosen needle thread. (yellow)
Ослабьте нить иглы (желтая).
Loosen upperlooper thread (green).
Loosen upperlooper thread (green)
Ослабьте нить верхнего петлителя
(зеленая).
Tighten lowerlooper thread (blue)
Tighten lowerlooper thread (blue).
Натяните нить нижнего петлителя
(синяя).
Tighten upperlooper thread (green)
Tighten upperlooper thread (green).
Натяните нить верхнего петлителя
(зеленая).
Loosen lowerlooper thread (blue).
Loosen lowerlooper thread (blue)
Ослабьте нить нижнего петлителя
ПРИМЕЧАНИЕ:
(синяя).
Порядок настройки натяжения нити
Настраивайте натяжение нити в следующем
порядке:
(1) Нить иглы
(2) Нить верхнего петлителя
(3) Нить нижнего петлителя
Это простейший способ получить
правильное натяжение нити.
Tighten upperlooper thread (green)
Tighten upperlooper thread (green).
Натяните нить верхнего петлителя
(зеленая).
Tighten lowerlooper thread (blue)
Tighten lowerlooper thread (blue).
Натяните нить нижнего петлителя (синяя).
32
1034D-ru.book Page 33 Monday, August 29, 2005 6:49 PM
Test-sewing
Пробное шитье
• ЭTest-sew after threading.
• После заправки выполните пробное
(1) Place a piece of scrap material under the
шитье.
presser foot for test sewing.
(1) Для выполнения пробного шитья
поместите кусочек ткани под прижимную
NOTE:
лапку.
Always lift the presser foot before placing the
fabric under it. Just running the fabric under the
ПРИМЕЧАНИЕ:
foot without lifting the presser foot may cause an
Перед установкой ткани всегда поднимайте
uneven seam.
прижимную лапку. Попытка поместить ткань
под опущенную прижимную лапку может
(2) Holding the needle threads with your left
привести к появлению неравномерного шва.
hand, turn the pulley slowly a few times in the
counter clockwise direction with your right
(2) Перед использованием педали, удерживая
hand, and check to see that the threads
нити левой рукой, правой поверните
entwine themselves before using the foot
маховик на несколько оборотов против
pedal to sew.
часовой стрелки, чтобы убедиться, что
нити сплетаются.
33


