Acer Aspire 5741 – страница 2
Инструкция к Ноутбуку Acer Aspire 5741
Securing your computer 33
Using a computer security lock 33
Using passwords 33
Entering passwords 34
Setting passwords 34
Expanding through options 35
Connectivity options 35
Fax/data modem (only for certain models) 35
Built-in network feature 36
Consumer Infrared (CIR) (only for certain models) 36
Universal Serial Bus (USB) 37
IEEE 1394 port (only for certain models) 37
High-Definition Multimedia Interface
(only for certain models) 38
ExpressCard (only for certain models) 38
Installing memory 39
Enjoying TV with Windows Media Center 41
Choose your input type 41
Watching TV using the optional DVB-T (digital TV)
antenna (for selected models) 41
To connect the digital antenna 41
Watching TV with an external antenna or cable socket 42
BIOS utility 43
Boot sequence 43
Enable disk-to-disk recovery 43
Password 43
Using software 44
Playing DVD movies 44
Frequently asked questions 45
Requesting service 48
International Travelers Warranty (ITW) 48
Before you call 48
Troubleshooting 49
Troubleshooting tips 49
Error messages 49
Regulations and safety notices 50
FCC statement 50
Modem notices (only for certain models) 51
LCD pixel statement 53
Radio device regulatory notice 53
General 53
The FCC RF safety requirement 54
Canada — Low-power license-exempt radio
communication devices (RSS-210) 55
Exposure of humans to RF fields (RSS-102) 55
LCD panel ergonomic specifications 56

1
English
Special keys and indicators
The special keys and indicators provide easy access to handy features and clear
status information.
Icon Item Description
Backup key Launches Acer Backup Management for three-
step data backup (only for certain models).
PowerSmart key Puts your computer into power-saving mode
P
(only for certain models).
Programmable
User-programmable (only for certain models).
key
Power indicator Indicates the computer's power status.
Battery indicator Indicates the computer's battery status.
1. Charging: The light shows amber when the
battery is charging.
2. Fully charged: The light shows blue when in
AC mode.
Communication
Indicates the computer's wireless connectivity
indicator
device status.
HDD indicator Indicates when the hard disk drive is active.
Num Lock
Lights up when Num Lock is activated.
indicator
(only for certain models)
Caps Lock
Lights up when Caps Lock is activated.
indicator
(only for certain models)
2
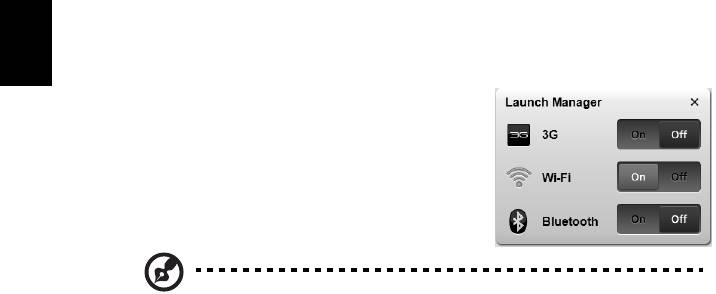
Enabling your wireless devices
The Launch Manager allows you to enable and disable the various wireless
connectivity devices on your computer.
English
Press <Fn> + <F3> to bring up the Launch Manager
window panel.
A red toggle indicates the device is off.
• Click the red toggle to turn the device on.
A green toggle indicates the device is on.
• Click the green toggle to turn the device off.
Note: Communication devices may vary by system configuration.
Remember to access the respective wireless devices' configuration
panel for additional options.
3
English
Touchpad
The built-in touchpad is a pointing device that senses movement on its surface.
This means the cursor responds as you move your finger across the surface of
the touchpad. The central location on the palmrest provides optimum comfort
and support.
Touchpad basics (with two-click buttons)
The following items show you how to use the touchpad with two-click buttons.
• Move your finger across the touchpad to move the cursor.
• Press the left and right buttons located beneath the touchpad to perform
selection and execution functions. These two buttons are similar to the left
and right buttons on a mouse. Tapping on the touchpad is the same as
clicking the left button.
Right
Function Left button
Main touchpad
button
Execute Quickly click twice. Tap twice (at the same speed
as double-clicking a mouse
button).
Select Click once. Tap once.
Drag Click and hold, then
Tap twice (at the same speed
use finger on the
as double-clicking a mouse
touchpad to drag
button); rest your finger on
the cursor.
the touchpad on the second
tap and drag the cursor.
Access context
Click once.
menu
Note: Illustrations for reference only. The exact configuration of
your PC depends on the model purchased.
Note: When using the touchpad, keep it — and your fingers — dry
and clean. The touchpad is sensitive to finger movement; hence,
the lighter the touch, the better the response. Tapping harder will
not increase the touchpad's responsiveness.
Note: By default, vertical and horizontal scrolling is enabled on
your touchpad. It can be disabled under Mouse settings in
Windows Control Panel.

4
Using the keyboard
The keyboard has full-sized keys and an embedded numeric keypad*, separate
English
cursor, lock, Windows, function and special keys.
Lock keys and embedded numeric keypad*
The keyboard has three lock keys which you can toggle on and off.
Lock key Description
Caps Lock
When Caps Lock is on, all alphabetic characters typed are
in uppercase.
Num Lock
When Num Lock is on, the embedded keypad is in numeric mode.
The keys function as a calculator (complete with the arithmetic
<Fn> + <F11>*
operators +, -, *, and /). Use this mode when you need to do a lot of
numeric data entry. A better solution would be to connect an
external keypad.
Scroll Lock
When Scroll Lock is on, the screen moves one line up or down when
you press the up or down arrow keys respectively. Scroll Lock does
<Fn> + <F12>
not work with some applications.
The embedded numeric keypad functions like a desktop numeric keypad. It is
indicated by small characters located on the upper right corner of the keycaps.
To simplify the keyboard legend, cursor-control key symbols are not printed on
the keys.
Desired access Num Lock on Num Lock off
Number keys on
Type numbers in a normal
manner.
embedded keypad
Cursor-control keys
Hold <Shift> while using cursor-
Hold <Fn> while using
control keys.
cursor-control keys.
on embedded keypad
Main keyboard keys
Hold <Fn> while typing letters on
Type the letters in a
embedded keypad.
normal manner.
* only for certain models
5
English
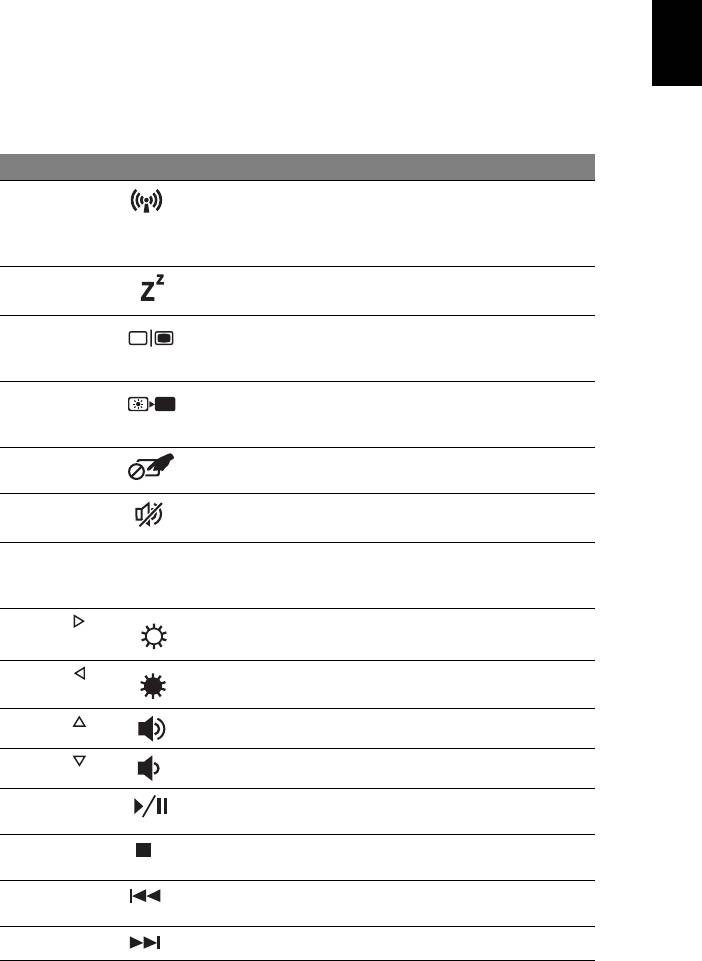
Hotkeys
The computer employs hotkeys or key combinations to access most of the
computer's controls like screen brightness and volume output.
To activate hotkeys, press and hold the <Fn> key before pressing the other key
in the hotkey combination.
Hotkey Icon Function Description
<Fn> + <F3> Communication
Enables / disables the computer's
key
communication devices.
(Communication devices may vary by
configuration.)
<Fn> + <F4> Sleep Puts the computer in Sleep mode.
<Fn> + <F5> Display toggle Switches display output between the
display screen, external monitor
(if connected) and both.
<Fn> + <F6> Display off Turns the display screen backlight
off to save power. Press any key to
return.
<Fn> + <F7> Touchpad
Turns the internal touchpad on and
toggle
off.
<Fn> + <F8> Speaker toggle Turns the speakers on and off.
<Fn> + <F11> NumLk Turns the embedded numeric
keypad on or off.
(only for certain models)
<Fn> + < >
Brightness up Increases the screen brightness.
<Fn> + < >
Brightness
Decreases the screen brightness.
down
<Fn> + < >
Volume up Increases the sound volume.
<Fn> + < >
Volume down Decreases the sound volume.
<Fn> +
Play/Pause Play or pause a selected media file.
<Home>
<Fn> +
Stop Stop playing the selected media file.
<Pg Up>
<Fn> +
Previous Return to the previous media file.
<Pg Dn>
<Fn> + <End> Next Jump to the next media file.
6
Windows keys
The keyboard has two keys that perform Windows-specific functions.
English
Key Description
Windows key
Pressed alone, this key has the same effect as clicking on the
Windows Start button; it launches the Start menu.
It can also be used with other keys to provide a variety of
functions:
<>: Open or close the Start menu
< > + <D>: Display the desktop
< > + <E>: Open Windows Explore
< > + <F>: Search for a file or folder
< > + <G>: Cycle through Sidebar gadgets
< > + <L>: Lock your computer (if you are connected to a
network domain), or switch users (if you're not connected to a
network domain)
< > + <M>: Minimizes all windows
< > + <R>: Open the Run dialog box
< > + <T>: Cycle through programs on the taskbar
< > + <U>: Open Ease of Access Center
< > + <X>: Open Windows Mobility Center
< > + <BREAK>: Display the System Properties dialog box
< > + <SHIFT+M>: Restore minimized windows to the
desktop
< > + <TAB>: Cycle through programs on the taskbar by
using Windows Flip 3-D
< > + <SPACEBAR>: Bring all gadgets to the front and select
Windows Sidebar
<CTRL> + < > + <F>: Search for computers (if you are on a
network)
<CTRL> + < > + <TAB>: Use the arrow keys to cycle through
programs on the taskbar by using Windows Flip 3-D
Note: Depending on your edition of Windows,
some shortcuts may not function as described.
Application
This key has the same effect as clicking the right mouse button;
key
it opens the application's context menu.

7
English
Audio
The computer also comes with 32-bit High Definition (HD) Audio, and stereo
speakers.
Acer PureZone (only for certain models)
The system provides you whole new enthusiastic audio experience including
Acer PureZone with built-in stereo microphones featuring beam forming and
echo cancellation technologies. Acer PureZone technology supports Acoustic
Echo Cancellation, Beam Forming and Noise Suppression for pure sound
recording. To set up your microphone, run the Acer HD Audio Manager by
double-clicking the Acer HD Audio Manager icon in the system tray of your
Windows system. The Acer HD Audio Manager dialog box will pop up. Click the
Microphone tab, and then click the Microphone Effects tab. Select Beam
Forming and Acoustic Echo Canellation to set the microphone effect.
Note: Disable the beam forming to get the multi-sound source
input.
Tuba (only for certain models)
The dedicated Tuba CineBass subwoofer pumps out earthshaking movie-house
audio. The innovative design integrates the subwoofer with the tube-style
hinge.
Using Dolby Home Theater for surround/
multi-channel sound (only for certain models)
®
Your Acer notebook comes with the Dolby Home Theater
audio enhancement
featuring Dolby Pro Logic IIx, Dolby Digital Live, Dolby Headphone, Dolby
Natural Bass and Dolby Sound Space Expander,Audio Optimization, High
Frequency Enhancer technologies to give you high-quality digital surround
sound for enjoying movies, games and music in a realistic, multi-channel audio
environment.
Dolby Pro Logic IIx
Dolby Pro Logic IIx creates a vivid 5.1-channel surround sound experience from
any stereo (two-channel) movie, music, TV, or game audio source. Dolby Pro
Logic IIx examines the signal and uses that information to expand audio into up
to 5.1 channels of highly realistic, natural surround sound.

8
Dolby Digital Live
Dolby Digital Live converts any audio signal in real time from PCs or game
consoles into Dolby Digital for easy connection to home theater systems
English
through a single digital cable. Users can enjoy PC or game audio entertainment
with exciting realism through home theater receivers or other devices equipped
with Dolby Digital decoding technology.
Dolby Headphone
Dolby Headphone creates a personal surround sound experience using any set
of headphones. The playback of music, movies, and games results in sound that
is more spacious, open, and dramatic, improving listening comfort and making
listeners feel as if the action is happening all around them.
Dolby
Natural Bass
A bass enhancement system, which provides up to an octave of downward
extension in the bass response of most speakers.
Dolby Sound Space Expander
A sound stage enhancer, which produces a wide stereo image and improves the
separation of instruments without diminishing the center of the mix.
Video
16:9 display
16:9 display delivers Full HD movies at home like never before. Sky-high color
saturation guarantees an authentic HD viewing experience.16:9 quality means
true home theater visuals have finally arrived for notebook entertainment
enthusiasts.
9
English
Using the system utilities
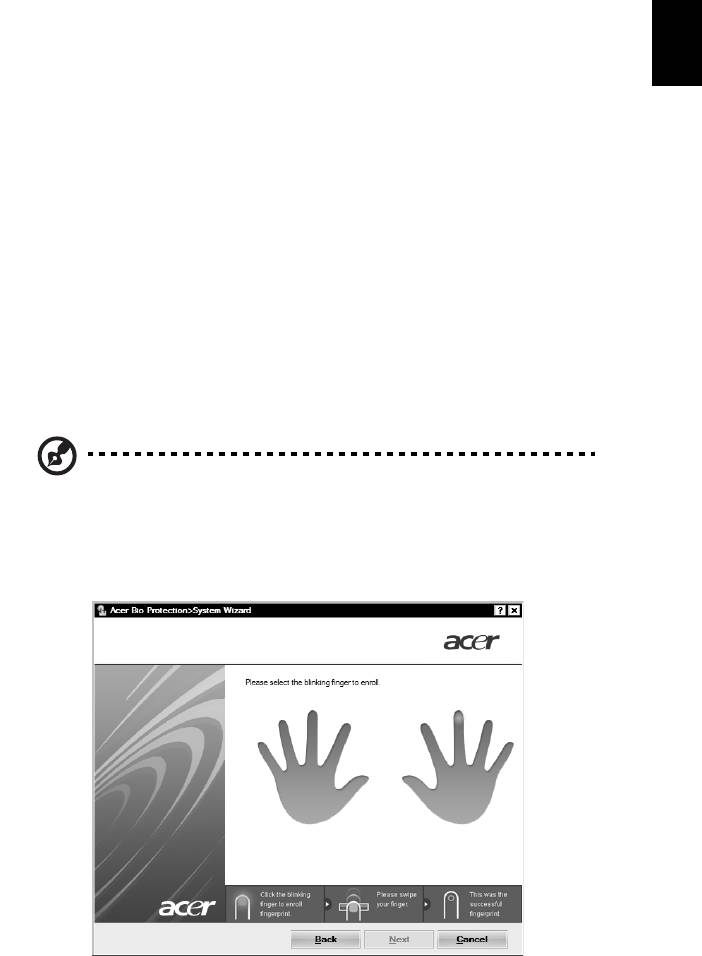
Acer Bio-Protection (only for certain models)
Acer Bio-Protection Fingerprint Solution is a multi-purpose fingerprint software
package integrated with the Microsoft Windows operating system. Utilizing the
uniqueness of one's fingerprint, Acer Bio-Protection Fingerprint Solution
incorporates protection against unauthorized access to your computer with
centralized password management via Password Bank; easy music player
launching with Acer MusicLaunch*; secure Internet favorites via Acer
MyLaunch*; and fast application/website launching and login with Acer
FingerLaunch. Acer ProfileLaunch** can launch up to three applications/
websites with a single finger swipe.
Acer Bio-Protection Fingerprint Solution also allows you to navigate through
web browsers and documents using Acer FingerNav*. With Acer Bio-Protection
Fingerprint Solution, you can now enjoy an extra layer of protection for your
personal computer, as well as the convenience of accessing your daily tasks with
a simple swipe of your finger!
For more information, refer to the Acer Bio-Protection help files.
Notes:
* Acer ProfileLaunch, MusicLaunch, MyLaunch and FingerNav are
only available on select models.
** In models without Acer ProfileLaunch, Acer FingerLaunch can
be used to open applications in the
Acer ProfileLaunch icons
area;
a single finger swipe will launch only one application at a time.
10
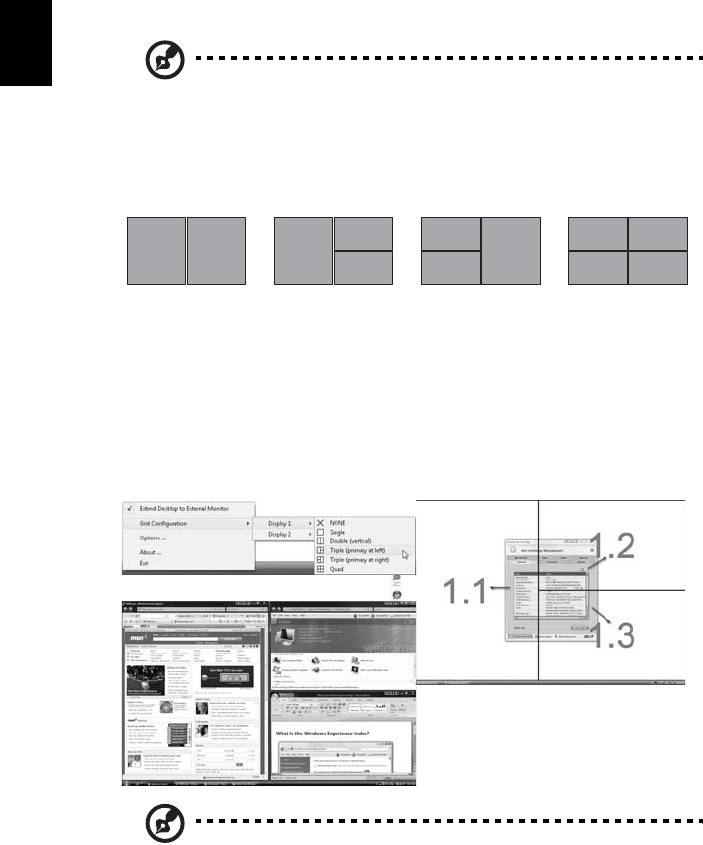
Acer GridVista (dual-display compatible)
English
Note: This feature is only available on certain models.
Acer GridVista is a handy utility that offers four pre-defined display settings so
you can view multiple windows on the same screen. To access this function,
please go to Start, All Programs and click on Acer GridVista. You may choose
any one of the four display settings indicated below:
2
1
1
3
12
3
1
3
2
2
4
Double (vertical), Triple (primary at left), Triple (primary at right), or Quad
Acer Gridvista is dual-display compatible, allowing two displays to be
partitioned independently.
Acer GridVista is simple to set up:
1 Run Acer GridVista and select your preferred screen configuration for each
display from the taskbar.
2 Drag and drop each window into the appropriate grid.
3 Enjoy the convenience of a well-organized desktop.
Note: Please ensure that the resolution setting of your second
monitor is set to the manufacturer's recommended value.
11
English
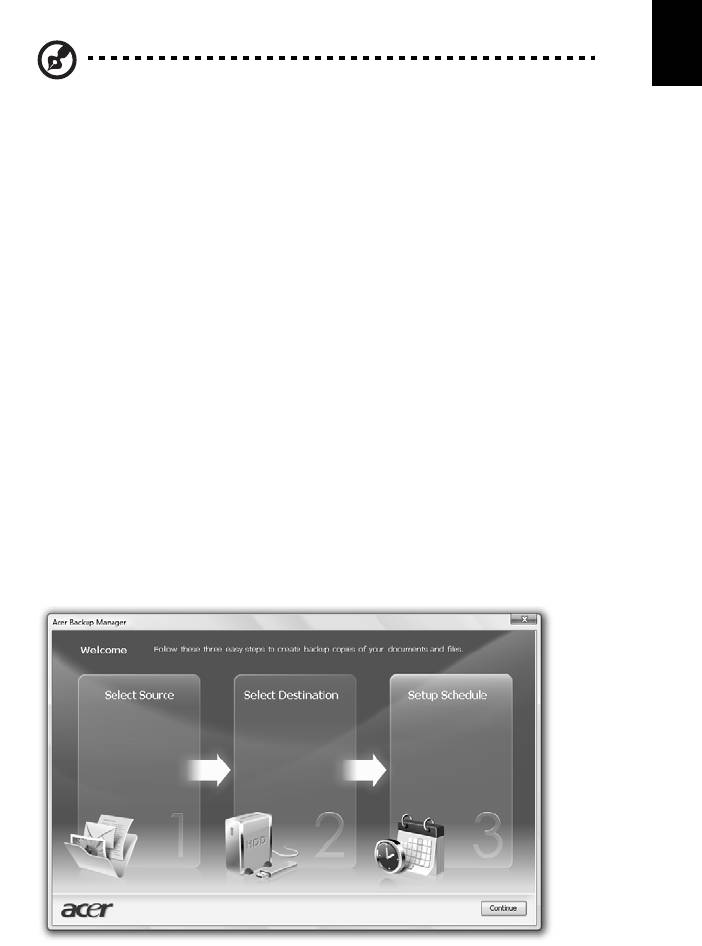
Acer Backup Manager
Note: This feature is only available on certain models.
Acer Backup Manager is a simple three-step process that allows you to create
backup copies of your entire system or selected files and folders according to a
schedule or as you need to.
To start Acer Backup Manager, press the Acer Backup Manager key above the
keyboard. Alternatively, you can go to Start > All Programs > Acer Backup
Manager > Acer Backup Manager. This will open the Welcome screen; from this
screen you will be taken through the three steps to setup scheduled back ups.
Click Continue to proceed to the following screen. Click the + button and follow
the onscreen instructions:
1 Select the content you want to back up. The less content you select, the
quicker the process will be, but it will increase your risks of losing data.
2 Select where you want the backup copies to be stored. You will need to
select an external drive or your D: drive; Acer Backup Manager cannot
store a backup on the source drive.
3 Select how often you want Acer Backup Manager to create back ups.
Once you have finished these three steps, backups will be created according to
the schedule. You can also create backups manually by pressing the Acer
Backup Manager key.
If you wish to change your settings at any time, run Acer Backup Manager from
the Start menu and go through the steps outlined above.

12
Power management
This computer has a built-in power management unit that monitors system
English
activity. System activity refers to any activity involving one or more of the
following devices: keyboard, mouse, hard disk, peripherals connected to the
computer, and video memory. If no activity is detected for a period of time
(called an inactivity timeout), the computer stops some or all of these devices in
order to conserve energy.
This computer employs a power management scheme that supports the
advanced configuration and power interface (ACPI), which allows for maximum
power conservation and maximum performance at the same time. Windows
handles all power-saving chores for your computer.
Acer PowerSmart key
Note: This feature is only available on certain models.
The Acer PowerSmart key uses the power-saving features of your computer's
graphics sub-system to reduce overall power consumption. When you press the
Acer PowerSmart key, the screen brightness is reduced and the graphics chip
switched to a lower speed; PCI and WLAN switch to power-saving modes. Press
the Acer PowerSmart key again to return to your previous settings.
13
English
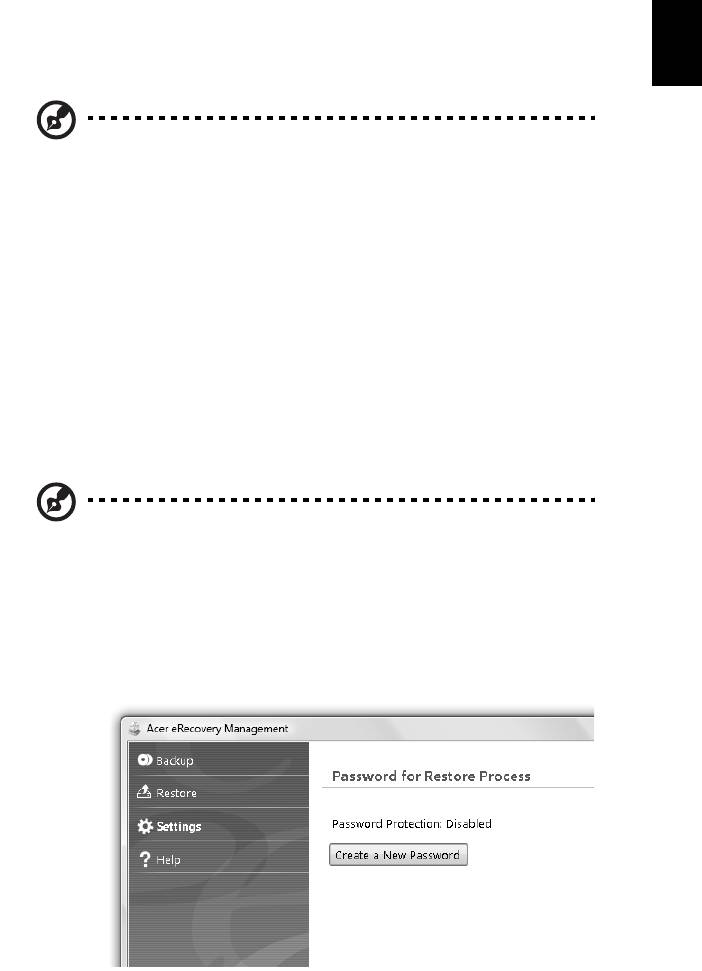
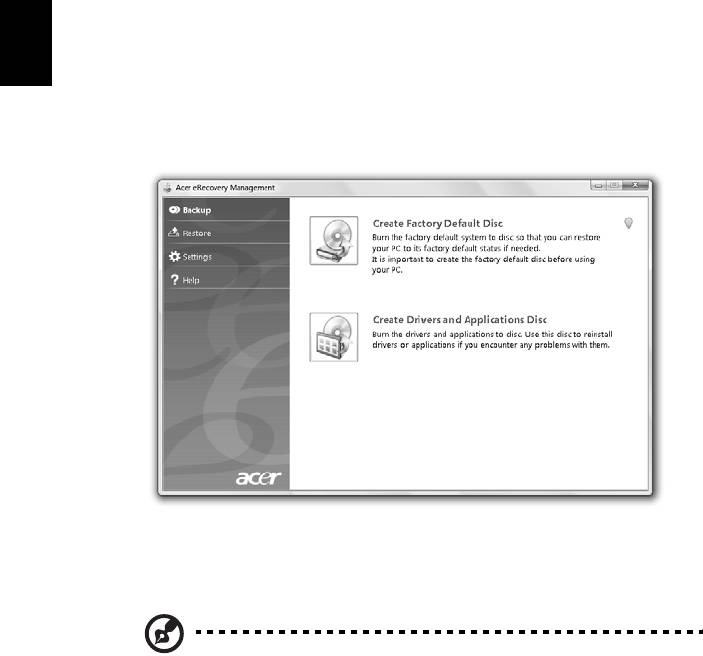
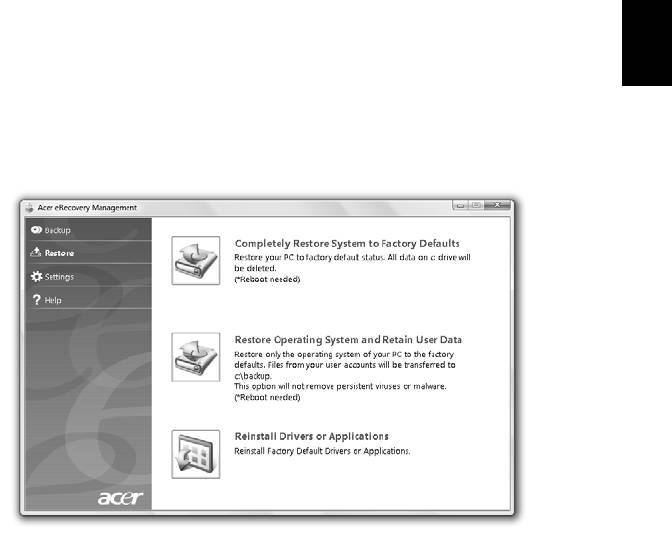
Acer eRecovery Management
Acer eRecovery Management is a tool to quickly restore the system. You can
back up/restore the factory default image, and reinstall applications and drivers.
Note: All of the following content is for general reference only.
Actual product specifications may vary.
Acer eRecovery Management consists of the following functions:
1 Backup:
• Create Factory Default Disc
• Create Drivers and Applications Disc
2 Restore:
• Completely Restore System to Factory Defaults
• Restore Operating System and Retain User Data
• Reinstall Drivers or Applications
This chapter will guide you through each process.
Note: This feature is only available on certain models. For systems
that do not have a built-in optical disc burner, plug in an external
optical disc burner before entering Acer eRecovery Management
for optical disc-related tasks.
To use the password protection feature of Acer eRecovery Management, you
must first set the password. The password is set by launching Acer eRecovery
Management and clicking Settings.
14
Burn backup discs
From the Backup page of Acer eRecovery Management, you can burn the
English
factory default image or back up drivers and applications.
1 Click on Start > All Programs > Acer > Acer eRecovery Management.
2 Acer eRecovery Management opens to the Backup page.
3 Select the type of backup (factory default or drivers and applications) you
would like to burn to disc.
4 Follow the instructions on screen to complete the process.
Note: Create a factory default image when you want to burn a
bootable disc that contains your computer's entire operating
system as it was delivered to you from the factory. If you wish to
have a disc that will allow you to browse the contents and install
selected drivers and applications, create a drivers and application
backup instead — this disc will not be bootable.
15
English
Restore
The restore feature allows you to restore or recover the system from a factory
default image or from previously created CD and DVD backups. You can also
reinstall applications and drivers for your Acer system.
1 Click on Start, All Programs, Acer, Acer eRecovery Management.
2 Switch to the Restore page by clicking Restore.
3 You can choose to restore the system from a factory default image or
reinstall applications and drivers.
4 Follow the instructions on screen to complete the process.

16
Restore Windows from backup discs
English
Note: This feature is only available on certain models.
To restore Windows from your previously burned backup discs, you will need to
insert the first backup disc and enable the F12 Boot Menu via the BIOS Setup
Utility.
1 Turn on your computer and insert the first system recovery disc into the
optical disc drive. Restart your computer.
2 During startup when the Acer logo shows, press the F2 key to enter BIOS
Setup, where you can set system parameters.
3 Use the left and right arrow keys to select the Main submenu.
4 Use the up and down arrow keys to select F12 Boot Menu.
5 Use the F5 or F6 key to change F12 Boot Menu to Enabled.
6 Press the ESC key to enter the Exit submenu, press the ENTER key to Exit
Saving Changes. Press the ENTER key again to select Yes. The system will
reboot.
7 After rebooting, when the Acer logo shows, press the F12 key to open the
Boot Menu. Here you can select which device to boot from.
8 Use the arrow keys to select the IDE1*, then press the ENTER key. Windows
will be installed from the recovery disc.
9 Insert the second recovery disc when prompted, then follow the onscreen
prompts to complete the restore.
10 Remove the recovery disc from the optical drive once the restore is
complete. Do this before rebooting your computer.

17
If you prefer to set the boot priority for long-term use, you should select the
English
Boot submenu.
1 Turn on your computer and insert the first system recovery disc into the
optical disc drive. Restart your computer.
2 During startup when the Acer logo shows, press the F2 key to enter BIOS
Setup, where you can set system parameters.
3 Use the left and right arrow keys to select the Boot submenu.
4 Use the up and down arrow keys to select the IDE1* device.
5 Use the F6 key to move the IDE1* device to the highest boot priority, or use
the F5 key to move other devices to a lower boot priority. Ensure that the
IDE1* device is the highest priority.
6 Press the ESC key to enter the Exit submenu, press the ENTER key to Exit
Saving Changes. Press the ENTER key again to select Yes. The system will
reboot.
7 When you reboot, Windows will be installed from the recovery disc.
8 Insert the second recovery disc when prompted, then follow the onscreen
prompts to complete the restore.
9 Remove the recovery disc from the optical drive once the restore is
complete. Do this before rebooting your computer.
18
Acer Arcade Deluxe
English
Note: This feature is only available on certain models.
Acer Arcade Deluxe is an integrated player for music, photos, DVD movies and
videos. Use the MediaConsole, touchpad or arrow keys to select the media type
you wish to enjoy.
• Cinema — watch DVDs, VCDs or Blu-Ray movies, and video clips
• Homemedia — connect to other devices wirelessly to share media content
• Advanced — change settings, update your Arcade software, view the help
file and About information
• Albums — view photos stored on your hard disk or removable media
• Music — listen to music files in a variety of formats
• Online Media — browse online content from YouTube and Flickr
Note: While watching videos, optical discs or slideshows, your
screensaver and power-saving features are unavailable.
Note: For more detailed information on the features of Acer
Arcade, please refer to the Arcade Help menu. This can be
accessed from the Arcade home page by selecting Help.
