Swarovski Optik Rangefinder: 3. Range finding
3. Range finding: Swarovski Optik Rangefinder
DEEN EN
DE
3.4. Scan mode
3. Range finding
When in scan mode, moving
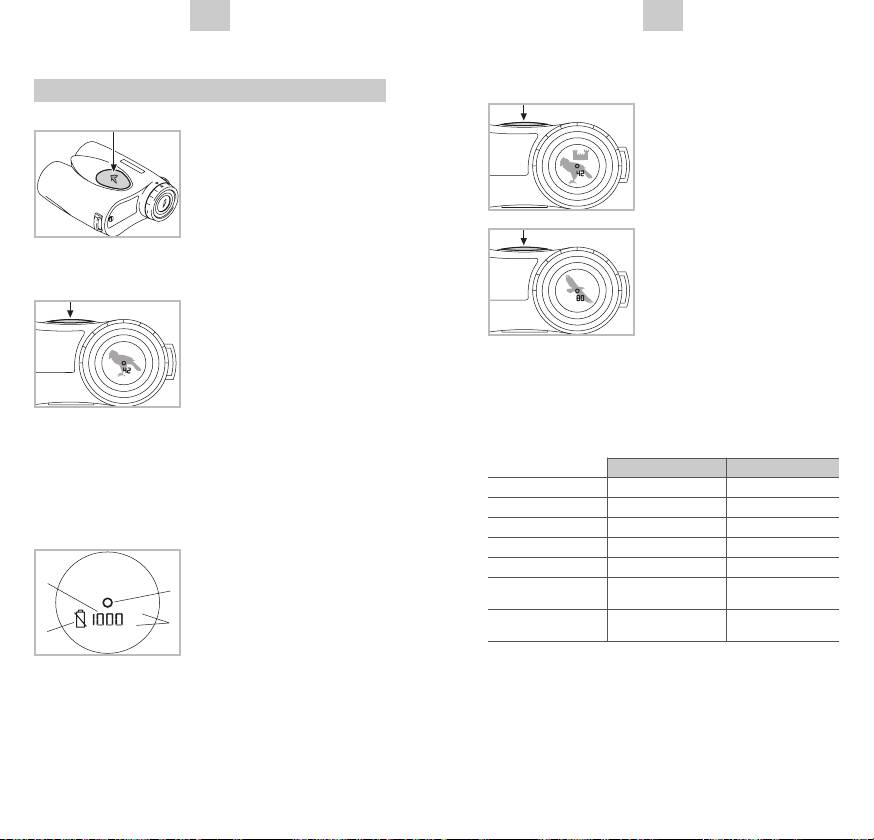
3.1. Switching the instrument on and off
targets are constantly being
Switch the instrument on by
measured. The instru-
pressing the measurement
ment automatically works
button. The target circle will
in the scan mode when
appear in the field of view.
the measurement button is
The instrument will auto-
pressed for more than 2
matically switch off again
seconds. As long as the
after 20 seconds.
measurement button is
3.2. Single measurement
depressed, items in the cir-
Depress the measurement
cle are being measured and
nd
button a 2
time and within
ranges displayed. Range in
1 second the distance
scan mode extends up to 1,000 m/1,100 yds.
measurement will appear
on the display. A further
3.5. Range
measurement can only be
carried out after approx. 3 seconds. To allow
Environmental factors will affect maximum ranging
recharging of the laser for maximum performance.
performance:
The typical range is 1,000 m/1,100 yds, under
Maximum Range Reduced Range
favourable conditions, distances of up to 1,500 m/
Color bright dark
1,600 yds and more, can be measured (see 3.5.).
Surface glossy matt
Angle to target vertical acute (up or down)
3.3. Explanation of the display
Target size large small
1 Target circle
Sunlight little (cloudy) bright (sunshine)
2 4-figure measurement in
Atmospheric
yards or meters; measu-
conditions clear hazy
rement problem “---“
Structure of target solid broken
(house wall) (bush, tree)
(see 10.)
3 Setting for yards (YD) or
meters (M)
3.6. Accuracy
4 Battery symbol to show charge (see 2.2.)
The display brightness adjusts automatically to the
Accuracy is typically ± 2 m/2 yds, > 700 m
exterior light conditions and is therefore optimally
± 0,5%, both for individual measurements and
readable under all light conditions.
also in scan mode.
22
23
R PRODUCT
YD
2
1
YD
M
3
4
R PRODUCT
YD
R PRODUCT
YD
Оглавление
- WEEE/ElektroG
- 2. Inbetriebnahme des Gerätes
- Batteries Directive
- 4. Einstellung Yard/Meter
- 6. Einstellen der Bildschärfe
- 8. Montage des Laser Guides auf das Stativ
- 12. Lieferumfang
- WEEE/ElektroG
- 2. Preparing the instrument for use
- 3. Range finding
- 4. Yard/meter setting
- 7. Attaching the carrying strap and lens cover
- 11. Care and maintenance
- WEEE/ElektroG
- 2. Mise en service de l’instrument
- Batteries Directive
- 4. Réglage yards/mètres
- 6. Réglage de la netteté de l’image
- 8. Montage du Laser Guide sur le trépied
- 12. Sont compris dans la livraison
- WEEE/ElektroG
- 2. Messa in funzione dello strumento
- 3. Misurazioni
- 4. Regolazione iarde/metri
- 7. Montaggio della cinghia e del coperchio di protezione della conchiglia oculare
- 11. Cura e manutenzione
- WEEE/ElektroG
- 2. Puesta en marcha del instrumento
- 3. Toma de mediciones
- 4. Selección de metros o yardas
- 7. Montaje de la correa de transporte y de la tapa protectora del ocular
- 8. Montaje de la guía láser en el trípode 11. Cuidados y mantenimiento
- 12. Elementos suministrados
- WEEE/ElektroG
- Batteries Directive
- 3. Meten
- 4. Instelling yard/meter
- 7. Montage van draagriem en oculairbeschermkapje
- 11. Reiniging en onderhoud
- WEEE/ElektroG
- 2. Ta instrumentet i drift
- 3. Mätningar
- 4. Inställning yard/meter
- 7. Montering av bärremmen och okularskyddet
- 8. Montering av Laser Guiden på stativ 11. Skötsel och underhåll
- 12. Leveransomfång
- WEEE/ElektroG
- Batteries Directive
- 3. Mittauksen tekeminen
- 4. Asetus jaardi/metri
- 7. Kantohihnan ja okulaarisuojuksen kiinnittäminen
- 11. Hoito ja huolto
- WEEE/ElektroG
- 2. Idriftsættelse af apparatet
- 3. Måling
- 5. Indstilling af forskydningsøjestykket
- 7. Montage af bærerem og beskyttelsesdæksel til okular
- 8. Montage af Laser Guiden på stativet 11. Pleje og vedligeholdelse
- 12. Leveringsomfang
- WEEE/ElektroG
- 2. Подготовка прибора к эксплуатации
- 3. Выполнение замеров
- 4. Настройка индикации в ярдах/метрах
- 7. Крепление подвесного ремня и защитной крышки окуляра
- 11. Уход и обслуживание
