Swarovski Optik Rangefinder: 2. Preparing the instrument for use
2. Preparing the instrument for use: Swarovski Optik Rangefinder
DEEN EN
DE
2. Preparing the instrument for use
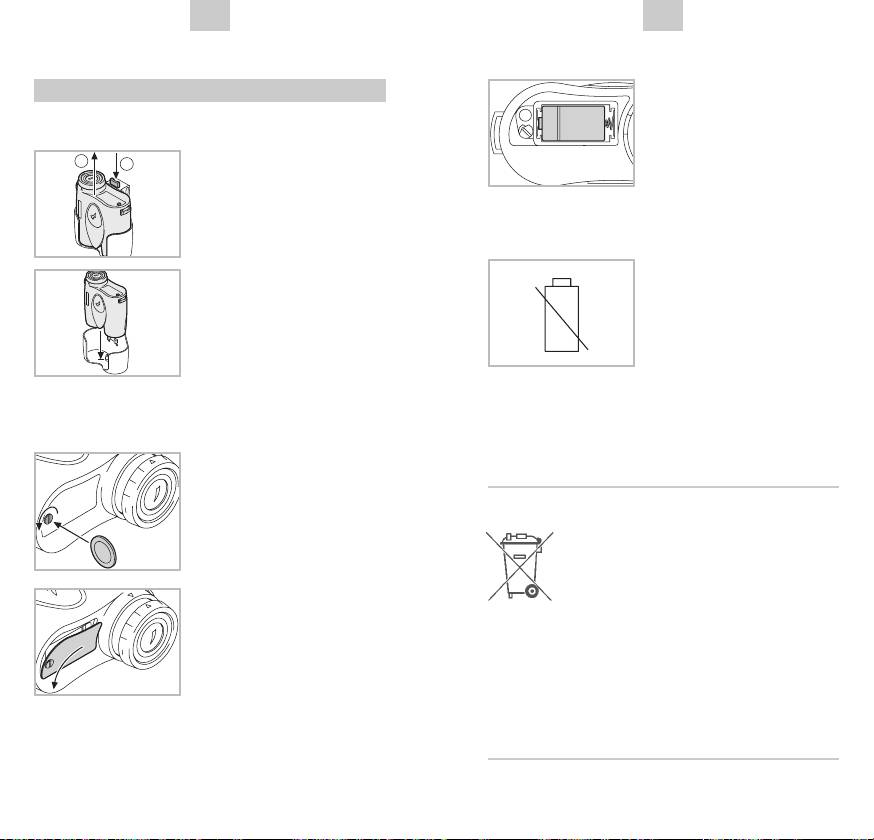
2.1. Removal from holster
➀ Press the button.
➁ Lift the laser guide out of
the holster.
2.2. Inserting batteries
• Open the battery cover
with a coin or screwdriver.
Insert the CR 2 battery. Fol-
low symbols on the interior
to ensure correct polarity.
Use leakproof batteries only
in good condition.
• Replace the battery cover
and tighten.
20
21
click!
2
1
T
RF2
U
C
R
O
D
P
S
E
R
L
A
S
1
S
L
A
C
C
T
RF2
O
D
U
PR
ER
L
A
S
1
A
SS
C
L
• Battery disposal:
Do not throw used batteries
in normal waste-bins, as
they contain toxic, envi-
ronmentally-harmful sub-
stances. To recycle the
battery, please return it to a dealer or dispose of it
at a recycling depot.
• Checking the battery
status:
If the battery symbol
appears in the display this
indicates a limited remai-
ning life. After the first
appearance of the battery symbol, approx. 100
measurements are still possible.
Batteries Directive
Batteries must not be disposed of as
household waste and you are legally
obliged to return used batteries. Local
facilities exist for returning used bat-
teries free of charge (e.g. in retail outlets or at
communal collection points). Batteries are labelled
with a crossed-out wheeled bin and the chemical
symbol of the harmful substance they contain:
“Cd” for cadmium, “Hg” for mercury and “Pb”
for lead.
Please help us to protect the environment.
_
+
CR2
MI
Оглавление
- WEEE/ElektroG
- 2. Inbetriebnahme des Gerätes
- Batteries Directive
- 4. Einstellung Yard/Meter
- 6. Einstellen der Bildschärfe
- 8. Montage des Laser Guides auf das Stativ
- 12. Lieferumfang
- WEEE/ElektroG
- 2. Preparing the instrument for use
- 3. Range finding
- 4. Yard/meter setting
- 7. Attaching the carrying strap and lens cover
- 11. Care and maintenance
- WEEE/ElektroG
- 2. Mise en service de l’instrument
- Batteries Directive
- 4. Réglage yards/mètres
- 6. Réglage de la netteté de l’image
- 8. Montage du Laser Guide sur le trépied
- 12. Sont compris dans la livraison
- WEEE/ElektroG
- 2. Messa in funzione dello strumento
- 3. Misurazioni
- 4. Regolazione iarde/metri
- 7. Montaggio della cinghia e del coperchio di protezione della conchiglia oculare
- 11. Cura e manutenzione
- WEEE/ElektroG
- 2. Puesta en marcha del instrumento
- 3. Toma de mediciones
- 4. Selección de metros o yardas
- 7. Montaje de la correa de transporte y de la tapa protectora del ocular
- 8. Montaje de la guía láser en el trípode 11. Cuidados y mantenimiento
- 12. Elementos suministrados
- WEEE/ElektroG
- Batteries Directive
- 3. Meten
- 4. Instelling yard/meter
- 7. Montage van draagriem en oculairbeschermkapje
- 11. Reiniging en onderhoud
- WEEE/ElektroG
- 2. Ta instrumentet i drift
- 3. Mätningar
- 4. Inställning yard/meter
- 7. Montering av bärremmen och okularskyddet
- 8. Montering av Laser Guiden på stativ 11. Skötsel och underhåll
- 12. Leveransomfång
- WEEE/ElektroG
- Batteries Directive
- 3. Mittauksen tekeminen
- 4. Asetus jaardi/metri
- 7. Kantohihnan ja okulaarisuojuksen kiinnittäminen
- 11. Hoito ja huolto
- WEEE/ElektroG
- 2. Idriftsættelse af apparatet
- 3. Måling
- 5. Indstilling af forskydningsøjestykket
- 7. Montage af bærerem og beskyttelsesdæksel til okular
- 8. Montage af Laser Guiden på stativet 11. Pleje og vedligeholdelse
- 12. Leveringsomfang
- WEEE/ElektroG
- 2. Подготовка прибора к эксплуатации
- 3. Выполнение замеров
- 4. Настройка индикации в ярдах/метрах
- 7. Крепление подвесного ремня и защитной крышки окуляра
- 11. Уход и обслуживание
