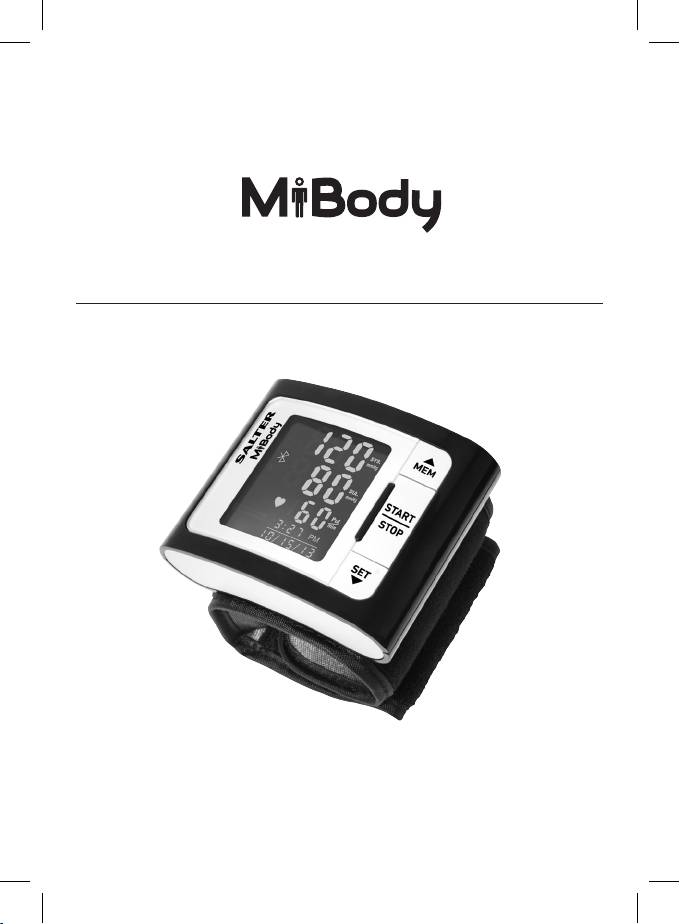
Salter BPW-9154 MiBody Bluetooth Automatic Wrist Blood Pressure Monitor: инструкция
Раздел: Узкоспециализированное и бизнес оборудование
Тип: Весы ювелирные
Инструкция к Весам ювелирным Salter BPW-9154 MiBody Bluetooth Automatic Wrist Blood Pressure Monitor
E
BLOOD PRESSURE MONITOR
Instructions and Guarantee
BPW-9154
GB
MiBODY
Salter MiBody is a range of connected devices to make weight and health management easier. Measurements are sent
wireless to your mobile device and can be viewed using the free to download MiBody App. Trends can be tracked overtime
and the measurements explained with healthy/recommended ranges. The results are stored on your personal mobile device
only and are private unless you choose to share your achievements.
MiBody should be used in addition with and not as a substitute to professional medical guidance. If you are concerned about
any aspect of your health please seek professional medical guidance.
INDICATIONS FOR USE
The Salter MiBody Blood Pressure Monitor is intended for use in measuring blood pressure and heartbeat rate with wrist
circumference ranging from 13.5 cm to 21.5 cm (about 5-8.5 inches).
It is intended for adult indoor use only.
CONTRAINDICATIONS
This device is contraindicated for any female subject who is pregnant and any children under the age of 18 years old.
This device is not intended to be a diagnostic device. Contact your physician if hypertensive values are indicated.
MEASUREMENT PRINCIPLE
This product uses the Oscillometric Measuring method to detect blood pressure. Before every measurement, the unit
establishes a “zero pressure” equivalent to the air pressure. Then it starts inflating the cu, meanwhile, the unit detects
pressure oscillations generated by beat-to-beat pulsatile, which is used to determine the systolic and diastolic pressure,
and also pulse rate. The device also compares the longest and the shortest time intervals of detected pulse waves to mean
time interval then calculates standard deviation. The device will display a warning signal with the reading to indicate the
detection of irregular heartbeat when the dierence of the time intervals over.
WEEE EXPLANATION
This marking indicates that this product should not be disposed with other household wastes throughout the EU. To prevent possible
harm to the environment or human health from uncontrolled waste disposal, recycle it responsibly to promote the sustainable reuse of
material resources. To return your used device, please use the return and collection systems or contact the retailer where the product
was purchased. They can take this product for environmental safe recycling.
BATTERY DIRECTIVE
This symbol indicates that batteries must not be disposed of in the domestic waste as they contain substances which can be damaging
to the environment and health. Please dispose of batteries in designated collection points.
GUARANTEE
This product is intended for domestic use only. Salter will repair or replace the product, or any part of this product, free of charge if within 2
years of the date of purchase, it can be shown to have failed through defective workmanship or materials. This guarantee covers working parts
that aect the function of the scale. It does not cover cosmetic deterioration caused by fair wear and tear or damage caused by accident or
misuse. Opening or taking apart the scale or its components will void the guarantee. Claims under guarantee must be supported by proof of
purchase and be returned carriage paid to Salter (or local Salter appointed agent if outside the UK). Care should be taken in packing the scale
so that it is not damaged while in transit. This undertaking is in addition to a consumer’s statutory rights and does not aect those rights in any
way. For UK Sales and Service contact HoMedics Group Ltd, HoMedics House, Somerhill Business Park, Five Oak Green Road, Tonbridge, Kent
TN11 0GP, UK. Helpline Tel No: (01732) 360783. e-mail: support@homedics.co.uk. For Ireland, please contact Petra Brand Masters, Unit J4
Maynooth Business Campus, Maynooth, Co. Kildare, Ireland. Tel +00 353 (0) 1 6510660. e-mail sales@petrabrandmasters.ie.
www.salterhousewares.com/servicecentres
2

GB
SAFETY INFORMATION
The below signs might be in the user manual, labeling or other components. They are the requirement of standard and
using.
Symbol for “THE OPERATION GUIDE
The Bluetooth Combination Mark
MUST BE READ”
Symbol for “COMPLIES WITH
0120
Symbol for “TYPE BF APPLIED PARTS”
MDD 93/42/EEC REQUIREMENTS”
Symbol for “ENVIRONMENT
PROTECTION - Wast electrical products
should not be disposed of with
Symbol for “MANUFACTURER”
household waste. Please recycle where
facilities exist. Check with your local
authority or retailer for recycling
advice”
Symbol for “SERIAL NUMBER” Symbol for “DIRECT CURRENT”
CAUTION
• Please do read this user manual carefully and thoroughly before use.
• This device is intended for adult use only.
• This device is intended for non-invasive measuring and monitoring of asterial blood pressure. It is not intended for
use on extremities other than the wrist or for functions other than obtaining a blood pressure measurement.
• Do not confuse self-monitoring with self-diagnosis. This unit allows you to monitor your blood pressure. Please
start or end medical treatment basing solely on physician’s treatment advice.
• If you are taking medication, consult your physician to determine the most appropriate time for your measurement.
Never change a prescribed medication without your physician’s consent.
• This unit is not suitable for continuous monitoring during medical emergencies or operations.
• If the pressure of the cu exceeds 40 kPa (300 mmHg), the unit will automatically deflate. Should the cu not
deflate when its pressure exceeds 40 kPa (300 mmHg), detach the cu from the wrist and press the START/STOP
button to stop inflation.
• Do not use the monitor under the conditions of strong electromagnetic field (e.g. medical RF equipment) that
radiates interference signal or electrical fast transient / burst signal.
• The maximum temperature that the applied part can be achieved is 42.5ºC while the environmental temperature is
40ºC.
• The device is not AP/APG equipment. It is not suitable for use in the presence of a flammable anaesthetic mixture
with air (or oxygen, nitrous oxide).
• Please keep the unit out of reach of infants or children, since inhalation or swallowing of small parts is dangerous
or even fatal.
• Please use ACCESSORIES and detachable parts specified / authorised by MANUFACTURER. Otherwise, it may cause
damage to the unit or danger to the user / patient.
3

GB
DISPLAY GUIDE
SYMBOL DESCRIPTION EXPLANATION
Systolic Blood Pressure
Diastolic Blood Pressure
Pulse beat/minute
Low Battery Low battery and please replace the batteries
Unit Measurement unit of blood pressure
Time Hour:Minute (Month/Day/Year)
IHB Detector Irregular Heartbeat Detector
Bluetooth Successful Bluetooth Connection
Error Error
User ID The selected User ID
Memory Recalling the history records
4
GB
INSTALLING AND REPLACING THE BATTERIES
1. Open the battery door.
2. Insert the batteries according to the polarity indications.
(Always select the authorized / specified battery: Two AAA-size alkaline batteries).
3. Close the battery door.
Replace the batteries under following circumstances:
• displays on the LCD
• The LCD display dims
• When powering on the monitor, the LCD doesn’t light up.
CAUTION
• Remove batteries if the device is not likely to be used for some time.
• Worn batteries are harmful to the environment. Do not dispose with daily garbage.
• Remove the old battery from the device following your local recycling guidelines.
SETTING DATE & TIME
1. When the monitor is o, press and hold
5
SET
MEM
button for 3 seconds.
2. The hour digits will flash. Press
SET
MEM
button to change the hour.
3. Press
SET
MEM
to confirm.
4. The minute digits will flash. Press
SET
MEM
button to change the minute.
5. Press
SET
MEM
to confirm.
6. The month digits will flash. Press
SET
MEM
button to change the month.
7. Press
SET
MEM
to confirm.
8. The day digits will flash. Press
SET
MEM
button to change the day.
9. Press
SET
MEM
to confirm.
10. The year digits will flash. Press
SET
MEM
button to change the year.
11. Press
SET
MEM
to confirm.
12. dOnE will be displayed then the monitor will turn o.
Note: To update or change the time or date repeat the above procedure making changes as required.
MiBODY APP
Before using your device for the first time:
1. Download and install the Salter MiBody App from the App store. Use keyword search terms “Salter” or “MiBody”
2. Turn Bluetooth “On” in the “Settings” menu of your iPhone/iPad.
3. Open the MiBody App and follow the on screen instructions to set up your user account.
GB
PAIRING DEVICES
1. Turn Bluetooth “On” in the “Settings” menu of your iPhone/iPad.
2. Open the MiBody App.
3. Press the button to enter “Settings”.
4. Press the button.
5. Press the button.
6. When the blood pressure monitor is o press and hold the
6
START
STOP
0
button until
0
is displayed on the screen.
7. On your iPhone/iPad, touch the blood pressure monitor icon to connect with the blood pressure monitor. Select the user
number you wish to pair. Touch the Done button to finish.
8. If pairing is successful [] will be displayed.
9. If pairing is unsuccessful E1 will be displayed.
10. The blood pressure monitor will automatically switch o.
11. Repeat procedure for each user and each iPhone/iPad.
Note: Each user number can only be paired with one iOS device. Results will be sent to the paired device only.
POSITIONING THE CUFF
1. Remove all accessories (watch, bracelet, etc) from your left wrist. If your physician has diagnosed you with poor
circulation in your left wrist, use your right wrist.
2. Roll or push up your sleeve to expose the skin.
3. Apply the cu to your left wrist with your palm facing up.
4. Position the top edge of the cu about 1-1.5cm from the wrist.
5. Fasten the wrist cu around your wrist, leaving no extra room between the cu and your skin. If the cu is too loose, the
measurement will not be accurate.
6. During measurement the monitor should be level with your heart.
BLOOD PRESSURE MEASUREMENT
1. After correctly positioning the cu ensuring the monitor is level with your heart press the
START
STOP
button. The monitor turns
on and the user number is displayed.
2. Press
SET
MEM
or
SET
MEM
button to change the user number.
3. Press
START
STOP
button to confirm and start the measurement.
4. Measurement is automatic and takes approximately 30 seconds. The monitor will inflate and squeeze your wrist. After
measurement the monitor will deflate and the results will be displayed on the screen.
5. If the user number is paired with an iPhone/iPad will be displayed and the data will be sent wirelessly to your mobile
device.
6. If the device is out of range or the App is closed will be displayed and the data will be saved on the monitor and
transferred next time the monitor is used.
Note: To receive data the MiBody App must be open or running in the background. The MiBody App will not receive data if it
is closed completely or Bluetooth is turned o.
Caution: Data is not saved or transferred for GuESt users.
GB
RECALLING THE RECORDS
1. Press
7
SET
MEM
button to access the memory. The monitor will display the last measurement data.
2. Press
SET
MEM
button or
SET
MEM
button to rotate the history records.
SET
MEM
to go forward;
SET
MEM
to go backward.
CAUTION
The most recent record (1) is shown first. Each new measurement is assigned to the first (1) record. All other records
are pushed back one digit (e.g., 2 becomes 3, and so on), and the last record (60) is dropped from the list.
If you want to check the other users’ measurement data. Please press the START button to turn on the monitor to
select the correct user, press the STOP button to turn o the monitor. Then press “MEM” button to access the memory.
The User Guest only can check the last record.
DELETING THE RECORDS
When you did not obtain the accurate measurement, you can clear all the measuring results by following below steps.
1. Under Memory Recalling Mode, press and hold both the
SET
MEM
button for 3 seconds.
2. When the LCD display blinking dEL ALL, press
SET
MEM
button to confirm clearing.
The LCD will display dEL dOnE, indicating that memory clearing is complete. And then it will turn o automatically.
3. If you wish to cancel clearing, press
START
STOP
to turn o the monitor.
4. When there is no memory in the monitor, if you press the
SET
MEM
button to look up history, the LCD will display ---.
TIPS FOR MEASUREMENT
It can cause inaccuracy if the measurement is taken in the following circumstances.
1. Within 1 hour after eating a meal or drinking.
2. Immediate measurement after tea, coee or smoking.
3. Within 20 minutes of taking a bath.
4. When talking or moving your fingers.
5. In a very cold environment.
6. When you need the lavatory.
7. Rest for 5 minutes before measuring
8. Wait at least 3 minutes between measurements. This allows your blood circulation to recover.
9. Try to measure under similar conditions for example, take daily measurements at approximately the same time, on the
same wrist, or as directed by a physician.
GB
ADVICE FOR USE AND CARE
To obtain the best performance, please follow below instructions.
• Put in a dry place and avoid the sunshine.
• Avoid immersing it in the water. Clean it with a dry cloth in case.
• Avoid shaking and collision.
• Avoid dusty environment and unstable temperature surrounding.
• Use the slightly damp cloth to remove the dirt.
• Avoid washing the cu.
Cleaning: Dust environment may aect the performance of the unit. Please use the soft cloth to remove the dirt before and
after use.
Please make sure the unit functions safely and it is in proper working conditions before use.
Please follow the instructions for correct replacement of interchangeable or detachable parts specified by SERVICE
PERSONNEL of MANUFACTURER as “replaceable”.
Disposal: Degraded sensors may result in inaccurate measurement while loosened electrodes may cause the monitor’s
failure to power on. Please dispose of ACCESSORIES, detachable parts, and ME EQUIPMENT according to local guidelines.
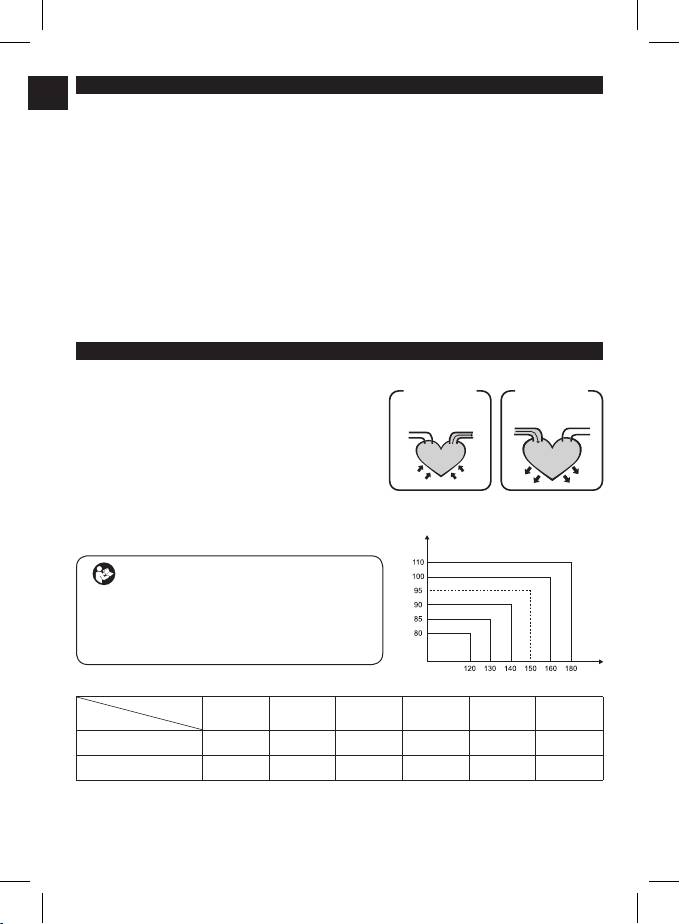
ABOUT BLOOD PRESSURE
What are systolic pressure and diastolic pressure?
Systolic
Diastolic
When ventricles contract and pump blood out of the heart, the blood
blood discharging
blood entering
pressure reaches its maximum value in the cycle, which is called
artery
vein
systolic pressure. When the ventricles relax, the blood pressure
reaches its minimum value in the cycle, which is called diastolic
press
relax
pressure.
What is the standard blood pressure classification?
The blood pressure classification published by World Health Organization (WHO) and International Society of Hypertension
(ISH) in 1999 is as follows:
Grade 3 hypertension (severe)
Grade 2 hypertension (moderate)
CAUTION
Grade 1 hypertension (mild)
Only a physician can tell your normal BP range. Please contact a
Subgroup: borderline
physician if your measuring result falls out of the range. Kindly
High-normal blood pressure
note that only a physician could tell whether your blood pressure
Normal blood pressure
Optimal blood
value has reached a dangerous point.
Diastolic blood pressure (mmHg)
pressure
Systolic blood pressure (mmHg)
Blood
Level
Optimal Normal High-normal Mild Moderate Severe
pressure (mm Hg)
SYS <120 120–129 130–139 140–149 160–179 ≥180
DIA <80 80–84 85–89 90–99 100–109 ≥110
8
GB
IRREGULAR HEARTBEAT DETECTOR
This Blood Pressure Monitor is equipped with an intelligent function of Irregular Heartbeat (IHB) Detector. During each
measurement, this equipment records the heartbeat intervals and works out the standard deviation. If the calculated value
is larger than or equal to 15, this equipment will light up the IHB symbol on the screen when displaying the measuring
result.
CAUTION
The appearance of the IHB icon indicates that a pulse irregularity consistent with an irregular heartbeat was detected
during measurement. Usually this is NOT a cause for concern. However, if the symbol appears often, we recommend
you seek medical advice. Please note that the device does not replace a cardiac examination, but serves to detect
pulse irregularities at an early stage.
QUESTIONS & ANSWERS
For a full list of MiBody frequently asked questions please visit www.uk.salterhousewares.com/mibody
Why my blood pressure varies even in one day?
1. Individual blood pressure varies during the day. It also aected by the way you tie your cu and your measurement
position, so please take the measurement under similar conditions.
2. The varies of the pressure is greater if the person take medicine.
3. Waiting at least 4-5 minutes for another measurement.
Why the blood pressure I get from the hospital is dierent from home?
The blood pressure is dierent even during 24 hour because of the weather,emotion, exercise etc, specially the “white coat”
in hospital which makes the results are higher than the ones at home. The attention you need to pay when you measure
your blood pressure at home:
• If the cu is tied properly.
• If the cu is too tight or too loose.
• If the cu is tied on the wrist.
• If you feel anxious pressured.
You had better take deep breath 2-3 times before beginning.
Advice: adjust yourself for 4-5 minutes until you calm down.
If the result is the same if measuring on the right wrist?
It is ok for both wrists, but there will be some dierent results for dierent person, so suggest you measure the same wrist
every time.
9
GB
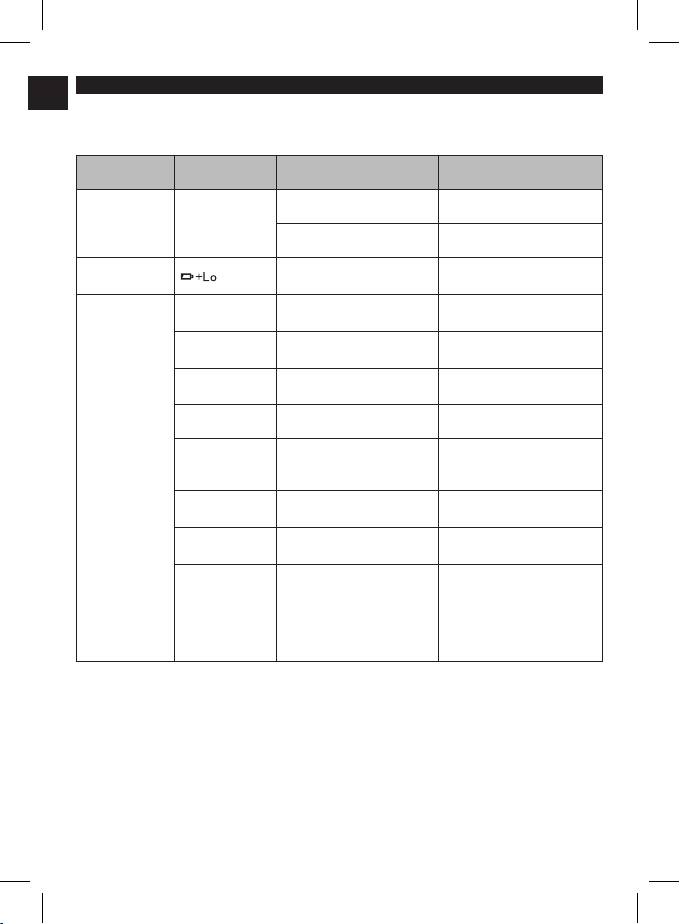
TROUBLESHOOTING
This section includes a list of error messages and frequently asked questions for problems you may encounter with
your blood pressure monitor. If the products not operating as you think it should, check here before arranging for
servicing.
PROBLEM SYMPTOM CHECK THIS REMEDY
Batteries are exhausted. Replace with new batteries
Display is dim or will
No power
not light up.
Batteries are inserted incorrectly. Insert the batteries correctly
Show on
Low batteries
Batteries are low. Replace with new batteries
the display
Make sure that phone’s Bluetooth is
E 1 shows Data communication has failed
on or within the distance range
Refasten the cu and then measure
E 2 shows The cu is very tight
again.
Relax for a moment and then
E 3 shows The pressure of the cu is excess.
measure again.
E 9 shows Product has not been activated. Reactivated
Movement can aect the
E 10 or
The monitor detected motion while
measurement. Relax for a moment
E 11 shows
measuring.
Error message
and then measure again.
The measurement process does not
Loosen the clothing on the arm and
E 20 shows
detect the pulse signal.
then measure again.
Relax for a moment and then
E 21 shows Measure incorrectly.
measure again.
Retake the measurement. If the
problem persists, contact the
EExx, shows on the
retailer or our customer service
A calibration error occurred.
display.
department for further assistance.
Refer to the warranty for contact
information and return instructions.
10
GB
SPECIFICATIONS
Power supply 2*AAA alkaline batteries
Display moder Digital LCD V.A. 36x41mm
Measurement mode Oscillographic testing mode
Pressure: 0kpa-40kpa (0mmHg-300mmHg)
Measurement range
pulse value: (40-199) beat/minute
Pressure:
5ºC-40ºC within ± 0.4kpa (3mmHg)
Accuracy
0ºC-45ºC (out of 5ºC-40ºC)
within ± 0.7kpa (5mmHg)
pulse value: ± 5%
Temperature: 5ºC to 40ºC Relative humidity ≤85%
Normal working condition
Atmospheric pressure: 86kPa to 106kPa
Temperature: -20ºC to 60ºC RH: 10% to 93%
Storage & transportation condition
Atmospheric pressure: 50kPa to 106kPa
Measurement perimeter of the wrist About 13.5cm-21.5cm
Net Weight Approx. 120g (Excluding the dry cells)
External dimensions Approx. 80x65x22mm (Excluding the cu)
Attachment 2*AAA alkaline batteries, user manual
Mode of operation Continuous operation
Degree of protection Type BF applied part
Protection against ingress of water IP20
Software version V01
Device classification Internally Powered ME Equipment
WARNING: No modification of this equipment is allowed.
11
GB
CONTACT INFORMATION
For more information about our products, please visit www.salterhousewares.com
For UK Sales and Service contact HoMedics Group Ltd, HoMedics House, Somerhill Business Park, Five Oak Green Road,
Tonbridge, Kent TN11 0GP, UK. Helpline Tel No: (01732) 360783. For Ireland, please contact Petra Brand Masters, Unit J4
Maynooth Business Campus, Maynooth, Co. Kildare, Ireland. Tel +00 353 (0) 1 6510660. e-mail sales@petrabrandmasters.ie.
www.salterhousewares.com/servicecentres
EMC GUIDANCE
Table 1 Guidance and manufacturer’s declaration – electromagnetic emissions - for all EQUIPMENT and SYSTEMS
Guidance and manufacture’s declaration – electromagnetic emission
The BPW-9154 is intended for use in the electromagnetic environment specified below. The customer or the user of the
BPW-9154 should assure that it is used in such an environment.
Emission test Compliance Electromagnetic environment - guidance
The BPW-9154 must emit electro-magnetic energy in order to
RF emissions
Group 1
perform its intended function. Nearby electronic equipment
CISPR 11
may be aected.
RF emission
Class B
CISPR 11
Harmonic emissions
Not applicable
IEC 61000-3-2
Voltage fluctuations/
flicker emissions
Not applicable
IEC 61000-3-3
12
GB
Table 2 Guidance and manufacturer’s declaration – electromagnetic immunity – for all ME EQUIPMENT and ME SYSTEMS
Guidance and manufacture’s declaration – electromagnetic emission
The BPW-9154 is intended for use in the electromagnetic environment specified below. The customer or the user of the
BPW-9154 should assure that it is used in such an environment.
Electromagnetic
Immunity test IEC 60601 test level Compliance level
environment - guidance
Electrostatic
±6 kV contact
±6 kV contact
Floors should be wood, concrete or
discharge (ESD)
±8 kV air
±8 kV air
ceramic tile. If floors are covered
IEC 61000-4-2
with synthetic material, the relative
humidity should be at least 30%.
Electrical fast
±2 kV for
N/A
transient/burst
power supply lines
IEC 61000-4-4
Surge
±1 kV line(s) to line(s)
N/A
IEC 61000-4-5
±2 kV line(s) to earth
Voltage dips, short
<5% UT
N/A
interruptions and
(>95% dip in UT )
voltage variations on
for 0.5 cycle
power supply input
40% UT
N/A
lines
(60% dip in UT )
IEC 61000-4-11
for 5 cycles
70% UT
N/A
(30% dip in UT )
for 25 cycles
<5% UT
N/A
(>95% dip in UT)
for 5 sec
Power frequency 3A/m
3A/m 3A/m Power frequency magnetic
(50Hz) magnetic
fields should be at levels
field
characteristic of a typical location
IEC 61000-4-8
in a typical commercial or hospital
environment.
NOTE UT is the a.c. mains voltage prior to application of the test level.
13
Table 4 Guidance and manufacturer’s declaration – electromagnetic immunity – for ME EQUIPMENT and ME SYSTEMS that
GB
are not LIFE-SUPPORTING
Guidance and manufacture’s declaration – electromagnetic emission
The BPW-9154 is intended for use in the electromagnetic environment specified below. The customer or user of the
BPW-9154 should assure that it’s used in such an environment.
IEC 60601
Compliance
Electromagnetic
Immunity test
test level
level
environment - guidance
Portable and mobile RF communications equipment should
be used no closer to any part of the BPW-9154, including
cables, than the recommended separation distance
calculated from the equation applicable to the frequency of
the transmitter.
Recommended separation distance
—
Conducted RF
3 Vrms
N/A
d = 1.167
√
P
IEC 61000-4-6
150 kHz to
80 MHz
—
Radiated RF
3 V/m
3 V/m
d = 1.167
√
P
80 MHz to 800 MHz
IEC 61000-4-3
80 MHz to
—
2.5 GHz
d = 2.333
√
P
800 MHz to 2.5 GHz
where
P
is the maximum output power rating of the
transmitter in watts (W) according to the transmitter
manufacture and
d
is the recommended separation
distance in metres (m).
Field strengths from fixed RF transmitters, as determined
a
by an electromagnetic site survey,
should be less than the
b
compliance level in each frequency range.
Interference may occur in the vicinity of
equipment marked with the following symbol:
NOTE 1 At 80 MHz and 800 MHz, the higher frequency range applies.
NOTE 2 These guidelines may not apply in all situations. Electromagnetic propagation is aected by absorption and
reflection from structures, objects and people.
a
Field strengths from fixed transmitters, such as base stations for radio (cellular / cordless) telephones and land
mobile radios, amateur radio, AM and FM radio broadcast cannot be predicted theoretically with accuracy. To assess
the electromagnetic environment due to fixed RF transmitters, an electromagnetic site survey should be considered.
If the measured field strength in the location in which the BPW-9154 is used exceeds the applicable RF compliance
level above, the BPW-9154 should be observed to verify normal operation. If abnormal performance is observed,
additional measures may be necessary, such as re-orienting or relocating the BPW-9154.
b
Over the frequency range 150 kHz to 80 MHz, field strengths should be less than 3V/m.
14
GB
Table 6 Recommended separation distances between portable and mobile RF communications equipment and the
EQUIPMENT or SYSTEM – for ME EQUIPMENT or ME SYSTEM that are not LIFE-SUPPORTING
Recommended separation distances
between portable and mobile RF communications equipment at the BPW-9154.
The BPW-9154 is intended for use in an electromagnetic environment in which radiated RF disturbances are
controlled. The customer or the user of the BPW-9154 can help prevent electromagnetic interference by maintaining a
minimum distance between portable and mobile RF communications equipment (transmittters) and the BPW-9154 as
recommended below, according to the maximum output power of the communications equipment.
Separation distance according to frequency of transmitter (m)
Rated maximum output
power of transmitter
150 kHz to 80 MHz
80 MHz to 800 MHz
800 MHz to 2.5 GHz
(W)
—
—
—
d = 1.167
√
P
d = 1.167
√
P
d = 2.333
√
P
0.01 N/A 0.117
0.233
0.1 N/A 0.369
0.738
1 N/A 1.167
2.333
10
N/A 3.690
7.377
100
N/A 11.67
23.33
For transmitters rated at a maximum output power not listed above, the recommended separation distance
d
in metres
(m) can be determined using the equation applicable to the frequency of the transmitter, where
P
is the maximum
output power rating of the transmitter in watts (W) according to the transmitter manufacturer.
NOTE 1 At 80MHz and 800MHz, the separation distance for the higher frequency range applies.
NOTE 4 These guidelines may not apply in all situations. Electromagnetic propagation is aected by absorption and
reflection from structures, objects and people.
15
MiBODY
F
Salter MiBody est une gamme d’appareils connectés qui facilitent la gestion du poids et de la santé. Les mesures sont
envoyées via une liaison sans fil vers votre appareil mobile et peuvent être visionnées avec l’appli MiBody que vous pouvez
télécharger gratuitement. Il est ainsi possible de suivre la courbe d’évolution et les précisions ainsi que des conseils de
régime alimentaire accompagnant les résultats. Ceux-ci sont stockés uniquement sur votre appareil mobile personnel et
demeurent confidentiels, à moins que vous choisissiez de les partager avec d’autres.
MiBaby doit être utilisé en complément et non en substitution des conseils prodigués par les professionnels de la santé. Si
votre condition physique vous préoccupe, demandez conseil à un personnel médical qualifié.
INDICATIONS D’UTILISATION
Le moniteur de pression artérielle Salter MiBody est conçu pour mesurer la pression artérielle et le rythme cardiaque via la
circonférence du poignet allant de 13,5 cm à 21,5 cm (environ 5 à 8,5 pouces).
Il est destiné à une utilisation en intérieur par des adultes uniquement.
CONTRE-INDICATIONS
Ce dispositif est contre-indiqué chez les femmes enceintes et les enfants de moins de 18 ans.
Cet appareil ne peut pas être considéré comme un dispositif de diagnostic. Contactez votre médecin si les valeurs indiquent
une hypertension.
PRINCIPE DE MESURE
Ce produit utilise la technique oscillométrique de mesure de la pression artérielle. Avant chaque mesure, l’appareil
détermine une « pression zéro » équivalant à la pression d’air. Par la suite, il commence le gonflage du brassard, pendant
ce temps, l’appareil détecte les oscillations de pression générées à chaque battement du cœur, cela détermine la pression
systolique et diastolique, mais également la fréquence du pouls. L’appareil compare également les intervalles de temps les
plus longs et les plus courts entre les ondes de pulsation détectées pour déterminer l’intervalle de récurrence et calculer
l’écart type. L’appareil achera un signal d’alerte avec la mesure prise pour indiquer la détection d’un rythme cardiaque
irrégulier si la diérence des intervalles de temps est supérieure.
EXPLICATION WEEE
Le symbole indique que le produit ne doit pas être éliminé avec les autres déchets ménagers dans toute l’Union Européenne.
L’élimination incontrôlée des déchets pouvant porter préjudice à l’environnement ou à la santé humaine, veuillez le recycler de façon
responsable. Vous favoriserez ainsi la réutilisation durable des ressources matérielles. Pour renvoyer votre appareil usagé, prière
d’utiliser le système de renvoi et collection ou contacter le revendeur où le produit a été acheté. Ils peuvent se débarrasser de ce produit afin
qu’il soir recyclé tout en respectant l’environnement.
DIRECTIVE RELATI VE AUX PILES ET AUX ACC UMULATE URS
Ce symbole indique que les piles et les accumulateurs ne doivent pas être jetés avec les déchets ménagers car ils contiennent des
substances pouvant être préjudiciables pour la santé humaine et l’environnement. Veuillez utiliser les points de collecte mis à
disposition pour vous débarrasser des piles et accumulateurs usagés.
GARANTIE
Ce produit est uniquement destiné à un usage domestique. Salter s’engage à réparer ou remplacer gratuitement le produit, ou toute pièce de ce
produit, dans les 15 ans suivant la date d’achat s’il est prouvé que la défaillance provient d’une mauvaise qualité de fabrication ou de matériaux
défectueux. Cette garantie couvre les parties mobiles qui aectent le fonctionnement de l’appareil. Elle ne couvre pas toute détérioration
esthétique provoquée par l’usure normale ou tout dommage provoqué par accident ou une mauvaise utilisation. Le fait d’ouvrir ou de démonter
l’appareil ou ses composants annulera la garantie. Les retours sous garantie doivent être accompagnés du justificatif d’achat et expédiés en port
payé à Salter (ou à un agent Salter agréé local, si en dehors du R.-U.) Il est conseillé de bien emballer l’appareil afin de ne pas l’endommager
durant le transport. Cet engagement vient en complément des droits statutaires du consommateur et n’aecte ces droits en aucun cas. En cas de
problème ou pour toute question, contactez : Distec International, Z.I.”Les Portes de l’Europe”, Rue Maurice Faure 1, 1400 Nivelles, Belgium. Tel.
+32-67-874820 e-mail support@distec.be.
www.salterhousewares.com/servicecentres
16
INFORMATIONS DE SÉCURITÉ
F
Les symboles suivants doivent se trouver dans le mode d’emploi, sur l’étiquetage ou sur tous autres éléments. Ils
représentent les normes d’utilisation à respecter.
Symbole « LE MANUEL DOIT ÊTRE LU » Logo Bluethooth
Symbole « CONFORME AUX NORMES
Symbole « PIÈCES APPLIQUÉES DE
0120
MDD 93/42/CEE »
TYPE BF »
Symbole « PROTECTION DE
L’ENVIRONNEMENT — les déchets
électriques ne doivent pas être jetés
avec les ordures ménagères. Veuillez
Symbole « FABRICANT »
recycler là où les installations existent.
Contactez les autorités locales ou votre
revendeur pour des conseils en matière
de recyclage »
Symbole « NUMÉRO DE SÉRIE » Symbole « COURANT CONTINU »
ATTENTION
• Veuillez lire attentivement ce mode d’emploi avant toute utilisation.
• Cet appareil est réservé à un usage par des personnes adultes.
• Cet appareil est destiné à la prise de mesure non invasive et la surveillance de la pression artérielle. Il n’est pas
prévu pour une utilisation sur les extrémités autres que les poignets ou pour toute autre fonction dans le but
d’obtenir une mesure de la pression artérielle.
• Ne pas confondre autosurveillance et autodiagnostic. Cet appareil vous permet de surveiller votre pression
artérielle. Veuillez commencer ou terminer tout traitement médical en ne vous basant uniquement que sur les
conseils de traitement du médecin.
• Si vous prenez des médicaments, consultez votre médecin afin de déterminer le moment le plus approprié pour vos
mesures. Ne jamais modifier un traitement prescrit sans consulter votre médecin.
• Cet appareil n’est pas adapté à une surveillance continue pendant des opérations ou des urgences médicales.
• Si la pression au niveau du brassard dépasse les 40 kPa (300 mmHg), l’appareil se dégonflera automatiquement.
Dans le cas où le brassard ne se dégonflerait pas lorsque la pression dépasserait les 40 kPa (300 mmHg), détachez
le brassard du poignet et appuyez sur le bouton START/STOP (DÉMARRER/ARRÊTER) pour arrêter le gonflage.
• Ne pas utiliser le moniteur dans des conditions de champs électromagnétiques puissants (p. ex. : équipement
médical RF) qui émettent un signal d’interférence ou un signal rapide électrique transitoire/en rafale.
• La température maximale que la pièce appliquée peut atteindre est 42,5 °C lorsque la température ambiante est de
40 °C.
• L’appareil n’est pas classé en catégorie AP/APG. Il ne convient pas à une utilisation en présence d’un mélange
anesthésique inflammable avec l’air (l’oxygène ou l’oxyde nitreux).
• Veuillez garder l’appareil hors de portée des bébés ou des enfants, puisqu’il est possible d’inhaler ou d’ingérer de
petites pièces pouvant entraîner la mort.
• Veuillez utiliser les ACCESSOIRES et les pièces détachables spécifiés/autorisés par le FABRICANT. Dans le cas
contraire, cela pourrait endommager l’appareil voire causer un danger pour l’utilisateur/le patient.
17
GUIDE D’INFORMATIONS
F
SYMBOLE DESCRIPTION EXPLICATION
Pression artérielle systolique
Pression artérielle diastolique
Pouls battement/minute
Batterie faible Batterie faible et veuillez remplacer les piles
Appareil Unité de mesure de la pression artérielle
Temps Heure:Minute (jours/mois/année)
Détecteur IHB Détecteur de rythme cardiaque irrégulier
Bluetooth Connexion Bluetooth réussie
Erreur Erreur
Identifiant utilisateur Identifiant utilisateur sélectionné
Mémoire Rappel des mesures enregistrées
18
INSTALLER ET REMPLACER LES PILES
F
1. Ouvrir le compartiment à piles.
2. Insérer les piles en tenant compte de la polarité indiquée.
(Toujours utiliser les piles autorisées/spécifiées : deux piles alcalines AAA).
3. Fermer le compartiment des piles.
Remplacer les piles dans les circonstances suivantes :
• si l’écran LCD l’indique,
• si la luminosité de l’écran LCD faiblit,
• lorsque vous allumez le moniteur et que l’écran LCD ne s’allume pas.
ATTENTION
• Retirez les piles en cas d’inutilisation prolongée de l’appareil.
• Les piles usagées sont nocives pour l’environnement. Ne les pas jetez avec les ordures ménagères.
• Jetez les piles usagées de l’appareil selon vos directives locales de recyclage.
RÉGLAGE DE LA DATE ET DE L’HEURE
1. Lorsque l’écran est éteint, appuyer et maintenir enfoncé le bouton
19
SET
MEM
pendant 3 secondes.
2. Les chires des heures clignoteront. Appuyez sur le bouton
SET
MEM
pour modifier les heures.
3. Appuyer sur
SET
MEM
pour confirmer le réglage.
4. Les chires des minutes clignoteront. Appuyez sur le bouton
SET
MEM
pour modifier les minutes.
5. Appuyer sur
SET
MEM
pour confirmer le réglage.
6. Les chires des mois clignoteront. Appuyez sur le bouton
SET
MEM
pour modifier les mois.
7. Appuyer sur
SET
MEM
pour confirmer le réglage.
8. Les chires du jour clignoteront. Appuyez sur le bouton
SET
MEM
pour modifier les jours.
9. Appuyer sur
SET
MEM
pour confirmer le réglage.
10. Les chires des années clignoteront. Appuyez sur le bouton
SET
MEM
pour modifier les années.
11. Appuyer sur
SET
MEM
pour confirmer le réglage.
12. dOnE s’achera par la suite et l’écran s’éteindra.
Remarque : pour mettre à jour ou modifier la date et l’heure, répétez la procédure ci-dessus en eectuant les modifications
nécessaires.
APPLI MiBODY
Avant d’utiliser votre appareil pour la première fois :
1. Téléchargez et installez l’application Salter Mibody à partir de l’App Store. Lancez la recherche en utilisant les mots-clés
« Salter » ou « MiBody ».
2. Activez le Bluetooth dans le menu « Réglages » de votre iPhone/iPad.
3. Ouvrez l’application MiBody et suivez les instructions qui s’achent pour paramétrer votre compte utilisateur.
SYNCHRONISATION DES APPAREILS MOBILES
F
1. Activez le Bluetooth dans le menu « Réglages » de votre iPhone/iPad.
2. Ouvrez l’appli MiBody.
3. Appuyez sur le bouton pour saisir les paramètres « Réglages ».
4. Appuyez sur le bouton .
5. Appuyez sur le bouton .
6. Lorsque le moniteur de pression artérielle est éteint, appuyez et maintenez enfoncé le bouton
20
START
STOP
0
jusqu’à ce que
0
s’ache sur l’écran.
7. Sur votre iPhone/iPad, touchez l’icône du moniteur de pression artérielle pour vous connecter au moniteur de pression
artérielle. Sélectionnez le numéro d’utilisateur que vous souhaitez appairer. Appuyez sur le bouton Done pour terminer.
8. Si la synchronisation a réussi, [] s’ache.
9. Si la synchronisation n’a pas réussi, E1 s’ache.
10. Le moniteur de pression artérielle s’éteindra automatiquement.
11. Répétez la procédure pour chaque utilisateur et chaque iPhone/iPad.
Remarque : un numéro d’utilisateur ne peut être associé qu’à un seul appareil iOS. Les résultats seront envoyés
exclusivement vers l’appareil relié.
POSITIONNER LE BRASSARD
1. Retirez tous les accessoires (montre, bracelet, etc.) de votre poignet gauche. Si votre médecin vous a diagnostiqué une
mauvaise circulation dans votre poignet gauche, utilisez alors le droit.
2. Enroulez ou soulevez votre manche pour laisser apparaître votre peau.
3. Positionnez le brassard autour de votre poignet gauche avec la paume de votre main vers le haut.
4. Positionner le dessus du brassard à environ 1-1,5 cm à partir du poignet.
5. Fixez le brassard autour de votre poignet, en veillant à ne laisser aucun espace entre le brassard et votre peau. Si le
brassard n’est pas assez serré, la mesure ne sera pas exacte.
6. Lors de la mesure, le moniteur doit se situer au niveau de votre cœur.
MESURE DE LA PRESSION ARTÉRIELLE
1. Après avoir correctement positionné le brassard en vous assurant que le moniteur soit placé au niveau de votre cœur,
appuyez sur le bouton
START
STOP
. Le moniteur s’allume et le numéro d’utilisateur s’ache.
2. Appuyez sur le bouton
SET
MEM
ou
SET
MEM
pour changer le numéro d’utilisateur.
3. Appuyez sur le bouton
START
STOP
pour confirmer et lancer la mesure.
4. La mesure est automatique et prend environ 30 secondes. Le moniteur se gonflera et serrera votre poignet. Une fois la
mesure eectuée, le moniteur se dégonflera et les résultats s’acheront à l’écran.
5. Si le numéro d’utilisateur est associé à un iPhone/iPad, s’ache et les données sont envoyées vers votre appareil
mobile via une connexion sans fil.
6. Si l’appareil se trouve hors de portée ou si l’application est fermée, s’ache et les données sont alors
mémorisées sur le moniteur et seront transférées lors de sa prochaine utilisation.
Remarque : pour recevoir des données, l’application MiBody doit être ouverte ou lancée en arrière-plan. L’application
MiBody ne pourra pas recevoir de données si elle est complètement fermée ou si le Bluetooth est éteint.
Attention : les données ne sont pas enregistrées ou transférées pour les utilisateurs GuESt.
RAPPEL DES MESURES ENREGISTRÉES
F
1. Appuyez sur le bouton
21
SET
MEM
pour accéder à la mémoire. L’écran achera les dernières données mesurées.
2. Appuyez sur le bouton
SET
MEM
ou le bouton
SET
MEM
pour faire défiler les mesures enregistrées.
SET
MEM
tpour avancer,
SET
MEM
pour revenir en arrière.
ATTENTION
Le résultat le plus récent (1) s’ache en premier. Chaque nouvelle prise de mesure devient le premier (1) résultat.
Tous les autres résultats sont décalés d’un chire (p. ex. : 2 devient 3 et ainsi de suite) et le dernier résultat est
supprimé de la liste.
Si vous souhaitez vérifier les données de mesure d’autres utilisateurs. Veuillez appuyer sur le bouton START pour
allumer l’écran et sélectionner l’utilisateur de votre choix, appuyez sur le bouton STOP pour éteindre le moniteur.
Appuyez ensuite sur la touche « MEM » pour accéder à la mémoire.
L’utilisateur Guest ne peut consulter que le dernier enregistrement.
SUPPRIMER DES MESURES ENREGISTRÉES
Si vous n’avez pas obtenu une mesure convenable, vous pouvez eacer tous les résultats de mesure en suivant les étapes
ci-dessous.
1. Dans le mode Rappel de mémoire, appuyez et maintenez enfoncé le bouton
SET
MEM
pendant 3 secondes.
2. Lorsque dEL ALL clignote sur l’écran LCD, appuyez sur le bouton
SET
MEM
pour confirmer la suppression.
L’écran LCD achera dEL dOnE, ce qui signifie que la suppression de la mémoire est terminée. Il s’éteindra par la suite
automatiquement.
3. Si vous souhaitez annuler la suppression, appuyez sur le bouton
START
STOP
pour éteindre le moniteur.
4. Quand il n’y a aucun enregistrement dans le moniteur, si vous appuyez sur la touche
SET
MEM
pour rechercher les mesures
enregistrées, l’écran LCD achera ---.
CONSEILS POUR PRENDRE LA MESURE
Des inexactitudes peuvent se présenter si la mesure est prise dans les circonstances suivantes.
1. Une fois après avoir mangé ou bu.
2. Prendre la mesure après avoir immédiatement, fumé, bu un thé ou un café.
3. Dans les 20 minutes après la prise de bain.
4. Si vous parlez ou bougez vos doigts.
5. Dans une pièce très froide.
6. Si vous avez besoin d’aller aux toilettes.
7. Reposez-vous pendant 5 minutes avant de prendre la mesure.
8. Attendez au moins 3 minutes entre chaque mesure. Cela permet à votre circulation sanguine de récupérer.
9. Essayez de mesurer dans des conditions similaires, par exemple, prenez vos mesures tous les jours à peu près au même
moment, sur le même poignet, ou selon les directives de votre médecin.
