Brother PE-750D: Using the Memory Function
Using the Memory Function: Brother PE-750D

2
— — — — — — — — — — — — — — — — — — — — — — — — — — — — — — — — — — — — — — — — — — — — — — — — — — —
Using the Memory Function
Embroidery data precautions
Observe the following precautions when using embroidery data other than that created and saved in this machine.
CAUTION
■
Types of Embroidery Data that can be Used
• Only .pes and .dst embroidery data files can be used with this machine. Using data other than that saved
using our data design systems or sewing machines may cause the embroidery machine to malfunction.
■
Computers and Operating Systems with the Following Specifications can be Used
• Compatible models:
IBM PC with a USB port as standard equipment
IBM PC-compatible computer equipped with a USB port as standard equipment
• Compatible operating systems:
Microsoft Windows Me/2000/XP
(Windows 98SE requires a driver. Download the driver from our web site (www.brother.com).)
■
Precautions on Using the Computer to Create and Save Data
• If the file name of embroidery data cannot be identified, for example, because the name contains special
characters, the file is not displayed. If this occurs, change the name of the file. We recommend using the
26 letters of the alphabet (uppercase and lowercase), the numbers 0 through 9, “-”, and “_”.
• If .pes embroidery data larger than 18 cm (H)
×
13 cm (W) is selected, a message appears asking if you
wish to rotate the pattern 90 degrees.
Embroidery data larger than 18 cm (H)
×
13 cm (W), even after being rotated 90 degrees, cannot be used
(All designs must be within the 18 cm (H)
×
13 cm (W) design field size.)
• .pes files saved with the number of stitches, the number of colors and the number of combined patterns
exceeding the specified limits cannot be displayed. Use one of our original data design systems to edit the
embroidery pattern so that it meets the specifications.
• Do not create folders in “Removable Disk” on a computer. If embroidery data is stored in a folder in
“Removable Disk”, that embroidery data cannot be retrieved by the machine.
• Even if the embroidery unit is not attached, the machine will manage embroidery data.
■
Tajima (.dst) Embroidery Data
• .dst data is displayed in the pattern list screen by file name (the actual image cannot be displayed). Only
the first eight characters of the file name can be displayed.
• Since Tajima (.dst) data does not contain specific thread color information, it is displayed with our default
thread color sequence. Check the preview and change the thread colors as desired.
■
Trademarks
• IBM is a registered trademark or a trademark of International Business Machines Corporation.
• Microsoft and Windows are registered trademarks or trademarks of Microsoft Corporation.
Each company whose software title is mentioned in this manual has a Software License Agreement specific
to its proprietary programs.
All other brands and product names mentioned in this manual are registered trademarks of their respective
companies. However, the explanations for markings such as
®
and
™
are not clearly described within the text.
●
When using embroidery data other than our original patterns, the thread or needle may break
when sewing with a stitch density that is too fine or when sewing three or more overlapping
stitches. In that case, use one of our original data design systems to edit the embroidery data.
3
— — — — — — — — — — — — — — — — — — — — — — — — — — — — — — — — — — — — — — — — — — — — — — — — — — — —
Engl ish
Retrieving embroidery
patterns from the computer
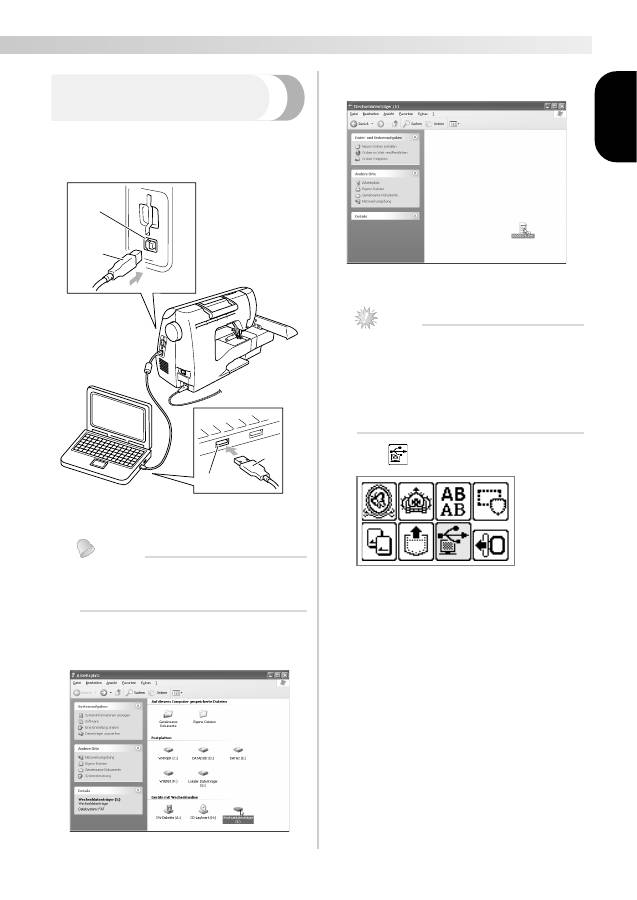
a
Plug the USB cable connectors into the corre-
sponding USB port connectors on the com-
puter and on the machine.
a
USB port connector for computer
b
USB cable connector
Memo
z
The USB cable can be plugged into the USB
port connectors on the computer and
machine whether or not they are turned on.
b
The “Removable Disk” icon appears in “My
Computer” on the computer.
c
Copy the pattern data to “Removable Disk”.
X
Pattern data in “Removable Disk” is written
to the machine.
Note
z
While data is being written, do not
disconnect the USB cable.
z
Do not create folders within “Removable
Disk”. Since folders are not displayed, pattern
data within folders cannot be retrieved.
z
While the machine is sewing, do not write
data to or delete data from “Removable Disk”.
d
Press .
X
The saved patterns are displayed.
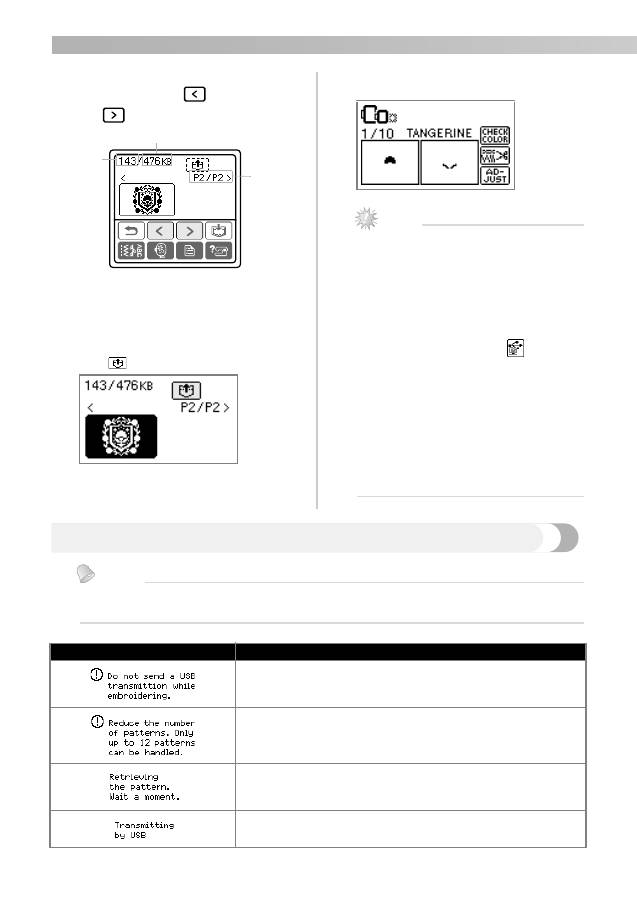
a
b
a
b
4
— — — — — — — — — — — — — — — — — — — — — — — — — — — — — — — — — — — — — — — — — — — — — — — — — — —
e
Select the pattern you wish to retrieve.
Switch screens using
(Previous page key)
and
(Next page key).
a
Total amount of memory used
b
Total amount of memory space
c
Number of the currently displayed page from the total
number of pages
X
The selected pattern is shown in reverse
highlighting.
f
Press .
X
The saved pattern is retrieved.
X
The embroidery screen appears, and you
can embroider the retrieved pattern.
g
Adjust the pattern as desired, and then begin
embroidering.
Note
z
If there are 13 or more patterns saved in
“Removable Disk”, the patterns cannot be
displayed. When the message “Reduce the
number of patterns. Only up to 12 patterns
can be handled.” appears, delete patterns
from “Removable Disk” so that it contains
no more than 12 patterns. Then, close the
error message, repeat the procedure starting
from step
d
and then press
to retrieve
the pattern.
z
If patterns copied to “Removable Disk” are
not saved in the machine's memory, their
data is lost when the machine is turned off.
In order to retrieving patterns directly from
the machine the next time that they are
needed, save the data in the machine's
memory before turning off the machine. For
details, refer to “Storing patterns” of the
Operation Manual.
Error messages
Memo
z
This manual describes the error messages concerning the USB connection. For details on other error
messages, refer to the Operation Manual.
c
b
a
Error Message
Probable Cause
While embroidering, data is written to the “Removable Disk” in the
connected computer or data is deleted from the “Removable Disk”.
When 13 or more patterns are in “Removable Disk”, a pattern was
being retrieved.
Retrieving the pattern
Transmitting by USB
Оглавление
- Introduction
- Using the Memory Function
- Upgrading Your Machine’s Software
- Einführung
- Verwenden der Speicherfunktion
- Aktualisieren der Maschinensoftware
- Introduction
- Utilisation de la fonction de mise en mémoire
- Mise à niveau du logiciel de la machine à coudre
- Inleiding
- Gebruik van de geheugenfunctie
- Upgrade van de software van uw machine
- Introduzione
- Utilizzo della Funzione Memoria
- Aggiornamento del software della macchina da cucire
- Introducción
- Uso de la función de Memoria
- Actualización del software de la máquina’
- Введение
- Использование функции памяти
- Обновление программного обеспечения машины
