Brother RSR-55: ВНИМАНИЕ –
ВНИМАНИЕ –: Brother RSR-55

«УКАЗАНИЯ ПО ТЕХНИКЕ БЕЗОПАСНОСТИ»
При пользовании швейной машиной всегда необходимо соблюдать рекомендации по технике безопасности,
включающие следующие положения:
“Перед началом работы на машине внимательно изучите настоящее руководство.”
ВНИМАНИЕ –
Для того, чтобы уменьшить риск поражения электрическим током:
1. Никогда не оставляйте включенную в сеть машину без присмотра. После окончания работ на машине, а также
перед чисткой обязательно отключайте машину от сети.
2. Всегда отключайте машину от сети перед заменой осветительной лампочки.
Для замены используйте однотипную лампочку мощностью 5 Вт для сети с напряжением 12 В. (для моделей
STAR 240E, STAR 230E)
Для замены используйте однотипную лампочку мощностью 15 Вт. (для моделей PS-57, PS-55,
STAR-50,
RSR-55, XRX-55
, PS-53)
ПРЕДУПРЕЖДЕНИЕ –
Для того, чтобы снизить риск ожогов, возгорания, поражения
электрическим током или получения травмы:
1. Не допускайте использования машины в качестве игрушки. Будьте особо внимательны, когда машина
используется детьми, или когда при шитье они находятся в непосредственной близости от машины.
2. Используйте машину только для выполнения операций, описанных в настоящем руководстве. Используйте
только принадлежности, рекомендованные изготовителем и описанные в настоящем руководстве.
3. Не допускается работа на машине при поврежденных шнуре питания или штепселе, при ненормальном
функционировании машины, если машина падала откуда-либо или имеет повреждения, если она попадала в
воду. Для проверки, ремонта, электрических или механических регулировок машины следует обратиться в
ближайший офис соответствующего уполномоченного дилера или в пункт технического обслуживания.
4. Не допускается работа на машине с закрытыми вентиляционными отверстиями. Необходимо исключить
попадание и скапливание в вентиляционных отверстиях машины и ножного контроллера пыли, пуха и кусочков
ткани.
5. Не вставляйте и не опускайте внутрь машины через отверстия какие-либо посторонние предметы.
6. Не используйте машину вне помещения.
7. Не включайте машину в помещении, в котором производилось распыление аэрозолей или имеется повышенная
концентрация кислорода.
8. Для отключения машины от сети поверните главный выключатель в положение “O” (выключено), после чего
отсоедините штепсель от розетки.
9. При отсоединении штепселя от розетки не тяните за шнур. Возьмитесь непосредственно за штепсель, а не за
шнур, и потяните ее на себя.
10. Оберегайте пальцы рук от движущихся деталей машины. Будьте особо осторожны в зоне движения швейной
иглы.
11. Используйте только рекомендованную игольную пластину. Применение неподходящей пластины может привести
к поломке швейной иглы.
12. Не допускается применение погнутых игл.
13. Не допускается принудительное вытягивание или проталкивание ткани во время строчки. Это может вызвать
деформацию иглы и ее поломку.
14. Перед выполнением любых операций регулировки в зоне иглы (таких, например, как заправка ниток в иглу,
замена иглы, заправки нитки со шпульки, замена нажимной лапки) устанавливайте главный выключатель в
положение “O”(выключено).
15. Обязательно отключайте машину от сети питания перед снятием защитных крышек, смазкой узлов машины или
проведением прочих регулировок и операций обслуживания, описанных в данном руководстве.
16. Данная машина не предназначена для использования без присмотра детьми или больными людьми.
17. Следует внимательно присматривать за маленькими детьми и следить за тем, чтобы они не играли со швейной
машиной.
“СОХРАНИТЕ НАСТОЯЩЕЕ РУКОВОДСТВО” “Данная машина предназначена только для бытового использования.”

FOR USERS IN UK, EIRE, MALTA AND CYPRUS ONLY.
If this machine is fitted with a 3 pin non-rewireable BS plug then please read the following.
IMPORTANT (in the United Kingdom)
Main supply (AC 230/240V~, 50Hz)
DO NOT cut off the main plug from equipment. If the plug
fitted is not suitable for the power point in your home or the
cable is too short to reach a power point, then obtain an
appropriate safety approved extension lead or consult your
dealer.
BE SURE to replace the fuse only with an identical approved
type, as originally fitted and to replace the fuse cover.
If none the less the main plug is cut off be sure to remove the
fuse and dispose of the plug immediately, to avoid a possible
shock hazard by inadvertent connection to the main supply.
IMPORTANT (in the other countries)
If the available socket outlet is not suitable for the plug
supplied with this equipment, it should be cut off and an
appropriate three pin plug fitted. With alternative plugs an
approved fuse must be fitted in the plug.
NOTE: The plug severed from the main leads must be
destroyed as a plug with bared flexible cords is hazardous if
engaged in a live socket outlet. In the event of replacing the
plug fuse, use a fuse approved by ASTA to BS 1362, i.e.
carrying the
ASA
mark, rating as marked on plug.
Always replace the fuse cover. Never use plugs with the fuse
cover omitted.
WARNING: DO NOT CONNECT EITHER WIRE TO THE
EARTH TERMINAL WHICH IS MARKED WITH
THE LETTER ‘E’, BY THE EARTH SYMBOL
OR COL-
OURED GREEN OR YELLOW.
The wires in this main lead are coloured in accordance with
the following code:
Blue
Neutral
Brown
Live
As the colours of the wiring in the main lead of this appliance
may not correspond with the coloured markings identifying
the terminals in your plug, proceed as follows:
The wire which is coloured blue must be connected to the
terminal which is marked with the letter ‘N’ or coloured black
or blue.
The wire which is coloured brown must be connected to the
terminal which is marked with the letter ‘L’ or coloured red or
brown.
Connecting Plugs and Main Power / Sewing Light Switch
1
2
( Model STAR 240E, STAR 230E )

1. Connect the power cord or three-prong plug into the
machine.
2. Connect the electrical supply plug into a wall outlet.
- When leaving the machine unattended, the main switch of
the machine should be switched off or the plug must be
removed from the socket outlet.
Turn on or off the switch for the main power and sew-light.
1
Turn on
2
Turn off
- When servicing the machine, or when removing covers or
changing bulbs, the machine or the electrical set must
unplugged.
1
2
(Model PS-57, PS-55, STAR-50, RSR-55, XRX-55, PS-53)

PLEASE READ BEFORE USING THIS MACHINE
For safe operation
1. Be sure to keep your eye on the needle while sewing. Do not touch the balance wheel, thread take-up, needle, or other
moving parts.
2. Remember to turn off the power switch and unplug the cord when:
• Operation is completed
• Replacing or removing the needle or any other parts
• A power failure occurs during use
• Maintaining the machine
• Leaving the machine unattended.
3. Do not store anything on the foot controller.
4. Plug the machine directly into the wall. Do not use extension cords.
For a longer service life
1. When storing this machine, avoid direct sunlight and high humidity locations. Do not use or store the machine near a space
heater, iron, halogen lamp, or other hot objects.
2. Use only neutral soaps or detergents to clean the case. Benzene, thinner, and scouring powders can damage the case
and machine, and should never be used.
3. Do not drop or hit the machine.
4. Always consult the operation manual when replacing or installing any assemblies, the presser feet, needle, or other parts
to assure correct installation.
For repair or adjustment
In the event a malfunction occurs or adjustment is required, first follow the troubleshooting table in the back of the operation
manual to inspect and adjust the machine yourself. If the problem persists, please consult your local authorized dealer.

BITTE VOR BENUTZUNG DIESER MASCHINE LESEN
Für sicheren Betrieb:
1. Behalten Sie während des Nähens immer die Nadel im Auge. Handrad, Fadenhebel, Nadel und andere bewegliche Teile dürfen nicht
berührt werden.
2. Denken Sie daran, den Netzschalter auszuschalten und den Stecker aus der Steckdose zu ziehen, wenn:
• Sie mit dem Nähen fertig sind
• die Nadel oder andere Teile ausgewechselt werden müssen
• während der Benutzung ein Stromausfall auftritt
• die Maschine gewartet wird
• Sie sich von der Maschine entfernen
3. Stellen Sie keine Gegenstände auf den Fußanlasser.
4. Schließen Sie die Maschine direkt an einer in der Nähe befindlichen Netzsteckdose an. Benutzen Sie keine Verlängerungskabel.
Für eine möglichst lange Lebensdauer Ihrer Maschine:
1. Bewahren Sie diese Maschine an einem Ort auf, der vor direktem Sonnenlicht und hoher Luftfeuchtigkeit geschützt ist. Lagern Sie das
Gerät nicht neben einem Heizkörper, einem heißen Bügeleisen oder anderen heißen Gegenständen.
2. Benutzen Sie zur Reinigung des Gehäuses nur neutrale Seifen und Reinigungsmittel. Benzin, Verdünner und Scheuerpulver könnten
das Gehäuse und die Maschine beschädigen und sollten daher nie verwendet werden.
3. Setzen Sie die Maschine keinen starken Erschütterungen aus.
4. Lesen Sie immer zuerst das entsprechende Kapitel dieser Bedienungsanleitung, bevor Sie Zubehör, Nähfüße und sonstige Teile
auswechseln oder installieren, um eine korrekte Installation zu gewährleisten.
Für Reparaturen und Einstellungen:
Sollte eine Funktionsstörung auftreten oder eine spezielle Einstellung erforderlich sein, versuchen Sie zuerst, mit Hilfe der Fehlertabelle
im hinteren Teil dieser Bedienungsanleitung den Fehler selbst zu ermitteln und die entsprechenden Einstellungen vorzunehmen. Sofern
die Störung sich nicht beheben lässt, wenden Sie sich bitte an ein autorisiertes Kundendienstzentrum in Ihrer Nähe.

ПОЖАЛУЙСТА, ПРОЧИТАЙТЕ ПЕРЕД НАЧАЛОМ ЭКСПЛУАТАЦИИ МАШИНЫ
В целях безопасности
1. Всегда следите за иглой во время шитья. Не прикасайтесь к маховику, механизму подтягивания нитки, игле или
иным движущимся деталям машины.
2. Помните о необходимости выключить выключатель питания и отсоединить шнур питания от розетки в следующих
случаях:
• Когда Вы закончили работу на машине
• Когда Вы меняете или снимаете иглу или иные детали
• Когда произошел сбой питания во время работы машины
• Когда Вы проводите обслуживание машины
• Когда Вы оставляете машину без присмотра
3. Запрещается хранить любые предметы на ножном контроллере.
4. Подключайте шнур питания непосредственно к стенной розетке. Не пользуйтесь удлинителями.
Для продления срока службы машины
1. При хранении машины избегайте мест, подверженных воздействию прямых солнечных лучей и повышенной
влажности. Не храните машину рядом с обогревателями, галогенными лампами или иными горячими предметами.
2. Для чистки корпуса машины используйте только нейтральные мыльные или моющие средства. Запрещается
применение бензола, растворителя, или чистящих порошков - они могут повредить корпус машины.
3. Не роняйте машину и избегайте механических ударов.
4. При замене или установке любых узлов машины, нажимной лапки, иглы или иных деталей всегда обращайтесь
к инструкциям руководства по эксплуатации для обеспечения правильности установки.
Для проведения ремонтных работ или регулировок
В случае возникновения неисправности или в случае необходимости проведения регулировок сначала обратитесь
к таблице возможных неисправностей в конце руководства по эксплуатации для проведения самостоятельного
осмотра и регулировки. Если неисправность не устраняется, обратитесь к Вашему уполномоченному дилеру.

KNOWING YOUR SEWING MACHINE
PRINCIPAL PARTS ......................................................... 1
ACCESSORIES ............................................................... 5
Optional Accessories .............................................. 5
OPERATING YOUR SEWING MACHINE ....................... 7
Connecting Plugs ................................................... 7
Main Power/Sewing Light Switch ........................... 9
Foot Controller ...................................................... 10
Checking the Needle ............................................ 11
Replacing the Needle ........................................... 11
Changing the Presser Foot .................................. 13
Flat Bed Attachment ............................................. 14
VARIOUS CONTROLS .................................................. 15
Pattern Selection Dial ........................................... 15
Recommended Widths and Lengths for Stitches ... 17
Stitch Length Dial ................................................. 26
Stitch Width Dial ................................................... 28
Reverse Sewing Lever ......................................... 29
Feed Dog Position Switch .................................... 30
Start/Stop Button .................................................. 31
Sewing Speed Controller ...................................... 32
Converting to Free-arm Style ............................... 32
THREADING THE MACHINE ........................................ 33
Winding the Bobbin .............................................. 33
Lower Threading ................................................... 37
Upper Threading ................................................... 39
Using Needle Threader ........................................ 41
Manually Drawing Up Lower Thread .................... 43
Twin Needle Sewing ............................................. 44
Thread Tension .................................................... 46
FABRIC/THREAD/NEEDLE COMBINATIONS .............. 47
STRAIGHT AND ZIGZAG STITCHING
PLEASE READ BEFORE SEWING ............................... 49
Straight Stitching .................................................. 50
Zigzag Stitching .................................................... 53
BUILT-IN STITCHES
Blind Hem Stitching .............................................. 54
Shell Tuck Stitching .............................................. 55
Elastic Stitching .................................................... 56
Double Action Stitching ........................................ 57
Scallop Stitching ................................................... 58
Decorative Stitching .............................................. 59
Patchwork ............................................................. 60
Overedge Stitching ............................................... 61
Feather Stitching .................................................. 62
Triple Zigzag Stretch Stitching .............................. 62
TABLE OF CONTENTS
BUTTONHOLE AND BUTTON SEWING
Making a Buttonhole (For 1-step BH Type) .......... 63
Odd-shaped buttons that do not fit into
the button holder plate .......................................... 65
Making a Buttonhole (For 4-step BH Type ) ......... 66
Buttonhole Fine Adjustment ................................. 69
Button Sewing ...................................................... 72
USING ATTACHMENTS AND APPLICATIONS
Zipper Insertion ..................................................... 73
Gathering .............................................................. 73
Darning ................................................................. 75
Appliqués .............................................................. 76
Monogramming and Embroidering ....................... 77
OPTIONAL ACCESSORIES
Using the Walking Foot ........................................ 79
Using the Spring-action Quilting Foot ................... 81
Using the 1/4-Inch Quilting Foot ........................... 83
MAINTENANCE
Changing the Light Bulb ....................................... 85
Cleaning ............................................................... 87
Performance Check List ....................................... 89
Repacking the Machine ........................................ 95
INDEX

KENNENLERNEN IHRER MASCHINE
HAUPTBESTANDTEILE ........................................................ 2
ZUBEHÖR ................................................................................ 6
Optionales Zubehör ......................................................... 6
BEDIENUNG IHRER NÄHMASCHINE ................................ 8
Kabelanschlüsse .............................................................. 8
Netz- und Nählichtschalter ............................................. 9
Fußanlasser ................................................................... 10
Nadel prüfen ................................................................. 12
Nadel austauschen ......................................................... 12
Nähfuß wechseln .......................................................... 13
Anschiebetisch (mit Zubehörfach) ................................ 14
VERSCHIEDENE REGLER .................................................. 16
Stichmuster-Einstellrad ................................................. 16
Empfohlene Stichlängen und Stichbreiten .................... 20
Stichlängen-Einstellrad ................................................. 27
Stichbreiten-Einstellrad ................................................ 28
Rückwärtstaste .............................................................. 29
Transporteurhebel ......................................................... 30
Start-/Stopp-Taste ......................................................... 31
Hebel für den Geschwindigkeitsbereich ....................... 32
Umbau auf Freiarm ....................................................... 32
FADENFÜHRUNG ................................................................ 34
Aufspulen ...................................................................... 34
Unterfadenführung ........................................................ 38
Oberfadenführung ......................................................... 40
Bedienung der Fadeneinfädelung ................................. 42
Manuelles Heraufholen des Unterfadens ...................... 43
Nähen mit Doppelnadel ................................................ 44
Fadenspannung ............................................................. 46
STOFF-/FADEN-/NADELKOMBINATIONEN ................... 47
GERAD- UND ZICKZACKSTICH
BITTE VOR DEM NÄHEN LESEN ...................................... 49
Geradstich ..................................................................... 51
Zickzackstich ................................................................ 53
VERFÜGBARE STICHMUSTER
Blindsaumstich ............................................................. 54
Biesenstich .................................................................... 55
Elastikstich .................................................................... 56
Elastische Schrittnaht .................................................... 57
Bogennaht ..................................................................... 58
Dekorstiche ................................................................... 59
Patchwork ..................................................................... 60
Ketteln & Versäubern ................................................... 61
Grätenstich .................................................................... 62
Dreifach-Zickzackstich ................................................. 62
INHALT
KNOPFLÖCHER UND KNÖPFE NÄHEN
Knopfloch nähen
(Für 1-Stufen-Knopfloch BH-Typ) ............................... 64
Knöpfe die nicht in den Halter passen .......................... 65
Knopfloch nähen
(Für 4-Stufen-Knopfloch BH-Typ) ............................... 66
Knopfloch-Feineinstellung ........................................... 70
Knöpfe annähen ............................................................ 72
HEFTEN UND APPLIZIEREN
Einnähen eines Reißverschlusses .................................. 74
Raffen ........................................................................... 74
Stopfen .......................................................................... 75
Applizieren ................................................................... 76
Monogramme und Stickarbeiten ................................... 78
OPTIONALES ZUBEHÖR
Einsatz des Obertransporteurs ...................................... 80
Einsatz des Stopffußes .................................................. 82
Einsatz des Patchworkfußes .......................................... 84
WARTUNG
Nählichtlampe auswechseln .......................................... 86
Reinigung ...................................................................... 88
Checkliste ..................................................................... 91
Maschine verpacken ..................................................... 95
INDEX

КРАТКОЕ ТЕХНИЧЕСКОЕ ОПИСАНИЕ МАШИНЫ
ОСНОВНЫЕ ЧАСТИ МАШИНЫ .................................... 2
ПРИНАДЛЕЖНОСТИ ..................................................... 6
Дополнительные принадлежности ..................... 6
ПОЛЬЗОВАНИЕ МАШИНОЙ ......................................... 8
Соединительные штепсели ................................. 8
Главный выключатель питания
/ освещения зоны строчки ................................... 9
Ножной контроллер ........................................... 10
Проверка иглы .................................................... 12
Замена иглы ........................................................ 12
Замена нажимной лапки .................................... 13
Платформа-приставка ....................................... 14
ОРГАНЫ НАСТРОЙКИ ................................................ 16
Ручка выбора типа стежка ................................ 16
РЕКОМЕНДУЕМАЯ ДЛИНА СТЕЖКА .............. 23
Ручка регулирования длины стежка ................ 27
Ручка регулирования ширины стежка ............. 28
Рычаг реверсирования строчки ........................ 29
Переключатель позиции зубчатой рейки
механизма продвижения ткани ........................ 30
Кнопка пуска/остановки машины ..................... 31
Контроллер скорости шитья ............................. 32
Переключение на режим"Free-arm" ................. 32
ЗАПРАВКА НИТОК ...................................................... 34
Намотка ниток на шпульку ................................ 34
Заправка нижней нитки ..................................... 38
Заправка верхней нитки .................................... 40
Использование приспособления для
заправки нити в иглу .............................................. 42
Вытягивание нижней нитки вручную ............... 43
Двухигольная строчка ........................................ 44
Натяжение ниток ............................................... 46
ТАБЛИЦА КОМБИНАЦИЙ ТКАНЕЙ/НИТОК/ИГЛ ...... 48
НОРМАЛЬНАЯ ПРЯМАЯ И ЗИГЗАГООБРАЗНАЯ СТРОЧКА
ПОЖАЛУЙСТА, ПРОЧИТАЙТЕ ДО НАЧАЛА ШИТЬЯ ......... 49
Прямой стежок ................................................... 51
Зигзагообразный стежок ................................... 53
ФИГУРНЫЕ СТРОЧКИ
Потайной подрубочный шов .............................. 54
Подшивочная строчка ....................................... 55
Эластичная строчка ........................................... 56
Стежок с двойным эффектом .......................... 57
Строчка-елочка .................................................. 58
Декоративный стежок ....................................... 59
Лоскутное шитье ................................................ 60
Обметочный стежок ........................................... 61
Перистый стежок ............................................... 62
Тройная трикотажная строчка «зигзаг» .......... 62
ОГЛАВЛЕНИЕ
ОБМЕТЫВАНИЕ ПЕТЕЛЬ И ПРИШИВАНИЕ ПУГОВИЦ
Обметывание петель
(Для 1-ступенчатого обметывания петли) ....... 64
Пуговицы нестандартной формы,
не входящие в пуговичный зажим ........................ 65
Обметывание петель
(Для 4-ступенчатого обметывания петли) ....... 66
Тонкая настройка для обметывания петель ... 70
Пришивание пуговиц .......................................... 72
ИСПОЛЬЗОВАНИЕ ПРИСПОСОБЛЕНИЙ И ИЗГОТОВЛЕНИЕ АППЛИКАЦИЙ
Вшивание застежек-молний ............................. 74
Обработка сборок .............................................. 74
Штопка ................................................................ 75
Аппликации ......................................................... 76
Изготовление монограмм и вышивание ........... 78
ДОПОЛНИТЕЛЬНЫЕ ПРИНАДЛЕЖНОСТИ
Использование шагающей лапки ...................... 80
Использование лапки штопки-вышивки .......... 82
Использование направляющей
лапки 1/4 дюйма (6,5 мм) ...................................... 84
ТЕХНИЧЕСКОЕ ОБСЛУЖИВАНИЕ
Замена лампочки освещения ............................ 86
Чистка машины ................................................... 88
ТАБЛИЦА ВОЗМОЖНЫХ НЕИСПРАВНОСТЕЙ ....... 93
Переупаковка машины ...................................... 95
УКАЗАТЕЛЬ

1
KNOWING YOUR SEWING MACHINE
KENNENLERNEN IHRER MASCHINE
КРАТКОЕ ТЕХНИЧЕСКОЕ ОПИСАНИЕ МАШИНЫ
5
2
1
D
3
4
9
0
C
8
B
7
6
A
L
E
G
H
I
M
J
K
F
PRINCIPAL PARTS
(Model STAR 240E, STAR 230E)
1
BOBBIN WINDER (Page 33)
Winds the thread onto the bobbin to be used for the lower thread.
2
STITCH LENGTH DIAL (Page 15, 26)
Controls the length of the stitches.
3
SPOOL PIN AND SPOOL CAP (Page 33, 39)
4
STITCH WIDTH DIAL (Page 28)
Controls the stitch width.
5
UPPER TENSION CONTROL DIAL (Page 46)
Controls the tension of the upper thread.
6
BUTTONHOLE LEVER (Page 63)
7
NEEDLE THREADER (Page 41)
8
FLAT BED ATTACHMENT WITH ACCESSORY COMPART-
MENT (Page 14, 32)
9
ZIGZAG PRESSER FOOT (Page 5, 13)
:
START/STOP BUTTON (Page 31)
Touch to start or stop machine.
A
FEED DOG POSITION SWITCH (Page 30)
B
REVERSE SEWING LEVER (Page 29)
Push for stitching in the reverse direction.
C
SEWING SPEED CONTROLLER (Page 32)
Controls the speed range.
D
PATTERN INDICATION WINDOW (Page 15)
Shows the stitch number to be performed.
E
HOLE FOR VERTICAL SPOOL PIN (Page 44)
Used to hold a second spool of thread for twin needle sewing.
F
BALANCE WHEEL
G
PATTERN SELECTION DIAL (Page 15)
Turn in either direction to select the desired stitch.
H
MAIN POWER/SEWING LIGHT SWITCH (Page 9)
Turn on/off the main power/sewing light switch.
I
FOOT CONTROLLER JACK (Page 10)
Insert for foot controller operation.
J
CORD JACK (Page 7)
Connect machine to power supply.
K
BUTTONHOLE FINE ADJUSTMENT SCREW (Page 69)
L
PRESSER FOOT LEVER (Page 39)
M
FOOT CONTROLLER (Page 10)
Used to control sewing speed/start and stop.

2
KNOWING YOUR SEWING MACHINE
KENNENLERNEN IHRER MASCHINE
КРАТКОЕ ТЕХНИЧЕСКОЕ ОПИСАНИЕ МАШИНЫ
ОСНОВНЫЕ ЧАСТИ МАШИНЫ
(Модели STAR 240E, STAR 230E)
1
1
1
1
1
МЕХАНИЗМ НАМОТКИ ШПУЛЬКИ (Стр. 34)
Наматывает на шпульку нитку, используемую в качестве
нижней.
2
2
2
2
2
РУЧКА РЕГУЛИРОВАНИЯ ДЛИНЫ СТЕЖКА (Стр. 16, 27)
Регулирует длину стежка.
3
3
3
3
3
КАТУШЕЧНЫЙ СТЕРЖЕНЬ И КАТУШЕЧНЫЙ КОЛПАЧОК
(Стр. 34, 40)
4
4
4
4
4
РУЧКА РЕГУЛИРОВАНИЯ ШИРИНЫ СТЕЖКА (Стр. 28)
Контролирует натяжение верхней нити.
5
5
5
5
5
РЕГУЛЯТОР НАТЯЖЕНИЯ ВЕРХНЕЙ НИТКИ (Стр. 46)
Для настройки натяжения верхней нитки.
6
6
6
6
6
РЫЧАГ МЕХАНИЗМА ОБМЕТЫВАНИЯ ПЕТЕЛЬ (Стр. 64)
7
7
7
7
7
ПРИСПОСОБЛЕНИЕ ДЛЯ ЗАПРАВКИ НИТИ В ИГЛУ (Стр.
42)
8
8
8
8
8
ПЛАТФОРМА-ПРИСТАВКА С ОТДЕЛЕНИЕМ ДЛЯ
ПРИНАДЛЕЖНОСТЕЙ (Стр. 14, 32)
9
9
9
9
9
НАЖИМНАЯ ЛАПКА ДЛЯ СТРОЧКИ ЗИГЗАГ (Стр. 6, 13)
:
:
:
:
:
КНОПКА ПУСКА/ОСТАНОВКИ МАШИНЫ (Стр. 31)
Нажатием данной кнопки можно запустить или остановить
машину.
A
A
A
A
A
ПЕРЕКЛЮЧАТЕЛЬ ПОЗИЦИИ ЗУБЧАТОЙ РЕЙКИ
МЕХАНИЗМА ПРОДВИЖЕНИЯ ТКАНИ (Стр. 30)
B
B
B
B
B
РЫЧАГ РЕВЕРСИРОВАНИЯ СТРОЧКИ (Стр. 29)
Нажмите на данный рычаг для осуществления строчки в
обратном направлении.
C
C
C
C
C
КОНТРОЛЛЕР СКОРОСТИ ШИТЬЯ (Стр. 32)
Используется для управления скоростью шитья.
D
D
D
D
D
ОКОШКО ИНДИКАЦИИ ТИПА СТЕЖКА (Стр. 16)
Показывает номер стежка, которым будет выполнена
строчка.
E
E
E
E
E
ОТВЕРСТИЕ ДЛЯ ВЕРТИКАЛЬНОГО КАТУШЕЧНОГО
СТЕРЖНЯ (Стр. 44)
Используется для удерживания второй катушки ниток при
выполнении двухигольной строчки.
F
F
F
F
F
МАХОВИК
G
G
G
G
G
РУЧКА ВЫБОРА ТИПА СТЕЖКА (Стр. 16)
Осуществляет выбор требуемого узора строчки при
вращении в любом направлении.
H
H
H
H
H
ГЛАВНЫЙ ВЫКЛЮЧАТЕЛЬ ПИТАНИЯ/ОСВЕЩЕНИЯ
ЗОНЫ СТРОЧКИ (Стр. 9)
Используется для включения/выключения питания/
лампочки освещения зоны строчки.
I
I
I
I
I
ГНЕЗДО ПОДКЛЮЧЕНИЯ НОЖНОГО КОНТРОЛЛЕРА (Стр.
10)
Вставьте ножной контроллер.
J
J
J
J
J
ГНЕЗДО ДЛЯ ПОДСОЕДИНЕНИЯ ШНУРА ПИТАНИЯ (Стр.
8)
Подсоедините машину к источнику электропитания.
K
K
K
K
K
ВИНТ ТОНКОЙ НАСТРОЙКИ ДЛЯ ОБМЕТЫВАНИЯ
ПЕТЕЛЬ (Стр. 70)
L
L
L
L
L
РЫЧАГ НАЖИМНОЙ ЛАПКИ (Стр. 40)
M
M
M
M
M
НОЖНОЙ КОНТРОЛЛЕР (Стр. 10)
Для управления скоростью строчки, пуском и остановкой
машины.
HAUPTBESTANDTEILE
(Modell STAR 240E, STAR 230E)
1
SPULER
(Seite 34)
Spult den Faden auf die Unterfadenspule.
2
STICHLÄNGEN-EINSTELLRAD (Seite 16, 27)
Stellt die Stichlänge ein.
3
GARNROLLENSTIFT UND -HALTER (Seite 34, 40)
4
STICHBREITEN-EINSTELLRAD (Seite 28)
Regelt die Stichbreite
5
OBERFADENSPANNUNG (Seite 46)
Stellt die Spannung des Oberfadens ein.
6
AUTOMATISCHER EINFÄDLER (Seite 64)
7
FADENEINFÄDELUNG (Seite 42)
8
ANSCHIEBETISCH & ZUBEHÖRFACH (Seite 14, 32)
9
ZICKZACKNÄHFUSS (Seite 6, 13)
:
START/STOPP-TASTE (Seite 31)
Hier können Sie die Maschine starten und stoppen.
A
TRANSPORTEURHEBEL (Seite 30)
B
RÜCKWÄRTSTASTE (Seite 29)
Drücken Sie diese Taste zum Rückwärtsnähen.
C
HEBEL FÜR DEN GESCHWINDIGKEITSBEREICH (Seite 32)
Hier wird der Geschwindigkeitsbereich der Maschine eingestellt.
D
STICHMUSTERANZEIGE (Seite 16)
Zeigt die Nummer des eingestellten Stichmusters an.
E
ÖFFNUNG FÜR VERTIKALEN GARNROLLENHALTER (Seite 44)
Hier kann zum Nähen mit Doppelnadel eine zweite Garnrolle
aufgesteckt werden.
F
HANDRAD
G
STICHMUSTER - EINSTELLRAD (Seite 16)
Wählen Sie hier den gewünschten Stich durch Drehen in eine Richtung.
H
NETZ-/NÄHLICHTSCHALTER (Seite 9)
Hiermit schalten Sie die Maschine und das Nählicht ein und aus.
I
FUßANLASSERBUCHSE (Seite 10)
Hier kann ein Fußpedal angeschlossen werden.
J
NETZBUCHSE (Seite 8)
Hier wird die Maschine an das Stromnetz angeschlossen.
K
SCHRAUBE FÜR KNOPFLOCHFEINSTELLUNG (Seite 70)
L
NÄHFUßHEBEL (Seite 40)
M
FUßANLASSER (Seite 10)
Start/Stopp und Regelung der Nähgeschwindigkeit.

3
KNOWING YOUR SEWING MACHINE
KENNENLERNEN IHRER MASCHINE
КРАТКОЕ ТЕХНИЧЕСКОЕ ОПИСАНИЕ МАШИНЫ
J
D
F
G
I
E
C
H
PRINCIPAL PARTS
(Model PS-57, PS-55, STAR-50, RSR-55, XRX-55, PS-53)
1
BOBBIN WINDER (Page 33)
Winds the thread onto the bobbin to be used for the lower thread.
2
STITCH LENGTH DIAL (Page 15, 26)
Controls the length of the stitches.
3
SPOOL PIN AND SPOOL CAP (Page 33, 39)
4
STITCH WIDTH DIAL (Page 28)
Controls the stitch width.
5
UPPER TENSION CONTROL DIAL (Page 46)
Controls the tension of the upper thread.
6
BUTTONHOLE LEVER (Page 63)
*PS-57, PS-55, STAR-50, RSR-55, XRX-55 only
7
NEEDLE THREADER (Page 41)
8
FLAT BED ATTACHMENT WITH ACCESSORY COMPART-
MENT (Page 14, 32)
9
ZIGZAG PRESSER FOOT (Page 5, 13)
:
REVERSE SEWING LEVER (Page 29)
Push for stitching in the reverse direction.
A
FEED DOG POSITION SWITCH (Page 30)
B
PATTERN INDICATION WINDOW (Page 15)
Shows the stitch number to be performed.
C
HOLE FOR VERTICAL SPOOL PIN (Page 44)
Used to hold a second spool of thread for twin needle sewing.
D
BALANCE WHEEL
E
PATTERN SELECTION DIAL (Page 15)
Turn in either direction to select the desired stitch.
F
MAIN POWER/SEWING LIGHT SWITCH (Page 9)
Turn on/off the main power/sewing light switch.
G
FOOT CONTROLLER JACK (Page 7)
Insert the foot controller plug for operation and connect the
machine to the power supply.
H
BUTTONHOLE FINE ADJUSTMENT SCREW (Page 69)
I
PRESSER FOOT LEVER (Page 39)
J
FOOT CONTROLLER (Page 10)
Used to control sewing speed/start and stop.
5
2
1
B
3
4
:
A
9
8
7
6
*

4
KNOWING YOUR SEWING MACHINE
KENNENLERNEN IHRER MASCHINE
КРАТКОЕ ТЕХНИЧЕСКОЕ ОПИСАНИЕ МАШИНЫ
ОСНОВНЫЕ ЧАСТИ МАШИНЫ
(Модели PS-57, PS-55, STAR-50, RSR-55, XRX-55, PS-53)
1
1
1
1
1
МЕХАНИЗМ НАМОТКИ ШПУЛЬКИ (Стр. 34)
Наматывает на шпульку нитку, используемую в качестве
нижней.
2
2
2
2
2
РУЧКА РЕГУЛИРОВАНИЯ ДЛИНЫ СТЕЖКА (Стр. 16, 27)
Регулирует длину стежка.
3
3
3
3
3
КАТУШЕЧНЫЙ СТЕРЖЕНЬ И КАТУШЕЧНЫЙ КОЛПАЧОК
(Стр. 34, 40)
4
4
4
4
4
РУЧКА РЕГУЛИРОВАНИЯ ШИРИНЫ СТЕЖКА (Стр. 28)
Используется для регулирования ширины стежка.
5
5
5
5
5
РЕГУЛЯТОР НАТЯЖЕНИЯ ВЕРХНЕЙ НИТКИ (Стр. 46)
Для настройки натяжения верхней нитки.
6
6
6
6
6
РЫЧАГ МЕХАНИЗМА ОБМЕТЫВАНИЯ ПЕТЕЛЬ (Стр. 64)
*
Только для PS-57, PS-55, STAR-50, RSR-55, XRX-55
7
7
7
7
7
ПРИСПОСОБЛЕНИЕ ДЛЯ ЗАПРАВКИ НИТИ В ИГЛУ (Стр.
42)
8
8
8
8
8
ПЛАТФОРМА-ПРИСТАВКА С ОТДЕЛЕНИЕМ ДЛЯ
ПРИНАДЛЕЖНОСТЕЙ (Стр. 14, 32)
9
9
9
9
9
НАЖИМНАЯ ЛАПКА ДЛЯ СТРОЧКИ ЗИГЗАГ (Стр. 6, 13)
:
:
:
:
:
РЫЧАГ РЕВЕРСИРОВАНИЯ СТРОЧКИ (Стр. 29)
Нажмите на данный рычаг для осуществления строчки в
обратном направлении.
A
A
A
A
A
ПЕРЕКЛЮЧАТЕЛЬ ПОЗИЦИИ ЗУБЧАТОЙ РЕЙКИ
МЕХАНИЗМА ПРОДВИЖЕНИЯ ТКАНИ (Стр. 30)
B
B
B
B
B
ОКОШКО ИНДИКАЦИИ ТИПА СТЕЖКА (Стр. 16)
Показывает номер стежка, которым будет выполнена
строчка.
C
C
C
C
C
ОТВЕРСТИЕ ДЛЯ ВЕРТИКАЛЬНОГО КАТУШЕЧНОГО
СТЕРЖНЯ (Стр. 44)
Используется для удерживания второй катушки ниток при
выполнении двухигольной строчки.
D
D
D
D
D
МАХОВИК
E
E
E
E
E
РУЧКА ВЫБОРА ТИПА СТЕЖКА (Стр. 16)
Осуществляет выбор требуемого узора строчки при
вращении в любом направлении.
F
F
F
F
F
ГЛАВНЫЙ ВЫКЛЮЧАТЕЛЬ ПИТАНИЯ/ОСВЕЩЕНИЯ
ЗОНЫ СТРОЧКИ (Стр. 9)
Используется для включения/выключения питания/
лампочки освещения зоны строчки.
G
G
G
G
G
ГНЕЗДО ПОДКЛЮЧЕНИЯ НОЖНОГО КОНТРОЛЛЕРА (Стр. 8)
Вставив в данный разъем штепсель ножного контроллера,
управляющего работой машины, подсоедините машину к
сети питания.
H
H
H
H
H
ВИНТ ТОНКОЙ НАСТРОЙКИ ДЛЯ ОБМЕТЫВАНИЯ
ПЕТЕЛЬ (Стр. 70)
I
I
I
I
I
РЫЧАГ НАЖИМНОЙ ЛАПКИ (Стр. 40)
J
J
J
J
J
НОЖНОЙ КОНТРОЛЛЕР (Стр. 10)
Для управления скоростью строчки, пуском и остановкой
машины.
HAUPTBESTANDTEILE
(Modell PS-57, PS-55, STAR-50, RSR-55, XRX-55, PS-53)
1
SPULER
(Seite 34)
Spult den Faden auf die Unterfadenspule.
2
STICHLÄNGEN-EINSTELLRAD (Seite 16, 27)
Stellt die Stichlänge ein.
3
GARNROLLENSTIFT UND -HALTER (Seite 34, 40)
4
STICHBREITEN-EINSTELLRAD (Seite 28)
Regelt die Stichbreite
5
OBERFADENSPANNUNG (Seite 46)
Stellt die Spannung des Oberfadens ein.
6
AUTOMATISCHER EINFÄDLER (Seite 64)
* Nur PS-57, PS-55, STAR-50, RSR-55, XRX-55
7
FADENEINFÄDELUNG (Seite 42)
8
ANSCHIEBETISCH & ZUBEHÖRFACH (Seite 14, 32)
9
ZICKZACKNÄHFUSS (Seite 6, 13)
:
RÜCKWÄRTSTASTE (Seite 29)
Drücken Sie diese Taste zum Rückwärtsnähen.
A
TRANSPORTEURHEBEL (Seite 30)
B
STICHMUSTERANZEIGE (Seite 16)
Zeigt die Nummer des eingestellten Stichmusters an.
C
ÖFFNUNG FÜR VERTIKALEN GARNROLLENHALTER (Seite 44)
Hier kann zum Nähen mit Doppelnadel eine zweite Garnrolle
aufgesteckt werden.
D
HANDRAD
E
STICHMUSTER - EINSTELLRAD (Seite 16)
Wählen Sie hier den gewünschten Stich durch Drehen in eine Richtung.
F
NETZ-/NÄHLICHTSCHALTER (Seite 9)
Hiermit schalten Sie die Maschine und das Nählicht ein und aus.
G
FUßANLASSERBUCHSE (Seite 8)
H
SCHRAUBE FÜR KNOPFLOCHFEINSTELLUNG (Seite 70)
I
NÄHFUßHEBEL (Seite 40)
J
FUßANLASSER (Seite 10)
Start/Stopp und Regelung der Nähgeschwindigkeit.

5
KNOWING YOUR SEWING MACHINE
KENNENLERNEN IHRER MASCHINE
КРАТКОЕ ТЕХНИЧЕСКОЕ ОПИСАНИЕ МАШИНЫ
1
X59370-051
2
SA156
XA5539-051
3
X57117-051
4
X57521-001
5
XA4911-151
(STAR 240E, STAR 230E
PS-57, PS-55, STAR-50,
RSR-55, XRX-55)
6
130012-054
7
130013-054
8
X59476-051
9
130920-051
<
X55467-051
A
X54243-001
1
SA140
X81065-002
2
SA129
X81021-002
ACCESSORIES
1
Zipper Foot (1 pc.)
2
Bobbin (3 pcs.)
SA156 (For U.S.A)
XA5539-051 (For other countries)
Replacements (10-piece set)
3
Needle Pack (Regular Single Needle No. 14) (3 pcs.)
4
Twin Needle (1 pc.)
5
Buttonhole Foot (1 pc.)
6
Spool Cap (Large) (1 pc.)
7
Spool Cap (Small) (1 pc.)
8
Cleaning Brush (1 pc.)
9
Extra Spool Pin (1 pc.)
<
Screwdriver (1 pc.)
A
Seam Ripper (1 pc.)
B
Hard Case (1 pc.) (Model STAR 240E, STAR 230E
, STAR-50,
RSR-55, XRX-55
)
C
Dust Cover (1 pc.) (Model PS-57,
PS-55,
PS-53)
Parts Code for Zigzag Presser Foot: 137748-101
Parts Code for Spool Cap (Medium): X55260-153
(Model STAR 240E, STAR 230E)
Foot Controller: Model N5V
Parts Code: XA3931-051
NOTE (For U.S.A. only):
This foot controller can be used for Model STAR 240E, STAR 230E.
(Model PS-57,
PS-55, STAR-50, RSR-55, XRX-55
, PS-53)
Foot Controller: Model N
Parts Code: J00360-051 (110/120V Area)
XA6400-051 (220/240V Area)
XA6402-051 (U.K.)
XA6404-051 (Australia, New Zealand)
XA6434-051 (110/220V Dual Ara)
NOTE (For U.S.A. only):
Foot Controller: Model N
Parts Code: J00360-051 (110/120V Area)
This foot controller can be used for Model PS-57,
PS-55, STAR-50,
RSR-55, XRX-55
, PS-53.
The above accessories are stored in the flat bed attachment. These
accessories have been designed to help complete most sewing
tasks.
X59369-251
(PS-53)
B
X52769-656
C
X53984-054
3
SA125
X80980-002
Optional Accessories
1
Walking Foot
SA140 (For U.S.A)
X81065-002 (For other countries)
2
Springaction Quilting Foot
SA129 (For U.S.A)
X81021-002 (For other countries)
3
1/4-Inch Quilting Foot
SA125 (For U.S.A)
X80980-002 (For other countries)
NOTE:
The content of accessories depends on model.

6
KNOWING YOUR SEWING MACHINE
KENNENLERNEN IHRER MASCHINE
КРАТКОЕ ТЕХНИЧЕСКОЕ ОПИСАНИЕ МАШИНЫ
ПРИНАДЛЕЖНОСТИ
1
Лапка для вшивания застежек-молний (1 шт.)
2
Шпулька (3 шт.)
SA156 (Для США)
XA5539-051 (Для других стран)
Запасные шпульки (Комплект из
10 шт.)
3
Комплект игл (Нормальные иглы No. 14) (3 шт.)
4
Двойная игла (1 шт.)
5
Лапка для обметывания петель (1 шт.)
6
Катушечный колпачок (Большой) (1 шт.)
7
Катушечный колпачок (Малый) (1 шт.)
8
Щетка для чистки (1 шт.)
9
Вставной катушечный стержень (1 шт.)
0
Отвертка (1 шт.)
A
Нож для распарывания швов (1 шт.)
B
Твердый чехол (1 шт.) (Модели STAR 240E, STAR 230E,
STAR-50, RSR-55, XRX-55)
C
Пылезащитный чехол (1 шт.) (Модели PS-57, PS-55, PS-53)
Кодовый номер нажимной лапки для строчки зигзаг: 137748-101
Кодовый номер катушечного колпачка (Средний): X55260-153
(Модели STAR 240E, STAR 230E)
Ножной контроллер: Модель N5V
Кодовый номер: XA3931-051
ПРИМЕЧАНИЕ (Только для США):
Данный ножной контроллер предназначен только для моделей
STAR 240E, STAR 230E.
(Модели PS-57, PS-55, STAR-50, RSR-55, XRX-55, PS-53)
Ножной контроллер: Модель N
Кодовый номер:J00360-051 (для стран с напряжением сети 110/120В)
XA6400-051 (для стран с напряжением сети 220/240В)
XA6402-051 (для Великобритании)
XA6404-051 (для Австралии и Новой Зеландии)
XA6434-051 (для стран с двойным напряжением сети 110/220В)
ПРИМЕЧАНИЕ (Только для США):
Ножной контроллер: Модель N
Кодовый номер: J00360-051 (для стран с напряжением сети 110/120В)
Данный ножной контроллер применим для моделей PS-57,
PS-55, STAR-50, RSR-55, XRX-55, PS-53.
Вышеперечисленные принадлежности упакованы в платформе-
приставке. Данные принадлежности предназначены для
расширения возможностей швейной машины и выполнения
широкой гаммы швейных операций.
ZUBEHÖR
1
Reißverschlußfuß (1 St.)
2
Spule (3 St.)
SA156 (für die USA)
XA5539-051 (andere Länder)
Ersatzteile (10-teiliges Set)
3
Nadel-Set (Normale Einfach-Nadel Nr. 14) (3 St.)
4
Doppelnadel (1 St.)
5
Knopflochfuß (1 St.)
6
Garnrollenkappe (Groß) (1 St.)
7
Garnrollenkappe (Klein) (1 St.)
8
Bürste (1 St.)
9
Zusätzlicher Garnrollenstift (1 St.)
:
Schraubendreher (1 St.)
A
Knopflochschneider (1 St.)
B
Tragekoffer (1 St.) (Modell STAR 240E, STAR 230E, STAR-50,
RSR-55, XRX-55)
C
Staubabdeckung (1 St.) (Modell PS-57, PS-55, PS-53)
Ersatzteilnummer des Zickzack-Nähfußes: 137748-101
Ersatzteilnummer des Garnrollenkappe (mittel): X55260-153
(Modell STAR 240E, STAR 230E)
Fußanlasser: Modell N5V
Teilenummer: XA3931-051
NOTIZEN (nur für USA):
Dieser Fußanlasser kann mit dem Nähmaschinenmodell STAR 240E,
STAR 230E benutzt werden.
(Modell PS-57, PS-55, STAR-50, RSR-55, XRX-55, PS-53)
Fußanlasser: Modell N
Teilenummer:
J00360-051
(Länder m. 110/120 V)
XA6400-051
(Länder m. 220/240 V)
XA6402-051
(U.K.)
XA6404-051
(Australien, Neuseeland)
XA6434-051
(Länder m. 110 und 220 V)
NOTIZEN (nur für USA):
Fußanlasser: Modell N
Teilenummer: J00360-051 (Länder m. 110/120 V)
Dieser Fußanlasser kann mit den Nähmaschinenmodellen PS-57, PS-55,
STAR-50, RSR-55, XRX-55, PS-53 benutzt werden.
Das aufgeführte Zubehör wird im Anschiebetisch aufbewahrt. Das Zubehör
reicht für die meisten Nähanwendungen aus. (Änderungen vorbehalten.)
Optionales Zubehör
1
Obertransportfuß
SA140 (für die USA)
X81065-002 (andere Länder)
2
Stopf/Quiltfuß
SA129 (für die USA)
X81021-002 (andere Länder)
3
Patchworkfuß
SA125 (für die USA)
X80980-002 (andere Länder)
NOTIZEN:
Das beiliegende Zubehör ist je nach Modell unterschiedlich.
Дополнительные принадлежности
1
Шагающая лапка
SA140 (Для США)
X81065-002 (Для других стран)
2
Лапка штопки-вышивки
SA129 (Для США)
X81021-002 (Для других стран)
3
Направляющая лапка 1/4 дюйма (6,5 мм)
SA125 (Для США)
X80980-002 (Для других стран)
ПРИМЕЧАНИЕ:
Содержание комплекта принадлежностей зависит от модели.

7
KNOWING YOUR SEWING MACHINE
KENNENLERNEN IHRER MASCHINE
КРАТКОЕ ТЕХНИЧЕСКОЕ ОПИСАНИЕ МАШИНЫ
OPERATING YOUR
SEWING MACHINE
Connecting Plugs
1. Connect the power cord plug into the machine.
2. Connect the power supply plug into a wall outlet.
CAUTION
1. When leaving the machine unattended, the main switch of
the machine should be switched off or the plug must be
removed from the socket-outlet.
2. When servicing the machine, or when removing covers or
changing bulbs, the machine or the electrical set must be
unplugged.
3. For U.S.A. only
This appliance has a polarized plug (one blade wider than
the other). To reduce the risk of electric shock, this plug is
intended to fit in a polarized outlet only one way. If the plug
does not fit fully in the outlet, reverse the plug.
If it still does not fit, contact a qualified electrician to install
the proper outlet. Do not modify the plug in any way.
WARNING
•
Use only regular household electricity for the power
source. Using other power sources may result in fire,
electric shock, or damage to the machine.
•
Turn off the main power and remove the plug in the
following circumstances:
-
When you are away from the machine
-
After using the machine
-
When the power fails during use
-
When the machine does not operate correctly due to
a bad connection or a disconnection
-
During electrical storms
CAUTION
•
Do not use extension cords or multi-plug adapters with
many other appliances plugged in to them. Fire or
electric shock may result.
•
Do not touch the plug with wet hands. Electric shock
may result.
•
When unplugging the machine, always turn off the main
power first. Always grasp the plug to remove it from the
outlet. Pulling on the cord may damage the cord, or lead
to fire or electric shock.
•
Do not allow the power cord to be cut, damaged, modi-
fied, forcefully bent, pulled, twisted, or bundled. Do not
place heavy objects on the cord. Do not subject the cord
to heat. These things may damage the cord and cause
fire or electric shock. If the cord or plug is damaged, take
the machine to your authorized dealer for repairs before
continuing use.
•
Unplug the power cord if the machine is not to be used
for a long period of time. Otherwise a fire may result.
(Model STAR 240E, STAR 230E)
(Model PS-57, PS-55, STAR-50, RSR-55, XRX-55, PS-53)

19
KNOWING YOUR SEWING MACHINE
KENNENLERNEN IHRER MASCHINE
КРАТКОЕ ТЕХНИЧЕСКОЕ ОПИСАНИЕ МАШИНЫ
RECOMMENDED WIDTHS AND LENGTHS FOR STITCHES
(Model PS-53)
PATTERN
STITCH NAME
RECOMMENDED WIDTH
RECOMMENDED
INSTRUCTION
mm (inch)
LENGTH mm (inch)
MANUAL PAGE
4-STEP AUTOMATIC
3-5 (Dial 4-7)
F-1.5
66
BUTTONHOLE
(1/8-3/16)
(1/64-1/16)
STRAIGHT STITCH
6.5
1-4.5
50, 73, 75
(1/4)
(1/16-3/16)
ZIGZAG STITCH
0-6.5
F-4.5
53, 72, 76, 77
(0-1/4)
(1/64-3/16)
DOUBLE ACTION STITCH
3-6.5
F-3
57
(1/8-1/4)
(1/64-1/8)
STRETCH BLIND HEM STITCH
3-6.5
F-1.5
54
(1/8-1/4)
(1/64-1/16)
BLIND HEM STITCH
3-6.5
F-2
54
(1/8-1/4)
(1/64-1/16)
SHELL TUCK STITCH
3-6.5
F-3
55
(1/8-1/4)
(1/64-1/8)
ELASTIC STITCH
3-6.5
F-2.5
56
(1/8-1/4)
(1/64-3/32)
TRIPLE STRETCH STITCH
6.5
SS
Fixed
50
(1/4)
2.5 (3/32)
TRIPLE ZIGZAG STRETCH
3-6.5
SS
Fixed
62
STITCH
(1/8-1/4)
2.5 (3/32)
FAGOTING STITCH
3-6.5
SS
Fixed
60
(1/8-1/4)
2.5 (3/32)
COMB STITCH
3-6.5
SS
Fixed
61
(1/8-1/4)
2.5 (3/32)
ELASTIC OVERLOCK STITCH
3-6.5
SS
Fixed
61
(1/8-1/4)
2.5 (3/32)
ELASTIC OVERLOCK STITCH
3-6.5
SS
Fixed
61
(1/8-1/4)
2.5 (3/32)
FEATHER STITCH
3-6.5
SS
Fixed
62
(1/8-1/4)
2.5 (3/32)

20
KNOWING YOUR SEWING MACHINE
KENNENLERNEN IHRER MASCHINE
КРАТКОЕ ТЕХНИЧЕСКОЕ ОПИСАНИЕ МАШИНЫ
EMPFOHLENE STICHLÄNGEN UND STICHBREITEN
(Modell STAR 240E, PS-57)
STICHMUSTER
STICHNAME
VOREINGESTELLTE
EMPFOHLENE
SEITE IN DER
BREITE [mm (Zoll)]
LÄNGE [mm (Zoll)]
ANLEITUNG
1-STUFEN-
3-5 (Drehschalter 4-7)
F-1,5
64
KNOPFLOCHAUTOMATIK
(1/8-3/16)
(1/64-1/16)
GERADSTICH
6,5
1-4,5
51, 74, 75
(1/4)
(1/16-3/16)
ZICKZACKSTICH
0-6,5
F-4,5
53, 72, 76, 78
(0-1/4)
(1/64-3/16)
BLINDSAUMSTICH
3-6,5
F-2
54
(1/8-1/4)
(1/64-1/16)
BIESENSTICH
3-6,5
F-3
55
(1/8-1/4)
(1/64-1/8)
ELASTIKSTICH
3-6,5
F-2,5
56
(1/8-1/4)
(1/64-3/32)
ELASTISCHER BLINDSTICH
3-6,5
F-1,5
54
(1/8-1/4)
(1/64-1/16)
BOGENNAHT
3-6,5
F-1,5
58
(1/8-1/4)
(1/64-1/16)
ELASTISCHE SCHRITTNAHT
3-6,5
F-3
BRÜCKENSTICH
57
PALISADENSTICH
(1/8-1/4)
(1/64-1/8)
ELASTIK-MUSCHELSTICH
3-6,5
F-3
61
(1/8-1/4)
(1/64-1/8)
PERLZIERSTICH
59
PFEILSPITZENSTICH
3-6,5
F-1
PARALLELOGRAMMSTICH
(1/8-1/4)
(1/64-1/16)
DREIECKSSTICH
BLITZSTICH
6,5
F-1
RECHTECKSTICH
59
DEKORATIVER STICH
(1/4)
(1/64-1/16)
STRETCH-GERADSTICH
6,5
SS
Fixiert
51
(1/4)
2,5 (3/32)
DREIFACH-ZICKZACKSTICH
3-6,5
SS
Fixiert
62
(1/8-1/4)
2,5 (3/32)
ÜBERWENDLINGNAHT
3-6,5
SS
Fixiert
61
(1/8-1/4)
2,5 (3/32)
ÜBERWENDLINGNAHT
3-6,5
SS
Fixiert
61
(1/8-1/4)
2,5 (3/32)
GRÄTENSTICH
3-6,5
SS
Fixiert
62
(1/8-1/4)
2,5 (3/32)
KAMMSTICH
3-6,5
SS
Fixiert
61
(1/8-1/4)
2,5 (3/32)
DEKORATIVER STICH
6,5
SS
Fixiert
59
(1/4)
2,5 (3/32)
HEXENSTICH
3-6,5
SS
Fixiert
60
(1/8-1/4)
2,5 (3/32)
DEKORATIVER STICH
3-6,5
SS
Fixiert
59
(1/8-1/4)
2,5 (3/32)
FLACHNAHT
3-6,5
SS
Fixiert
57
(1/8-1/4)
2,5 (3/32)
DEKORATIVER STICH
6,5
SS
Fixiert
59
(1/4)
2,5 (3/32)
MANSCHETTENSTICH
3-6,5
SS
Fixiert
60
(1/8-1/4)
2,5 (3/32)

21
KNOWING YOUR SEWING MACHINE
KENNENLERNEN IHRER MASCHINE
КРАТКОЕ ТЕХНИЧЕСКОЕ ОПИСАНИЕ МАШИНЫ
EMPFOHLENE STICHLÄNGEN UND STICHBREITEN
(Modell STAR 230E, PS-55, STAR-50, RSR-55, XRX-55)
STICHMUSTER
STICHNAME
VOREINGESTELLTE
EMPFOHLENE
SEITE IN DER
BREITE [mm (Zoll)]
LÄNGE [mm (Zoll)]
ANLEITUNG
1-STUFEN-
3-5 (Drehschalter 4-7)
F-1,5
64
KNOPFLOCHAUTOMATIK
(1/8-3/16)
(1/64-1/16)
GERADSTICH
6,5
1-4,5
51, 74, 75
(1/4)
(1/16-3/16)
ZICKZACKSTICH
0-6,5
F-4,5
53, 72, 76, 78
(0-1/4)
(1/64-3/16)
BLINDSAUMSTICH
3-6,5
F-2
54
(1/8-1/4)
(1/64-1/16)
BIESENSTICH
3-6,5
F-3
55
(1/8-1/4)
(1/64-1/8)
ELASTIKSTICH
3-6,5
F-2,5
56
(1/8-1/4)
(1/64-3/32)
ELASTISCHER BLINDSTICH
3-6,5
F-1,5
54
(1/8-1/4)
(1/64-1/16)
BOGENNAHT
3-6,5
F-1,5
58
(1/8-1/4)
(1/64-1/16)
ELASTISCHE SCHRITTNAHT
3-6,5
F-3
BRÜCKENSTICH
57
PALISADENSTICH
(1/8-1/4)
(1/64-1/8)
ELASTIK-MUSCHELSTICH
3-6,5
F-3
61
(1/8-1/4)
(1/64-1/8)
PERLZIERSTICH
3-6,5
F-1
59
PFEILSPITZENSTICH
(1/8-1/4)
(1/64-1/16)
STRETCH-GERADSTICH
6,5
SS
Fixiert
51
(1/4)
2,5 (3/32)
DREIFACH-ZICKZACKSTICH
3-6,5
SS
Fixiert
62
(1/8-1/4)
2,5 (3/32)
ÜBERWENDLINGNAHT
3-6,5
SS
Fixiert
61
(1/8-1/4)
2,5 (3/32)
ÜBERWENDLINGNAHT
3-6,5
SS
Fixiert
61
(1/8-1/4)
2,5 (3/32)
GRÄTENSTICH
3-6,5
SS
Fixiert
62
(1/8-1/4)
2,5 (3/32)
KAMMSTICH
3-6,5
SS
Fixiert
61
(1/8-1/4)
2,5 (3/32)
DEKORATIVER STICH
6,5
SS
Fixiert
59
(1/4)
2,5 (3/32)
HEXENSTICH
3-6,5
SS
Fixiert
60
(1/8-1/4)
2,5 (3/32)
DEKORATIVER STICH
3-6,5
SS
Fixiert
59
(1/8-1/4)
2,5 (3/32)
FLACHNAHT
3-6,5
SS
Fixiert
57
(1/8-1/4)
2,5 (3/32)
DEKORATIVER STICH
6,5
SS
Fixiert
59
(1/4)
2.5 (3/32)

22
KNOWING YOUR SEWING MACHINE
KENNENLERNEN IHRER MASCHINE
КРАТКОЕ ТЕХНИЧЕСКОЕ ОПИСАНИЕ МАШИНЫ
EMPFOHLENE STICHLÄNGEN UND STICHBREITEN
(Modell PS-53)
STICHMUSTER
STICHNAME
VOREINGESTELLTE
EMPFOHLENE
SEITE IN DER
BREITE [mm (Zoll)]
LÄNGE [mm (Zoll)]
ANLEITUNG
4-STUFEN-
3-5 (Drehschalter 4-7)
F-1,5
66
KNOPFLOCHAUTOMATIK
(1/8-3/16)
(1/64-1/16)
GERADSTICH
6,5
1-4,5
51, 74, 75
(1/4)
(1/16-3/16)
ZICKZACKSTICH
0-6,5
F-4,5
53, 72, 76, 78
(0-1/4)
(1/64-3/16)
ELASTISCHE SCHRITTNAHT
3-6,5
F-3
57
(1/8-1/4)
(1/64-1/8)
ELASTISCHER BLINDSTICH
3-6,5
F-1,5
54
(1/8-1/4)
(1/64-1/16)
BLINDSAUMSTICH
3-6,5
F-2
54
(1/8-1/4)
(1/64-1/16)
BIESENSTICH
3-6,5
F-3
55
(1/8-1/4)
(1/64-1/8)
ELASTIKSTICH
3-6,5
F-2,5
56
(1/8-1/4)
(1/64-3/32)
STRETCH-GERADSTICH
6,5
SS
Fixiert
51
(1/4)
2,5 (3/32)
DREIFACH-ZICKZACKSTICH
3-6,5
SS
Fixiert
62
(1/8-1/4)
2,5 (3/32)
HEXENSTICH
3-6,5
SS
Fixiert
60
(1/8-1/4)
2,5 (3/32)
KAMMSTICH
3-6,5
SS
Fixiert
61
(1/8-1/4)
2,5 (3/32)
ÜBERWENDLINGNAHT
3-6,5
SS
Fixiert
61
(1/8-1/4)
2,5 (3/32)
ÜBERWENDLINGNAHT
3-6,5
SS
Fixiert
61
(1/8-1/4)
2,5 (3/32)
GRÄTENSTICH
3-6,5
SS
Fixiert
62
(1/8-1/4)
2,5 (3/32)

23
KNOWING YOUR SEWING MACHINE
KENNENLERNEN IHRER MASCHINE
КРАТКОЕ ТЕХНИЧЕСКОЕ ОПИСАНИЕ МАШИНЫ
РЕКОМЕНДУЕМАЯ ДЛИНА СТЕЖКА
(Модели STAR 240E, PS-57)
СТРОЧКА
НАИМЕНОВАНИЕ СТЕЖКА
ЗАДАННАЯ ШИРИНА
РЕКОМЕНДУЕМАЯ ДЛИНА
НОМЕР СТРАНИЦЫ
[мм(дюймы)]
[ мм(дюймы)]
РУКОВОДСТВА
1-СТУПЕНЧАТОЕ АВТОМАТИЧЕСКОЕ 3-5 (Отметки на ручке 4-7)
F-1,5
64
ОБМЕТЫВАНИЕ ПЕТЛИ
(1/8-3/16)
(1/64-1/16)
ПРЯМОЙ СТЕЖОК
6,5
1-4,5
51, 74, 75
(1/4)
(1/16-3/16)
ЗИГЗАГООБРАЗНЫЙ
0-6,5
F-4,5
53, 72, 76, 78
СТЕЖОК
(0-1/4)
(1/64-3/16)
ПОТАЙНОЙ ПОДРУБОЧНЫЙ
3-6,5
F-2
54
ШОВ
(1/8-1/4)
(1/64-1/16)
ПОДШИВОЧНАЯ СТРОЧКА
3-6,5
F-3
55
(1/8-1/4)
(1/64-1/8)
ЭЛАСТИЧНАЯ СТРОЧКА
3-6,5
F-2,5
56
(1/8-1/4)
(1/64-3/32)
ПОДШИВОЧНАЯ
3-6,5
F-1,5
54
ТРИКОТАЖНАЯ СТРОЧКА
(1/8-1/4)
(1/64-1/16)
СТРОЧКА-ЕЛОЧКА
3-6,5
F-1,5
58
(1/8-1/4)
(1/64-1/16)
СТЕЖОК С ДВОЙНЫМ ЭФФЕКТОМ
3-6,5
F-3
СТРОЧКА-МОСТИК
57
СТЕЖОК РАМПАРТ
(1/8-1/4)
(1/64-1/8)
ЭЛАСТИЧНАЯ
3-6,5
F-3
61
ПОДШИВОЧНАЯ СТРОЧКА
(1/8-1/4)
(1/64-1/8)
БИСЕРНЫЙ СТЕЖОК
СТРЕЛОВИДНЫЙ СТЕЖОК
3-6,5
F-1
СТРОЧКА-ПАРАЛЛЕЛОГРАММ
(1/8-1/4)
(1/64-1/16)
59
ТРЕУГОЛЬНЫЙ СТЕЖОК
СТРОЧКА-МОЛНИЯ
6,5
F-1
КВАДРАТНЫЙ СТЕЖОК
59
ДЕКОРАТИВНЫЙ СТЕЖОК
(1/4)
(1/64-1/16)
ТРОЙНАЯ ТРИКОТАЖНАЯ
6,5
SS
Фиксир.
51
СТРОЧКА
(1/4)
2,5 (3/32)
ТРОЙНАЯ ТРИКОТАЖНАЯ
3-6,5
SS
Фиксир.
62
СТРОЧКА «ЗИГЗАГ»
(1/8-1/4)
2,5 (3/32)
ЭЛАСТИЧНАЯ ОВЕРЛОЧНАЯ
3-6,5
SS
Фиксир.
61
СТРОЧКА
(1/8-1/4)
2,5 (3/32)
ЭЛАСТИЧНАЯ
3-6,5
SS
Фиксир.
61
ОВЕРЛОЧНАЯ СТРОЧКА
(1/8-1/4)
2,5 (3/32)
ПЕРИСТРЫЙ СТЕЖОК
3-6,5
SS
Фиксир.
62
(1/8-1/4)
2,5 (3/32)
СТРОЧКА «ГРЕБЕШОК»
3-6,5
SS
Фиксир.
61
(1/8-1/4)
2,5 (3/32)
ДЕКОРАТИВНЫЙ СТЕЖОК
6,5
SS
Фиксир.
59
(1/4)
2,5 (3/32)
СОЕДИНИТЕЛЬНЫЙ СТЕЖОК
3-6,5
SS
Фиксир.
60
(1/8-1/4)
2,5 (3/32)
ДЕКОРАТИВНЫЙ СТЕЖОК
3-6,5
SS
Фиксир.
59
(1/8-1/4)
2,5 (3/32)
ДЕКОРАТИВНЫЙ
3-6,5
SS
Фиксир.
57
ПОДРУБОЧНЫЙ СТЕЖОК
(1/8-1/4)
2,5 (3/32)
ДЕКОРАТИВНЫЙ СТЕЖОК
6,5
SS
Фиксир.
59
(1/4)
2,5 (3/32)
ЦЕПОЧНАЯ СТРОЧКА
3-6,5
SS
Фиксир.
60
(1/8-1/4)
2,5 (3/32)

24
KNOWING YOUR SEWING MACHINE
KENNENLERNEN IHRER MASCHINE
КРАТКОЕ ТЕХНИЧЕСКОЕ ОПИСАНИЕ МАШИНЫ
РЕКОМЕНДУЕМАЯ ДЛИНА СТЕЖКА
(Модели STAR 230E, PS-55, STAR-50, RSR-55, XRX-55)
СТРОЧКА
НАИМЕНОВАНИЕ СТЕЖКА
ЗАДАННАЯ ШИРИНА
РЕКОМЕНДУЕМАЯ ДЛИНА
НОМЕР СТРАНИЦЫ
[мм(дюймы)]
[ мм(дюймы)]
РУКОВОДСТВА
1-СТУПЕНЧАТОЕ АВТОМАТИЧЕСКОЕ 3-5 (Отметки на ручке 4-7)
F-1,5
64
ОБМЕТЫВАНИЕ ПЕТЛИ
(1/8-3/16)
(1/64-1/16)
ПРЯМОЙ СТЕЖОК
6,5
1-4,5
51, 74, 75
(1/4)
(1/16-3/16)
ЗИГЗАГООБРАЗНЫЙ
0-6,5
F-4,5
53, 72, 76, 78
СТЕЖОК
(0-1/4)
(1/64-3/16)
ПОТАЙНОЙ
3-6,5
F-2
54
ПОДРУБОЧНЫЙ ШОВ
(1/8-1/4)
(1/64-1/16)
ПОДШИВОЧНАЯ СТРОЧКА
3-6,5
F-3
55
(1/8-1/4)
(1/64-1/8)
ЭЛАСТИЧНАЯ СТРОЧКА
3-6,5
F-2,5
56
(1/8-1/4)
(1/64-3/32)
ПОДШИВОЧНАЯ
3-6,5
F-1,5
54
ТРИКОТАЖНАЯ СТРОЧКА
(1/8-1/4)
(1/64-1/16)
СТРОЧКА-ЕЛОЧКА
3-6,5
F-1,5
58
(1/8-1/4)
(1/64-1/16)
СТЕЖОК С ДВОЙНЫМ ЭФФЕКТОМ
3-6,5
F-3
СТРОЧКА-МОСТИК
57
СТЕЖОК РАМПАРТ
(1/8-1/4)
(1/64-1/8)
ЭЛАСТИЧНАЯ
3-6,5
F-3
61
ПОДШИВОЧНАЯ СТРОЧКА
(1/8-1/4)
(1/64-1/8)
БИСЕРНЫЙ СТЕЖОК
3-6,5
F-1
59
СТРЕЛОВИДНЫЙ СТЕЖОК
(1/8-1/4)
(1/64-1/16)
ТРОЙНАЯ ТРИКОТАЖНАЯ
6,5
SS
Фиксир.
51
СТРОЧКА
(1/4)
2,5 (3/32)
ТРОЙНАЯ ТРИКОТАЖНАЯ
3-6,5
SS
Фиксир.
62
СТРОЧКА «ЗИГЗАГ»
(1/8-1/4)
2,5 (3/32)
ЭЛАСТИЧНАЯ
3-6,5
SS
Фиксир.
61
ОВЕРЛОЧНАЯ СТРОЧКА
(1/8-1/4)
2,5 (3/32)
ЭЛАСТИЧНАЯ
3-6,5
SS
Фиксир.
61
ОВЕРЛОЧНАЯ СТРОЧКА
(1/8-1/4)
2,5 (3/32)
ПЕРИСТРЫЙ СТЕЖОК
3-6,5
SS
Фиксир.
62
(1/8-1/4)
2,5 (3/32)
СТРОЧКА «ГРЕБЕШОК»
3-6,5
SS
Фиксир.
61
(1/8-1/4)
2,5 (3/32)
ДЕКОРАТИВНЫЙ СТЕЖОК
6,5
SS
Фиксир.
59
(1/4)
2,5 (3/32)
СОЕДИНИТЕЛЬНЫЙ
3-6,5
SS
Фиксир.
60
СТЕЖОК
(1/8-1/4)
2,5 (3/32)
ДЕКОРАТИВНЫЙ СТЕЖОК
3-6,5
SS
Фиксир.
59
(1/8-1/4)
2,5 (3/32)
ДЕКОРАТИВНЫЙ
3-6,5
SS
Фиксир.
57
ПОДРУБОЧНЫЙ СТЕЖОК
(1/8-1/4)
2,5 (3/32)
ДЕКОРАТИВНЫЙ СТЕЖОК
6,5
SS
Фиксир.
59
(1/4)
2,5 (3/32)

25
KNOWING YOUR SEWING MACHINE
KENNENLERNEN IHRER MASCHINE
КРАТКОЕ ТЕХНИЧЕСКОЕ ОПИСАНИЕ МАШИНЫ
РЕКОМЕНДУЕМАЯ ДЛИНА СТЕЖКА
(Модели PS-53)
СТРОЧКА
НАИМЕНОВАНИЕ СТЕЖКА
ЗАДАННАЯ ШИРИНА
РЕКОМЕНДУЕМАЯ ДЛИНА
НОМЕР СТРАНИЦЫ
[мм(дюймы)]
[ мм(дюймы)]
РУКОВОДСТВА
4-СТУПЕНЧАТОЕ АВТОМАТИЧЕСКОЕ 3-5 (Отметки на ручке 4-7)
F-1,5
64
ОБМЕТЫВАНИЕ ПЕТЛИ
(1/8-3/16)
(1/64-1/16)
ПРЯМОЙ СТЕЖОК
6,5
1-4,5
51, 74, 75
(1/4)
(3/64-3/16)
ЗИГЗАГООБРАЗНЫЙ
0-6,5
F-4,5
53, 72, 76, 78
СТЕЖОК
(0-1/4)
(1/64-3/16)
СТЕЖОК С ДВОЙНЫМ
3-6,5
F-3
57
ЭФФЕКТОМ
(1/8-1/4)
(1/64-1/8)
ПОДШИВОЧНАЯ
3-6,5
F-1,5
54
ТРИКОТАЖНАЯ СТРОЧКА
(1/8-1/4)
(1/64-1/16)
ПОТАЙНОЙ
3-6,5
F-2
54
ПОДРУБОЧНЫЙ ШОВ
(1/8-1/4)
(1/64-1/16)
ПОДШИВОЧНАЯ СТРОЧКА
3-6,5
F-3
55
(1/8-1/4)
(1/64-1/8)
ЭЛАСТИЧНАЯ СТРОЧКА
3-6,5
F-2,5
56
(1/8-1/4)
(1/64-3/32)
ТРОЙНАЯ ТРИКОТАЖНАЯ
6,5
SS
Фиксир.
51
СТРОЧКА
(1/4)
2,5 (3/32)
ТРОЙНАЯ ТРИКОТАЖНАЯ »
3-6,5
SS
Фиксир.
62
СТРОЧКА «ЗИГЗАГ
(1/8-1/4)
2,5 (3/32)
СОЕДИНИТЕЛЬНЫЙ
3-6,5
SS
Фиксир.
60
СТЕЖОК
(1/8-1/4)
2,5 (3/32)
СТРОЧКА «ГРЕБЕШОК»
3-6,5
SS
Фиксир.
61
(1/8-1/4)
2,5 (3/32)
ЭЛАСТИЧНАЯ ОВЕРЛОЧНАЯ
3-6,5
SS
Фиксир.
61
СТРОЧКА
(1/8-1/4)
2,5 (3/32)
ЭЛАСТИЧНАЯ ОВЕРЛОЧНАЯ
3-6,5
SS
Фиксир.
61
СТРОЧКА
(1/8-1/4)
2,5 (3/32)
ПЕРИСТРЫЙ СТЕЖОК
3-6,5
SS
Фиксир.
62
(1/8-1/4)
2,5 (3/32)

26
KNOWING YOUR SEWING MACHINE
KENNENLERNEN IHRER MASCHINE
КРАТКОЕ ТЕХНИЧЕСКОЕ ОПИСАНИЕ МАШИНЫ
1
3
2
1
2
3
4
·
·
· 4 · 3 · 2 · 1 · F · 0 .................
SS
A
A
A
A
A
Stitch Length Dial
Depending on your selected stitch, you may need to adjust the stitch
length for best results.
The numbers marked on the Stitch Length Dial represent the length
of the stitch in millimeters (mm).
THE HIGHER THE NUMBER, THE LONGER THE STITCH.
The “0” setting does not feed the material. This is used for sewing
on a button.
The “F” area is used for making a Satin Stitch (a dense zigzag stitch)
which can be used in making buttonholes and decorative stitches.
The position needed for making the Satin Stitch varies according to
the material and thread being used. To determine the exact dial
position, you should first test the stitch and length settings on a
scrap of fabric to observe the feeding of the material.
1
Stitch length dial
2
Length
3
Fine
→
SS
4
Coarse
CAUTION
Do not set the Stitch Length Dial in the range shown by
A
A
A
A
A
. If
the machine is started while the dial is set in the range shown
by
A
A
A
A
A
, the fabric will not feed correctly and the fabric or
machine may be damaged.
Turn the dial to the left past “0” for the
SS
position.
SS
(Fixed 2.5)
CAUTION
If the stitches get bunched together, lengthen the stitch
length and continue sewing. Do not continue sewing with-
out lengthening the stitch length, otherwise the needle may
break and cause injury.

27
KNOWING YOUR SEWING MACHINE
KENNENLERNEN IHRER MASCHINE
КРАТКОЕ ТЕХНИЧЕСКОЕ ОПИСАНИЕ МАШИНЫ
Stichlängen-Einstellrad
Abhängig vom gewählten Stich kann es sein, daß Sie für beste Ergebnisse
die Stichlänge ändern müssen.
Die auf dem Stichlängen-Einstellrad aufgedruckten Zahlen repräsentie-
ren die Stichlänge in Millimetern (mm).
JE HÖHER DIE ZAHL, DESTO LÄNGER DER STICH.
Bei der Einstellung “0” wird das Material nicht transportiert. Damit
können Sie z. B. einen Knopf annähen.
Der Bereich “F” wird für den Satinstich benutzt (ein enger Zickzackstich).
Dieser Stich wird für Knopflöcher und für dekorative Ausführungen
benutzt. Die Stellung des Rades für den Satinstich variiert mit dem
Material und dem verwendeten Faden. Um die genaue Position des Rades
zu bestimmen, sollten Sie zunächst die Stichmuster und -längen auf einem
Stück Stoff ausprobieren, um den Transport des Materials zu beobachten.
1
Stichlängen-Einstellrad
2
Stichlänge
3
Fein
→
SS
4
Grob
VORSICHT
Stellen Sie nicht das Stichlängen-Einstellrad in dem in
A
A
A
A
A
gezeigten
Bereich ein. Wenn die Maschine gestartet wird, während das
Einstellrad auf den in
A
A
A
A
A
gezeigten Bereich gestellt ist, wird der Stoff
nicht richtig transportiert, und der Stoff oder die Maschine können
beschädigt werden.
Drehen Sie das Stichlängen-Einstellrad über “0” hinaus auf die Position
SS
.
SS
(Fixiert 2,5)
VORSICHT
Wenn die Stiche sich zusammenziehen, wählen Sie eine größere
Stichlänge, bevor Sie weiternähen. Nähen Sie nicht weiter, ohne
eine größere Stichlänge gewählt zu haben, da die Nadel sonst
abbrechen und Verletzungen verursachen kann.
Ручка регулирования длины стежка
В зависимости от типа выбранного Вами шва для обеспечения
наилучших результатов может возникнуть необходимость в
регулировании длины стежка.
Цифры, указанные на ручке регулирования длины стежка,
представляют длину стежка в миллиметрах (мм).
ЧЕМ БОЛЬШЕ ЧИСЛО, ТЕМ ДЛИННЕЕ СТЕЖОК.
При установке на
“0”
продвижение ткани отключается. Данный
режим применяется для пришивания пуговиц.
Область, обозначенная символом“F”, предназначена для
«сатинового» шва (мелкие зигзагообразные стежки), который
может использоваться для обметывания петель, а также для
декоративной обработки ткани. Задаваемая в данной области
величина выбирается в зависимости от типа прошиваемой
ткани и применяемой нитки. Для получения оптимального
результата сначала рекомендуется сделать пробную строчку
на лоскутке и проследить за продвижением ткани.
1
Ручка регулирования длины стежка
2
Длина
3
Частые
→
SS
4
Редкие
ПРЕДОСТЕРЕЖЕНИЕ
Не устанавливайте ручку регулирования длины стежка в
пределах, обозначенных символом
A
A
A
A
A
. Если ручка
регулирования длины стежка установлена в пределах
A
A
A
A
A
на момент включения швейной машины, возможно
неправильное продвижение ткани и повреждение
материала или машины.
Поверните ручку влево за“0”на позицию
SS
.
SS
(Фиксированная 2,5)
ПРЕДОСТЕРЕЖЕНИЕ
При наложении стежков друг на друга увеличьте длину
стежка и продолжите строчку. Не продолжайте строчку
без удлинения стежка - в противном случае игла может
сломаться, и Вы можете получить травму.
1
3
2
1
2
3
4
·
·
· 4 · 3 · 2 · 1 · F · 0 .................
SS
A
A
A
A
A

28
KNOWING YOUR SEWING MACHINE
KENNENLERNEN IHRER MASCHINE
КРАТКОЕ ТЕХНИЧЕСКОЕ ОПИСАНИЕ МАШИНЫ
7
6
5
2
1
0
1
Stitch Width Dial
Depending on the stitch selected, you may need to adjust the stitch
width.
The numbers marked on the dial represent the stitch width.
THE HIGHER THE NUMBER, THE WIDER THE STITCH.
1
Stitch width dial
CAUTION
Do not adjust the stitch width while the needle is in the fabric.
Otherwise, the needle or fabric may be damaged.
NOTE:
When you choose the Straight Stitch or the Triple Stretch Stitch you
can change the needle position from left to right.
Stichbreiten-Einstellrad
Abhängig von dem gewählten Stich kann es sein, daß Sie die Stichbreite
ändern müssen.
Die Zahlen auf dem Einstellrad repräsentieren die Stichbreite.
JE HÖHER DIE ZAHL, DESTO BREITER DER STICH.
1
Stichbreiten-Einstellrad
VORSICHT
Stellen Sie nicht die Stichbreite ein, während die Nadel im Gewebe ist,
andernfalls können die Nadel oder der Stoff beschädigt werden.
NOTIZEN:
Wenn Sie den Geradstich oder den Dreifach-Stretchstich wählen, können
Sie die Nadelposition auf Links oder Rechts einstellen.
Ручка регулирования
ширины стежка
В зависимости от выбранного типа стежка, Вам может
потребоваться регулировка его ширины.
Числа, нанесенные на круговую шкалу ручки регулятора,
соответствуют ширине стежка.
ЧЕМ БОЛЬШЕ ЧИСЛО, ТЕМ ШИРЕ СТЕЖОК.
1
Ручка регулирования ширины стежка
ПРЕДОСТЕРЕЖЕНИЕ
Запрещается регулировать ширину стежка, когда игла
находится в ткани.
Вы можете повредить иглу или ткань.
ПРИМЕЧАНИЕ:
Если Вы выбрали прямой стежок или тройную трикотажную
строчку, Вы можете поменять положение иглы с левого на
правое.

29
KNOWING YOUR SEWING MACHINE
KENNENLERNEN IHRER MASCHINE
КРАТКОЕ ТЕХНИЧЕСКОЕ ОПИСАНИЕ МАШИНЫ
1
Reverse Sewing Lever
Reverse sewing is used for back tacking and reinforcing seams.
(Model PS-57, PS-55, STAR-50, RSR-55, XRX-55, PS-53)
To sew in reverse, push the Reverse Sewing Lever in as far as
possible and hold in that position while pressing lightly on the foot
pedal. To sew forward, release the Reverse Sewing Lever. The
machine will then sew forward.
(Model STAR 240E, STAR 230E)
To sew in reverse when the foot controller is not used, push the
Reverse Sewing Lever in as far as possible and hold it. The
machine will sew slowly in reverse.
When the foot controller is used, push this lever and hold it while
pressing lightly on the foot pedal. Then, the machine will sew at
ordinary speed in reverse.
1
Reverse sewing lever
Rückwärtstaste
Rückwärtsnähen wird zum Befestigen von Nähten und zur Verstärkung
von Säumen benutzt.
(Modell PS-57, PS-55, STAR-50, RSR-55, XRX-55, PS-53)
Zum Rückwärtsnähen drücken Sie die Rückwärtstaste soweit wie möglich
und halten die Taste in dieser Position, während Sie leicht auf den
Fußanlasser drücken. Zum Vorwärtsnähen lassen Sie die Rückwärtstaste
los.
(Modell STAR 240E, STAR 230E)
Um Rückwärts zu nähen, wenn der Fußanlasser nicht verwendet wird,
drücken Sie die Rückwärts-Nähtaste so weit wie möglich ein und halten
sie gedrückt. Die Maschine näht langsam in Rückwärtsrichtung.
Wenn der Fußanlasser verwendet wird, drücken Sie diese Taste und halten
sie gedrückt, während Sie den Fußanlasser vorsichtig betätigen. Die
Maschine näht jetzt mit normaler Geschwindigkeit in Rückwärtsrichtung.
1
Rückwärtstaste
Рычаг реверсирования строчки
Реверсирование направления строчки применяется для
фиксации конца швов и их усиления.
(Модели PS-57, PS-55, STAR-50, RSR-55, XRX-55, PS-53)
Для реверсирования направления строчки как можно сильнее
нажмите на рычаг реверсирования строчки и, удерживая его
в нажатом состоянии, слегка надавите на педаль ножного
контроллера. Для продолжения строчки в прямом направлении
отпустите рычаг реверсирования строчки. Машина начнет
шов в прямом направлении.
(Модели STAR 240E, STAR 230E)
Для реверсирования строчки при отсутствии ножного
контроллера, до упора в направлении от себя нажмите на
рычаг реверсирования строчки и удерживайте его в этом
положении. Машина начнет медленно шить в обратном
направлении.
Если Вы используете ножной контроллер, нажмите на рычаг
и, удерживая его в этом положении, слегка надавите на
педаль ножного контроллера. В этом случае машина начнет
обратную строчку на обычной скорости.
1
Рычаг реверсирования строчки

30
KNOWING YOUR SEWING MACHINE
KENNENLERNEN IHRER MASCHINE
КРАТКОЕ ТЕХНИЧЕСКОЕ ОПИСАНИЕ МАШИНЫ
3
2
1
Feed Dog Position Switch
Use the Feed Dog Position Switch to raise or lower the feed dogs
according to the job that is being done. When monogramming,
embroidering, darning or sewing on buttons, the feed dogs should
be lowered. (The garment will not be fed.)
NOTE:
When raising or lowering the feed dogs, move the Feed Dog
Position Switch as far as possible to the appropriate side. Since the
feed dogs can not be lowered using the Feed Dog Position Switch
immediately after they are raised, turn the balance wheel toward
you once and after the feed dogs are raised, lower them using the
Feed Dog Position Switch.
1
Feed dog position switch
2
Down position
3
Up position
Transporteurhebel
Benutzen Sie den Transporteurhebel zum Heben und Senken des Trans-
porteurs, je nach der Näharbeit, die Sie vorhaben. Beim Sticken von
Monogrammen oder Motiven, beim Stopfen oder beim Annähen von
Knöpfen sollte der Transporteur versenkt werden (das Material wird dann
nicht transportiert).
NOTIZEN:
Wenn Sie den Transporteur heben oder senken, bewegen Sie den Hebel so
weit wie möglich auf die entsprechende Position. Da sich der Transporteur
nicht in jeder Position absenken läßt, drehen Sie einmal in Nährichtung am
Handrad, bis der Transporteur über den höchsten Punkt hinaus ist, und
senken Sie dann den Transporteur ab.
1
Transporteurhebel
2
Position unten
3
Markierung für Position oben
Переключатель позиции
зубчатой рейки механизма
продвижения ткани
Используйте переключатель позиции зубчатой рейки
механизма продвижения ткани для поднятия или опускания
зубчатой рейки в соответствии с видом выполняемых на
швейной машине работ. При изготовлении монограмм,
вышивании, штопке или во время пришивания пуговиц
зубчатая рейка механизма продвижения ткани должна быть
опущена. (Изделие не подается.)
ПРИМЕЧАНИЕ:
При поднятии или опускании зубчатой рейки механизма
продвижения ткани до упора сдвиньте переключатель позиции
зубчатой рейки механизма продвижения ткани в ту или иную
сторону. Поскольку зубчатую рейку механизма продвижения
ткани нельзя опустить сразу же после того, как она была
поднята, поверните на себя маховик машины и после подъема
рейки опустите ее с помощью переключателя позиции зубчатой
рейки механизма продвижения ткани.
1
Переключатель позиции зубчатой рейки
механизма продвижения ткани
2
Нижнее положение
3
Верхнее положение

31
KNOWING YOUR SEWING MACHINE
KENNENLERNEN IHRER MASCHINE
КРАТКОЕ ТЕХНИЧЕСКОЕ ОПИСАНИЕ МАШИНЫ
1
(Model STAR 240E, STAR 230E)
Start/Stop Button
Pressing the Start/Stop Button once starts the machine; pressing
the button again stops the machine.
•
The machine sews at a slow speed when sewing with the button
held down.
•
The needle stops in its highest position when sewing stops.
1
Start/Stop button
(Model STAR 240E)
When you turn on the main power switch, the Start/Stop Button light
will be red, and will change to green after about 1 second. This
shows that sewing is possible. When you turn off the power, the light
of the button will also turn off.
While the bobbin is being wound (the bobbin winder shaft is moved
to the right), the button lights up in orange.
(Modell STAR 240E, STAR 230E)
Start-/Stopp-Taste
Durch Drücken der Taste Start/Stopp wird die Nähmaschine gestartet;
erneutes Drücken stoppt die Maschine.
•
Wenn diese Taste gedrückt wird, näht die Maschine langsamer.
•
Die Nadel stoppt beim Nähstopp in der oberen Position.
1
Start-/Stopp-Taste
(Modell STAR 240E)
Beim Einschalten des Hauptnetzschalters leuchtet die Taste Start/Stopp in
rot auf und wechselt nach etwa 1 Sekunde auf grün um. Dies zeigt an, daß
Nähen möglich ist. Beim Ausschalten des Geräts erlischt die Taste.
Während des Aufspulbetriebs (Aufspulhebel nach rechts) leuchtet die
Taste orange.
(Модели STAR 240E, STAR 230E)
Кнопка пуска/остановки
машины
При однократном нажатии на данную кнопку машина
запуститься; при повторном нажатии на кнопку машина
остановится.
• При нажатой кнопке машина шьет на малой скорости.
• После остановки машины игла находится в крайнем верхнем
положении.
1
Кнопка пуска/остановки машины
(Модель STAR 240E)
При включении главного выключателя питания кнопка пуска/
остановки машины загорится красным светом и
приблизительно через 1 секунду переключится на зеленый.
Это сигнализирует о готовности машины к шитью. При
выключении главного выключателя питания световой
индикатор на кнопке пуска/остановки машины погаснет.
При намотке ниток на шпульку (вал мотального механизма
сдвинут вправо) данная кнопка горит оранжевым светом.

32
KNOWING YOUR SEWING MACHINE
KENNENLERNEN IHRER MASCHINE
КРАТКОЕ ТЕХНИЧЕСКОЕ ОПИСАНИЕ МАШИНЫ
1
1
1
(Model STAR 240E, STAR 230E)
Sewing Speed Controller
Controls the speed range.
When the foot controller is used, you can control maximum speed
with the sewing speed controller.
The sewing speed controller should be set at right (fastest) position
for normal usage with foot controller.
1
Sewing speed controller
Converting to Free-arm Style
Free-arm sewing is convenient for sewing tubular and hard-to-
reach areas on a garment. To change your machine to the free-arm
style, simply lift out the flat bed attachment.
1
Slide the flat bed attachment to the left.
1
Flat bed attachment
(Modell STAR 240E, STAR 230E)
Hebel für den
Geschwindigkeitsbereich
Hier wird der Geschwindigkeitsbereich des Nähwerks eingestellt.
Wenn der Fußanlasser angeschlossen ist, können Sie die maximale
Geschwindigkeit mit dem Hebel für den Geschwindigkeitsbereich
einstellen. Der Hebel sollte für die normale Benutzung der Maschine ganz
nach rechts gestellt werden (höchste Maximalgeschwindigkeit).
1
Hebel für den Geschwindigkeitsbereich
Umbau auf Freiarm
Das Nähen mit Freiarm ist praktisch, wenn Sie röhrenförmige und schwer
zu erreichende Stellen eines Kleidungsstückes nähen müssen. Für den
Umbau Ihrer Maschine zur Freiarmmaschine nehmen Sie einfach den
Anschiebetisch heraus.
1
Schieben Sie den Anschiebetisch nach links.
1
Anschiebetisch (Zubehörfach)
(Модели STAR 240E, STAR 230E)
Контроллер скорости шитья
Используется для управления скоростью шитья.
При использовании ножного контроллера Вы можете
регулировать максимальную скорость с помощью контроллера
скорости шитья.
Контроллер скорости шитья следует установить в крайнее
правое положение (наибольшая скорость) для нормальной
работы ножного контроллера.
1
Контроллер скорости шитья
Переключение на режим
"Free-arm"
Данный режим удобен для обработки прошиваемых деталей
трубчатой формы или труднодоступных участков предметов
одежды. Для переключения машины на этот режим, поднятием
снимите платформу-приставку.
1
Сдвиньте платформу-приставку.
1
Платформа-приставка

33
KNOWING YOUR SEWING MACHINE
KENNENLERNEN IHRER MASCHINE
КРАТКОЕ ТЕХНИЧЕСКОЕ ОПИСАНИЕ МАШИНЫ
THREADING
THE MACHINE
Winding the Bobbin
CAUTION
•
If the thread spool and/or spool cap are set incorrectly,
the thread may tangle on the spool pin.
•
Use the spool cap (large, medium, or small) that is
closest in size to the thread spool. If a spool cap smaller
than the thread spool is used, the thread may become
caught in the slit on the end of the spool.
1. Place the spool of thread on the horizontal spool pin and firmly
hold it with a spool cap so that the spool of thread will not turn.
Pass the thread through the thread guide as shown following the
dotted line on the machine.
CAUTION
Use only bobbins recommended by the manufacturer of
this machine (see page 5). Using other bobbins may result
in damage or injury.
(Model STAR 240E, STAR 230E)
2. Place the bobbin on the bobbin winder shaft. Push the bobbin
winder shaft to the right.
1
Spring on the shaft
2
Groove of the bobbin
*
Align the groove of the bobbin with the spring on the shaft.
3. Wind the thread clockwise around the bobbin four or five times,
pass the end of the thread through the slit in the bobbin winder
seat, and then pull the thread in the direction shown in the
illustration. Use the cutter to cut the thread.
3
Bobbin winder seat
(Model PS-57, PS-55, STAR-50, RSR-55, XRX-55, PS-53)
2. Pass the end of the thread through the hole on the bobbin from
the inside.
Place the bobbin onto the bobbin winder shaft and slide the
bobbin winder shaft to the right. Turn the bobbin clockwise, by
hand, until the spring on the shaft slides into the groove of the
bobbin.
1
Spring on the shaft
2
Groove of the bobbin
3
Bobbin winder seat
3. While holding the end of the thread, gently depress the foot
controller to wind the thread around the bobbin a few times.
Then stop the machine.
Trim the excess thread above the bobbin.
1
2
2
1
2
1
1
3
2
3
1
3
2
(Model STAR 240E, STAR 230E)
(Model PS-57, PS-55, STAR-50, RSR-55, XRX-55, PS-53)

34
KNOWING YOUR SEWING MACHINE
KENNENLERNEN IHRER MASCHINE
КРАТКОЕ ТЕХНИЧЕСКОЕ ОПИСАНИЕ МАШИНЫ
ЗАПРАВКА НИТОК
Намотка ниток на шпульку
ПРЕДОСТЕРЕЖЕНИЕ
• Если катушка с нитками и/или катушечный колпачок
установлены неправильно, нитка может запутаться
на катушечном стержне.
• Используйте катушечный колпачок (большой,
малый, средний), наиболее подходящий к катушке
по размеру. Если катушечный колпачок меньше
используемой катушки, нитка может зацепиться в
прорези на торце катушки.
1. Установите катушку с нужной ниткой на горизонтальный
катушечный стержень и плотно зафиксируйте ее
катушечным колпачком таким образом, чтобы катушка с
ниткой не поворачивалась. Пропустите конец нитки через
нитенаправитель вдоль пунктирной линии, обозначенной
на машине.
ПРЕДОСТЕРЕЖЕНИЕ
Используйте только шпульки, рекомендованные к
применению заводом-изготовителем данной швейной
машины (см. стр. 6). Применение шпулек других типов
может привести к повреждению машины или травме.
(Модели STAR 240E, STAR 230E)
2. Установите шпульку на вал мотального механизма.
Нажатием сдвиньте вал мотального механизма вправо.
1
Пружина вала
2
Прорезь шпульки
*
Совместите прорезь шпульки с пружиной вала.
3. Намотайте нитку по часовой стрелке на 4-5 оборотов
вокруг шпульки, затем пропустите нитку сквозь прорезь
седла мотального механизма и вытяните ее в направлении,
показанном на рисунке. С помощью нитеобрезателя
обрежьте нитку.
3
Седло мотального механизма
(Модели PS-57, PS-55, STAR-50, RSR-55, XRX-55, PS-53)
2. Пропустите конец нитки изнутри наружу сквозь отверстие
в шпульке.
Установите шпульку на вал мотального механизма и
сместите этот вал вправо. Поверните шпульку рукой по
часовой стрелке, чтобы пружина вала вошла в прорезь
шпульки.
1
Пружина вала
2
Прорезь шпульки
3
Седло мотального механизма
3. Придерживая конец нитки, слегка надавите на педаль
ножного контроллера и на малой скорости несколько раз
намотайте нитку на шпульку. Затем остановите машину.
Отрежьте лишний конец нитки, торчащий из верхней части
шпульки.
FADENFÜHRUNG
Aufspulen
VORSICHT
•
Inkorrektes Aufsetzen der Garnrolle bzw. Garnrollenkappe
kann dazu führen, daß der Faden sich auf dem Garnrollenstift
verwickelt.
•
Verwenden Sie eine Garnrollenkappe (groß, mittel oder klein),
die in ihrer Größe am besten zur Garnrolle paßt. Ist die
Garnrollenkappe kleiner als die Garnrolle, kann der Faden
sich in dem Schlitz am Rand der Garnrolle verfangen.
1. Setzen Sie die Garnrolle auf den horizontalen Garnrollenstift und
halten Sie sie mit einer Garnrollenkappe fest, so daß die Garnrolle
nicht drehen kann. Führen Sie den Faden durch die Fadenführung
entlang der gepunkteten Linie auf der Maschine.
VORSICHT
Benutzen Sie nur die vom Hersteller für diese Maschine
empfohlenen Spulen (Siehe Seite 6). Wenn Sie andere Spulen
verwenden, kann dies zu Beschädigungen der Maschine und
Verletzungen führen.
(Modell STAR 240E, STAR 230E)
2. Setzen Sie die Spule auf den Spuler und schieben Sie den Spuler nach
rechts.
1
Schaftfeder
2
Kerbe
* Drehen Sie die Spule von Hand im Uhrzeigersinn, bis die Schaftfeder
in der Kerbe der Spule einrastet.
3. Wickeln Sie den Faden im Uhrzeigersinn vier- bis fünfmal um die
Spule, führen Sie das Fadenende durch den Schlitz im Spuler, und
ziehen Sie dann den Faden in der Richtung, die in der Abbildung
angegeben ist. Schneiden Sie den Faden mit dem Fadenabschneider
ab.
3
Spuler
(Modell PS-57, PS-55, STAR-50, RSR-55, XRX-55, PS-53)
2. Führen Sie den Faden von innen durch das Loch in der Spule.
Setzen Sie die Spule auf den Spuler und schieben Sie den Spuler nach
rechts. Drehen Sie die Spule im Uhrzeigersinn, mit der Hand, bis die
Schaftfeder in der Kerbe in der Spule einrastet.
1
Schaftfeder
2
Kerbe
3
Spulenträgerplatte
3. Während Sie das Fadenende halten, drücken Sie leicht den Fußanlasser,
um den Faden einige Male um die Spule zu wickeln. Dann stoppen Sie
die Maschine.
Schneiden Sie den überschüssigen Faden über der Spule ab.

35
KNOWING YOUR SEWING MACHINE
KENNENLERNEN IHRER MASCHINE
КРАТКОЕ ТЕХНИЧЕСКОЕ ОПИСАНИЕ МАШИНЫ
(Model STAR 240E, STAR 230E)
4. Slide the sewing speed controller to its maximum (as far to the
right as possible).
5. Push the Start/Stop button. The machine will stop automatically
when the bobbin is full.
6. After the bobbin has stopped moving, push the Start/Stop button
to stop the machine.
1
Sewing speed controller
CAUTION
When removing the bobbin, do not pull on the bobbin winder
seat. Doing so could loosen or remove the bobbin winder seat,
resulting in damage to the machine.
7. Cut the thread, slide the bobbin winder shaft to the left and
remove the bobbin.
(Mode PS-57, PS-55, STAR-50, RSR-55, XRX-55, PS-53)
4. Step down on the foot controller to start.
5. After the machine stops automatically when the bobbin is full,
take your foot off of the foot controller.
CAUTION
When removing the bobbin, do not pull on the bobbin winder
seat. Doing so could loosen or remove the bobbin winder seat,
resulting in damage to the machine.
6. Cut the thread, slide the bobbin winder shaft to the left and
remove the bobbin.
NOTE:
The needle bar does not move when the bobbin winding shaft is slid
to the right.
Immediately after winding the bobbin, it is normal to hear the sound
of the clutch engaging when beginning to sew or manually turning
the balance wheel.
CAUTION
Be sure to follow the process described. If the thread is not
cut completely, and the bobbin is wound, when the thread
runs low it may tangle around the bobbin and cause the
needle to break.
CAUTION
Setting the bobbin improperly may cause the thread ten-
sion to loosen, breaking the needle and resulting in injury.
1
Wound evenly
2
Wound poorly
1
2
(Model STAR 240E, STAR 230E)
(Model PS-57, PS-55, STAR-50, RSR-55, XRX-55, PS-53)
1

36
KNOWING YOUR SEWING MACHINE
KENNENLERNEN IHRER MASCHINE
КРАТКОЕ ТЕХНИЧЕСКОЕ ОПИСАНИЕ МАШИНЫ
(Модели STAR 240E, STAR 230E)
4. Сдвиньте контроллер скорости шитья в положение
наибольшей скорости (до упора вправо).
5. Нажмите кнопку пуска/остановки машины. После полной
намотки шпульки машина остановится автоматически.
6. После остановки шпульки нажмите кнопку пуска/остановки
машины, чтобы остановить машину.
1
Контроллер скорости шитья
ПРЕДОСТЕРЕЖЕНИЕ
При снятии шпульки не тяните за седло мотального
механизма. Это может ослабить или сломать седло
мотального механизма, что приведет к поломке швейной
машины.
7. Отрежьте нитку, сдвиньте вал мотального механизма влево
и снимите шпульку со стержня.
(Модели PS-57, PS-55, STAR-50, RSR-55, XRX-55, PS-53)
4. Нажав на педаль ножного контроллера, запустите машину.
5. После полной намотки шпульки машина остановится
автоматически - в этот момент снимите ногу с педали
ножного контроллера.
ПРЕДОСТЕРЕЖЕНИЕ
При снятии шпульки не тяните за седло мотального
механизма. Это может ослабить или сломать седло
мотального механизма, что приведет к поломке швейной
машины.
6. Отрежьте нитку, сдвиньте вал мотального механизма влево
и снимите шпульку со стержня.
ПРИМЕЧАНИЕ:
При сдвиге вала мотального механизма вправо иглодержатель
недвижим.
Непосредственно вслед за намоткой нитки на шпульку обычно
слышен звук срабатывания механизма свободного хода
маховика при начале выполнения строчки или при ручном
повороте маховика. Это нормальное явление.
ПРЕДОСТЕРЕЖЕНИЕ
Строго следуйте последовательности вышеописанных
операций. Если нитка не обрезана полностью, а шпулька
намотана, то во время использования последнего
отрезка шпулечной нити возможно запутывание нити
вокруг шпульки и поломка иглы.
ПРЕДОСТЕРЕЖЕНИЕ
Неправильная установка шпульки может привести к
ослаблению натяжения нити, поломке иглы и травме.
1
Ровная намотка
2
Неправильная намотка
(Modell STAR 240E, STAR 230E)
4. Stellen Sie den Geschwindigkeitshebel auf Maximum (ganz nach
rechts).
5. Drücken Sie die Taste Start/Stopp. Die Maschine stoppt automatisch,
wenn die Spule voll ist.
6. Wenn die Spule sich nicht mehr dreht, drücken Sie die Taste Start/
Stopp, um die Maschine zu stoppen.
1
Hebel für den Geschwindigkeitsbereich
VORSICHT
Zerren Sie beim Abnehmen der Spule nicht zu fest an der
Spulenträgerplatte. Der Spuler könnnte beschädigt werden.
7. Schneiden Sie Faden ab, schieben Sie den Spuler zurück nach links
und entnehmen Sie die volle Spule.
(Modell PS-57, PS-55, STAR-50, RSR-55, XRX-55, PS-53)
4. Betätigen Sie Fußanlasser, um die Maschine zu starten.
5. Sobald die Maschine automatisch gestoppt hat, nehmen Sie Ihren Fuß
vom Fussanlasser.
VORSICHT
Ziehen Sie beim Abnehmen der Spule nicht zu fest an der
Spulenträgerplatte. Dies kann zum Lösen oder Entfernen der
Spulenträgerplatte führen, was Schäden an der Maschine verursacht.
6. Schneiden Sie den Faden ab, schieben Sie den Spuler zurück nach links
und entnehmen Sie die volle Spule.
NOTIZEN:
Das Nähwerk ist abgeschaltet, wenn die Spulerwelle nach rechts geschoben
wird.
Direkt nach dem Aufspulen ist das Geräusch der Kupplung zu hören,
sobald Sie zu nähen beginnen oder das Handrad von Hand bewegen.
VORSICHT
Halten Sie sich unbedingt an den oben beschriebenen Vorgang.
Wenn der Faden nicht vollständig abgeschnitten wird, kann der
Faden sich während des Aufspulens auf der Spule verwickeln, was
dazu führen kann, daß die Nadel beim Nähen abbricht.
VORSICHT
Fehlerhaftes Einsetzen der Spule kann zur Folge haben, dass die
Fadenspannung zu locker ist und die Nadel hierdurch abbricht,
was zu Verletzungen führen kann.
1
Gleichmäßig gewickelt
2
Ungleichmäßig gewickelt

37
KNOWING YOUR SEWING MACHINE
KENNENLERNEN IHRER MASCHINE
КРАТКОЕ ТЕХНИЧЕСКОЕ ОПИСАНИЕ МАШИНЫ
1
2
1
2
Lower Threading
CAUTION
Setting the bobbin improperly may cause the thread ten-
sion to loosen, breaking the needle and resulting in injury.
1
Wound evenly
2
Wound poorly
CAUTION
Be sure to turn off the power. If you accidentally press the
Start/Stop button or step on the foot controller and the
machine begins to operate, injury could result.
1. Raise the needle to its highest position by turning the balance
wheel toward you (counterclockwise) and raise the presser foot
lever.
2. Slide the button and open the cover.
1
Slide button
2
Cover
3. Insert bobbin and deliver thread end through the slit, then pull the
thread to cut.
CAUTION
Be sure the bobbin is set so the thread unrolls in the correct
direction. If the thread unrolls in the wrong direction, it may
cause the thread tension to be incorrect or the needle to
break.
4. Replace the bobbin cover. Place the left tab in place (see arrow
1 at left), then press lightly on the right side (see arrow 2 at left)
until the cover clicks into place.
*
You can begin sewing immediately without drawing up the
bobbin thread.
1
2

38
KNOWING YOUR SEWING MACHINE
KENNENLERNEN IHRER MASCHINE
КРАТКОЕ ТЕХНИЧЕСКОЕ ОПИСАНИЕ МАШИНЫ
Заправка нижней нитки
ПРЕДОСТЕРЕЖЕНИЕ
Неправильная установка шпульки может привести к
ослаблению натяжения нити, поломке иглы и травме.
1
Ровная намотка
2
Неправильная намотка
ПРЕДОСТЕРЕЖЕНИЕ
Обязательно выключите электропитание. При
случайном нажатии на кнопку пуска/остановки машины
или на педаль ножного контроллера машина
включится, и это может привести к травме.
1. Установите иглу в крайнее верхнее положение, вращая
маховик на себя (против часовой стрелки при виде с торца
машины) и поднимите рычаг нажимной лапки.
2. Сдвиньте кнопку и откройте крышку.
1
Скользящая кнопка
2
Крышка
3. Вставьте шпульку, сориентировав конец нитки в
направлении, указанном стрелкой.
ПРЕДОСТЕРЕЖЕНИЕ
Убедитесь в том, что шпулька установлена таким образом, что
нитка разматывается в правильном направлении. Если нитка
разматывается в неправильном направлении, это может привести
к нарушению натяжения нити или поломке иглы.
Unterfadenführung
VORSICHT
Fehlerhaftes Einsetzen der Spule kann zur Folge haben, dass die
Fadenspannung zu locker ist und die Nadel hierdurch abbricht,
was zu Verletzungen führen kann.
1
Gleichmäßig gewickelt
2
Ungleichmäßig gewickelt
VORSICHT
Immer die Maschine ausschalten. Falls Sie versehentlich die Start/
Stopp-Taste betätigen oder auf den Fußanlasser treten und die
Maschine zu arbeiten beginnt, besteht sonst Verletzungsgefahr.
1. Bringen Sie die Nadel auf die höchste Position, indem Sie das Handrad
auf sich zu bewegen (entgegen dem Uhrzeigersinn). Heben Sie dann
den Nähfußhebel an.
2. Schieben Sie den Knopf zur Seite und öffnen Sie die Abdeckung.
1
Knopf wegschieben
2
Abdeckung
3. Die Spule so einsetzen, daß der Faden in der mit dem Pfeil markierten
Richtung herauskommt.
VORSICHT
Achten Sie darauf, daß die Spule so eingesetzt ist, daß der Faden
sich in die richtige Richtung abwickelt. Wenn der Faden sich in die
falsche Richtung abwickelt, kann dies zur Folge haben, daß die
Fadenspannung zu locker ist und die Nadel hierdurch abbricht.
4. Установите на место крышку шпульки. Сначала вставьте
на место левое ушко (см. стрелку 1 слева), а затем слегка
надавите на правую часть крышки (см. стрелку 2 слева),
пока крышка не встанет на место со щелчком.
*
Вы можете сразу приступить к пошиву, не вытягивая
шпулечную нить.
4. Bringen Sie die Abdeckung wieder an. Führen Sie die linke Lasche an
entsprechender Stelle ein (siehe Pfeil 1 links) und drücken Sie sie an
der rechten Seite leicht nach unten (siehe Pfeil 2 links), bis die
Abdeckung einrastet.
* Sie können sofort mit dem Nähen beginnen, ohne den Unterfaden
heraufzuholen.

39
KNOWING YOUR SEWING MACHINE
KENNENLERNEN IHRER MASCHINE
КРАТКОЕ ТЕХНИЧЕСКОЕ ОПИСАНИЕ МАШИНЫ
Upper Threading
1. Raise the presser foot using the Presser Foot Lever.
2. Raise the needle to its highest position by turning the balance
wheel toward you (counterclockwise).
1
Presser foot lever
3. Place a spool of thread on the horizontal spool pin and press a
spool cap onto the spool pin to hold the thread spool firmly in
place.
The thread end should come from the bottom front of the spool.
CAUTION
•
If the thread spool and/or spool cap are set incorrectly,
the thread may tangle on the spool pin and cause the
needle to break.
•
Use the spool cap (large, medium, or small) that is
closest in size to the thread spool. If a spool cap smaller
than the thread spool is used, the thread may become
caught in the slit on the end of the spool and cause the
needle to break.
CAUTION
Be sure to thread the machine properly. Improper threading
can cause the thread to tangle and break the needle, leading
to injury.
4. Deliver the upper thread as shown in this diagram.
5. Make sure to guide the thread through the thread take-up lever
from the right to the left.
2
Thread take-up lever
6. Place thread behind the guide above the needle.
NOTE:
If the thread take-up lever is lowered, the upper thread can not be
wrapped around the thread take-up lever. Be sure to raise the
Presser Foot Lever and the thread take-up before feeding the upper
thread.
Incorrectly feeding the thread may cause sewing problems.
1
2
5
1
2
4
3

40
KNOWING YOUR SEWING MACHINE
KENNENLERNEN IHRER MASCHINE
КРАТКОЕ ТЕХНИЧЕСКОЕ ОПИСАНИЕ МАШИНЫ
Заправка верхней нитки
1. С помощью рычага нажимной лапки поднимите нажимную
лапку.
2. Установите иглу в крайнее верхнее положение, вращая
маховик на себя (против часовой стрелки при виде с торца машины).
1
Рычаг нажимной лапки
3. Установите катушку с нитками на горизонтальный катушечный
стержень и нажатием закрепите катушечный колпачок на катушечном
стержне. Катушка с нитками должна плотно удерживаться на стержне.
Конец нитки должен выступать из нижней передней части катушки.
ПРЕДОСТЕРЕЖЕНИЕ
• Если катушка с нитками и/или катушечный колпачок
установлены неправильно, нитка может запутаться на
катушечном стержне, и это может привести к поломке иглы.
•
Используйте катушечный колпачок (большой, малый,
средний), наиболее подходящий к катушке по размеру. Если
катушечный колпачок меньше используемой катушки, нитка
может зацепиться в прорези на торце катушки, и это
может привести к поломке иглы.
ПРЕДОСТЕРЕЖЕНИЕ
Обязательно следите за правильностью заправки нитки.
Неверная заправка может привести к запутыванию нитки, а это
может привести к поломке иглы и, как следствие, - к травме.
4. Пропустите верхнюю нитку, как показано на диаграмме.
5. Обязательно протягивайте нитку через рычаг подтягивания нитки
справа налево.
2
Рычаг подтягивания нитки
6. Заправьте нитку за нитенаправитель, расположенный над иглой.
ПРИМЕЧАНИЕ:
Если рычаг подтягивания нитки опущен, пропустить верхнюю
нитку вокруг рычага подтягивания нитки невозможно. Перед
протягиванием верхней нитки необходимо обязательно
поднять рычаг подтягивания нитки.
Неверная заправка нитки может привести к проблемам во
время выполнения швейных операций.
Oberfadenführung
1. Heben Sie den Nähfuß mit dem Nähfußhebel.
2. Bringen Sie die Nadel auf die höchste Position, indem Sie das Handrad
auf sich zu bewegen (entgegen dem Uhrzeigersinn).
1
Nähfußhebel
3. Platzieren Sie eine Garnrolle auf den waagerechten Garnrollenstift
und fixieren sie mit einem Spulenhalter, so daß die Garnrolle fest sitzt.
Das Fadenende sollte von der Unterseite der Rolle nach vorne
heraushängen.
VORSICHT
•
Inkorrektes Einsetzen der Garnrolle bzw. Garnrollenkappe
kann dazu führen, daß der Faden sich auf dem Garnrollenstift
verwickelt und die Nadel dadurch abbricht.
•
Verwenden Sie eine Garnrollenkappe (groß, mittel oder klein),
die in ihrer Größe am besten zur Garnrolle paßt. Ist die
Garnrollenkappe kleiner als die Garnrolle, kann der Faden
sich in dem Schlitz am Rand der Garnrolle verfangen, was
dazu führen kann, daß die Nadel abbricht.
VORSICHT
Achten Sie darauf, daß der Faden richtig eingefädelt ist. Fehlerhafte
Fadenführung kann dazu führen, daß der Faden sich verwickelt
und die Nadel abbricht, wodurch Verletzungen entstehen können.
4. Führen Sie den Oberfaden, wie in der Abbildung gezeigt.
5. Achten Sie darauf, daß der Faden von rechts nach links durch den
Fadenhebel verläuft.
2
Fadenhebel
6. Fädeln Sie den Faden hinter die Führung oberhalb der Nadel.
NOTIZEN:
Wenn der Fadenhebel abgesenkt ist, kann es sein, daß der obere Faden
nicht um den Fadenhebel gewickelt ist.
Achten Sie darauf, daß der
Nähfußhebel sowie der Fadenhebel in der oberen Position sind, bevor Sie
den Oberfaden einfädeln.
Falsches Einfädeln kann zu Problemen beim Nähen führen.
5
1
2
4
3

41
KNOWING YOUR SEWING MACHINE
KENNENLERNEN IHRER MASCHINE
КРАТКОЕ ТЕХНИЧЕСКОЕ ОПИСАНИЕ МАШИНЫ
Using Needle Threader
Turn power switch to “O”.
1. Lower the presser foot lever.
2. Turn the balance wheel toward you (counter-clockwise) to raise
the needle holder to the highest position.
1
Needle holder
2
Needle threader lever
CAUTION
When using the needle threader, be sure the needle holder is
in the highest position. Otherwise, the hook may be damaged.
3. While lowering the needle threader lever, hook the thread onto
the guide.
4. Pull down the needle threader lever as much as possible, then
rotate the lever toward the back of the machine (away from you).
Make sure that the hook passes through the eye of the needle
and grabs the thread.
•
Hold the thread in front of the needle in order to make sure that
the hook grabs it.
1
Needle holder
2
Needle threader lever
3
Guide
4
Hook holder
5. While lightly holding the thread, rotate the needle threader lever
toward the front of the machine (toward you). The hook will pull
the thread through the needle.
5
Hook
6
Thread
6. Raise the needle threader lever and pull out about 5 cm (2") of
thread through the needle toward the back of the sewing
machine.
CAUTION
The needle threader can only be used with home sewing
machine needles size 75/11-100/16. Check the table on
page 47 for appropriate needle and thread combinations.
Note that, if you are using transparent nylon mono-filament
thread, only needles in the range of 90/14-100/16 can be
used.
CAUTION
The needle threader can not be used to thread the needle
when you are using decorative threads or specialty needles
like the twin needle and wing needle. When using those
types of threads or needles, thread the eye of the needle
manually. Make sure the main power switch is OFF when
threading the needle manually.
1
2
3
4
2
1
5
5
6
42
KNOWING YOUR SEWING MACHINE
KENNENLERNEN IHRER MASCHINE
КРАТКОЕ ТЕХНИЧЕСКОЕ ОПИСАНИЕ МАШИНЫ
Использование приспособления
для заправки нити в иглу
Установите выключатель питания в положение "O" (ВЫКЛ.).
1. Опустите рычаг нажимной лапки.
2. Поверните маховик на себя (против часовой стрелки),
чтобы поднять иглодержатель в крайнее верхнее
положение.
1
Иглодержатель
2
Рычаг приспособления для заправки нити в
иглу
ПРЕДОСТЕРЕЖЕНИЕ
При использовании приспособления для заправки нити в
иглу убедитесь в том, что иглодержатель находится в
крайнем верхнем положении. В противном случае Вы
можете повредить крючок.
3. Опуская рычаг приспособления для заправки нити в иглу,
зацепите нить за нитенаправитель.
4. До упора опустите рычаг приспособления для заправки
нити в иглу, затем поверните этот рычаг от себя в
направлении задней части машины. Убедитесь в том, что
крючок прошел через ушко иглы и зацепил нить.
• Держите нить перед иглой для того, чтобы крючок зацепил
нить.
1
Иглодержатель
2
Рычаг приспособления для заправки нити в
иглу
3
Нитенаправитель
4
Держатель крючка
5. Удерживая нить, поверните рычаг приспособления для
заправки нити в иглу к себе в направлении передней части
машины. Крючок проденет нить сквозь ушко иглы.
5
Крючок
6
Нить
6. Поднимите рычаг приспособления для заправки нити в
иглу и вытяните приблизительно 5 см (2 дюйма) нитки от
себя, в направлении задней части машины.
ПРЕДОСТЕРЕЖЕНИЕ
Приспособление для заправки нити в иглу можно
использовать только с бытовыми иглами для швейных
машин размера 75/11-100/16. Проверьте нужную
комбинацию игл и ниток в таблице на стр. 48.
Обращаем Ваше внимание но то, что если Вы используете
прозрачные нейлоновые однокомпонентные нитки, то
допустимо использование только игл размера 90/14-
100/16.
ПРЕДОСТЕРЕЖЕНИЕ
Приспособление для заправки нити в иглу нельзя
использовать для заправки ниток, если Вы используете
декоративные нитки или специальные иглы, такие
как, например, двойные или крылообразные иглы.
При использовании таких специальных ниток или игл,
продевайте нитку в ушко иглы вручную. При ручной
заправке ниток в иглу убедитесь в том, что
выключатель питания находится в положении ВЫКЛ.
Bedienung der Fadeneinfädelung
Hauptschalter auf “O” stellen.
1. Senken Sie den Nähfußhebel.
2. Drehen Sie das Handrad zu sich hin (gegen den Uhrzeigersinn), um
den Nadelhalter in höchste Position zu bringen.
1
Nadelhalter
2
Fadeneinfädelungshebel
VORSICHT
Bei Verwendung der Fadeneinfädelung achten Sie bitte immer darauf,
daß das untere Ende des Nadelhalters mit dem unteren Ende der
Halterung des Einfädelhakens auf einer Höhe ist, bevor Sie den
Fadeneinfädelungshebel absenken. Anderenfalls kann der
Einfädelhaken beschädigt werden.
3. Haken Sie den Faden in die Führung ein, während Sie den
Fadeneinfädelungshebel absenken.
4. Ziehen Sie den Fadeneinfädelungshebel soweit wie möglich nach
unten, und drehen Sie den Hebel dann nach hinten (von sich weg).
Achten Sie darauf, daß der Haken das Nadelöhr passiert und den Faden
greift.
•
Halten Sie den Faden vor der Nadel, so daß der Haken den Faden
greifen kann.
1
Nadelhalter
2
Fadeneinfädelungshebel
3
Führung
4
Halterung des Einfädelhakens
5. Drehen Sie den Fadeneinfädelungshebel auf sich zu (Richtung
Vorderseite), wobei Sie den Faden locker festhalten. Der Haken zieht
den Faden nun durch das Nadelöhr.
5
Haken
6
Faden
6. Heben Sie den Nähfußhebel an und ziehen Sie etwa 5 cm Faden durch
die Nadel nach hinten heraus.
VORSICHT
Der Nadeleinfädlerhebel kann nur in Verbindung mit Haus-halts-
Nähmaschinennadeln der Stärke 75/11-100/16 benutzt werden.
Die Tabelle auf Seite 48 enthält alle nötigen Informationen über
die richtigen Nadel- und Fadenkombinationen.
Beachten Sie bitte, daß bei durchsichtigem Nylonfaden nur Nadeln
Stärke 90/14-100/16 benutzt werden können.
VORSICHT
Die Einfädelvorrichtung kann nicht für eine Reihe von Zierfäden
oder Spezialnadeln wie Zwillingsnadeln oder Flügelnadeln
verwendet werden. Wenn Sie solche Arten von Fäden oder Nadeln
verwenden, müssen Sie die Nadel mit der Hand einfädeln.

43
KNOWING YOUR SEWING MACHINE
KENNENLERNEN IHRER MASCHINE
КРАТКОЕ ТЕХНИЧЕСКОЕ ОПИСАНИЕ МАШИНЫ
Manually Drawing Up
Lower Thread
When sewing gathers or darts, the lower thread can be manually
drawn up so that it will have some excess.
1. Pass the thread along the groove in the direction of the arrow,
and leave it there without cutting it.
•
The bobbin cover should still be removed.
2. While lightly holding the end of the upper thread, slowly turn the
balance wheel to the front (counter-clockwise) once by hand to
lower and then raise the needle.
3. Pull on the upper thread to draw up the lower thread.
4. Pull out about 10 cm (4") of both threads and place them toward
the back of the machine under the presser foot.
1
Upper thread
2
Lower thread
1
2
txt_Sp
Вытягивание нижней нитки
вручную
При пошиве изделий со сборками нижнюю нитку можно
вытянуть вручную, чтобы обеспечить нужный запас длины
нити.
1. Пропустите нитку вдоль прорези в направлении стрелки и,
не обрезая ее, оставьте ее там.
• При этом крышка шпульки должна быть снята.
2. Слегка придерживая конец верхней нитки, медленно
поверните маховик на себя (против часовой стрелки) на
один оборот так, чтобы игла опустилась в нижнее
положение, а затем вновь поднялась в крайнее верхнее
положение.
3. Потяните верхнюю нитку на себя для того, чтобы вытянуть
нижнюю нитку.
4. Вытяните свободные концы обеих ниток приблизительно
на 10 см (4 дюйма) и, направив назад, пропустите их под
язычки нажимной лапки.
1
Верхняя нитка
2
Нижняя нитка
Manuelles Heraufholen des
Unterfadens
Beim Nähen von Falten oder beim Figurnähen kann der Unterfaden
manuell heraufgeholt werden, so daß mehr Garn zur Verfügung steht.
1. Führen Sie den Faden in Pfeilrichtung entlang der Rille und belassen
Sie ihn so, ohne ihn abzuschneiden.
•
Die Spulenabdeckung sollte immer noch geöffnet sein.
2. Während Sie das Ende des Oberfadens locker festhalten, drehen Sie
langsam am Handrad nach vorne (entgegen dem Uhrzeigersinn), bis
die Nadel ganz angehoben ist.
3. Ziehen Sie am Oberfaden, um den Unterfaden heraufzuholen.
4. Ziehen Sie beide Fäden etwa 10 cm durch den Schlitz des Nähfußes
nach hinten heraus.
1
Oberfaden
2
Unterfaden

44
KNOWING YOUR SEWING MACHINE
KENNENLERNEN IHRER MASCHINE
КРАТКОЕ ТЕХНИЧЕСКОЕ ОПИСАНИЕ МАШИНЫ
Twin Needle Sewing
Your machine is designed for twin needle sewing, which allows you
to sew with two top threads. You can use the same color or two
different colors of thread for making decorative stitches. Any of the
patterns, except the buttonhole pattern, can be sewn with the twin
needle. When using the Straight Stitch, the Stitch Width Dial should
be set so that the needle is in the center position (between 3 and 4).
However, when other patterns are used, set the Stitch Width Dial
between 0 and 5. See page 28 for details on adjusting the Stitch
Width Dial.
CAUTION
•
Use only twin needles made for this machine (part code
X57521-001). Other needles could break, resulting in
damage.
•
When sewing with the twin needle, be sure the Stitch
Width Dial is not set above 5 since this may cause the
needle to hit the needle plate and break.
•
Do not sew with bent needles. The needle could break
and cause injury.
•
When using the twin needle, be sure to use zigzag
presser foot only.
INSERTING THE TWIN NEEDLE
Insert in the same way a single needle is inserted (refer to page 11).
The flat side of the needle should face toward the back and the
rounded side should face toward you.
txt_Sp
Двухигольная строчка
В данной машине предусмотрена возможность выполнения строчки
одновременно двумя верхними нитками. При этом можно использовать
нитки как одного цвета, так и разных цветов для выполнения
декоративных швов. Двойной иглой можно выполнять любую строчку,
за исключением обработки петель. При пошиве прямым стежком
ручка регулирования ширины стежка должна быть установлена в
позиции для центрального положения иглы (между 3 и 4).
Однако при использовании других типов строчки установите ручку
регулирования ширины стежка на отметку между 0 и 5. Подробное
описание регулировки ручки регулирования ширины стежка
приводится на стр. 28.
ПРЕДОСТЕРЕЖЕНИЕ
• Используйте только двойные иглы, специально
предназначенные для данной швейной машины (код
детали X57521-001). Другие иглы могут сломаться и
повредить швейную машину.
• При выполнении двухигольной строчки убедитесь
в том, что ручка регулирования ширины стежка не
установлена на отметку выше 5, так как это может
привести к удару иглы об игольную пластину и ее
поломке.
• Не шейте гнутыми иглами. Игла может сломаться и
нанести травму.
• При использовании двойной иглы применяйте
только нажимную лапку зигзаг.
УСТАНОВКА ДВОЙНОЙ ИГЛЫ
Данная операция выполняется так же, как и операция
установки нормальной швейной иглы (см, стр. 12). Плоская
сторона иглы должна быть обращена назад, а цилиндрическая
часть - вперед.
Nähen mit Doppelnadel
Ihre Nähmaschine wurde für das Nähen mit Doppelnadel konstruiert,
wodurch Ihre Maschine mit zwei Oberfäden nähen kann. Sie können die
gleiche oder aber – für dekorative Zwecke – verschiedene Farben für die
Oberfäden wählen. Beim Geradstich sollte das Stichbreiten-Einstellrad so
eingestellt werden, daß sich die Nadel in der Mittelposition befindet
(zwischen 3 und 4). Bei anderen Mustern stellen Sie die Stichbreite
zwischen 0 und 5 ein. Lesen Sie dazu auf Seite 28 für Einzelheiten zur
Einstellung des Stichbreiten-Einstellrad.
VORSICHT
•
Benutzen Sie nur Zwillingsnadeln, die speziell für diese
Maschine hergestellt wurden (Best.-Nr. X57521-001). Andere
Nadeln könnten abbrechen, was zu Schäden an der Maschine
führen kann.
•
Beim Nähen mit Doppelnadel darf die Stichbreite nicht höher
als 5 eingestellt werden, da die Nadel sonst die Stichplatte
treffen und abbrechen kann.
•
Verwenden Sie keine verbogenen Nadeln. Die Nadel könnte
sonst abbrechen und Sie könnten sich dadurch verletzen.
•
Bei Benutzung der Zwillingsnadel kann nur der Zickzack-
Nähfuß benutzt werden.
DOPPELNADEL EINSETZEN
Setzen Sie die Doppelnadel genau wie eine einfache Nadel ein (lesen Sie
dazu Seite 12). Die flache Seite der Nadel sollte nach hinten weisen, und
die runde Seite nach vorn.

45
KNOWING YOUR SEWING MACHINE
KENNENLERNEN IHRER MASCHINE
КРАТКОЕ ТЕХНИЧЕСКОЕ ОПИСАНИЕ МАШИНЫ
A
B
1
2
PLACING THE EXTRA SPOOL PIN
Place the vertical spool pin in the hole found on top of the machine
near the horizontal spool pin. Place the second spool of thread onto
the vertical spool pin as shown in fig. A.
TWIN NEEDLE THREADING
Each needle should be threaded separately.
1. Threading the Right Needle
Follow the same instructions for single needle threading using
the thread from the spool on the extra spool pin. See page 39 for
more details.
2. Threading the Left Needle
Thread the left needle in the same manner that the right needle
was threaded, but do not pass the thread through the thread
guide above the needle before passing it through the eye of the
left needle as shown below in fig. B.
1
Right needle thread passes through this guide.
2
Left needle thread passes in front of this guide.
CAUTION
The needle threader can not be used. Thread the twin needle
by hand, from front to back. Using the needle threader may
result in damage to the machine.
SENKRECHTEN GARNROLLENSTIFT ANBAUEN
Setzen Sie den senkrechten Garnrollenstift in die Öffnung in der Nähe des
waagrechten Garnrollenstifts oben auf der Maschine. Setzen Sie die
zweite Garnrolle auf den senkrechten Garnrollenstift, wie in
Abb. A
gezeigt.
NÄHEN MIT DOPPELNADEL
Jede Nadel sollte einzeln eingefädelt werden.
1. Fadenführung rechte Nadel
Befolgen Sie die Anweisungen, die für das Nähen mit einem Oberfaden
gelten, benutzen Sie jedoch den Faden vom senkrechten Garnrollenstift.
Siehe Seite 40 für weitere Einzelheiten.
2. Fadenführung linke Nadel
Führen Sie den Faden für die linke Nadel auf die gleiche Weise wie für
den ersten Faden, der zweite Faden soll jedoch nicht durch die
Fadenführung über der Nadel laufen, bevor Sie den Faden durch das
Öhr der linken Nadel fädeln; siehe
Abb. B
.
1
Faden der rechten Nadel passiert die Führung.
2
Faden der linken Nadel läuft vor der Führung.
VORSICHT
Achten Sie darauf, dass Sie Zwillingsnadel-Modus wählen, wenn Sie
die Zwillingsnadel benutzen. Wenn Sie die Zwillingsnadel benutzen,
während Sie im Einzelnadel-Modus sind, kann die Nadel abbrechen
und Schäden verursachen.
УСТАНОВКА ДОПОЛНИТЕЛЬНОГО ВСТАВНОГО КАТУШЕЧНОГО СТЕРЖНЯ
Вставьте вертикальный катушечный стержень в специальное
гнездо, расположенное в верхней части машины рядом с
горизонтальным катушечным стержнем. Установите на
вертикальный стержень вторую катушку с нитками, как
показано на
рис. А
.
ЗАПРАВКА НИТОК В ДВОЙНУЮ ИГЛУ
Операция выполняется для каждой иглы отдельно.
1. Заправка правой иглы
Выполните те же операции, что и для заправки обычной
иглы, но при этом заправляйте иглу ниткой со вставного
катушечного стержня. Подробное описание заправки иглы
приводится на странице 40.
2. Заправка левой иглы
Операция выполняется аналогично операции заправки
правой иглы с той лишь разницей, что данная нитка минует
нитенаправитель, расположенный непосредственно над
иглой, и направляется сразу в игольное ушко левой иглы,
как это показано на
рис. В
.
1
Правая игольная нитка проходит через данный
нитенаправитель.
2
Левая игольная нитка проходит спереди
данного нитенаправителя.
ПРЕДОСТЕРЕЖЕНИЕ
Использовать приспособление для заправки нити в иглу
нельзя. Вручную вставьте нитку в игольное ушко двойной
иглы с передней стороны по направлению от себя.
Использование приспособления для заправки нити в иглу
может привести к поломке машины.
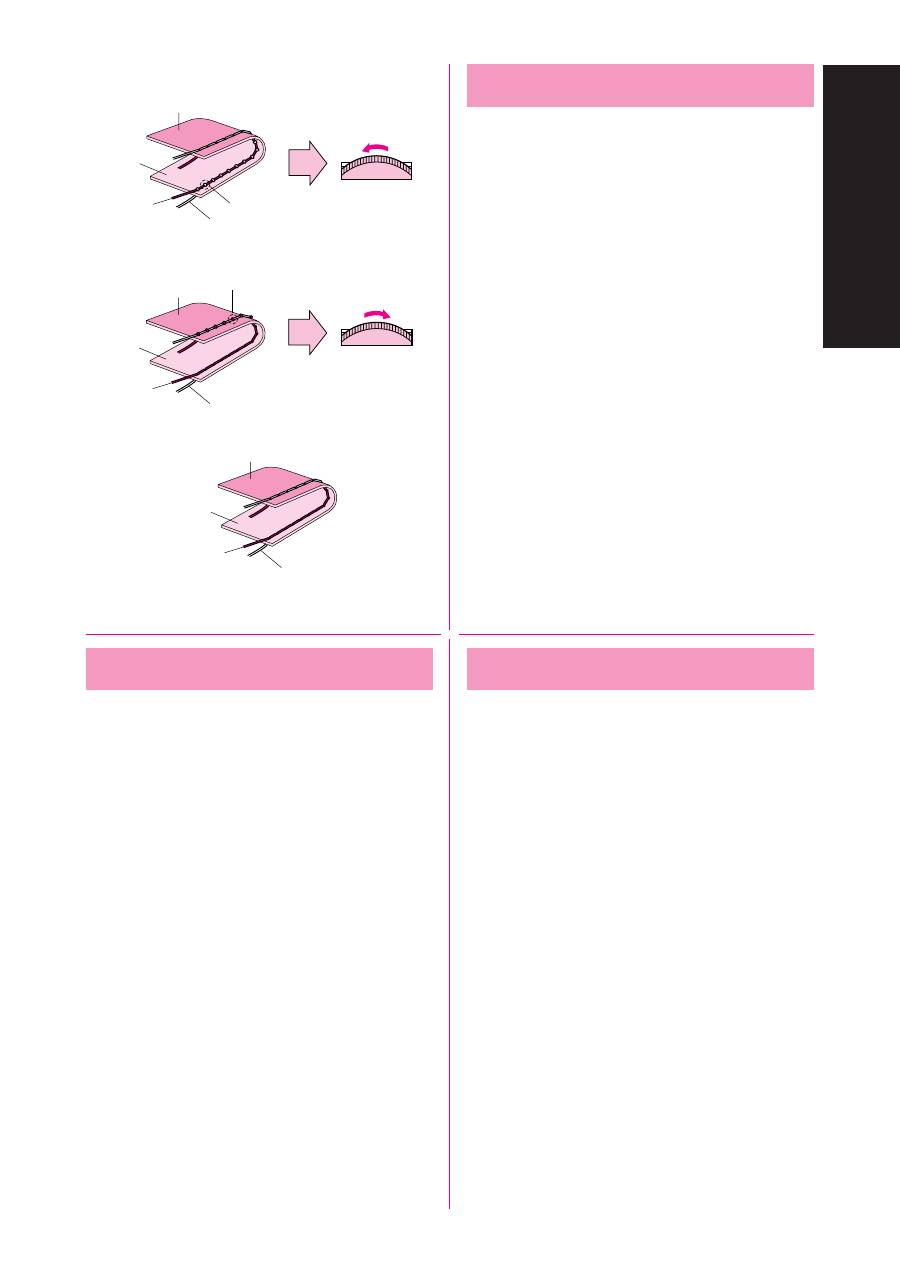
46
KNOWING YOUR SEWING MACHINE
KENNENLERNEN IHRER MASCHINE
КРАТКОЕ ТЕХНИЧЕСКОЕ ОПИСАНИЕ МАШИНЫ
Thread Tension
Thread tension will affect the quality of your stitches. It may need to
be adjusted when you change fabric or thread type.
NOTE:
It is recommended that a test sample be made on a fabric scrap
before sewing on your project.
Possible misadjustments and their results.
Upper tension is too tight. (Fig. A)
Locks appear on the surface of the fabric.
<Solution>
Decrease the tension by turning the Upper Tension Control
Dial to a lower number.
Upper tension is too loose. (Fig. B)
Locks appear on the reverse side of the fabric.
<Solution>
Increase the tension by turning the Upper Tension Control Dial
to a higher number.
Correct tension (Fig. C)
Correct tension is important since too much or too little tension
will weaken your seams or cause puckers on your fabric.
1
Surface
2
Reverse side
3
Upper thread
4
Lower thread
5
Locks appear on surface of fabric
6
Locks appear on reverse side of fabric
4
3
5 ~
~
4
3
5 ~
~
1
2
3
4
1
2
3
4
5
1
2
3
4
6
Fadenspannung
Die Fadenspannung beeinflußt die Qualität Ihrer Stiche. Die Spannung
muß ggf. eingestellt werden, wenn Sie einen anderen Stoff oder anderen
Faden benutzen.
HINWEIS:
Es wird empfohlen, zum Test einen Stoffrest zu nähen, bevor Sie Ihr
Vorhaben beginnen.
Mögliche Fehleinstellungen und deren Ergebnisse.
Oberfadenspannung ist zu hoch. (Abb. A)
Die obere Stoffbahn wellt sich.
<Lösung>
Verringern Sie die Spannung, indem Sie die Oberfaden-spannung
auf eine niedrigere Zahl stellen.
Oberfadenspannung ist zu niedrig. (Abb. B)
Die untere Stoffbahn wellt sich.
<Lösung>
Erhöhen Sie die Spannung, indem Sie die Oberfadenspannung auf
eine höhere Zahl stellen.
Korrekte Spannung (Abb. C)
Die richtige Fadenspannung ist sehr wichtig, da zu geringe oder zu
hohe Spannung Ihre Nähte zu locker werden läßt, oder Wellen in
den Stoff näht.
1
Oberseite
2
Unterseite
3
Oberfaden
4
Unterfaden
5
Schlingen sind an der Vorderseite des Stoffes sichtbar
6
Schlingen sind an der Rückseite des Stoffes sichtbar
A
B
C
Натяжение ниток
Натяжение ниток имеет большое значение для качественного выполнения
любой строчки. Возможно, Вам придется регулировать натяжение ниток
при смене типа прошиваемой ткани или типа используемых ниток.
ПРИМЕЧАНИЕ:
Рекомендуем перед началом строчки на обрабатываемом
изделии произвести пробную строчку на лоскутке ткани с
целью коррекции параметров.
Возможные ошибки регулировки натяжения ниток и
способы их устранения.
Слишком сильное натяжение верхней нитки. <Рис.A>
На лицевой поверхности ткани образуются петли.
<Решение проблемы>
Вы можете снизить натяжение нитки повернув регулятор
натяжения верхней нитки в сторону уменьшения числовых величин.
Слишком слабое натяжение верхней нитки.<Рис.B>
На изнаночной стороне ткани образуются петли.
<Решение проблемы>
Вы можете повысить натяжение нитки повернув регулятор
натяжения верхней нитки в сторону увеличения числовых величин.
ПРАВИЛЬНОЕ НАТЯЖЕНИЕ<Рис.C>
Правильное натяжение имеет большое значение, так как
слишком сильное или слишком слабое натяжение ослабит
шов и приведет к образованию складок на ткани.
1
Лицевая сторона
2
Обратная сторона
3
Верхняя нитка
4
Нижняя нитка
5
На лицевой поверхности ткани образуются петли
6
На обратной стороне ткани образуются петли

47
KNOWING YOUR SEWING MACHINE
KENNENLERNEN IHRER MASCHINE
КРАТКОЕ ТЕХНИЧЕСКОЕ ОПИСАНИЕ МАШИНЫ
FABRIC/THREAD/NEEDLE COMBINATIONS
NOTE:
1. For transparent nylon thread, always use needle 90/14 - 100/16.
2. The same thread is usually used for the bobbin thread and upper threading.
CAUTION
Be sure to follow the needle, thread, and fabric combinations listed in the table. Using an improper combination, especially a
heavyweight fabric (i.e., denim) with a small needle (i.e., 65/9 - 75/11), may cause the needle to bend or break, and lead to injury.
Also, the seam may be uneven, the fabric may pucker, or the machine may skip stitches.
Medium weight fabric
Lightweight fabric
Heavyweight fabric
Stretch fabric
For top stitching
Cotton
Synthetic mercerized
Silk or silk finished
Cotton
Synthetic mercerized
Silk
Cotton
Synthetic mercerized
Silk
Thread for knits
Synthetic mercerized
Silk
Fabric
Broadcloth
Taffeta
Flannel,
Gabardine
Lawn, Batiste
Georgette
Challis, Satin
Denim
Corduroy
Tweed
Jersey
Tricot
60 - 80
60 - 80
50 - 80
60 - 80
60 - 80
50 - 80
30 - 50
50
50
50 - 60
30
30
75/11 - 90/14
65/9 - 75/11
90/14 - 100/16
Ball point needle (golden colored)
75/11 - 90/14
90/14 - 100/16
Size
Thread
Size of needle
Type
STOFF-/FADEN-/NADELKOMBINATIONEN
NOTIZEN:
1. Benutzen Sie bei transparentem Nylonfaden immer eine Nadel 90/14 - 100/16.
2. Für Ober- und Unterfaden wird im Allgemeinen das gleiche Garn benutzt.
VORSICHT
Halten Sie sich bitte an die in der Tabelle aufgeführten Nadel-, Faden- und Stoffkombinationen. Eine unsachgemäße Kombination, wie z.B.
ein dicker Stoff (z.B. Jeansstoff) und eine dünne Nadel (z.B. 65/9 - 75/11), kann dazu führen, daß die Nadel sich verbiegt oder abbricht, was
Verletzungen zur Folge haben kann. Außerdem kann es zu ungleichmäßigen Nähten führen, der Stoff kann Falten werfen oder die Maschine
kann Stiche überspringen.
Stoffe mittleren
Gewichts
Dünne Stoffe
Dicke Stoffe
Stretch-Stoffe
Zum Nähen auf Stoffoberseite
Baumwolle
Synthetik mercerisiert
Seide oder Seidebeschichtung
Baumwolle
Synthetik mercerisiert
Seide
Baumwolle
Synthetik mercerisiert
Seide
Garne für Stretchstoffe
Synthetik mercerisiert
Seide
Stoffe
Grobes Tuch
Taft
Flanell,
Gabardine
Linon, Batist
Georgette
Challis, Satin
Jeansstoff
Kord
Tweed
Jersey
Trikot
60 - 80
60 - 80
50 - 80
60 - 80
60 - 80
50 - 80
30 - 50
50
50
50 - 60
30
30
75/11 - 90/14
65/9 - 75/11
90/14 - 100/16
Goldfarbene Nadel mit Kugelspitze
75/11 - 90/14
90/14 - 100/16
Größe
Faden
Nadelstärke (System 130/705 H)
Typ

48
KNOWING YOUR SEWING MACHINE
KENNENLERNEN IHRER MASCHINE
КРАТКОЕ ТЕХНИЧЕСКОЕ ОПИСАНИЕ МАШИНЫ
Швейная нитка
ТАБЛИЦА КОМБИНАЦИЙ ТКАНЕЙ/НИТОК/ИГЛ
ПРИМЕЧАНИЕ:
1. При пошиве прозрачными нейлоновыми нитками всегда используйте иглу 90/14 - 100/16.
2. Обычно используется шпулечная и верхняя нитка одного номера.
ПРЕДОСТЕРЕЖЕНИЕ
Обязательно следуйте рекомендациям по подбору комбинаций тканей, игл и ниток, изложенным в соответствующей
таблице. Использование неверной комбинации, в особенности использование тонких игл (то есть, 65/9 - 75/11) для
пошива тяжелых тканей (например, джинсовой ткани) может привести к сгибанию иглы или ее поломке и, как
следствие, к травме. Кроме того, это может сказаться на ровности шва, привести к образованию складок на ткани или
к пропуску стежков внутри шва.
Ткани среднего веса
Легкие ткани
Тяжелые ткани
Трикотаж
Для обработки лицевой стороны ткани
Ткань
Тонкое сукно
Тафта
Фланель,
Габардин
Батист
Жоржет
Шелковая, Атласная
Хлопчатобумажная ткань с саржевым переплетением
Обычная ткань с продольным рубчиком
Твид
Джерси
Трико
60 - 80
60 - 80
50 - 80
60 - 80
60 - 80
50 - 80
30 - 50
50
50
50 - 60
30
30
75/11 - 90/14
65/9 - 75/11
90/14 - 100/16
Игла со
сферическим
концом (золоченного
цвета)75/11 - 90/14
90/14 - 100/16
Номер
Номер иглы
Тип
Хлопковая
Синтетическая мерсеризованная
Шелк или
шелковая отделка
Хлопковая
Синтетическая мерсеризованная
Шелк
Хлопковая
Синтетическая мерсеризованная
Шелк
Нитка для вязания
Синтетическая мерсеризованная
Шелк

49
STRAIGHT AND ZIGZAG STITCHING
GERAD- UND ZICKZACKSTICH
НОРМАЛЬНАЯ ПРЯМАЯ И ЗИГЗАГООБРАЗНАЯ СТРОЧКА
PLEASE READ BEFORE SEWING
CAUTION
•
To avoid injury, pay special attention to the needle while the machine is in operation. Keep your hands away from moving
parts while the machine is in operation.
•
Do not stretch or pull the fabric during sewing. Doing so may lead to injury.
•
Do not use bent or broken needles. Doing so may lead to injury.
•
Take care that the needle does not strike basting pins or other objects during sewing. Otherwise, the needle may break and
cause injury.
•
If stitches become bunched, lengthen the stitch length setting before continuing sewing. Otherwise, the needle may break
and cause injury.
•
Always use the correct presser foot. If the wrong presser foot is used, the needle may strike the presser foot and bend or
break, resulting in injury.
•
When you turn the balance wheel by hand, always turn it to the front (counter-clockwise). Turning it the other way may cause
the thread to tangle, and result in damage to the needle or fabric or injury.
ПОЖАЛУЙСТА, ПРОЧИТАЙТЕ ДО НАЧАЛА ШИТЬЯ
ПРЕДОСТЕРЕЖЕНИЕ
• Во избежание несчастного случая внимательно следите за иглой во время работы машины. Держите руки на
расстоянии от движущихся деталей во время работы машины.
• Не проталкивайте и не тяните за ткань во время шитья. Это может привести к травме.
• Не пользуйтесь погнутыми или сломанными иглами. Это может привести к травме.
• Следите за тем, чтобы в процессе выполнения строчки игла не ударила булавку или нечто подобное. В противном
случае возможна поломка иглы и нанесение травмы.
• При наложении стежков друг на друга увеличьте длину стежка и затем продолжите шов. В противном случае
возможны поломка иглы и нанесение травмы.
• Всегда пользуйтесь нажимной лапкой нужного типа. При использовании неправильной нажимной лапки игла
может ударить нажимную лапку, погнуться или сломаться, что, в свою очередь, может привести к травме.
• Когда Вы рукой поворачиваете маховик, всегда поворачивайте его на себя (против часовой стрелки при виде с
торца). Поворачивание маховика в обратном направлении может привести к запутыванию нитки и, как следствие,
- к повреждению иглы, ткани или к получению травмы.
BITTE VOR DEM NÄHEN LESEN
VORSICHT
•
Achten Sie während des Nähens immer darauf, wo die Nadel sich gerade befindet. Halten Sie die Hände während des Nähens fern von allen
beweglichen Teilen.
•
Ziehen oder zerren Sie den Stoff nicht beim Nähen. Die Nadel könnte abbrechen und Sie könnten sich dadurch verletzen.
•
Verwenden Sie keine verbogenen Nadeln. Diese könnten abbrechen und Sie könnten sich dadurch verletzen.
•
Achten Sie darauf, dass die Nähnadel während des Nähens keine Stecknadeln oder sonstige Objekte berührt. Die Nadel könnte sonst
abbrechen und Sie könnten sich dadurch verletzen.
•
Wenn die Stiche sich zusammenziehen, wählen Sie eine größere Stichlänge, bevor Sie weiternähen. Die Nadel könnte sonst abbrechen und
Sie könnten sich dadurch verletzen.
•
Benutzen Sie immer den richtigen Nähfuß. Wird der falsche Nähfuß benutzt, kann die Nadel auf den Nähfuß treffen und sich dadurch
verbiegen oder abbrechen, so dass es zu Verletzungen kommen kann.
•
Beim Drehen des Handrades mit der Hand dieses immer nach vorne drehen (entgegen dem Uhrzeigersinn). Drehen in die andere Richtung
kann bewirken, daß sich der Faden verfängt, was zu Beschädigung der Nadel oder des Stoffs oder zu Verletzungen führen kann.
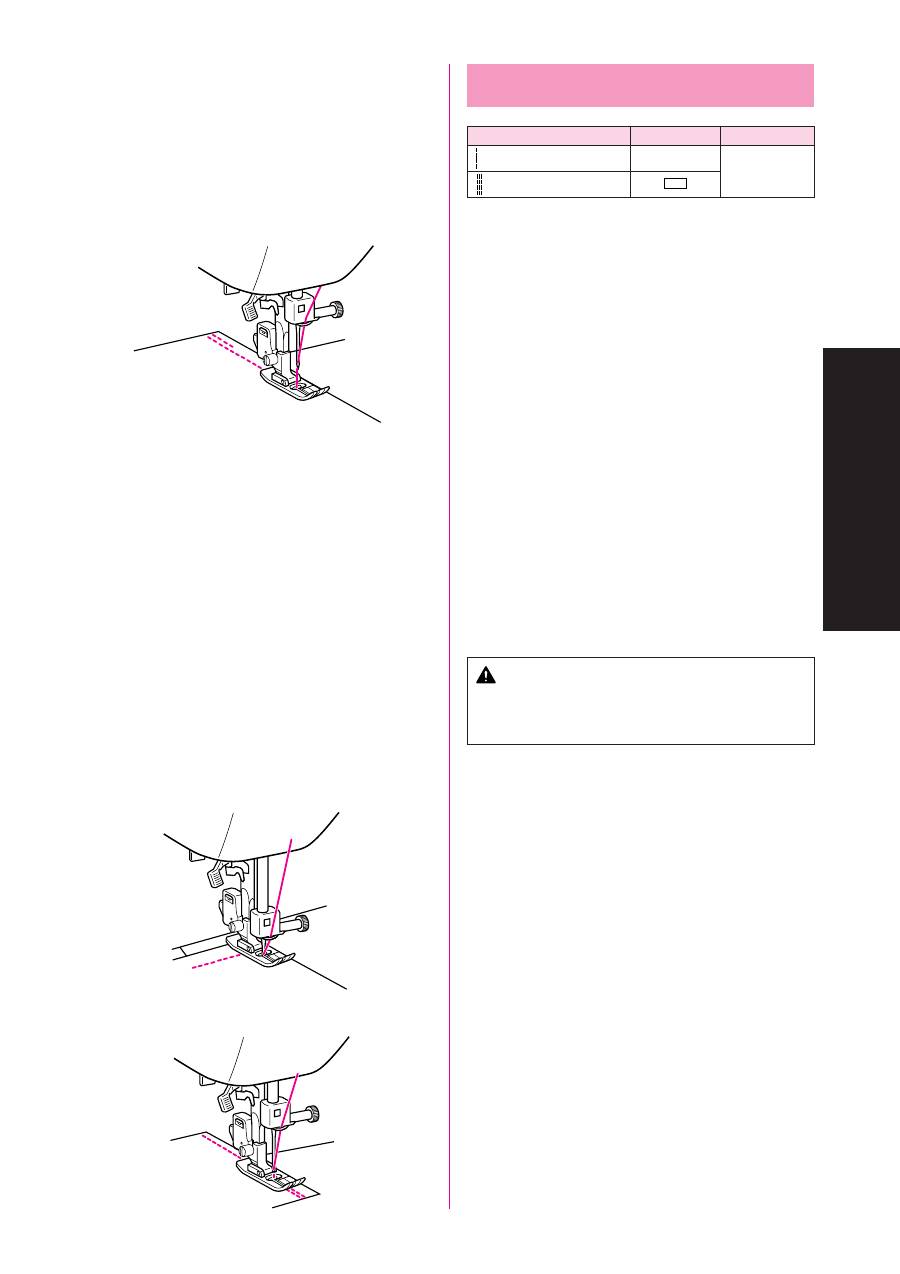
50
STRAIGHT AND ZIGZAG STITCHING
GERAD- UND ZICKZACKSTICH
НОРМАЛЬНАЯ ПРЯМАЯ И ЗИГЗАГООБРАЗНАЯ СТРОЧКА
Straight Stitching
Pattern
Stitch Length
Stitch Width
(Straight Stitch)
1-4.5
6.5
(Triple Stretch Stitch)
SS
STARTING SEWING
1. Turn the Pattern Selection Dial to show your desired stitch in the
Pattern Indication Window. Setting the Pattern Selection Dial to
Straight Stitch or Triple Stretch Stitch is required.
2. Raise the needle to its highest position and lift the presser foot
lever.
3. Pull the upper thread toward the back of the presser foot.
4. Place the fabric under the presser foot and position the needle
1 cm (3/8") from the edge of the fabric.
5. Lower the presser foot.
(Model PS-57, PS-55, STAR-50, RSR-55, XRX-55, PS-53)
6. To backtack, push down the Reverse Sewing Lever as far as
possible, then step down on the foot controller to start reverse
sewing.
7. Release the Reverse Sewing Lever and start sewing in the
forward direction by applying pressure to the foot controller.
(Model STAR 240E, STAR 230E)
6. To backtack, push down the Reverse Sewing Lever as far as
possible to start reverse sewing.
7. Release the Reverse Sewing Lever and press the Start/Stop
Button to start sewing in the forward direction.
*
When the foot controller is used, step 6 and 7 are the same as
for Model PS-57, PS-55, STAR-50, RSR-55, XRX-55, PS-53.
*
Reverse sewing is used for locking the end of seams and where
reinforcement is needed.
CAUTION
Be sure the needle does not strike a basting pin, or any
other objects, during sewing. The thread could tangle or the
needle could break, causing injury.
CHANGING SEWING DIRECTION
1. Stop the machine at the point where you wish to change
direction with the needle still in the fabric.
2. Raise the presser foot and turn the fabric to line up its new
direction using the needle as a turning point.
3. Lower the presser foot and start sewing in the new direction.
FINISHING SEWING
Reverse stitching is used to lock the threads at the end of the seam
or wherever reinforcement is needed.
1. Stitch to the end of the seam and stop.
2. Push the Reverse Sewing Lever and stitch backwards for 1 cm
(3/8") from the end of the fabric.
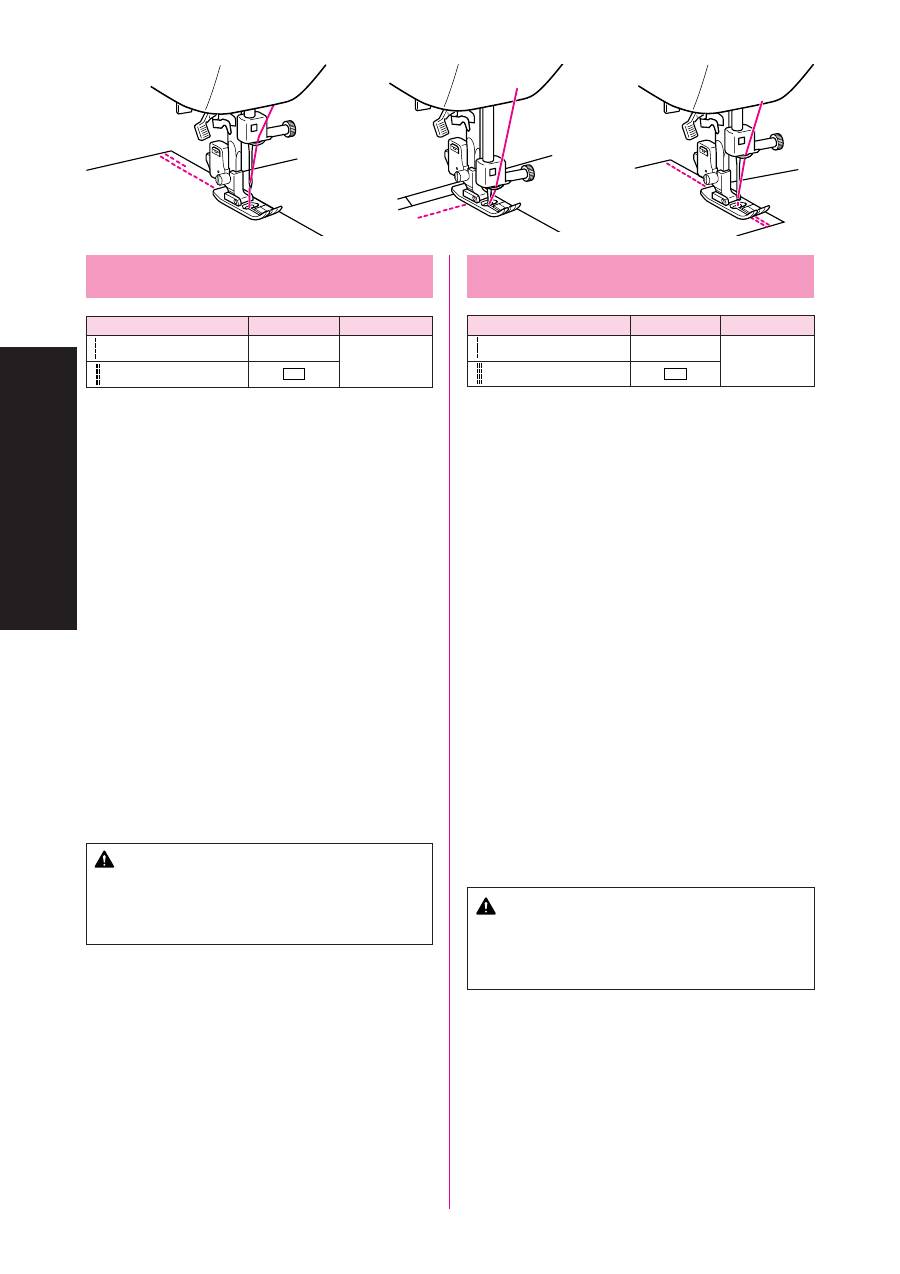
51
STRAIGHT AND ZIGZAG STITCHING
GERAD- UND ZICKZACKSTICH
НОРМАЛЬНАЯ ПРЯМАЯ И ЗИГЗАГООБРАЗНАЯ СТРОЧКА
Geradstich
Stichmuster
Stichlänge
Stichbreite
(Geradstich)
1-4,5
6,5
(Stretch-Geradstich)
SS
NÄHBEGINN
1. Drehen Sie am Stichmuster-Einstellrad, bis der gewünschte Stich auf
der Stichmusteranzeige erscheint. Wählen Sie einen Geradstich oder
einen Dreifach-Stretchstich.
2. Bringen Sie die Nadel auf die höchste Position und heben Sie den
Nähfußhebel.
3. Ziehen Sie den Oberfaden hinter den Nähfuß.
4. Legen Sie den Stoff unter den Nähfuß, so daß die Nadel ca. 1 cm
innerhalb der Stoffkante liegt.
5. Senken Sie den Nähfuß.
(Modell PS-57, PS-55, STAR-50, RSR-55, XRX-55, PS-53)
6. Zum verdeckten Zusammenheften die Rückwärts-Nähtaste so weit
wie möglich eindrücken und dann auf den Fußanlasser treten, um das
Rückwärtsnähen zu beginnen.
7. Die Rückwärts-Nähtaste loslassen und das Nähen in Vorwärtsrichtung
durch Drücken auf den Fußanlasser beginnen.
(Modell STAR 240E, STAR 230E)
6. Zum verdeckten Zusammenheften die Rückwärts-Nähtaste so weit
wie möglich eindrücken, um das Rückwärtsnähen zu beginnen.
7. Die Rückwärts-Nähtaste loslassen und die Start/Stopp-Taste drücken,
um das Nähen in Vorwärtsrichtung zu beginnen.
* Wenn der Fußanlasser verwendet wird, sind die Schritte 6 und 7 die
gleichen wie bei den Modellen PS-57, PS-55, STAR-50, RSR-55,
XRX-55, PS-53
* Rückwärts-Nähen dient zum Sichern der Nahtenden und zum Nähen
von Verstärkungen.
VORSICHT
Achten Sie darauf, dass die Nähnadel während des Nähens keine
Reihnadeln oder sonstige Objekte berührt. Der Faden könnte sich
verwickeln und die Nadel könnte abbrechen, was Verletzungen
zur Folge haben könnte.
NÄHRICHTUNG ÄNDERN
1. Stoppen Sie die Maschine dort, wo Sie die Nährichtung ändern
möchten, und so, daß sich die Nadel im Stoff befindet.
2. Heben Sie den Nähfuß und drehen den Stoff in die neue Richtung,
indem Sie die Nadel als Drehpunkt benutzen.
3. Senken Sie den Nähfuß und fahren Sie in der neuen Richtung mit dem
Nähen fort.
NÄHENDE
Nähen Sie am Ende der Naht nochmals rückwärts, um den Abschluß der
Naht zu verstärken.
1. Nähen Sie bis zum Ende der Naht und stoppen die Maschine.
2. Drücken Sie die Rückwärtstaste und nähen am Ende des Stoffes etwa
1 cm rückwärts.
Прямой стежок
Стежок
Длина стежка Ширина стежка
(Прямой стежок)
1-4,5
6,5
(Tройная трикотажная строчка)
SS
Начало строчки
1. Вращая ручку выбора типа стежка, установите в окошке индикации
типа стежка требуемый тип строчки. Вам необходимо установить
ручку выбора типа стежка на «Прямой стежок» или на «Тройную
трикотажную строчку» в зависимости от типа стежка, который Вам
нужен.
2. Установите иглу в крайнее верхнее положение и поднимите рычаг
нажимной лапки.
3. Вытяните конец верхней нитки и расположите его позади лапки,
направив его назад.
4. Положите прошиваемую ткань под нажимную лапку таким образом,
чтобы игла находилась на расстоянии примерно 1 см (3/8 дюйма) от
кромки ткани.
5. Опустите нажимную лапку.
(Модели PS-57, PS-55, STAR-50, RSR-55, XRX-55, PS-53)
6. Для фиксации конца шва как можно сильнее прижмите вниз рычаг
реверсирования строчки и надавите на педаль ножного
контроллера, чтобы выполнить строчку в обратном направлении.
7. Для продолжения строчки в прямом направлении отпустите рычаг
реверсирования строчки и надавите на ножной контроллер.
(Модели STAR 240E, STAR 230E)
6. Для фиксации конца шва как можно сильнее прижмите вниз рычаг
реверсирования строчки, чтобы выполнить строчку в обратном
направлении.
7. Для продолжения строчки в прямом направлении отпустите рычаг
реверсирования строчки и нажмите кнопку пуска/остановки
машины.
*
Если используется ножной контроллер, операции 6 и 7 - одни и те
же, что и для моделей PS-57, PS-55, STAR-50, RSR-55, XRX-55,
PS-53.
*
Реверсирование строчки используется для фиксации конца швов
и их усиления.
ПРЕДОСТЕРЕЖЕНИЕ
Следите за тем, чтобы в процессе выполнения строчки
игла не ударила булавку или иной предмет. В противном
случае возможно запутывание нитки или поломка иглы
и нанесение травмы.
ИЗМЕНЕНИЕ НАПРАВЛЕНИЯ СТРОЧКИ
1. Остановите машину в той точке шва, в которой необходимо изменить
направление строчки; игла при этом должна оставаться в ткани.
2. Поднимите нажимную лапку и, используя иглу как центр вращения,
поверните ткань, сориентировав ее в нужном направлении.
3. Опустите нажимную лапку и продолжите строчку в новом
направлении.
ЗАВЕРШЕНИЕ СТРОЧКИ
Реверсирование строчки используется для фиксации концов нитки в
конце шва и его усиления.
1. Доведите строчку до конца шва и остановите машину.
2. Нажмите рычаг реверсирования строчки и прошейте обратную
строчку н участке длиной примерно 1 см (3/8 дюйма) от края ткани.
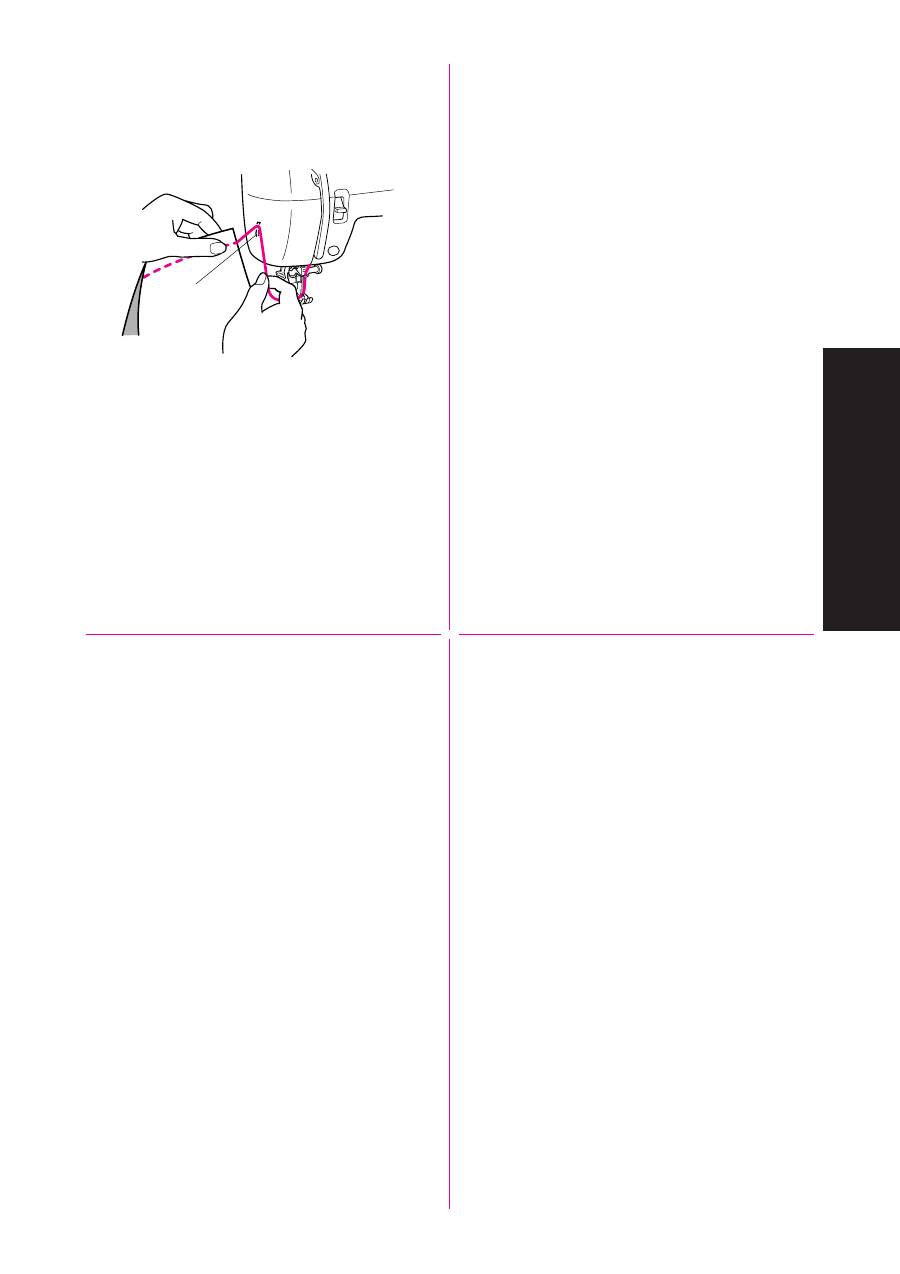
52
STRAIGHT AND ZIGZAG STITCHING
GERAD- UND ZICKZACKSTICH
НОРМАЛЬНАЯ ПРЯМАЯ И ЗИГЗАГООБРАЗНАЯ СТРОЧКА
REMOVING THE MATERIAL FROM THE MACHINE
(Model PS-57, PS-55, STAR-50, RSR-55, XRX-55, PS-53)
1. Stop the machine.
Raise the needle to its highest position and make sure that the
thread take-up lever is also in its highest position.
(Model PSTAR 240E, STAR 230E)
1. Press the Start/Stop Button again. The needle stops in its
highest position.
2. Lift the presser foot and pull the fabric out gently to the left side.
3. Cut both threads with the thread cutter located on the left side of
the machine.
1
Thread cutter
4. To prepare the machine for the next seam, pull about 10 cm (4")
of thread through the toes of the presser foot toward the back of
the machine.
TOP STITCHING AND STRETCH MATERIALS
Straight Stitch is used for top stitching and sewing lightweight
fabrics.
Triple Stretch Stitch is used for stretch fabrics.
1
СНЯТИЕ ПРОШИТОЙ ТКАНИ С МАШИНЫ
(Модели PS-57, PS-55, STAR-50, RSR-55, XRX-55, PS-53)
1. Выключите машину.
Поднимите иглу в крайнее верхнее положение и убедитесь
в том, что рычаг подтягивания нитки при этом также
находится в крайней верхней позиции.
(Модели PSTAR 240E, STAR 230E)
1. Вновь нажмите кнопку пуска/остановки машины. Игла
остановится в крайнем верхнем положении.
2. Поднимите нажимную лапку и плавно отведите ткань влево
из рабочей зоны иглы.
3. Обрежьте обе нитки с помощью ножа для обрезания ниток,
расположенного в левой части машины.
1
Нож для обрезания ниток
4. Чтобы подготовить машину к выполнению следующей
строчки, вытяните конец нитки через язычки нажимной
лапки назад на длину около 10 см (4 дюйма) и, направив
назад, расположите его позади лапки.
ВЕРХНИЙ СТЕЖОК И ЭЛАСТИЧНЫЕ МАТЕРИАЛЫ
Прямой стежок используется для верхних стежков и сшивания
легких тканей.
Тройная трикотажная строчка используется для сшивания
эластичных тканей.
STOFF AUS DER MASCHINE NEHMEN
(Modell PS-57, PS-55, STAR-50, RSR-55, XRX-55, PS-53)
1. Stoppen Sie die Maschine.
Heben Sie die Nadel auf die höchste Position und vergewissern Sie
sich, daß der Fadenhebel sich ebenfalls auf höchster Position befindet.
(Modell STAR 240E, STAR 230E)
1. Drücken Sie nochmals die Taste Start/Stopp. Die Nadel stoppt auf
höchster Stellung.
2. Heben Sie den Nähfuß und ziehen Sie den Stoff vorsichtig nach links
heraus.
3. Schneiden Sie beide Fäden mit dem Fadenabschneider links hinten an
der Maschine ab.
1
Fadenabschneider
4. Zur Vorbereitung der Maschine für die nächste Naht ziehen Sie etwa
10 cm Faden durch den Schlitz des Nähfußes nach hinten heraus.
APPLIZIEREN UND STRETCH-MATERIALIEN
Der Geradstich wird für Obernähte und zum Nähen leichter Stoffe
benutzt.
Der Stretch-Geradstich wird bei Stretch-Stoffen benutzt.
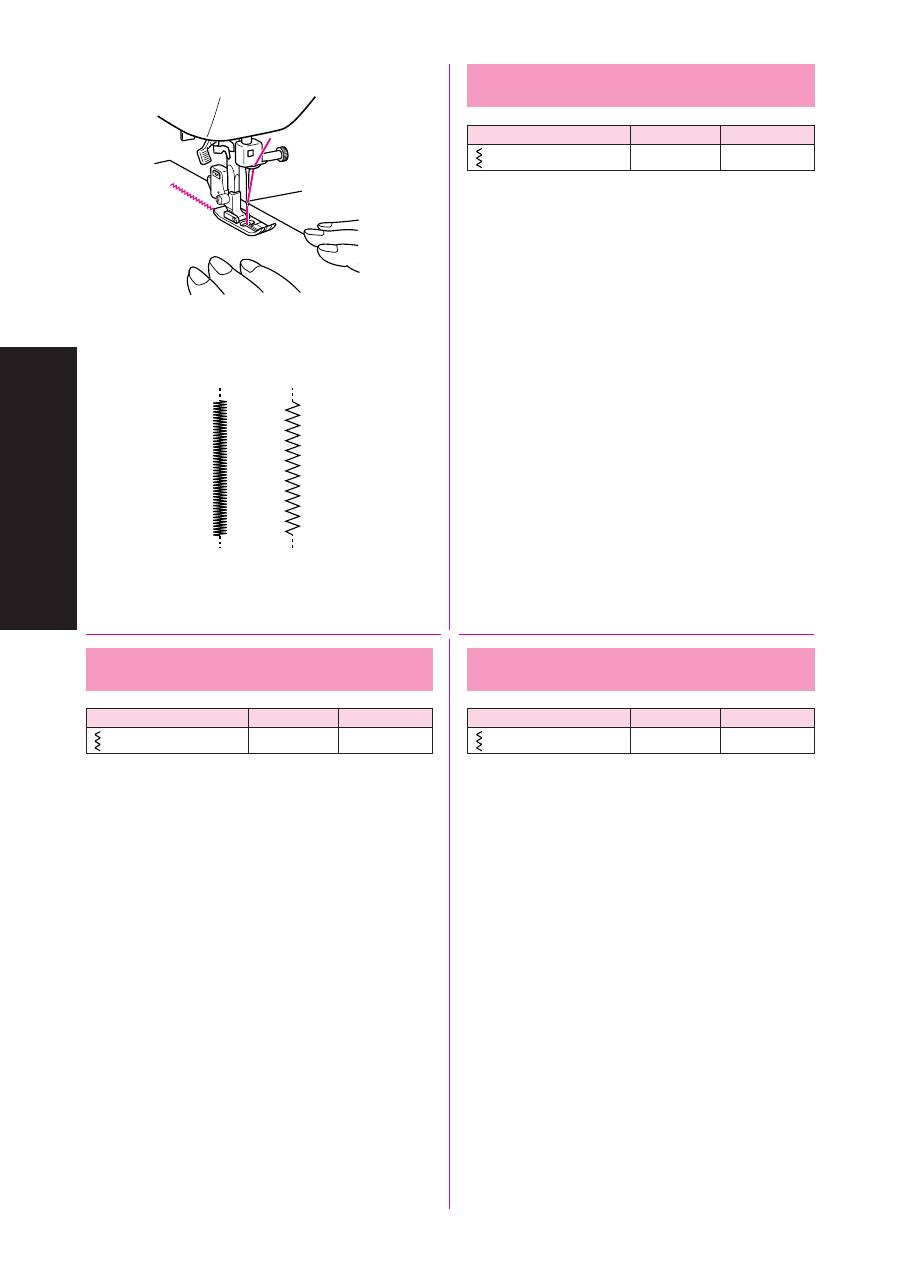
53
STRAIGHT AND ZIGZAG STITCHING
GERAD- UND ZICKZACKSTICH
НОРМАЛЬНАЯ ПРЯМАЯ И ЗИГЗАГООБРАЗНАЯ СТРОЧКА
Zigzag Stitching
Pattern
Stitch Length
Stitch Width
(Zigzag Stitch)
F-4.5
0-6.5
ZIGZAG STITCH
Select the Zigzag Stitch using the Pattern Selection Dial. Then,
select the Stitch Length and the Stitch Width.
It is recommended to sew using the Straight Stitch at the beginning
and end of the Zigzag Stitches.
(This acts as a reinforcement stitch.)
SATIN STITCH
When the Zigzag Stitch length is set in the “F” range, it produces a
Satin Stitch (a dense Zigzag Stitch). The Satin Stitch can be used
for making decorative stitches. Select the Zigzag Stitch, then set the
stitch length in the “F” range and set the desired stitch width.
When sewing a satin stitch, use a slightly loose upper thread
tension to produce more beautiful stitches.
Зигзагообразный стежок
Стежок
Длина стежка Ширина стежка
(Зигзагообразный стежок)
F-4,5
0-6,5
ЗИГЗАОГООБРАЗНЫЙ СТЕЖОК
Выберите зигзагообразный стежок ручкой выбора типа
стежка. Затем выберите нужную длину и ширину стежка.
При данной строчке рекомендуется начало и конец шва
выполнять прямым стежком.
(Он служит для усиления шва.)
«САТИНОВЫЙ» СТЕЖОК
При установке длины зигзагообразного стежка в пределах
области с индексом“F”формируется так называемый
«сатиновый» стежок (мелкие зигзагообразные стежки).
Сатиновый стежок может использоваться для декоративной
обработки ткани. Выберите зигзагообразный стежок, затем
установите длину стежка в пределах области “F” и установите
требуемую ширину стежка.
Для получения красивого шва при прошивании ткани
сатиновым стежком слегка ослабьте натяжение верхней нити.
Zickzackstich
Stichmuster
Stichlänge
Stichbreite
(Zickzackstich)
F-4,5
0-6,5
ZICKZACKSTICH
Wählen Sie mit dem Stichmuster-Einstellrad den Zickzackstich. Wählen
Sie dann die Stichlänge und die Stichbreite.
Jeweils am Anfang und Ende von Zickzacknähten wird (zur Befestigung
und Verstärkung der Naht) der Geradstich empfohlen.
SATIN-STICH
Wenn die Länge des Zickzackstiches im Bereich “F” eingestellt ist, wird
ein Satin-Stich erzeugt (ein enger Zickzackstich). Der Satin-Stich kann für
dekorative Stiche benutzt werden. Wählen Sie den Zickzackstich, stellen
Sie die Stichlänge auf “F” und stellen die gewünschte Stichbreite ein.
Verringern Sie beim Nähen eines Satinstiches die Oberfadenspannung
etwas, um ein besseres Nahtbild zu erzielen.
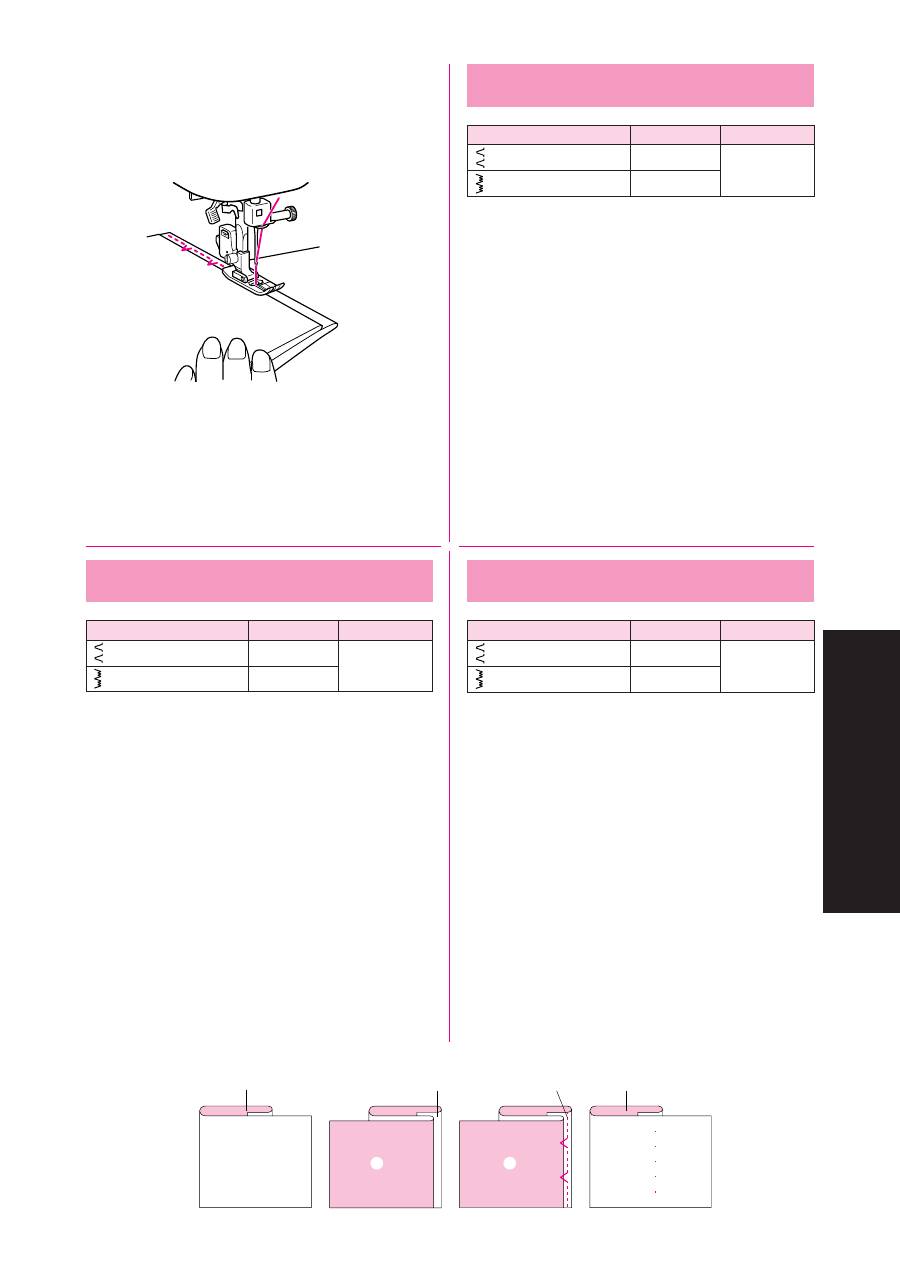
54
BUILT-IN STITCHES
VERFÜGBARE STICHMUSTER
ФИГУРНЫЕ СТРОЧКИ
Blind Hem Stitching
Pattern
Stitch Length
Stitch Width
(Blind Hem Stitch)
F-2
3-6.5
(Stretch Blind Hem Stitch)
F-1.5
The Blind Hem Stitch is used to finish the edge of a project like the
hem of a pair of pants without the stitch showing. Use the Blind Hem
Stitch for any non-stretch fabrics and the Stretch Blind Hem Stitch
for stretch fabrics.
1. Both the threads should be the same color as the fabric.
2. Fold back the fabric to the desired location of the hem as shown
in fig. A. Then, fold the edge of the fabric as in fig. B. Leave a
6 mm (15/64") overlap at the edge.
3. Set the Pattern Selection Dial to Blind Hem Stitch or Stretch
Blind Hem Stitch and set the stitch length and width.
4. Sew on the fold as in fig. C.
5. When the fabric is unfolded you will have a Blind Stitch hem as
shown in fig. D.
1
Right side of fabric
2
Wrong side of fabric
NOTE:
The Stretch Blind Hem Stitch is useful for stretch fabrics.
A
B
C
D
1
2
1
1
1
2
2
2
Потайной подрубочный шов
Стежок
Длина стежка
Ширина стежка
(Потайной подрубочный шов)
F-2
3-6,5
(Подшивочная трикотажная строчка)
F-1,5
Потайной подрубочный шов используется для обработки кромки
деталей, например, низа брюк, когда необходимо, чтобы стежки шва
были невидимы. Для обработки неэластичных тканей следует
применять потайной подрубочный шов, а для эластичных
тканей - подшивочную трикотажную строчку.
1. Обе нитки должны быть одного цвета с обрабатываемой тканью.
2. Подогните ткань на изнаночную сторону в позиции, где должен
пройти шов, как показано на
рис. А
. Затем подогните ткань, как
показано на
рис. В
. Оставьте напуск на кромке около 6 мм
(15/64 дюйма).
3. Установите ручку выбора типа стежка на потайной подрубочный шов или
на подшивочную трикотажную строчку, а затем установите длину стежка.
4. Выполните строчку, как показано на
рис. С
.
5. После того, как материал будет расправлен, Вы получите невидимый с лицевой
поверхности ткани потайной подрубочный шов, как показано на
рис. D
.
1
Лицевая сторона ткани
2
Изнаночная сторона ткани
ПРИМЕЧАНИЕ:
Подшивочная трикотажная строчка применяется для
обработки эластичных тканей.
Blindsaumstich
Stichmuster
Stichlänge
Stichbreite
(Blindsaumstich)
F-2
3-6,5
(Elastischer Blindstich)
F-1,5
Der Blindstich wird zum endgültigen Umnähen einer Stoffkante wie z. B.
der Unterkante einer Hose benutzt, wenn der Stich nicht zu sehen sein soll.
Benutzen Sie den Blindstich für alle Nicht-Stretch-Stoffe, und den
Elastischen Blindstich für Stretch-Stoffe.
1. Beide Fäden sollten die gleiche Farbe wie der Stoff besitzen.
2. Falten Sie den Stoff bis zur gewünschten Position des Hohlsaumes,
wie in
Abb. A
gezeigt. Falten Sie dann die Stoffkante wie in
Abb. B
.
Lassen Sie 6 mm überstehen.
3. Stellen Sie das Stichmuster-Einstellrad auf Blindsaumstich oder
elastischen Blindstich und stellen Sie die Stichlänge ein.
4. Nähen Sie auf der Falte, wie in
Abb. C
gezeigt.
5. Wenn der Stoff entfaltet ist, sehen Sie den Blindnaht-Saum wie in
Abb. D
.
1
Stoffvorderseite
2
Stoffrückseite
NOTIZEN:
Der Stretch-Blindstich eignet sich für Stretch-Stoffe.
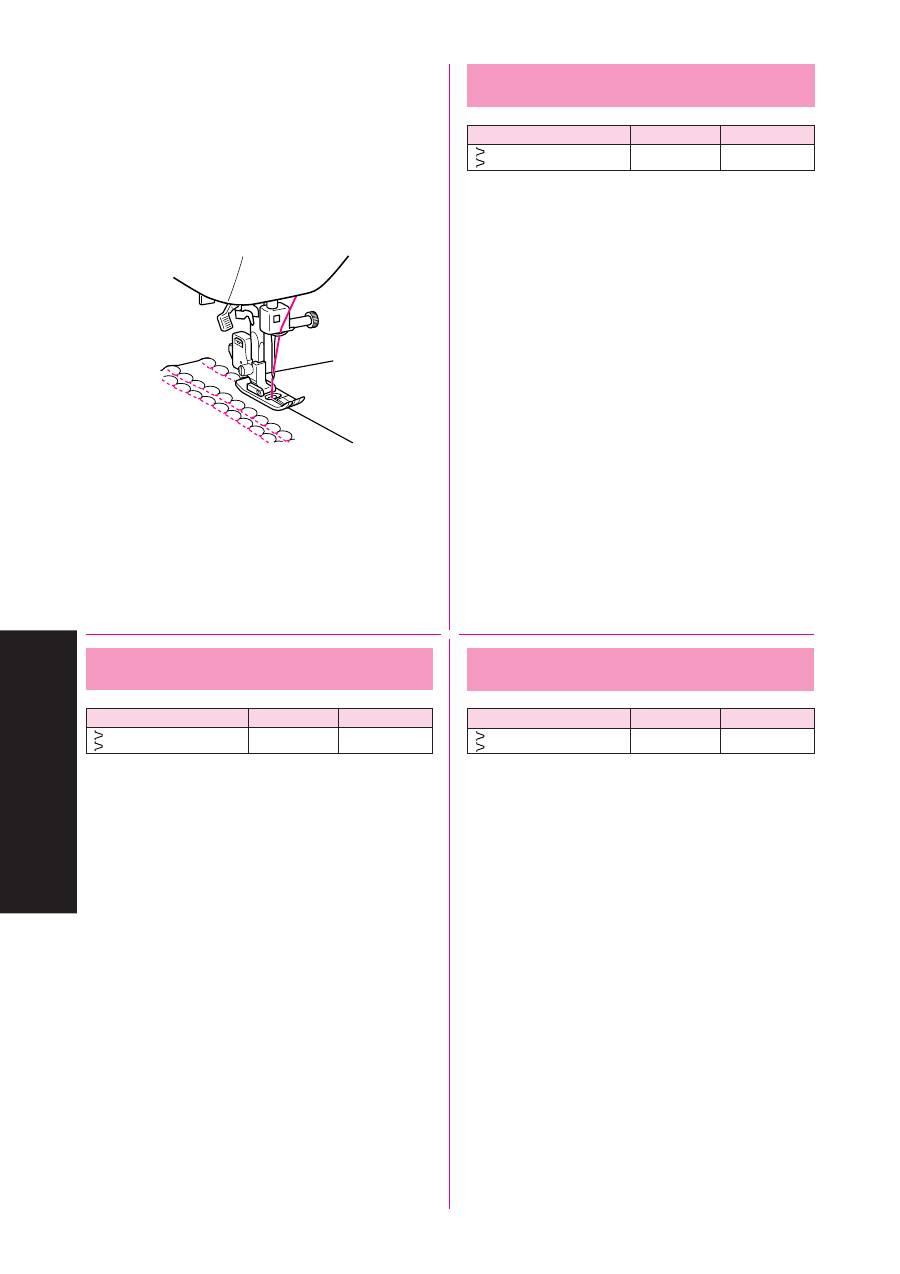
55
BUILT-IN STITCHES
VERFÜGBARE STICHMUSTER
ФИГУРНЫЕ СТРОЧКИ
Shell Tuck Stitching
Pattern
Stitch Length
Stitch Width
(Shell Tuck Stitch)
F-3
3-6.5
The Shell Tuck Stitch can be used to sew a picot (lace like) edge on
a lightweight fabric.
1. Set the Pattern Selection Dial to Shell Tuck Stitch.
2. Sew the fabric on the bias, placing it under the presser foot so
that the straight stitches are sewn on the seamline and the
zigzag stitches are sewn slightly over the folded edge.
3. This stitch requires a tighter thread tension than normal.
4. Sew at a slow speed.
Подшивочная строчка
Стежок
Длина стежка
Ширина стежка
(Подшивочная строчка)
F-3
3-6,5
Подшивочная строчка предназначена для пришивания
кружевной полоски к кромке легкой ткани.
1. Установите ручку выбора типа стежка на подшивочную
строчку.
2. Прошейте обрабатываемую ткань, расположив ее под
нажимной лапкой таким образом, чтобы при смещении
ткани прямые стежки были направлены вдоль линии
формируемого шва, а зигзагообразные стежки слегка
перекрывали подогнутую кромку.
3. Данная строчка требует повышенного натяжения нитки.
4. Выполняйте строчку на малой скорости.
Biesenstich
Stichmuster
Stichlänge
Stichbreite
(Biesenstich)
F-3
3-6,5
Der Biesenstich kann als Kanten-Zierstich (ähnlich Spitzen) auf leichten
Stoffen benutzt werden.
1. Stellen Sie das Stichmuster-Einstellrad auf den Biesenstich ein.
2. Nähen Sie den Stoff schräg zum Fadenlauf, indem Sie den Stoff so
unter den Nähfuß legen, daß die geraden Stiche entlang des Saums
laufen und die Zickzackstiche leicht über die gefaltete Stoffkante
hinaus gehen.
3. Dieser Stich erfordert eine höhere Fadenspannung als normal.
4. Nähen Sie mit langsamer Geschwindigkeit.
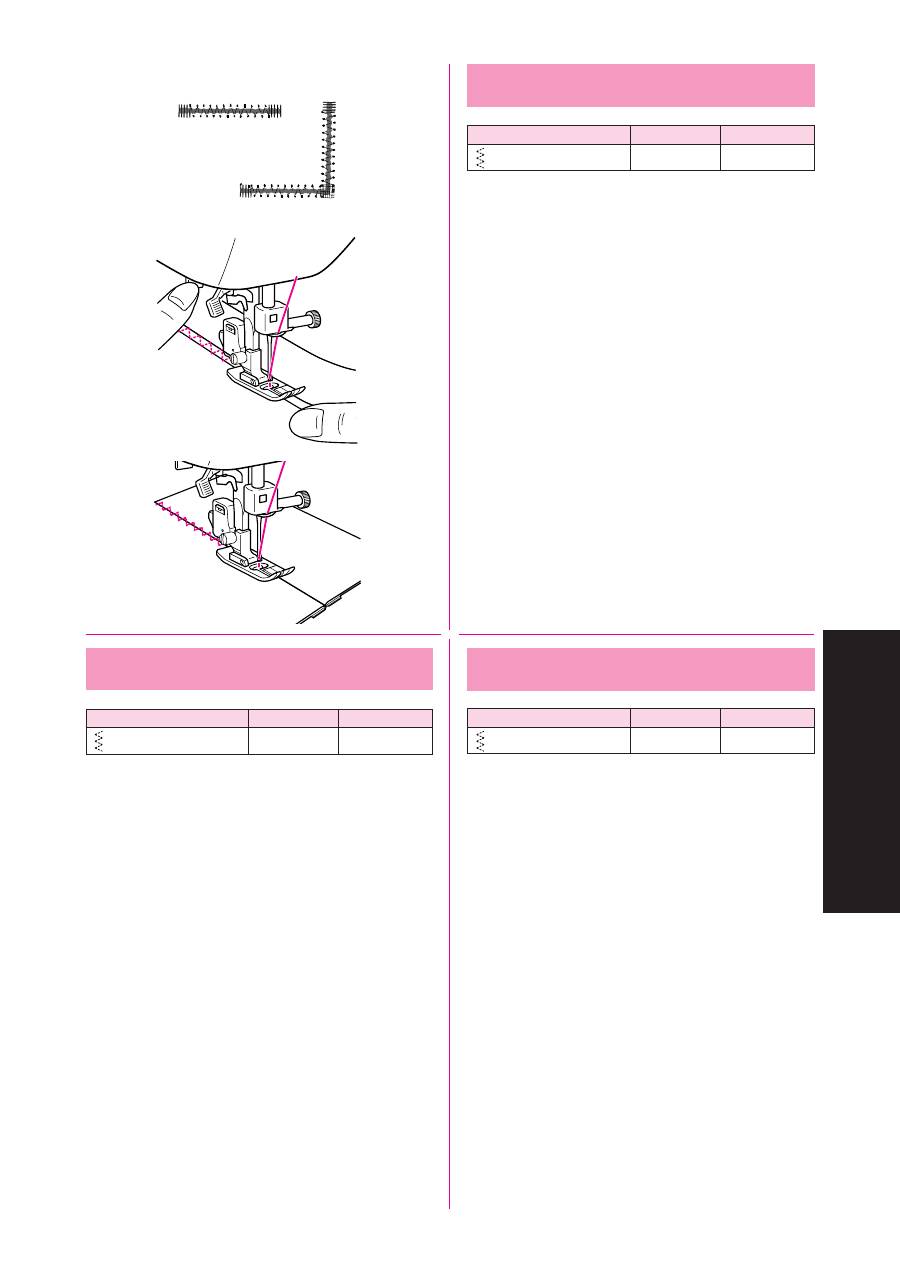
56
BUILT-IN STITCHES
VERFÜGBARE STICHMUSTER
ФИГУРНЫЕ СТРОЧКИ
Elastic Stitching
Pattern
Stitch Length
Stitch Width
(Elastic Stitch)
F-2.5
3-6.5
The Elastic Stitch can be used for 3 functions: mending, sewing
elastic or joining fabric. Each is explained below.
Set the Pattern Selection Dial to Elastic Stitch.
MENDING
1. Place the reinforcement fabric under area to be mended.
2. Following the line of the tear, sew using the Elastic Stitch as
illustrated in fig. A.
SEWING ELASTIC
1. Place the elastic on the fabric.
2. As you sew, stretch the elastic both in the front and behind the
presser foot as shown in fig. B.
JOINING FABRIC
The Elastic Stitch can be used to join two pieces of fabric together
and is very effective when sewing knitted fabrics. When nylon
thread is used, the stitch will not be visible.
1. Place the edge of the two pieces of fabric together and center
them under the presser foot.
2. Sew them together using the Elastic Stitch taking care to keep
the two fabric edges close together as shown in fig. C.
Эластичная строчка
Стежок
Длина стежка
Ширина стежка
(Подшивочная строчка)
F-2,5
3-6,5
Эластичная строчка может использоваться для трех целей: для
штопки порезов ткани, для пришивания резинки и для сшивания
кусков ткани. Каждый из указанных методов описан ниже.
Установите ручку выбора типа стежка на эластичную строчку.
ШТОПКА ПОРЕЗОВ ТКАНИ
1. Положите заплатку под порез, подлежащий ремонту.
2. Ориентируясь по направлению линии пореза ткани, выполните
шов эластичной строчкой, как показано на
рис. A
.
ПРИШИВАНИЕ РЕЗИНКИ
1. Наложите резинку на ткань.
2. Во время выполнения строчки растягивайте резинку как
спереди, так и сзади нажимной лапки, как показано на
рис. B
.
СШИВАНИЕ КУСКОВ ТКАНИ
Эластичная строчка может использоваться, когда необходимо
сшить вместе два куска ткани. В частности, она особо
эффективна для обработки трикотажных тканей. Если Вы
примените нейлоновые нитки, шов становится практически
невидим.
1. Поместите два куска ткани встык относительно друг друга
и так, чтобы линия стыка проходила под нажимной лапкой.
2. Сшейте их вместе эластичной строчкой, следя за тем,
чтобы в процессе продвижения ткани кромки обоих кусков
были плотно прижаты друг к другу, как показано на
рис. С
.
A
B
C
Elastikstich
Stichmuster
Stichlänge
Stichbreite
(Elastikstich)
F-2,5
3-6,5
Der Elastikstich kann für 3 Arbeiten benutzt werden: zum Flicken, zum
Nähen von Elastik oder zum Zusammennähen von Stoff. Alle drei
Arbeiten werden unten erklärt.
Stellen Sie das Stichmuster-Einstellrad auf den Elastikstich ein.
FLICKEN
1. Legen Sie ein Stück Stoff unter die zu flickende Stelle.
2. Folgen Sie der Rißlinie mit dem Elastikstich, wie in
Abb. A
gezeigt.
EINNÄHEN VON ELASTIKBÄNDERN
1. Legen Sie das Elastikband auf den Stoff.
2. Während Sie nähen, spannen Sie das Elastikband vor und hinter dem
Nähfuß, wie in
Abb. B
gezeigt.
STOFFE ZUSAMMENNÄHEN
Mit dem Elastischen Zickzack können Sie zwei Stoffstücke zusammennä-
hen. Der Stich ist auch für Strick besonders geeignet. Wenn Sie Nylon-
Faden benutzen, ist der Stich nicht sichtbar.
1. Legen Sie die Kanten der beiden Stoffstücke zusammen und mittig
unter den Nähfuß.
2. Nähen Sie die Stücke mit dem Elastischen Zickzack zusammen und
achten Sie darauf, daß Sie die Stoffkanten so dicht zusammenhalten,
wie in
Abb. C
gezeigt.
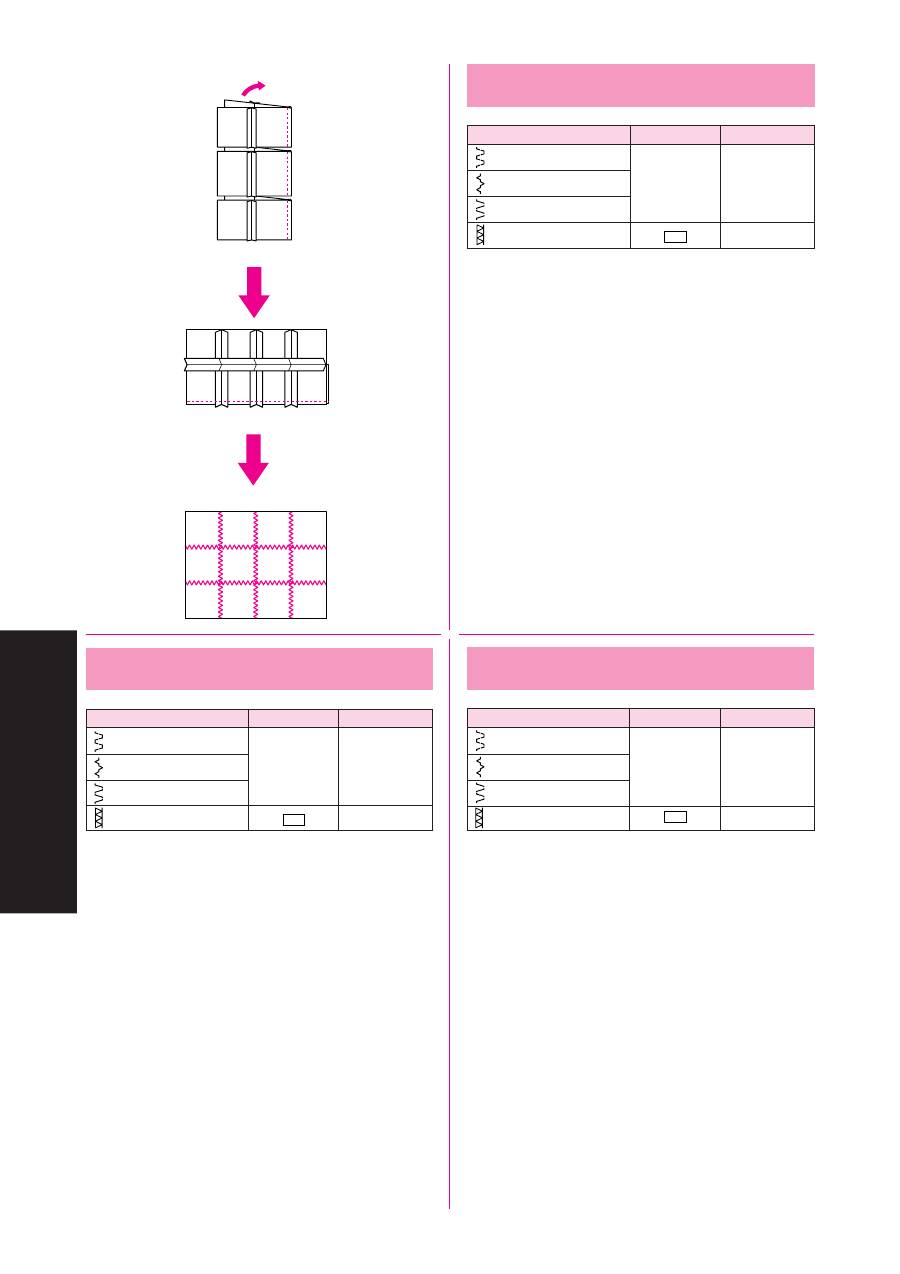
57
BUILT-IN STITCHES
VERFÜGBARE STICHMUSTER
ФИГУРНЫЕ СТРОЧКИ
Double Action Stitching
Pattern
Stitch Length
Stitch Width
(Double Action Stitch)
(Bridging Stitch)
F-3
3-6.5
(Rampart Stitch)
(Decorative Hem Stitch)
SS
3-6.5
These stitches are used for joining two pieces of fabric, for example,
when making patchwork.
Set the Pattern Selection Dial to Double Action Stitch, Bridging
Stitch, etc.
Стежок с двойным эффектом
Стежок
Длина стежка Ширина стежка
(Стежок с двойным эффектом)
(Строчка-мостик)
F-3
3-6,5
(Стежок рампарт)
(Декоративный подрубочный стежок)
SS
3-6,5
Данные типы стежка применяются для сшивания двух кусков
ткани, например, при лоскутном шитье.
Установите ручку выбора типа стежка на стежок с двойным
эффектом, строчка-мостик и т.д.
Elastische Schrittnaht
Stichmuster
Stichlänge
Stichbreite
(Elastische Schrittnaht)
(Brückenstich)
F-3
3-6,5
(Palisadenstich)
(Flachnaht)
SS
3-6,5
Diese Stiche werden benutzt, um zwei Stoffteile zusammenzunähen, z.B.
für Patchwork.
Stellen Sie das Stichmuster-Einstellrad auf Elastische Schrittnaht oder
Brückenstich ein.
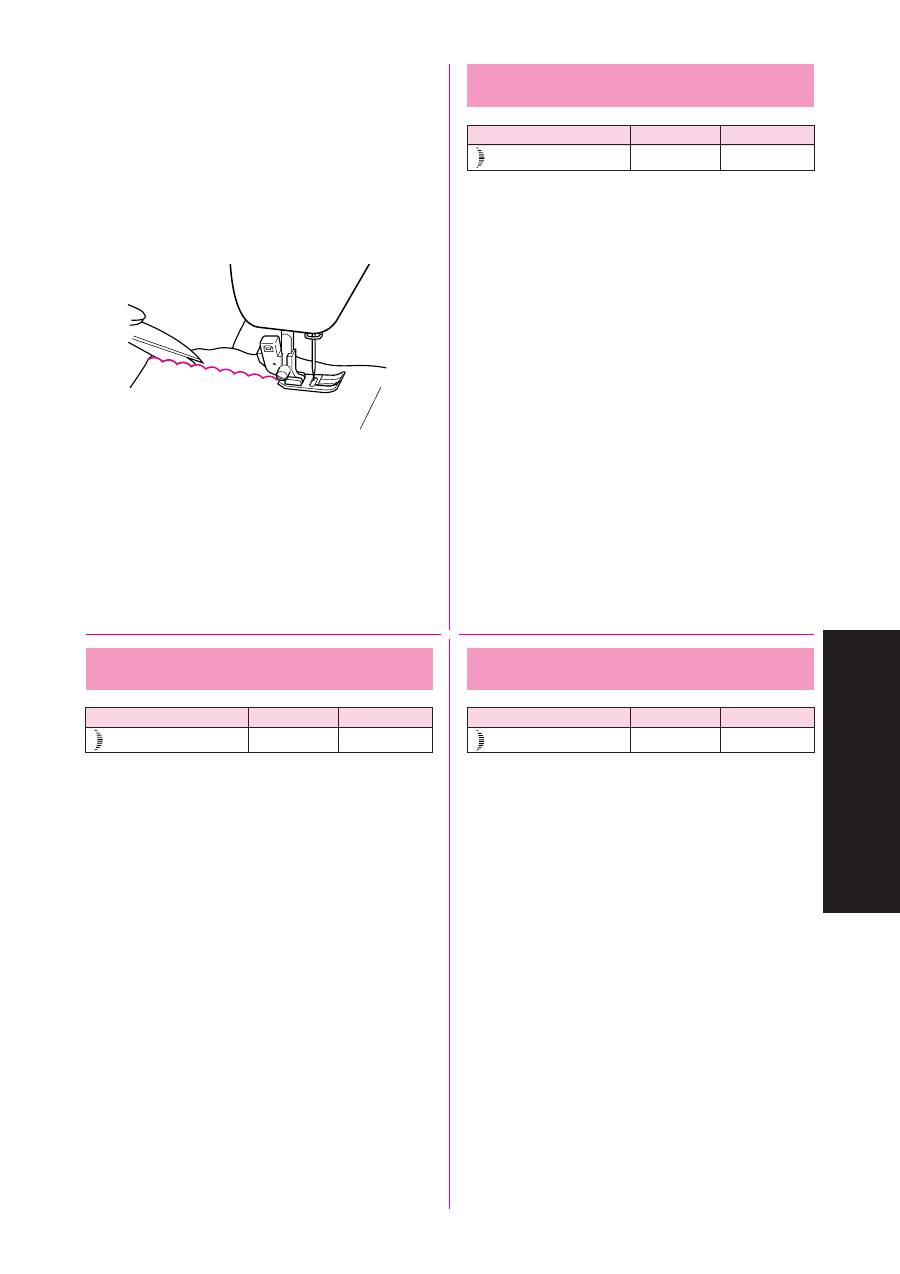
58
BUILT-IN STITCHES
VERFÜGBARE STICHMUSTER
ФИГУРНЫЕ СТРОЧКИ
Scallop Stitching
Pattern
Stitch Length
Stitch Width
(Scallop Stitch)
F-1.5
3-6.5
This machine automatically produces a Scallop Stitch which may
be used as a decorative edging.
1. Set the Pattern Selection Dial to Scallop Stitch.
2. Sew the Scallop Stitch along the edge of the material.
3. If desired, trim around the scallop with scissors to create a
scalloped edge. Be careful not to cut the thread.
Строчка-елочка
Стежок
Длина стежка
Ширина стежка
(Строчка-елочка)
F-1,5
3-6,5
Данная машина выполняет строчку-елочку в автоматическом
режиме; строчка-елочка может использоваться для
декоративной обработки кромки ткани.
1. Установите ручку выбора типа стежка на строчку-елочку.
2. Произведите строчку вдоль кромки ткани.
3. При желании Вы можете ножницами обрезать ткань вдоль
контура полученного шва, следя за тем, чтобы не
перерезать при этом швейную нитку.
Bogennaht
Stichmuster
Stichlänge
Stichbreite
(Bogennaht)
F-1,5
3-6,5
Diese Maschine näht eine Bogennaht, die für dekorative Ränder verwendet
werden kann.
1. Stellen Sie das Stichmuster-Einstellrad auf den Bogennaht ein.
2. Nähen Sie die Bogennaht entlang der Kante des Materials.
3. Schneiden Sie mit einer Schere entlang der Bögen, wenn Sie einen
Bogenrand wünschen. Achten Sie darauf, nicht in den Faden zu
schneiden.
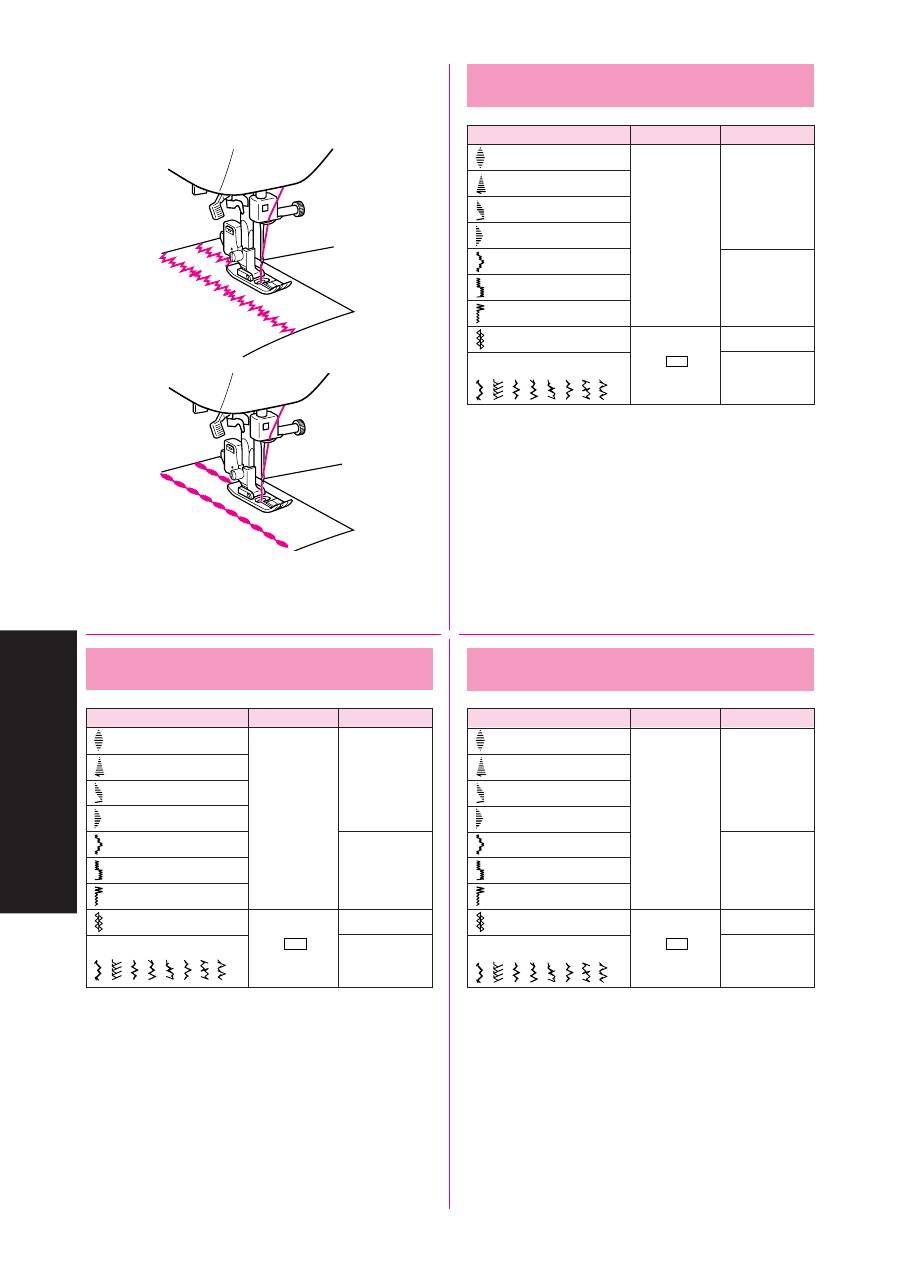
59
BUILT-IN STITCHES
VERFÜGBARE STICHMUSTER
ФИГУРНЫЕ СТРОЧКИ
SS
SS
SS
Decorative Stitching
Pattern
Stitch Length
Stitch Width
(Bead Stitch)
(Arrowhead Stitch)
3-6.5
(Parallelogram Stitch)
(Triangle Stitch)
F-1
(Lighting Stitch)
(Square Stitch)
6.5
(Decorative Stitch)
(Decorative Stitch)
3-6.5
(Decorative Stitch)
6.5
These stitches can be used for making decorative top stitching and
for smocking.
Set the Pattern Selection Dial to Triangle Stitch, Bead Stitch, etc.
Декоративный стежок
Стежок
Длина стежка
Ширина стежка
(Бисерный стежок)
(Стреловидный стежок)
(Строчка-параллелограмм)
3-6,5
(Треугольный стежок)
F-1
(Строчка-молния)
(Квадратный стежок)
6,5
(Декоративный стежок)
(Декоративный стежок)
3-6,5
(Декоративный стежок)
6,5
Данные строчки можно использовать для декоративной
отделки лицевой стороны ткани или для украшения изделия
сборками.
Установите ручку выбора типа стежка на треугольный стежок,
бисерный стежок и т.д.
Dekorstiche
Stichmuster
Stichlänge
Stichbreite
(Perlzierstich)
(Pfeilspitzenstich)
3-6,5
(Parallelogrammstich)
(Dreiecksstich)
F-1
(Blitzstich)
(Rechteckstich)
6,5
(Dekorativer Stich)
(Dekorativer Stich)
3-6,5
(Dekorativer Stich)
6,5
Diese Stiche können für dekoratives Sticken und zum Smoken benutzt
werden.
Stellen Sie das Stichmuster-Einstellrad auf Dreiecks- oder Perlzierstich
ein.
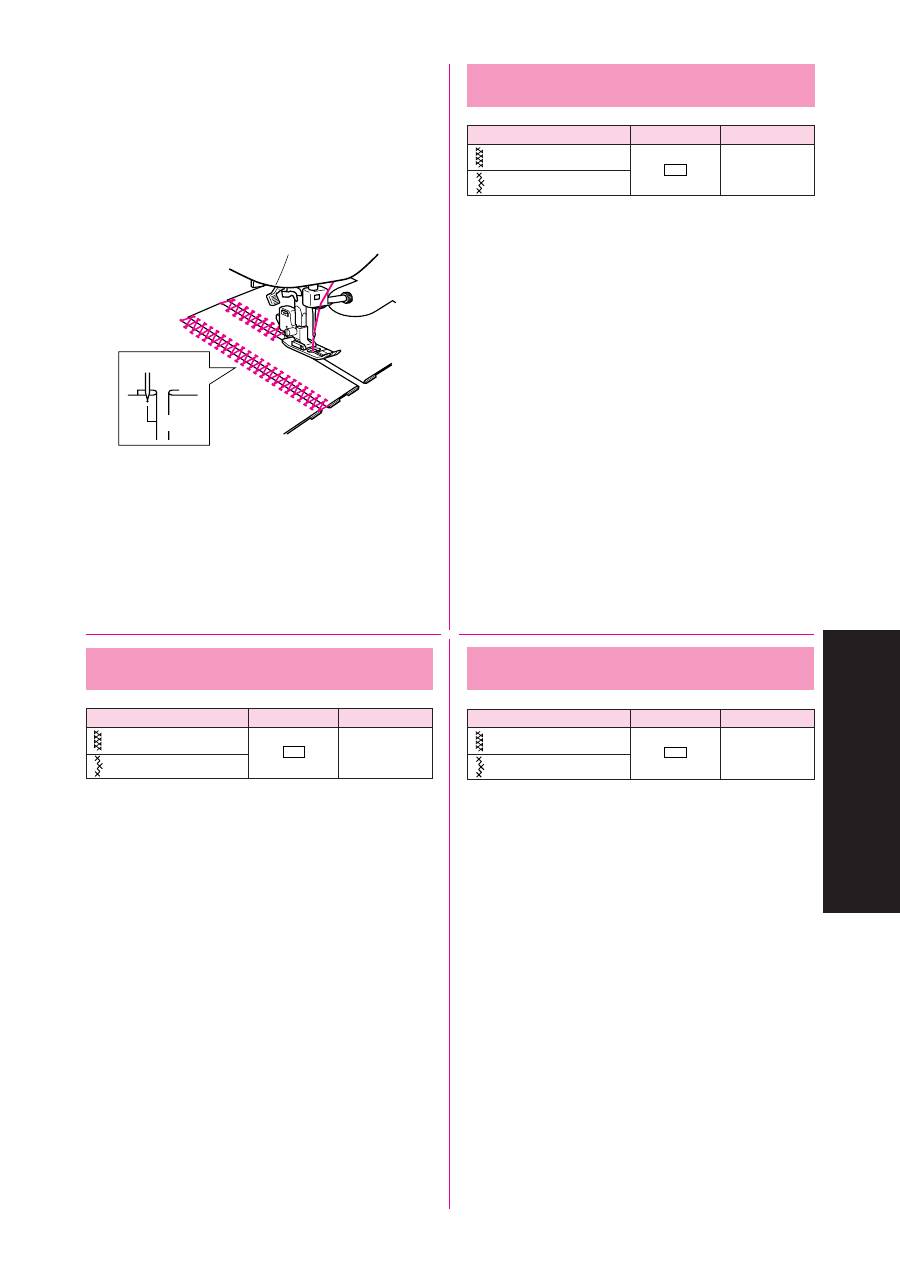
60
BUILT-IN STITCHES
VERFÜGBARE STICHMUSTER
ФИГУРНЫЕ СТРОЧКИ
Patchwork
Pattern
Stitch Length
Stitch Width
(Fagoting Stitch)
SS
3-6.5
(Link Stitch)
These stitches are used to join two pieces of fabric while leaving a
space between their edges.
1. Fold over the edges of the two pieces of fabric for the hem and
baste the edges to a thin piece of paper leaving a small space
between them.
2. Set the Pattern Selection Dial to Fagoting Stitch or Link Stitch.
3. Stitch along the edge, pulling both threads slightly when begin-
ning to sew.
•
Use thicker than normal threads for sewing.
4. After sewing, remove the basting and the paper. Finish by tying
knots on the reverse side at the beginning and the end of the
seams.
1
First needle drop
1.5 mm
1
Лоскутное шитье
Стежок
Длина стежка Ширина стежка
(Соединительный стежок)
SS
3-6,5
(Цепочная строчка)
Данные виды строчки используются для сшивания двух кусков
ткани, когда требуется оставить небольшое расстояние между
кромками ткани.
1. Подогните кромки обоих соединяемых кусков в месте
наложения шва и затем приметайте кромки к листу тонкой
бумаги, оставив между ними требуемый зазор.
2. Установите ручку выбора типа стежка на соединительный
стежок или цепочную строчку.
3. Выполните строчку вдоль кромок, слегка натягивая обе
нитки при формировании начальных стежков.
• Для выполнения данной строчки необходимо использовать
швейную нитку несколько большей толщины, чем обычно.
4. После окончания строчки удалите сметочную нить и бумагу.
В заключение свяжите концы швов обеих швейных ниток
в начале и конце шва с изнаночной стороны.
1
Позиция формирования первого стежка
Patchwork
Stichmuster
Stichlänge
Stichbreite
(Hexenstich)
SS
3-6,5
(Manschettenstich)
Diese Stiche werden benutzt, um zwei Stoffstücke flach aneinanderzunähen,
so daß zwischen ihnen eine Lücke bleibt.
1. Falten Sie die Kanten der beiden Stoffstücke für den Saum und heften
Sie beide Stücke mit einem geringen Abstand auf ein Stück dünnes
Papier.
2. Stellen Sie das Stichmuster-Einstellrad auf Hexenstich oder
Manschettenstich.
3. Nähen Sie entlang der Kante, während Sie beide Fäden zum Nähbeginn
leicht spannen.
•
Benutzen Sie zum Nähen dickere Fäden als gewöhnlich.
4. Entfernen Sie nach dem Nähen die Heftung und das Papier. Verriegeln
Sie die Naht durch Verknoten der Fäden auf der Unterseite am Anfang
und am Ende der Naht.
1
Erste Einstichstelle
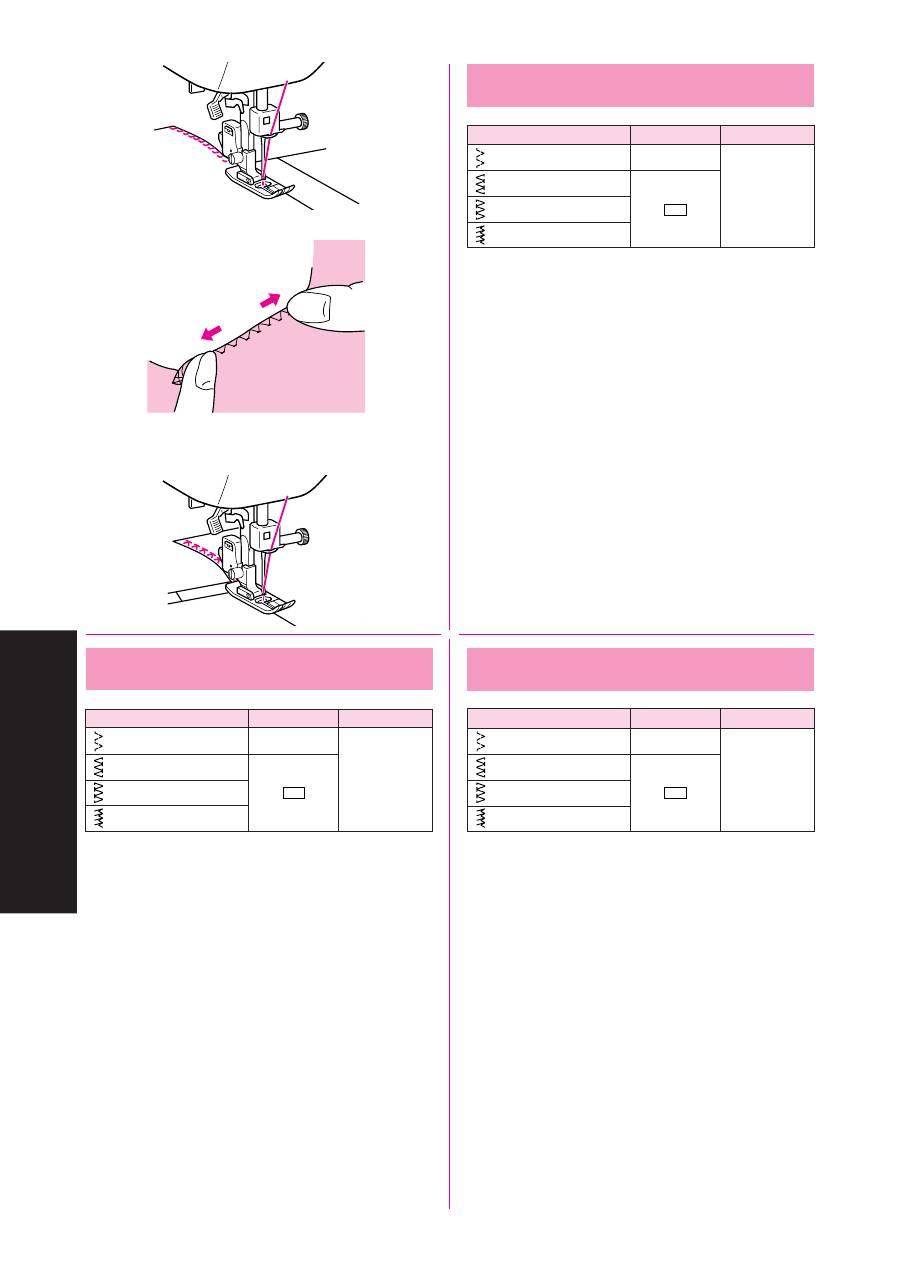
61
BUILT-IN STITCHES
VERFÜGBARE STICHMUSTER
ФИГУРНЫЕ СТРОЧКИ
A
B
C
Overedge Stitching
Pattern
Stitch Length
Stitch Width
(Elastic Shell Tuck Stitch)
F-3
(Elastic Overlock Stitch)*
3-6.5
(Elastic Overlock Stitch)
SS
(Comb Stitch)
These stitches are used to join together seams and finish them in
one operation. The Elastic Overlock Stitches are useful when
sewing stretch materials.
1. Set the Pattern Selection Dial to Comb Stitch, either Elastic
Overlock Stitch, or Elastic Shell Tuck Stitch.
2. Position the fabric under the presser foot so that the seamline (or
arrowhead point) is approximately 3 mm (1/8") to the left of the
center of the presser foot. This stitch works best with a seam
allowance of approximately 6.5 mm (1/4") as this allows the right
(zigzag) side of the stitch to overlock the cut edge of the fabric
as shown in fig. A.
3. If the seam allowance is wider than the stitch pattern, trim away
any excess fabric after stitching.
A finished Elastic Overlock Stitch is shown in fig. B.
*
When sewing the Elastic Overlock Stitch, position the fabric so
that its edge is on the left of the needle. (See fig. C)
Обметочный стежок
Стежок
Длина стежка
Ширина стежка
(Эластичная подшивочная строчка)
F-3
(Эластичная оверлочная строчка)*
3-6,5
(Эластичная оверлочная строчка)
SS
(Строчка «Гребешок»)
Данные стежки предназначены для совмещения в одном шве
двух функций: формирования собственно шва и декоративной
отделки шва. Эластичные оверлочные строчки рекомендуется
применять для пошива эластичных тканей.
1. Установите ручку выбора типа стежка на строчку
«Гребешок», эластичную оверлочную строчку или
эластичную подшивочную строчку.
2. Расположите ткань под нажимной лапкой таким образом,
чтобы линия шва находилась на расстоянии примерно 3 мм
(1/8 дюйма) влево от центра нажимной лапки. Данные типы
строчки обеспечивают оптимальные результаты при
припуске примерно в 6,5 мм (1/4 дюйма), так как при этом
правая (зигзагообразная) часть шва формирует оверлок
на кромке ткани, как это видно на
рис. А
.
3. Если припуск ткани шире ширины шва, после завершения
строчки отрежьте выступающую кромку ткани.
На
рис. В
изображена эластичная оверлочная строчка.
*
При пошиве эластичной оверлочной строчкой располагайте
ткань таким образом, чтобы ее кромка была слева от иглы.
(См.
рис. С
)
Ketteln & Versäubern
Stichmuster
Stichlänge
Stichbreite
(Elastik-Muschelstich)
F-3
(Überwendlingnaht)*
3-6,5
(Überwendlingnaht)
SS
(Kammstich)
Diese Stiche werden benutzt, um Säume in einem Arbeitsgang
zusammenzunähen und zu versäubern. Die Überwendlingnaht und der
offene Overlockstich eignen sich sehr gut, um den Rand einer Decke zu
vernähen, während sich die Überwendlingnaht und der Federstich besonders
für Stretch-Materialien eignen.
1. Stellen Sie das Stichmuster-Einstellrad auf Kammstich,
Überwendlingnaht oder Elastik-Muschelstich.
2. Legen Sie den Stoff unter den Nähfuß, so daß die Spitze des Pfeils
ungefähr 3 mm links von der Mitte des Nähfußes zum liegen kommt.
Dieser Stich arbeitet am besten mit einem Überstand von 6,5 mm, da
hierbei die rechte (Zickzack-) Seite der Naht die Schnittkante des
Stoffes übernäht, wie in
Abb. A
gezeigt.
3. Wenn der Überstand breiter ist als das Stichmuster, schneiden Sie den
überstehenden Stoff nach dem Nähen ab.
Eine fertige Überwendlingnaht ist in
Abb. B
zu sehen.
* Beim Nähen der Überwendlingnaht den Stoff so legen, daß die Kante
links ist. (Siehe
Abb. C
)
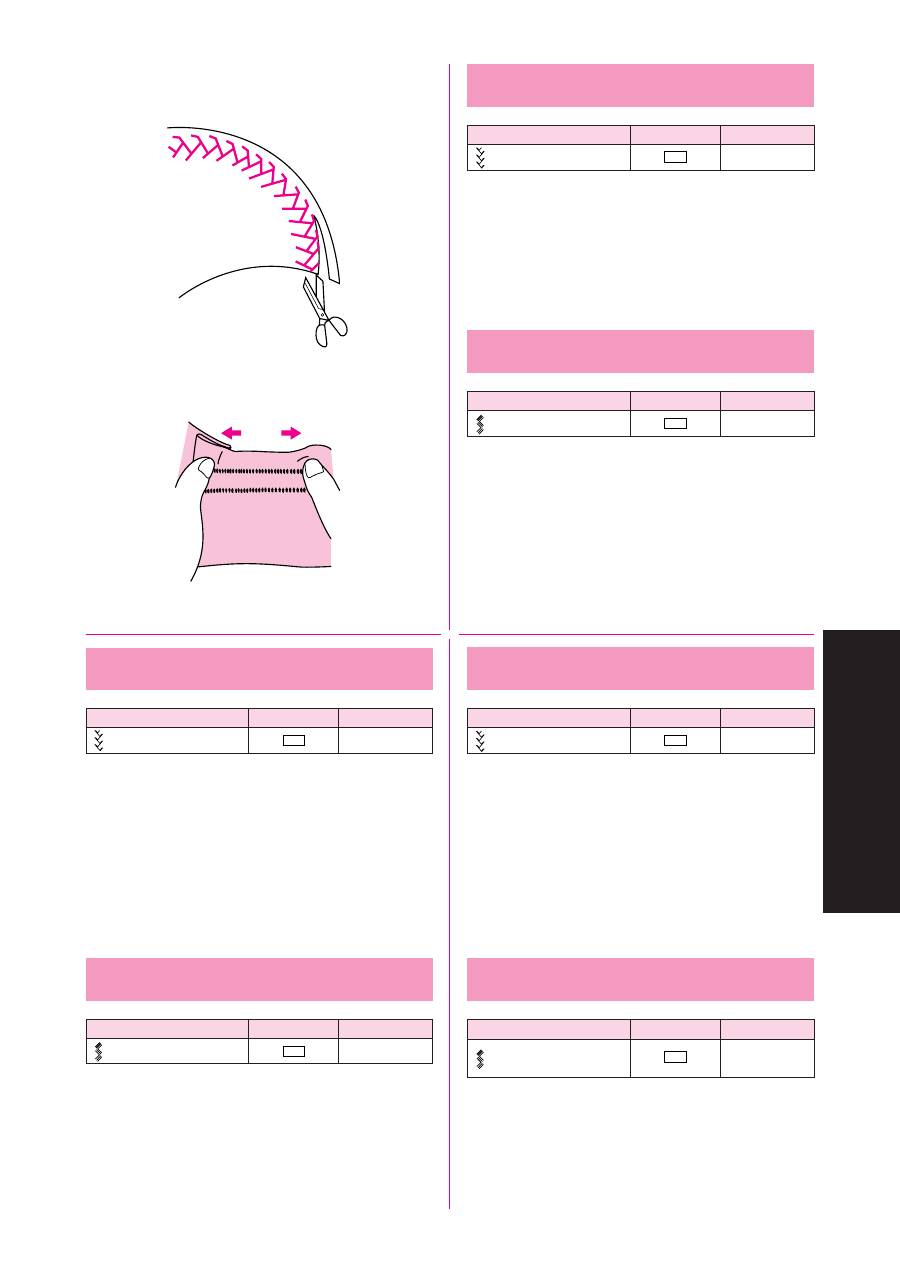
62
BUILT-IN STITCHES
VERFÜGBARE STICHMUSTER
ФИГУРНЫЕ СТРОЧКИ
Feather Stitching
Pattern
Stitch Length
Stitch Width
(Feather Stitch)
SS
3-6.5
Use the Feather Stitch as a decorative top stitch or when hemming
blankets, tablecloths or draperies or when embroidering.
1. Set the Pattern Selection Dial to Feather Stitch.
2. Place the fabric right side up and sew 1 cm (3/8") from the edge
of the fabric.
3. Trim close to the stitching.
This stitch will prevent the fabric from unravelling.
Triple Zigzag Stretch Stitching
Pattern
Stitch Length
Stitch Width
(Triple Zigzag Stretch Stitch)
SS
3-6.5
This stitch can be used to sew heavyweight stretch fabrics wher-
ever a Zigzag Stitch could be used. The Triple Zigzag Stretch Stitch
can also be used as a decorative top stitch.
Set the Pattern Selection Dial to Triple Zigzag Stretch Stitch.
Перистый стежок
Стежок
Длина стежка
Ширина стежка
(Перистый стежок)
SS
3-6,5
Перистый стежок используется для декоративной отделки
лицевой стороны ткани или для подрубки одеял, скатертей
или драпировочных тканей, а также для вышивки.
1. Установите ручку выбора типа стежка на перистый стежок.
2. Поместите ткань в зону иглы лицевой стороной вверх и
произведите строчку на расстоянии примерно 1 см (3/8
дюйма) от края.
3. Обрежьте выступающую кромку ткани вдоль полученного
шва.
Сформированные на кромке стежки предохранят ткань от
коробления.
Тройная трикотажная строчка «зигзаг»
Стежок
Длина стежка
Ширина стежка
(Тройная трикотажная
SS
3-6,5
строчка «зигзаг»)
Данная строчка может использоваться для обработки тяжелых
эластичных тканей, для которых применим обычный
зигзагообразный шов. Тройная трикотажная строчка «зигзаг»
может быть также использована для декоративной отделки
лицевой стороны ткани.
Установите ручку выбора типа стежка на тройную
трикотажную строчку «зигзаг».
Grätenstich
Stichmuster
Stichlänge
Stichbreite
(Grätenstich)
SS
3-6,5
Benutzen Sie den Grätenstich als dekorativen Stich beim Sticken, oder
beim Säumen von Tüchern, Tischdecken oder Vorhängen.
1. Stellen Sie das Stichmuster-Einstellrad auf den Grätenstich ein.
2. Legen Sie den Stoff auf rechts und nähen in 1 cm Abstand von der
Stoffkante.
3. Schneiden Sie dicht an der Naht.
Dieser Stich verhindert das Aufreppeln des Stoffes.
Dreifach-Zickzackstich
Stichmuster
Stichlänge
Stichbreite
(Dreifach-Zickzackstich)
SS
3-6,5
Dieser Stich kann benutzt werden, um schwere Stretch-Stoffe
zusammenzunähen, wann immer der Zickzackstich geeignet ist. Der
Dreifach-Zickzackstich kann auch als dekorativer Applikationsstich
eingesetzt werden.
Stellen Sie das Stichmuster-Einstellrad auf den Dreifach-Zickzack-stich
ein.
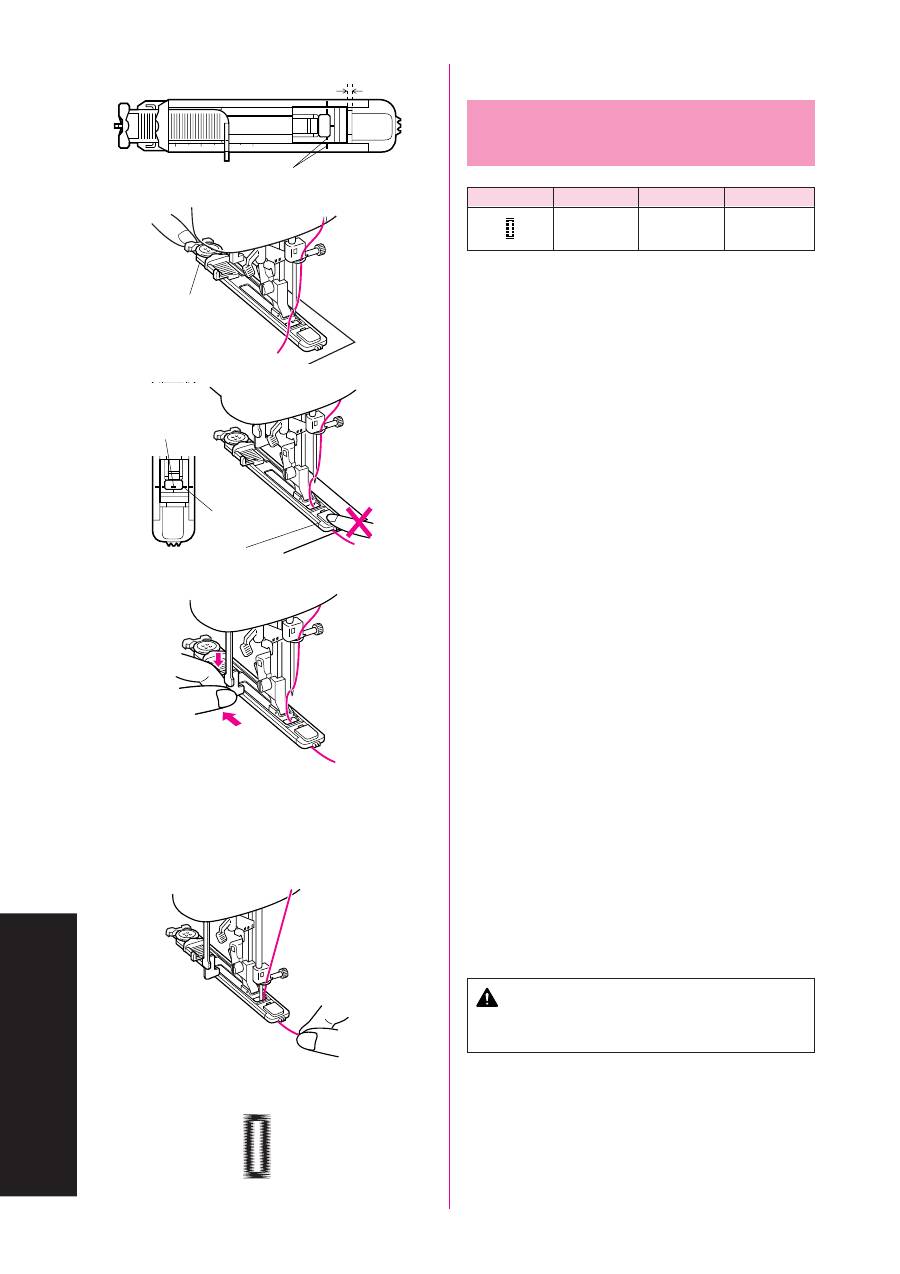
63
BUTTONHOLE AND BUTTON SEWING
KNOPFLÖCHER UND KNÖPFE NÄHEN
ОБМЕТЫВАНИЕ ПЕТЕЛЬ И ПРИШИВАНИЕ ПУГОВИЦ
(Model STAR 240E, STAR 230E, PS-57, PS-55, STAR-50,
RSR-55, XRX-55)
Making a Buttonhole
(For 1-step BH Type)
Pattern
Stitch Length
Stitch Width
Foot
F-1.5
3-5
Buttonhole Foot
(Dial 4-7)
NOTE:
1. It is recommended to practice making a buttonhole on a scrap
piece of fabric before attempting it on the actual garment.
2. When making buttonholes on soft fabrics, place a stabilizer
material on the underside of the fabric.
One-step buttonhole-making is a simple process that provides
reliable results.
MAKING A BUTTONHOLE
1. Using tailor’s chalk, mark the position of the buttonhole on the
fabric.
2. Set the Pattern Selection Dial to Buttonhole.
NOTE:
Set the Stitch Width Dial to “7” for a buttonhole with an actual width
of 5 mm or to “4” for a 3-mm-width buttonhole.
3. Attach the buttonhole foot, pull open the button holder and insert
a button. (See fig. B)
*
The size of the buttonhole is determined by the button inserted
into the button holder.
4. Align the red line on the presser foot with the mark on the fabric,
then lower the Presser Foot Lever. Be sure to pass the thread
under the presser foot and pull it toward you. (See fig. C)
NOTE:
Do not lower the Presser Foot Lever while pushing in the area of the
presser foot marked
a
in fig.C. Otherwise the buttonhole will not
be sewn with the correct size.
1
Do not close this gap.(Fig.A)
2
Align the lines on the presser foot.
5. Pull down the buttonhole lever to its lowest position, then lightly
push it toward the back of the machine. (See fig. D)
3
Button holder
4
Mark on fabric
5
Line on presser foot
6. Hold the upper thread and step down on the foot controller (or
press the Start/Stop Button) to begin sewing.
CAUTION
Pulling the thread too strongly may bend or break the
needle, and lead to injury.
7. Stitches
1
,
2
,
3
and
4
are automatically sewn, then stop the
machine.
A
D
5
4
a
B
3
1
A
2
3
2
4
1
C
64
BUTTONHOLE AND BUTTON SEWING
KNOPFLÖCHER UND KNÖPFE NÄHEN
ОБМЕТЫВАНИЕ ПЕТЕЛЬ И ПРИШИВАНИЕ ПУГОВИЦ
(Модели STAR 240E, STAR 230E, PS-57, PS-55, STAR-50,
RSR-55, XRX-55)
Обметывание петель
(Для 1-ступенчатого обметывания петли)
Стежок
Длина стежка Ширина стежка
Лапка
F-1,5
ПРИМЕЧАНИЕ:
1. Перед обметыванием петель на деталях одежды рекомендуется
выполнить несколько пробных обметываний на лоскутках ткани.
2. При обработке петель на тонких тканях под ткань следует
подкладывать стабилизирующий материал.
Одноступенчатое обметывание петли - простая операция,
обеспечивающая надежные результаты.
ОБРАБОТКА ПЕТЛИ
1. С помощью мелка пометьте на ткани положение будущей
петли.
2. Установите ручку выбора типа стежка на обметывание
петель.
ПРИМЕЧАНИЕ:
Установите ручку регулирования ширины стежка на отметку
“7” для обметывания петли, действительная ширина которой
составляет 5 мм, и на отметку “4” для обметывания петли,
действительная ширина которой составляет 3 мм.
3. Прикрепите лапку для обметывания петель, откройте
пуговичный зажим и вставьте в него пуговицу. (См.
рис. B
)
*
Размер петли определяется размером пуговицы, установленной
в пуговичный зажим.
4. Совместите красную линию на нажимной лапке с отметкой
на ткани и затем опустите рычаг нажимной лапки.
Обязательно вытяните нитку, пропущенную под нажимную
лапку, к себе. (См.
рис. C
)
ПРИМЕЧАНИЕ:
Не опускайте рычаг нажимной лапки в момент нажатия на
область нажимной лапки, обозначенную символом
a
на
рис.
С
. В противном случае петля получится неправильного
размера.
1
Не закрывайте этот зазор. (
рис.A
)
2
Совместите с линиями на нажимной лапке.
5. Опустите рычаг лапки для обметывания петель в крайнее
нижнее положение и затем слегка надавите на него в
направлении от себя. (См.
рис. D
)
3
Пуговичный зажим
4
Метка на ткани
5
Линия на нажимной лапке
6. Удерживая верхнюю нитку, надавите на педаль ножного
контроллера (или нажмите кнопку пуска/остановки
машины) для начала строчки.
ПРЕДОСТЕРЕЖЕНИЕ
Не тяните сильно за нитку - игла может погнуться или
сломаться и Вы можете получить травму.
7. После автоматического выполнения строчек
1
,
2
,
3
и
4
остановите машину.
(Modell STAR 240E, STAR 230E, PS-57, PS-55, STAR-50, RSR-55,
XRX-55)
Knopfloch nähen
(Für 1-Stufen-Knopfloch BH-Typ)
Stichmuster
Stichlänge
Stichbreite
Fuß
F-1,5
3-5
Knopflochfuß
(Drehschalter 4-7)
NOTIZEN:
1. Es wird empfohlen, das Nähen eines Knopfloches auf einem Stoffrest
auszuprobieren, bevor Sie es auf dem zu nähenden Kleidungsstück
anwenden.
2. Wenn Sie Knopflöcher auf weichen Stoffen anbringen möchten, legen
Sie Verstärkungsmaterial auf die Stoffunterseite.
Das Nähen von Knopflöchern in einem Durchgang ist ein einfacher
Vorgang mit zuverlässigen Ergebnissen.
KNOPFLOCH NÄHEN
1. Markieren Sie die Position des Knopfloches mit Schneiderkreide auf
dem Stoff.
2. Stellen Sie das Stichmuster-Einstellrad auf Knopfloch.
NOTIZEN:
Stellen Sie das Stichbreiten-Einstellrad auf “Max”, um ein Knopfloch mit
einer effektiven Breite von 5 mm zu nähen. Wählen Sie den Wert “4” für
ein 3 mm breites Knopfloch.
3. Bringen Sie den Knopflochnähfuß an, ziehen Sie den Knopfhalter auf
und legen Sie einen Knopf ein (siehe
Abb. B
).
* Die Größe des Knopfloches richtet sich nach dem eingelegten Knopf.
4. Richten Sie die rote Linie am Nähfuß auf die Marke auf dem Stoff aus
und senken Sie den Nähfußhebel. Achten Sie darauf, den Faden unter
dem Nähfuß nach vorne herauszuziehen (siehe
Abb. C
).
NOTIZEN:
Senken Sie den Nähfußhebel nicht, während Sie auf den mit
a
markierten
Bereich in
Abb. C
drücken. Es kann sonst passieren, daß das Knopfloch
nicht in der richtigen Größe genäht wird.
1
Schließen Sie diesen Spalt nicht. (
Abb. A
)
2
Richten Sie die Linien am Nähfuß aus.
5. Bringen Sie den Nähfußhebel auf die untere Position, und drücken Sie
ihn dann leicht nach hinten (siehe
Abb. D
).
3
Knopfhalter
4
Markierung auf dem Stoff
5
Linie auf dem Nähfuß
6. Halten Sie den Oberfaden und drücken Sie den Fußanlasser (oder
drücken Sie die Start/Stopp-Taste) zum Beginn des Nähens.
VORSICHT
Wenn Sie den Faden zu stramm ziehen, kann dies zum Abbrechen
der Nadel und zu Verletzungen führen.
7. Die Nähte
1
,
2
,
3
und
4
werden automatisch genäht, wonach die
Maschine stoppt.
3-5
(Отметки
на ручке 4-7)
Лапка для
обметывания
петель
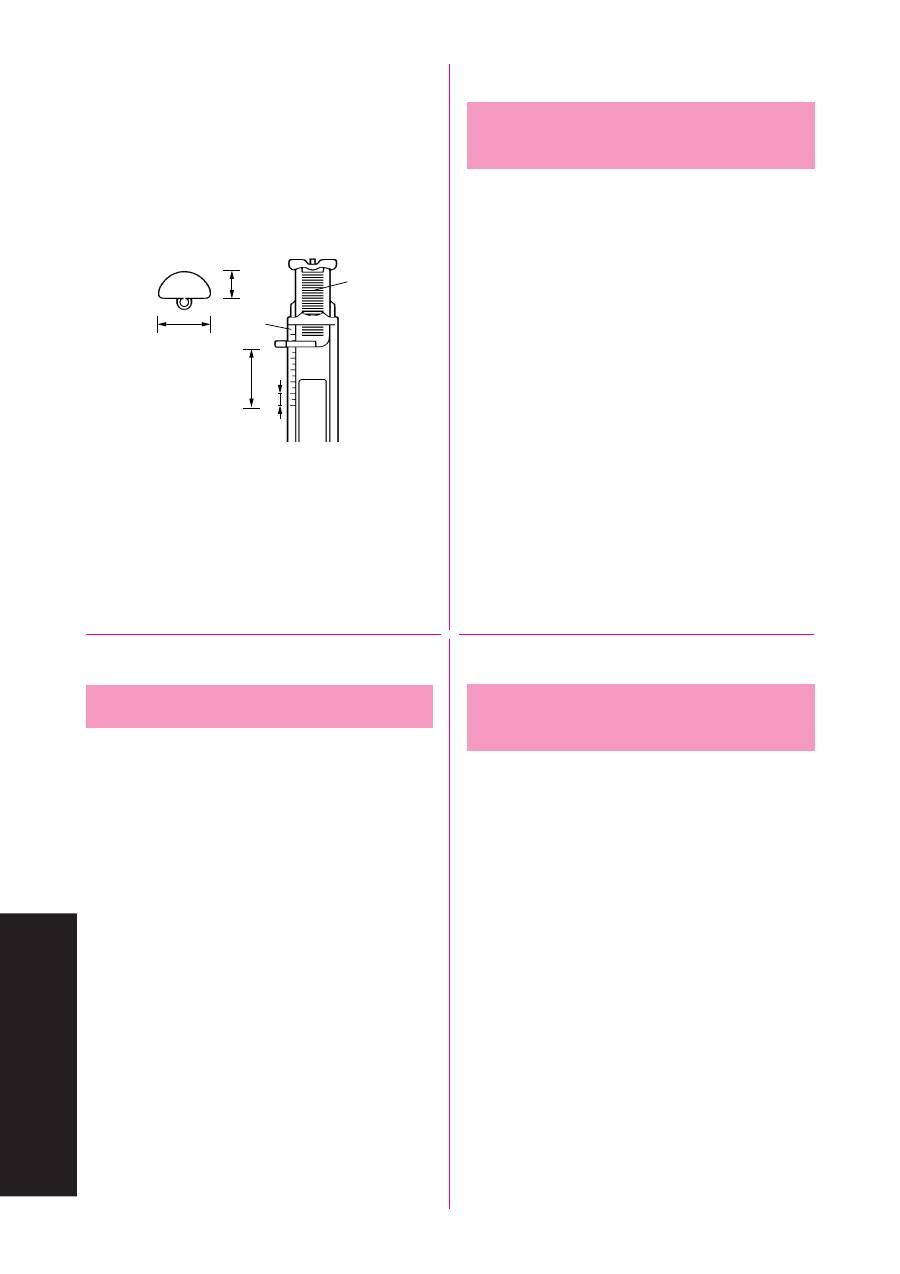
65
BUTTONHOLE AND BUTTON SEWING
KNOPFLÖCHER UND KNÖPFE NÄHEN
ОБМЕТЫВАНИЕ ПЕТЕЛЬ И ПРИШИВАНИЕ ПУГОВИЦ
(Modell STAR 240E, STAR 230E, PS-57, PS-55, STAR-50, RSR-55,
XRX-55)
Knöpfe die nicht in den Halter passen
Addieren Sie die Höhe des Knopfes und den Durchmesser des Knopfes,
und stellen Sie den so erhaltenen Wert auf der Skala des Knopflochfußes
ein. Der Abstand zwischen zwei Linien auf der Skala beträgt 0,5 cm.
Beispiel:
Bei einem Knopf mit dem Durchmesser 1,5 cm und einer Höhe von 1 cm
sollte die Skala auf 2,5 cm eingestellt werden.
1
Höhe [1 cm]
2
Durchmesser [1,5 cm]
3
Knopfhalterplatte
4
Skala
5
Durchmesser + Höhe [2,5 cm]
6
0,5 cm
2
1
5
6
4
3
(Model STAR 240E, STAR 230E, PS-57, PS-55, STAR-50,
RSR-55, XRX-55)
Odd-shaped buttons that do not
fit into the button holder plate
Add the button diameter to its thickness, then set the buttonhole
presser foot scale to this measurement. The distance in the scale
between two lines of the same length is 0.5 cm (3/16").
Example:
For a button with a diameter of 1.5 cm (9/16") and a thickness of
1 cm (3/8"), the scale should be set at 2.5 cm (1").
1
Thickness [1 cm (3/8")]
2
Diameter [1.5 cm (9/16")]
3
Button holder plate
4
Scale
5
Diameter + thickness [2.5 cm (1")]
6
0.5 cm (3/16")
(Модели STAR 240E, STAR 230E, PS-57, PS-55, STAR-50,
RSR-55, XRX-55)
Пуговицы нестандартной формы,
не входящие в пуговичный зажим
Прибавьте значение диаметра пуговицы к значению толщины
пуговицы, и затем установите пуговичный зажим на отметку
шкалы, соответствующую значению полученной суммы.
Расстояние между двумя линиями одинаковой длины на шкале
пуговичного зажима равно 0,5 см (3/16 дюйма).
Например:
Для пуговицы диаметром 1,5 см (9/16 дюйма) и толщиной 1 см
(3/8 дюйма) пуговичный зажим следует установить на отметку
шкалы 2,5 см (1 дюйм).
1
Толщина пуговицы [1 cм (3/8 дюйма)]
2
Диаметр пуговицы [1,5 cм (9/16 дюйма)]
3
Пуговичный зажим
4
Шкала
5
Диаметр + толщина [2,5 cм (1 дюйм)]
6
0,5 cм (3/16 дюйма)
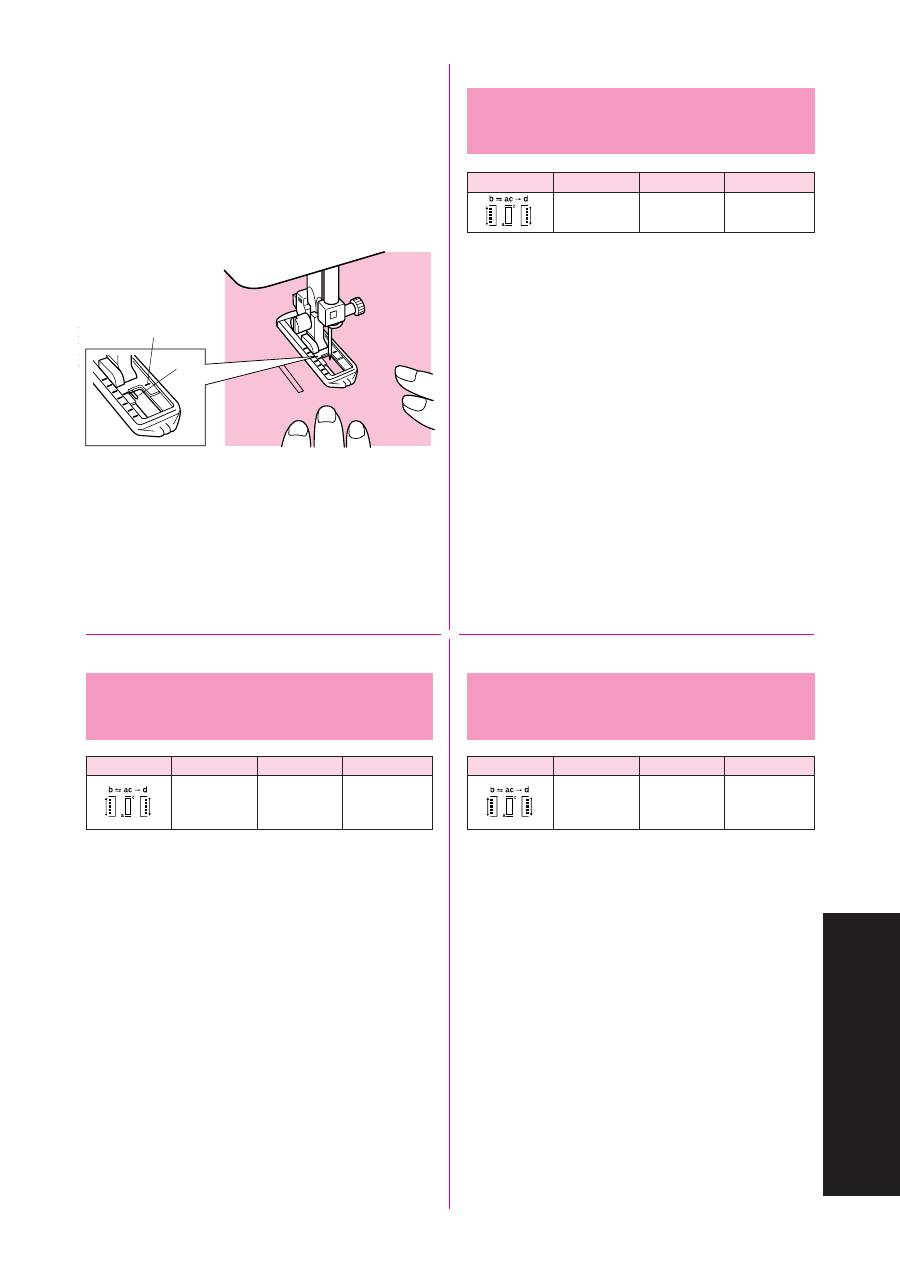
66
BUTTONHOLE AND BUTTON SEWING
KNOPFLÖCHER UND KNÖPFE NÄHEN
ОБМЕТЫВАНИЕ ПЕТЕЛЬ И ПРИШИВАНИЕ ПУГОВИЦ
(Model PS-53)
Making a Buttonhole
(For 4-step BH Type )
Pattern
Stitch Length
Stitch Width
Foot
F-1.5
3-5
Buttonhole Foot
(Dial 4-7)
NOTE:
1. It is recommended to practice making a buttonhole on a scrap
piece of fabric before attempting it on the actual garment.
2. When making buttonholes on soft fabrics, place a stabilizer
material on the underside of the fabric.
Buttonhole-making is a simple process that provides reliable
results.
MAKING A BUTTONHOLE
1. Using tailor’s chalk, mark the position and length of the button-
hole on the fabric.
2. Attach the buttonhole foot and push the frame back until it stops
with the plastic insert in the front of the frame.
3. The front bar tack will be sewn first. Place the fabric under the
presser foot so that the center of the front bar tack mark is
directly under the center of the presser foot and aligned with the
two red lines as shown.
1
Front of chalk mark
2
Red lines
1
2
(Модели PS-53)
Обметывание петель
(Для 4-ступенчатого обметывания петли)
Стежок
Длина стежка Ширина стежка
Лапка
F-1,5
ПРИМЕЧАНИЕ:
1. Перед обметыванием петель на деталях одежды
рекомендуется выполнить несколько пробных
обметываний на лоскутках ткани.
2. При обработке петель на тонких тканях под ткань следует
подкладывать стабилизирующий материал.
Обметывание петли - простая операция, обеспечивающая
надежные результаты.
Обметывание петель
1. С помощью мелка пометьте на ткани положение и длину
будущей петли.
2. Прикрепите лапку для обметывания петель и отодвиньте
рамку назад, пока она не упрется в пластмассовую вставку
в передней части рамки.
3. Обработка начнется с передней поперечной планки петли.
Разместите ткань под нажимной лапкой таким образом,
чтобы метка передней поперечной планки петли
располагалась непосредственно под центром нажимной
лапки и на одной линии с двумя красными метками, как это
показано.
1
Передняя часть меловой отметки
2
Красные линии
(Modell PS-53)
Knopfloch nähen
(Für 4-Stufen-Knopfloch BH-Typ)
Stichmuster
Stichlänge
Stichbreite
Fuß
F-1,5
3-5
Knopflochfuß
(Drehschalter 4-7)
NOTIZEN:
1. Es wird empfohlen, das Nähen eines Knopfloches auf einem Stoffrest
auszuprobieren, bevor Sie es auf dem zu nähenden Kleidungsstück
anwenden.
2. Wenn Sie Knopflöcher auf weichen Stoffen anbringen möchten, legen
Sie Verstärkungsmaterial auf die Stoffunterseite.
Das Nähen von Knopflöchern in einem Durchgang ist ein einfacher
Vorgang mit zuverlässigen Ergebnissen.
KNOPFLOCH NÄHEN
1. Markieren Sie die Position und Länge des Knopfloches mit
Schneiderkreide auf dem Stoff.
2. Montieren Sie den Knopflochfuß, und schieben Sie den äußeren
Rahmen nach hinten, bis der Einsatz vorne eingeführt ist.
3. Die vordere Raupe wird zuerst genäht. Legen Sie den Stoff unter den
Nähfuß, so daß die Mitte der Frontriegelmarkierung direkt unter der
Mitte des Nähfußes ist und mit den beiden roten Linien ausgerichtet ist
wie in der AbbiIdung unten gezeigt.
1
Vordere Kreidemarkierung
2
Rote Linien
Лапка для
обметывания
петель
3-5
(Отметки
на ручке 4-7)
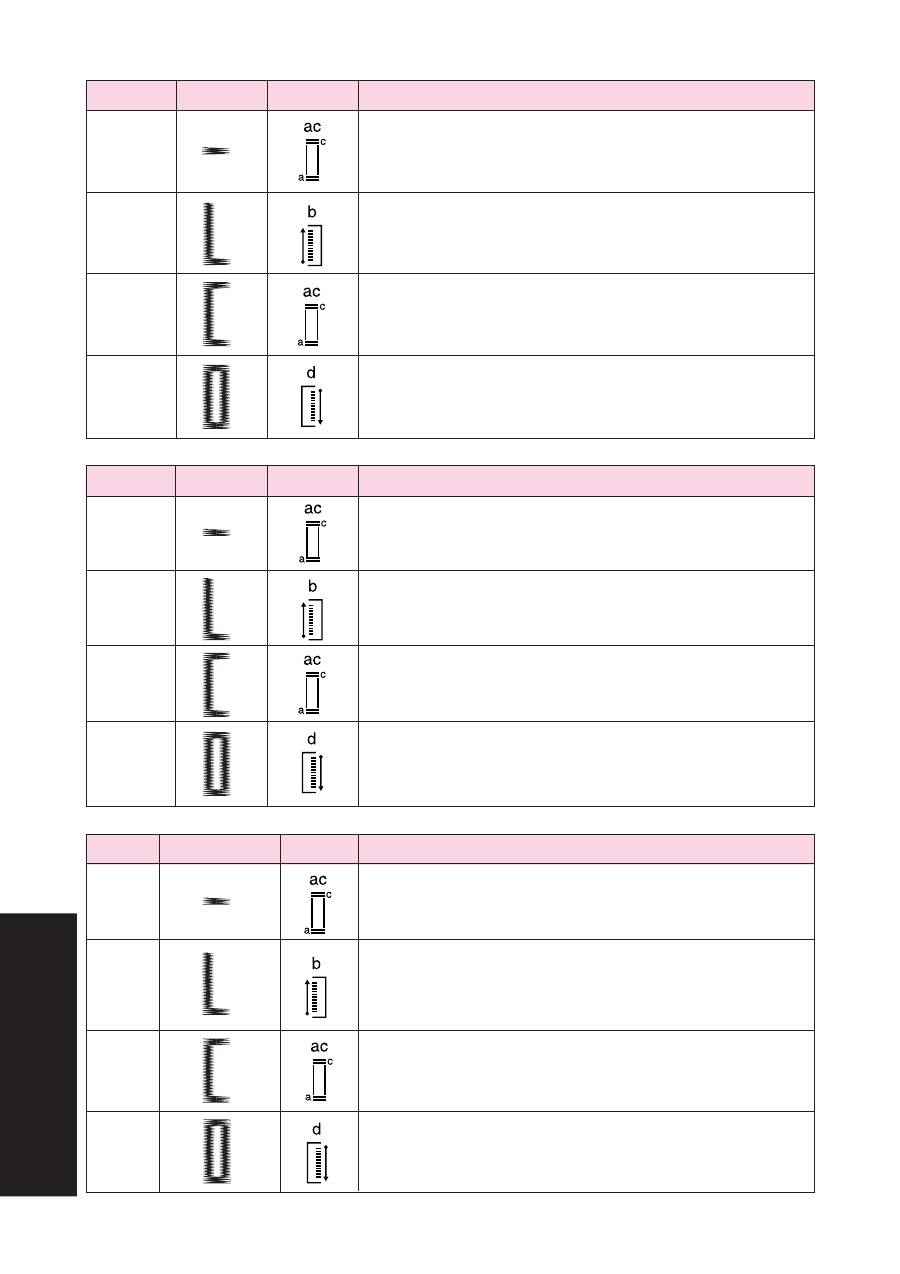
67
BUTTONHOLE AND BUTTON SEWING
KNOPFLÖCHER UND KNÖPFE NÄHEN
ОБМЕТЫВАНИЕ ПЕТЕЛЬ И ПРИШИВАНИЕ ПУГОВИЦ
Step 2
(Left side)
Step 4
(Right side)
MAKING A BUTTONHOLE
Step
Sewn Portion
Pattern
How to Sew
1. Set the pattern selection dial to “a”.
2. Lower the presser foot and sew 5 to 6 stitches.
3. Stop the machine when the needle is at the left side of the stitches, then raise
the needle from the material.
1. Turn the pattern selection dial to “b”.
2. Sew the predetermined length of the tailor’s chalk line.
3. Stop the machine when the needle is at the left side of the stitch, then raise the
needle.
1. Turn the pattern selection dial to “c” (same position as in step 1).
2. Sew 5 to 6 stitches.
3. Stop the machine when the needle is at the right side of the stitch, then raise the
needle from the material.
1. Set the pattern selection dial to “d”.
2. Sew the right side until the needle reaches the stitches sewn in step 1.
Step 1
(Front bar
tack)
Step 3
(Back bar
tack)
a
b
c
d
a
b
c
d
Шаг
1
(Передняя
планка
петли)
Шаг
2
(Левая
планка
петли)
Шаг
3
(Задняя
планка
петли)
Шаг
4
(Правая
планка
петли)
Шаг
a
b
c
d
Schritt 2
(Linke Raupe)
Schritt 4
(Rechte
Raupe)
KNOPFLOCH NÄHEN
Schritt
Genähter Teil
Stichart
Nähablauf
Schritt 1
(Vorderer
Riegel)
Schritt 3
(Hinterer
Riegel)
1. Stellen Sie den Musterwähler auf “a”.
2. Senken Sie den Nähfuß und nähen Sie einige Stiche.
3. Stoppen Sie die Maschine, wenn die Nadel auf der linken Stichseite ist und drehen Sie die
Nadel aus dem Material.
1. Drehen Sie den Musterwähler auf “b”.
2. Nähen Sie die Raupe entlang der vorgezeichneten Kreidelinie.
3. Stoppen Sie die Maschine, wenn die Nadel auf der linken Stichseite ist und drehen Sie die
Nadel aus dem Material.
1. Drehen Sie den Musterwähler auf “c” (gleiche Position wie 1).
2. Senken Sie den Nähfuß und nähen Sie einige Stiche.
3. Stoppen Sie die Maschine, wenn die Nadel auf der rechten Stichseite ist und drehen Sie
die Nadel aus dem Material.
1. Stellen Sie den Musterwähler auf “d”.
2. Nähen Sie die rechte Raupe, bis die Nadel die in Schritt 1 erzeugten Stiche erreicht.
Обметывание петель
Обшиваемый элемент петли Тип стежка
Последовательность операций
1. Установите ручку выбора типа стежка в положение “a”.
2. Опустите нажимную лапку и сделайте 5-6 стежков.
3. Остановите машину, когда игла находится с левой стороны стежка, после
чего поднимите ее над тканью.
1. Поверните ручку выбора типа стежка в положение “b”.
2. Обработайте участок по длине, помеченной мелом.
3. Остановите машину, когда игла находится с левой стороны стежка, после
чего поднимите ее над тканью.
1. Поверните ручку выбора типа стежка в положение “c”(та же позиция, что и в шаге1).
2. Сделайте 5-6 стежков.
3. Остановите машину, когда игла находится с правой стороны стежка, после
чего поднимите ее над тканью.
1. Установите ручку выбора типа стежка в положение “d”.
2. Производите обметывание до тех пор, пока игла не достигнет стежков,
выполненных в шаге 1.
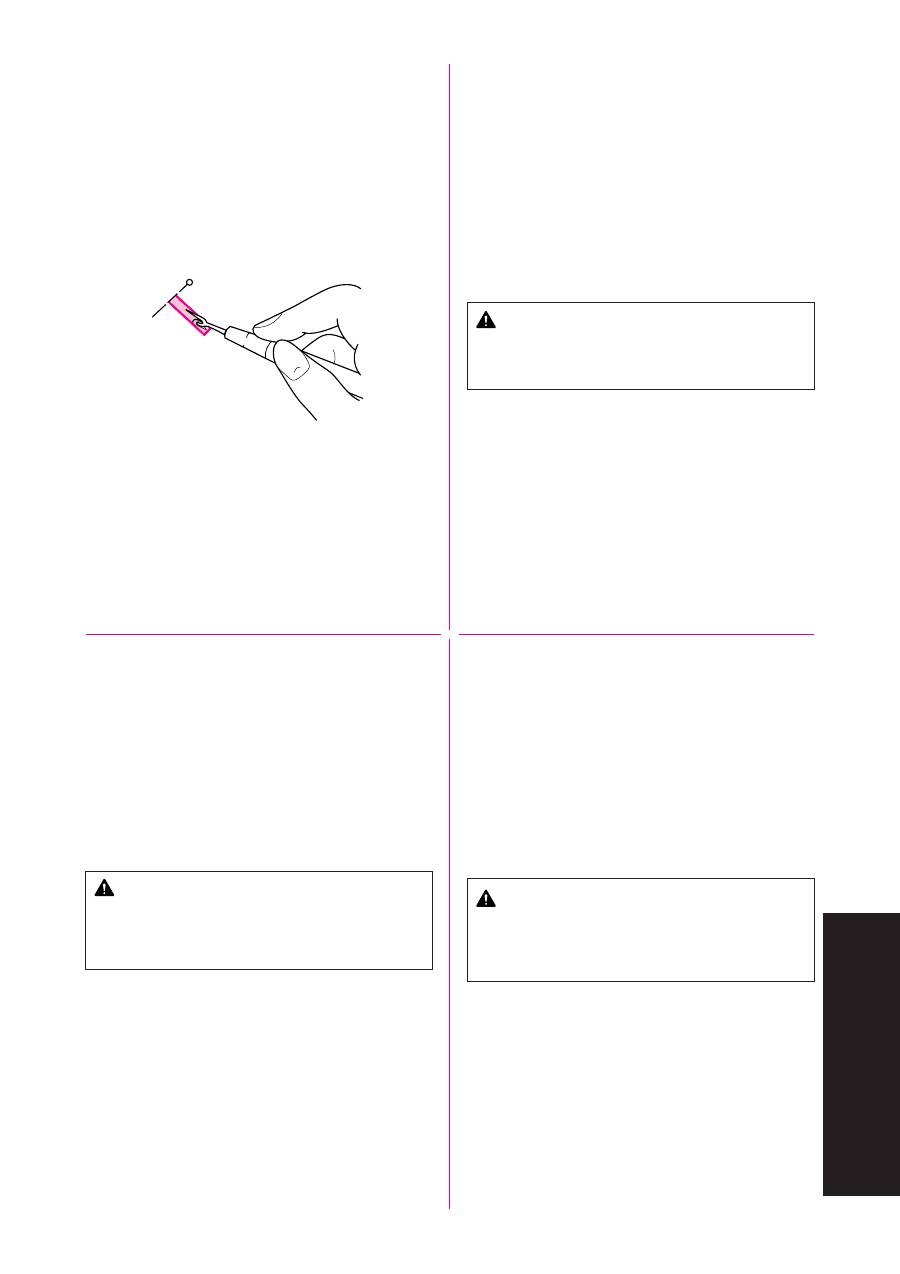
68
BUTTONHOLE AND BUTTON SEWING
KNOPFLÖCHER UND KNÖPFE NÄHEN
ОБМЕТЫВАНИЕ ПЕТЕЛЬ И ПРИШИВАНИЕ ПУГОВИЦ
(Model STAR 240E, STAR 230E, PS-57, PS-55, STAR-50,
RSR-55, XRX-55, PS-53)
SECURING THE STITCHING AND CUTTING THE BUTTON-
HOLE
1. To secure the stitching, turn the material 90 degrees
counterclockwise and sew Straight Stitches to the end of the
front bar tack of the buttonhole.
2. Remove the material from the machine. It is recommended that
pins be placed across both ends of the buttonhole as protection
against cutting the stitches.
3. Cut an opening in the middle of the buttonhole with a seam ripper
tool. Be careful not to cut through any stitches.
CAUTION
When using the seam ripper to open the buttonhole, do not
put your hand or finger in the path of the ripper. The ripper
may slip and cause injury.
(Модели STAR 240E, STAR 230E, PS-57, PS-55, STAR-50,
RSR-55, XRX-55, PS-53)
ЗАКРЕПЛЕНИЕ ШВА И ПРОРЕЗКА ПЕТЛИ
1. Для закрепления шва поверните ткань на 90 є против
часовой стрелки и прошейте несколько прямых стежков
до конца передней планки петли.
2. Снимите обработанную ткань с машины. После этого
рекомендуется на обоих концах петли зафиксировать
булавки, чтобы не повредить стежки при прорезке.
3. Прорежьте ткань в середине обработанной петли с
помощью ножа для распарывания швов. Внимательно
следите за тем, чтобы не прорезать стежки.
ПРЕДОСТЕРЕЖЕНИЕ
Используя нож для распарывания швов с целью
прорезания петли, берегите руки и пальцы от попадания
под траекторию движения ножа. Нож может
соскользнуть с ткани и нанести травму.
(Modell STAR 240E, STAR 230E, PS-57, PS-55, STAR-50, RSR-55,
XRX-55, PS-53)
STICHE SICHERN UND KNOPFLOCH AUFSCHNEIDEN
1. Zum Sichern der Naht drehen Sie das Material um 90 Grad nach links
und nähen Sie mit dem Geradstich bis zum Ende des vorderen
Knopflochriegels.
2. Nehmen Sie das Material aus der Maschine. Es wird empfohlen,
jeweils eine Nadel in den oberen und unteren Riegel zu stecken, damit
Sie nicht zu weit einschneiden.
3. Schneiden Sie mit einem Knopflochschneider eine Öffnung in die
Mitte des Knopfloches. Beschädigen Sie nicht den Faden.
VORSICHT
Achten Sie bei der Benutzung des Trennmessers darauf, dass Ihre
Hand oder Ihre Finger sich nicht in dessen Weg befinden. Das
Trennmesser könnte ausrutschen und Sie könnten sich dadurch
verletzen.
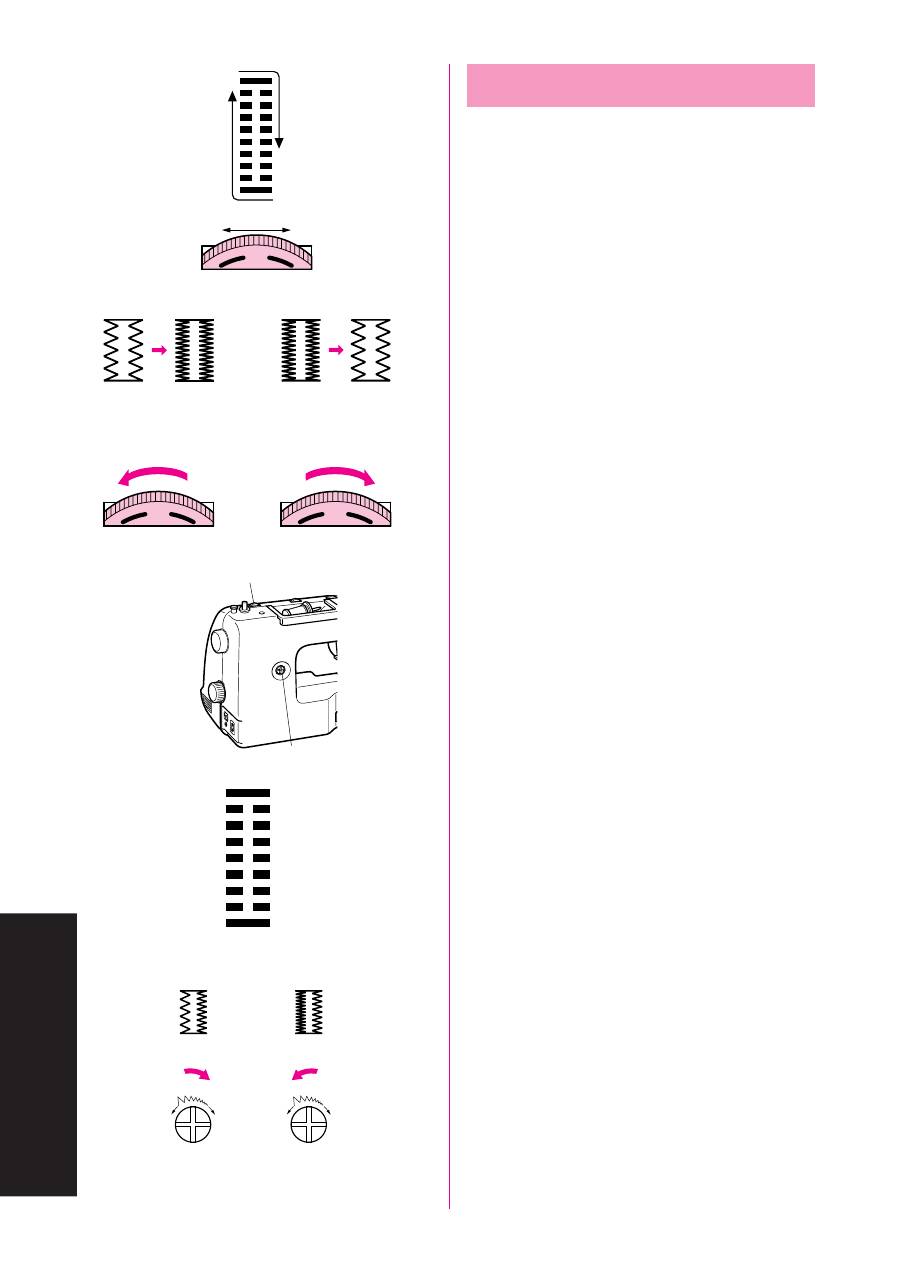
69
BUTTONHOLE AND BUTTON SEWING
KNOPFLÖCHER UND KNÖPFE NÄHEN
ОБМЕТЫВАНИЕ ПЕТЕЛЬ И ПРИШИВАНИЕ ПУГОВИЦ
Buttonhole Fine Adjustment
If the stitching on the two sides of the buttonhole do not appear
uniform, the following adjustments can be made.
1. Set the Stitch Length Dial at “F-1.5” and stitch the right side of
the buttonhole on a scrap of fabric while observing how the
material is fed.
2. If the right side of the buttonhole is too coarse or fine, adjust the
feeding of the material with the Stitch Length Dial.
1
Right row
2
Stitch length
3
Shorter
4
Longer
5
Adjusted stitch
3. After obtaining a satisfactory feeding on the right side, stitch the
left side of the buttonhole and observe the feeding.
4. If the left side is too coarse or fine compared to the right side,
adjust the buttonhole fine adjustment screw as described below.
If the left side is too coarse, turn the screw with the enclosed
large screwdriver in the – direction.
If the left side is too fine, turn the screw with the enclosed large
screwdriver in the + direction.
This adjustment allows both sides of the buttonhole to appear
uniform.
6
Stitch length dial
7
Buttonhole fine adjusting screw
8
Right row
9
Adjusted stitch
2
3
4
F
1
F
5
F
5
7
6
8
+
–
9
9
+
–

70
BUTTONHOLE AND BUTTON SEWING
KNOPFLÖCHER UND KNÖPFE NÄHEN
ОБМЕТЫВАНИЕ ПЕТЕЛЬ И ПРИШИВАНИЕ ПУГОВИЦ
Тонкая настройка для
обметывания петель
Если стежки с обеих сторон петли не идентичны по размеру,
то можно выполнить описанные ниже регулировки.
1. Установите ручку регулирования длины стежка на отметку
“F-1,5” и проведите пробное обметывание правой планки
петли на лоскутке ткани, наблюдая при этом за
продвижением ткани.
2. Если стежки на правой стороне петли слишком редкие
или, наоборот, слишком частые, произведите коррекцию
механизма подачи ткани, используя ручку регулирования
длины стежка.
1
Правая планка
2
Длина стежка
3
Короче
4
Длиннее
5
Отрегулированная строчка
3. После достижения требуемой подачи ткани на правой
планке, проведите аналогичное обметывание левой планки
петли, наблюдая при этом за продвижением ткани.
4. Если полученная обметка слишком редкая или, наоборот,
слишком частая в сравнении с правой планкой петли,
произведите коррекцию поворотом специального
регулировочного винта тонкой настройки механизма
обметывания петель, как описано ниже.
Если обметка левой планки петли слишком редкая,
пользуясь входящей в комплект отверткой, поверните
этот винт в направлении «
–
».
Если обметка левой планки петли слишком частая,
пользуясь входящей в комплект отверткой, поверните
этот винт в направлении «+».
Данная настройка позволяет отрегулировать подачу ткани
таким образом, что после обработки обе планки петли будут
иметь совершенно одинаковый вид.
6
Ручка регулирования длины стежка
7
Винт тонкой настройки для обметывания петель
8
Правая планка
9
Отрегулированная строчка
Knopfloch-Feineinstellung
Wenn die Stiche zu beiden Seiten des Knopfloches nicht einheitlich
erscheinen, können die folgenden Einstellungen vorgenommen werden.
1. Stellen Sie den Stichlängen-Einstellrad auf “F-1,5” und nähen Sie auf
einem Stoffrest die rechte Raupe des Knopfloches, während Sie
beobachten, wie das Material transportiert wird.
2. Wenn die rechte Raupe zu grob oder zu fein ist, stellen Sie den
Stofftransport mit dem Stichlängen-Einstellrad ein.
1
Rechte Raupe
2
Stichlänge
3
Kürzer
4
Länger
5
Einstellung des Stiches
3. Wenn der Stofftransport auf der rechten Seite zufriedenstellend ist,
nähen Sie die linke Raupe und beobachten Sie, wie das Material
transportiert wird.
4. Wenn die linke Raupe im Vergleich zur rechten zu grob oder zu fein
ist, stellen Sie die Schraube für die Knopfloch-Feineinstellung ein, wie
unten beschrieben.
Wenn die rechte Raupe zu grob ist, drehen Sie die Schraube mit dem
beiliegenden großen Schraubenzieher in die Richtung –.
Wenn die rechte Raupe zu fein ist, drehen Sie die Schraube mit dem
beiliegenden großen Schraubenzieher in die Richtung +.
Mit dieser Einstellung erreichen Sie, daß beide Seiten des Knopfloches
einheitlich aussehen.
6
Stichlängen-Einstellrad
7
Schraube für die Knopfloch-Feineinstellung
8
Rechte Raupe
9
Einstellung des Stiches

71
BUTTONHOLE AND BUTTON SEWING
KNOPFLÖCHER UND KNÖPFE NÄHEN
ОБМЕТЫВАНИЕ ПЕТЕЛЬ И ПРИШИВАНИЕ ПУГОВИЦ
For 1-Step BH Type
(Model STAR 240E, STAR 230E, PS-57, PS-55, STAR-50,
RSR-55, XRX-55)
When the buttonhole is not sewn correctly:
There are two different procedures for correcting buttonhole
sewing, depending on which part of the buttonhole is not sewn
correctly.
Correction Procedure 1 (See fig. A)
1. Raise the Presser Foot Lever, then remove the fabric, upper
thread and lower thread.
2. Pull the buttonhole lever slightly toward you.
3. Sew about 10 stitches with no fabric, upper thread, or lower
thread in the machine.
4. Place the fabric under the presser foot, and set the upper and
lower thread again, then lightly push the buttonhole lever toward
the back of the machine and sew the buttonhole from the
beginning.
Correction Procedure 2 (See fig. B)
1. Raise the Presser Foot Lever, then remove the fabric and all of
the sewn thread.
2. Place the fabric under the presser foot again, then lightly push
the buttonhole lever toward the back of the machine and sew the
buttonhole from the beginning.
NOTE:
When you are finished sewing all buttonholes be sure to raise the
buttonhole lever.
If the buttonhole lever is pushed toward the back of the machine
while sewing any stitch other than a buttonhole, the buttonhole feed
will be used and the stitch will not be sewn correctly.
If the buttonhole lever is accidentally pushed when you are sewing
a stitch other than a buttonhole, remove the fabric and thread from
the machine, raise the buttonhole lever, and sew about 20 stitches.
Then sew the intended stitch.
A
B
Для 1-ступенчатого обметывания петли
(Модели STAR 240E, STAR 230E, PS-57, PS-55, STAR-50,
RSR-55, XRX-55)
Если обметывание петель выполняется некачественно:
Существует два способа коррекции механизма обметывания
петель, в зависимости от того, какая планка петли
обрабатывается некачественно.
Операция коррекции 1 (См.
рис. A
)
1. Поднимите рычаг нажимной лапки, снимите с машины
ткань, а также верхнюю и нижнюю нитки.
2. Слегка потяните рычаг лапки для обметывания петель на себя.
3. Прошейте примерно 10 стежков без заправленных в машину
ткани, верхней и нижней нитки.
4. Положите ткань под нажимную лапку, вновь заправьте
нижнюю и верхнюю нитки, а затем, нажав на рычаг лапки
для обметывания петель в направлении от себя, вновь
начните обметывание петли.
Операция коррекции 2 (См.
рис. B
)
1. Поднимите рычаг нажимной лапки, снимите с машины
ткань, а также всю прошитую верхнюю и нижнюю нитки.
2. Вновь положите ткань под нажимную лапку и затем, нажав
на рычаг лапки для обметывания петель в направлении от
себя, вновь начните обметывание петли.
ПРИМЕЧАНИЕ:
После завершения обметывания всех петель не забудьте
поднять рычаг лапки для обметывания петель.
Если рычаг лапки для обметывания петель нажат в
направлении от себя во время выполнения любых иных типов
строчки, за исключением обметывания петель, получение
качественной строчки невозможно.
Если Вы случайно нажали на рычаг лапки для обметывания
петель от себя во время выполнения любой иной строчки, за
исключением обметывания петель, снимите ткань и нитки с
машины, поднимите рычаг лапки для обметывания петель и
прошейте примерно 20 стежков. Затем вновь начните
выполнять требуемую строчку.
Für 1-Stufen-Knopfloch BH-Typ
(Modell STAR 240E, STAR 230E, PS-57, PS-55, STAR-50, RSR-55,
XRX-55)
Wenn das Knopfloch nicht richtig genäht wird:
Es gibt zwei verschiedene Methoden zur Korrektur von Knopfloch-
nähten, je nachdem, welcher Teil des Knopfloches nicht richtig
genäht wird.
Methode 1 (siehe
Abb. A
)
1. Heben Sie den Nähfußhebel an, entfernen Sie den Stoff, den Oberfaden
und den Unterfaden.
2. Ziehen Sie den Knopflochhebel leicht in Ihre Richtung.
3. Nähen Sie etwa 10 Stiche ohne Stoff, Oberfaden und Unterfaden in der
Maschine.
4. Den Stoff unter den Nähfuß legen, und den Ober- und Unterfaden
erneut einsetzen. Dann leicht den Knopflochhebel zur Rückseite der
Maschine drücken, und das Knopfloch von Anfang an nähen.
Methode 2 (siehe
Abb. B
)
1. Heben Sie den Nähfußhebel, nehmen Sie Stoff- und Fadenreste
heraus.
2. Legen Sie den Stoff wieder unter den Nähfuß, drücken Sie dann den
Nähfußhebel leicht nach hinten und nähen Sie das Knopfloch von
Anfang an.
NOTIZEN:
Wenn Sie mit dem Nähen fertig sind, müssen Sie den Knopflochhebel
anheben.
Wenn der Knopflochhebel nach hinten gedrückt wird, während ein
anderer Stich als der Knopflochstich genäht wird, wird der Knopfloch-
transport benutzt, und der Stich wird nicht richtig genäht.
Wenn der Knopflochhebel versehentlich gedrückt wird, während Sie
einen anderen Stich als ein Knopfloch nähen, entfernen Sie den Stoff und
Faden von der Maschine, heben Sie den Knopflochhebel an, und nähen Sie
etwa 20 Stiche. Dann nähen Sie den vorgesehenen Stich.
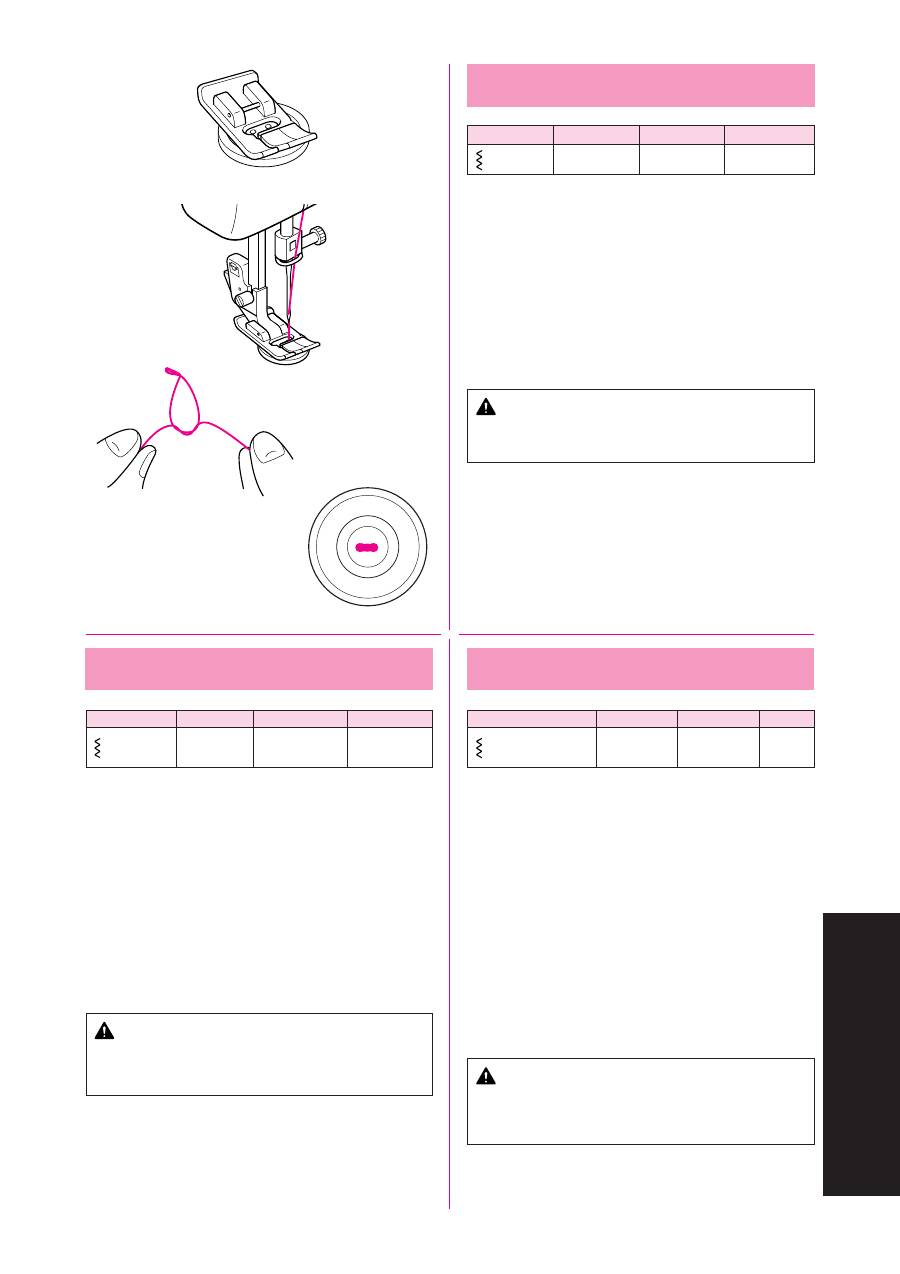
72
BUTTONHOLE AND BUTTON SEWING
KNOPFLÖCHER UND KNÖPFE NÄHEN
ОБМЕТЫВАНИЕ ПЕТЕЛЬ И ПРИШИВАНИЕ ПУГОВИЦ
Button Sewing
Pattern
Stitch Length
Stitch Width
Foot
(Zigzag Stitch)
0
Less than 6.5
1. Measure the distance between the holes and set the appropriate
stitch width using the Stitch Width Dial. For example, if the
distance between the holes is 1.5 mm, set the stitch width to 1.5.
2. Change the foot to the Zigzag presser foot.
3. Lower the feed dogs by setting the Feed Dog Position Switch to
the Down Position as shown on page 30.
4. Place a button between the foot and the fabric and make sure
that the needle enters the holes without hitting the button. If it hits
see Step 1.
5. At a slow speed, sew approximately 10 stitches.
6. Remove the material from the machine. Cut the upper and lower
threads and tie both threads at the back of the material.
CAUTION
Make sure the needle does not strike the button during
sewing. The needle may break, leading to injury.
Zigzag Presser
Foot
Пришивание пуговиц
Стежок
Длина стежка Ширина стежка
Лапка
(Зигзагообразный
0
Менее 6,5
стежок)
1. Измерьте расстояние между отверстиями и установите
требуемое значение ширины стежка с помощью ручки
регулирования ширины стежка. Например, если расстояние
между отверстиями составляет 1,5 мм, установите ширину
стежка на отметку 1,5.
2. Замените лапку на нажимную лапку зигзаг.
3. Опустите зубчатую рейку механизма продвижения ткани,
установив переключатель позиции зубчатой рейки
механизма продвижения ткани в нижнее положение, как
показано на стр. 30.
4. Разместите пуговицу между лапкой и тканью и убедитесь в
том, что игла нормально входит в отверстия, не задевая
пуговицу. В противном случае см. Пункт 1.
5. На малой скорости сделайте примерно 10 стежков.
6. Снимите ткань с машины. Обрежьте верхнюю и нижнюю
нитки и свяжите их концы узелком на изнаночной стороне
ткани.
ПРЕДОСТЕРЕЖЕНИЕ
Убедитесь в том, что игла не задевает за пуговицу во
время шитья. Игла может сломаться и причинить
травму.
Knöpfe annähen
Stichmuster
Stichlänge
Stichbreite
Fuß
(Zickzackstich)
0
Weniger als
Zickzack-
6,5
Nähfuß
1. Messen Sie den Lochabstand und stellen mit dem Stichbreiten-
Einstellrad die entsprechende Stichbreite ein. Wenn der Lochabstand
z. B. 1,5 mm beträgt, stellen Sie die Stichbreite auf 1,5.
2. Tauschen Sie den Fuß gegen den Zickzack-Nähfuß.
3. Versenken Sie den Transporteur, indem Sie den Transporteurhebel in
die Absenkposition stellen, wie auf Seite 30 gezeigt.
4. Legen Sie einen Knopf zwischen Fuß und Stoff und prüfen durch
manuelles Drehen, daß die Nadel ohne anzustreifen in die
Befestigungslöcher einsticht. Wenn dies passiert, beachten Sie Schritt
1.
5. Nähen Sie mit langsamer Geschwindigkeit etwa 10 Stiche.
6. Nehmen Sie das Material aus der Maschine. Schneiden Sie Ober- und
Unterfaden großzügig ab und verknoten Sie beide Fäden an der
Stoffunterseite.
VORSICHT
Achten Sie darauf, dass die Nadel den Knopf während des Nähens
nicht berührt. Die Nadel könnte abbrechen und Sie könnten sich
dadurch verletzen.
Нажимная
лапка
зигзаг
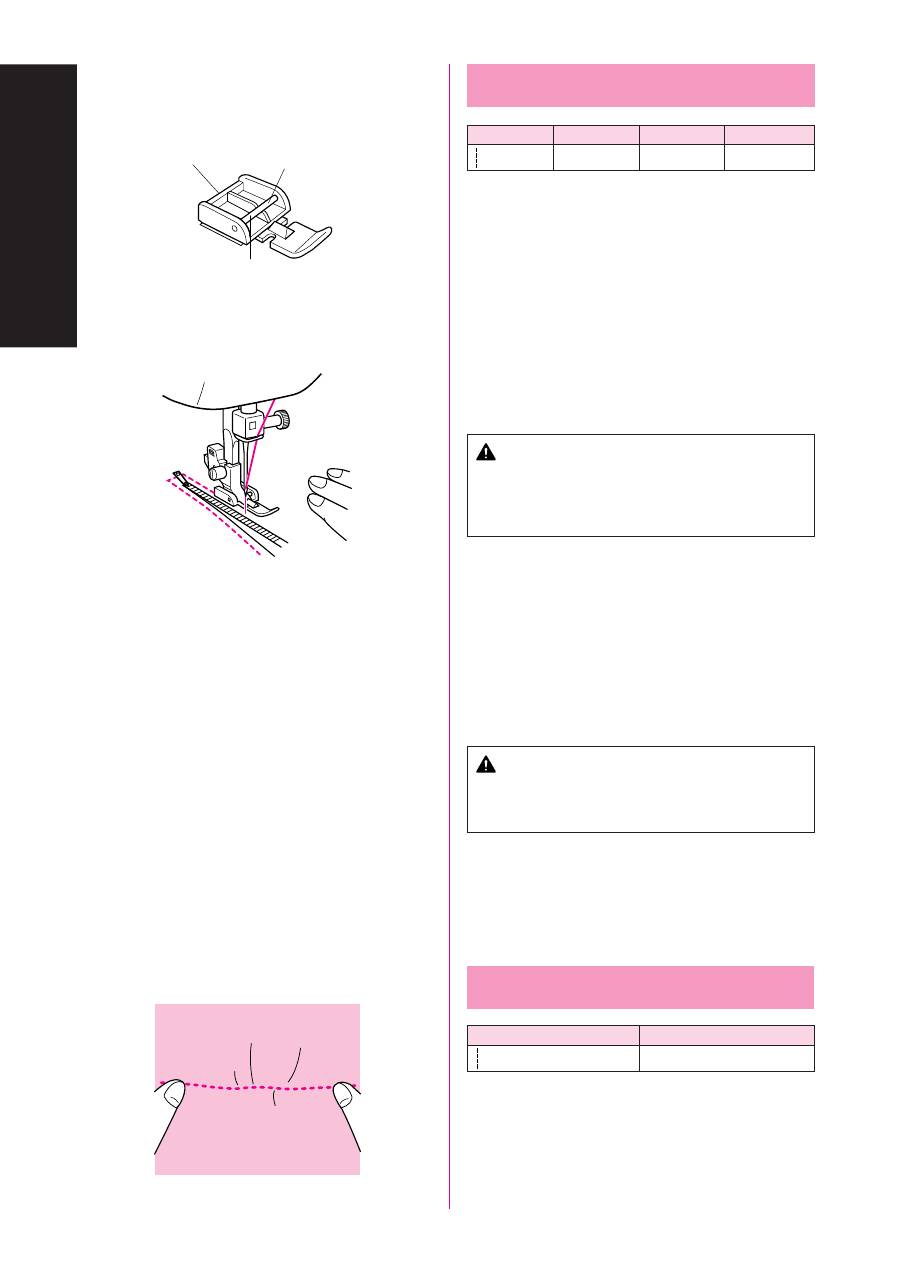
73
USING ATTACHMENTS AND APPLICATIONS
HEFTEN UND APPLIZIEREN
ИСПОЛЬЗОВАНИЕ ПРИСПОСОБЛЕНИЙ И ИЗГОТОВЛЕНИЕ АППЛИКАЦИЙ
Zipper Insertion
Pattern
Stitch Length
Stitch Width
Foot
(Straight Stitch)
2-3
3.5 (center)
Zipper Foot
The zipper foot is used to sew various types of zippers and can
easily be positioned to the right or left side of the needle.
When sewing the right side of the zipper, attach the shank to the left
pin of the zipper foot. When sewing the left side of the zipper, attach
the shank to the right pin of the zipper foot. (See fig. A)
1. Set the Pattern Selection Dial to Straight Stitch. Set the Stitch
Length between 2 and 3.
Set the Stitch Width 3.5 (center).
2. Lower the presser foot lever and fix either the left or right pin of
the zipper foot onto the shank.
3. Fold the edge of the material 2 cm (3/4") and place the zipper
under the folded portion.
4. Lower the needle into the notch located either on the left or right
side of the zipper foot.
CAUTION
Turn the balance wheel to make sure the needle does not
strike the presser foot. If another stitch is selected, the
needle will strike the presser foot, causing the needle to
break, possibly leading to injury.
5. Sew from the bottom of the zipper toward the top on both sides.
The needle should be positioned on the zipper side of the foot
for best results. (See fig. B)
6. To sew the opposite side of the zipper, release
the foot by pressing the button located at the back of the presser
foot, install the zipper foot on the other side of the zipper and
continue sewing using the other side notch.
1
Zipper foot
2
Right pin for sewing the left side of the zipper
3
Left pin for sewing the right side of the zipper
CAUTION
Make sure the needle does not strike the zipper during
sewing. If the needle strikes the zipper, the needle may
break, leading to injury.
A
B
1
2
3
Gathering
Pattern
Stitch Length
(Straight Stitch)
4
1. Set the Pattern Selection Dial to Straight Stitch.
2. Loosen the tension of the upper thread so that the lower thread
lies on the underside of the material.
3. Sew a single row or multiple rows of Straight Stitch.
4. Pull the lower thread(s) to gather the material.
74
USING ATTACHMENTS AND APPLICATIONS
HEFTEN UND APPLIZIEREN
ИСПОЛЬЗОВАНИЕ ПРИСПОСОБЛЕНИЙ И ИЗГОТОВЛЕНИЕ АППЛИКАЦИЙ
Вшивание застежек-молний
Cтежок
Длина стежка Ширина стежка
Лапка
(Прямой
2-3
3,5 (центр)
стежок)
Лапка для вшивания застежек-молний предназначена для
вшивания застежек-молний различных типов и может быть
установлена справа или слева от иглы.
Во время вшивания правой части молнии прикрепите
держатель нажимной лапки к левому штифту лапки для
вшивания застежек-молний. Во время вшивания левой части
молнии прикрепите держатель нажимной лапки к правому
штифту лапки для вшивания застежек-молний. (См.
рис. А
)
1. Установите ручку выбора типа стежка на прямой стежок. Задайте
длину стежка от 2 до 3.
Установите ширину стежка на 3,5 (центр).
2. Опустите рычаг нажимной лапки и прикрепите держатель
нажимной лапки к левому или правому штифту лапки для
вшивания застежек-молний.
3. Подогните кромку ткани на 2 см (3/4 дюйма) и подложите
молнию под подвернутый участок ткани.
4. Опустите иглу в прорезь с левой или правой стороны лапки
для вшивания застежек-молний.
ПРЕДОСТЕРЕЖЕНИЕ
Поверните маховик для того, чтобы убедиться в том, что
игла не задевает нажимную лапку. Если на машине выбран
другой тип стежка, игла ударится о нажимную лапку, что
приведет к ее поломке и, возможно, к получению травмы.
5. Прошейте молнию от нижней части к верхней с обеих
сторон. Для обеспечения наилучших результатов игла
относительно лапки должна находиться со стороны молнии.
(См.
рис. B
)
6. Для вшивания противоположной стороны молнии
необходимо отжать кнопку, расположенную с задней части
нажимной лапки, после чего установить лапку для вшивания
застежек-молний на другую сторону молнии и продолжить
строчку, используя прорезь с другой стороны лапки.
1
Лапка для вшивания застежек-молний
2
Правый штифт для вшивания левой стороны
молнии
3
Левый штифт для вшивания правой стороны
молнии
ПРЕДОСТЕРЕЖЕНИЕ
Убедитесь в том, что игла не задевает молнию во время
шитья. Если игла ударит о молнию, игла может
сломаться и причинить травму.
Обработка сборок
Стежок
Длина стежка
(Прямой стежок )
4
1. Установите ручку выбора типа стежка на прямой стежок.
2. Ослабьте натяжение верхней нитки с тем, чтобы нижняя
нитка располагалась на изнаночной стороне материала.
3. Прострочите один или несколько швов прямым стежком.
4. Потянув за нижнюю нитку (нитки), присборьте ткань.
Einnähen eines Reißverschlusses
Stichmuster
Stichlänge
Stichbreite
Fuß
(Geradstich)
2-3
3,5
Reißverschlußfuß
(Mitte)
Der Reißverschlußfuß wird benutzt, um verschiedene Reißverschlüsse
einzunähen und kann einfach auf der linken oder rechten Seite der Nadel
montiert werden.
Wenn Sie die linke Seite des Reißverschlusses nähen, muß sich der Fuß
auf der linken Seite der Nadel befinden. Wenn Sie die rechte Seite des
Reißverschlusses nähen, muß sich der Fuß auf der rechten Seite der Nadel
befinden. (Siehe
Abb. A
)
1. Stellen Sie das Stichmuster-Einstellrad auf den Geradstich ein. Stellen
Sie die Stichlänge zwischen 2 und 3 ein.
Stellen Sie die Stichbreite auf 3,5 (Mitte).
2. Senken Sie den Nähfußhebel und befestigen Sie entweder den linken
oder den rechten Stift des Fußes an dem Flansch der Stoffdrücker-
stange.
3. Falten Sie die Stoffkante etwa 2 cm um und legen den Reißverschluß
unter den umgefalteten Teil.
4. Senken Sie die Nadel in die rechte bzw. linke Kerbe des Reißverschluß-
fußes.
VORSICHT
Drehen Sie das Handrad, um zu kontrollieren, ob die Nadel den
Nähfuß nicht berührt. Wenn ein anderer Stich gewählt wird,
berührt die Nadel den Nähfuß, wodurch sie abbrechen und zu
Verletzungen führen kann.
5. Nähen Sie auf beiden Seiten vom Anfang des Reißverschlusses bis
zum Ende. Für optimale Ergebnisse sollte sich die Nadel dabei immer
an der Reißverschlußseite des Fußes befinden. (Siehe
Abb. B
)
6. Um die andere Seite des Reißverschlusses zu nähen, lösen Sie den Fuß
mit dem Knopf an der Rückseite, bauen den Fuß für die andere Seite
des Reißverschlusses um und beginnen zu nähen (mit der Nadel in der
anderen Kerbe).
1
Reißverschlußfuß
2
Rechter Stift zum Nähen der linken Verschlußseite
3
Linker Stift zum Nähen der rechten Verschlußseite
VORSICHT
Achten Sie darauf, dass die Nadel den Reißverschluss während
des Nähens nicht berührt. Wenn die Nadel den Reißverschluss
berührt, kann dies zum Abbrechen der Nadel und zu Verletzun-
gen führen.
Лапка для
вшивания
застежек-молний
Raffen
Stichmuster
Stichlänge
(Geradstich)
4
1. Stellen Sie das Stichmuster-Einstellrad auf den Geradstich ein.
2. Lockern Sie die Spannung des Oberfadens, so daß der Unterfaden auf
der Unterseite des Materials liegt.
3. Nähen Sie eine oder mehrere Reihe Geradstiche.
4. Ziehen Sie den Unterfaden, um das Material zu raffen.
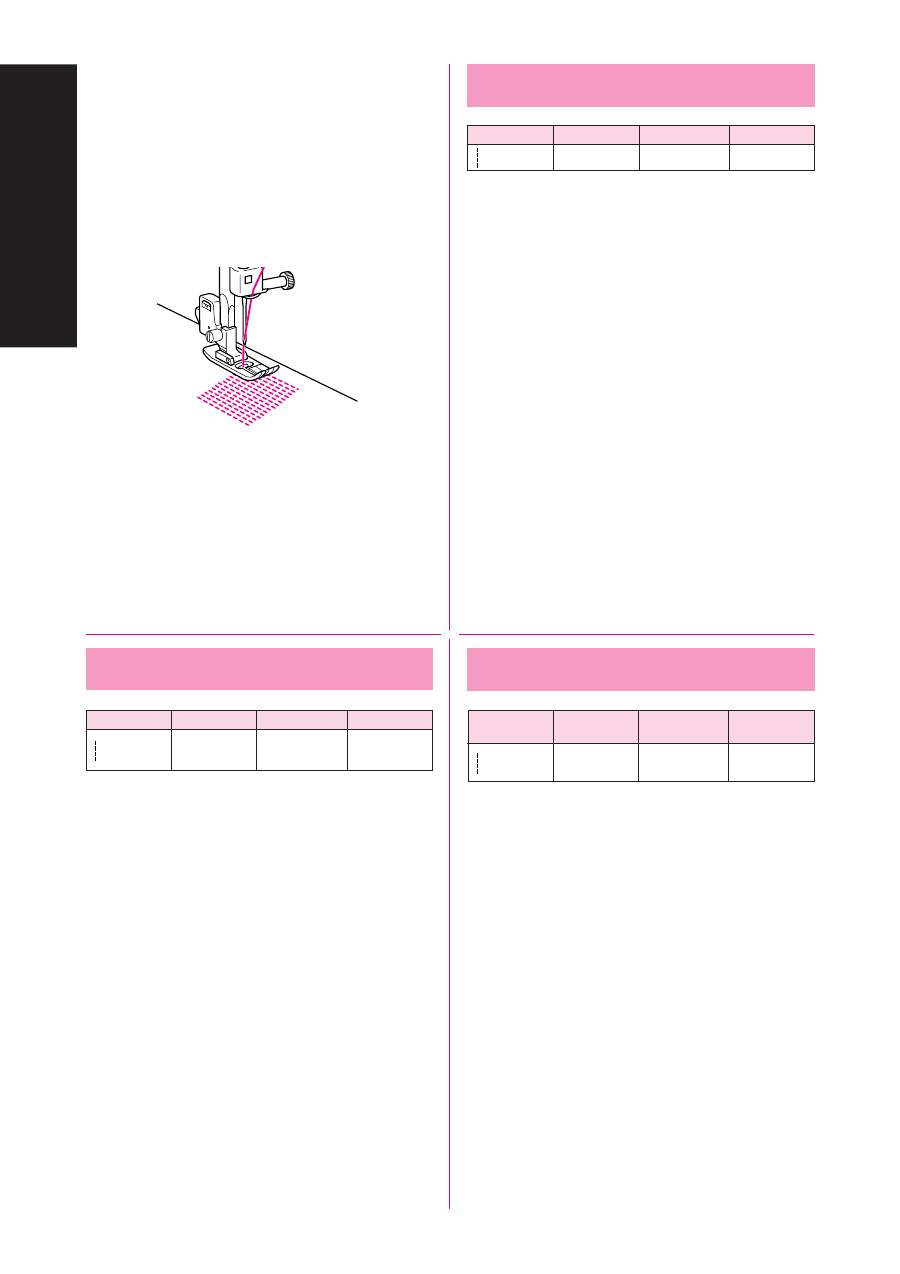
75
USING ATTACHMENTS AND APPLICATIONS
HEFTEN UND APPLIZIEREN
ИСПОЛЬЗОВАНИЕ ПРИСПОСОБЛЕНИЙ И ИЗГОТОВЛЕНИЕ АППЛИКАЦИЙ
Зубчатая рейка
механизма
продвижения
ткани
Darning
Pattern
Stitch Length
Foot
Feed Dog
(Straight Stitch)
Any
Down Position
1. Lower the feed dogs by setting the Feed Dog Position Switch to
the Down Position as shown on page 30.
2. Set the Pattern Selection Dial to Straight Stitch.
3. Place the portion to be darned under the presser foot together
with a fabric for reinforcement.
4. Lower the presser foot.
5. Begin sewing alternating between gently drawing the work away
from you and pulling it toward you.
6. Repeat this motion until the portion to be darned is filled with
parallel lines of stitching.
Zigzag Presser
Foot
Штопка
Стежок
Длина стежка Нажимная лапка
(Прямой
Любая
Нажимная
стежок)
лапка зигзаг
1. Опустите зубчатую рейку механизма продвижения ткани,
установив переключатель позиции зубчатой рейки
механизма продвижения ткани в нижнее положение, как
показано на стр. 30.
2. Установите ручку выбора типа стежка на прямой стежок.
3. Поместите участок изделия, подлежащий ремонту, вместе
с подложенной под него заплаткой под нажимную лапку.
4. Опустите нажимную лапку.
5. Начните строчку, попеременно медленно перемещая
прошиваемую деталь в направлении от себя и на себя.
6. Повторяйте эти движения до тех пор, пока вся
ремонтируемая часть не покроется параллельными
стежками.
Stopfen
Stichmuster
Stichlänge
Stichbreite
Transporteur
(Geradstich)
Beliebig
Zickzack-
Position unten
Nähfuß
1. Versenken Sie den Transporteur, indem Sie den Transporteurhebel in
die Absenkposition stellen, wie auf Seite 30 gezeigt.
2. Stellen Sie das Stichmuster-Einstellrad auf den Geradstich ein.
3. Legen Sie die zu stopfende Stelle zusammen mit einer Stoffunterlage
zur Verstärkung unter den Nähfuß.
4. Senken Sie den Nähfuß.
5. Beginnen Sie mit dem Nähen, während Sie den Stoff leicht vor und
zurück bewegen.
6. Wiederholen Sie diese Bewegung, bis die betreffende Stelle mit
parallelen Stichlinien ausgefüllt ist.
Нижнее
положение
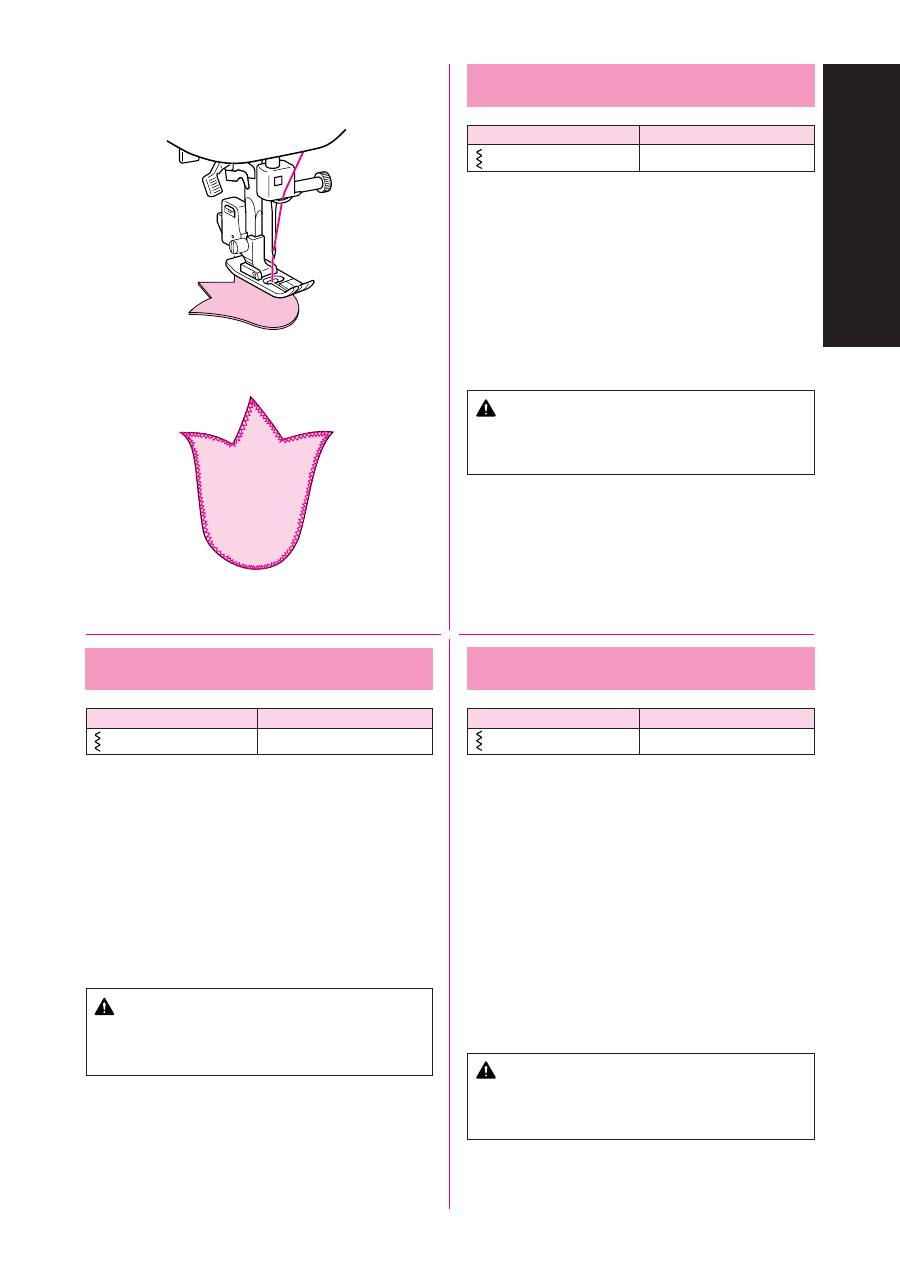
76
USING ATTACHMENTS AND APPLICATIONS
HEFTEN UND APPLIZIEREN
ИСПОЛЬЗОВАНИЕ ПРИСПОСОБЛЕНИЙ И ИЗГОТОВЛЕНИЕ АППЛИКАЦИЙ
Appliqués
Pattern
Stitch Length
(Zigzag Stitch)
F-2
An appliqué is created by cutting a contrasting piece of fabric into
a shape to be used as a decoration on a garment or project.
1. Baste the cut design to the fabric in the location where desired.
2. Carefully sew around the edge of the cutout design with a Zigzag
Stitch in the fine stitch length.
3. Cut away the surplus fabric outside of the stitching.
4. Remove the basting, if necessary.
NOTE:
Make reinforcing Straight Stitches at the beginning and the end of
the stitching to secure.
CAUTION
Be careful that the needle does not strike a basting pin
during sewing. Striking a pin can cause the needle to break,
resulting in injury.
Аппликации
Стежок
Длина стежка
(Зигзагообразный стежок)
F-2
Для изготовления аппликации необходимо вырезать из ткани
контрастирующего с основным материалом цвета кусочек
желаемой формы, который нашивается в качестве
декоративного элемента на пошиваемое изделие или предмет
одежды.
1. Наметайте вырезанную форму на желаемый участок
изделия.
2. Тщательно прошейте аппликацию по контуру, используя
зигзагообразный стежок с малой длиной стежка.
3. Отрежьте лишнюю кромку аппликации с наружной стороны
строчки.
4. Удалите сметочную нить.
ПРИМЕЧАНИЕ:
В начале и конце строчки для закрепления используйте прямые
стежки.
ПРЕДОСТЕРЕЖЕНИЕ
Следите за тем, чтобы во время шитья игла не ударила
о сметочную булавку. Это может вызвать поломку
иглу и получение травмы.
Applizieren
Stichmuster
Stichlänge
(Zickzackstich)
F-2
Eine Applikation wird hergestellt, indem ein Stück kontrastierenden
Stoffes ausgeschnitten und als Dekoration auf einem Kleidungsstück oder
einer anderen Arbeit aufgebracht wird.
1. Heften Sie den zugeschnittenen Stoff an den gewünschten Platz.
2. Nähen Sie sorgfältig entlang der Schnittkante mit einem Zickzackstich
und mit geringer Stichlänge.
3. Schneiden Sie den überstehenden Stoff außerhalb der Naht ab.
4. Entfernen Sie die Heftung, wenn nötig.
NOTIZEN:
Nähen Sie zur Befestigung ein paar Geradstiche an Anfang und Ende der
Nähte.
VORSICHT
Achten Sie darauf, dass die Nähnadel während des Nähens keine
Stecknadeln berührt. Dies kann zum Abbrechen der Nadel und zu
Verletzungen führen.
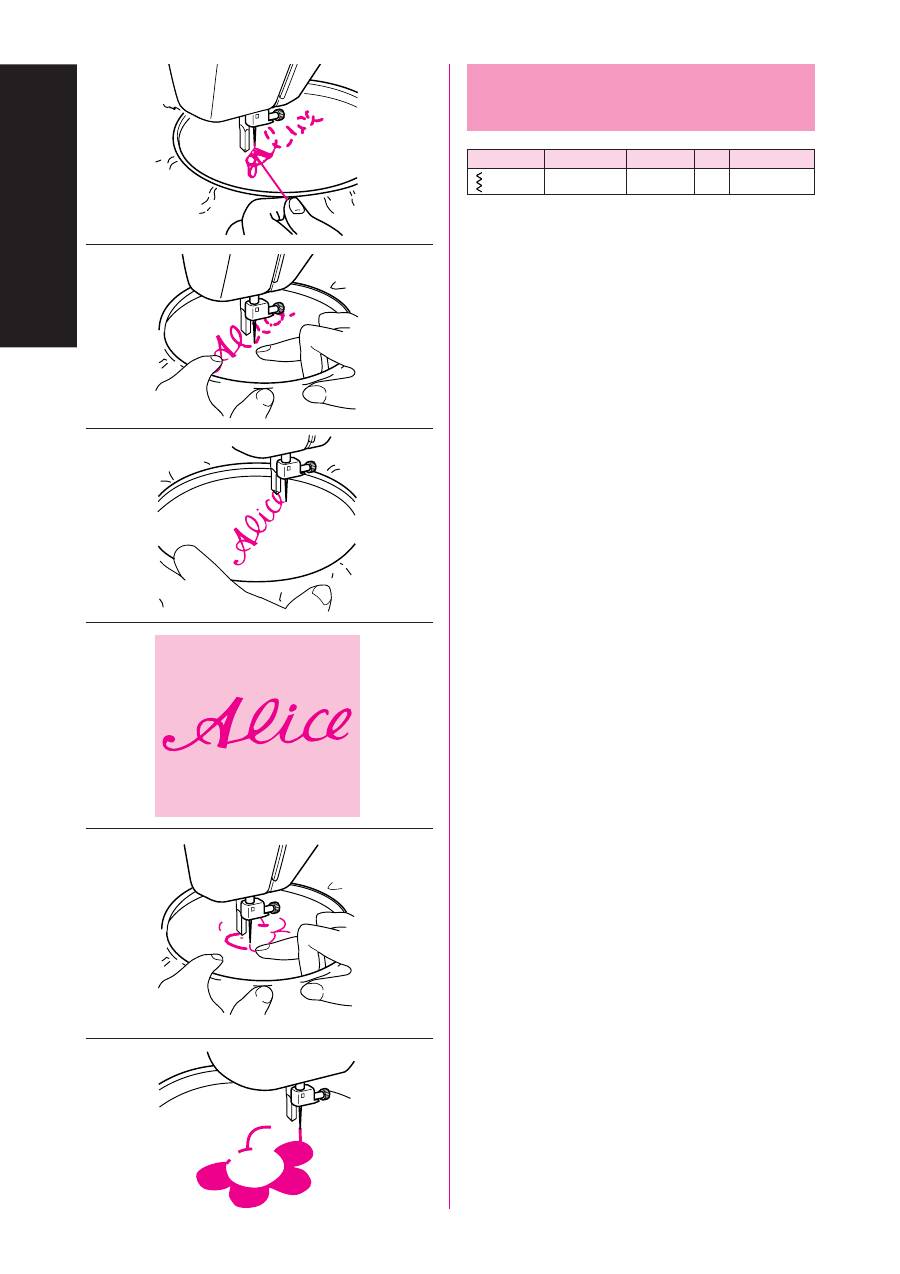
77
USING ATTACHMENTS AND APPLICATIONS
HEFTEN UND APPLIZIEREN
ИСПОЛЬЗОВАНИЕ ПРИСПОСОБЛЕНИЙ И ИЗГОТОВЛЕНИЕ АППЛИКАЦИЙ
Monogramming and
Embroidering
Pattern
Stitch Length Stitch Width Foot
Feed Dog
(Zigzag Stitch)
Any
Any
None Down Position
PREPARING FOR MONOGRAMMING AND EMBROIDERING
1. Lower the feed dogs by setting the Feed Dog Position Switch to
the Down Position as shown on page 30.
2. Set the Pattern Selection Dial to the appropriate Zigzag Stitch
setting.
3. Draw the lettering (for monogramming) or design (for embroi-
dering) on the surface of the fabric.
4. Stretch the fabric between embroidery hoops as firmly as
possible with the underside of the fabric on the bottom of the
inside hoop.
5. Place the work under the needle and lower the presser bar with
the foot removed.
6. Pull the lower thread up through the work at the starting position
by turning the balance wheel and make a few holding stitches.
7. Grip the hoop with the thumb and forefingers of both hands while
pressing the fabric with the middle and third fingers and support-
ing the outside of the hoop with your smaller fingers.
MONOGRAMMING
1. Sew, moving the hoop slowly along the lettering at a constant
speed.
2. Secure with a few straight stitches at the end of the last letter.
EMBROIDERING
1. Stitch the outline of the design by moving the embroidery hoop.
2. Fill in the design alternating from the outline of the design to the
inside and from the inside to the edge of the outline until the
design is completely filled in. Keep the stitching close together.
NOTE:
A long stitch is made by moving the embroidery hoop rapidly and a
short stitch is made by moving it slowly.
3. Secure with a few Straight Stitches at the end of the design.
78
USING ATTACHMENTS AND APPLICATIONS
HEFTEN UND APPLIZIEREN
ИСПОЛЬЗОВАНИЕ ПРИСПОСОБЛЕНИЙ И ИЗГОТОВЛЕНИЕ АППЛИКАЦИЙ
Зубчатая рейка
механизма
продвижения
ткани
Monogramme und Stickarbeiten
Stichmuster
Stichläng
Stichbreite
Fuß
Transporteur
(Zickzackstich)
Beliebig
Beliebig
Kein
Position unten
VORBEREITUNG FÜR MONOGRAMME UND STICKARBEITEN
1. Versenken Sie den Transporteur, indem Sie den Transporteurhebel in
die Absenkposition stellen, wie auf Seite 30 gezeigt.
2. Stellen Sie das Stichmuster-Einstellrad auf den entsprechenden
Zickzackstich.
3. Zeichnen Sie die Umrandung des Monogramms oder des Stickobjektes
auf die Stoffoberseite.
4. Spannen Sie den Stoff so fest wie möglich in einen Stickrahmen, so daß
sich die Stoffunterseite am unteren Rand des inneren Rahmens befin-
det.
5. Demontieren Sie den Nähfuß. Platzieren Sie die Arbeit unter der Nadel
und senken Sie den Nähfußhebel.
6. Ziehen Sie den Unterfaden an der Startposition nach oben durch,
indem Sie am Handrad drehen und ein paar Befestigungsstiche ausfüh-
ren.
7. Ergreifen Sie den Rahmen mit Daumen und Zeigefinger beider Hände,
während Sie den Stoff mit Mittel- und Ringfinger und die Außenseite
des Rahmens mit dem kleinen Finger unterstützen.
MONOGRAMME
1. Nähen Sie mit gleichbleibender Geschwindigkeit entlang der Buchsta-
ben, indem Sie den Rahmen langsam bewegen.
2. Befestigen Sie die Naht am Ende des letzten Buchstabens mit einigen
Geradstichen.
STICKARBEITEN
1. Sticken Sie die Umrandung des Motivs durch Bewegung des Stickrah-
mens.
2. Füllen Sie das Motiv aus, indem Sie von der Umrandung nach innen
und wieder nach außen bis zur Umrandung sticken, bis das Motiv
vollständig ausgefüllt ist. Halten Sie die Stiche eng beieinander.
NOTIZEN:
Ein langer Stich wird durch schnelle, ein kurzer Stich durch langsame
Bewegung des Stickrahmens erzeugt.
3. Befestigen Sie die Naht am Ende des Motivs mit einigen Geradstichen.
Изготовление монограмм и вышивание
Стежок
Длина
Ширина
Ширина
стежка
стежка
Лапка
(Зигзагообразный
Любая
Любая
Не нужна
Нижнее
стежок)
положение
ПОДГОТОВИТЕЛЬНЫЕ ОПЕРАЦИИ ПЕРЕД ИЗГОТОВЛЕНИЕМ
МОНОГРАММ И ВЫШИВАНИЕМ
1. Опустите зубчатую рейку механизма продвижения ткани,
установив переключатель позиции зубчатой рейки
механизма продвижения ткани в нижнее положение, как
показано на стр. 30.
2. Установите ручку выбора типа стежка на соответствующий
зигзагообразный стежок.
3. Нарисуйте буквы монограммы или соответствующий узор
для вышивания на поверхности обрабатываемой ткани.
4. Как можно сильнее растяните ткань и зажмите ее пяльцами,
при этом ткань должна располагаться с нижней стороны
внутреннего обруча пялец.
5. Поместите ткань под иглу и опустите механизм нажимной
лапки (без самой лапки).
6. Вытяните вверх нижнюю нитку через ткань в начальной
точке, повернув для этого маховик и выполнив несколько
фиксирующих стежков.
7. Держите пяльцы большими и указательными пальцами
обеих рук и одновременно прижимайте ткань вниз средними
и безымянными пальцами. Мизинцами придерживайте
пяльцы снаружи. Начните строчку.
ИЗГОТОВЛЕНИЕ МОНОГРАММ
1. Выполните строчку, перемещая с постоянной скоростью
пяльцы с натянутой тканью вдоль контура нарисованных
букв.
2. Закрепите начало и конец строчки несколькими прямыми
стежками.
ВЫШИВАНИЕ
1. Выполните строчку по наружному контуру нанесенного
узора перемещением пялец с натянутой тканью.
2. Вышивайте узор, попеременно меняя направление строчки
от наружного контура к центру и обратно до тех пор, пока
не будет вышита вся поверхность узора. При этом в
процессе вышивания необходимо следить за тем, чтобы
смежные стежки ложились как можно ближе друг к другу.
ПРИМЕЧАНИЕ:
Длинные стежки формируются при быстром перемещении
пялец, для получения коротких стежков перемещайте пяльцы
медленно.
3. Для фиксирования строчки в конце узора следует сделать
несколько прямых стежков.
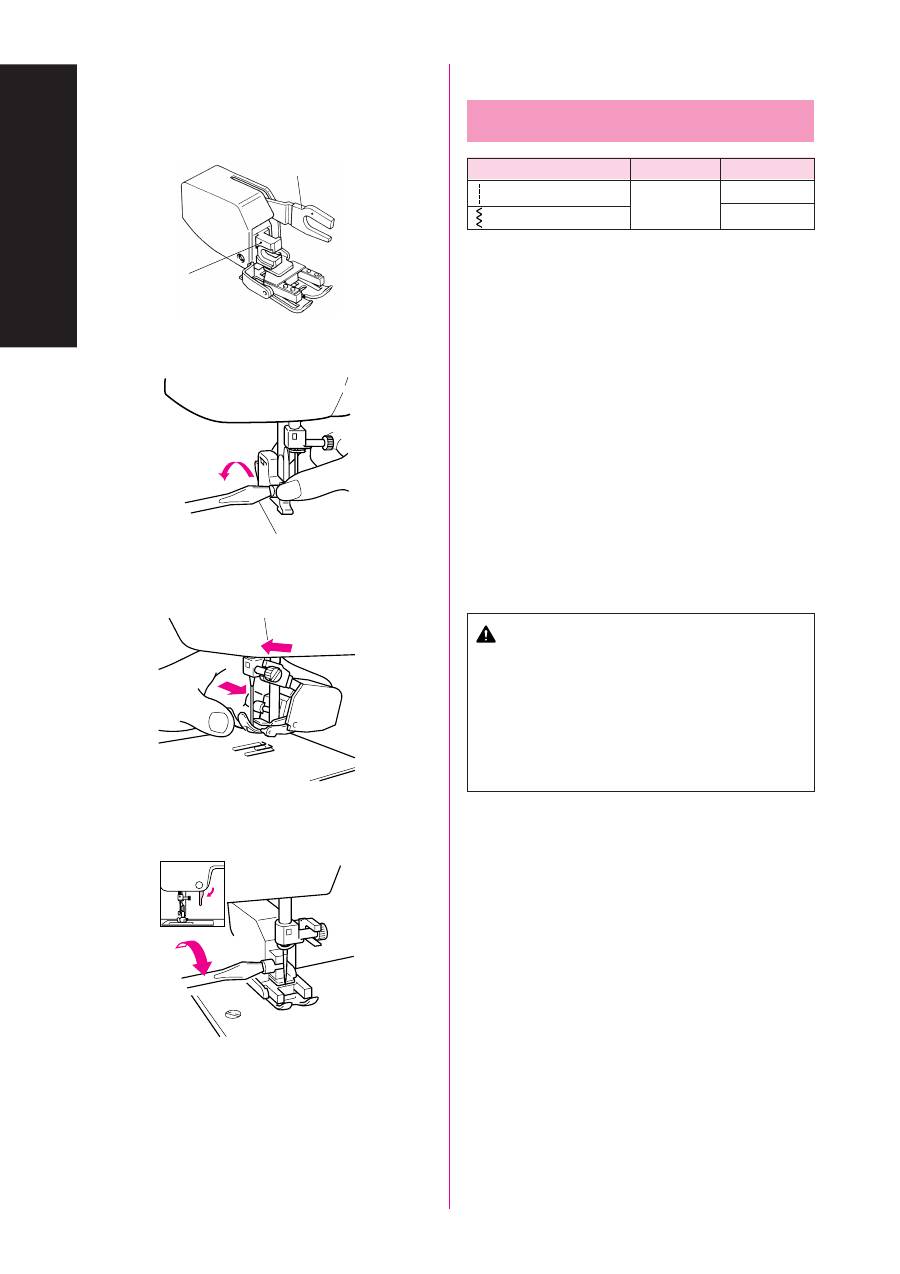
79
USING ATTACHMENTS AND APPLICATIONS
HEFTEN UND APPLIZIEREN
ИСПОЛЬЗОВАНИЕ ПРИСПОСОБЛЕНИЙ И ИЗГОТОВЛЕНИЕ АППЛИКАЦИЙ
OPTIONAL ACCESSORIES
Using the Walking Foot
Pattern
Stitch Length
Stitch Width
(Straight Stitch)
1-4.5
3-4
(Zigzag Stitch)
0-6.5
This foot is very useful for sewing materials such as vinyl cloth,
synthetic leather, thin leather, etc. These materials are difficult to
feed when sewing. The walking foot prevents such materials from
crumpling, slipping or sticking between presser foot and material
due to even feeding of upper and lower materials.
NOTE:
Use this foot only for straight sewing and zigzag stitching. Do not
use other patterns.
1. Remove the power supply plug from the outlet.
2. Raise the needle and the presser foot.
3. Loosen the presser foot screw to remove the presser foot holder.
(See fig. A)
4. Attach the forked section of the connecting lever to the needle
clamp, install the walking foot to the presser bar. (See fig. B)
5. Lower the presser foot lever and then tighten the accessory
presser bar holder fixing screw. (See fig. C)
1
Forked part of operation lever
2
Presser bar holder
1
Use a screwdriver
CAUTION
•
Use the screwdriver to tighten the screw securely. If the
screw is loose, the needle may strike the presser foot
and cause injury.
•
Be sure to turn the balance wheel toward the front of the
machine to check that the needle does not strike the
presser foot. If the needle strikes the presser foot, injury
may result.
•
Be careful not to touch the needle doring this time,
otherwise injury may result.
CAUTION
When sewing with the walking foot, sew at medium to low
speeds.
1
2
C
B
A
1
80
USING ATTACHMENTS AND APPLICATIONS
HEFTEN UND APPLIZIEREN
ИСПОЛЬЗОВАНИЕ ПРИСПОСОБЛЕНИЙ И ИЗГОТОВЛЕНИЕ АППЛИКАЦИЙ
ДОПОЛНИТЕЛЬНЫЕ ПРИНАДЛЕЖНОСТИ
Использование шагающей лапки
Стежок
Длина стежка
Ширина стежка
(Прямой стежок)
1-4,5
3-4
(Зигзагообразный стежок)
0-6,5
Эта лапка очень полезна при сшивании таких материалов,
как клеенка, синтетическая кожа, тонкая натуральная кожа
и т.д. Во время шитья подача этих материалов чрезвычайно
затруднена. Шагающая лапка позволяет устранить смятие,
скольжение и прилипание данных материалов между
нажимной лапкой и пришиваемым куском материала за счет
ровной подачи верхнего и нижнего слоя материала.
ПРИМЕЧАНИЕ:
Данная лапка пригодна только при пошиве материалов прямым
и зигзагообразным стежком. Применение иных типов стежка
запрещено.
1. Отсоедините штепсель шнура питания от розетки.
2. Поднимите иглу и нажимную лапку.
3. Ослабьте крепежный винт нажимной лапки для того, чтобы
снять держатель нажимной лапки. (См.
рис. A
)
4. Прикрепите вилочную часть соединительного рычага к
игловодителю и вставьте шагающую лапку в механизм
нажимной лапки. (См.
рис. В
)
5. Опустите рычаг нажимной лапки и затем затяните
крепежный винт механизма нажимной лапки. (См.
рис. C
)
1
Вилочная часть рабочего рычага
2
Держатель механизма нажимной лапки
1
Используйте отвертку
ПРЕДОСТЕРЕЖЕНИЕ
• Воспользуйтесь отверткой, чтобы надежно затянуть
винт. Если винт ослаблен, игла может ударить о
нажимную лапку и причинить травму.
• Повернув маховик на себя, убедитесь в том, что
игла не задевает нажимную лапку. Если игла ударит
о нажимную лапку, возможно получение травмы.
• Старайтесь не прикасаться к игле во время
выполнения этой операции, чтобы избежать травмы.
ПРЕДОСТЕРЕЖЕНИЕ
При пошиве материала с использованием шагающей
лапки, выполняйте строчку на низкой или средней
скорости.
OPTIONALES ZUBEHÖR
Einsatz des Obertransporteurs
Stichmuster
Stichlänge
Stichbreite
(Geradstich)
1-4,5
3-4
(Zickzackstich)
0-6,5
Dieser Fuß eignet sich besonders beim Nähen von Materialien wie
Vinylstoffen, synthetischem Leder, dünnem Leder etc. Diese Materialien
sind schwer zu transportieren. Der Obertransporteur verhindert bei sol-
chen Stoffen Faltenwurf, Verrutschen oder Haftenbleiben am Nähfuß
durch gleichmäßigen Transport an der Stoffober- und -unterseite.
NOTIZEN:
Diesen Fuß können Sie nur für Geradstich und Zickzackstich und nicht für
andere Stichmuster verwenden.
1. Schalten Sie die Maschine am Hauptschalter aus.
2. Heben Sie Nadel und Nähfuß an.
3. Lösen Sie die Nähfußschraube, um den Nähfuß abzuschrauben (Siehe
Abb. A
).
4. Bringen Sie den gabelförmigen Teil des Betätigungshebels an der
Nadelklemme an und befestigen Sie den Obertransporteur an der
Stoffdrückerstange (Siehe
Abb. B
).
5. Senken Sie den Nähfußhebel und ziehen Sie die Befestigungsschraube
der Stangenhalterung am Nähfuß an (Siehe
Abb. C
).
1
Gabelförmiger Teil des Betätigungshebels
2
Stangenhalterung
1
Benutzen Sie einen Schraubendreher
VORSICHT
•
Ziehen Sie die Schraube mit Hilfe des Schraubendrehers
fest an. Ist die Schraube nicht fest genug angezogen, kann die
Nadel auf den Nähfuß treffen, was Verletzungen zur Folge
haben kann.
•
Drehen Sie das Handrad zur Vorderseite der Maschine, um zu
kontrollieren, dass die Nadel den Nähfuß nicht berührt. Wenn
die Nadel den Nähfuß berührt, kann dies zu Verletzungen
führen.
•
Achten Sie darauf, daß Sie die Nadel während dieser Zeit nicht
berühren, da es sonst zu Verletzungen kommen kann.
VORSICHT
Nähen Sie bei Benutzung des oberen Transporteurs mit geringer bis
mittlerer Geschwindigkeit.
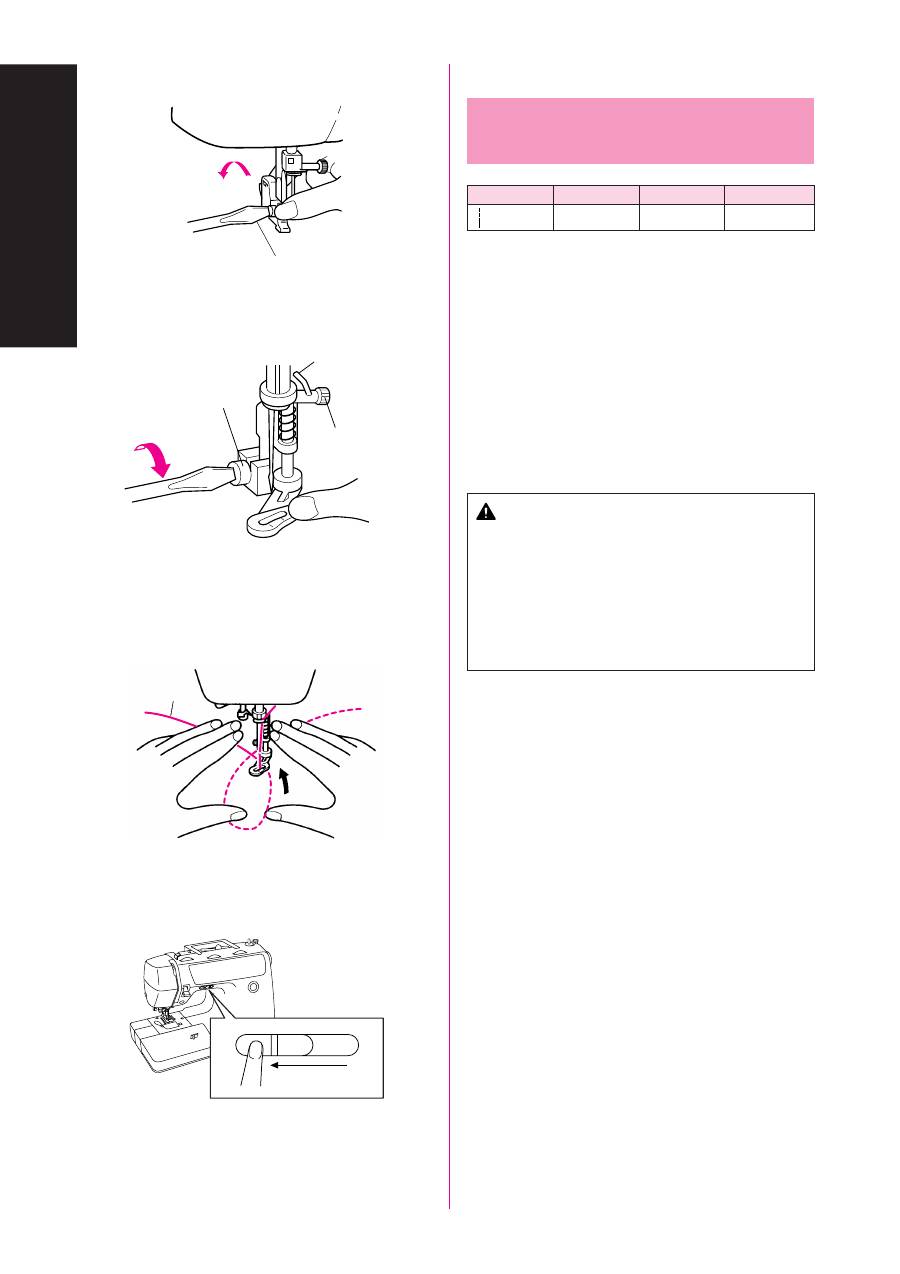
81
USING ATTACHMENTS AND APPLICATIONS
HEFTEN UND APPLIZIEREN
ИСПОЛЬЗОВАНИЕ ПРИСПОСОБЛЕНИЙ И ИЗГОТОВЛЕНИЕ АППЛИКАЦИЙ
OPTIONAL ACCESSORIES
Using the Spring-action
Quilting Foot
Pattern
Stitch Length
Stitch Width
Feed Dog
(Straight Stitch)
Any
3.5 (center)
Down position
The Spring -action Quilting Foot is useful for darning and freemotion
machine quilting.
1. Remove the power supply plug from the outlet.
2. Raise the needle and the presser foot.
3. Loosen the presser foot screw to remove the presser foot holder.
(See fig. A)
4. Attach the quilting foot, making sure that part indicated by
A
in
the illustration is above the needle clamp screw, then lower the
Presser Foot Lever and tighten the presser foot screw.
*
Be sure that the needle clamp screw is firmly tightened.
(See fig. B)
1
Use a screwdriver.
2
Presser Foot Screw
3
Needle Clamp Screw
CAUTION
•
Be careful not to touch the needle during this time,
otherwise injury may result.
•
Use the screwdriver to tighten the presser foot holder
screw securely. If the screw is loose, the needle may
strike the presser foot and cause injury.
•
Be sure to turn the balance wheel toward the front of the
machine to check that the needle does not strike the
presser foot. If the needle strikes the presser foot, injury
may result.
5. Lower the feed dogs by setting the Feed Dog Position Switch to
the Down Position as shown on page 30.
6. Set the Pattern Selection Dial to Straight Stitch.
*
Before starting to sew, draw the quilting design on the fabric.
7. Use both hands to keep the fabric firmly stretched and move the
fabric to sew over the drawn design. (See fig. C)
B
Quilting design (Line)
8. The stitch length depends on how quickly the fabric is moved
and on the machine’s sewing speed. Sew slowly and move the
fabric at a constant speed to sew uniform stitches. (See fig. D)
(Model STAR 240E, STAR 230E)
B
A
1
A
3
2
D
C
B
(Model STAR 240E, STAR 230E)
82
USING ATTACHMENTS AND APPLICATIONS
HEFTEN UND APPLIZIEREN
ИСПОЛЬЗОВАНИЕ ПРИСПОСОБЛЕНИЙ И ИЗГОТОВЛЕНИЕ АППЛИКАЦИЙ
ДОПОЛНИТЕЛЬНЫЕ ПРИНАДЛЕЖНОСТИ
Использование лапки штопки-
вышивки
Стежок
Длина
Ширина
стежка
стежка
(Прямой
Любая
3,5 (центр)
Нижнее
стежок)
положение
Лапка штопки-вышивки полезна при выполнении штопки и
машинной обработке стеганых изделий.
1. Отсоедините штепсель шнура питания от розетки.
2. Поднимите иглу и нажимную лапку.
3. Ослабьте крепежный винт нажимной лапки для того, чтобы
снять держатель нажимной лапки. (См.
рис. A
)
4. Прикрепите лапку штопки-вышивки, проследив за тем,
чтобы область
A
на рисунке располагалась над крепежным
винтом игловодителя, а затем опустите рычаг нажимной
лапки и затяните крепежный винт нажимной лапки.
*
Убедитесь в том, что винт иглодержателя затянут надежно.
(См.
рис. B
)
1
Используйте отвертку.
2
Винт нажимной лапки
3
Крепежный винт на игловодителя
ПРЕДОСТЕРЕЖЕНИЕ
• Не прикасайтесь к игле во время выполнения данной
операции, в противном случае возможно получение
травмы.
• Воспользуйтесь отверткой, чтобы надежно затянуть
винт держателя нажимной лапки. Если винт
ослаблен, игла может ударить о нажимную лапку и
причинить травму.
• Повернув маховик на себя, убедитесь в том, что
игла не задевает нажимную лапку. Если игла ударит
о нажимную лапку, возможно получение травмы.
5. Опустите зубчатую рейку механизма продвижения ткани,
установив переключатель позиции зубчатой рейки
механизма продвижения ткани в нижнее положение, как
показано на стр. 30.
6. Установите ручку выбора типа стежка на прямой стежок.
*
Перед началом строчки нарисуйте стеганый узор на
материале.
7. Обеими руками растягивая материал, перемещайте его
для выполнения строчки по контуру нарисованного узора.
(См.
рис. C
)
B
Стеганый узор (Линия)
8. Длина стежка определяется скоростью перемещения
материала и скоростью машины. Шейте медленно и
перемещайте материал с постоянной скоростью для
получения ровных стежков. (См.
рис. D
)
(Модели STAR 240E, STAR 230E)
OPTIONALES ZUBEHÖR
Einsatz des Stopffußes
Stichmuster
Stichlänge
Stichbreite
Transporteur
(Geradstich)
Beliebig
3,5 (Mitte)
Position unten
Der Stopffuß eignet sich für Stopfarbeiten und für manuelles Steppen.
1. Ziehen Sie den Netzstecker aus der Steckdose.
2. Heben Sie Nadel und Nähfuß an.
3. Lösen Sie die Nähfußschraube, um den Nähfuß abzubauen (Siehe
Abb. A
).
4. Bringen Sie den Stopffuß an, während Sie darauf achten, daß das Teil
mit der Bezeichnung
A
in der Abbildung sich an der Nadel-
klemmschraube befindet. Senken Sie dann den Nähfuß und ziehen Sie
die Nähfußschraube an.
* Achten Sie darauf, daß die Nadelklemmschraube fest angezogen ist
(Siehe
Abb. B
).
1
Benutzen Sie einen Schraubendreher
2
Nähfußschraube
3
Nadelklemmschraube
VORSICHT
•
Achten Sie darauf, daß Sie die Nadel während dieser Zeit nicht
berühren, da es sonst zu Verletzungen kommen kann.
•
Ziehen Sie die Schraube des Nähfußhalters fest mit Hilfe des
Schraubendrehers an. Ist die Schraube nicht fest genug ange-
zogen, kann die Nadel auf den Nähfuß treffen, was Verletzun-
gen zur Folge haben kann.
•
Drehen Sie das Handrad zur Vorderseite der Maschine, um zu
kontrollieren, dass die Nadel den Nähfuß nicht berührt. Wenn
die Nadel den Nähfuß berührt, kann dies zu Verletzungen
führen.
5. Senken Sie den Transporteur, indem Sie den Transporteurhebel auf die
untere Position stellen, wie auf Seite 30 gezeigt.
6. Stellen Sie das Stichmuster-Einstellrad auf Geradstich ein.
* Zeichnen Sie vor Nähbeginn die Steppnaht auf dem Stoff an.
7. Benutzen Sie beide Hände zum Spannen des Stoffes, und bewegen Sie
den Stoff so, daß die angezeichnete Steppnaht genäht wird (Siehe
Abb. C
).
B
Angezeichneter Nahtverlauf
8. Die Stichlänge hängt von der Nähgeschwindigkeit ab und auch davon,
wie schnell der Stoff bewegt wird. Nähen Sie langsam und bewegen
Sie den Stoff möglichst gleichmäßig, um eine gleichmäßige Naht zu
erhalten (siehe
Abb. D
).
(Modell STAR 240E, STAR 230E)
Зубчатая рейка
механизма
продвижения ткани
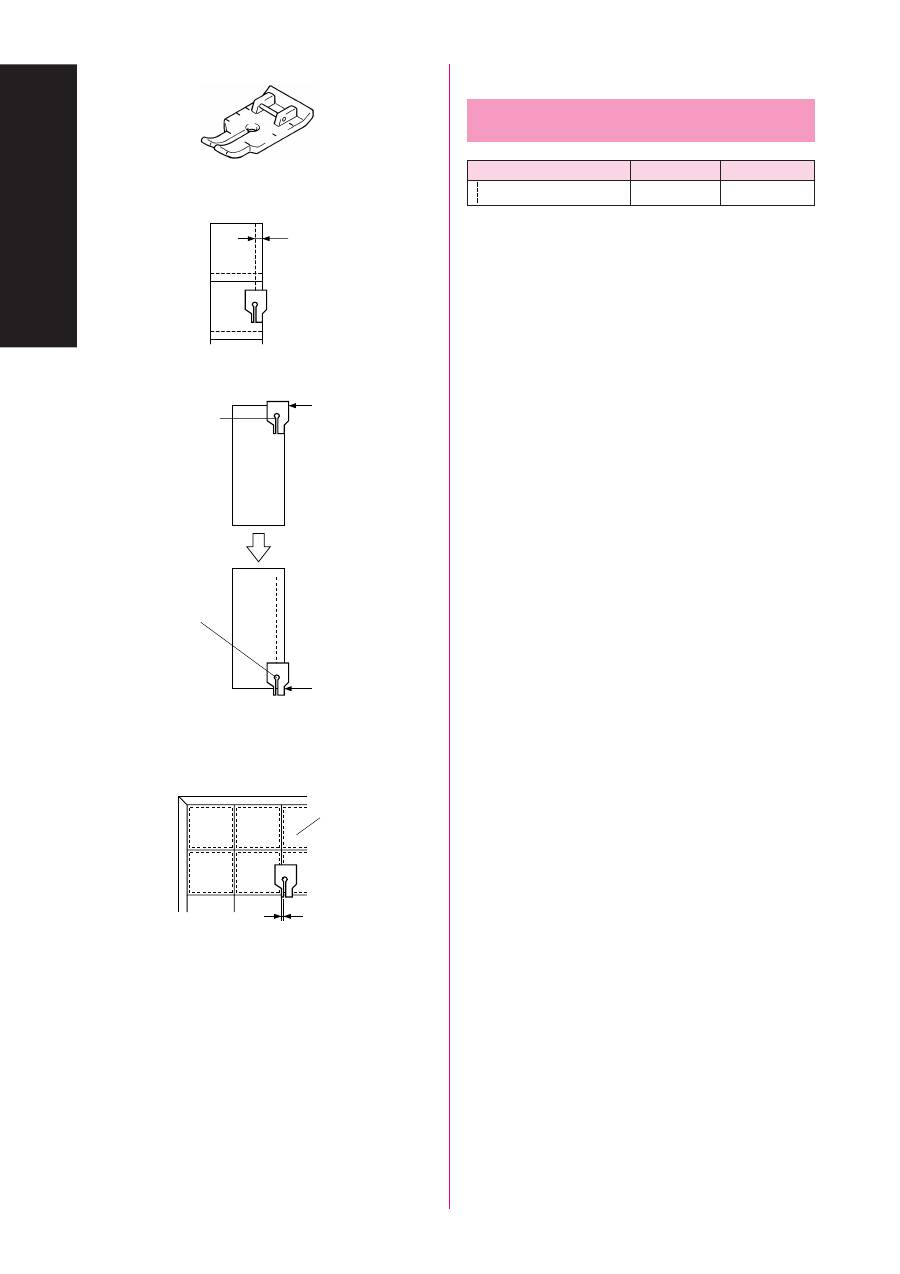
83
USING ATTACHMENTS AND APPLICATIONS
HEFTEN UND APPLIZIEREN
ИСПОЛЬЗОВАНИЕ ПРИСПОСОБЛЕНИЙ И ИЗГОТОВЛЕНИЕ АППЛИКАЦИЙ
OPTIONAL ACCESSORIES
Using the 1/4-Inch Quilting Foot
Pattern
Stitch Length
Stitch Width
(Straight Stitch)
2-2.5
3.5 (center)
The 1/4-Inch Quilting Foot is used to sew fixed seam allowance 6.5
mm (1/4") when piecing together a quilt. (See fig. A)
1. Set the Pattern Selection Dial to Straight Stitch.
Set the Stitch Length between 2 and 2.5.
Set the Stitch Width 3.5 (center).
2. Change the foot to the 1/4-Inch Quilting Foot.
1
Seam allowance (1/4", 6.5mm)
3. Position the presser foot over the fabric and sew as shown in fig.
B and C.
•
Achieving an accurate seam allowance. (See fig. B)
2
Beginning of stitching.
3
Align this mark with edge of fabric.
4
End of stitching
5
Align this mark with edge of fabric.
•
Quickly stitch together a quilt. (See fig. C)
6
Top of fabric.
7
Seam (1/8", 3.2mm)
1
3
2
4
5
6
7
A
B
C
84
USING ATTACHMENTS AND APPLICATIONS
HEFTEN UND APPLIZIEREN
ИСПОЛЬЗОВАНИЕ ПРИСПОСОБЛЕНИЙ И ИЗГОТОВЛЕНИЕ АППЛИКАЦИЙ
ДОПОЛНИТЕЛЬНЫЕ ПРИНАДЛЕЖНОСТИ
Использование направляющей
лапки 1/4 дюйма (6,5 мм)
Стежок
Длина стежка Ширина стежка
(Прямой стежок )
2-2,5
3,5 (центр)
Направляющая лапка ј дюйма (6,5 мм) позволяет выполнять
соединительный шов на расстоянии 6,5 мм (1/4 дюйма) от кромки
ткани при изготовлении лоскутного одеяла. (См.
рис. A
)
1. Установите ручку выбора типа стежка на прямой стежок.
Установите длину стежка в пределах между 2 и 2,5.
Установите ширину стежка на 3,5 (центр).
2. Замените лапку на направляющую лапку 1/4 дюйма (6,5 мм).
1
Припуск шва (1/4 дюйма, 6,5мм)
3. Расположите нажимную лапку над тканью и выполните
строчку, как показано на
рис.
B
и
C
.
• Достижение точного припуска шва. (См.
рис. B
)
2
Начало строчки.
3
Установите данную отметку на одну линию с
кромкой ткани.
4
Конец строчки
5
Установите данную отметку на одну линию с
кромкой ткани.
• Позволяет быстро сшить лоскутное одеяло. (См.
рис. C
)
6
Лицевая сторона ткани.
7
Шов (1/8 дюйма, 3,2мм)
OPTIONALES ZUBEHÖR
Einsatz des Patchworkfuß
Stichmuster
Stichlänge
Stichbreite
(Geradstich)
2-2,5
3,5 (Mitte)
Der Patchworkfuß wird benutzt, um z. B. bei Stepparbeiten mit einer
festen Nahtzugabe von 6,5 mm zu nähen (siehe
Abb. A
).
1. Stellen Sie das Stichmuster-Einstellrad auf Geradstich ein.
Stellen Sie die Stichlänge auf einen Wert zwischen 2 und 2,5 ein.
Stellen Sie die Stichbreite auf 3,5 (Mitte).
2. Bringen Sie den Patchworkfuß an.
1
Nahtzugabe (6,5 mm)
3. Positionieren Sie den Nähfuß auf dem Stoff, und nähen Sie wie in
Abb.
B
und
C
gezeigt.
•
Um eine präzise Nahtzugabe zu erzielen. (Siehe
Abb. B
)
2
Nahtbeginn
3
Richten Sie diese Markierung mit der Stoffkante aus.
4
Nahtende
5
Richten Sie diese Markierung mit der Stoffkante aus.
•
Schnelles Nähen einer Steppdecke. (Siehe
Abb. C
)
6
Stoffoberseite
7
Saum (3,2 mm)
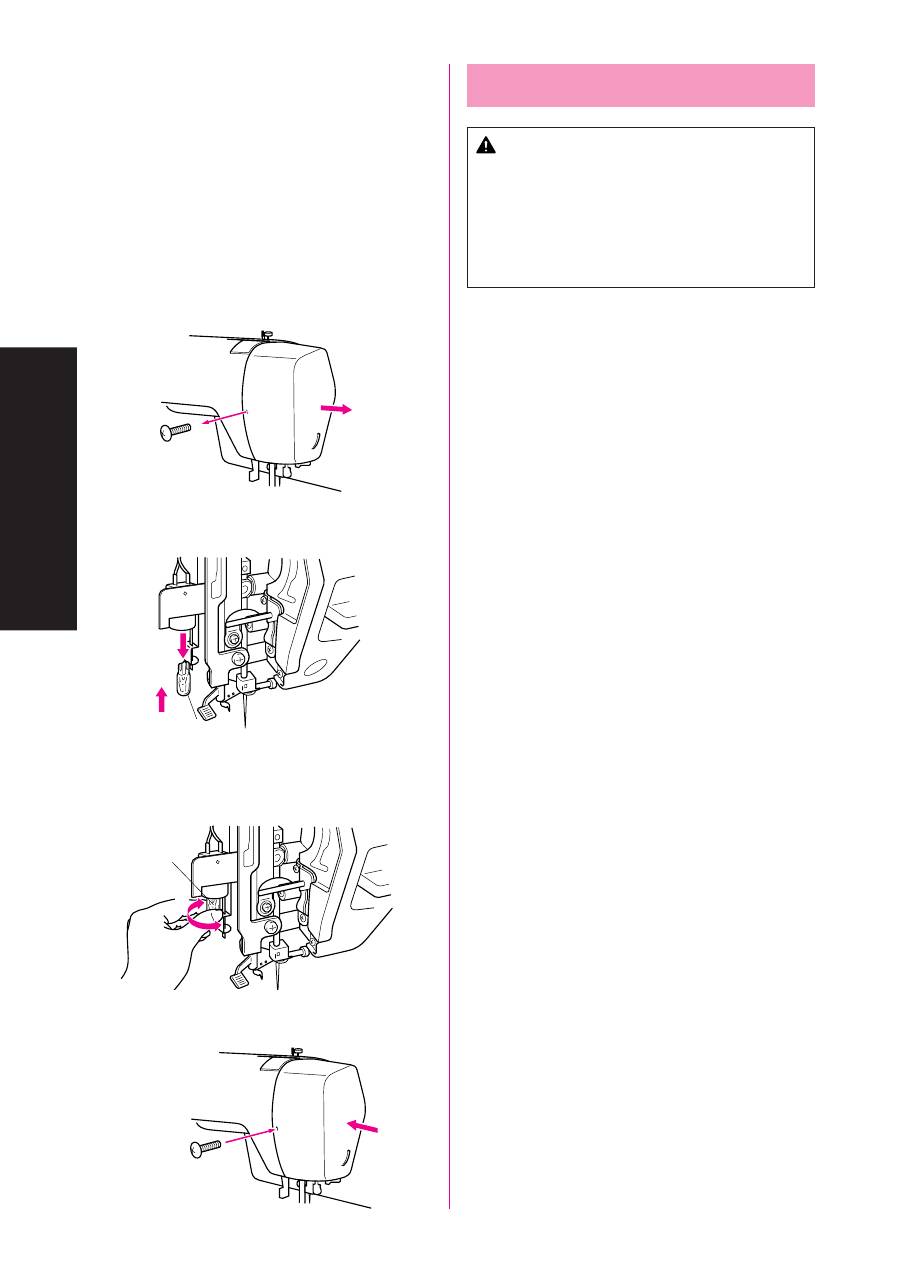
85
MAINTENANCE
WARTUNG
ТЕХНИЧЕСКОЕ ОБСЛУЖИВАНИЕ
Changing the Light Bulb
CAUTION
•
Turn off the main power switch and unplug the machine
before changing the light bulb. If the main power switch
is on when the light bulb is changed, an electric shock
may result. If the machine is on and Start/Stop button is
pressed or foot controller is stepped on, injuries may
result.
•
To avoid burns, give the light bulb time to cool before
changing it.
1. Remove the power supply plug from the outlet.
2. Loosen the screw on the reverse side of sewing head as shown
in fig. A.
3. Remove the light cover from the machine as illustrated in fig. A.
(Model STAR 240E, STAR 230E)
4. Replace the sewing light bulb. (See fig. B)
1
Bulb
1
Pull out
2
Push in
(Model PS-57, PS-55, STAR-50, RSR-55, XRX-55, PS-53)
4. Replace the sewing light bulb. (See fig. B)
1
Bulb
1
Loosen
2
Tighten
5. Reattach the light cover and fasten the screw as shown in fig.
C.
B
A
1
1
2
1
1
2
B
C
(Model STAR 240E, STAR 230E)
(Model PS-57, PS-55, STAR-50, RSR-55, XRX-55, PS-53)

86
MAINTENANCE
WARTUNG
ТЕХНИЧЕСКОЕ ОБСЛУЖИВАНИЕ
Замена лампочки освещения
ПРЕДОСТЕРЕЖЕНИЕ
• Перед заменой лампочки освещения выключите
выключатель питания на машине и отсоедините
штепсель шнура питания от розетки. Если
выключатель питания останется в положении
«включено» во время замены лампочки освещения,
возможно поражение электрическим током. Если
питание машины включено, то при нажатии кнопки
пуска/остановки машины или при нажатии на ножной
контроллер, возможно получение травмы.
• Чтобы избежать ожогов, перед заменой лампочки
освещения подождите некоторое время, чтобы
лампочка остыла.
1. Отсоедините штепсель шнура питания от розетки.
2. Отвинтите винт крепления крышки с обратной стороны
швейной головки, как показано на
рис. А
.
3. Снимите крышку с машины, как показано на
рис. А
.
(Модели STAR 240E, STAR 230E)
4. Замените лампочку. (См.
рис. B
)
1
Лампочка
1
Направление вывинчивания
2
Направление завинчивания
(Модели PS-57, PS-55, STAR-50, RSR-55, XRX-55, PS-53)
4. Замените лампочку. (См.
рис. B
)
1
Лампочка
1
Направление вывинчивания
2
Направление завинчивания
5. Установите крышку на место и завинтите винт, как показано
на
рис. C
.
Nählichtlampe auswechseln
VORSICHT
•
Schalten Sie den Netzschalter aus und ziehen Sie vor dem
Auswechseln der Glühbirne den Netzstecker aus der Steckdo-
se. Wenn der Netzschalter auf Ein “ON” steht, wenn die
Glühlampe gewechselt wird, besteht die Gefahr elektrischer
Schläge. Wenn die Maschine eingeschaltet ist und die Start-/
Stopp-Taste versehentlich gedrückt oder der Fußanlasser be-
tätigt wird, kann es zu schweren Verletzungen kommen.
•
Lassen Sie die Glühlampe zuerst abkühlen, damit Sie sich beim
Auswechseln nicht verbrennen.
1. Ziehen Sie den Netzstecker aus der Netzsteckdose.
2. Lösen Sie die Schraube an der Rückseite des Nähfußes, wie in
Abb. A
gezeigt.
3. Nehmen Sie die Abdeckplatte von der Maschine, wie in
Abb. A
gezeigt.
(Modell STAR 240E, STAR 230E)
4. Ersetzen Sie die Nählichtlampe. (Siehe
Abb. B
)
1
Lampe
1
Herausziehen
2
Hineindrücken
(Modell PS-57, PS-55, STAR-50, RSR-55, XRX-55, PS-53)
4. Ersetzen Sie die Nählichtlampe. (Siehe
Abb. B
)
1
Lampe
1
Lösen
2
Festziehen
5. Setzen Sie die Abdeckplatte wieder auf und ziehen Sie die Schraube
wieder fest –
Abb. C
.
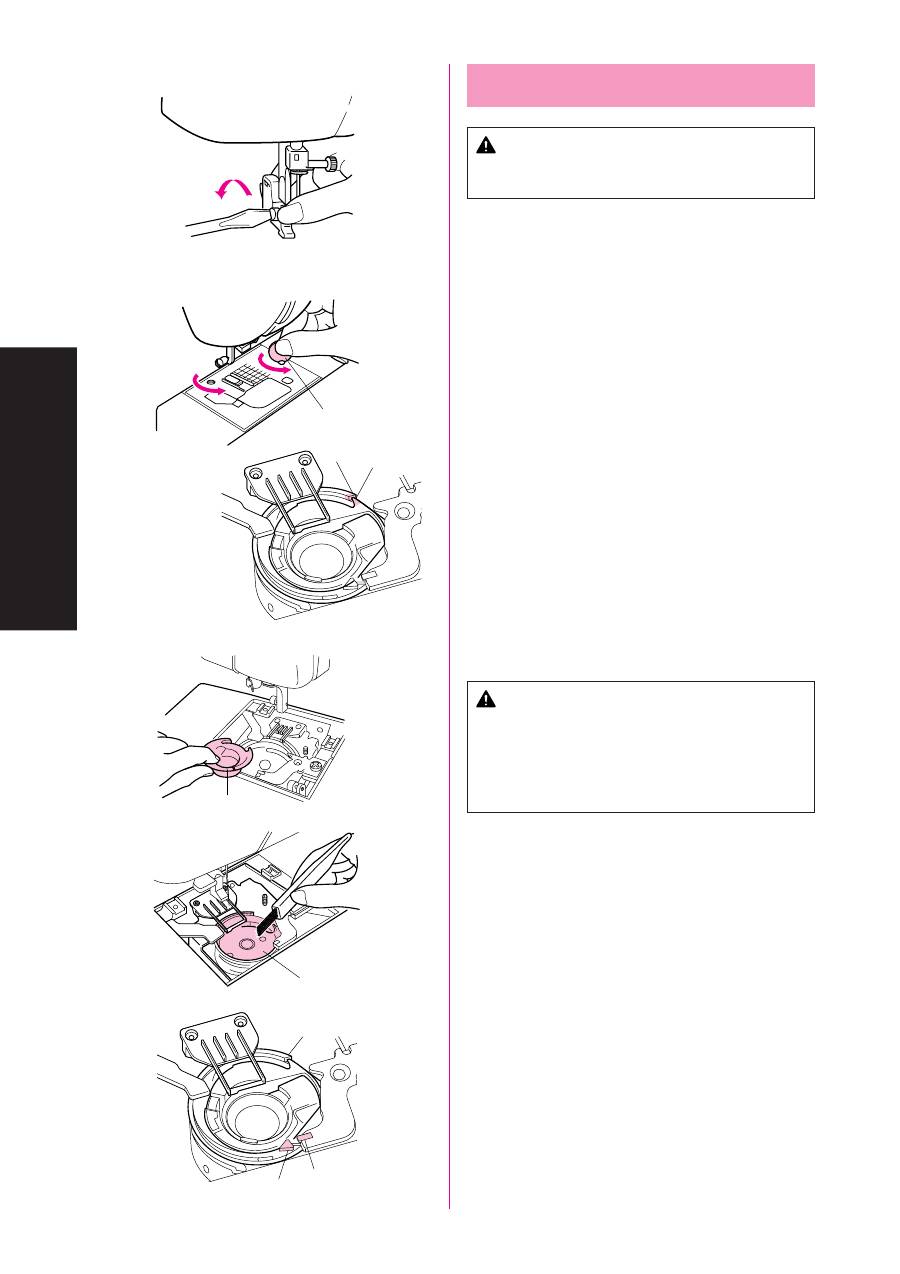
87
MAINTENANCE
WARTUNG
ТЕХНИЧЕСКОЕ ОБСЛУЖИВАНИЕ
Cleaning
CAUTION
Be sure to unplug the machine before cleaning it. Other-
wise, electric shock or injury may result.
1. Remove the power supply plug from the outlet.
2. Raise the needle and the presser foot.
3. Loosen the presser foot screw and the needle clamp screw to
remove the presser foot holder and the needle. (See fig. A)
4. Remove the needle plate using a coin to remove the screws.
(See fig. B)
1
Use a coin or screwdriver.
5. Turn the balance wheel toward you until the notch of shuttle
aligns with the shelf of race as shown in the illustration.
2
Notch of shuttle race
3
Shelf of race
CAUTION
Be sure to turn the balance wheel towards the front of the
machine. Turning the balance wheel in the other direction may
damage the machine.
6. Remove the race. (See fig. C)
7. Clean out lint and dust.
*
Use soft fabric to clean the race. DO NOT OIL the race or shuttle.
(See fig. D)
4
Race
5
Shuttle
*
DO NOT OIL.
CAUTION
•
Do not use a damaged race or shuttle. Otherwise, the
thread may tangle and cause a poor finish, or the needle
may break. You can get the proper parts from your
authorized dealer.
•
Be sure to insert the race in the correct position. Other-
wise, the needle may break.
8. Assemble the race first then the needle plate.
When installing the race, be sure that the notch of shuttle is in the
same position that it was when the shuttle hook was removed
and that the shelf on the race aligns with the spring.
Install the needle plate by sliding it to the left (the reverse of its
removal procedure).
6
Notch of shuttle
7
Shelf
8
Spring
A
B
1
3
2
C
D
4
5
6
7
8
88
MAINTENANCE
WARTUNG
ТЕХНИЧЕСКОЕ ОБСЛУЖИВАНИЕ
Чистка машины
ПРЕДОСТЕРЕЖЕНИЕ
Перед чисткой машины обязательно отсоедините
штепсель шнура питания от розетки. В противном
случае возможно поражение электрическим током или
получение иной травмы.
1. Отсоедините штепсель шнура питания от розетки.
2. Поднимите иглу и нажимную лапку.
3. Ослабьте винт нажимной лапки и крепежный винт на
игловодителе, чтобы снять держатель нажимной лапки и
иглу. (См.
рис. A
)
4. Снимите игольную пластину, монеткой отвинтив винты.
(См.
рис. B
)
1
Воспользуйтесь отверткой или монеткой.
5. Поверните маховик на себя, чтобы паз челнока был на
одной линии с выступом обоймы, как показано на рисунке.
2
Паз челнока
3
Выступ обоймы
ПРЕДОСТЕРЕЖЕНИЕ
Убедитесь в том, что Вы поворачиваете маховик на себя.
Поворачивая маховик в обратном направлении, Вы
можете повредить машину.
6. Снимите обойму. (См.
рис. C
)
7. Удалите пух и пыль.
*
Протрите обойму мягкой салфеткой. НЕ СМАЗЫВАЙТЕ
обойму и челнок. (См.
рис. D
)
4
Обойма
5
Челнок
* НЕ СМАЗЫВАТЬ.
ПРЕДОСТЕРЕЖЕНИЕ
• Запрещается использовать поврежденную обойму
или челнок. В противном случае возможно
запутывание нитки и получение некачественной
строчки или поломка иглы. Новые детали можно
заказать у Вашего дилера.
• Проследите за тем, что Вы вставили обойму в
правильном положении. В противном случае
возможна поломка иглы.
8. Сначала установите на место обойму, а затем - игольную пластину.
Во время установки обоймы, проследите за тем, чтобы
выступ челнока был в том же положении, в котором он
была в момент снятия крючка челнока, а также за тем,
чтобы выступ обоймы был на одной линии с пружиной.
Вставьте игольную пластину, сдвинув ее влево (в
направлении, обратном направлению ее снятия).
6
Паз челнока
7
Выступ
8
Пружина
Reinigung
VORSICHT
Ziehen Sie zum Reinigen der Nähmaschine das Netzkabel aus der
Steckdose, da Sie sonst der Gefahr von Verletzung und Strom-
schlag ausgesetzt sind.
1. Ziehen Sie den Netzstecker aus der Steckdose.
2. Bringen Sie die Nadel auf die höchste Position und heben Sie den
Nähfuß an.
3. Lösen Sie die Nähfußschraube und die Nadelbefestigungsschraube, und
nehmen Sie den Nähfußhalter und die Nadel heraus. (Siehe
Abb. A
)
4. Entfernen Sie die Stichplatte, indem Sie mit einer Münze die Schrau-
ben lösen. (Siehe
Abb. B
)
1
Benutzen Sie eine Münze oder einen Schraubendreher
5. Drehen Sie das Handrad in Ihre Richtung, bis die Kerbe im Greifer-
innenteil auf die Greiferbahn ausgerichtet ist, wie in der Abbildung
gezeigt.
2
Kerbe im Greifergehäuse
3
Spitze des Greifers
VORSICHT
Drehen Sie das Handrad immer nur auf sich zu, nie von sich weg.
Drehen des Handrads in die andere Richtung kann eine Beschädigung
der Maschine zur Folge haben.
6. Nehmen Sie das Greiferinnenteil heraus. (Siehe
Abb. C
)
7. Entfernen Sie jegliche angesammelte Stofffasern und Fadenreste aus
dem Greifergehäuse.
* Benutzen Sie ein weiches Tuch, um das Greiferinnenteil zu reinigen.
Ölen Sie KEINESFALLS das Greifergehäuse, den Lauf oder den
Greifer. (Siehe
Abb. D
)
4
Greiferinnenteil
5
Greifer
* NICHT ÖLEN.
VORSICHT
•
Benutzen Sie keinen Greifer und keine Spulenkapsel, die beschä-
digt sind. Der Faden könnte sich verwickeln, was zu einem Mißlin-
gen des Stick- bzw. Nähmusters oder einem Abbrechen der Nadel
führen kann. Die richtigen Ersatzteile für Ihre Maschine erhalten
Sie bei Ihrem Händler.
•
Achten Sie darauf, dass Sie den Greifer richtig einsetzen. Die
Nadel könnte sonst abbrechen.
8. Setzen Sie zuerst die Bahn ein, und bringen Sie dann die Stichplatte
wieder an.
Achten Sie beim Einsetzen der Bahn darauf, daß die Kerbe im Greifer
sich in der gleichen Position befindet, in der sie beim Herausnehmen
war, und daß die Bahn des Greifers gegen die Feder anliegt.
Setzen Sie die Stichplatte wieder ein durch Schieben nach links
(umgekehrt wie beim Herausnehmen).
6
Kerbe im Greifergehäuse
7
Haken
8
Feder
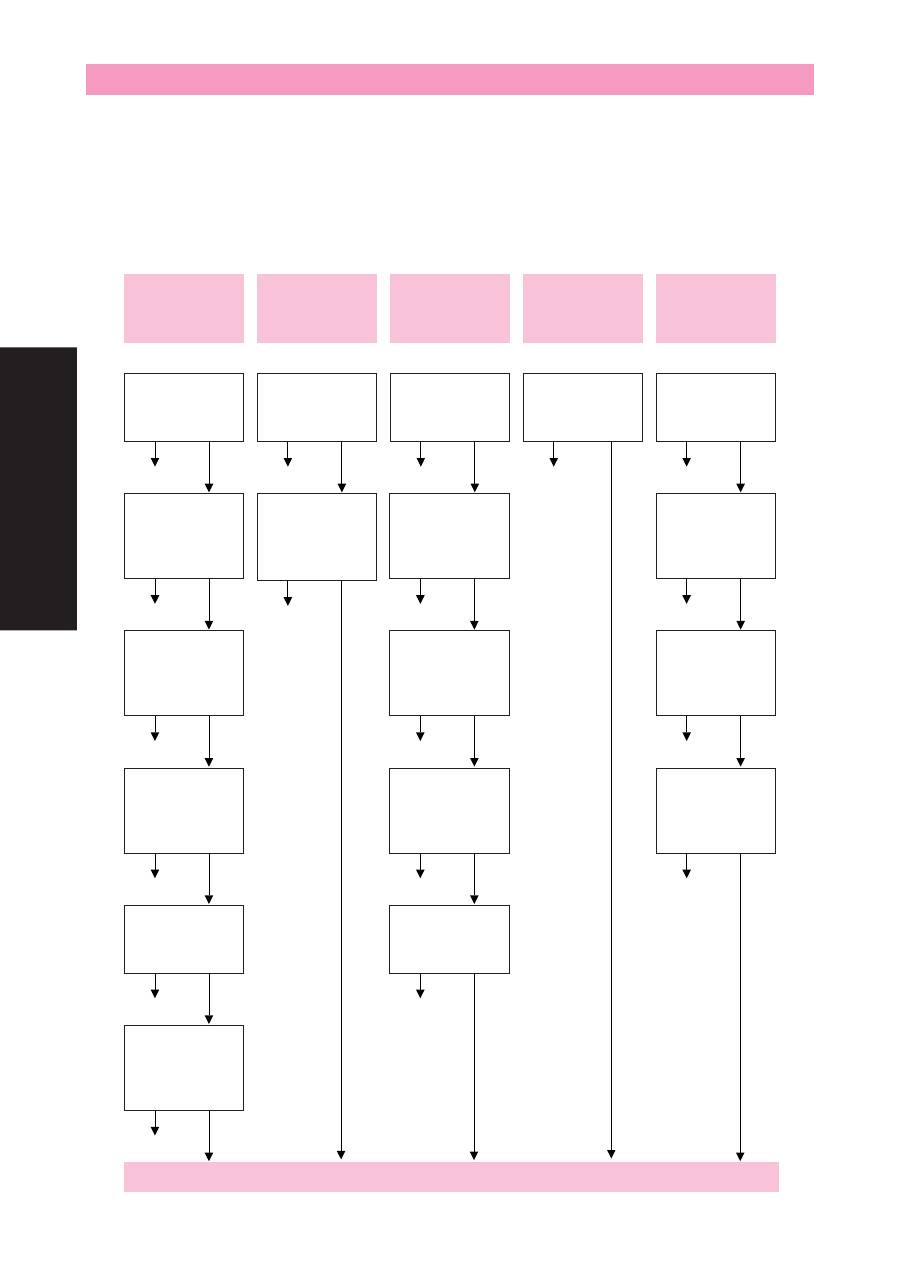
89
MAINTENANCE
WARTUNG
ТЕХНИЧЕСКОЕ ОБСЛУЖИВАНИЕ
No
Page 47
No
Page 87
No
Page 11
No
Page 37
Bobbin is not
threaded properly in
the race.
Inferior needle is
used.
Lint is clinging to the
bottom of the needle
plate.
The combination of
needle size/thread
size/fabric is
incorrect.
SKIPPED
STITCHES
LOOP IN SEAM
FABRIC
PUCKERS
CONTACT YOUR LOCAL SERVICE CENTER
LOWER THREAD
BREAKS
UPPER THREAD
BREAKS
PERFORMANCE CHECK LIST
Whenever sewing difficulties are encountered, review the section in this instruction manual that details the operation you are performing to
make sure you are correctly using the machine. If the problem continues, the following check list may help you to improve the operation.
If you still have difficulties, contact your nearest authorized service center.
With the model STAR 240E and STAR 230E, you can use the sewing speed controller to adjust the sewing speed. When sewing at the slowest
speed, skipped stitches may easily occur depending on the type of thread and fabric used. If this occurs, sew at a faster speed.
No
Page 39
Upper thread is not
correctly installed.
No
Page 37
No
Page 11
No
Page 46
No
Page 46
Lower thread is
tangled.
Needle is incorrectly
inserted.
Thread tension is
incorrect.
Thread tension is
too tight.
No
Page 39
Upper thread is
tangled.
No
Page 39
Threading is not
correct.
No
Page 46
Upper thread
tension is too tight.
No
Page 47
No
Page 11
Wrong needle is
used.
The combination of
needle size/thread
size/fabric is
incorrect.
No
Page 39
Spool of thread is
not correctly
installed.
No
Page 11
Needle is bent or
not sharp.
No
Page 47
The combination of
needle size/thread
size/fabric is
incorrect.
No
Page 39
Threading is not
correct.
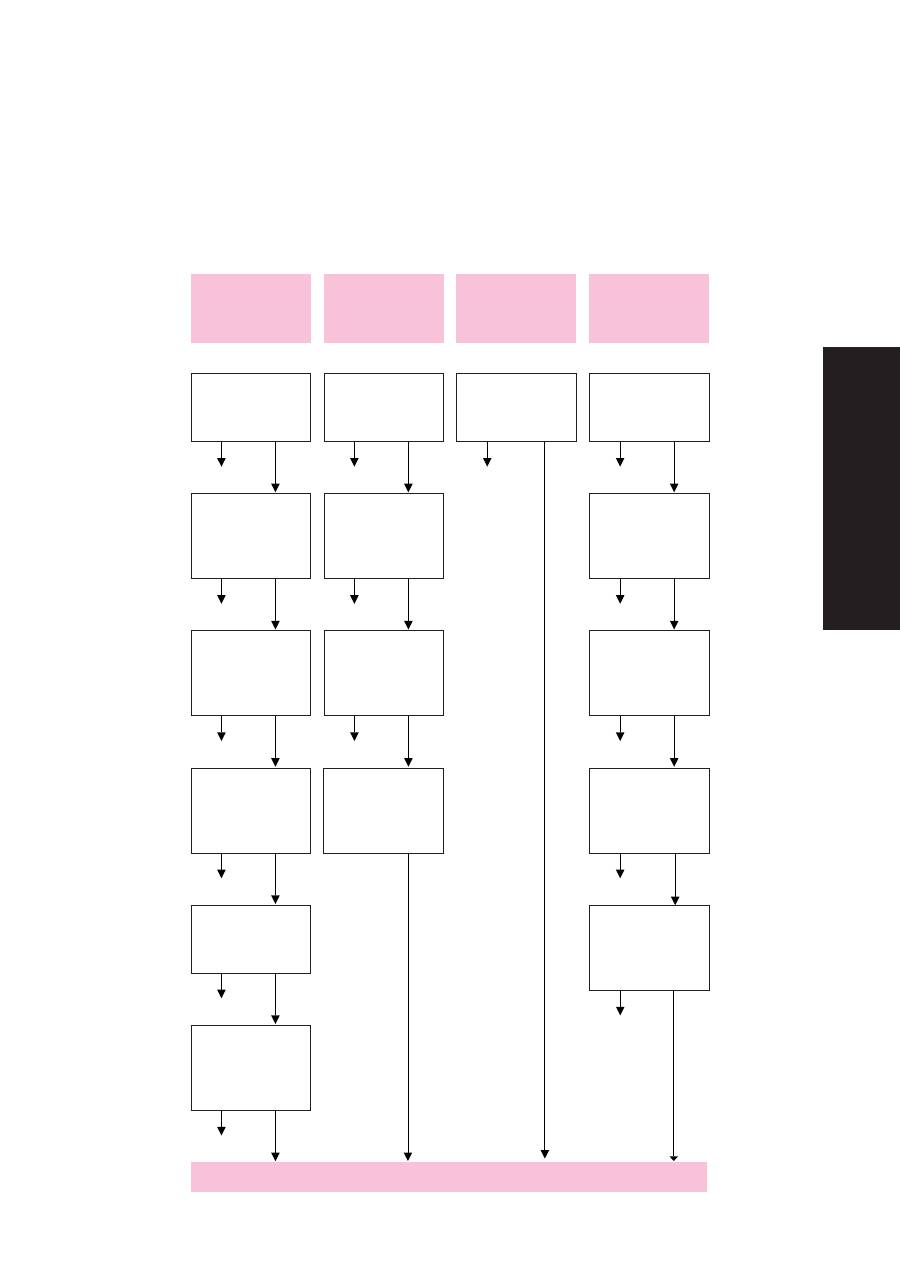
90
MAINTENANCE
WARTUNG
ТЕХНИЧЕСКОЕ ОБСЛУЖИВАНИЕ
No
Page 10
Foot controller is not
used correctly.
MACHINE IS
NOISY OR SLOW
MACHINE DOES
NOT START
CONTACT YOUR LOCAL SERVICE CENTER
FABRIC DOES
NOT FEED
PROPERLY
No
Page 26
Stitch Length Dial is
set at no feeding.
("0")
No
Page 87
No
Page 7
Lint is clinging to the
bottom of the needle
plate.
Power supply plug is
removed from outlet.
No
Page 47
The combination of
needle size/thread
size/fabric is
incorrect.
No
Page 9
Main power switch
is turned off.
No
Page 11
Inferior needle is
used.
No
Page 33
The bobbin winder
shaft is slid to the
right.
No
Page 39
Thread is tangled.
No
Page 30
Feed Dog Position
Switch in down
position.
No
Page 63
(Model STAR 240E, STAR
230E, PS-57, PS-55, STAR-50,
RSR-55, XRX-55)
The buttonhole lever is
pushed toward the back
of the machine.
NEEDLE
BREAKS
No
Page 11
Needle is not
correctly inserted.
No
Page 11
Inferior needle is
used.
No
Page 47
The combination of
needle size/thread
size/fabric is
incorrect.
No
Fabric is pulled
excessively. Let the
feed dogs move the
fabric. Do not pull
the fabric.
Page 10
(Model STAR 240E,
STAR 230E)
Start/Stop button will not
work when foot controller
is plugged into machine.
91
MAINTENANCE
WARTUNG
ТЕХНИЧЕСКОЕ ОБСЛУЖИВАНИЕ
CHECKLISTE
Wann immer Sie beim Nähen auf Schwierigkeiten stoßen, lesen Sie den Abschnitt dieser Anleitung, die den Vorgang beschreibt, den Sie gerade
durchführen, um sicherzugehen, daß Sie die Nähmaschine richtig bedienen. Wenn das Problem dadurch nicht gelöst wurde, kann die folgende Checkliste
bei der Analyse behilflich sein.
Wenn die Probleme weiterbestehen, wenden Sie sich an den nächsten Reparaturservice.
Bei dem Modell STAR 240E und STAR 230E können Sie das Nähgeschwindigkeit-Steuerteil verwenden, um die Nähgeschwindigkeit einzustellen. Beim
Nähen mit der niedrigsten Geschwindigkeit kann Überspringen von Stichen leicht auftreten, je nach verwendetem Stoff und Faden. In diesem Fall mit
höherer Geschwindigkeit nähen.
Nein
Seite 47
Nein
Seite 88
Nein
Seite 12
Nein
Seite 38
WENDEN SIE SICH AN EINE WERKSTATT
Nein
Nein
Seite 38
Nein
Seite 12
Nein
Seite 46
Nein
Seite 46
Nein
Seite 40
Nein
Seite 40
Nein
Seite 46
Nein
Seite 47
Nein
Seite 12
Nein
Seite 40
Nein
Seite 12
Nein
Seite 47
Nein
Seite 40
Der Oberfaden ist
nicht richtig
eingefädelt.
Oberfadenspannung
ist zu hoch.
Oberfaden ist
verheddert.
Nadel ist verbogen
oder stumpf.
Die Kombination
Nadelstärke/
Fadenstärke/Stoff ist
nicht richtig.
Unterfaden ist
verheddert.
Nadel ist falsch
eingesetzt.
Schlechte Nadel
wurde verwendet.
Die Kombination
Nadelstärke/
Fadenstärke/Stoff ist
nicht richtig.
Fadenführung ist
nicht richtig.
Fadenspannung ist
nicht richtig.
Fadenspannung ist zu
hoch.
Fadenführung ist
nicht richtig.
Falsche Nadel wurde
verwendet.
Die Kombination
Nadelstärke/
Fadenstärke/Stoff ist
nicht richtig.
SCHLAUFEN IN
DER NAHT
UNTERFADEN
REISST
OBERFADEN
REISST
STOFF
KRÄUSELT
STICHE WER-
DEN AUSGE-
LASSEN
Unter der Stichplatte
befinden sich Fasern
oder Fusseln.
Garnrolle ist nicht
richtig installiert.
Spule wurde nicht
richtig eingefädelt.
Seite 40
92
MAINTENANCE
WARTUNG
ТЕХНИЧЕСКОЕ ОБСЛУЖИВАНИЕ
Nein
Seite 10
WENDEN SIE SICH AN EINE WERKSTATT
Nein
Seite 27
Nein
Seite 88
Nein
Seite 8
Nein
Seite 47
Nein
Seite 9
Nein
Seite 12
Nein
Seite 34
Nein
Seite 40
Nein
Seite 12
Nein
Seite 12
Nein
Seite 47
Nein
Nadel ist nicht richtig
eingesetzt.
Die Kombination
Nadelstärke/
Fadenstärke/Stoff ist
nicht richtig.
Schlechte Nadel
wurde verwendet.
Schlechte Nadel
wurde verwendet.
Die Kombination
Nadelgröße/
Fadenstärke/Stoff ist
nicht richtig.
Der Netzstecker steckt
nicht in der Steckdo-
se.
Netzschalter ist
ausgeschaltet.
Der Stoff wird zu sehr
gezogen. Lassen Sie den
Transporteur den Stoff
transportieren. Ziehen
Sie nicht am Stoff.
Die Spulerwelle ist
nach rechts gescho-
ben.
MASCHINE IST
LAUT ODER
LANGSAM
STOFF WIRD
NICHT RICHTIG
TRANSPOR-
TIERT
NADEL BRICHT
MASCHINE
LÄUFT NICHT
AN
Stichlängen-
Einstellrad ist auf
niedrigster Stellung.
(“0”)
Unter der Stichplatte
befinden sich Fasern
oder Fusseln.
Fußanlasser wird
nicht richtig benutzt.
Faden ist verheddert.
Nein
(Modell STAR 240E,
STAR 230E)
Die Start/Stopp-Taste
arbeitet nicht, wenn das
Fußanlasser in die
Maschine eingesteckt ist.
Seite 10
Nein
Seite 30
Transporteur ist
versenkt.
Nein
Seite 64
(Nicht bei den Modell STAR
240E, STAR 230E, PS-57,
PS-55, STAR-50, RSR-55,
XRX-55 erhältlich.)
Der Knopflochhebel ist
nach hinten gestellt.
93
MAINTENANCE
WARTUNG
ТЕХНИЧЕСКОЕ ОБСЛУЖИВАНИЕ
ТАБЛИЦА ВОЗМОЖНЫХ НЕИСПРАВНОСТЕЙ
Если в процессе работы возникли какие-либо проблемы, обратитесь к соответствующему разделу настоящего руководства,
чтобы убедиться в том, что та или иная операция выполняется Вами правильно. Если и после этого не удается устранить
возникшие проблемы, обратитесь к приведенной ниже таблице. Если устранить дефект, используя рекомендации данной
таблицы, не представляется возможным, обратитесь за квалифицированной консультацией в ближайший центр технического
обслуживания.
На моделях STAR 240E и STAR 230E Вы можете воспользоваться контроллером скорости шитья для регулирования скорости
выполнения строчки. При выполнении строчки на самой малой скорости при использовании определенных типов нитки и ткани
возможен пропуск стежков. В данном случае выполните строчку на более высокой скорости.
Нет
Стр.48
Нет
Стр.88
Нет
Стр.12
Нет
Стр.38
Нитка шпульки
неправильно
заправлена за
челночный
крючок.
Используется
поврежденная
игла.
Налипание пуха на
нижней
поверхности
игольной
пластины.
Неправильная
комбинация номер
иглы/номер нитки/
тип ткани.
ПРОПУСКИ
СТЕЖКОВ
ОБРАЗОВАНИЕ
ПЕТЕЛЬ НА ШВЕ
ОБРАЗОВАНИЕ
МОРЩИН НА
ТКАНИ
ОБРАТИТЕСЬ ЗА ДОПОЛНИТЕЛЬНОЙ КОНСУЛЬТАЦИЕЙ В
БЛИЖАЙШИЙ ЦЕНТР ТЕХНИЧЕСКОГО ОБСЛУЖИВАНИЯ
ОБРЫВ
НИЖНЕЙ НИТКИ
ОБРЫВ
ВЕРХНЕЙ НИТКИ
Нет
Стр.40
Неправильная
заправка верхней
нитки.
Нет
Стр.38
Нет
Стр.12
Нет
Стр.46
Нет
Стр.46
Спутывание
нижней нитки.
Неправильная
установка иглы.
Неправильная
установка
натяжения ниток.
Чрезмерное
натяжение ниток.
Нет
Стр.40
Спутывание
верхней нитки.
Нет
Стр.40
Неправильная
заправка ниток.
Нет
Стр.46
Чрезмерное
натяжение
верхней нитки.
Нет
Стр.48
Нет
Стр.12
Используемая игла
не соответствует
типу операции.
Неправильная
комбинация номер
иглы/номер нитки/
тип ткани.
Нет
Стр.40
Неправильно
установлена
катушка с ниткой.
Нет
Стр.12
Игла искривлена
или затуплена.
Нет
Стр.48
Неправильная
комбинация номер
иглы/номер нитки/
тип ткани.
Нет
Стр.40
Неправильная
заправка ниток.
94
MAINTENANCE
WARTUNG
ТЕХНИЧЕСКОЕ ОБСЛУЖИВАНИЕ
Нет
Стр.88
Нет
ЧРЕЗМЕРНЫЙ ШУМ И
НИЗКАЯ СКОРОСТЬ
В РАБОТЕ МАШИНЫ
МАШИНА НЕ
ЗАПУСКАЕТСЯ
ОБРАТИТЕСЬ ЗА ДОПОЛНИТЕЛЬНОЙ КОНСУЛЬТАЦИЕЙ В
БЛИЖАЙШИЙ ЦЕНТР ТЕХНИЧЕСКОГО ОБСЛУЖИВАНИЯ
НЕПРАВИЛЬНАЯ
ПОДАЧА ТКАНИ
Нет
Стр.27
Ручка регулирования
длины стежка
установлена в положение
нулевой подачи. (“0”)
Нет
Стр.8
Налипание пуха на
нижнюю
поверхность
игольной пластины.
Штепсель шнура
питания не
вставлен в
розетку.
Нет
Стр.48
Неправильная
комбинация номер
иглы/номер нитки/
тип ткани.
Нет
Стр.9
Выключен главный
выключатель
питания.
Нет
Стр.12
Используется
поврежденная
игла.
Нет
Стр.34
Мотальный вал
шпульки сдвинут
вправо.
Нет
Стр.40
Спутывание нитки.
ПОЛОМКА ИГЛЫ
Нет
Стр.12
Игла установлена
неправильно.
Нет
Стр.12
Используется
поврежденная
игла.
Нет
Стр.48
Неправильная
комбинация номер
иглы/номер нитки/
тип ткани.
Чрезмерное принудительное
вытягивание ткани. Не тяните
ткань. Обеспечьте ее движение
только за счет действия зубчатой
рейки механизма подачи ткани.
Нет
Стр.10
Стр.10
(Модели STAR 240E,
STAR 230E)
Если к машине
подсоединен ножной
контроллер, кнопка
пуска/остановки
машины не действует.
Неверно
используется
ножной
контроллер.
Нет
Стр.30
Зубчатая рейка
механизма
продвижения ткани в
нижем положении.
Нет
Стр.64
(Отсутствует на моделях
TAR 240E, STAR 230E,
PS-57, PS-55, STAR-50,
RSR-55, XRX-55)
Рычаг механизма
обметывания петель
нажат от себя.
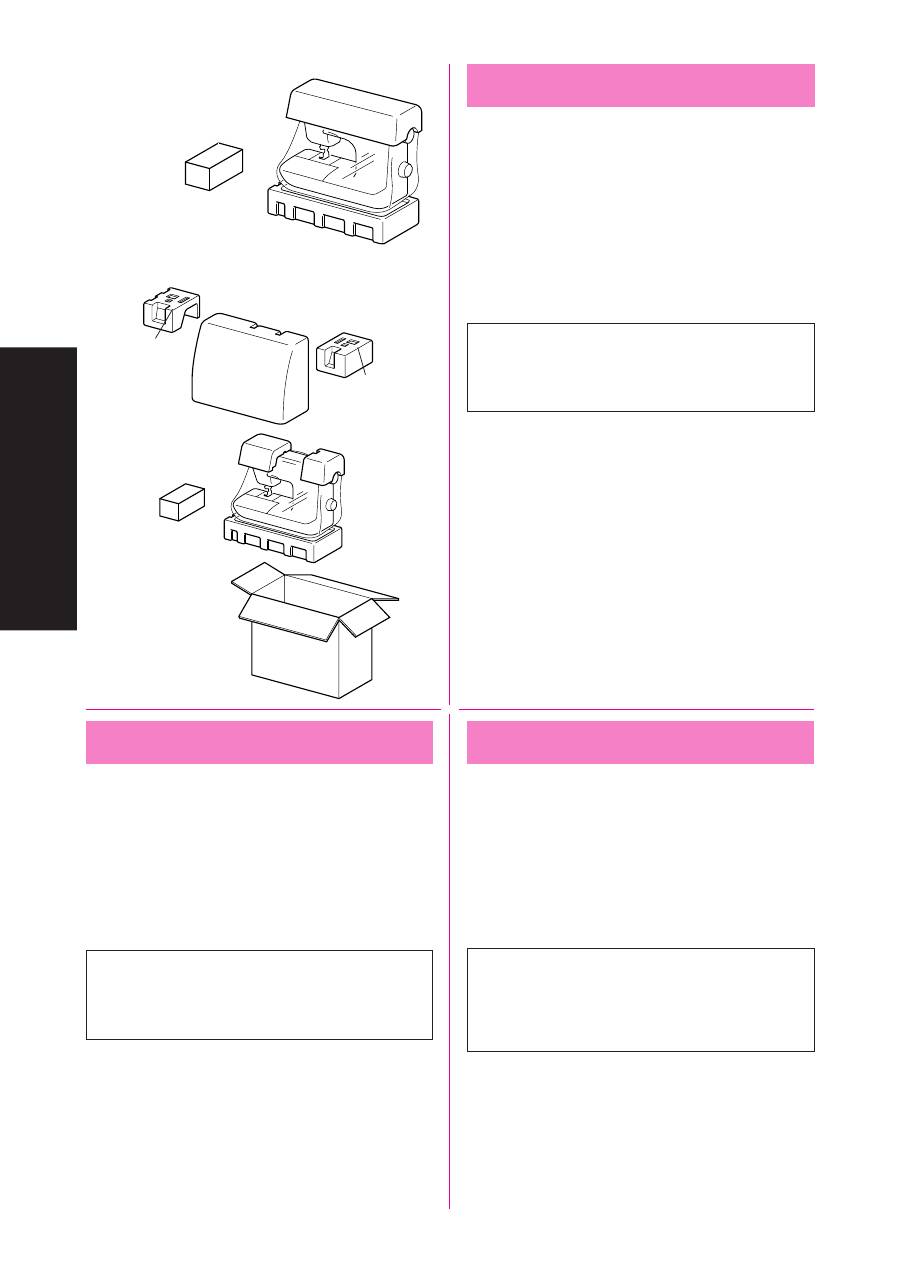
95
MAINTENANCE
WARTUNG
ТЕХНИЧЕСКОЕ ОБСЛУЖИВАНИЕ
Repacking the Machine
Keep the carton and packing materials for future use. It may
become necessary to reship the machine. Improper packing or
improper packing material could result in damage during shipping.
Instructions for repacking the machine are illustrated.
*
Hard case (
1
) and packing materials (
2
,
3
) are included only
with
STAR-50, RSR-55, XRX-55,
STAR 240E and STAR 230E.
IMPORTANT
This packing material is designed to prevent damage in
transit. Save this packing material in the event it is needed to
transport this machine.
Maschine verpacken
Bewahren Sie Karton und Verpackungsmaterial für zukünftigen Ge-
brauch auf. Es kann erforderlich sein, die Maschine einzuschicken.
Unsachgemäße Verpackung oder falsches Verpackungsmaterial kann die
Maschine beim Transport beschädigen. Die Anweisungen zum Verpak-
ken der Maschine sind hier abgebildet.
* Harthaube (
1
) und Verpackungsmaterialien (
2
), (
3
) sind nur bei
STAR-50, RSR-55, XRX-55, STAR 240E und STAR 230E mitgeliefert.
WICHTIG
Dieses Verpackungsmaterial ist dazu gedacht, Schäden beim Trans-
port zu vermeiden. Bewahren Sie dieses Verpackungsmaterial für
den Fall auf, daß die Maschine transportiert werden muß.
1
2
3
(Model STAR 240E, STAR 230E, STAR-50, RSR-55,
XRX-55)
(Model PS-57, PS-55, PS-53)
Переупаковка машины
Сохраните упаковочную коробку и прочие упаковочные
материалы на будущее. Они могут пригодиться, если
потребуется перевозить машину. Плохая упаковка и
использование случайных упаковочных материалов могут
привести к повреждению машины при транспортировке.
Инструкции по переупаковке машины приведены в
иллюстрированной форме на рисунке.
*
Твердый чехол (
1
) и упаковочные материалы (
2
,
3
)
входят в комплект поставки только моделей STAR-50,
RSR-55, XRX-55, STAR 240E и STAR 230E.
ВНИМАНИЕ!
Упаковочная тара данной машины специально
разработана для защиты от повреждений во время
транспортировки. Сохраните упаковку на случай
возможной повторной транспортировки.

96
INDEX
ÍNDICE
УКАЗАТЕЛЬ
Page
1/4-Inch Quilting Foot ............................................... 5, 83
A
Accessories .................................................................... 5
Appliqués ..................................................................... 76
Arrowhead Stitch .......................................................... 59
B
Bead Stitch ................................................................... 59
Blind Hem Stitch ........................................................... 54
Bobbin Winder .............................................................. 33
Bridging Stitch .............................................................. 57
Button Sewing .............................................................. 72
Buttonhole Fine Adjustment Screw .............................. 69
Buttonhole Lever .......................................................... 63
C
Changing Light Bulb ..................................................... 85
Changing the Presser Foot .......................................... 13
Checking the Needle .................................................... 11
Cleaning ....................................................................... 87
Comb Stitch .................................................................. 61
Connecting Plugs ........................................................... 7
D
Darning ......................................................................... 75
Decorative Hem Stitch ................................................. 57
Decorative Stitch .......................................................... 59
Double Action Stitch ..................................................... 57
E
Elastic Overlock Stitch ................................................. 61
Elastic Shell Tuck Stitch ............................................... 61
Elastic Stitch ................................................................. 56
Embroidering ................................................................ 77
F
Fabric/Thread/Needle Combinations ........................... 47
Fagoting Stitch ............................................................. 60
Feather Stitch ............................................................... 62
Feed Dog Position Switch ............................................ 30
Flat Bed Attachment with Accessory
Compartment ......................................................... 14, 32
Foot Controller ............................................................. 10
G
Gathering ..................................................................... 73
H
Hole for Vertical Spool Pin ........................................... 44
L
Lightning Stitch ............................................................. 59
Link Stitch ..................................................................... 60
Lower Threading .......................................................... 37
M
Main Power/Sewing Light Switch ................................... 9
Manually Drawing Up Lower Thread ............................ 43
Monogramming ............................................................ 77
Page
N
Needle
Inspection ........................................................... 11
Replacement ...................................................... 11
Needle Threader .......................................................... 41
O
Overedge Stitching ....................................................... 61
P
Parallelogram Stitch ..................................................... 59
Patchwork .................................................................... 60
Pattern Indication Window ........................................... 15
Pattern Selection Dial ................................................... 15
Performance Check List ............................................... 89
Presser Foot Lever ....................................................... 39
Principal Parts ................................................................ 1
R
Race ............................................................................ 87
Rampart Stitch ............................................................. 57
Repacking the Machine ................................................ 95
Reverse Sewing Lever ................................................. 29
S
Scallop Stitch ............................................................... 58
Sewing Light
Light Bulb Replacement ..................................... 85
Switch ................................................................... 9
Sewing Speed Controller ............................................. 32
Shell Tuck Stitch .......................................................... 55
Shuttle .......................................................................... 87
Spool Pin and Spool Cap ....................................... 33, 39
Springaction Quilting Foot ........................................ 5, 81
Square Stitch ................................................................ 59
Start/Stop Button .......................................................... 31
Stitch Length Dial ................................................... 15, 26
Stitch Width Dial ........................................................... 28
Straight Stitch ................................................... 50, 73, 75
Stretch Blind Hem Stitch .............................................. 54
T
Thread Tension ............................................................ 46
Triangle Stitch .............................................................. 59
Triple Stretch Stitch ...................................................... 50
Triple Zigzag Stretch Stitch .......................................... 62
Twin Needle Sewing .................................................... 44
U
Upper Tension Control Dial .......................................... 46
Upper Threading .......................................................... 39
Using Needle Threader ................................................ 41
W
Walking Foot ............................................................ 5, 79
Winding the Bobbin ...................................................... 33
Z
Zigzag Presser Foot ................................................. 5, 13
Zigzag Stitch .............................................. 53, 72, 76, 77
Zipper Foot ............................................................... 5, 73
Zipper Insertion ............................................................ 73

97
INDEX
ÍNDICE
УКАЗАТЕЛЬ
Seite
A
Anschiebetisch & Zubehörfach ....................................... 14, 32
Applizieren ............................................................................ 76
Aufspulen .............................................................................. 34
Automatischer Einfädler ........................................................ 64
B
Biesenstich ............................................................................. 55
Blindsaumstich ...................................................................... 54
Blitzstich ................................................................................ 59
Bogennaht .............................................................................. 58
Brückenstich .......................................................................... 57
C
Checkliste .............................................................................. 91
D
Dekorativer Stich ................................................................... 59
Dreiecksstich ......................................................................... 59
Dreifach-Zickzackstich .......................................................... 62
E
Einnähen eines Reißverschlusses .......................................... 74
Elastik-Muschelstich ............................................................. 61
Elastikstich ............................................................................ 56
Elastische Schrittnaht ............................................................ 57
Elastischer Blindstich ............................................................ 54
F
Fadenspannung ...................................................................... 46
Flachnaht ............................................................................... 57
Freiarm .................................................................................. 32
Fußanlasser ............................................................................ 10
Fußanlasserbuchse ................................................................... 8
G
Garnrollenstift und -Halter .............................................. 34, 40
Geradstich .................................................................. 51, 74, 75
Grätenstich ............................................................................. 62
Greifer .................................................................................... 88
Greiferinnenteil ...................................................................... 88
H
Hauptbestandteile .................................................................... 2
Hebel für den Geschwindigkeitsbereich ................................ 32
Hexenstich ............................................................................. 60
K
Kabelanschlüsse ...................................................................... 8
Kammstich ............................................................................. 61
Ketteln & Versäubern ............................................................ 61
Knöpfe annähen ..................................................................... 72
Knopfloch .............................................................................. 64
Knopfloch-Feineinstellung .................................................... 70
M
Manschettenstich ................................................................... 60
Maschine verpacken .............................................................. 95
Monogramme ........................................................................ 78
Seite
N
Nadel
ersetzen ....................................................................... 12
prüfen .......................................................................... 12
Nadel prüfen .......................................................................... 12
Nähen mit Doppelnadel ......................................................... 44
Nähfuß wechseln ................................................................... 13
Nähfußhebel .......................................................................... 40
Nählich
Ersetzen der Lampe .................................................... 86
-Schalter ........................................................................ 9
Nählichtlampe auswechseln .................................................. 86
Netz-/Nählichtschalter ............................................................. 9
O
Oberfadenführung .................................................................. 40
Oberfadenspannung ............................................................... 46
Obertransportfuß ................................................................ 6, 80
Öffnung für vertikalen Garnrollenhalter ............................... 45
Overlock-Schrägstich ............................................................ 61
P
Palisadenstich ........................................................................ 57
Parallelogrammstich .............................................................. 59
Patchwork .............................................................................. 60
Patchworkfuß ..................................................................... 6, 84
Perlzierstich ........................................................................... 59
Pfeilspitzenstich ..................................................................... 59
Problemlösungen ................................................................... 91
R
Rechteckstich ......................................................................... 59
Reffen .................................................................................... 74
Reinigung .............................................................................. 88
Reißverschlußfuß ............................................................... 6, 74
Rückwärtstaste ....................................................................... 29
S
Schraube für Knopflochfeineinstellung ................................. 70
Spuler .................................................................................... 34
Start-/Stopp-Taste .................................................................. 31
Stichbreiten-Einstellrad ......................................................... 28
Stichlängen-Einstellrad .................................................... 16, 27
Stichmuster - Einstellrad ....................................................... 16
Stichmusteranzeige ................................................................ 16
Stickarbeiten .......................................................................... 78
Stoff-/Faden-/Nadelkombinationen ....................................... 47
Stopf/Quiltfuß .................................................................... 6, 82
Stopfen ................................................................................... 76
Stretch-Geradstich ................................................................. 51
T
Transporteurhebel .................................................................. 30
U
Überwendlingnaht ................................................................. 61
Unterfadenfühung .................................................................. 38
Z
Zickzacknähfuss ................................................................ 6, 13
Zickzackstich ....................................................... 53, 72, 76, 78
Zubehör ................................................................................... 6

98
INDEX
ÍNDICE
УКАЗАТЕЛЬ
Страница
А
Аппликации ................................................................. 76
Б
Бисерный стежок ....................................................... 59
В
Винт тонкой настройки для обметывания петель ........... 70
Возможные неисправности и способы их устранения ........... 93
Вшивание застежек-молний ..................................... 74
Выключатель ................................................................ 9
Вытягивание нижней нитки ...................................... 43
Вышивание ................................................................. 78
Г
Главный выключатель питания
/ освещения зоны строчки ........................................... 9
Гнездо для вертикального катушечного стержня .. 45
Д
Двухигольная строчка ............................................... 44
Декоративный подрубочный стежок ....................... 57
Декоративный стежок ............................................... 59
З
Замена лампочки освещения ................................... 86
Замена нажимной лапки ........................................... 13
Заправка верхней нитки ........................................... 40
Заправка нижней нитки ............................................ 38
Зигзагообразный стежок ........................ 53, 72, 76, 78
И
Игла
Замена иглы ...................................................... 12
Проверка иглы .................................................. 12
Изготовление монограмм .......................................... 78
Использование приспособления для заправки нити в иглу .. 42
К
Катушечный стержень и катушечный колпачок ........ 33, 40
Квадратный стежок ................................................... 59
Кнопка пуска/остановки машины ............................. 31
Контроллер скорости шитья ..................................... 32
Комбинации тканей, игл и ниток .............................. 48
Л
Лампочка освещения
Замена лампочки освещения .......................... 86
Лапка для вшивания застежек-молний ............... 6, 74
Лапка штопки-вышивки ......................................... 6, 82
Лоскутное шитье ........................................................ 60
M
Мотальный механизм ................................................ 33
Н
Нажимная лапка для строчки зигзаг ................... 6, 13
Наклонная оверлочная строчка ............................... 61
Намотка ниток на шпульку ....................................... 33
Направляющая лапка 1/4 дюйма (6,5 мм) ........... 6, 84
Натяжение ниток ....................................................... 46
Ножной контроллер ................................................... 10
Страница
О
Обметочный стежок .................................................. 61
Обметывание петель ................................................. 64
Обойма ........................................................................ 88
Обработка сборок ...................................................... 74
Окошко индикации типа стежка .............................. 16
Основные части машины ............................................. 4
П
Переключатель позиции зубчатой рейки
механизма продвижения ткани ................................ 30
Переупаковка машины .............................................. 95
Перистый стежок ....................................................... 62
Платформа-приставка с отделением для пр
инадлежностей .................................................... 14, 32
Подшивочная cстрочка ............................................. 55
Подшивочная трикотажная строчка ........................ 54
Потайной подрубочный шов ..................................... 54
Принадлежности .......................................................... 6
Пришивание пуговиц ................................................. 72
Проверка иглы ........................................................... 12
Продеватель нити ...................................................... 42
Прямой стежок ............................................... 50, 74, 75
Р
Разъем для ножного контроллера ............................. 8
Регулятор натяжения верхней нитки ...................... 46
Режим "Free-Arm" ...................................................... 32
Ручка выбора типа стежка ....................................... 16
Ручка регулирования длины стежка ................. 16, 27
Ручка регулирования ширины стежка ..................... 28
Рычаг лапки для обметывания петель .................... 64
Рычаг нажимной лапки ............................................. 40
Рычаг реверсирования строчки ............................... 29
С
Соединительные штепсели ......................................... 8
Соединительный стежок ........................................... 60
Стежок рампарт ......................................................... 57
Стежок с двойным эффектом .................................. 57
Стреловидный стежок .............................................. 59
Строчка «Гребешок» ................................................. 61
Строчка-елочка .......................................................... 58
Строчка-молния ......................................................... 59
Строчка-мостик .......................................................... 57
Строчка-параллелограмм ......................................... 59
Т
Таблица возможных неисправностей ...................... 93
Треугольный стежок .................................................. 59
Tройная трикотажная строчка ................................. 50
Тройная трикотажная строчка «зигзаг» .................. 62
Ц
Цепочная строчка ...................................................... 60
Ч
Челнок ......................................................................... 88
Чистка машины .......................................................... 88
Ш
Шагающая лапка .................................................... 6, 80
Штопка ........................................................................ 75
Э
Эластичная оверлочная строчка ............................. 61
Эластичная подшивочная строчка .......................... 61
Эластичная строчка .................................................. 56

ENGLISH
DEUTSCH
РУССКИЙ
194277-213
Printed in Taiwan

