Vitek VT-1698: Menu table of the auto cooking modes for the different weight of foodstuff Cooking the foodstuff in two steps Setting up the cooking-on time
Menu table of the auto cooking modes for the different weight of foodstuff Cooking the foodstuff in two steps Setting up the cooking-on time: Vitek VT-1698
Table of contents
- MICROWAVE OVEN PRECAUTIONS, WHICH MUST BE FOLLOWED IN ORDER TO MINIMIZE THE RISK OF MICROWAVE ENERGY EXPOSURE IMPORTANT SAFETY INSTRUCTIONS Important information SAFETY MEASURES If a fire occurs:
- Rules that should always be remembered: CAUTION Dishes for microwave ovens
- Checking dishes before using them in the microwave Materials you can use in microwave oven Materials to be avoided in microwave oven Description Control panel
- Display Assembling the microwave oven Protective coating Glass tray installation Installation
- Using the oven Setting the current time Cooking the foodstuff in the microwave oven Grill operating mode Combined operating mode of foodstuff cooking
- Fast cooking Defrosting the foodstuff by weight Defrosting the foodstuff by time Auto cooking mode Menu table of the auto cooking modes for the different foodstuff
- Menu table of the auto cooking modes for the different weight of foodstuff Cooking the foodstuff in two steps Setting up the cooking-on time
- Interlocking function to prevent the oven from been switched on by children Automatic switching off the lighting of the operating chamber Display indication Cleaning and maintenance Trouble shooting
- Normal operation Technical parameters and characteristics Operating conditions: Basic parameters Delivery set Antibacterial coating of the cooking chamber
ENGLISH
3. Press “Auto Menu” button again to set the weight of the foodstuff.
4. Rotate the “Time, Power, Weight” knob clockwise or anticlockwise to set up the weight of the foodstuff (300 g), the
icon (25) is lighted on the display.
5. Press the “Start/Express cooking” button to initiate the process of cooking in auto mode.
The remaining time of defrosting is displayed, and the icons (17, 24) are blinking. Then the cooking is other, the oven
is stopped, and 5 audio sounds are played.
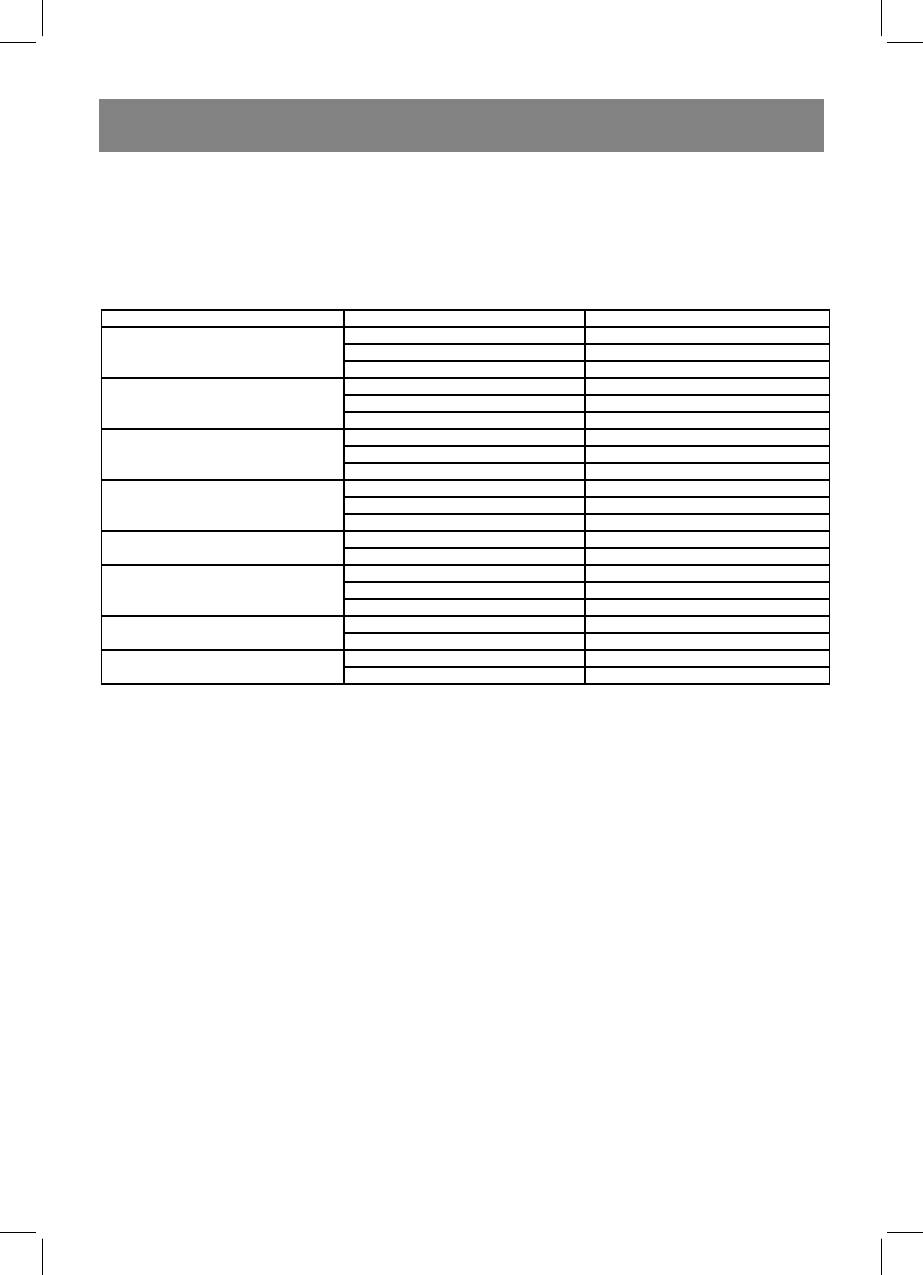
Menu table of the auto cooking modes for the different weight of foodstuff
Menu Weight of the foodstuff Display indication
200 g 200 g
А-1 – Auto heating
400 g 400 g
600 g 600 g
200 g 200 g
А-2 –Vegetables
300 g 300 g
400 g 400 g
250 g 250 g
А-3 – Fish
350 g 350 g
450 g 450 g
250 g 250 g
А-4 – Meet
350 g 350 g
450 g 450 g
50 g 50 g
А-5 – Paste
100 g 100 g
200 g 200 g
А-6 – Potatoes
400 g 400 g
600 g 600 g
200 g 200 g
А-7 – Pizza
400 g 400 g
200 ml 200 ML
А-8 - Soup
400 ml 400 ML
Notice:
• The result of cooking in the auto mode depends on the dimensions and the shape of the foodstuff, and on the loca-
tion of the dish on the glass tray too. In any case, if you consider the result of cooking as unsatisfactory, you should
increase or decrease the weight of the foodstuff.
• After selection of auto cooking program “A-8 – soup” the icon (27) is lighted on the display.
Cooking the foodstuff in two steps
Example: cooking the foodstuff at the full power (100%) for 20 minutes, and at the 80% power for 5 minutes.
1. Press “Microwaves/Grill/Combined” button. Power level equal to 100% (P-100) is displayed, and the icons (17, 20)
are lighted on the display.
2. Press “Microwaves/Grill/Combined” button again to set the time of cooking.
3. Rotate the “Time, Power, Weight” knob clockwise or anticlockwise to set up the cooking time (20:00 minutes).
4. Press “Microwaves/Grill/Combined” button again to set the second step of cooking.
5. Rotate the “Time, Power, Weight” knob clockwise or anticlockwise to set up the power level 80% (Р-80).
6. Press “Microwaves/Grill/Combined” button again to set the time of the second step of cooking.
7. Rotate the “Time, Power, Weight” knob clockwise or anticlockwise to set up the cooking time (5:00 minutes).
8. Press the “Start/Express cooking” button to initiate the process of cooking in two steps. The remaining time of the first
step is displayed, and the icons (17, 21) are blinking. During the second step the remaining time of the second step of
is displayed, and the icons (17, 21) are still blinking.
Then the second step is other, the oven is stopped, and 5 audio sounds are played
Notice:
- If the defrost function is included into the two step process of cooking, this function should be set as first step only.
- The program of auto cooking cannot be included into the program of cooking in two steps.
Setting up the cooking-on time
Example: setting up the cooking-on time as 13 h 12 min.
1. Verify the current time is set correctly.
2. Select the program of cooking the foodstuff you need.
9
1698_new.indd 91698_new.indd 9 22.07.2010 10:19:5322.07.2010 10:19:53


