Sigma ELECTRONIC FLASH EF-610 DG SUPER SA-STTL (シグマ用): BOUNCE FLASH
BOUNCE FLASH: Sigma ELECTRONIC FLASH EF-610 DG SUPER SA-STTL (シグマ用)
20
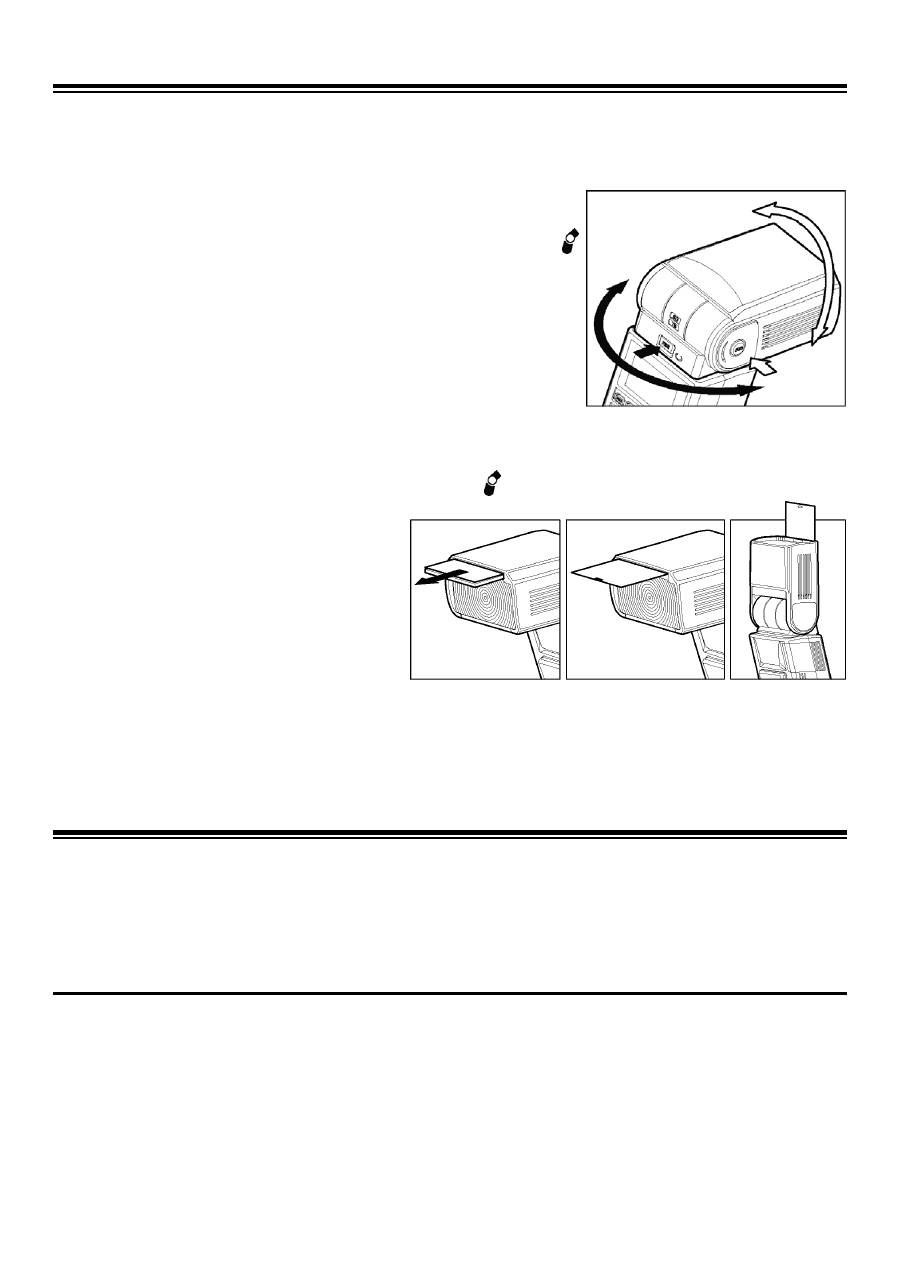
BOUNCE FLASH
When you take a photo with flash in a room, sometimes a strong shadow will appear behind the
subject, if you point the flash head upwards or sideways to reflect the light off the ceiling, wall etc. the
subject will be illuminated softly. Press the lock button and adjust the flash head to set the bounce
angle.
UP: 0°, 60°, 75°, 90°
DOWN: 0°,7°
RIGHT: 0°, 60°, 75°, 90
°
LEFT: 0°, 60°, 75°,90°, 120°, 150°, 180°
When the bounce flash mode is activated, a bounce indicator
will appear on the LCD panel.
Choose a white surface for bouncing the flash, otherwise the
image’s colour may be incorrect.
Depending on the reflecting surface, the subject distance and other
factors, the effective distance range for the TTL AUTO may change.
Please check for correct exposure confirmation (TTL mark on the
LCD panel) after releasing the shutter.
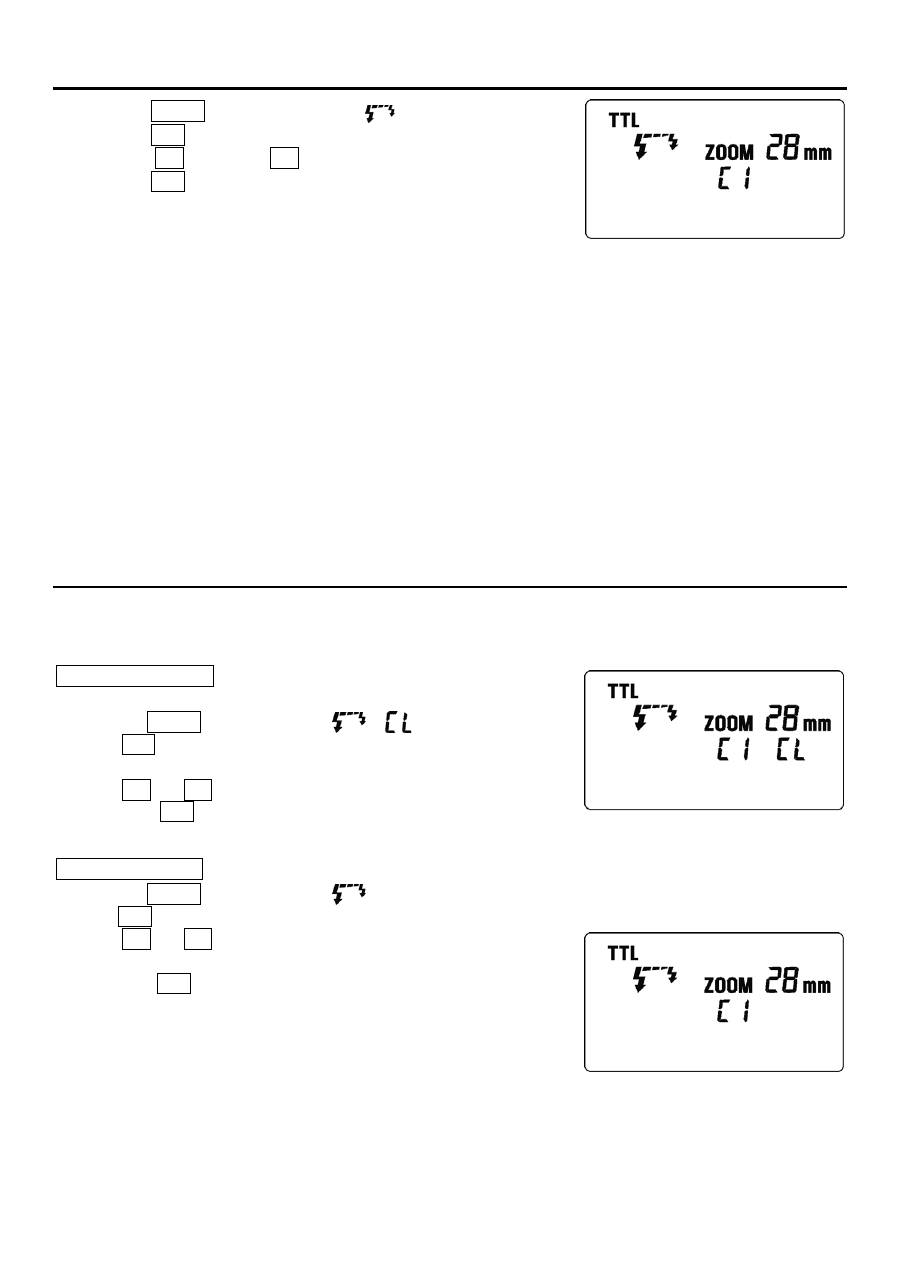
CLOSE-UP EXPOSURES
Bounce flash can be tilted 7° downward for close-ups. The Flash will be effective only for the subjects
0.5 meter to 2 meters. When the flash head is tilted 7°,
will blink.
CATCH LIGHT PANEL
This flash is equipped with a built-in catch
light panel, which can create a catch light in
the eyes of the subject when the bounce
flash mode is activated. Slide out the wide
panel and catch light panel, and then put
wide panel back in its place. (Be careful to
slide the panels out smoothly.)
◆
To create a catch light effectively, tilt the flash head upward 90 degrees and take pictures at a close
distance.
WIRELESS FLASH
(Except SD9)
When using the “Wireless Flash” mode, you can take pictures with a more three-dimensional feeling,
or make natural images by using shadowing depending on the flash position. This can be done without
any extension cord connecting the camera body and flash. In case of the EF-610 DG SUPER,
communication between the camera body and the flash will be achieved by the light produced by the
flash. In the “Wireless Flash” mode, the camera will calculate the correct exposure automatically.
CONTROL SYSTEM CHANGE
Control System of “Wireless Flash” is different for each camera. First it is necessary to attach the flashgun to the
camera for activating the control system. If this operation is neglected, wireless function may not work when
flashgun is separated from the camera.
1.
Attach the flashgun to the camera and turn on the power switch of the flashgun and camera.
2.
Press the shutter button of camera halfway. (The camera and flashgun communicate and control
system will be switched automatically.)
3.
Turn off the power switch of the flashgun and camera.
21
WHEN BUILT-IN FLASH IS USED (SA-7, SA-9 SD14 AND SD15)
1.
Press the MODE button to select the
mark.
2.
Press the SEL button to make the channel indicator blink.
3.
Press the + button or – button to set the channel.
4.
Press the SEL button to stop the indicator blinking.
5.
Place the EF-610 DG SUPER SA-STTL at the desired position.
■
Do not place the flash unit within the picture area.
■
Please be set the flash unit between 0.5m
~
5m (1.6 ~16ft) from the subject, and set the camera
body between 1m
~
5m (1.6~16ft) from the subject.
■
Be sure to set the camera’s flash mode to “Wireless Flash Mode”, and set the channel number on
the EF-610 DG SUPER SA-STTL Flash unit to the same channel number as that you set on the
camera. Otherwise, the EF-610 DG SUPER SA-STTL and your camera will not communicate with
each other and the EF-610 DG SUPER SA-STTL will not fire, when you take picture.
6.
Pop-up the camera’s built-in flash, and then after both flashes are fully charged, press the shutter
button to take the picture.
■
AF Auxiliary Light on the EF-610 DG SUPER SA-STTL will blink, when the flash unit charged and is
ready to fire.
■
The EF-610 DG SUPER SA-STTL will fire when the built-in flash fires. The camera’s built-in flash is
fired only to control the EF-610 DG SUPER SA-STTL only. The flash lighting of the subject is done
by the EF-610 DG SUPER SA-STTL. The camera will control the flash power level, as a TTL mode
flash, to Obtain correct exposure.
CAMERAS NOT EQUIPPED WITH BUILT-IN FLASH USED (SD10)
For Wireless flash two pieces of EF-610 DG SUPER SA-STTL will be necessary. In this instruction, we
call a flash unit, which is attached to the camera body “Master unit”, and we call a flash unit at a
remote position “Slave unit”.
Master unit Setting
1.
Attach the flash unit to the camera.
2.
Press the MODE button to select
⁄
mark.
3.
Press SEL button, to make the channel indicator blink on the
display.
4.
Press + or – button to set the desired channel number.
5.
Press the SEL button several times until the display stops
blinking.
Slave unit Setting
6.
Press the MODE button to select
.
7.
Press SEL button, to make the channel indicator blink, on the display.
8.
Press + or – button to choose the same channel number
as set on the Master unit.
9.
Press the SEL button several times until the indicator stops
blinking.
10.
Place the Slave unit at the desired position.
11.
Check that both flashes are fully charged.
■
Ready light lamp will light, and the AF Auxiliary lamp will blink to
indicate that the flash is ready for shooting.
12.
Adjust the focus on the subject, and take the picture.
■
Master unit fires just for controlling the Slave unit, and does not influence photography.
■
When you set a slave unit at the desired position, you can use mini-stand. This mini-stand has a
screw hole for a tripod.
Оглавление
- 安全上のご注意
- 各部の名称( 1 ページ)
- 発光部のセット
- ワイドパネルについて
- 連続撮影時のご注意
- FP 発光
- モデリング発光
- バウンス撮影
- スレーブ発光
- 主要諸元
- PRECAUTIONS
- DESCRIPTION OF THE PARTS
- ADJUSTING THE FLASH HEAD
- WIDE PANEL
- LIMITS OF CONTINUOUS SHOOTING
- FP FLASH
- MODELING FLASH
- BOUNCE FLASH
- SLAVE FLASH
- SPECIFICATIONS
- VORSICHTSMAßNAHMEN
- BESCHREIBUNG DER TEILE
- EINSTELLEN DES BLITZKOPFES
- WEITWINKELSTREUSCHEIBE
- GRENZEN DER SERIENAUSLÖSUNG
- KURZZEITBLITZSYNCHRONISATION (FP)
- REDUZIERUNG ROTER AUGEN
- INDIREKTES BLITZEN
- „SLAVE“ GERÄT
- TECHNISCHE DATEN
- PRECAUTIONS
- DESCRIPTION DES ELEMENTS
- AJUSTEMENT DE LA TETE FLASH
- ELARGISSEUR D'ANGLE
- LIMITES DES PRISES DE VUE CONSECUTIVES AU FLASH
- FLASH HAUTE VITESSE FP (sauf SA-300)
- REDUCTION DE L'EFFET "YEUX ROUGES"
- FLASH INDIRECT
- FLASH ESCLAVE
- CARACTERISTIQUES TECHNIQUES
- PRECAUCIONES
- DESCRIPCIÓN DE LAS PARTES
- AJUSTE DEL CABEZAL DEL FLASH
- PANTALLA ANGULAR
- LIMITACIONES DEL DISPARO CONTINUO
- SINCRONIZACIÓN CON LA SEGUNDA CORTINILLA
- LUZ DE MODELADO
- FLASH REFLEJADO
- FLASH ESCLAVO
- ESPECIFICACIONES
- ATTENZIONE
- DESCRIZIONE DELLE PARTI
- REGOLAZIONE DELLA TESTA DEL FLASH
- DIFFUSORE GRANDANGOLARE
- LIMITAZIONI QUANDO SI SCATTA IN SEQUENZA
- SINCRONIZZAZIONE DELLA SECONDA TENDINA
- FLASH DI RIEMPIMENTO
- FLASH INDIRETTO
- FLASH AUSILIARIO
- SPECIFICHE
- BEMÆRK
- BESKRIVELSE AF FLASHENS DELE
- MONTERING OG AFMONTERING AF FLASHEN
- LCD-DISPLAY BELYSNING
- KONTINUERLIG OPTAGELSE
- SYNKRONISERING MED ANDET LUKKERGARDIN
- MULTI-FLASH FUNKTION
- TRÅDLØS FLASH
- SLAVE-FLASH
- SPECIFIKATIONER
- VOORZORGSMAATREGELEN
- OMSCHRIJVING VAN DE ONDERDELEN
- HET AFSTELLEN VAN DE FLITSKOP
- GROOTHOEK ADAPTER
- MAXIMALE PRESTATIES BIJ CONTINU FOTOGRAFEREN.
- FP FLITS (BEHALVE SA-300)
- MODEL / TESTFLITS
- INDIRECT FLITSEN
- SLAVE FUNCTIE
- TECHNISCHE GEGEVENS:
- 注 意各部位名稱
- 關於電池
- 安裝閃光燈到相機及其解除
- 液晶顯示屏夜光照明
- 閃燈連發限制
- 第二簾幕 ( 後簾 ) 閃燈同步
- 頻閃模式
- 相機與閃燈無線配合操控 ( 不適用於 SD9)
- 離機無線從屬( Slave )閃光模式
- 規 格
- 사용상 주의점
- 각부의 명칭
- 플래시 헤드 조정
- 와이드 패널
- 연속 촬영시 주의점
- 고속 싱크로(FP) 촬영
- 모델링 플래시
- 바운스 촬영
- 슬레이브 플래시
- 제품 사양
- ПРЕДОСТОРОЖНОСТИ
- ОПИСАНИЕ СОСТАВНЫХ ЧАСТЕЙ
- НАСТРОЙКА ГОЛОВКИ ВСПЫШКИ
- РАССЕИВАЮЩАЯ ПАНЕЛЬ
- ОГРАНИЧЕНИЯ ДЛЯ НЕПРЕРЫВНОЙ СЪМКИ
- СИНХРОНИЗАЦИЯ ПО ВТОРОЙ ШТОРКЕ
- МОДЕЛИРОВАНИЕ ВСПЫШКИ
- НАПРАВЛЕННОСТЬ ВСПЫШКИ
- ДОПОЛНИТЕЛЬНАЯ ВСПЫШКА
- ХАРАКТЕРИСТИКИ
- PRECAUÇÕES
- DESCRIÇÃO DOS COMPONENTES
- COMO AJUSTAR A CABEÇA DO FLASH
- PAINEL DE GRANDE ANGULAR
- LIMITES DE DISPAROS CONTÍNUOS
- FLASH FP
- O FLASH EM MODO DE PRÉ-VISÃO (FLASH MODELING)
- FLASH INDIRECTO
- FLASH ESCRAVO
- ESPECIFICAÇÕES
