Acer ASPIRE ONE AO722 – страница 2
Инструкция к Нетбуку Acer ASPIRE ONE AO722
2
English
Creating a recovery backup (Optical drive)
To reinstall using a backup on optical discs, you must create the recovery disc
beforehand. Throughout the process, you will be guided by onscreen
instructions. Please read them carefully!
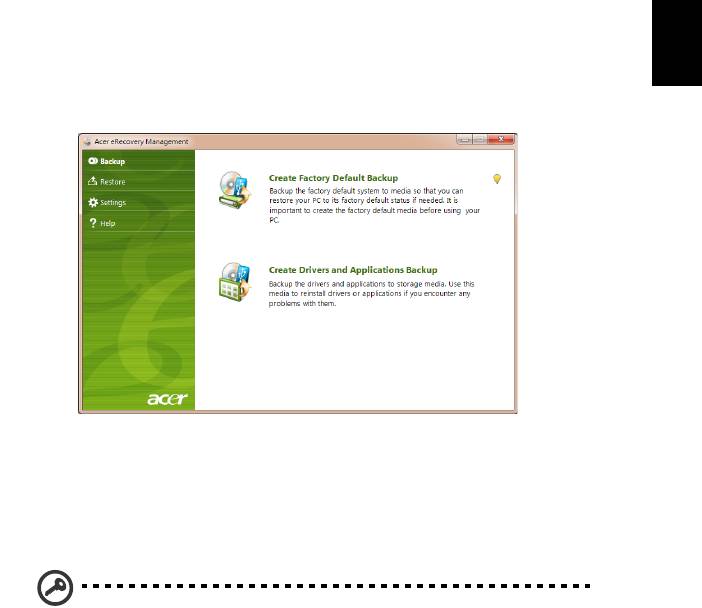
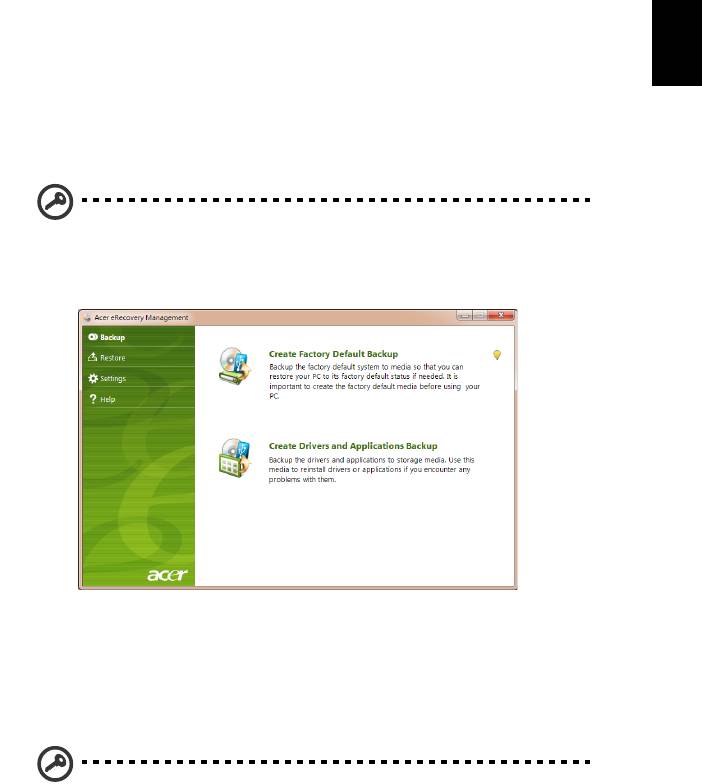
1 Click St
art > All Programs > Acer, then click Acer eRecovery Management.
2 To create recovery discs for the hard drive’s entire original contents,
including Windows and all factory-loaded software and drivers, click
Create Factory Default Backup.
- OR -
To create a recovery disc for only the facto
ry-loaded software and drivers, click
Create Drivers and Applications Backup.
Important: We recommend that you create each type of recovery
backup as soon as possible.

3
English
The Create Factory Default Backup dialog box tells you the number of blank,
recordable discs you will need to complete the recovery discs. Make sure that
you have the required number of identical, blank discs ready before continuing.
Note: The number of blank DVDs required varies depending on
the operating system installed.
3 Insert a blank disc into the drive indicated in the Backup to list, then click
Next. You will be shown the backup progress on the screen.
The drive ejects each disc as it completes burning it.
4 Remove the disc from the drive and mark it with a permanent marker.
Important: Write a unique, descriptive label on each disc, such as
‘Windows Recovery Disc 1 of 2’ or ‘Apps/Drivers Recovery disc’.
Make sure you keep the discs in a safe place that you will
remember.
4
English
5 If multiple discs are required, insert a new disc when prompted, then click
OK. Continue recording discs until the process is complete.
Creating a recovery backup (USB flash drive)
To reinstall using a backup on a USB flash drive, you must create the recovery
backup beforehand. Throughout the process, you will be guided by onscreen
instructions. Please read them carefully!
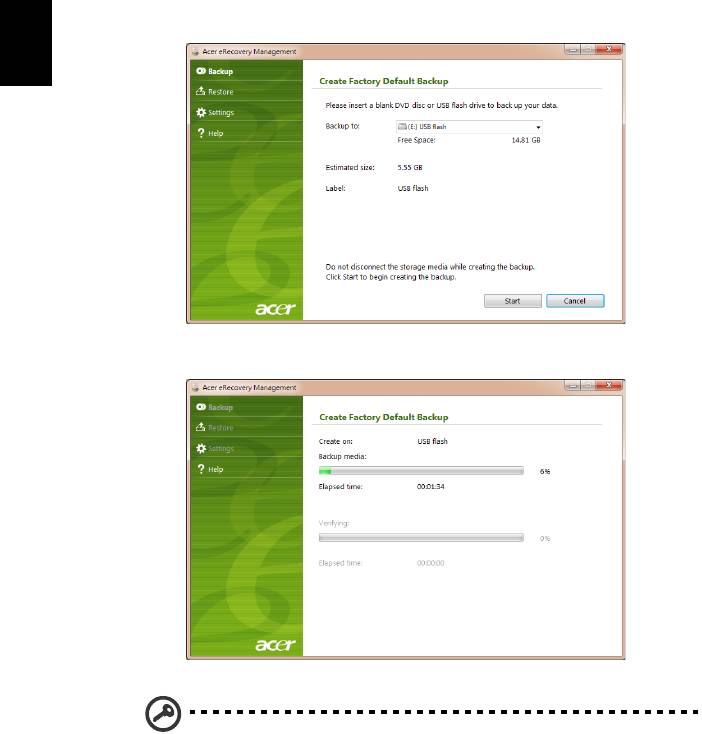
Important: If you are using a USB flash drive, ensure it is at least 12
GB and does not contain any previous data.
1 Click Start > All Programs > Acer, then click Acer eRecovery Management.
2 To create recovery backup for the hard drive’s entire original contents,
including Windows and all factory-loaded software and drivers, click
Create Factory Default Backup.
- OR -
To create a recovery backup for only the facto
ry-loaded software and drivers,
click Create Driver and Applications Backup.
Important: We recommend that you create each type of recovery
backup as soon as possible.
5
English
The Create Factory Default Backup dialog box opens. This dialog box tells you
the estimated size of the backup file on your USB flash drive.
3 Plug in the USB disk, then click Start. You will be shown the backup
progress on the screen.
4 Unplug the USB flash drive and mark it with a permanent marker.
Important: Write a unique, descriptive label on each backup, such
as ‘Windows Recovery Backup’ or ‘Apps/Drivers Recovery Backup’.
Make sure you keep the USB flash drive in a safe place that you
will remember.

6
English
Recovering your system (Optical
drive)
If calling Acer support did not help fix your problem, you can use the Acer
eRecovery Management program. This will restore your computer to the same
state as when you purchased it, while giving you an option to retain all settings
and personal data for later retrieval.
To recover your system
1 Perform minor fixes.
If only one or two items of software or hardware have stopped working
correctly, the problem may be solved by reinstalling the software or the device
drivers. To recover software and drivers that were pre-installed at the factory,
see
"Recovering pre-installed software and drivers" on page 6. For instructions
on reinstalling software and drivers that were not pre-installed, see that
product’s documentation or technical support Web site.
2 Revert to a previous system condition.
If reinstalling software or drivers does not help, then the problem may be
solved by returning your system to a previous state when everything was
working correctly. For instructions, see
"Returning to a previous system
condition" on page 7.
3 Reset your system to its factory condition.
If nothing else has solved the problem and you want to reset your system to
factory condition, see
"Returning your system to its factory condition" on page
8.
Types of recovery
Recovering pre-installed software and drivers
As a troubleshooting step, you may need to reinstall the software and device
drivers that came pre-installed on your computer from the factory. You can
recover using either your hard drive or the recovery discs you have created.
• New software: If you need to recover software that did not come pre-
installed on your computer, you need to follow that software’s installation
instructions.
• New device drivers: If you need to recover device drivers that did not come
pre-installed on your computer, follow the instructions provided with the
device.
To recover your pre-installed software and drivers:
7
English
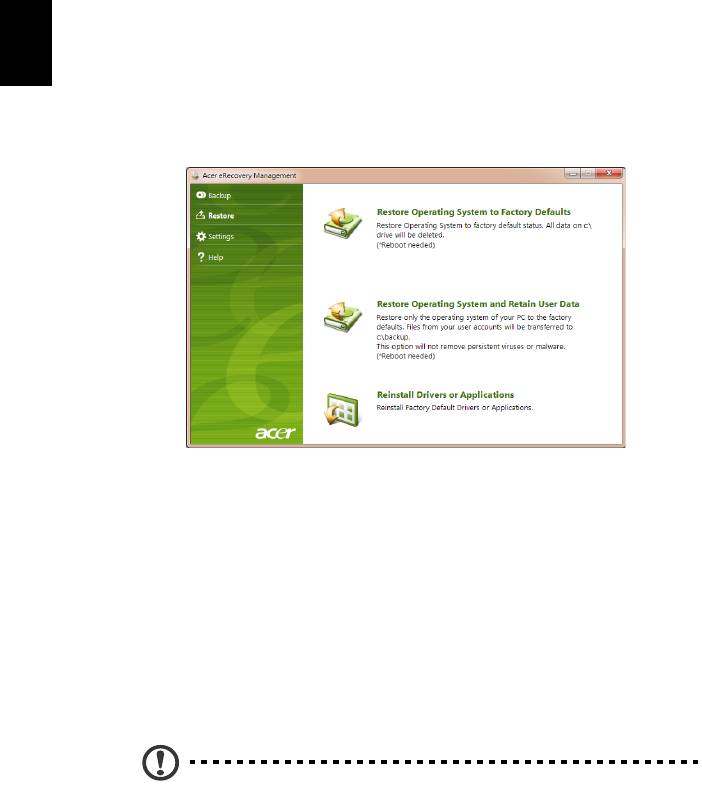
1 Click Start > All Programs > Acer, then click Acer eRecovery Management.
- OR -
If you are recovering from your driver and application recovery disc, insert it
into
the disc drive, then go to Step 3 after the Acer Application Recovery main
menu opens.
2 Click the Restore t
ab, then click Reinstall Drivers or Applications to display
the Acer Application Recovery main menu.
3 Click Contents to show a list of software and device drivers.
4 Click the install icon for the item you want to install, then follow the
on
screen prompts to complete the installation. Repeat this step for each
item you want to reinstall.
Returning to a previous system condition
Microsoft System Restore periodically takes ’snapshots’ of your system settings
and saves them as restore points. In most cases of hard-to-resolve software
problems, you can return to one of these restore points to get your system
running again.
Windows automatically creates an additional restore point each day, and also
each t
ime you install software or device drivers.
Tip: For more information about using Microsoft System Restore,
click Start, then click Help and Support. Type
windows system
restore
in the Search Help box, then press Enter.
To return to a restore point:
1 Click St
art > Control Panel > System and Security > Action Center, then
click Recovery.
2 Click O
pen System Restore, then Next.

8
English
3 Select the restore point you want, click Next, then Finish. A confirmation
message box will appear.
4 Click Yes. Your system is restored using the restore point you specified. This
process may take several minutes, and may restart your computer.
Returning your system to its factory condition
If your computer experiences problems that are not recoverable by other
methods, you may need to reinstall everything to return your system to its
factory condition. You can reinstall using either your hard drive or the recovery
discs you have created.
Warning: This complete recovery deletes everything on your hard
drive, then reinstalls Windows and all software and drivers that
were pre-installed on your system. If you can access important
files on your hard drive, back them up now.
If you can still run Windows, see "Recovering from within Windows" on page 8.
If you cannot run Windows and your original hard drive is still working, see
"Recovering from the hard drive during startup" on page 9.
If you cannot run Windows and your original hard drive has been completely re-
formatted or you have installed a replacement hard drive, see
"Recovering from
your recovery discs" on page 9.
Recovering from within Windows
To reinstall Windows and all pre-installed software and drivers:
Click Start > All Programs > Acer, then click Acer eRecovery Management.
Click the Restore tab, then Restore Operating System to Factory Defaults.
Click Yes, then Start. A dialog box will display information about the hard drive
that the operating system will be recovered to.
Warning: Continuing the process will erase all files on your hard
drive.
Click OK. The recovery process begins by restarting your computer, then
continues by copying files to your hard drive. This process may take a while, the
Acer eRecovery Management screen displays the progress.
When the recovery has finished, a dialog box will prompt you to restart your
computer.
Click OK to restart your computer.
Follow the onscreen prompts for first-time system setup.

9
English
Recovering from the hard drive during startup
To reinstall Windows and all pre-installed software and drivers:
1 Turn on your computer, then press <Alt> + <F10> during startup to open
Acer eRecovery Management.
2 Click Restore Operating System to Factory Defaults.
Warning: Continuing the process will erase all files on your hard
drive.
3 Click Next. Your hard drive’s original, factory-loaded contents will be
recovered. This process will take several minutes.
Recovering from your recovery discs
To reinstall Windows and all pre-installed software and drivers:
1 Turn on your computer, insert the first system recovery disc into your
optical disc drive, then restart your computer.
Warning: Continuing the process will erase all files on your hard
drive.
If it is not already enabled, you must enable the F12 Boot Menu:
Press <F2> when starting your computer.
Use the left or right arrow keys to select the Main menu.
Press the down key until F12 Boot Menu is selected, press <F5> to change this
setting to Enabled.
Use the left or right arrow keys to select the Exit menu.
Select Save Changes and Exit and press Enter. Select OK to confirm.
Your computer will restart.
2 During startup, press <F12> to open the boot menu. The boot menu allows
you to select which device to start from, such as the hard drive or an optical
disc.
3 Use your arrow keys to select the line CDROM/DVD (this line may start with
’IDE 1...’), then press <Enter>. Windows will install from the recovery disc
you inserted.
4 Insert the second recovery disc when prompted, then follow the onscreen
prompts to complete the recovery.

10
English
Recovering your system (USB flash
drive)
If calling Acer support did not help fix your problem, you can use the Acer
eRecovery Management program. This will restore your computer to the same
state as when you purchased it, while giving you an option to retain all settings
and personal data for later retrieval.
To recover your system
1 Perform minor fixes.
If only one or two items of software or hardware have stopped working
correctly, the problem may be solved by reinstalling the software or the device
drivers. To recover software and drivers that were pre-installed at the factory,
see
"Recovering pre-installed software and drivers" on page 10. For instructions
on reinstalling software and drivers that were not pre-installed, see that
product’s documentation or technical support Web site.
2 Revert to a previous system condition.
If reinstalling software or drivers does not help, then the problem may be
solved by returning your system to a previous state when everything was
working correctly. For instructions, see
"Returning to a previous system
condition" on page 11.
3 Reset your system to its factory condition.
If nothing else has solved the problem and you want to reset your system to
factory condition, see
"Returning your system to its factory condition" on page
12.
Types of recovery
Recovering pre-installed software and drivers
As a troubleshooting step, you may need to reinstall the software and device
drivers that came pre-installed on your computer from the factory. You can
recover using either your hard drive or the backup you have created.
• New software: If you need to recover software that did not come pre-
installed on your computer, you need to follow that software’s installation
instructions.
• New device drivers: If you need to recover device drivers that did not come
pre-installed on your computer, follow the instructions provided with the
device.
To recover your pre-installed software and drivers:

11
English
1 Click Start > All Programs > Acer, then click Acer eRecovery Management.
- OR -
If you are recovering from your driver and application recovery backup, insert
the USB
flash drive into a USB port. Open the USB flash drive in Windows
Explorer and double-click Recovery.
2 Click Reinstall Drivers or Application from a USB device.
3 Click Contents to show a list of software and device drivers.
4 Click the install icon for the item you want to install, then follow the
on
screen prompts to complete the installation. Repeat this step for each
item you want to reinstall.
Returning to a previous system condition
Microsoft System Restore periodically takes ’snapshots’ of your system settings
and saves them as restore points. In most cases of hard-to-resolve software
problems, you can return to one of these restore points to get your system
running again.
Windows automatically creates an additional restore point each day, and also
each t
ime you install software or device drivers.
Tip: For more information about using Microsoft System Restore,
click Start, then click Help and Support. Type
windows system
restore
in the Search Help box, then press Enter.
To return to a restore point:
1 Click St
art > Control Panel > System and Security > Action Center, then
click Recovery.
2 Click O
pen System Restore, then Next.
3 Select the restore point you want, click Ne
xt, then Finish. A confirmation
message box will appear.

12
English
4 Click Yes. Your system is restored using the restore point you specified. This
process may take several minutes, and may restart your computer.
Returning your system to its factory condition
If your computer experiences problems that are not recoverable by other
methods, you may need to reinstall everything to return your system to its
factory condition. You can reinstall using either your hard drive or the recovery
backup you have created.
Warning: This complete recovery deletes everything on your hard
drive, then reinstalls Windows and all software and drivers that
were pre-installed on your system. If you can access important
files on your hard drive, back them up now.
If you can still run Windows, see "Recovering from within Windows" on page
12.
If you cannot run Windows and your original hard drive is still working, see
"Recovering from the hard drive during startup" on page 13.
If you cannot run Windows and your original hard drive has been completely re-
formatted or you have installed a replacement hard drive, see
"Recovering from
your recovery backup" on page 13.
Recovering from within Windows
To reinstall Windows and all pre-installed software and drivers:
Click Start > All Programs > Acer, then click Acer eRecovery Management.
Click the Restore tab, then Restore Operating System to Factory Defaults to
open the Confirm Restoration dialog box.
Click Yes, then Start. A dialog box will display information about the hard drive
that the operating system will be recovered to.
Warning: Continuing the process will erase all files on your hard
drive.
Click OK. The recovery process begins by restarting your computer, then
continues by copying files to your hard drive. This process may take a while, the
Acer eRecovery Management screen displays the progress.
When the recovery has finished, a dialog box prompts you to restart your
computer.
Click OK to restart your computer.
Follow the onscreen prompts for first-time system setup.

13
English
Recovering from the hard drive during startup
To reinstall Windows and all pre-installed software and drivers:
1 Turn on your computer, then press <Alt> + <F10> during startup to open
Acer eRecovery Management.
2 Click Restore Operating System to Factory Defaults.
Warning: Continuing the process will erase all files on your hard
drive.
3 Click Next. Your hard drive’s original, factory-loaded contents will be
recovered. This process will take several minutes.
Recovering from your recovery backup
To reinstall Windows and all pre-installed software and drivers:
1 Plug in the USB flash drive and turn on your computer.
Warning: Continuing the process will erase all files on your hard
drive.
If it is not already enabled, you must enable the F12 Boot Menu:
Press <F2> when starting your computer.
Use the left or right arrow keys to select the Main menu.
Press the down key until F12 Boot Menu is selected, press <F5> to change this
setting to Enabled.
Use the left or right arrow keys to select the Exit menu.
Select Save Changes and Exit and press Enter. Select OK to confirm.
Your computer will restart.
2 During startup, press <F12> to open the boot menu. The boot menu allows
you to select which device to start from, such as a flash drive.
3 Use your arrow keys to select the line USB HDD, then press <Enter>.
Windows will install from the recovery backup on the USB flash drive.
4 Follow the onscreen prompts to complete the recovery.
14
English
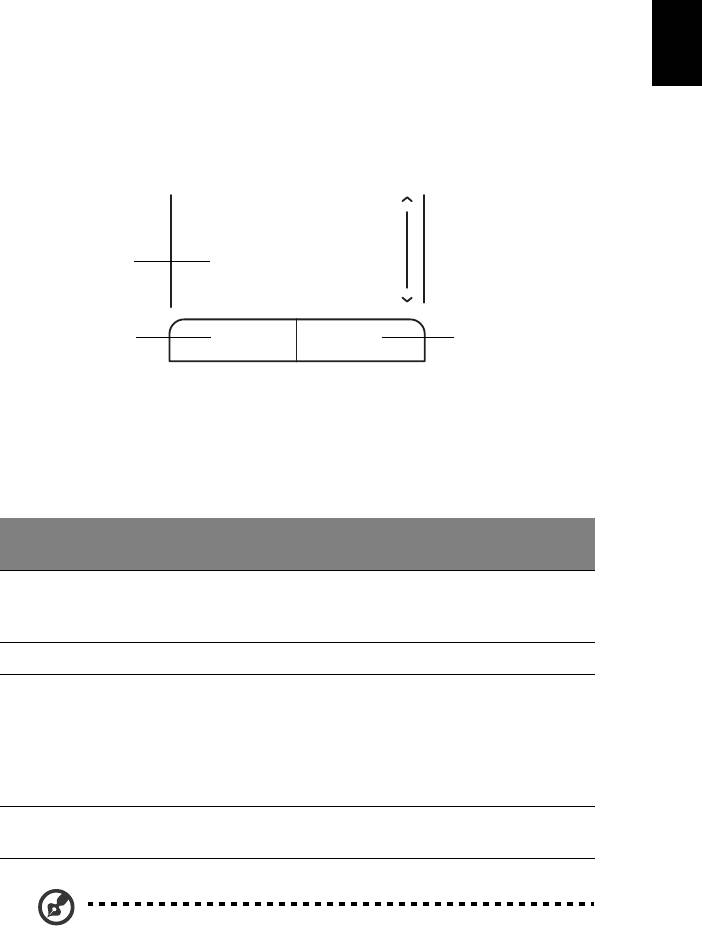
Touchpad
The built-in touchpad is a pointing device that senses movement on its surface.
This means the cursor responds as you move your finger across the surface of
the touchpad. The central location on the palmrest provides optimum comfort
and support.
Touchpad basics (with two buttons)
1
2
3
The following items show you how to use the touchpad with two buttons.
• Move your finger across the touchpad to move the cursor.
• Press the left and right buttons located beneath the touchpad to perform
selection and execution functions. These two buttons are similar to the left
and right buttons on a mouse. Tapping on the touchpad is the same as
clicking the left button.
Right
Function Left button (2)
Main touchpad (1)
button (3)
Execute Quickly click
Tap twice (at the same
tw
ice.
speed as double-clicking a
mouse button).
Select Click once. Tap once.
Drag Click and hold,
Tap twice (at the same
t
hen use finger on
speed
as double-clicking a
the touchpad to
mouse button); rest your
drag the cursor.
finger on the touchpad
on the second tap and
drag the cursor.
Access context
Click
me
nu
once.
Note: Illustrations for reference only. The exact configuration of
your PC depends on the model purchased.
15
English
Note: When using the touchpad, keep it — and your fingers — dry
and clean. The touchpad is sensitive to finger movement; hence,
the
lighter the touch, the better the response. Tapping harder will
not increase the touchpad's responsiveness.
Note: By default, vertical and horizontal scrolling is enabled on
your touchpad. It can be disabled under Mouse settings in
Windows Control Panel.
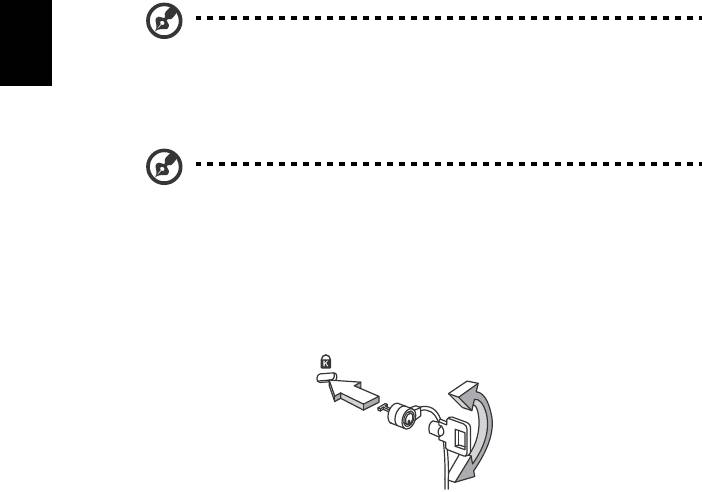
Using a computer security lock
The notebook comes with a Kensington-compatible security slot for a security
lock.
Wrap the computer security lock cable around an immovable object such as a
table or handle of a locked drawer. Insert the lock into the notch and turn the
key to secure the lock. Some keyless models are also available.

16
English
Using the keyboard
The keyboard has full-sized keys and an embedded numeric keypad, separate
cursor, lock, Windows, function and special keys.
Lock keys and embedded numeric keypad
The keyboard has three lock keys which you can toggle on and off.
Lock key Description
Caps Lock When Caps Lock is on, all alphabetic characters typed are
in uppercase.
Num Lock
When Num Lock is on, the embedded keypad is in numeric
<Fn> + <F11>
mode. The keys function as a calculator (complete with the
arithmetic operators +, -, *, and /). Use this mode when
you need to do a lot of numeric data entry. A better
solution would be to connect an external keypad.
Note: <Fn> + <F11> only for certain models.
Scroll Lock
When Scroll Lock is on, the screen moves one line up or
<Fn> + <F12>
down when you press the up or down arrow keys
respectively. Scroll Lock does not work with some
applications.
The embedded numeric keypad functions like a desktop numeric keypad. It is
indicated by small characters located on the upper right corner of the keycaps.
To simplify the keyboard legend, cursor-control key symbols are not printed on
the keys.
Desired access Num Lock on Num Lock off
Number keys on
Type numbers in a normal
embedded keypad
manner.
Cursor-control keys
Hold <Shift> while using
Hold <Fn> while using
on embedded
cursor-control keys.
cursor-control keys.
keypad
Main keyboard keys Hold <Fn> while typing
Type the letters in a
letters on embedded
normal manner.
keypad.
17
English
Windows keys
The keyboard has two keys that perform Windows-specific functions.
Key Description
Windows key
Pressed alone it launches the Start menu. It can also be
used with other keys for other functions:
<
> : Open or close the Start menu
<
> + <D>: Display the desktop
<
> + <E>: Open Windows Explorer
<
> + <F>: Search for a file or folder
<
> + <G>: Cycle through Sidebar gadgets
<
> + <L>: Lock your computer (if you are connected
to a network domain), or switch users (if you're not
c
onnected to a network domain)
<
> + <M>: Minimizes all windows
<
> + <R>: Open the Run dialog box
<
> + <T>: Cycle through programs on the taskbar
<
> + <U>: Open Ease of Access Center
<
> + <X>: Open Windows Mobility Center
<
> + <Break>: Display the System Properties dialog
box
<
> + <Shift+M>: Restore minimized windows to the
desktop
<
> + <Tab>: Cycle through programs on the taskbar
by using Windows Flip 3-D
<
> + <SPACEBAR>: Bring all gadgets to the front and
select Windows Sidebar
<CTRL> + <
> + <F>: Search for computers (if you are
on a network)
<CTRL> + <
> + <Tab>: Use the arrow keys to cycle
through programs on the taskbar by using Windows Flip
3-D
Note: Depending on your edition of
Windows, some shortcuts may not function
as described.
Application
This key has the same effect as clicking the right mouse
key
button; it opens the application's context menu.

18
English
Special keys (only for certain models)
You can locate the Euro symbol and the US dollar sign at the upper-center of
your keyboard.
The Euro symbol
1 Open a text editor or word processor.
2Hold <Alt Gr> and then press the <5> key at the upper-center of the
keyboard.
Note: Some fonts and software do not support the Euro symbol.
Please refer to www.microsoft.com/typography/faq/faq12.htm for
more information.
The US dollar sign
1 Open a text editor or word processor.
2Hold <Shift> and then press the <4> key at the upper-center of the
keyboard.
Note: This function varies according to the language settings.

19
English
Frequently asked questions
The following is a list of possible situations that may arise during the use of
your computer. Easy solutions are provided for each one.
I turned the power on, but the computer does not start or
boot up.
Look at the power indicator:
• If it is not lit, n
o power is being supplied to the computer. Check the
following:
• If you are using on the battery, it may be low and unable to power
the co
mputer. Connect the AC adapter to recharge the battery pack.
• Make sure that the AC adapter is properly plugged into the computer
and
to the power outlet.
• If it is lit, check
the following:
• Is a non-bootable (non-system) disk in the external USB floppy drive?
Remove or replace it with a
system disk and press <Ctrl> + <Alt> +
<Del> to restart the system.
Nothing appears on the screen.
The computer’s power management system automatically blanks the screen to
save power. Press any key to turn the display back on.
If pressing a key does not turn the display back on, three things might be
the cause:
• The b
rightness level might be too low. Press <Fn> + < > (increase) to
adjust the brightness level.
• The display de
vice might be set to an external monitor. Press the display
toggle hotkey <Fn> + <F5> to toggle the display back to the computer.
• If the Sleep in
dicator is lit, the computer is in Sleep mode. Press and release
the power button to resume.
No audio is heard from the computer.
Check the following:
• The vo
lume may be muted. In Windows, look at the volume control
(speaker) icon on the taskbar. If it is crossed-out, click the icon and deselect
the Mute all option.
• The vo
lume level may be too low. In Windows, look at the volume control
icon on the taskbar. You can also use the volume control buttons to adjust
the volume.
• If head
phones, earphones or external speakers are connected to the line-
out port on the computer, the internal speakers automatically turn off.

20
English
The keyboard does not respond.
Try attaching an external keyboard to a USB port on the computer. If it works,
contact your dealer or an authorized service center as the internal keyboard
cable may be loose.
The printer does not work.
Check the following:
• Make sure that the printer is connected to a power outlet and that it is
turned on.
• Make sure that the printer cable is connected securely to a USB port and
the corresponding port on the printer.
I want to restore my computer to its original settings without
recovery CDs.
Note: D2D Recovery is only available in notebook models fitted
with a hard drive.
Note: If your system is the multilingual version, the operating
system and language you choose when you first turn on the
system will be the only option for future recovery operations.
This recovery process helps you restore the C: drive with the original software
content that is installed when you purchase your notebook. Follow the steps
below to rebuild your C: drive. (Your C: drive will be reformatted and all data
will be erased.) It is important to back up all data files before using this option.
Before performing a restore operation, please check the BIOS settings by
pressing
<F2> during POST.
1 Check to see if Acer disk-to-disk recovery is enabled or not.
2 Make sure the D2D Recovery setting in Main is Enabled.
3 Exit the BIOS utility and save changes. The system will reboot.
To start the recovery process:
1 Restart the system.
2 While the Acer logo is showing, press <Alt> + <F10> at the same time to
enter the recovery process.
3 Refer to the onscreen instructions to perform system recovery.

21
English
Important! This feature occupies 6 GB in a hidden partition on
your hard disk.
Requesting service
Before you call
Please have the following information available when you call Acer for online
service, and please be at your computer when you call. With your support, we
can reduce the amount of time a call takes and help solve your problems
efficiently. If there are error messages or beeps reported by your computer,
write them down as they appear on the screen (or the number and sequence in
the case of beeps).
You are required to provide the following information:
Name: __________________________________________________________________
Address: _________________________________________________________________
Telephone number: ______________________________________________________
Machine and model type: _________________________________________________
Serial number: ___________________________________________________________
Date of purchase: ________________________________________________________


