Indesit DISP 5377: Care and maintenance
Care and maintenance: Indesit DISP 5377
Care and maintenance
Shutting off the water and electricity
Clean the water inlet filter at the tap outlet regularly.
EN
supplies
- Turn off the water tap.
• Turn off the water tap after every wash cycle to avoid
- Unscrew the end of the water inlet hose, remove the filter
leaks.
and clean it carefully under running water.
- Replace the filter and screw the water hose back into
• Always unplug the appliance when cleaning it and when
performing maintenance work.
position.
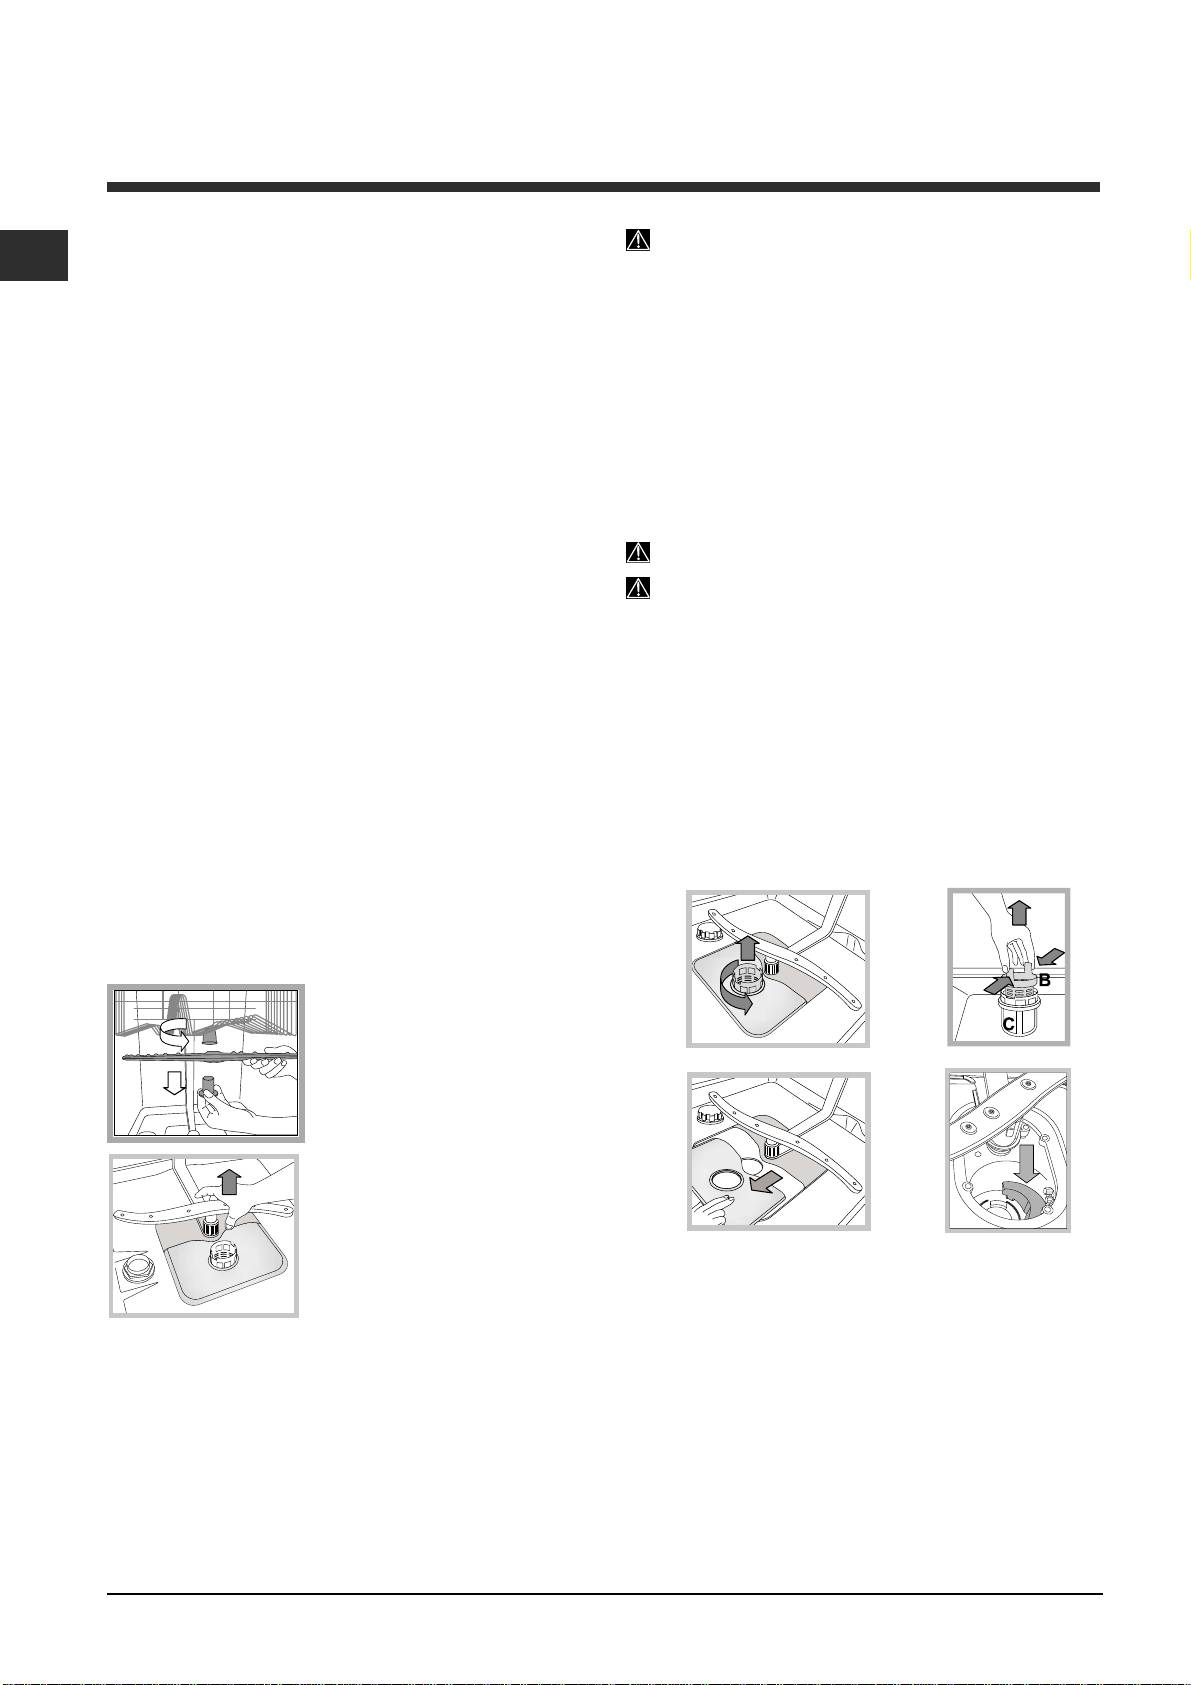
Cleaning the dishwasher
Cleaning the filters
• The external surfaces of the machine and the control
panel may be cleaned using a non-abrasive cloth which
The filter assembly consists of three filters which remove
has been dampened with water. Do not use solvents or
food residues from the washing water and then recirculate
abrasive products.
the water. They should be cleaned if you wish to achieve
the best results in every wash.
• Any marks on the inside of the appliance may be
removed using a cloth dampened with water and a little
Clean the filters regularly.
vinegar.
The dishwasher should not be used without filters, or if
Preventing unpleasant odours
the filter is loose.
• Always keep the door of the appliance ajar in order to
• After several washes, check the filter assembly and if
avoid moisture from forming and being trapped inside
necessary clean it thoroughly under running water, using
the machine.
a non-metallic brush and following the instructions below:
1.1.
1.1.
1. Turn the cylindrical filter C in an anti-clockwise direction
• Clean the seals around the door and detergent
and pull it out (fig. 1).
dispensers regularly using a damp sponge. This will
2.2.
2.2.
2. Remove the cup filter B by exerting a slight pressure on
avoid food becoming trapped in the seals, which is the
the side flaps (fig. 2).
main cause behind the formation of unpleasant odours.
3.3.
3.3.
3. Slide out the stainless steel plate filter A (fig. 3).
4.
Inspect the trap and remove any food residue. NEVER
Cleaning the sprayer arms
REMOVE the wash cycle pump (black detail)
(fig. 4)
.
Food residue may become encrusted onto the sprayer arms
and block the holes used to spray the water. It is therefore
recommended that the arms are checked from time to time
and cleaned with a small non-metallic brush.
The two sprayer arms may both be removed.
C
To remove the upper sprayer
arm, rotate the locking ring in
an anti-clockwise direction.
1
2
The upper sprayer arm should
be replaced with the holes
facing upwards.
A
The lower sprayer arm can be
removed by pulling it upwards.
3
4
After cleaning the filters, replace the filter assembly and fix
it in position correctly; this is essential for maintaining the
efficient operation of the dishwasher.
Leaving the machine unused for
Cleaning the water inlet filter*
extended periods
If the water hoses are new or have not been used for an
• Disconnect the appliance from the electricity supply and
extended period of time, let the water run to make sure it is
shut off the water tap.
clear and free of impurities before performing the necessary
• Leave the door of the appliance ajar.
connections. If this precaution is not taken, the water inlet
could become blocked and damage the dishwasher.
• When you return, run a wash cycle when the dishwasher
is empty.
* Only available in selected models.
22
Table of contents
- Istruzioni per l’uso
- Installazione
- Descrizione dell’apparecchio
- Caricare i cestelli
- Avvio e utilizzo
- Programmi
- Brillantante e sale rigenerante
- Manutenzione e cura
- Precauzioni e consigli
- Anomalie e rimedi
- Operating instructions
- Installation
- Description of the appliance
- Loading the racks
- Start-up and use
- Wash cycles
- Rinse aid and refined salt
- Care and maintenance
- Precautions and advice
- Troubleshooting
- Mode d’emploi
- Installation
- Description de l’appareil
- Charger les paniers
- Mise en marche et utilisation
- Programmes
- Produit de rinçage et sel régénérant
- Entretien et soin
- Précautions et conseils
- Anomalies et remèdes
- Instrukcja obsługi
- Instalacja
- Opis urządzenia
- Napełnianie koszy
- Uruchomienie i użytkowanie
- Programy
- Środek nabłyszczający i sól regeneracyjna
- Konserwacja i utrzymanie
- Anomalie i środki zaradcze
- Návod k použití
- Instalace
- Popis zaŕízení
- Plnění košů
- Spuštění a použití
- Programy
- Leštidlo a regenerační sůl
- Údržba a péče
- Opatŕení a rady
- Poruchy a způsob jejich odstranění
- Руководство поРуководство по Руководство поРуководство по Руководство по
- МонтажМонтаж МонтажМонтаж Монтаж
- Описание изОписание из Описание изОписание из Описание из де деде деде лиялия лиялия лия
- ЗагрЗагр ЗагрЗагр Загр узкузк узкузк узк а к а ка к а ка к орор орор ор зин зинзин зинзин
- ВкВк ВкВк Вк лю люлю люлю чение ичение и чение ичение и чение и эксплуатацияэксплуатация эксплуатацияэксплуатация эксплуатация
- ПрограммыПрограммы ПрограммыПрограммы Программы
- ОпоОпо ОпоОпо Опо ласкивласкив ласкивласкив ласкив аа аа а т тт тт ее ее е ль и ль иль и ль иль и регенерирующая сольрегенерирующая соль регенерирующая сольрегенерирующая соль регенерирующая соль
- ТТ ТТ Т ее ее е хническ хническхническ хническхническ оеое оеое ое обслуживание и уходобслуживание и уход обслуживание и уходобслуживание и уход обслуживание и уход
- Неисправности иНеисправности и Неисправности иНеисправности и Неисправности и меме меме ме тт тт т о оо оо ды их у ды их уды их у ды их уды их у странения странениястранения странениястранения


