Indesit PWE-91273-S-(EU): instruction
Class: Household, kitchen appliances, electronics and equipment
Type: Laundry Machine
Manual for Indesit PWE-91273-S-(EU)

1
GB
English,1
GB
WASHING MACHINE
Contents
Installation, 2-3
Unpacking and levelling
Connecting the electricity and water supplies
The first wash cycle
Technical data
Description of the washing machine, 4-5
Control panel
Display
Running a wash cycle, 6
Wash cycles and options, 7
Table of programmes and wash cycles
Wash options
Detergents and laundry, 8
Detergent dispenser drawer
Preparing the laundry
Special wash cycles
Precautions and advice, 9
General safety
Disposal
Care and maintenance, 10
Cutting off the water and electricity supplies
Cleaning the washing machine
Cleaning the detergent dispenser drawer
Caring for the door and drum of your appliance
Cleaning the pump
Checking the water inlet hose
Troubleshooting, 11
Service, 12
PWE 91273 S
Instructions for use
Türkçe,13
TR
CZ
Česky,25
CIS
Русский,37
2
GB
Installation
!
This instruction manual should be kept in a safe place for
future reference. If the washing machine is sold, transferred
or moved, make sure that the instruction manual remains
with the machine so that the new owner is able to
familiarise himself/herself with its operation and features.
!
Read these instructions carefully: they contain vital
information relating to the safe installation and operation of
the appliance.
Unpacking and levelling
Unpacking
1. Remove the washing machine from its packaging.
2. Make sure that the washing machine has not been
damaged during the transportation process. If it has been
damaged, contact the retailer and do not proceed any
further with the installation process.
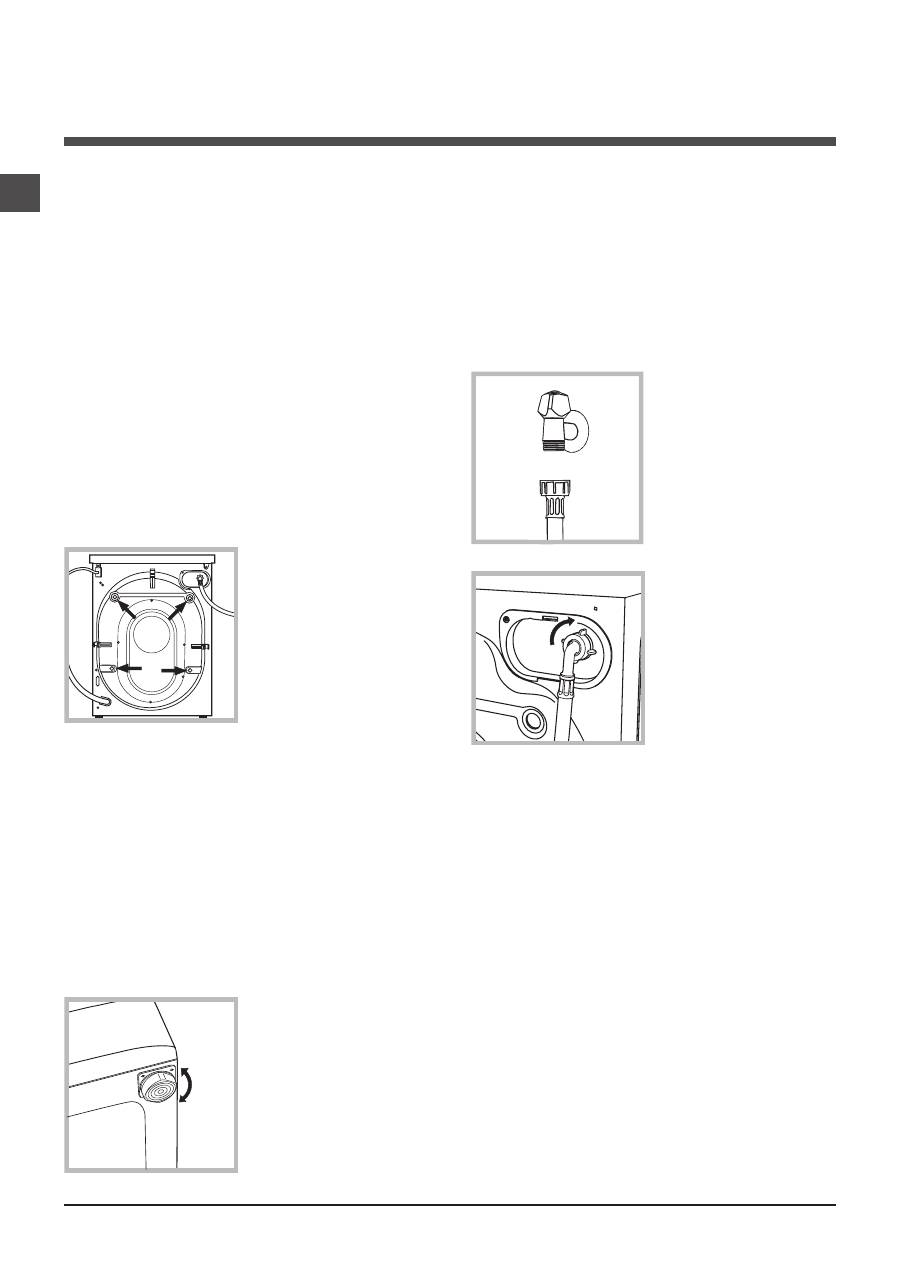
3. Remove the 4 protective
screws (used during
transportation) and the
rubber washer with the
corresponding spacer,
located on the rear part of
the appliance (
see figure
).
4. Close off the holes using the plastic plugs provided.
5. Keep all the parts in a safe place: you will need them
again if the washing machine needs to be moved to
another location.
!
Packaging materials should not be used as toys for
children.
Levelling
1. Install the washing machine on a flat sturdy floor, without
resting it up against walls, furniture cabinets or anything
else.
2. If the floor is not perfectly
level, compensate for any
unevenness by tightening or
loosening the adjustable front
feet (
see figure
); the angle
of inclination, measured in
relation to the worktop, must
not exceed 2°.
Levelling the machine correctly will provide it with stability,
help to avoid vibrations and excessive noise and prevent it
from shifting while it is operating. If it is placed on carpet or
a rug, adjust the feet in such a way as to allow a sufficient
ventilation space underneath the washing machine.
Connecting the electricity and water
supplies
Connecting the water inlet hose
1. Connect the inlet hose
by screwing it to a cold
water tap using a 3/4 gas
threaded connection
(see
figure).
Before performing the
connection, allow the
water to run freely until it is
perfectly clear.
2. Connect the inlet hose
to the washing machine
by screwing it onto the
corresponding water inlet
of the appliance, which is
situated on the top right-
hand side of the rear part of
the appliance
(see figure)
.
3. Make sure that the hose is not folded over or bent.
!
The water pressure at the tap must fall within the range
of values indicated in the Technical data table
(see next
page).
!
If the inlet hose is not long enough, contact a specialised
shop or an authorised technician.
!
Never use second-hand hoses.
!
Use the ones supplied with the machine.
3
GB
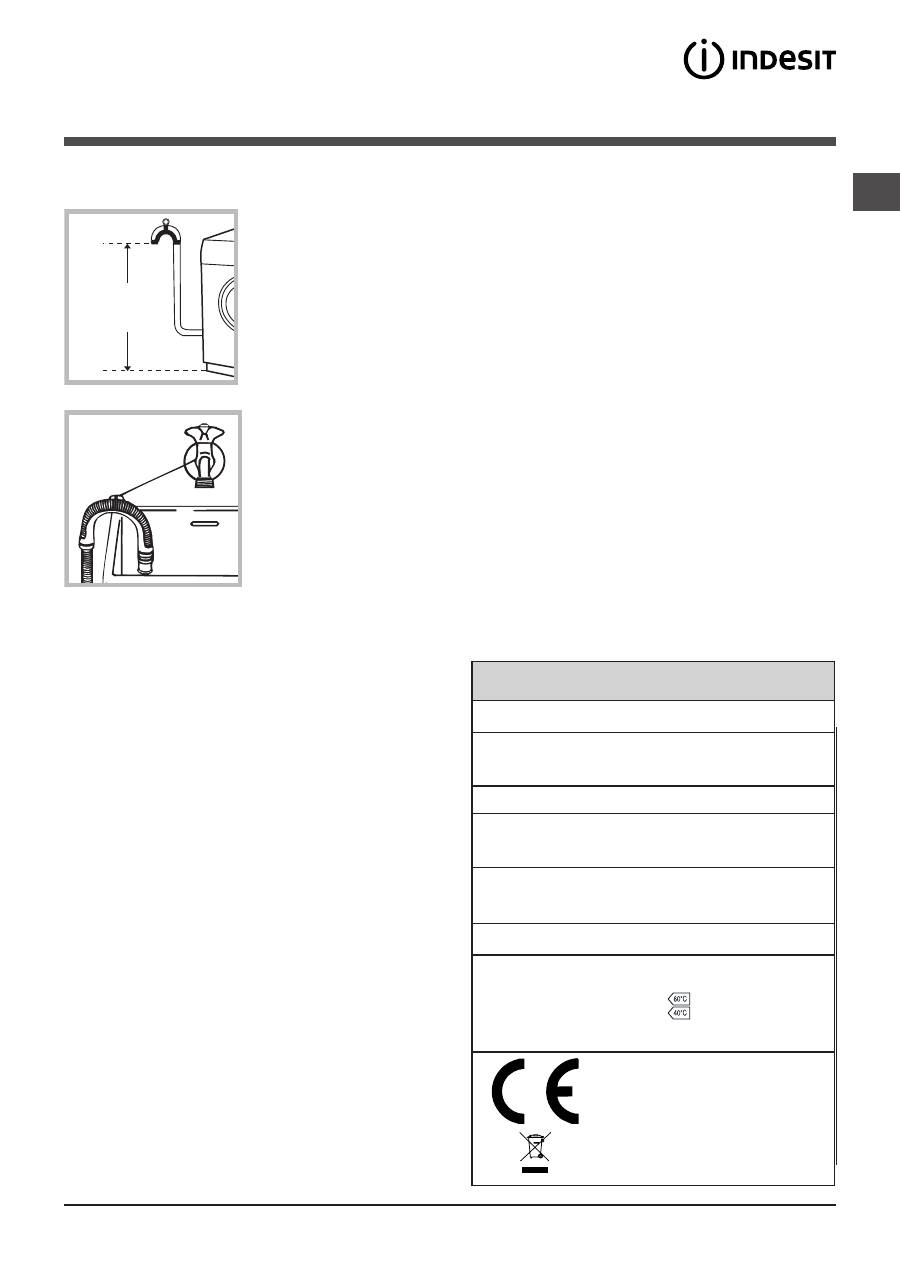
Connecting the drain hose
Connect the drain hose,
without bending it, to a
drain duct or a wall drain
situated between 65 and
100 cm from the floor;
alternatively, placed it over
the edge of a basin, sink
or tub, fastening the duct
supplied to the tap (
see
figure
). The free end of
the hose should not be
underwater.
!
We advise against the use of hose extensions; if it is
absolutely necessary, the extension must have the same
diameter as the original hose and must not exceed 150 cm
in length.
Electrical connections
Before plugging the appliance into the electricity socket,
make sure that:
• the socket is earthed and complies with all applicable
laws;
• the socket is able to withstand the maximum power
load of the appliance as indicated in the Technical data
table
(see opposite);
• the power supply voltage falls within the values
indicated in the Technical data table (
see opposite
);
• the socket is compatible with the plug of the washing
machine. If this is not the case, replace the socket or the
plug.
!
The washing machine must not be installed outdoors,
even in covered areas. It is extremely dangerous to leave
the appliance exposed to rain, storms and other weather
conditions.
!
When the washing machine has been installed, the
electricity socket must remain within easy reach.
!
Do not use extension cords or multiple sockets.
65 - 100 cm
!
The cable should not be bent or compressed.
!
The power supply cable must only be replaced by
authorised technicians.
Warning! The company shall not be held responsible in the
event that these standards are not observed.
The first wash cycle
Once the appliance has been installed, and before you use
it for the first time, run a wash cycle with detergent and no
laundry, using wash cycle number
2
.
Technical data
Model
PWE 91273 S
Dimensions
width 59.5 cm
height 85 cm
depth 60 cm
Capacity
from 1 to 9 kg
Electrical
connections
please refer to the technical data plate
fixed to the machine
Water connections
maximum pressure 1 MPa (10 bar)
minimum pressure 0.05 MPa (0.5 bar)
drum capacity 62 litres
Spin speed
up to 1200 rotations per minute
Test wash cycles
in accordance
with directives
1061/2010 and
1015/2010.
Programme
: Cotton Standard 60°;
Programme
: Cotton Standard 40°.
This appliance conforms to the following
EC Directives:
- 2004/108/EC (Electromagnetic Compa-
tibility)
- 2006/95/EC (Low Voltage)
- 2002/96/EC
4
GB
Description of the washing machine
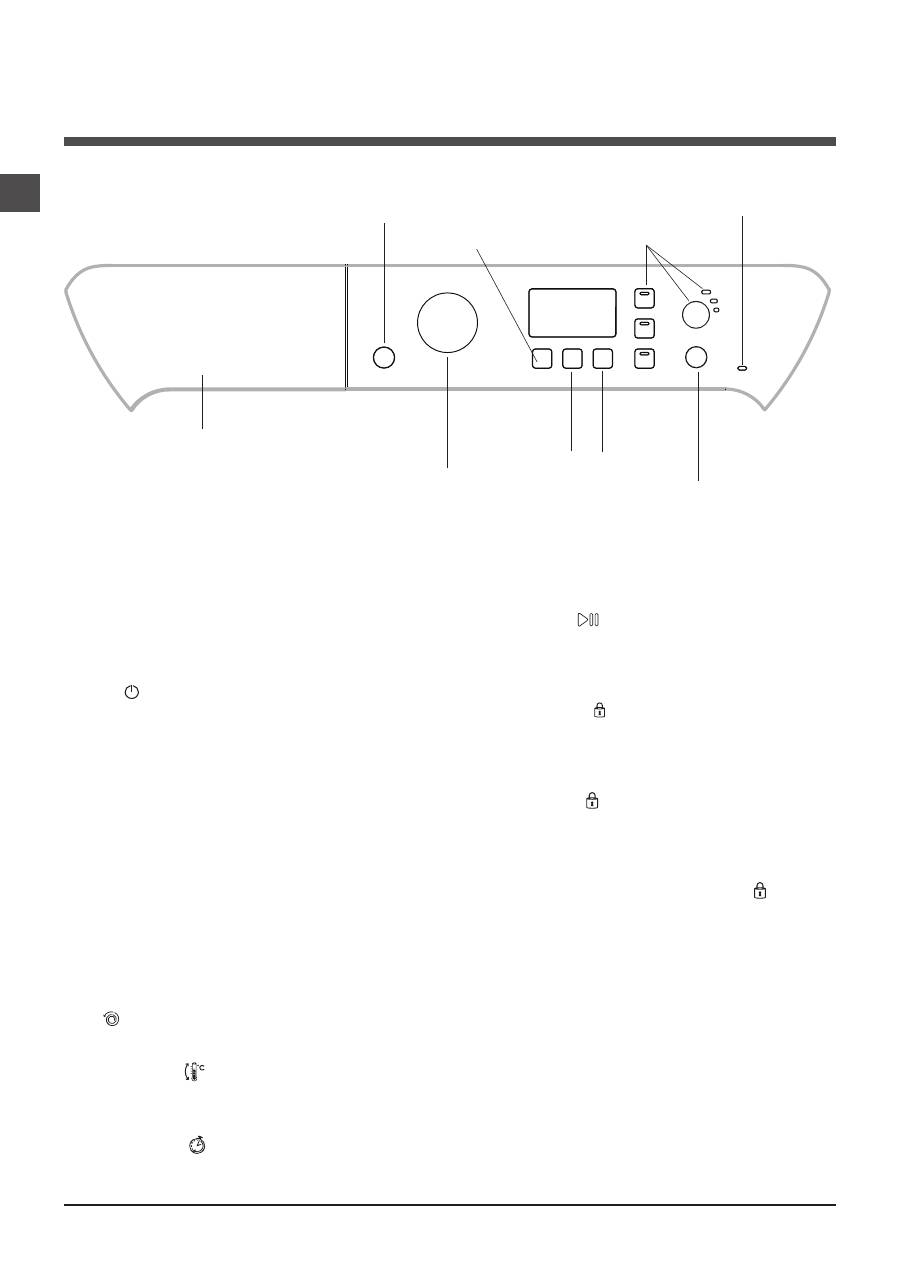
Control panel
TEMPERATURE
button
WASH
CYCLE
SELECTOR
KNOB
Detergent dispenser drawer
ON/OFF
button
SPIN
button
START/PAUSE
button and indicator
light
DISPLAY
DELAYED
START
button
OPTION
buttons and
indicator lights
DOOR
LOCKED
indicator light
Detergent dispenser drawer:
used to dispense
detergents and washing additives (
see “Detergents and
laundry”
).
ON/OFF
button: press this briefly to switch the
machine on or off. The START/PAUSE indicator light which
flashes slowly in a blue colour shows that the machine is
switched on. To switch off the washing machine during the
wash cycle, press and hold the button for approximately 3
seconds; if the button is pressed briefly or accidentally the
machine will not switch off.
If the machine is switched off during a wash cycle, this
wash cycle will be cancelled.
WASH CYCLE SELECTOR KNOB
:
used to set the
desired wash cycle (see “
Table of programmes and wash
cycles
”).
OPTION
buttons and indicator lights:
press to select the
available options. The indicator light corresponding to the
selected option will remain lit.
SPIN
button: press to reduce or completely exclude
the spin cycle; the value appears on the display.
TEMPERATURE
button: press to reduce or
completely exclude the temperature; the value appears on
the display.
DELAYED START
button: press to set a delayed start
for the selected wash cycle; the delay period appears on
the display.
START/PAUSE
button and indicator light: when the
blue indicator light flashes slowly, press the button to start
a wash cycle. Once the cycle has begun the indicator light
will remain lit in a fixed manner. To pause the wash cycle,
press the button again; the indicator light will flash in an
amber colour. If the symbol is not illuminated, the door
may be opened (wait approximately 3 minutes). To start
the wash cycle from the point at which it was interrupted,
press the button again.
DOOR LOCKED
indicator light:
The lit symbol indicates that the door is locked. To prevent
any damage, wait until the symbol turns off before opening
the door (wait approximately 3 minutes).
To open the door while a cycle is in progress, press the
START/PAUSE button; if the DOOR LOCKED symbol is
switched off the door may be opened.
Standby mode
This washing machine, in compliance with new energy
saving regulations, is fitted with an automatic standby
system which is enabled after about 30 minutes if no
activity is detected. Press the ON-OFF button briefly and
wait for the machine to start up again.
Consumption in off-mode: 0,5 W
Consumption in Left-on: 0,5 W
5
GB
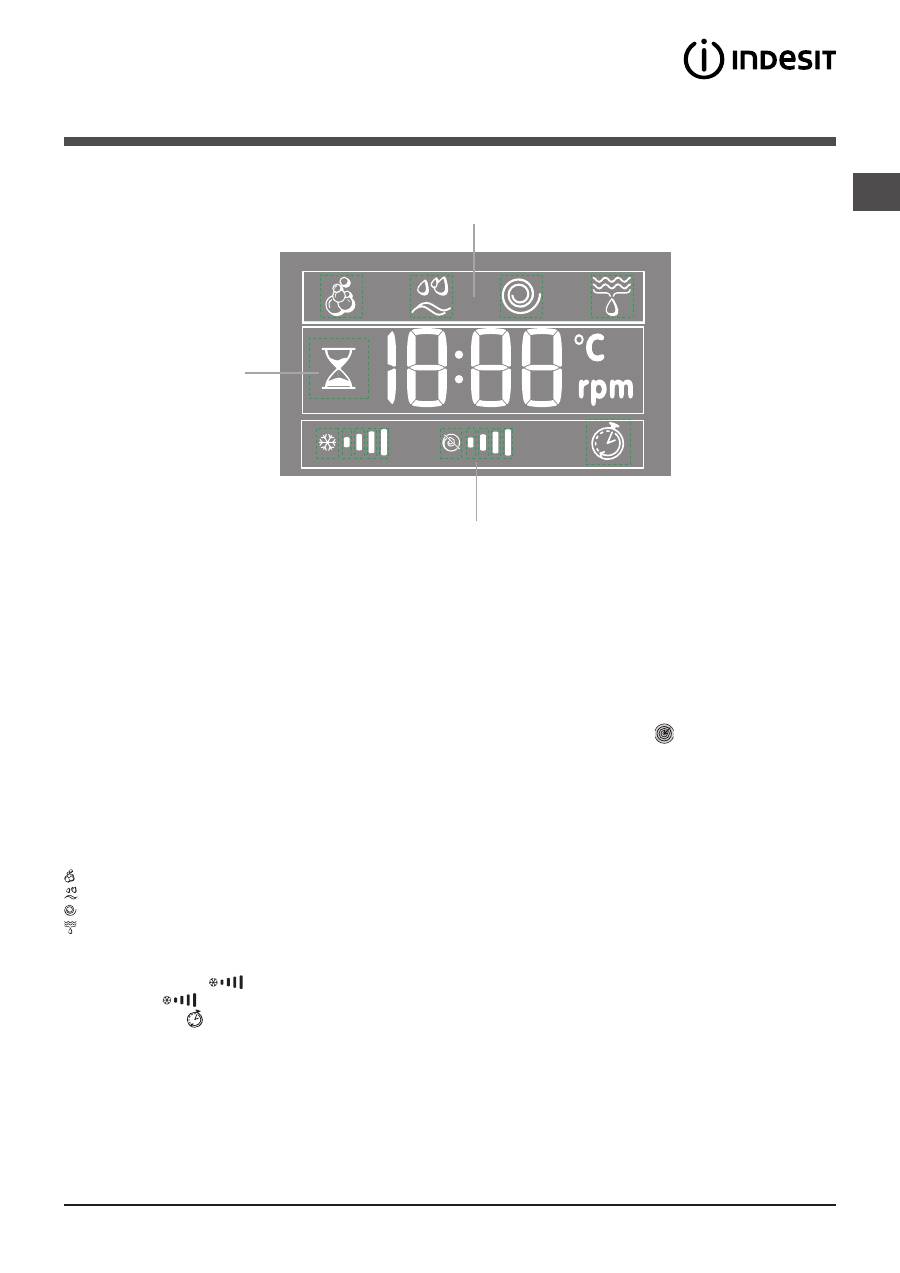
Display
B
C
A
The display is useful when programming the machine and provides a great deal of information.
The duration of the available wash cycles and the remaining time of a running cycle appear in section
A
; if the DELAYED
START option has been set, the countdown to the start of the selected wash cycle will appear.
Pressing the corresponding button allows you to view the maximum spin speed and temperature values attained by the
machine during the set wash cycle, or the values selected most recently, if these are compatible with the set wash cycle.
The hour-glass flashes while the machine is processing data, depending on the wash cycle and
level selected. After
a maximum of 10 minutes, the “hour-glass” icon remains lit in a fixed manner and the final amount of time remaining is
displayed. The hour-glass icon will then switch off approximately 1 minute after the final amount of time remaining has
appeared.
The “wash cycle phases” corresponding to the selected wash cycle and the “wash cycle phase” of the running wash cycle
appear in section
B
:
Main wash
Rinse
Spin
Drain
The icons corresponding to “temperature”, “spin” and “delayed start” (working from the left) are displayed in section
C
.
The “temperature” bars
indicate the maximum temperature level which may be selected for the set cycle.
The “spin” bars
indicate the maximum spin level which may be selected for the set cycle.
The “delay” symbol , when lit, indicates that the set “delayed start” value has appeared on the display.
Table of contents
- Installation
- Description of the washing machine
- Running a wash cycle
- Wash cycles and options
- Detergents and laundry
- Precautions and tips
- Care and maintenance
- Troubleshooting
- Service
- Kullanma talimatları
- Montaj
- Çamaşır makinesinin tanıtımı
- Bir yıkama çevriminin çalıştırılması
- Yıkama çevrim ve seçenekleri
- Deterjan ve çamaşır
- Önlemler ve püf noktaları
- Bakım ve onarım
- Sorun giderme
- Teknik Servis
- Návod k použití
- Instalace
- Popis pračky
- Jak provést prací cyklus
- Programy a volitelné funkce
- Prací prostředky a prádlo
- Opatření a rady
- Údržba a péče
- Poruchy a způsob jejich odstranění
- Servisní služba
- Руководство по эксплуатации
- Установка
- Описание стиральной машины
- Порядок выполнения цикла стирки
- Программы и дополнительные функции
- Стиральные вещества и типы белья
- Предосторожности и рекомендации
- Техническое обслуживание и уход
- Неисправности и методы их устранения
- Сервисное обслуживание
