Indesit VIB-644-C-E: instruction
Class: Household, kitchen appliances, electronics and equipment
Type: Stove
Manual for Indesit VIB-644-C-E

English
GB
Operating Instructions
HOB
Contents
Operating Instructions,1
WARNING,2
Description of the appliance-Control Panel,3
Installation,3
Start-up and use,5
Precautions and tips,10
Care and maintenance,11
Technical description of the models,11
FR
Français
Mode d’emploi Manutenção e cuidados
TABLE DE CUISSON
Sommaire
Mode d’emploi,1
ATTENTION,12
Description de l’appareil-Tableau de bord,13
Installation,13
Mise en marche et utilisation,15
Précautions et conseils, 20
Nettoyage et entretien,21
Description technique des modèles,21
Español
ES
Manual de instrucciones
ENCIMERA
Sumario
Manual de instrucciones,1
ATENCIÓN,22
Descripción del aparato-Panel de control,23
Instalación,23
Puesta en funcionamiento y uso,25
Precauciones y consejos,30
Mantenimiento y cuidados,31
Descripción técnica de los modelos,31
Instruções para a utilização
PLANO
Índice
Instruções para a utilização,1
ATENÇÃO,32
Descrição do aparelho-Painel de comandos,33
Instalação, 33
Início e utilização, 35
Precauções e conselhos,40
Manutenção e cuidados,41
Descrição técnica dos modelos,41
PT
Português
NL
Nederland
Gebruiksaanwijzing
KOOKPLAAT
Inhoud
Gebruiksaanwijzing,1
PAS OP,42
Beschrijving van het apparaat-
Bedieningspaneel,43
Installatie, 43
Starten en gebruik, 45
Voorzorgsmaatregelen en advies,50
Onderhoud en verzorging,51
Technische beschrijving van de modellen,51
DE
Bedienungsanleitung
KOCHFELD
Inhaltsverzeichnis
Bedienungsanleitung,1
ZUR BEACHTUNG,52
Beschreibung des Gerätes- Bedienfeld,53
Installation, 53
Inbetriebsetzung und Gebrauch,55
Vorsichtsmaßregeln und Hinweise, 61
Reinigung und Pflege, 62
Technische Beschreibung der Modelle, 62
Deutsch
PL
Polski
Instrukcja obs
ł
ugi
P
Ł
YTA GRZEJNA
Spis tre
ś
ci
Instrukcja obs
ł
ugi,1
UWAGA,63
Opis urz
ą
dzenia-Panel sterowania,64
Instalacja,64
Uruchomienie i u
ż
ytkowanie,66
Zalecenia i
ś
rodki ostro
ż
no
ś
ci,71
Konserwacja i utrzymanie,72
Opis Techniczny,72
RU
Русский
Руководство
по
эксплуатации
ВАРОЧНАЯ
ПАНЕЛЬ
Содержание
Руководство
по
эксплуатации
,1
ВНИМАНИЕ
,73
Описание
изделия
-
Панель
управления
,74
Монтаж
,74
B
арочная
панель
,76
Предосторожности
и
рекомендации
,82
Техническое
обслуживание
и
уход
,83
Техническое
обслуживание
,84
VIB 644 C E
VIB 633 C E
VIB 744 C E
IVIA 633 C E
2
GB
•
WARNING: The appliance and its
accessible parts become hot during
use.
•
Care should be taken to avoid
touching heating elements.
•
Children less than 8 years of age shall
be kept away unless continuously
supervised.
•
This appliance can be used by
children aged from 8 years and above
and persons with reduced physical,
sensory or mental capabilities or
lack of experience and knowledge
if they have been given supervision
or instruction concerning use of
the appliance in a safe way and
understand the hazards involved.
Children shall not play with the
appliance. Cleaning and user
maintenance shall not be made by
children without supervision.
•
WARNING: Unattended cooking on a
hob with fat or oil can be dangerous
and may result in fire.
•
NEVER try to extinguish a fire with
water, but switch off the appliance
and then cover flame e.g. with a lid
or a fire blanket.
•
WARNING: Danger of fire: do not
store items on the cooking surfaces.
•
WARNING: If the surface in glass-
ceramic is cracked, switch off the
appliance to avoid the possibility of
electric shock.
•
Never use steam cleaners or pressure
cleaners on the appliance.
•
The appliance is not intended to be
operated by means of an external
timer or separate remote control
system.
•
Do not place metal objects (knives,
spoons, pan lids, etc.) on the hob as
they may become hot.
•
After use, switch off the hob element
by its control and do not rely on the
pan detector.
GB
WARNING!
VIB 644 C E
VIB 633 C E
VIB 744 C E
IVIA 633 C E
3
GB
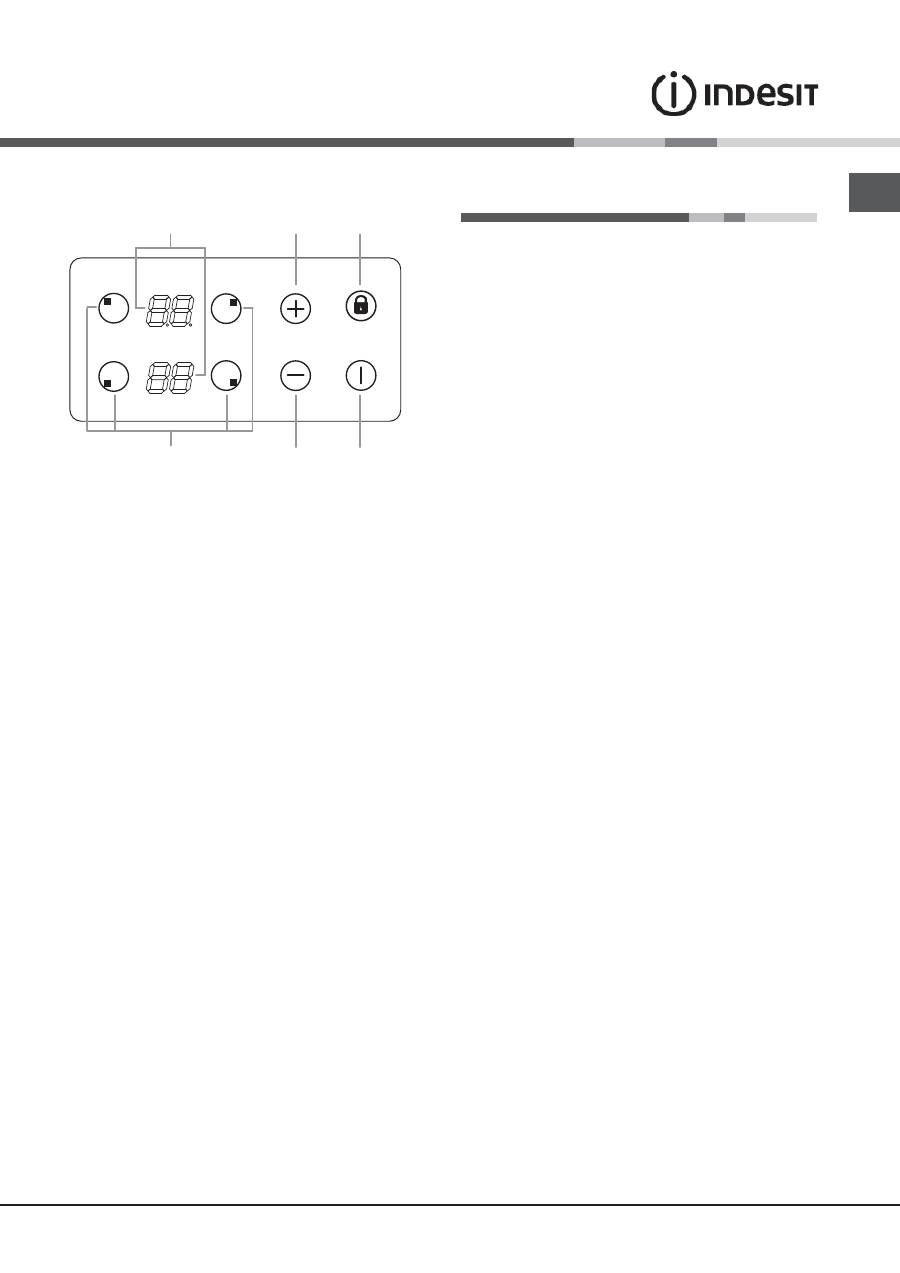
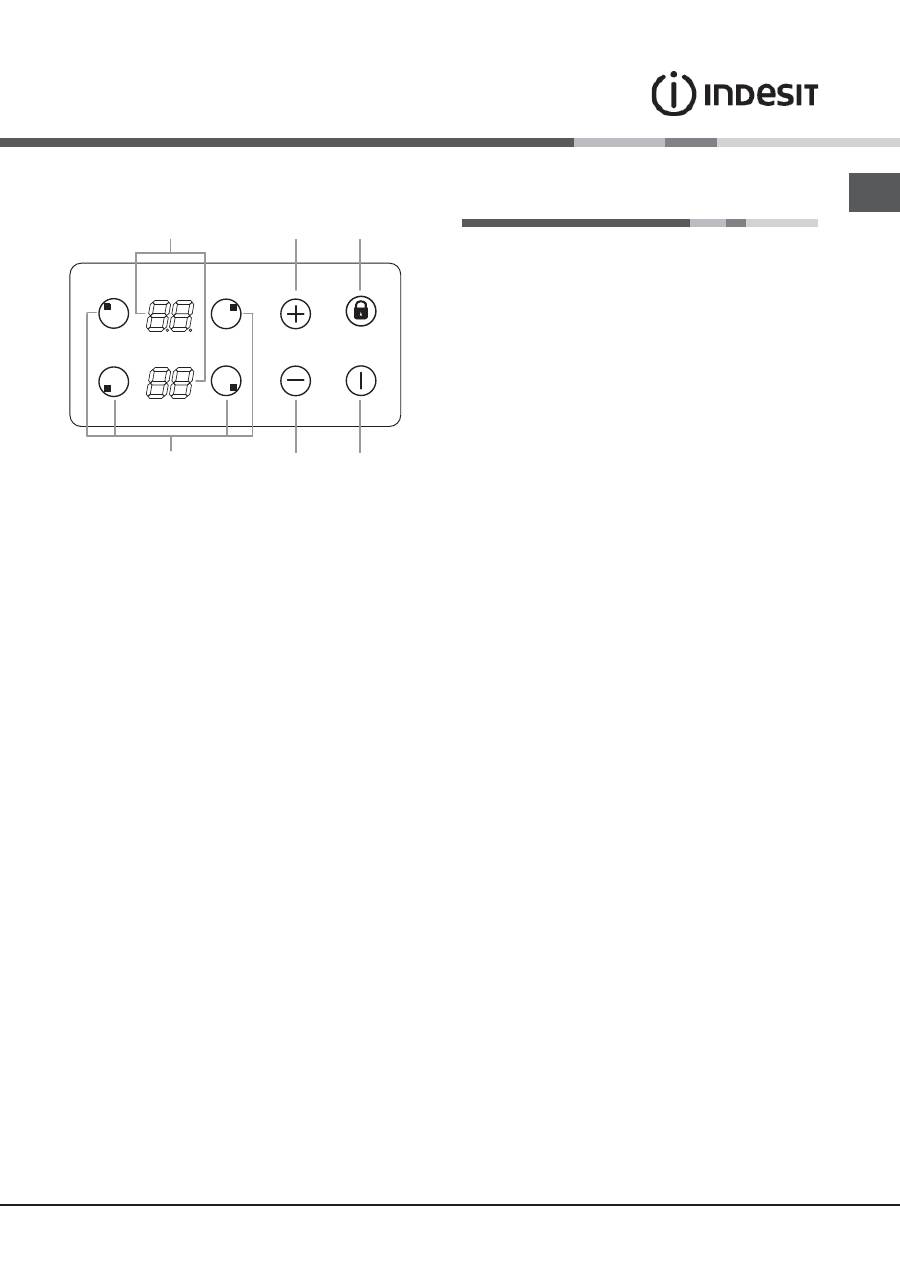
Description of the appliance
Control panel
The control panel described in this manual is only a representative
example: it may not exactly match the panelon your appliance.
When using the touch control pannel panel:
Do not use gloves
Use a clean finger
Touch the glass smoothly
1
INCREASE POWER/ TIME
button - controls the power
and time
2
REDUCE POWER/ TIME
button controls the power
and time.
3
COOKING ZONE SELECTOR
button is used to select
the desired cooking zone
4
ON/OFF
button switches the appliance on and off.
5
CONTROL PANEL LOCK
button prevents accidental
changes to the hob settings and shows the control
panel has been locked.
6
HEATER DISPLAY
-shows the cooking zone selected,
power level, preset time of cooking, booster funcition
activated.
! For detailed information on the control panel functions
refer to
“Start-up and use”
section.
! This product complies with the requirements of the
latest European Directive on the limitation of power
c o n s u m p t i o n o f t h e s t a n d b y m o d e .
If no operations are carried out for a period of 2
minutes, after the residual heat indicator lights turn
off and the fan stops (if present), the appliance
a u t o m a t i c a l l y s w i t c h e s t o t h e . o f f m o d e . .
The appliance resumes the operating mode once the
ON/OFF button is pressed.
! Depending on the number of heaters/cooking zones on
the hob the COOKING ZONE SELECTOR BUTTONS may
vary between 3 and 4
Installation
!
Before operating your new appliance please read
this instruction booklet carefully. It contains important
information concerning the safe operation, installation
and maintenance of the appliance.
!
Please keep these operating instructions for future
reference. Pass them on to any new owners of the
appliance.
Positioning
!
Keep all packaging material out of the reach of children.
It may present a choking or suffocation hazard (
see
Precautions and tips
).
!
The appliance must be installed by a qualified
professional in accordance with the instructions provided.
Incorrect installation may cause harm to people and
animals or may damage property.
Built-in appliance
Use a suitable cabinet to ensure that the appliance
functions properly.
• The supporting surface must be heat-resistant up to a
temperature of approximately 100°C.
• If the appliance is to be installed above an oven,
the oven must be equipped with a forced ventilation
cooling system.
• Avoid installing the hob above a dishwasher:
if this cannot be avoided, place a waterproof
separation device between the two appliances.
Ventilation
To allow adequate ventilation and to avoid overheating of the
surrounding surfaces the hob should be positioned as follows:
• At a minimum distance of 40 mm from the back panel
or any other vertical surfaces.
• So that a minimum distance of 20 mm is maintained
between the installation cavity and the cabinet
underneath.
• Kitchen cabinets adjacent to the appliance and taller
than the top of the hob must be at least 450 mm from
the edge of the hob.
Fixing
The appliance must be installed
on a perfectly level
supporting surface. Any deformities caused by improper
fixing could affect the features and operation of the hob.
The thickness of the supporting surface should be taken
into account when choosing
the length of the screws for
the fixing hooks:
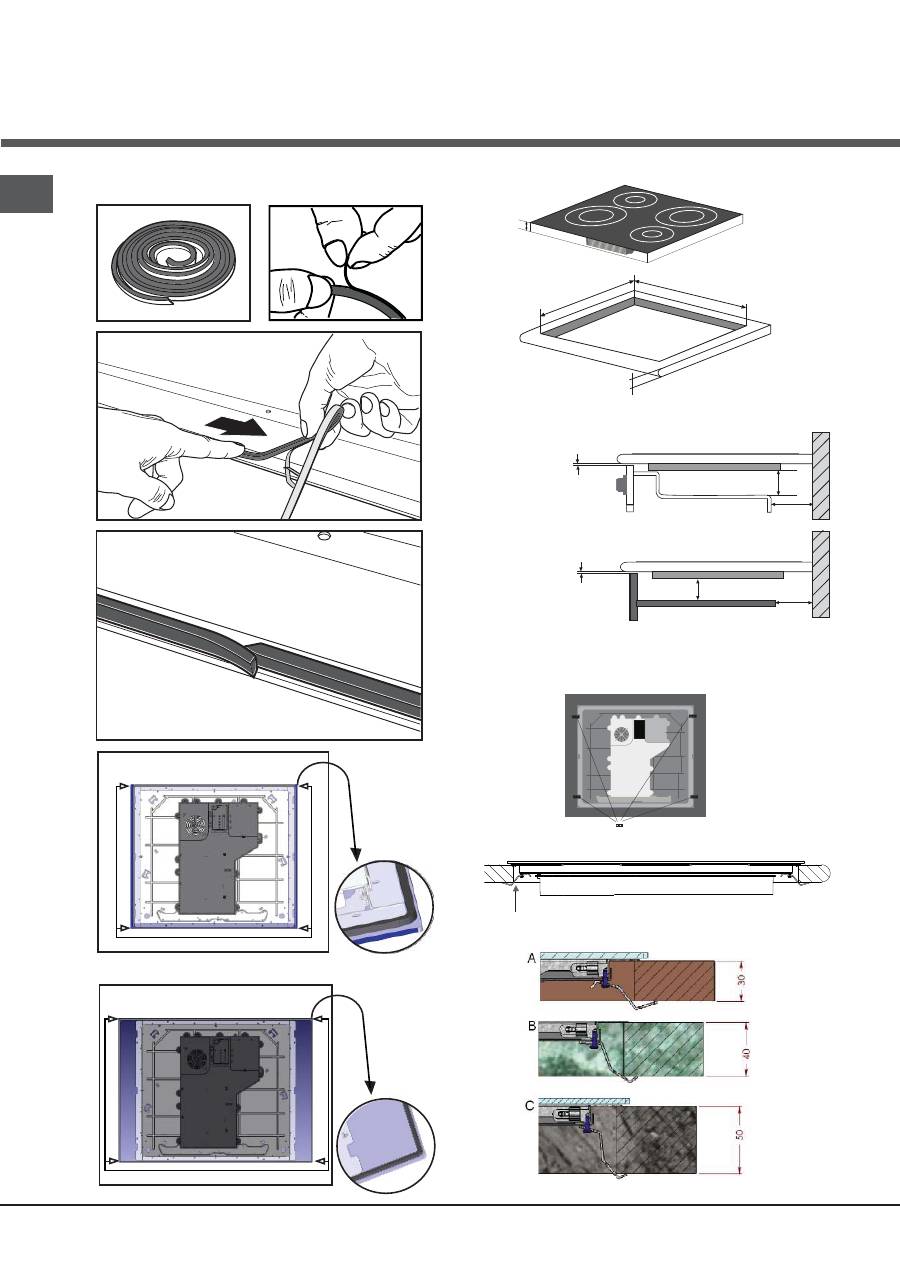
• 3,5 mm thick: 9,5 mm screws
1
2
3
4
5
6
4
GB
Installation of the safety washer
490
560
Min. 30/Max.50
CABINET DIMENSIONS
Min 5mm
Min 20mm
Min 20mm
Min 5mm
SAFETY DISTANCES WITH FURNITURE
30mm
30mm
60
1
2
4
3
5a- (models: 590 x 510 mm)
5b- (models: 690 x 510 mm)
5
GB
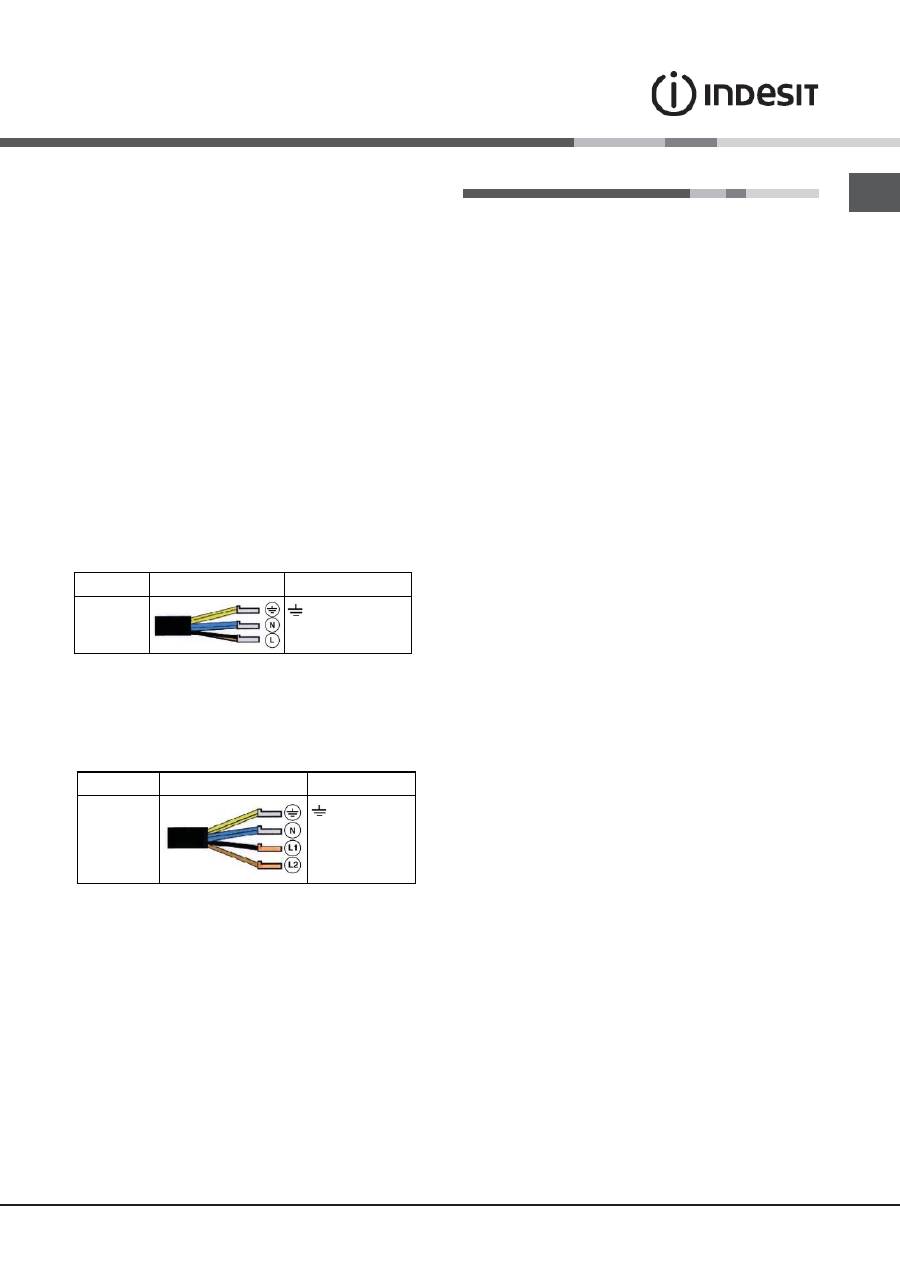
Electrical connection
!
The electrical connection for the hob and for any built-
in oven must be carried out separately, both for safety
purposes and to make extracting the oven easier.
Single-phase connection
The hob is equipped with a pre-connected electricity supply
cable, which is designed for single-phase connection.
Connect the wires in accordance with the instructions given
in the following table and diagrams:
Other types of connection
If the mains supply corresponds with one of the following:
Voltage and mains frequency
• 400V - 2+N ~ 50/60 Hz
• 220-240V 3 ~ 50/60 Hz
Separate the wires and connect them in accordance with
the instructions given in the following table and diagrams:
Connecting the electricity supply cable to the mains
If the appliance is being connected directly to the electricity
mains an omnipolar switch must be installed with a minimum
opening of 3 mm between contacts.
!
The installer must ensure that the correct electrical
connection has been made and that it is fully compliant
with safety regulations.
Fix the hob as follows:
1. Use short flat-bottomed screws to fix the 4 alignment
springs in the holes provided at the central point of each
side of the hob.
2. Place the hob in the cavity, make sure it is in a central
position and push down on the whole perimeter until the
hob is stuck to the supporting surface.
!
The screws for the alignment springs must remain
accessible.
!
In order to adhere to safety standards, the appliance
must not come into contact with electrical parts once it
has been installed.
!
All parts which ensure the safe operation of the
appliance must not be removable without the aid of a tool.
Start-up and use
!
The glue applied on the gaskets leaves traces of grease
on the glass. Before using the appliance, we recommend
you remove these with a special non-abrasive cleaning
product. During the first few hours of use there may be a
smell of rubber which will disappear very quickly.
!
A few seconds after the hob is connected to the electricity
supply, a buzzer will sound. The hob may now be switched
on.
Types of noise during normal hob operation:
• Buzz: due to the vibration of the metallic parts that
make up the induction element and the pot; it is
generated by the electromagnetic field required for
heating and increases as the power of the induction
element increases.
• Soft whistle: heard when the pot placed on the heating
zone is empty; the noise disappears once food or water
is placed into the pot.
• Crackle: produced by the vibration of materials on the
bottom of the pot due to the flow of parasitic currents
caused by electromagnetic fields (induction); can be
more or less intense depending on the material making
up the bottom of the pot, and decreases as the pot
dimensions increase.
Before connecting the appliance to the power supply, make
sure that:
• The appliance is earthed and the plug is compliant with
the law.
• The socket can withstand the maximum power of the
appliance, which is indicated on the data plate located
on the appliance itself.
• The voltage falls within the range of values indicated on
the data plate.
• The socket is compatible with the plug of the appliance. If
the socket is incompatible with the plug, ask an authorised
technician to replace it. Do not use extension cords or
multiple sockets.
!
Once the appliance has been installed, the power supply
cable and the electrical socket must be easily accessible.
!
The cable must not be bent or compressed.
!
The cable must be checked regularly and replaced by
authorised technicians only.
!
The manufacturer declines any liability should these
safety measures not be observed.
!
Do not remove or replace the power supply cable for any
reason. Its removal or replacement will void the warranty
and the CE marking. INDESIT does not assume liability for
accidents or damage arising from replacement/removal
of the original power supply cable. Replacement can only
be accepted when carried out by personnel authorised
by INDESIT and using an original spare part.
6
GB
To switch the hob on, press and hold the
button for
approximately one second.
The cooktop is switched On when a beep sound is
emmited and all the cooking zones displays show
the digit point.
When the cooktop is OFF, after 5 sec the control
.
switches off the KEYLOCK LED to reduce the power
consumption.
As soon as we touch a key, the KEYLOCK LED goes
ON and we can continue to use the cooktop, unlocking
the keyboard.
Switching off the cooktop is signalled by 3 beep sound
Setting the Power Management
The cooktop maximum power limit is 7200W. This power
limit can be reduced by the user to 2800W, 3500W or
6000W.
The sequence to set a new Cooktop Power Limit is:
·During the first 30 seconds after plugging the applian-
ce
·The Touch has to be unlocked and all Heaters Off
·Press at the same time Heater 1 and Heater 3 selection
keys
·Once this is done, a beep sounds and the actual Co-
oktop Power Limit will be shown in the heater displays.
For selecting a new Power Limit:
·With the (+) and (-) keys, the Power Limit is increased.
The selectable powers are: 2800W, 3500W, 6000W or
7200W. When the power is 7200W, if the [+] or [-] key is
touched the power changes to 2800W.
The sequence to finish recording the new Cooktop Po-
wer Limit is:
·Press at the same time Heater 1 and Heater 3 selection
keys
·Once this is done, new Cooktop Power Limit is recor-
ded and there is a system reset.
To finish without recording changes:
·If during 60 seconds there is no action, changes are not
recorded and there is a system reset.
.
• Loud whistle: heard when two induction elements of
the same group function simultaneously at maximum
power and/or when the booster function is set on
the larger element while the other is auto-adjusted.
Noise is reduced by decreasing the power level of the
auto-adjusted induction element; pot bottom layers
made of different kinds of materials are among the
main causes of this noise.
• Fan noise: a fan is necessary to ensure the hob functions
correctly and to safeguard the electronic unit from
possible overheating. The fan functions at maximum
power when the large induction element is at maximum
power or when the booster function is on; in all other
cases, it works at average power depending on the
temperature detected. Furthermore, the fan may continue
to work even after switching the hob off, if the temperature
detected is high.
The types of noise listed above are due to induction
technology and are not necessarily operational faults.
!
If the (-) or (+)button is pressed for an extended period
of time, the display scrolls quickly though the power
levels and timer minutes.
Initial Light Conditions
When power is initially applied to the Cooktop, the to-
uch control conducts a calibration process for the to-
uch keys, which requires a low level of ambient light in
the area of the touch keys.
If during this calibration process excessive ambient
lighting is detected the User Interface displays „FL”
(Infrared Ambient Light Error) and the control cali-
bration process is suspended. In order to rectify the
process any lighting that could effect the calibration
process should be switched off (e.g. halogen cooker
hood lighting). The error will disappear when satisfac-
tory ambient lighting is detected and the touch control
calibration procedure will now complete satisfactorily.
-The „FL” error can only be generated within approx 3s
of initial power being applied to the cooktop.
-We recommend that the user switches off all cooker
hood lighting and lighting directed towards the cook-
top when power is initially applied to the cooktop.
-After the touch control has conducted its initial cali-
bration process, (approx 3s) any cooker hood or other
lighting can be switched on as normal and will not af-
fect the operation of the touch control.
Switching on the hob
After connecting the hob to the electricity mains, the
touch pannel might be automatically locked. To un-
clock the pannel press and hold the Control Panel
Loock button
.
7
GB
Switching on the cooking zones
Each cooking zone is controlled using a selector button
and a power adjustment device consisting of a
double(-) and (+) button.
• To begin operating a cooking zone, press the
corresponding control button and set the desired
power level (between 0 and 9) using the buttons (-)
or (+)
Press and hold the (-) button to set the power level
immediately at “9”
Press and hold (+) and (-) buttons simultaneously to
return to power level “0”
If the power level is “0” press and hold the (+) button
to increase the power level quickly
The choice of a cooking zone is signalled by a beep
sound, and then the power level is shown on the
display
If the selection of a heater is not done in 10 seconds,
the cooktop will be turned off automatically.
Fast Boil- “Booster” function
The booster function for some of the cooking zones may be
used to shorten heating-up times.
It may be activated by pressing the (+) button over level
9. This function boosts the power to 1600 W or 2000 W,
depending on the size of the relevant cooking zone.
The activation of of the booster is signalled by a beep
sound, and the letter ‘P’ appearing on the display.
The booster works for max 10 minutes. After these 10
minutes a beep sounds and the cooking zone will
return to level “9”
With the heater at Booster level, if the [+] key is
Touched an error beep sounds and the cookset
doesn’t change. With the heater at Booster level, if the
[-] key is Touched a beep sounds and the cookset is
reduced to 9.
Switching off the cooking zones
To switch off a cooking zone, select it using the corresponding
selector button
and:
• Press the (-) button: the power of the cooking zone will
progressively decrease until it is switched off.
Once the cooking zone is selected, the heater can
also be switched off by touching the [-] and [+] keys
simultaneously. A beep
sounds and the corresponding display shows “0”.
Using the Timer
!
All the cooking zones may be programmed
simultaneously, for a duration between 1 and 99 min.
1. Select the cooking zone using the corresponding
selector button.
2. Adjust the power level of the cooking zone.
3.When required power level is selected, touching again
the corresponding heating zone selector button, a beep
sounds and a ‘t’ letter with dot point appears on the heater
display. The remaining time will be displayed in the opposite
part of timed heater. If timed heating zone is, for example,
in the down part, timed time will appear in up displays.
4. Set the cooking duration using the (-) and the(+)
buttons
The (-) and the(+) buttons touched simultaneously result|
in returning to the 0 value.
If the time is not selected before 10 seconds, or if the
selected time is 0 after 10 seconds the last touch over
the (-)or the (+) button, the timer is switched off.
Starting Timer countdown.
The countdown starts when the timer visualization is
finished touching any cooking zone key or
automatically 10 seconds after the last touch over
the [+] or [-] keys. A beep sounds and the heater
display will show the power
level and the dot point showing that the heater is
timed.
! To change the time for a timed heater, repeat the
process explained above.
!Pressing and holding the + and - keys increases the
speed of time selection
End of Timer countdown.
When the remaining time has run out, the timed heater
is switched off, the heater display shows a blinking ‘0’
and the timer alarm beeps for one minute
The alarm will be cancelled by pressing any key of the
touch control.
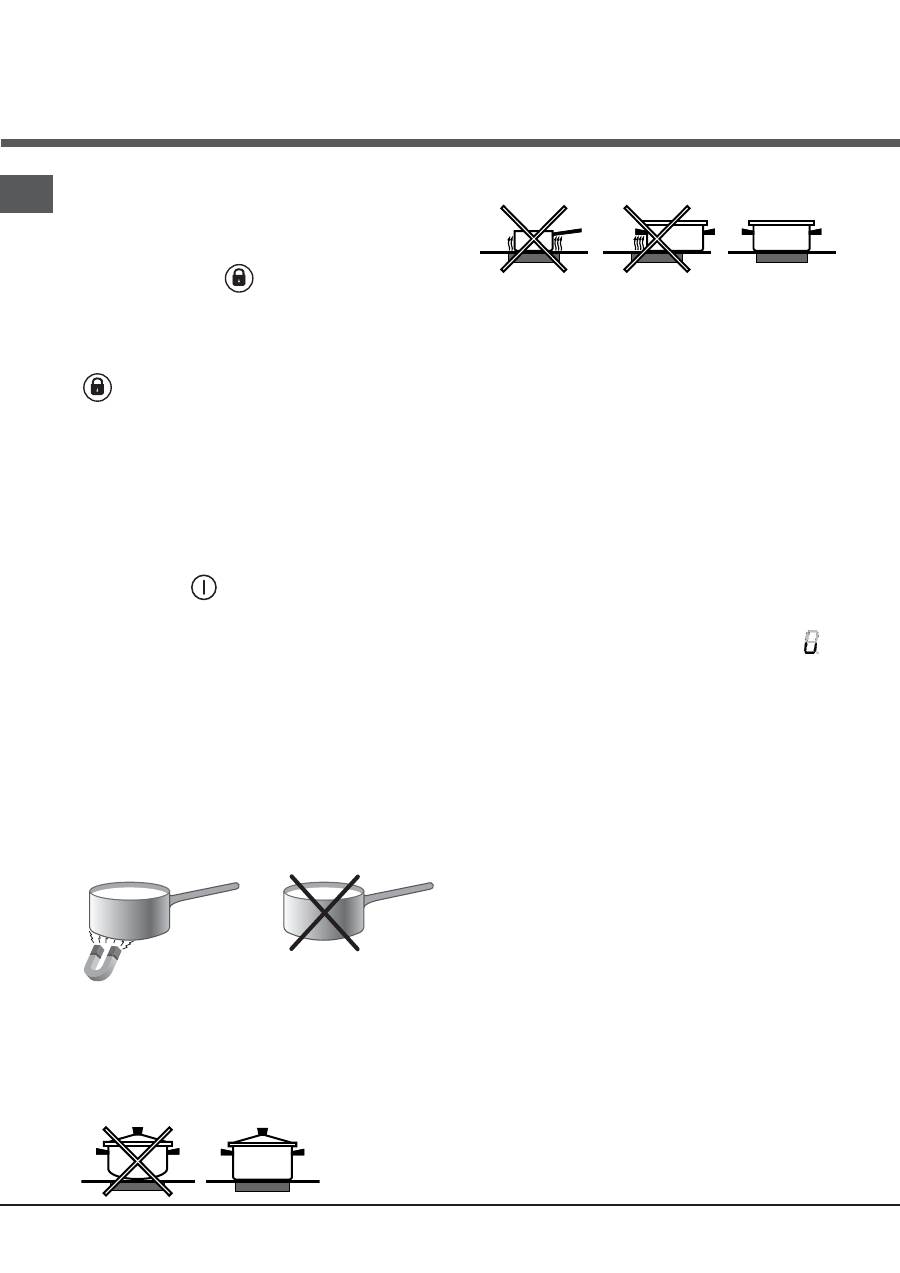
Control panel lock
When the hob is switched on, it is possible to lock the oven
controls in order to avoid accidental changes being made to
the settings (by children, during cleaning, etc.).
Press the
button to lock the control panel: -the icon
will illuminate and an audible beep sound will be emmited.
To use any of the controls (e.g. to stop cooking), you
must switch off this function. Press the
button for a
few moments, the icon will stop illuminating and the lock
function will be removed.
All the keys on the cooking zone selection will be locked
if :the cooktop is off,,
if the Control Panel Lock is activated or
if an error on a cooktop occurs.
8
GB
Practical advice on using the appliance
!
Use cookware made from materials which are
compatible with the induction principle (ferromagnetic
material). We especially recommend pans made from:
cast iron, coated steel or special stainless steel adapted
for induction. Use a magnet to test the compatibility of
the cookware.
*
SUITABLE
UNSUITABLE
Cast iron
Enamelled steel
Special stainless steel
Copper,
Aluminium, Glass, Earthenware,
Ceramic, non magnetic Stainless steel
In addition, to obtain the best results from your hob:
• Use pans with a thick, flat base in order to fully utilise the
cooking zone.
• Always use pans with a diameter which is large enough
to cover the hotplate fully, in order to use all the available
heat.
• Make sure that the base of the cookware is always clean
and dry, in order to fully utilise and extend the life of both
the cooking zones and the cookware.
• Avoid using the same cookware which has been used
on gas burners: the heat concentration on gas burners
may distort the base of the pan, causing it not to adhere
correctly.
Safety devices
Pan sensor
Each cooking zone is equipped with a pan sensor device.
The hotplate only emits heat when a pan with suitable
measurements for the cooking zone is placed on it.
The “u” sign on the display appears if after
selecting the cooking zone the pan is not placed on a
heater , or in case of:
• An incompatible pan
• A pan whose diameter is too small
• The pan has been removed from the hotplate.
After 10 sec. with no pan on the heating zone, a warning
beep signal is emmited.
After 60 sec. with no pan on the heating zone,, the heater
switches off.
Overheating protection
If the electronic elements overheat, the number signalizing
the power level starts flashing, and the letter “c” appears
on the display. When the temperature has reached a
suitable level, this message disappears and the hob may
be used again.
Safety switch
The appliance has a safety switch which automatically
switches the cooking zones off after they have been in
operation for a certain amount of time at a particular power
level. When the safety switch has been triggered, the display
shows “0”.
For example: the right rear hotplate is set to 5 and will
switch off after 5 hours of continuous operation, while the
front left hotplate is set to 2 and will switch off after 8 hours.
When one or more keys are activated for more than
10 sec. the touch control. switches off
A warning beep sounds is emmited every 10
sec., while the key/s is/are activated.
With all heaters at zero power during 10 sec. the
Cooktop is switched off.
If the switching off is due to an accidental activa-
tion of keys, the touch control actuates as above.
Buzzer
This can also indicate several irregularities:
• An object (a pan, cutlery, etc.) has been placed on the
control panel for more than 10 seconds.
• Something has been spilt on the control panel.
• A button has been pressed for too long. All of the above
situations may cause the buzzer to sound. Remove the
cause of the malfunction to stop the buzzer. If the cause of
the problem is not removed, the buzzer will keep sounding
and the hob will switch off.
Errors and Alarms
When an error is detected, the whole appliance or the
heater/s are switched off, a beep sounds (only if one or
more heaters are active) and all displays show a ‘F’
letter and the error code (an index number or a letter)
alternately.
If the problem does not disappear by itself, please
contact the Technical Service.
Switching off the hob
Press the button
to switch off the appliance - do not
rely solely on the pan sensor.
If the control panel lock has been activated, the controls
will continue to be locked even after the hob is switched
on again. In order to switch the hob on again, you must
first remove the lock function.
! Do not use adapters, diffusers, or metal plates on the
cooking zones .They may have a detrimental effect
upon the hob’s performance, and might damage the
hob’s aesthetics.
9
GB
Power level
1
2
3
4
5
6
7
8
9
Maximum operating time in hours
9
8
7
6
5
4
3
2
1
Practical cooking advice
ª
Pressure cooking
Pressure cooker
Frying
Grilling
Boiling
Very high-flame
cooking
High-flame
cooking
Medium-flame cooking
Low-flame
cooking
Very
low-flame
cooking
•
•
¶
Crêpes
Cooking on a high flame and browning
(roasts, steaks, escalopes, fish fillets,
fried eggs)
¶
§
Fast thickening (liquid juices)
Boiling water (pasta, rice, vegetables)
Milk
§
S
Slow thickening (dense juices)
S
¢
Bain-marie cooking
Pressure cooking after whistle
¢
£
™
Low-flame cooking (stews)
Reheating dishes
™
¡
Chocolate sauce
Keeping food hot
10
GB
Precautions and tips
!
This appliance has been designed and manufactured
in compliance with international safety standards. The
following warnings are provided for safety reasons and
must be read carefully.
This appliance conforms to the following European
Economic Community directives:
- 2006/95/EEC dated 12/12/06 (Low Voltage) and subsequent
amendments;
- 2004/108/EEC dated 15/12/04 (Electromagnetic
Compatibility) and subsequent amendments;
- 93/68/EEC dated 22/07/93 and subsequent amendments.
- 1275/2008 stand-by/off mode.
General safety
!
Make sure that the air inlet behind the fan grille is never
obstructed. The built-in hob should, in fact, be provided
with suitable ventilation for the cooling of the electronic
components used in the appliance.
!
We advise against the installation of an induction hob above
an under-the-counter refrigerator (heat) or above a washing
machine (vibrations). In fact, there would be insufficient space
for the ventilation of electronic components.
• The appliance was designed for domestic use inside the
home and is not intended for commercial or industrial use.
• The appliance must not be installed outdoors, even in
covered areas. It is extremely dangerous to leave the
appliance exposed to rain and storms.
• Do not touch the appliance when barefoot or with wet or
damp hands and feet.
• The appliance must be used by adults only for the
preparation of food, in accordance with the instructions
provided in this booklet. Do not use the hob as a worktop
or chopping board.
• The glass ceramic hob is resistant to mechanical shocks,
but it may crack (or even break) if hit with a sharp object
such as a tool. If this happens, disconnect the appliance
from the electricity mains immediately and contact a
Service Centre.
• Ensure that power supply cables of other electrical
appliances do not come into contact with the hot parts of
the hob.
• Remember that the cooking zones remain relatively hot for
at least thirty minutes after they have been switched off.
An indicator light provides a warning when residual heat
is present (
see Start-up and use
).
• Keep any object which could melt away from the hob,
for example plastic and aluminium objects, or products
with a high sugar content. Be especially careful when
using plastic film and aluminium foil or packaging: if
placed on surfaces which are still hot, they may cause
serious damage to the hob.
• Always make sure that pan handles are turned towards
the centre of the hob in order to avoid accidental burns.
• When unplugging the appliance, always pull the plug
from the mains socket; do not pull on the cable.
• Never perform any cleaning or maintenance work
without having disconnected the appliance from the
electricity mains.
• The appliance should not be operated by people
(including children) with reduced physical, sensory
or mental capacities, by inexperienced individuals or
by anyone who is not familiar with the product. These
individuals should, at the very least, be supervised
by someone who assumes responsibility for their
safety or receive preliminary instructions relating to
the operation of the appliance.
• For the attention of wearers of pacemakers or other
active implants:
The hob complies with all current standards on
electromagnetic interference.
Your induction hob is therefore perfectly in keeping
with legal requirements (89/336/CEE directives). It
is designed not to create interference on any other
electrical apparatus being used on condition that
the apparatus in question also complies with this
legislation.
Your induction hob generates short-range magnetic
fields.
To avoid any interference between your induction
hob and a pacemaker, the latter must be designed to
comply with relevant regulations.
In this respect, we can only guarantee our own
product conformity. Please consult the pacemaker
manufacturer or your doctor concerning its conformity
or any possible incompatibility.
• Do not let children play with the appliance.
• Do not place metal objects (knives, spoons, pan lids,
etc.) on the hob as they may become hot.
•
The appliance is not intended to be operated by
means of an external timer or separate remote-
control system.
Disposal
• When disposing of packaging material: observe local
legislation so that the packaging may be reused.
• The European Directive 2002/96/EC relating to Waste
Electrical and Electronic Equipment (WEEE) states that
household appliances should not be disposed of using
the normal solid urban waste cycle. Exhausted appliances
should be collected separately in order to optimise the cost
of re-using and recycling the materials inside the machine,
while preventing potential damage to the atmosphere and
to public health. The crossed-out dustbin is marked on all
products to remind the owner of their obligations regarding
separated waste collection.
For further information relating to the correct disposal of
exhausted household appliances, owners may contact
the public service provided or their local dealer.
11
GB
Care and maintenance
Switching the appliance off
Disconnect your appliance from the electricity supply
before carrying out any work on it.
Cleaning the appliance
!
Do not use abrasive or corrosive detergents (for
example, products in spray cans for cleaning barbecues
and ovens), stain removers, anti-rust products, powder
detergents or sponges with abrasive surfaces: these may
scratch the surface beyond repair.
!
Never use steam cleaners or pressure cleaners on the
appliance.
• It is usually sufficient simply to wash the hob using a
damp sponge and dry it with absorbent kitchen towel.
• If the hob is particularly dirty, rub it with a special
glass ceramic cleaning product, then rinse well and
dry thoroughly
• To remove more stubborn dirt, use a suitable scraper.
Remove spills as soon as possible, without waiting for
the appliance to cool, to avoid residues forming crusty
deposits. You can achieve excellent results by using
a rust-proof steel wire sponge - specifically designed
for glass ceramic surfaces - soaked in soapy water.
• If any plastic or sugary substances are accidentally
melted on the hob, remove them immediately with the
scraper, while the surface is still hot.
• Once it is clean, the hob may be treated with a special
protective maintenance product: the invisible film left
by this product protects the surface from drips during
cooking. This maintenance task should be carried out
while the appliance is warm (not hot) or cold.
• Always remember to rinse the appliance well with clean
water and dry it thoroughly: residues can become
encrusted during subsequent cooking processes.
Stainless steel frame
(only in models with outer frame)
Stainless steel can be marked by hard water which has
been left on the surface for a long time, or by cleaning
products containing phosphorus.
After cleaning, it is advisable to rinse the surface well
and dry it thoroughly. If water is spilt on the surface, dry
it quickly and thoroughly.
!
Some hobs have an aluminium frame which is similar to
stainless steel. Do not use any cleaning or degreasing
products which are not suitable for use with aluminium.
Disassembling the hob
If it is necessary to disassemble the hob:
1. Loosen the screws fixing the alignment springs on
each side.
2. Loosen the screws holding the fixing hooks in each
corner.
3. Take the hob out of its installation cavity.
!
Do not attempt to repair the appliance yourself. If the
appliance breaks down, contact a Service Centre.
Technical description of the
models
The induction system is the quickest existing way of cooking. Unlike traditional hotplates where the cooking zone heats
up, with the induction system heat is generated directly inside pans which have ferromagnetic bases.
Key:
I = single induction cooking zone
B = booster: the power level of the cooking zone may be boosted
Hobs
Cooking zone
Back Left
Back Right
Front Left
Front Right
Total power
Power (W)
I 1200 - B1600
I 1500 - B 2000
I 1500 - B 2000
I 1200 - B1600
7200
Power (W)
I 1200 - B1600
I 1500 - B 2300
I 1500 - B 2300
6200
-
VIB 644 C E
VIB 744 C E
VIB 633 C E
IVIA 633 C E
12
FR
•
ATTENTION : cet appareil ainsi que
ses parties accessibles deviennent très
chauds pendant leur fonctionnement.
•
Il faut faire attention de ne pas
toucher les éléments chauffants.
•
Ne laisser s’approcher les enfants
de moins de 8 ans à moins qu’ils ne
soient sous surveillance constante.
•
Le présent appareil peut être utilisé par
des enfants de plus de 8 ans et par des
personnes présentant des capacités
physiques, sensorielles ou mentales
réduites ou n’ayant pas l’expérience
ou les connaissances nécessaires,
à condition qu’ils soient sous bonne
surveillance ou qu’ils aient reçu les
instructions nécessaires pour une
utilisation de l’appareil en toute sécurité
et à condition qu’ils se rendent compte
des dangers encourus. Les enfants ne
doivent pas jouer avec l’appareil. Les
opérations de nettoyage et d’entretien
ne doivent pas être effectuées
par des enfants non surveillés.
•
ATTENTION : laisser un récipient de
cuisson contenant de l’huile ou de
la graisse sur le foyer est dangereux
et risque d’entraîner un incendie
•
Il ne faut JAMAIS essayer d’éteindre une
flamme ou un incendie avec de l’eau
! Il faut éteindre l’appareil et couvrir la
flamme avec un couvercle, par exemple,
ou avec une couverture anti-feu.
•
ATTENTION : risque d’incendie :
n e p a s l a i s s e r d ’ o b j e t s s u r
l e s s u r f a c e s d e c u i s s o n .
•
ATTENTION : si la surface vitrocéramique
est fêlée, éteindre l’appareil afin
d’éviter tout risque d’électrocution.
•
Ne jamais nettoyer l’appareil avec des
nettoyeurs vapeur ou haute pression.
•
Cet appareil ne peut pas être allumé
a u m o y e n d ’ u n t e m p o r i s a t e u r
extérieur ou d’un système de
commande à distance séparé.
•
Ne pas poser d’objets métalliques
(couteaux, cuillères, couvercles, etc.) sur
la table car ils risquent de devenir brûlants.
•
Après utilisation, éteindre la table de
cuisson à l’aide de son dispositif de
commande et ne pas se fier uniquement
à son détecteur de casserole.
ATTENTION !
VIB 644 C E
VIB 633 C E
VIB 744 C E
IVIA 633 C E
13
FR
Description de l'appareil
Bandeau de commande
Le bandeau de commande décrit dans le présent manuel n'est
qu'un exemple représentatif : il peut ne pas correspondre
exactement au bandeau de votre appareil.
Lorsque vous utilisez le bandeau de commande tactile :
N'utilisez pas les gants
Utilisez un doigt propre
Touchez le verre en douceur
1
La touche d'AUGMENTATION DU TEMPS/DE
PUISSANCE
- augmente la puissance et le temps
2
L a t o u c h e d e R É D U C T I O N D U T E M P S / D E
PUISSANCE
- diminue la puissance et le temps
3
La touche de SÉLECTION du FOYER
permet de
sélectionner le foyer correspondant
4
La touche ON/OFF
pour allumer ou éteindre l'appareil.
5
La touche de VERROUILLAGE DES BANDEAUX
DE COMMANDES
pour empêcher toute intervention
extérieure sur les réglages de la table de cuisson
et pour signaler le verrouillage des bandeaux de
commande.
6
Le VOYANT DE CHAUFFAGE
-indique le foyer
correspondant, le niveau de puissance, le temps
prédéfi ni de cuisson, la fonction booster activée.
! Pour plus d'informations sur les fonctions du bandeau
de commande, voir « Mise en marche et utilisation » .
! C e p r o d u i t e s t c o n f o r m e a u x e x i g e n c e s d e
la dernière Directive européenne sur la limitation
d e c o n s o m m a t i o n d ' é n e r g i e e n m o d e v e i l l e .
Si aucune opération n'est effectuée pendant 2
minutes, après que les voyants d'indication de chaleur
résiduelle soient désactivés et que le ventilateur s'arrête
(si disponible), l'appareil s'arrête automatiquement.
L'appareil est de nouveau en marche une fois que
vous appuyez sur la touche ON/OFF.
! Selon le nombre de zones de chauffage/cuisson de
la plaque, les TOUCHES DE SÉLECTION DU FOYER
varient entre 3 et 4.
Installation
!
Veuillez lire attentivement ces instructions, avant d'utiliser
votre nouvel appareil. Elles contiennent des conseils
importants sur la sécurité, l'installation et l'entretien de
cet appareil.
!
Veuillez conserver ce mode d'emploi pour pouvoir
le consulter à tout moment. Passez-le aux nouveaux
propriétaires de l'appareil.
Positionnement
!
Conservez tous les emballages hors de la portée des
enfants. Il peuvent présenter un risque d'étouffement ou
de suffocation (voir Précautions et conseils).
!
L'installation de l'appareil doit être effectuée par un
professionnel qualifi é, conformément aux instructions
du fabricant. Une mauvaise installation peut causer des
dommages à des personnes, à des animaux ou à des
biens.
Encastrement
Pour garantir le bon fonctionnement de l'appareil, utilisez
un meuble approprié.
• Le matériau du plan d'appui doit être thermorésistant
à une température d'environ 100°C.
• En cas d'installation de l'appareil sur un four, ce dernier
doit être équipé d'un dispositif de refroidissement par
ventilation forcée.
• Évitez d'installer la plaque de cuisson au-dessus
d'un lave-vaisselle : dans le cas contraire, prévoir une
séparation étanche entre les deux appareils.Aération
Pour permettre une bonne aération et pour éviter toute
surchauffe autour des surfaces, la plaque de cuisson doit
être positionnée comme suit :
• À au moins 40 mm du mur arrière ou de toutes autres
surfaces verticales.
• Afi n de garder une distance minimale de 20 mm entre
la découpe d'encastrement et le meuble en dessous.
• Les meubles jouxtant l'appareil, dont la hauteur est
supérieure à celle du plan de cuisson, doivent être
placés à au moins 450 mm du bord du plan.
Fixation
Il est impératif d'assurer l'encastrement de l'appareil
sur un
plan d'appui parfaitement plat. Toutes déformations
causées par une mauvaise fi xation pourraient altérer les
caractéristiques de la plaque de cuisson, ainsi que ses
performances.
La longueur de la vis de réglages des crochets de fi xation
doit être réglée avant leur montage
selon l'épaisseur du
plan d'appui :
• épaisseur de 3,5 mm : vis de 9,5 mm
1
2
3
4
5
6
14
FR
Installation de la rondelle de sécurité
490
560
Min. 30/Max.50
DIMENSIONS DE L'ARMOIRE
Min 5mm
Min 20mm
Min 20mm
Min 5mm
DISTANCES DE SÉCURITÉ AVEC LE MEUBLE
30mm
30mm
60
1
2
4
3
5a- (models: 590 x 510 mm)
5b- (models: 690 x 510 mm)
15
FR
Raccordement électrique
!
Le raccordement de la plaque de cuisson et celui
d'un éventuel four à encastrer doivent être effectués
séparément, pour des raisons de sécurité et pour un
démontage plus facile du four.
Raccordement monophasé
La plaque est équipée d'un câble d'alimentation prévu pour
raccordement monophasé. Raccordez les fi ls en respectant
les indications du tableau et des dessins suivants :
Autres types de branchement
Si l'installation électrique correspond à l'une des caractéristiques
suivantes :
Tension type et fréquence réseau
• 400V - 2+N ~ 50/60 Hz
• 220-240V 3 ~ 50/60 Hz
Séparez les fils et raccordez-les en respectant les
indications du tableau et des dessins suivants :
Branchement du câble d'alimentation au réseau
électrique
En cas de raccordement direct au réseau, il faut installer un
interrupteur à coupure omnipolaire avec un minimum de 3
mm d'écartement entre les contacts.
!
L'installeur est responsable du bon raccordement
électrique de l'appareil et du respect des normes de
sécurité.
F
ixez la plaque comme suit :
1. Servez-vous des vis courtes sans pointe pour visser les
4 ressorts de centrage dans les trous prévus sur chaque
côté de la table, en leur milieu.
2. Insérez la table de cuisson dans la découpe prévue,
bien au centre et appuyez tout autour du cadre pour que
la table adhère parfaitement au plan d'appui.
!
Les vis des ressorts de centrage doivent être accessibles.
!
Conformément aux normes de sécurité, après
encastrement, l'appareil ne doit plus être en contact avec
les parties électrifi ées.
!
Toutes les parties servant de protection de l'appareil
doivent être fi xées de manière à ne pouvoir être enlevées
qu'à l'aide d'un outil.
Tension type et
fréquence réseau
Cordon électrique
Raccordement fils
220-240V 1+N ~
50/60 Hz
: jaune/vert
N
: les deux fils bleus ensemble
L
: le marron avec le noir
Tension type et
fréquence réseau
Cordon électrique
Raccordement fils
400V - 2+N ~
50/60 Hz
220-240V 3 ~
50/60 Hz
: jaune/vert
N
: les deux fils bleus
ensemble
L1
: noir
L2
: brun
Mise en marche et utilisation
!
La colle utilisée pour les joints laisse des traces de
graisse sur le verre. Nous vous conseillons de les éliminer
avant utilisation de l'appareil, à l'aide d'un produit nettoyant
non abrasif. Au cours des premières heures d'utilisation,
l'odeur de caoutchouc qui pourrait se dégager, disparaîtra
très vite.
!
Vous entendrez un bip quelques secondes après la mise
sous tension de la plaque de cuisson. Vous pouvez alors
mettre votre table de cuisson en marche.
Types de bruit lors du fonctionnement normal de la
plaque de cuisson :
•
Bourdonnement :
Il est dû à la vibration des
éléments métalliques qui composent le générateur
et le récipient de cuisson ; il est produit par le champ
électromagnétique nécessaire à la montée en
température, il augmente au fur et à mesure que le
niveau de puissance du générateur augmente.
•
Léger sifflement :
Il se fait entendre lorsque la
casserole posée sur le foyer est vide ; une fois que
vous remplissez la casserole d'aliments ou d'eau, le
bruit s'arrête.
•
Crépitement :
Il s'agit d'un bruit provoqué par la
vibration des matériaux formant le fond de la casserole,
lorsqu'ils sont traversés par des courants parasites dus
au champ électromagnétique (induction) ; il est plus
ou moins intense, en fonction du matériau utilisé et il
diminue au fur et à mesure que les dimensions de la
casserole augmentent.
Avant de brancher l'appareil à la source d'alimentation,
assurez-vous que :
• L'appareil est relié au sol et la prise conforme à la loi.
• La prise peut supporter la puissance maximale de l'appareil,
indiquée sur la plaque signalétique de l'appareil.
• La tension se situe dans la plage de valeurs indiquées sur
la plaque signalétique.
• La prise est compatible avec la fi che de l'appareil. dans
le cas contraire, demandez à un technicien agréé de
la remplacer. N'utilisez pas de rallonges ou de fi ches
multiples.
!
Une fois l'appareil installé, le câble d'alimentation et la
prise électrique doivent être facilement accessibles.
!
Le câble ne doit être ni plié, ni excessivement écrasé.
!
Le câble doit être vérifi é régulièrement et remplacé par
un technicien agréé.
!
Le fabricant décline toute responsabilité en cas
de non-respect des normes de sécurité énumérées
ci-dessus.
!
Ne retirez ni ne remplacez le câble d'alimentation sous
aucun prétexte. Toute opération d'enlèvement ou de
remplacement annule automatiquement la garantie et la
marque CE. INDESIT décline toute responsabilité en cas
d'accidents ou de dommage causés par l'enlèvement ou
le remplacement du câble d'alimentation d'origine. Seul le
remplacement effectué par le technicien agréé INDESIT
et utilisant une pièce détachée originale, est autorisé.
16
FR
Activation de la plaque de cuisson
Une fois que vous avez connecté la plaque de cuis-
son à la source d'alimentation, le bandeau de com-
mande tactile se verrouille automatiquement. Une
pression prolongée sur la touche de verrouillage du
bandeau de commande permet de déverrouiller ce
dernier
.
Une pression prolongée pendant environ une seconde sur la
touche
permet d'activer la plaque de cuisson.
La table de cuisson est activée lorsqu'un bip sonore
se fait entendre et tous les voyants des zones de cuis-
son affi chent le point lumineux.
Lorsque la cuisson est éteinte, après 5 secondes la
commande débranche l’KEYLOCK LED
pour réduire
la consommation d’énergie.
Dès que nous touchons une touche, le LED KEYLOCK
se passe et nous ne pouvons continuer à utiliser la table
de cuisson, déverrouiller le clavier.
L'Arrêt de la table de cuisson est signalé par 3 bips
sonores
Réglage de gestion d'énergie
La limite de puissance maximale de la table de cuisson
est de 7 200W. Cette limite de puissance peut être ré-
duite par l'utilisateur à 2 800W, 3 500W ou 6 000W.
Pour fi xer une nouvelle limite de puissance de la table
de cuisson :
·Pendant les 30 premières secondes suivant le branche-
ment de l'appareil
·Les commandes doivent être déverrouillées et tous les
chauffages désactivés
·Appuyez simultanément sur les touches Chauffage 1 et
Chauffage 3
·Une fois l'opération terminée, vous entendrez un bip
sonore et le niveau limite actuel de puissance de votre
table de cuisson s'affi chera sur les voyants de chauffage.
Pour sélectionner une nouvelle limite de puissance :
·
Avec les touches (+) et (-), vous pouvez augmenter le
niveau de puissance. Les différents niveaux de puis-
sance disponibles sont : 2 800W, 3 500W, 6 000W ou
7 200W. Lorsque le niveau de puissance est à 7 200W,
si vous pressez les touches [+] ou [-], alors le niveau de
puissance devient 2 800W.
Pour achever l'enregistrement de la nouvelle limite de
puissance de la table de cuisson :
·Appuyez simultanément sur les touches Chauffage 1 et
Chauffage 3
·Une fois l'opération terminée, le niveau de puissance de
votre table de cuisson est enregistré et le système peut
être réinitialisé.
•
Siffl ement intense :
Il se produit lorsque les deux
éléments à induction du même groupe fonctionnent
simultanément à leur puissance maximale et/ou
lorsque la fonction booster est insérée sur le plus
grand élément à induction tandis que l'autre est
autorégulé. Le bruit diminue une fois que le niveau de
puissance de l'élément à induction autorégulé baisse ;
il est généralement causé par plusieurs couches de
matériaux différents formant le fond de la casserole.
•
Bruit du ventilateur :
Pour un fonctionnement
correct de la table et pour garantir la sécurité des
composantes électriques contre tout risque de surchauffe,
il est nécessaire d'activer un ventilateur. Le ventilateur
fonctionne à sa puissance maximale lorsque le plus grand
générateur est à son niveau de puissance maximum ou
lorsque la fonction booster est insérée ; dans tous les
autres cas, il fonctionne à sa puissance intermédiaire
selon la température détectée. De plus, le ventilateur peut
continuer à fonctionner même après désactivation de la
table de cuisson, si la température détectée est élevée.
Les différents types de bruits énumérés ci-dessus sont
causés par la technologie d'induction et ne sont pas
forcément des défauts de fonctionnement.
!
Une pression prolongée sur les touches (-) ou (+)
permet l'avancement rapide des minutes et du minuteur.
Conditions initiales d'éclairage
Lorsque l'alimentation est d'abord appliquée à la sur-
face de cuisson, le bandeau de commande tactile
effectue un processus d'étalonnage pour les touches
tactiles, ce qui nécessite un faible niveau de lumière
ambiante dans la zone des touches tactiles.
Si au cours de ce processus d'étalonnage un éclairage
ambiant excessif est détecté, l'interface d'utilisateur af-
fi che « FL » (erreur de lumière ambiante infrarouge) et
le processus de calibration du bandeau de commande
est suspendu. Pour rectifi er le processus, tout éclairage
qui pourrait affecter le processus d'étalonnage doit être
éteint (par exemple l'éclairage de la hotte aspirante ha-
logène). L'erreur disparaît lorsque l'éclairage ambiant
satisfaisant est détecté et la procédure d'étalonnage du
bandeau de commande tactile va maintenant s'achever
de manière satisfaisante.
-L'erreur « FL » ne peut être générée dans environ 3s
de la puissance initiale appliquée à la surface de cuis-
son.
-Désactivez tout éclairage de la hotte aspirante et
l'éclairage dirigé vers la table de cuisson lorsque l'ali-
mentation est d'abord appliquée à la table de cuisson.
-Une fois le processus de calibrage initial du bandeau
de commande tactile terminé, (environ 3s) toute hotte
aspirante ou autre éclairage peuvent être activés nor-
malement et n'affecteront pas le fonctionnement du
bandeau de commande tactile.
17
FR
Pour achever l'opération sans enregistrer les modifi ca-
tions :
·Si pendant 60 secondes vous n'observez aucune ac-
tion, alors les modifi cations ne sont pas enregistrées et
le système peut être réinitialisé.
.
Comment activer les foyers
Vous pouvez contrôler chaque foyer grâce à une touche
de sélection
et à un dispositif de régulation de
puissance doté des touches (-) et (+).
• Pour commencer à utiliser un foyer, appuyez sur la
touche de commande qui correspond et réglez le
niveau de puissance (entre 0 et 9) via les touches (-)
ou (+)
Une pression prolongée sur la touche (-) permet de
régler directement le niveau de puissance à « 9 »
Une pression prolongée et simultanée sur les touches
(+) et (-) permet de rentrer au niveau de puissance
« 0 »
Si le niveau de puissance est « 0 », appuyez sur la
touche (+) et maintenez-la enfoncée afi n d'augmenter
rapidement le niveau de puissance
Le choix d'un foyer est signalé par un bip sonore
et le niveau de puissance s'affi che sur le
voyant
Si vous ne sélectionnez pas un chauffage dans les 10
secondes suivantes,
la table de cuisson se désactive automatiquement.
Fonction d'ébullition rapide- « Booster »
La fonction booster correspondant à certains foyers peut être
utilisée pour économiser les temps de chauffage.
Vous l'activez en appuyant sur la touche (+) au-delà du
niveau 9. Cette fonction suralimente la puissance à 1 600
W ou 2 000 W, selon la taille du foyer correspondant.
Un bip sonore signale l'activation de la fonction booster
et la lettre‘P’s'affi che à l'écran.
La fonction booster fonctionne pendant 10 minutes
maximum. Après ces10 minutes, un bip se fait entendre
et le foyer rentre au niveau « 9 »
Avec le chauffage au niveau Booster, si vous pressez la
touche [+], un bip signale une erreur et il n'y a aucune
modifi cation du réglage de cuisson. Avec le chauffage
au niveau Booster, si vous pressez la touche [-], un
bip se fait entendre et la puissance de cuisson est
réduite à 9.
Comment désactiver les foyers
Pour désactiver un foyer, sélectionnez-le via la touche de
sélection correspondante
et :
• Appuyez
la
touche (-) : la puissance du foyer diminuera
progressivement jusqu'à désactivation.
Une fois le foyer sélectionné, vous pouvez également
désactiver le chauffage via les touches [-] et [+] pressées
simultanément. Un bip
se fait entendre et le voyant correspondant affi che « 0 ».
Utilisation du minuteur
! Tous les foyers peuvent être programmés simultanément,
pour une durée variant entre 1 et 99 min.
1. Sélectionnez le foyer via la touche de sélection
correspondante.
2. Réglez le niveau de puissance du foyer.
3.Une fois le niveau de puissance approprié sélectionné,
pressez à nouveau la touche de sélection du foyer, un
bip se fait entendre et une lettre ‘t’ suivie des pointillés
s'affichent à l'écran de chauffage. Le temps restant
s'affichera à l'opposé du temps de chauffage. Si le
chronomètre de la zone de chauffage est par exemple
en dessous, le temps chronométré s'affi chera à l'écran
du dessus.SFlb4. Réglez le temps de cuisson en utilisant
les touches (-) et(+)
Lorsque vous pressez les touches (-) et(+) simultanément,|
le compteur revient à la position 0.
Si vous ne sélectionnez pas le temps avant 10 secondes,
ou si le temps sélectionné correspond à 0,10 secondes
après la dernière pression effectuée sur les touches (-)
ou (+) , le chronomètre est désactivé.
Mise en marche du minuteur programmateur.
Le compte à rebours commence lorsque la visuali-
sation de la minuterie s'achève via n'importe quelle
touche de la zone de cuisson ou
automatiquement 10 secondes après la dernière
pression sur les touches [+] ou [-]. Un bip se fait
entendre et le voyant de chauffage affi chera le
niveau de
de puissance. Les pointillés indiquent que le chauf-
fage est chronométré.
! Pour modifi er le temps pour un chauffage chrono-
métré, répétez le processus expliqué ci-dessus.
!Une pression prolongée sur les touches + et - aug-
mente la rapidité du temps
F
in du minuteur programmateur.
Une fois que le temps restant est épuisé, le chauffage
programmé est désactivé, l'écran de chauffage affi che
un '0 ' clignotant et l'alarme de la minuterie sonne pen-
dant une minute
Vous désactivez l'alarme en pressant n'importe quelle
touche du bandeau de commande.
18
FR
Conseils d'utilisation de l'appareil
!
Utilisez des récipients dont le matériau est compatible
avec l'induction (matériau ferromagnétique). Nous
recommandons l'utilisation des casseroles en : fonte,
acier émaillé ou inox spécial induction. Pour vous assurer
de la compatibilité d'un récipient, effectuez un test avec
un aimant.
*
CORRECT
INCORREC
T
Fonte
Acier émaillé
Acier inoxydable spécial
Cuivre, aluminium, verre,
faïence, céramique, acier
inoxydable non magnétique
De plus, pour obtenir de meilleurs résultats avec votre plaque :
• Utilisez des casseroles à fond plat, d'épaisseur, pour
qu'elles adhèrent pleinement au foyer.
• Utilisez toujours des casseroles dont le diamètre couvre
entièrement le foyer, afi n de bénéfi cier de toute la chaleur
disponible.
• Assurez-vous que la base des casseroles est toujours
sèche et propre, pour garantir un bon contact et une longue
durée de vie des foyers et des casseroles.
• Évitez d'utiliser les mêmes casseroles que sur les brûleurs
à gaz : la concentration de chaleur sur les brûleurs à gaz
peut déformer le fond de la casserole, qui perd ainsi de
son adhérence.
Dispositifs de sécurité
Détection de récipient
Chaque foyer est équipé d'un dispositif de détection de
casserole. Le foyer n'émet de chaleur qu'en présence d'une
casserole adaptée.
Le signal “u” à l'écran s'affi che si une fois
que la sélection du foyer est effectuée, la casserole n'est
pas placée sur ce dernier, ou pour signaler :
• Une casserole incompatible,
• Une casserole avec un très petit diamètre,
• Une casserole enlevée du foyer.
Si après10 sec. aucune casserole n'est placée sur le
foyer,
un signal d'avertissement est émis.
Si après 60 sec. aucune casserole n'est placée sur le
foyer, le foyer
s'éteint.
Protection contre la surchauffe
En cas de surchauffe des composants électroniques, le
nombre indiquant le niveau de puissance clignote, et la
lettre « c » s'affi che à l'écran. Lorsque la température
atteint un niveau acceptable, ce message disparaît et la
plaque de cuisson est à nouveau utilisable.
Interrupteur sécurité
L'appareil est équipé d'un interrupteur sécurité qui éteint
automatiquement les foyers après un temps limite d'utilisation
à un niveau de puissance donné. Lorsque l'interrupteur
sécurité est activé, l'écran affi che «
0
».
Par exemple : le foyer arrière droit est réglé à 5 et s'éteindra après
5
heures de fonctionnement continu, tandis que le foyer
avant gauche est réglé à 2 et s'éteindra après 8 heures.
Lorsqu'une ou plusieurs touches sont activées pen-
dant plus de10 sec, le bandeau de commande tactile
se désactive.
Un bip sonore d'avertissement est émis toutes les 10
sec., pendant l'activation de(s) touche(s).
Verrouillage du bandeau de commande
Pendant le fonctionnement de la table de cuisson, il est
possible de verrouiller les commandes du four afi n d'éviter
toutes interventions extérieures sur le réglage (par les enfants,
lors du nettoyage, etc.).
Appuyez sur la touche
pour verrouiller le bandeau
de commande : -le voyant s'allume et un bip sonore se
fera entendre.
Pour utiliser toutes les commandes (ex. l'arrêt de cuisson),
vous devez désactiver cette fonction. Pressez la touche
pendant un moment, le voyant s'éteint et la fonction
de verrouillage est désactivée.
Toutes les touches de sélection du foyer seront verrouillées
si : la table de cuisson est désactivée,
si le verrouillage du bandeau de commande est activé
ou
si une erreur survient au niveau de la table de cuisson.
Désactivation de la plaque de cuisson
Pressez la touche
pour désactiver votre appareil - ne
comptez pas uniquement sur le capteur de casserole.
Si le verrouillage du bandeau de commande est activé,
alors les commandes resteront verrouillées même après
la mise en marche à nouveau de la plaque de cuisson.
Pour activer à nouveau la plaque, vous devez d'abord
désactiver la fonction de verrouillage.
! L'utilisation des adaptateurs, des diffuseurs ou des
plaques métalliques sur les zones de cuisson est
déconseillée. Cela pourrait se révéler préjudiciable
pour la performance de la plaque de cuisson et en
endommager l'esthétique.
19
FR
La table de cuisson est désactivée lorsque tous les
foyers sont à la position zéro pendant 10 sec.
Si la désactivation résulte d'une erreur d'activation
des touches, le bandeau de commande tactile agit
comme ci-dessus.
Signal sonore
Cette application indique également de multiples anomalies :
• Un objet (casserole, couvert, etc.) placé pendant plus de
10 secondes sur le bandeau de commande.
• Un débordement sur le bandeau de commande.
• Une pression prolongée sur une touche. Tous ces cas
énumérés ci-dessus peuvent déclencher un signal sonore.
Veuillez éliminer la cause du dysfonctionnement afi n
d'arrêter le signal sonore. Le cas échéant, le signal sonore
continue à retentir et la plaque s'éteint.
Erreurs et alarmes
En cas d'erreur, l'appareil tout entier ou le(s) foyer(s)
est(sont) éteint(s), un bip retenti (uniquement si un ou
Puissance
1
2
3
4
5
6
7
8
9
Durée limite de fonctionnement
9
8
7
6
5
4
3
2
1
plusieurs foyers sont activés), l'écran affi che une lettre
« F » ainsi que le code d'erreur (un numéro d'index ou
une lettre) en alternance.
Si le problème persiste, veuillez contacter le Service
technique.
Conseils utiles pour la cuisson
ª
Mise en pression
Autocuisser
Friture
Grillade
Ebullition
Cuiccon très vive
Cuisson vive
Cuisson moyenne
Cuisson douce
Cuisson
très douce
•
•
¶
Crêpes
Saise et coloration
(Rotis, Steack, Escalope, Filets de poisson,
Oeufs au plat)
¶
§
Réduction rapide (Sauce liquides)
Eau Frémissante (Pates, Riz, Légumes)
Lait
§
S
Réduction lente (Sauce épaisses)
S
¢
Cuisson au bain-marie
Cuisson Autocuiseur après chuchotement
¢
£
™
Mijotage (Ragouts)
Réchauffage des préparations
™
¡
Sauce chocolat
Maintien au chaud
20
FR
Précautions et conseils
!
Cet appareil a été conçu et fabriqué conformément
aux normes internationales de sécurité. Ces consignes
de sécurité sont très importantes et doivent être lues
attentivement.
Cet appareil est conforme aux Directives
Communautaires suivantes :
- 2006/95/CEE du 12/12/06 (Basse Tension) et modifications
successives
- 2004/108/CEE du 15/12/04 (Compatibilité électromagnétique)
et modifications successives
- 93/68/CEE du 22/07/93 et modifications successives.
- 1275/2008 stand-by/off mode.
Sécurité générale
!
S’assurer que la prise d’air à travers la grille du
ventilateur ne soit jamais bouchée. La table à encastrer
exige en effet une bonne aération pour le refroidissement
des composants électroniques.
!
L’installation d’une table de cuisson à induction au-dessus
d’un réfrigérateur sous plan (chaleur) ou au-dessus d’un
lave-linge (vibrations) est vivement déconseillée. L’espace
indispensable à la ventilation des éléments électroniques
serait en effet insuffisant.
• Cet appareil a été conçu pour un usage familial, de type
non professionnel.
• Cet appareil ne doit pas être installé en extérieur, même
dans un endroit abrité, il est en effet très dangereux de le
laisser exposé à la pluie et aux orages.
• Ne pas toucher à l’appareil si l’on est pieds nus ou si l’on
a les mains ou les pieds mouillés ou humides.
• Cet appareil qui sert à cuire des aliments ne doit être utilisé
que par des adultes conformément aux instructions du
mode d’emploi. Ne pas utiliser la table comme plan de
dépose ou comme planche à découper.
• Le plan vitrocéramique résiste aux chocs mécaniques, il
peut toutefois se fendre (ou même se briser) sous l’effet
d’un choc provoqué par un objet pointu, tel qu’un ustensile
par exemple. Dans ce cas, débrancher immédiatement
l’appareil du réseau électrique et s’adresser à un centre
d’assistance technique.
• Eviter que le cordon d’alimentation d’autres petits
électroménagers touche à des parties chaudes de la table
de cuisson.
• Ne pas oublier que la température des foyers reste
assez élevée pendant trente minutes au moins après leur
extinction. La chaleur résiduelle est aussi signalée par un
voyant (
voir Mise en marche et Utilisation
).
• Garder à bonne distance de la table de cuisson tout
objet qui pourrait fondre, des objets en plastique ou
en aluminium par exemple, ou des produits à haute
teneur en sucre. Faire très attention aux emballages,
au film plastique et au papier aluminium : au contact
des surfaces encore chaudes ou tièdes, ils risquent
d’endommager gravement la table.
• S’assurer que les manches des casseroles soient
toujours tournés vers l’intérieur de la table de cuisson
pour éviter tout risque d’accident.
• Ne pas tirer sur le câble pour débrancher la fiche de
la prise de courant.
• N’effectuer aucune opération de nettoyage ou
d’entretien sans avoir auparavant débranché la fiche
de la prise de courant.
• Il n’est pas prévu que cet appareil soit utilisé par des
personnes (enfants compris) présentant des capacités
physiques, sensorielles ou mentales réduites ou
qui n’ont pas l’expérience ou les connaissances
indispensables, à moins qu’elles ne le fassent sous la
surveillance de quelqu’un responsable de leur sécurité
ou qu’elles aient été dûment formées sur l’utilisation
de l’appareil.
•
Avis à toute personne portant un pacemaker ou
autre implant médical actif :
La table est conforme à toutes les réglementations en
matière d’interférences électromagnétiques.
Par conséquent, ce produit est parfaitement conforme
à toutes les dispositions légales (directives 89/336/
CEE). Il a été conçu de manière à ne pas provoquer
d’interférences à d’autres appareils électriques utilisés,
pourvu que ceux-ci soient également conformes aux
réglementations susmentionnées. La table induction
génère des champs électromagnétiques à courte
portée. Afin d’éviter tout risque d’interférence entre la
table de cuisson et le pacemaker, ce dernier devra
être fabriqué conformément à la réglementation en
vigueur.
A ce propos, nous ne pouvons assurer que la
conformité de notre produit. Pour tous renseignements
quant à la conformité ou à des problèmes éventuels
d’incompatibilité, prière de s’adresser à son médecin
traitant ou au fabricant du pacemaker.
• S’assurer que les enfants ne jouent pas avec l’appareil.
• Ne pas poser d’objets métalliques (couteaux, cuillères,
couvercles, etc.) sur la table, ils risquent de devenir
brûlants.
•
Le dispositif n’est pas destiné à être mis en œuvre
par une minuterie externe ou un système de
télécommande séparée.
Mise au rebut
• Mise au rebut du matériel d’emballage : se conformer aux
réglementations locales, les emballages pourront ainsi être
recyclés.
• La directive européenne 2002/96/CE relative aux déchets
d’équipements électriques et électroniques (DEEE),
prévoit que les électroménagers ne peuvent pas être
traités comme des déchets solides urbains courants.
Les appareils usagés doivent faire l’objet d’une collecte
séparée pour optimiser le taux de récupération et de
recyclage des matériaux qui les composent et empêcher
tout danger pour la santé et pour l’environnement. Le
symbole de la poubelle barrée est appliqué sur tous les
produits pour rappeler qu’ils font l’objet d’une collecte
sélective. Pour de plus amples renseignements sur la
mise au rebut des électroménagers, les possesseurs
peuvent s’adresser au service public prévu à cet effet
ou aux commerçants.
