Indesit IDV-75-(EU): instruction
Class: Household, kitchen appliances, electronics and equipment
Type: Dryer
Manual for Indesit IDV-75-(EU)

1
EN
Instruction manual
TUMBLE DRYER
Contents
Installation, 2
Where to install the tumble dryer
EN
NL
ES
Ventilation
Electrical connections
English, 1
Nederlands,11
Español,21
Levelling the tumble dryer
Before you start your dryer
PT
FR
RU
Warnings, 4
General safety
Português,31
Français,41
Русский, 51
Saving energy and respecting the environment
Care and maintenance, 6
Disconnecting the power supply
KZ
Cleaning the filter after each cycle
Checking the drum after each cycle
Қазақша, 61
Cleaning the tumble dryer
Description of the tumble dryer, 7
Front side
Rear side
IDV 75
Control panel
How to carry out a drying cycle
Starting a drying programme
Drying settings, 8
Drying times
Drying programmes and options
Troubleshooting, 9
www.indesit.com
Laundry
Assistance and Guarantee, 10
Spare parts
! This symbol reminds you to read this
Information on recycling and disposal
instruction manual.
! Keep this manual at hand for immediate reference whenever
necessary. Always store this manual close to the tumble dryer and
remember to pass it on to any new owners when selling or tran-
sferring the appliance, so they may familiarise with the warnings
and suggestions herein contained.
! Read these instructions carefully: the following pages contain
important information on installation and useful suggestions for
operating the appliance.
2
EN
Installation
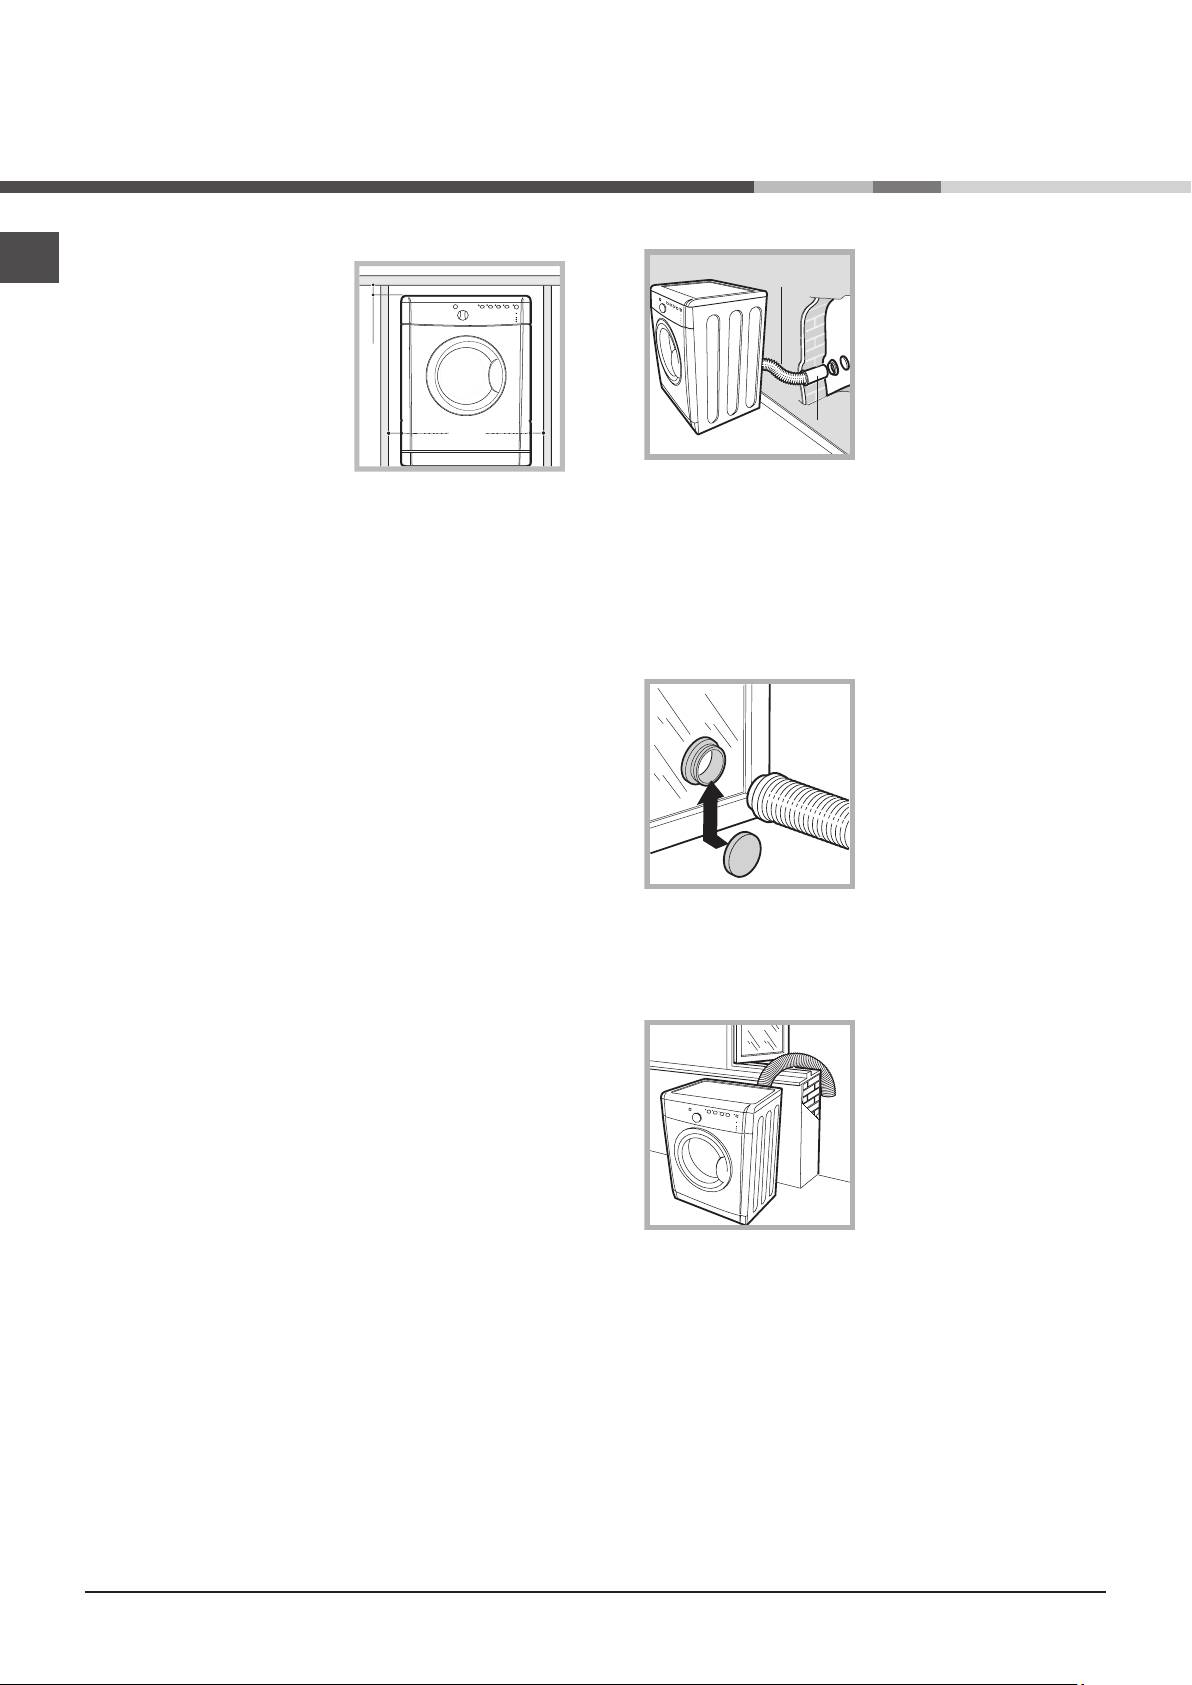
10
m
m
15 mm
15 mm
15 mm
15 mm
B
A
Wall ventilation hole
Where to install the tumble dryer
1. Leave an opening in the wall
• Install the dryer far
to the left of the tumble dryer
from gas ranges, stoves,
installation site.
radiators or hobs, as
2. Make the hose as short and
flames may damage it.
straight as possible, in order
If the dryer is installed
to prevent any moisture from
below a worktop, ensure
condensing and leaking back
into the appliance.
there are 10 mm betwe-
3. The hole in the wall must
en the upper panel of the
also be straight and pointing
dryer and any objects
downwards, so that the flow of air coming out is not
above it, and 15 mm
impeded.
between the sides of the machine and the
Areas A and B should be checked frequently, to prevent
walls or furniture units adjacent to it. This en-
the accumulation of fluff or debris, particularly if the tumble
sures adequate air circulation. Make sure the
dryer is used very often. The hose adaptor must be fitted
air inlets on the rear panel are not blocked or
correctly, in order to prevent damp air from coming back into
obstructed.
the room.
• You should also make sure that the room
in which the tumble dryer is installed is not
Window ventilation hole
damp, and that it is adequately ventilated.
The ventilation hole should
• ! We do not recommend that the dryer is
be directly behind the dryer in
installed in a cupboard but the dryer must
order to keep the hose as short
never be installed behind a lockable door,
as possible.
a sliding door or a door with a hinge on the
! Make sure you do not
opposite side to that of the dryer door.
push the tumble dryer too
far backwards, as this could
• ! The appliance must be installed with the
lead to the ventilation hose
rear surface placed against a wall.
being crushed, bent or even
disconnected.
Ventilation
! There should be no cuts, kinks or “U”-shaped bends
This appliance gently dries laundry by taking in cold, clean
in the hose, as these could impede ventilation or trap
and relatively dry air, heating it and passing it through the
condensation.
fabric. To facilitate the drying process, damp air is expelled at
the rear, through a ventilation hose. When the dryer is in use,
Ventilation through an open window
there has to be adequate ventilation to avoid a back flow
of gases into the room from appliances burning other fuels,
The end of the hose must be
including open fires.
facing downwards, in order to
prevent the hot, damp air from
Mobile ventilation system
forming condensation in the
When using the tumble dryer with the mobile ventilation
room or the tumble dryer.
system, a ventilation hose must be connected. The hose
should be securely fastened to the ventilation hole at the
rear of the appliance (see “Description of the tumble dryer”).
We recommend the hose is connected to an outlet near
the tumble dryer, if possible. If it cannot be installed in a
permanent spot, the tumble dryer will still function perfectly
! Make sure that the tumble dryer is adequately ventilated,
well if the ventilation hose is passed through a partially-
and that the end of the ventilation hose is not pointing
opened window.
towards the air inlet pipe on the rear of the appliance.
! Make sure you do not point the ventilation hose towards
! The ventilation hose must always be fitted to ensure
the air inlet, which is located on the rear of the appliance.
optimum performance.
! The ventilation hose should not exceed a maximum length
! Make sure that the ventilation hose and the air inlet vents
of 2.4 metres; it should also be shaken frequently to remove
are not obstructed or blocked.
any fluff, dust or water deposits inside it. Make sure you do
! Do not let the tumble dryer recirculate exhaust air.
not crush the hose.
! Improper use of the tumble dryer may result in fire hazards.
Fixed ventilation system
! The air emitted by the tumble dryer must not be expelled in
We recommend the ventilation hose is connected to a
the same duct as used for the fumes produced by different
ventilation system for windows or doors, available from the
appliances which burn gas or other fuels.
retailer which originally sold you the appliance or from your
! Do not discharge the exhaust air into an extraction system
local spare parts stockist.
or any duct with an extractor fan. This will affect the way the
thermal controls operate and can result in a fire hazard.
Electrical connections
Before plugging the appliance into the so-
cket, check the following:
• Make sure your hands are dry.
• The socket must have an earth connec-
tion.
• The socket must be able to withstand the
machine’s maximum power output as indica-
ted on the rating plate (see Description of the
tumble dryer).
Before you start your dryer
• The power supply voltage must fall within
Once the tumble dryer is installed, clean the inside of the
the values indicated on the rating plate (see
drum before operating it and remove any dirt accumulated
Description of the tumble dryer).
during transportation.
• The socket must be compatible with the
dryer’s plug. Should this not be the case,
replace the plug or the socket.
! DO NOT USE EXTENSION CORDS.
! The dryer must not be installed outdoors,
even if the space is sheltered. It can be very
dangerous if exposed to rain or storms.
! Once installed, the dryer’s electrical wire
and plug must be within reach.
! The power cord must not be bent or
squashed.
! If the plug being replaced is a non-rewirable
type, then the cut-off plug must be disposed
of safely. DO NOT leave it where it can be
inserted into a socket and create a shock
hazard.
! The electric cord must be regularly
checked. If the supply cord is damaged, it
must be replaced by the manufacturer, its
service agent or similarly qualified persons in
order to avoid a hazard.
(see Service). New or
longer power cords are supplied at an extra
charge by authorized dealers.
! The manufacturer denies any responsibility
should any of these rules not be followed.
! If in doubt about any of the above
consult a qualified electrician.
Levelling the tumble dryer
The tumble dryer should be installed level in order to
operate correctly.
After installing the tumble dryer in its permanent position,
make sure it is level; check its side-to-side levelling first,
followed by front-to-back.
If the tumble dryer is not perfectly level, use a wooden
block to support it while you adjust the two front feet, up
or down as necessary.

3
EN
Installation
10
m
m
15 mm
15 mm
15 mm
15 mm
B
A
Wall ventilation hole
Where to install the tumble dryer
1. Leave an opening in the wall
• Install the dryer far
to the left of the tumble dryer
from gas ranges, stoves,
installation site.
radiators or hobs, as
2. Make the hose as short and
flames may damage it.
straight as possible, in order
If the dryer is installed
to prevent any moisture from
below a worktop, ensure
condensing and leaking back
into the appliance.
there are 10 mm betwe-
3. The hole in the wall must
en the upper panel of the
also be straight and pointing
dryer and any objects
downwards, so that the flow of air coming out is not
above it, and 15 mm
impeded.
between the sides of the machine and the
Areas A and B should be checked frequently, to prevent
walls or furniture units adjacent to it. This en-
the accumulation of fluff or debris, particularly if the tumble
sures adequate air circulation. Make sure the
dryer is used very often. The hose adaptor must be fitted
air inlets on the rear panel are not blocked or
correctly, in order to prevent damp air from coming back into
obstructed.
the room.
• You should also make sure that the room
in which the tumble dryer is installed is not
Window ventilation hole
damp, and that it is adequately ventilated.
The ventilation hole should
• ! We do not recommend that the dryer is
be directly behind the dryer in
installed in a cupboard but the dryer must
order to keep the hose as short
never be installed behind a lockable door,
as possible.
a sliding door or a door with a hinge on the
! Make sure you do not
opposite side to that of the dryer door.
push the tumble dryer too
far backwards, as this could
• ! The appliance must be installed with the
lead to the ventilation hose
rear surface placed against a wall.
being crushed, bent or even
disconnected.
Ventilation
! There should be no cuts, kinks or “U”-shaped bends
This appliance gently dries laundry by taking in cold, clean
in the hose, as these could impede ventilation or trap
and relatively dry air, heating it and passing it through the
condensation.
fabric. To facilitate the drying process, damp air is expelled at
the rear, through a ventilation hose. When the dryer is in use,
Ventilation through an open window
there has to be adequate ventilation to avoid a back flow
of gases into the room from appliances burning other fuels,
The end of the hose must be
including open fires.
facing downwards, in order to
prevent the hot, damp air from
Mobile ventilation system
forming condensation in the
When using the tumble dryer with the mobile ventilation
room or the tumble dryer.
system, a ventilation hose must be connected. The hose
should be securely fastened to the ventilation hole at the
rear of the appliance (see “Description of the tumble dryer”).
We recommend the hose is connected to an outlet near
the tumble dryer, if possible. If it cannot be installed in a
permanent spot, the tumble dryer will still function perfectly
! Make sure that the tumble dryer is adequately ventilated,
well if the ventilation hose is passed through a partially-
and that the end of the ventilation hose is not pointing
opened window.
towards the air inlet pipe on the rear of the appliance.
! Make sure you do not point the ventilation hose towards
! The ventilation hose must always be fitted to ensure
the air inlet, which is located on the rear of the appliance.
optimum performance.
! The ventilation hose should not exceed a maximum length
! Make sure that the ventilation hose and the air inlet vents
of 2.4 metres; it should also be shaken frequently to remove
are not obstructed or blocked.
any fluff, dust or water deposits inside it. Make sure you do
! Do not let the tumble dryer recirculate exhaust air.
not crush the hose.
! Improper use of the tumble dryer may result in fire hazards.
Fixed ventilation system
! The air emitted by the tumble dryer must not be expelled in
We recommend the ventilation hose is connected to a
the same duct as used for the fumes produced by different
ventilation system for windows or doors, available from the
appliances which burn gas or other fuels.
retailer which originally sold you the appliance or from your
! Do not discharge the exhaust air into an extraction system
local spare parts stockist.
or any duct with an extractor fan. This will affect the way the
thermal controls operate and can result in a fire hazard.
Electrical connections
Before plugging the appliance into the so-
cket, check the following:
• Make sure your hands are dry.
• The socket must have an earth connec-
tion.
• The socket must be able to withstand the
machine’s maximum power output as indica-
ted on the rating plate (see Description of the
tumble dryer).
Before you start your dryer
• The power supply voltage must fall within
Once the tumble dryer is installed, clean the inside of the
the values indicated on the rating plate (see
drum before operating it and remove any dirt accumulated
Description of the tumble dryer).
during transportation.
• The socket must be compatible with the
dryer’s plug. Should this not be the case,
replace the plug or the socket.
! DO NOT USE EXTENSION CORDS.
! The dryer must not be installed outdoors,
even if the space is sheltered. It can be very
dangerous if exposed to rain or storms.
! Once installed, the dryer’s electrical wire
and plug must be within reach.
! The power cord must not be bent or
squashed.
! If the plug being replaced is a non-rewirable
type, then the cut-off plug must be disposed
of safely. DO NOT leave it where it can be
inserted into a socket and create a shock
hazard.
! The electric cord must be regularly
checked. If the supply cord is damaged, it
must be replaced by the manufacturer, its
service agent or similarly qualified persons in
order to avoid a hazard.
(see Service). New or
longer power cords are supplied at an extra
charge by authorized dealers.
! The manufacturer denies any responsibility
should any of these rules not be followed.
! If in doubt about any of the above
consult a qualified electrician.
Levelling the tumble dryer
The tumble dryer should be installed level in order to
operate correctly.
After installing the tumble dryer in its permanent position,
make sure it is level; check its side-to-side levelling first,
followed by front-to-back.
If the tumble dryer is not perfectly level, use a wooden
block to support it while you adjust the two front feet, up
or down as necessary.
This household tumble drier is a Vented
The weighted Annual Energy Consumption (AEc)* kWh 1) 472.0
This household tumble drier is a Non-automatic
Energy consumption full load; Edry - kWh 2) 4.02
Energy consumption partial load; Edry½ - kWh 2) 2.14
Power consumption: off-mode (Po) - Watts 0.00
Power consumption: left-on mode (Pl) - Watts N/A
Prog. Time - weighted (Tt) full & partial load - minutes 3) 82
Full load (Tdry) - minutes 109
Partial load (Tdry½) - minutes 62
weighted (Ct) full & partial load 3)
full load (Cdry)
partial load (Cdry½)
Airborne acoustical noise emissions - dB(A) re 1 pW 69.0
Programme time in minute, for program “Synthetics” full load 40
Partial load for program “Synthetics” N/A
Average condensation efficiency - %
1) The "standard cotton” at full and partial load are the standard programmes to
which the information in the label and the fiche relates. The standard cotton
program is suitable to dry at cupboard level (0%) cotton laundry and is the most
efficient programme in terms of energy consumption. Partial load is half the rated
load.
2) based on 160 drying cycles of the standard cotton programme at full and partial
load, and the consumption of the low-power modes. Actual energy consumption
will depend on how the appliance is used.
3) Weighted average of 3 cycles at full load and 4 cycles at half load.
Energy efficiency class on a scale from A+++ (low consumption)
B
to D (high consumption)
Duration of the 'left-on mode' for power management system -
N/A
minutes
Regulation 932/2012.
Energy consumption in kWh, for program “Synthetics” full load 1.18
Condensation efficiency class on a scale from G (least efficient) to
P
roduct Data - Regulation 392/2012.
Brand
N/A
A (most efficient)
Indesit
Maximum load sizes: 7 kg
Model
IDV 75 (EU)
Rated capacity of cotton laundry for the "standard cotton
7.0
programme" at full load - kg
Table of contents
- Instruction manual
- Installation
- Warnings
- Care and maintenance
- Description of the tumble dryer
- Drying settings
- Troubleshooting
- Assistance
- Gebruiksaanwijzing
- Installatie
- Waarschuwingen
- Zorg en onderhoud
- Beschrijving van de wasdroger
- Drooginstellingen
- Problemen en oplossingen
- Service
- Manual de instrucciones
- Instalación
- Advertencias
- Cuidados y mantenimiento
- Descripción de la secadora
- Programación del secado
- Problemas y soluciones
- Asistencia Técnica
- Instruções para a utilização
- Instalação
- Advertências
- Cuidados e manutenção
- Descrição da máquina de secar roupa
- Configuração da secagem
- Problemas e soluções
- Assistência
- Mode d’emploi
- Installation
- Précautions
- Soin et entretien
- Description du sèche-linge
- Paramètres de séchage
- Problèmes et solutions
- Assistance
- Руководство по эксплуатации
- Установка
- Предупреждения
- Уход и обслуживание
- Описание сушильной машины
- Настройки сушки
- Устранение неисправностей
- Сервисное обслуживание
- Нұсқаулық
- Орнату
- Ескертулер
- Күтім көрсету және техникалық қызмет көрсету
- Кептіргіш сипаттамасы
- Кептіру параметрлері
- Ақаулықтарды жою
- Көмек
