Indesit SIXL 129D: instruction
Class: Household, kitchen appliances, electronics and equipment
Type: Laundry Machine


Manual for Indesit SIXL 129D

GB
GB
1
English, 1
Contents
Installation, 2-3
Unpacking and levelling
Connecting the electricity and water supplies
Technical details
Description of the machine, 4-5
Self-cleaning detergent dispenser drawer
Control panel
Load balancing system
Running a wash cycle, 6
Wash programmes, 7
Detergents and laundry, 8
Preparing the laundry
Washing recommendations
Precautions and advice, 9
General safety
Disposal
Saving energy and respecting the environment
Drip-tray system
Care and maintenance, 10
Cutting off the water or electricity supply
Cleaning the machine
Cleaning the detergent dispenser drawer
Caring for the door and drum of your appliance
Cleaning the pump
Checking the water inlet hose
Troubleshooting, 11
Service, 12
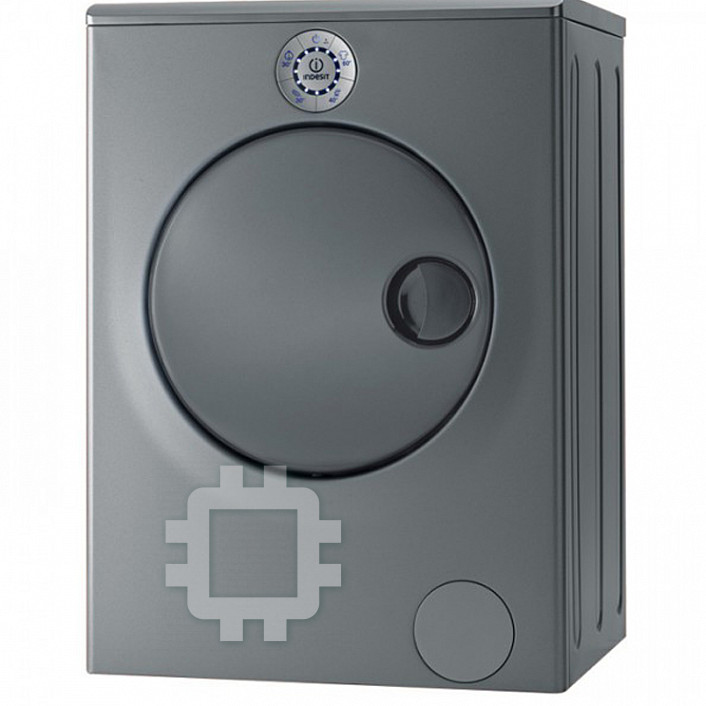
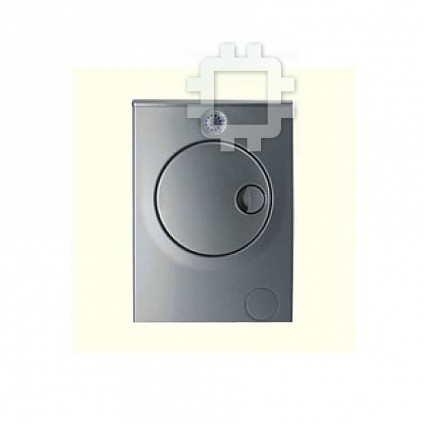
WASHING MACHINE
SIXL 129 D
Instructions for use
GB
Italiano,13
I
Ðóññêèé
,25
CIS
Espanol,37
ES
Português,49
PT
2
GB
A
Installation
This instruction manual should be kept in a safe
place for future reference. If the appliance is sold,
transferred or moved, make sure that the instruction
manual remains with the machine so that the new
owner is able to familiarise himself/herself with its
operation and features.
Read these instructions carefully: they contain vital
information relating to the safe installation and
operation of the appliance.
Unpacking and levelling
Unpacking
1. Unpack the washing machine.
2. Make sure that the machine has not been
damaged during the transportation process. If it has
been damaged, contact the retailer and do not
proceed any further with the installation process.
3. Remove the 4
protective screws (used
during transportation)
and the rubber washer
with the corresponding
spacer, located on the
rear part of the appliance
(
see figure
).
4. Close off the holes using the plastic plugs
provided.
5. Keep all the parts in a safe place: they will be
needed again if the washing machine is moved to
another location.
Packaging materials should not be used as toys for
children.
Levelling
Your machine may make a considerable amount of
noise if the two front feet have not been adjusted
correctly.
1. Install the washing machine on a flat and sturdy
floor, without placing it against walls, cabinets or
other furniture.
2. If the floor is not
perfectly level, compen-
sate for any unevenness
by tightening or loosening
the adjustable front feet
(
see figure);
the angle of
inclination, measured in
relation to the worktop,
must not exceed 2°.
Levelling the machine correctly will provide it with
stability, help to avoid vibrations and excessive noise
and prevent it from shifting while it is operating. If it is
placed on carpet or a rug, adjust the feet in such a
way as to allow a sufficient ventilation space
underneath the machine.
Connecting the electricity and water
supplies
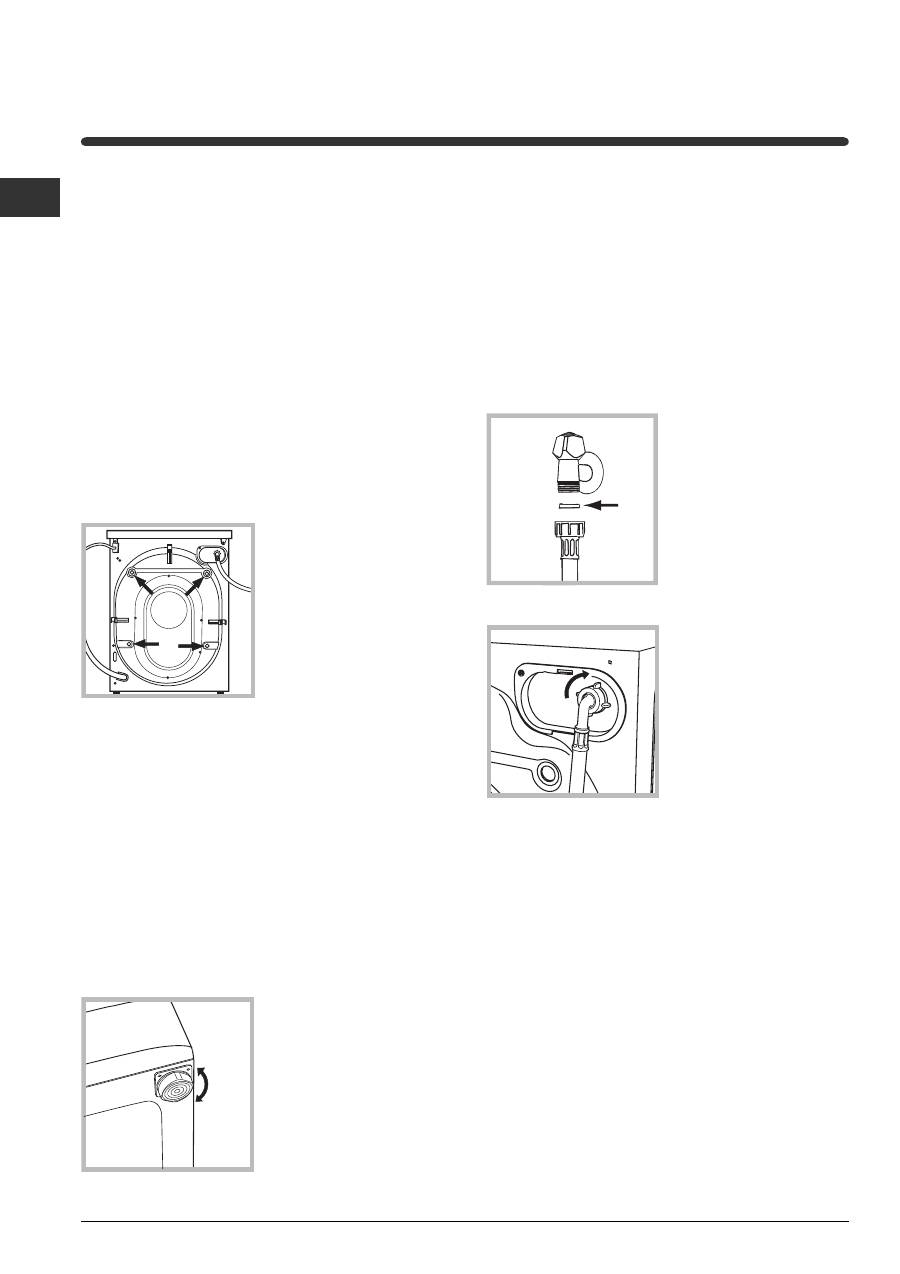
Connecting the water inlet hose
1. Insert seal A into the
end of the inlet hose and
screw the latter onto a
cold water tap with a 3/4
gas threaded opening
(see figure).
Before performing the
connection, allow the
water to run freely until it
is perfectly clear.
2. Connect the inlet hose
to the machine by
screwing it onto the cold
water inlet of the
appliance, which is
situated on the top right-
hand side of the rear part
of the appliance
(see
figure)
.
3. Make sure that the hose is not folded over or bent.
The water pressure at the tap must fall within the
values indicated in the Technical details table
(see
next page).
If the inlet hose is not long enough, contact a
specialised shop or an authorised technician.
GB
GB
3
Technical details
Model
SIXL 129 D
Dimensions
59.5 cm wide
85 cm high
53.5 cm deep
Capacity
from 1 to 6 kg
Electric
connections
please refer to the technical data plate
fixed to the machine
Water
connections
maximum pressure 1 MPa (10 bar)
minimum pressure 0.05 MPa (0.5 bar)
drum capacity 52 litres
Spin speed
up to 1200 rpm
Control
programmes
according to EN
60456 directive
programme ;
run with a load of 6 kg.
This appliance is compliant with the
following European Community
Directives:
- 89/336/CEE of 03/05/89
(Electromagnetic Compatibility) and
subsequent amendments
- 2002/96/CE
- 2006/95/CE (Low Voltage)
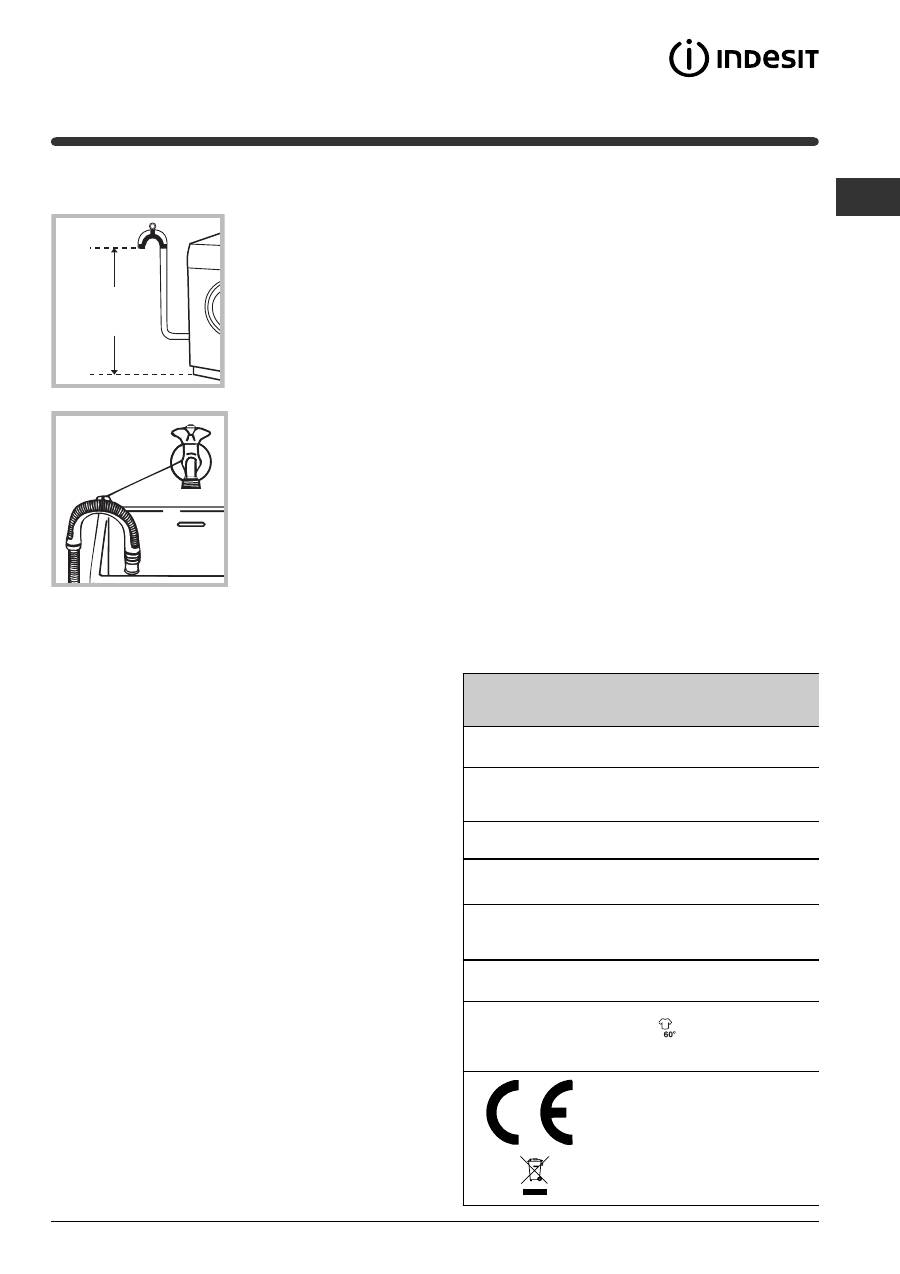
65 - 100 cm
Connecting the drain hose
Connect the drain hose,
without bending it, to a
draining duct or a wall
drain situated between
65 and 100 cm from the
floor;
alternatively, place it
over the edge of a
basin, sink or tub,
fastening the duct
supplied to the tap (
see
figure
). The free end of
the hose should not be
underwater.
We advise against the use of hose extensions; if it
is absolutely necessary, the extension must have the
same diameter as the original hose and must not
exceed 150 cm in length.
Electrical connections
Before plugging the appliance into the electricity
socket, make sure that:
the socket is earthed and complies with all
applicable laws;
the socket is able to withstand the maximum
power load of the appliance as indicated in the
Technical data table
(see opposite);
the power supply voltage falls within the values
indicated in the Technical data table(
see opposite
);
the socket is compatible with the plug of the
appliance. If this is not the case, replace the
socket or the plug.
The machine must not be installed outdoors, even
in covered areas. It is extremely dangerous to leave
the appliance exposed to rain, storms and other
weather conditions.
The mains socket must remain within easy reach
after the washing machine has been installed.
Do not use extension cords or multiple sockets.
The cable should not be bent or compressed.
The power supply cable must only be replaced by
authorised technicians.
Warning! The company shall not be held responsible
in the event that these regulations are not respected.
4
GB
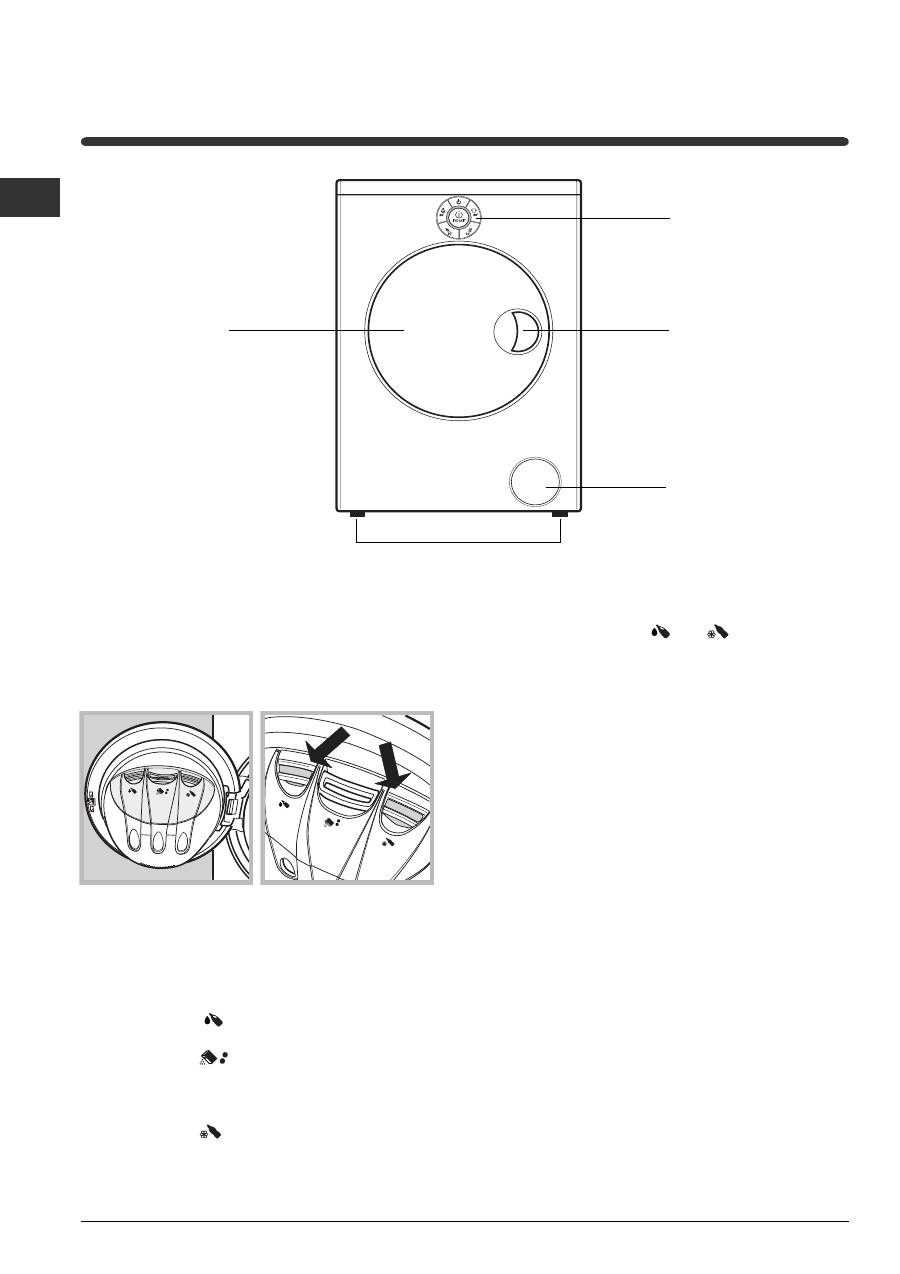
Description of the machine
CONTROL
PANEL
PORTHOLE
DOOR
PORTHOLE
DOOR
HANDLE
ACCESS
PANEL FOR
THE DRAIN
PUMP
Self-cleaning detergent dispenser
drawer
This washing machine is fitted with an innovative self-
cleaning detergent drawer which enhances the
quality of each wash.
The drawer is located inside the porthole door.
1. Open the porthole door to access the detergent
dispenser drawer
(see figure A).
2. Pour the detergent or the additive into the
compartments, over the protective grilles, as follows:
Compartment
: detergent and additives in
liquid form.
Compartment
: detergent in powder or tablet
form and powder addititves.
To place the tablets inside,
lift up the grille
protecting the drawer.
Compartment
: fabric softener.
Pouring liquid detergent or additives into the central
compartment may cause leakages to occur.
The detergent level can be seen through the corresponding
transparent windows provided on the compartment.
Inside compartments
and
, there are also
floating indicators (see figure B) . When the
maximum quantity of detergent/fabric softener has
been measured out, the indicators rise until they
touch the grilles protecting the compartments.
We recommend that the maximum levels
indicated on the detergent dispenser drawer are
not exceeded.
We recommend that the dosage instructions on
the detergent packaging are followed carefully. If
using certain particularly thick types of detergent,
we suggest that these are placed directly inside the
drum and not in the detergent dispenser drawer.
Exceeding the maximum levels indicated on the
machine may cause the detergent to leak out of the
bottom part of the drawer.
Exceeding the stated amount of detergent does not
result in a more effective was; it simply pollutes the
environment more.
The water used during the wash cycle will remove
any excess detergent from the drawer. It is, however,
possible
to remove the drawer manually
(see Care
and Maintenance).
To facilitate the process of measuring out the
detergents, we recommend that the dosing device
supplied with the washing machine is used.
The maximum capacity of the drawer is as follows:
- liquid detergents: 1 1/2 measures
- powder detergents: 2 measures
- fabric softener: 1 measure
MAX
MAX
STOP
ST
OP
A
B
ADJUSTABLE FEET
GB
GB
5
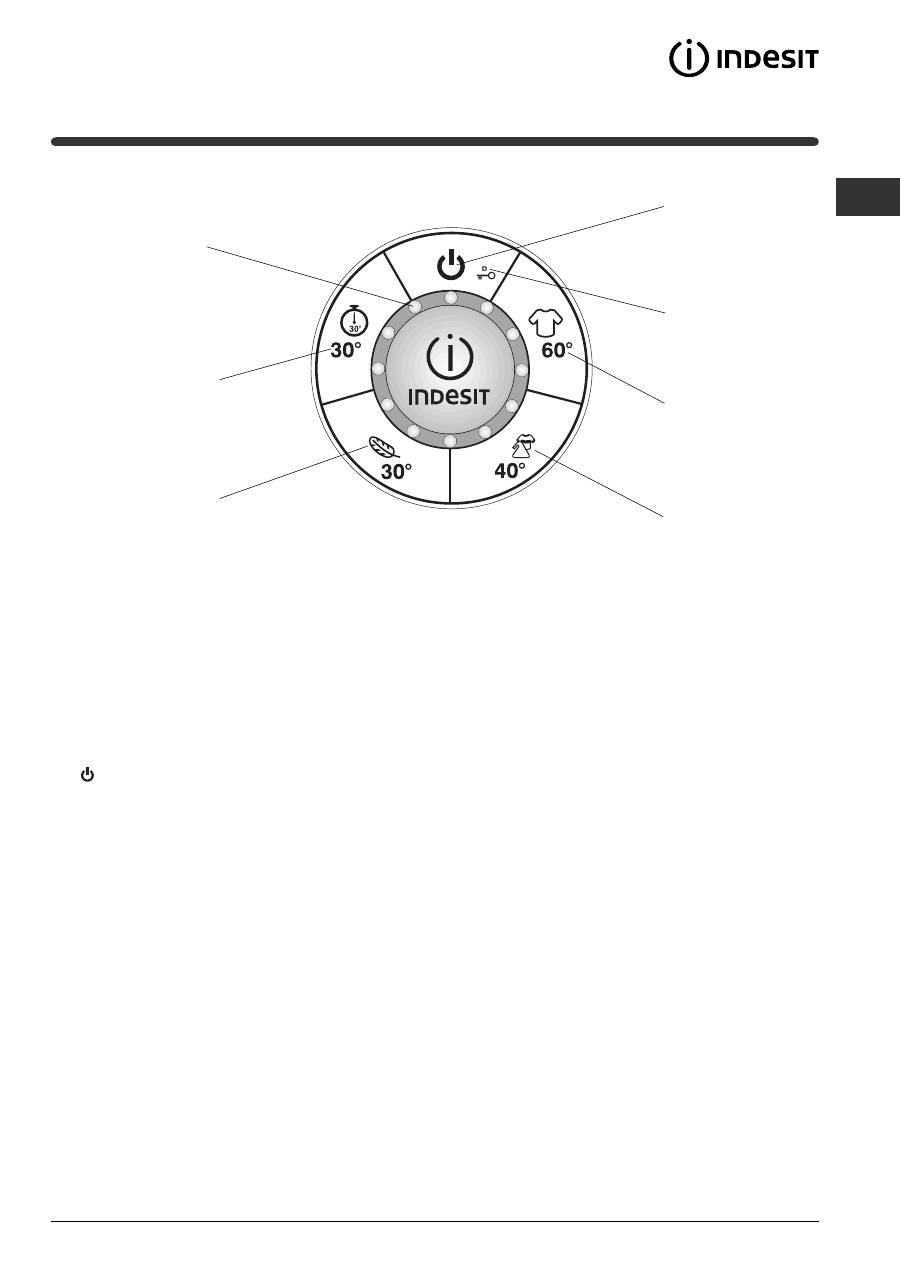
ON/OFF
button
DOOR
LOCKED red
indicator
light
WASHING TIME
INDICATOR
lights
START DAILY
WASH 30
PROGRAMME
button
START DELICATES
PROGRAMME
button
START WHITE
COTTON
PROGRAMME
button
START COLOUR
MIX EASY-IRON
PROGRAMME
button
Control panel
ON/OFF
button: press this to switch the machine on or off.
When the machine is switched on, the buttons
used to start various programmes begin to flash,
while the washing time indicator lights illuminate in
a fixed manner.
To cancel the cycle
, press and hold the on/off button
for approximately 2 seconds while the wash cycle is
in progress.
The indicator light
will flash for a few seconds
and the machine will automatically drain the water in
the tub.
DOOR LOCKED
red
indicator light:
when the indicator light is illuminated the door is
locked to prevent it being opened accidentally; to
avoid damaging the appliance,
wait for the light to
switch off before opening the door after the cycle
has ended or when the cycle is paused. The light
will remain lit for approximately two minutes after
the washing programme has finished.
Rapid flashing of the DOOR LOCKED indicator light
indicates a fault
(see Troubleshooting).
START PROGRAMME
buttons:
press one of these to start the selected washing
programme.
- button lit in a fixed manner: programme in progress.
- buttons flashing: awaiting selection.
WASHING TIME INDICATOR
lights: these light up
in sequence to indicate the progress of the washing
programme.
At the end of the programme all
the indicator lights begin to flash.
For further details, please refer to the chapter entitled
Running a wash cycle.
Load balancing system
To avoid excessive vibrations before every spin, the
machine distributes the load in a uniform manner by
rotating the drum continuously at a speed which is
slightly greater than the washing rotation speed.
When, despite repeated attempts, the load is not
perfectly distributed, the machine spins at a lower
speed than stated for the wash cycle.
If the load is excessively unbalanced, the machine
performs the distribution process instead of spinning.
Balancing attempts may increase the total duration of
the cycle, up to a maximum of 10 minutes.
Table of contents
- Installation
- Description of the machine
- Running a wash cycle
- Wash programmes
- Detergents and laundry
- Precautions and advice
- Care and maintenance
- Troubleshooting
- Service
- Istruzioni per luso
- Installazione
- Descrizione della macchina
- Come effettuare un ciclo dilavaggio
- Programmi di lavaggio
- Detersivi e biancheria
- Precauzioni e consigli
- Manutenzione e cura
- Anomalie e rimedi
- Assistenza
- Ðóêîâîäñòâî ïî ýêñïëóàòàöèè
- Óñòàíîâêà
- Îïèñàíèå ñòèðàëüíîé ìàøèíû
- Âûïîëíåíèå ïðîãðàììû ñòèðêè
- Ïðîãðàììû ñòèðêè
- Ìîþùèå ñðåäñòâà è áåëüå
- Ïðåäóïðåæäåíèÿ èðåêîìåíäàöèè
- Îáñëóæèâàíèå è óõîä
- Óñòðàíåíèåíåèñïðàâíîñòåé
- Ñåðâèñíîåîáñëóæèâàíèå
- Manual de instrucciones
- Instalación
- Descripción de la máquina
- Cómo efectuar unciclo de lavado
- Programas de lavado
- Detergentes y ropa
- Precauciones y consejos
- Mantenimiento y cuidados
- Anomalías y soluciones
- Asistencia Técnica
- Instruções para a utilização
- Instalação
- Descrição da máquina
- Como efectuar um ciclode lavagem
- Programas de lavagem
- Detergentes e roupa
- Precauções e conselhos
- Manutenção e cuidados
- Anomalias e soluções
- Assistência


