Electrolux EHG30235 x: Instruction for the User !
Instruction for the User !: Electrolux EHG30235 x
74
Once the hob has been installed, it is
important to remove any protective materials,
which were put on in the factory.
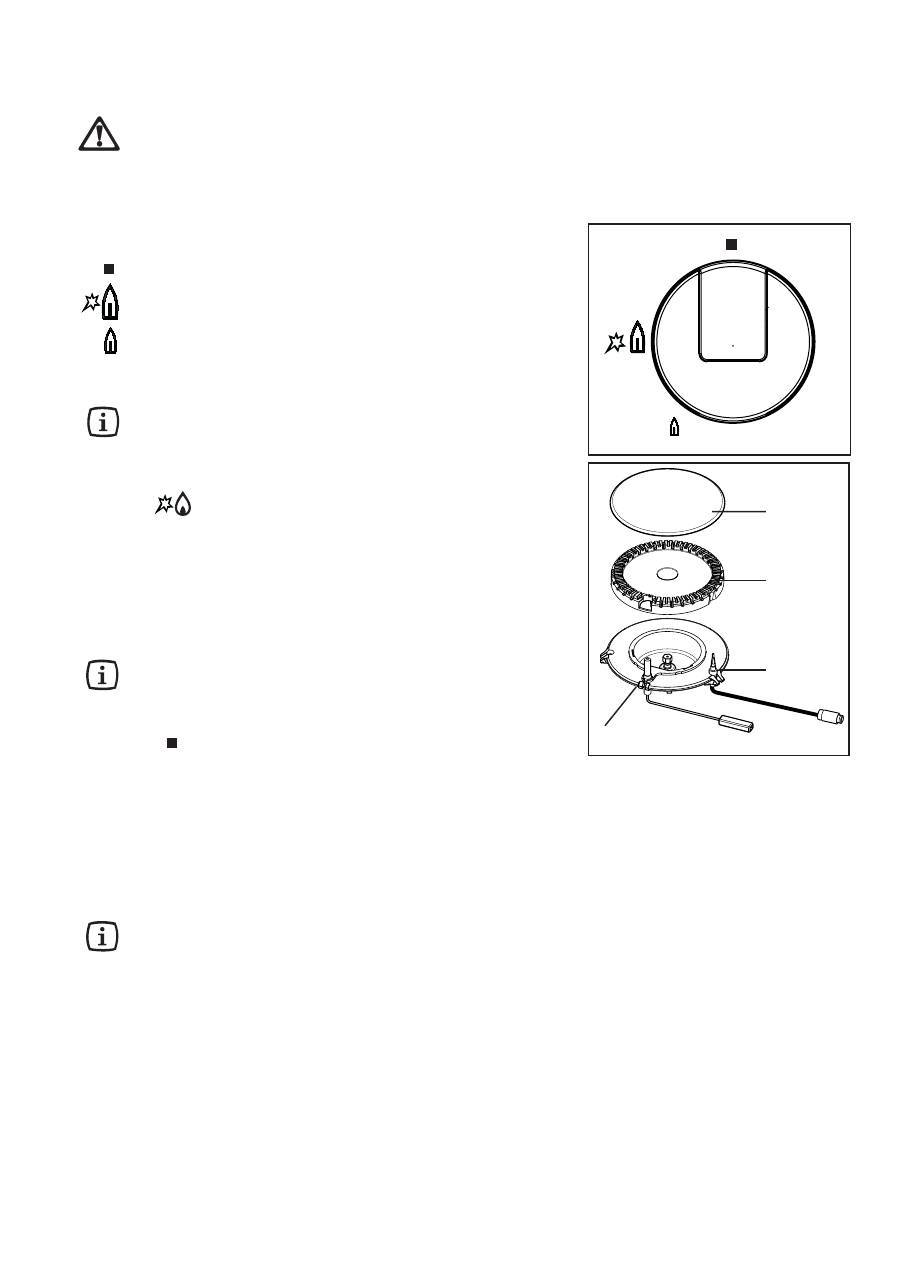
Hob burners control knobs
The hob burners control knobs are situated on the hob
right hand side. The symbols on the knobs mean that:
there is no gas supply
there is maximum gas supply
there is minimum gas supply
Lighting the burners
For easier lighting, proceed before putting a
pan on the pan support.
To light a burner:
1. turn the relevant knob anticlockwise to maximum po-
sition (
) and push down the knob to ignite.
2. After lighting the flame, keep the knob pushed down
for about 5 seconds. This will allow the "thermocouple"
(Fig. 1, lett. D) to be heated and the safety device to
be switched off, otherwise the gas supply would be
interrupted.
3. Then, check the flame is regular and adjust it as
required.
If you cannot light the flame even after several
attempts, check the "cap" (Fig. 1, lett. A) and the
"crown" (Fig. 1, lett. B) are in the correct position.
To put the flame out, turn the knob to the "off" position
(symbol
)
).
• Always turn the flame down or put it out before
taking the pans off the burner.
In the absence of electricity, ignition can occur without
the electrical device; in this case approach the burner
with a flame, push the relevant knob down and turn it anti-
clockwise until it reaches the "maximum" position.
When switching on the mains, after installation or
a power cut, it is quite normal for the spark
generator to be activated automatically.
Instruction for the User !
Fig. 1
A - Burner cap
B - Burner crown
C - Ignition candle
D - Thermocouple
A
B
C
D
75
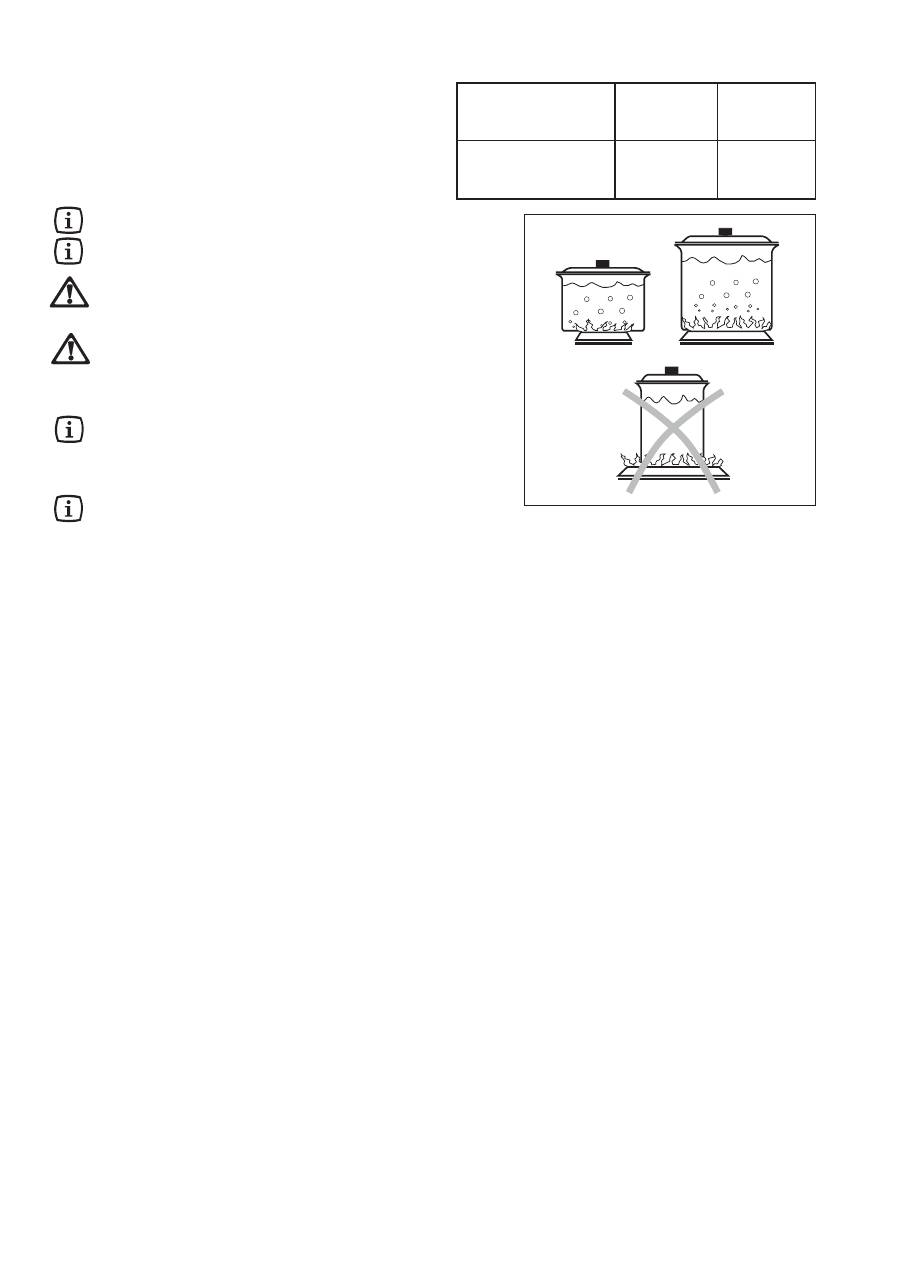
Using the hob correctly
To ensure maximum burner efficiency, it is strongly
recommended that you use only pots and pans with a
bottom fitting the size of the burner used, so that flame
will not spread beyond the bottom of the vessel (see the
table beside and Fig. 2). It is also advisable, as soon as
a liquid starts boiling, to turn down the flame so that it will
barely keep the liquid simmering.
Use only pans or pots with flat bottom.
Pots must not enter the control zone.
Carefully supervise cookings with fats or il,
since these types of foodstuff can result in a
fire, if over-heated.
Prolonged cooking with potstones,
earthenware pans or cast-iron plates is
inadvisable. Also, do not use aluminium foil
to protect the top during use.
Make sure pots do not protrude over the edges of
the cooktop and that they are centrally positioned
on the rings in order to obtain lower gas
consumption.
Do not place unstable or deformed pots on the
rings: they could tip over or spill their contents,
causing accidents.
Fig. 2
Burner
minimum
maximum
diameter
diameter
Large (rapid)
160 mm
240 mm
Small (auxiliary)
80 mm
160 mm
Table of contents
- Para su seguridad
- Indice
- Descripción del aparato
- Instrucciónes para el usuario
- Limpieza y mantenimiento
- Asistencia Tecnica - Piezas derecambio originalesGarantía/Servicio postventa
- Garantía europea
- Caracteristicas Tecnicas Instrucciónes para el instalador
- Conexión eléctrica
- Adaptación de los quemadores de lasencimera a los diversos tipos de gas
- Empotrado en los muebles de cocina
- Posibilidades de colocación
- Para a sua segurança
- Índice
- Instruções para o utilizador
- Limpeza e manutenção
- Garantia/Assistência Técnica
- Garantia europeia
- Instruções para o técnico instalador Características técnicas
- Ligação eléctrica
- Adaptação aos diferentes tipos de gás
- Encastre nos móveis de cozinha
- Possibilidade de encastrar
- Для Вашей безопасности
- СодержаниеУказания для пользователя Описание прибора
- Чистка и уход
- Эвpoрейскaя гарантия
- Технические характеристики Указания для установщика
- Электрическое подключение
- Переоборудование на другие типы газа
- Встраивание
- Варианты установки
- För din säkerhet
- Innehåll Beskrivning av produkten
- Instruktioner för användaren
- Rengöring och underhåll
- Tekniska dataInstruktioner för installatören
- Elektrisk anslutning
- Anpassning för olika gastyper
- Inbyggnad
- Alternativ för inbyggnad
- Garanti/Kundtjänst
- Europa-garanti
- Turvallisuuden vuoksi
- Sisältö Laitteen kuvaus
- Ohjeita käyttäjälle
- Puhdistus ja kunnossapito
- Tekniset tiedotOhjeita asentajalle
- Sähköliitäntä
- Eri kaasutyyppien edellyttämät toimenpiteet
- Asentaminen
- Asennusmahdollisuudet
- Takuu
- Euroopan takuu
- Per la Vostra sicurezza
- Indice
- Istruzioni per l'uso
- Pulizia e manutenzione
- Caratteristiche tecniche
- Istruzioni per l'installatore
- Collegamento alimentazione gas
- Collegamento elettrico
- L'incasso nei mobili componibili
- Assistenza e ricambi
- Garanzia/Servizio clienti
- Garanzia europea
- English
- Contents
- Instruction for the User !
- Cleaning and Maintenance
- Instruction for the Installer
- Electrical connection
- Gas connection
- Adaptation to different types of gas
- Building In
- Possibilities for insertion
- Service and original Spare Parts
- European guarantee
- Română
- Cuprins
- Instrucţiuni pentru utilizator
- Curăţarea și întreţinerea
- Instrucţiuni pentru instalator
- Racordarea electrică
- Racordarea la gaz
- Adaptarea la diferitele tipuri de gaz
- Încorporarea
- Posibilităţi de încorporare
- Asistenţă și piese de schimb
- Garanţie/Service


