Electrolux ZP 3520: instruction
Class: Household, kitchen appliances, electronics and equipment
Type:
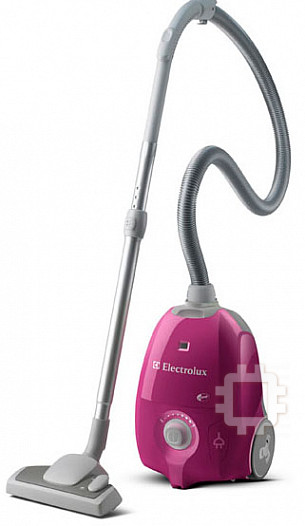
Manual for Electrolux ZP 3520
2193515-01
EN
Operating Instructions
2-3
CZ
Návod k použití
4-5
DK
Brugsanvisning
6-7
BG
Инструкция за употреба
8-9
SV
Bruksanvisning
10-11
EST
Kasutusjuhend
12-13
FR
Mode d‘emploi
14-15
GR
Οδηγίες χρήσεως
16-17
NO
Bruksanvisning
18-19
SK
Návod na použitie
20-21
ES
Instrucciones de uso
22-23
SCG
Uputstvo za upotrebu
24-25
TR
Kullanma Kılavuzu
26-27
NL
Gebruiksaanwijzing
28-29
FI
Käyttöohje
30-31
HR
Uputstvo za upotrebu
32-33
IT
Istruzioni per l‘uso
34-35
LV
Lietošanas instrukcija
36-37
LT
Naudojimo instrukc
ija
38-39
PL
Instrukcja obsług
i
40-41
PT
Instruções de utilização
42-43
SL
Navodila za uporabo
44-45
RO
Instrucţiuni de folosire
46-47
DE
Gebrauchsanweisung
48-49
HU
Használati útmutató
50-51
RU
Инструкция по зксплуатации
52-53
Share more of our thinking at www.electrolux.com
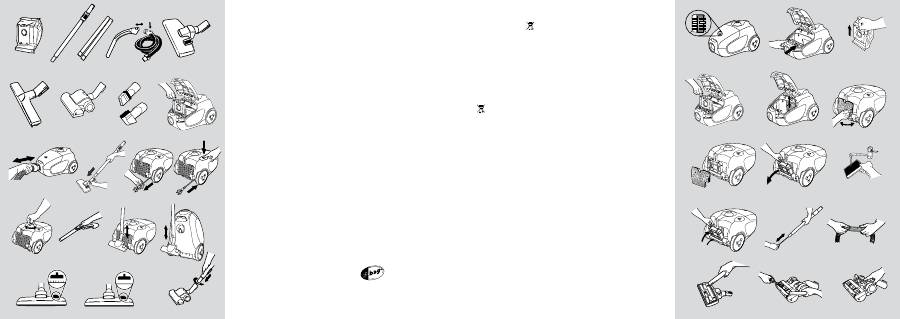
1. 3. 2. 4. 5. 6. 7. 8. 10. 11. 12. 13. 14. 15. 16. 17. 18. 19. 9. 20. 22. 23. 24. 26. 27. 28. 29. 30. 31. 32. 33. 34. 25. 21.
1.
2.
English
Accessories
1
Dust bag, s-bag®
2*
Telescopic tube
3*
Extension tube (2)
4
Hose handle + hose
5
Carpet/hard oor nozzle
6*
Parquet nozzle
7*
Turbo nozzle
8
Combination nozzle
Safety precautions
This appliance is not intended for use by persons (including
children) with reduced physical, sensory or mental capabili-
ties, or lack of experience and knowledge, unless they have
been given supervision or instruction concerning use of the
appliance by a person responsible for their safety.
The vacuum cleaner features double insulation and does
not need to be earthed.
Children should be supervised to ensure that they do not
play with the appliance.
Never vacuum:
In wet areas.
•
Close to ammable gases, etc.
•
Without an s-bag® (this may damage the cleaner). A
•
safety device is tted which prevents the cover to close
without an s-bag®. Do not attempt to force cover to close.
Sharp objects.
•
Fluids (this can cause serious damage to the machine).
•
Hot or cold cinders, lit cigarette butts, etc.
•
Fine dust from plaster, concrete, our or ash, for example.
•
The above can cause serious damage to the motor –
•
damage which is not covered by the warranty.
Electrical cable precautions:
If the supply cord is damaged, it must be replaced by
•
the manufacturer, it’s service agent or similary quali ed
person in order to avoid a hazard. Damage to the cleaner
cable will not be covered by the warranty.
Never pull or lift the vacuum cleaner by the cable.
•
Disconnect the plug from the wall socket before cleaning
•
or maintaining the vacuum cleaner.
Regularly check that the cable is not damaged. Never use
•
the vacuum cleaner if the cable is damaged.
All service and repairs must be carried out by an authorised
Electrolux service centre. Always keep the vacuum cleaner
in a dry place.
Before starting
(9.)
Check that the dust bag; s-bag® and motor filter are
in place.
(10.)
Insert the hose until the catch clicks to engage
(press the catch to release the hose).
(4.)
Insert the hose in the handle until the catch clicks
to engage (press the catch to release the hose ).
(11.)
Attach the extension wand or telescopic wand
(only on certain models) to the hose handle and
oor nozzle (to take them apart again, twist and
pull).
(12.)
Extend the cord and plug it into the wall socket.
The vacuum cleaner has an integrated cord winder.
To rewind the cable press the foot pedal (take hold
of the plug to prevent it striking you).
(13.)
Start the vacuum cleaner by rotaring the power
control button.
(13./14.) Adjust suction power using the power control but-
ton on the vacuum cleaner or the suction control
on the hose handle.
(15.)
A practical parking feature (as well as minimizing
the risk of breakage) makes things easier when
pausing during cleaning.
(16.)
The parking feature makes it easier to move and
store the vacuum cleaner.
Use the nozzles as follows:
Carpets:
Use the carpet/hard oor nozzle with the lever in
position (17). Reduce suction power for small carpets.
Hard floors:
Use the carpet/hard oor nozzle with the lever
in position (18).
Wooden oors:
Use the parquet nozzle (certain models only,
6).
Special combined nozzle:
Detach the nozzle from the ac-
cessory dock and use it for bookshelves (with folding out
of the „brush” end) or crevices, corners (with the „crevice”
end) (8.)
Using the turbo nozzle
(certain models only) (7.)
(19.)
Attach the nozzle to the tube.
Note: Do not use the power or turbo nozzle on fur rugs, rugs
with long fringes or a pile depth exceeding 15 mm. To avoid
damaging the carpet, do not keep the nozzle stationary whilst
the brush is rotating. Do not pass the nozzle across electric ca-
bles, and be sure to switch o the vacuum cleaner immediately
after use.
Replacing the s-bag®/cleaning the filter
Changing dust bag, s-bag®
The dust bag must be replaced latest when the indicator
window is completely red. Read with the nozzle lifted up
(20.).
1.
Open the lid.
2.
Push the dust bag holder backward (21.) and close the
bag by sliding tab (22.).
3.
Lift out the dust bag (23.).
Beware: Lift out the bag carefully if it’s completely full.
4.
Insert the new dust bag from upside by pushing the
holder backward again.
5.
Before closing the lid make sure the holder is in the
forward position and the dust bag cardboard ts over
the pipe-stub.
When purchasing new dust bags, look for this symbol on the
dust bag packaging:
2 59 Türkçe
Ürün veya ürünün ambalajı üzerindeki
sembolü, bu
ürünün normal ev atığı gibi işlem göremeyeceğini belirtir.
Bunun yerine ürün, elektrikli ve elektronik ekipmanların
geri dönüşümü için belirlenen toplama noktalarına teslim
edilmelidir. Ürünün hatalı bir şekilde atılması veya imha
edilmesi çevre ve insan sağlığı açısından olumsuz sonuçlara
yol açabilir. Bu nedenle, bu ürünün doğru bir şekilde elden
çıkarılmasını sağlayarak potansiyel olumsuz sonuçları önle-
meye yardımcı olmuş olursunuz. Bu ürünün geri dönüşümü
hakkında daha detaylı bilgi için lütfen mahalli idareyle, ev
çöpü toplama servisiyle ya da ürünü satın aldığınız mağaza
ile temasa geçiniz. Cihazınızın kullanma ömrü 10 yıldır. Kul-
lanma ömrü, tüketici ve/veya ithalatçı firmanın cihazınızla
ilgili yedek parça temini ve bakým bakım süresini ifade eder.
Slovenščina
Simbol
na izdelku ali njegovi embalaži označuje, da z
izdelkom ni dovoljeno ravnati kot z običajnimi gospodinjskimi
odpadki. Izdelek odpeljite na ustrezno zbirno mesto za
predelavo električne in elektronske opreme. S pravilnim
načinom odstranjevanja izdelka boste pomagali preprečiti
morebitne negativne posledice in vplive na okolje in
zdravje ljudi, ki bi se lahko pojavile v primeru nepravilnega
odstranjevanja izdelka. Za podrobnejše informacije o
odstranjevanju in predalavi izdelka se obrnite na pristojen
mestri organ za odstranjevanje odpadkov, komunalno službo
ali na trgovino, v kateri ste izdelek kupili.

3
Replacing the motor filter
Should be done with every 5th replacement of the dust bag,
s-bag ®
1.
Open the lid.
2.
Remove the old filter (24.).
3.
Insert a new filter and close the lid.
Replacement of the micro filter and the non-washable
HEPA filter *
The filter must always be replaced with new ones and cannot
be washed. Should be done with every 5th replacement of the
dust bag, s-bag ®
1.
Open and remove the lid (25. ; 26.).
2.
Remove the filter and replace it with a new one as
shown in the picture (27. ; 29.).
Important: snap on the lower part of the filter frame rst
then after the upper one. Make sure the sealing is in place.
Cleaning the washable HEPA filter*
Should be done with every 5th replacement of the dust bag,
s-bag®
1.
Open and remove the lid, then remove the filter (25. ;
26.).
2.
Rinse the inside (dirty side) of the filter in warm tap
water. (28.) Tap the filter frame to remove excess water.
Repeat four times and allow the filter to dry.
Note: Do not use cleaning agents and avoid touching the
delicate filter surface.
3
Replace the filter and lid as shown (27. ; 29.).
Important: snap on the lower part of the filter frame rst
then after the upper one. Make sure the sealing is in place.
Cleaning the hose and nozzle
The vacuum cleaner stops automatically if the nozzle, tube,
hose or filters and s-bag® becomes blocked. In such cases,
disconnect from wall socket and allow to cool for 20-30
minutes. Clear blockage and/or replace filters and s-bag®
and restart.
Cleaning tubes and hose
(30.) Use a cleaning strip or similar to clear the tubes and
hose.
(31.) It may also be possible to remove the obstruction in
the hose by squeezing it. However, be careful in case
the obstruction is caused by glass or needles caught
inside the hose.
Note: The warranty does not cover any damage to the hose
caused by cleaning it.
Cleaning the floor nozzle
(32.) To avoid deterioration of suction power, frequently
clean the carpet/hard floor nozzle. The easiest way to
clean it is by using the hose handle.
Cleaning the turbo nozzle
(certain models only)
(33.) Disconnect the nozzle from the vacuum cleaner tube
and remove entangled threads, etc. by snipping them
away with scissors. Use the hose handle to clean the
nozzle.
(34.) In case the turbo nozzle stops working, open the
cleaning lid and remove any objects that obstructs the
turbine to rotate freely.
Troubleshooting
The vacuum cleaner does not start
1
Check that the cable is connected to the mains.
2
Check that the plug and cable are not damaged.
3
Check for a blown fuse.
The vacuum cleaner stops
1
Check whether the dust bag, s-bag® is full. If so, replace
it with a new one.
2
Is the nozzle, tube or hose blocked?
3
Are the filters blocked?
Water has entered the vacuum cleaner
It will be necessary to replace the motor at an authorised
Electrolux service centre. Damage to the motor caused by
the penetration of water is not covered by the warranty.
Consumer information
Electrolux decline all responsibility for all damages arising
from any improper use of the appliance or in cases of tam-
pering with the appliance.
This product is designed with the environment in mind. All
plastic parts are marked for recycling purposes. For details
see our web site: www.electrolux.com
Dustbags and accessories!
If you are experiencing difficulties in finding the right
dustbag, filter or accessories to your new vacummcleaner
- please call our callcentre (you will find the number in the
warranty folder) or visit our webshop at www.electrolux.
co.uk
* Certain models only
Table of contents
- 1. 3. 2. 4. 5. 6. 7. 8. 10. 11. 12. 13. 14. 15. 16. 17. 18. 19. 9. 20. 22. 23. 24. 26. 27. 28. 29. 30. 31. 32. 33. 34.25. 21.
- 3
- 4 5 Česky
- 6 7 Dansk
- 8 9 Български
- 10 11 Svenska
- 12 13 Eesti keeles
- 14 15 Français
- 16 17 Ελληνικά
- 18 19 Norsk
- 20 21 Slovensky
- 22 23 Español
- 24 25 Srpski
- 26 27
- 28 29 Nederlands
- 30 31 Suomi
- 32 33 Hrvatski
- 34 35 Italiano
- 36 37 Lietuviškai
- 38 39 Latviskii
- 40 41 Polski
- 42 43 Português
- 44 45 Slovenščina
- 46 47 Română
- 48 49 Deutsch
- 50 51 Magyar
- 52 53 Pусский
- 54 55
- 56 57 English
- 58 Polski


