Electrolux EHG30235 x: Building In
Building In: Electrolux EHG30235 x
81
Fitting the hob to the worktop
The hob can be installed in a kitchen unit with an opening
for insertion whose dimensions are shown in Fig. 11. To
install the hob, proceed as follows:
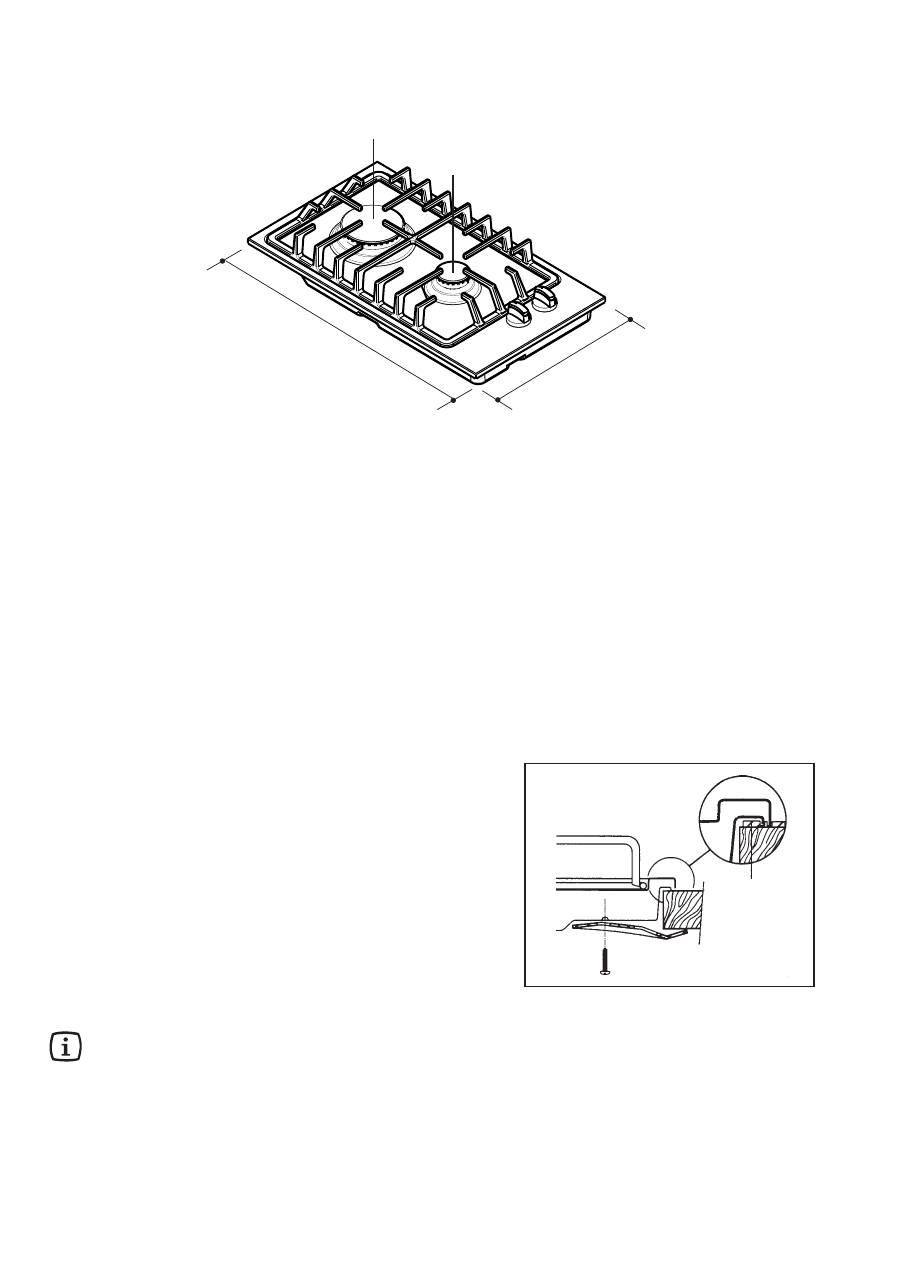
1) Place the seals supplied with the hob all around the
edge of the cut out, taking care that the sealings
meet without overlapping.
2) Place the hob in the cut out, taking care that it is
centred.
3) Fix the hob with the relevant screws (Fig. 10). The
traction of the screws is able to trace the sealing, any
excess of which can be easily removed.
The edge of the hob forms a double labyrinth seal which
provides a total guarantee against infiltration of liquids.
This hob can be inserted in a built-in kitchen unit whose
depth is between 550 and 600 mm. The hob dimensions
are shown in figure 9.
The edge of the cut out must have a minimum distance
from the rear wall of 55 mm.
If there are side walls, or sides of the furniture unit near
the hob, the cut out edges must have a minimum
distance of 100 mm.
R
= Rapid burner
A
= Auxiliary burner
Building In
Fig. 10
a
a) Sealing gasket
Fig. 9
290
510
R
A
Dimensions are given in millimeters
If several 30 cm hob are to be installed side by
side into the same cut out, an assembly kit
including a support side bracket and
supplementary sealings is available at our After
Sales Centres. The relevant installation instructions
are supplied within the kit package.
Table of contents
- Para su seguridad
- Indice
- Descripción del aparato
- Instrucciónes para el usuario
- Limpieza y mantenimiento
- Asistencia Tecnica - Piezas derecambio originalesGarantía/Servicio postventa
- Garantía europea
- Caracteristicas Tecnicas Instrucciónes para el instalador
- Conexión eléctrica
- Adaptación de los quemadores de lasencimera a los diversos tipos de gas
- Empotrado en los muebles de cocina
- Posibilidades de colocación
- Para a sua segurança
- Índice
- Instruções para o utilizador
- Limpeza e manutenção
- Garantia/Assistência Técnica
- Garantia europeia
- Instruções para o técnico instalador Características técnicas
- Ligação eléctrica
- Adaptação aos diferentes tipos de gás
- Encastre nos móveis de cozinha
- Possibilidade de encastrar
- Для Вашей безопасности
- СодержаниеУказания для пользователя Описание прибора
- Чистка и уход
- Эвpoрейскaя гарантия
- Технические характеристики Указания для установщика
- Электрическое подключение
- Переоборудование на другие типы газа
- Встраивание
- Варианты установки
- För din säkerhet
- Innehåll Beskrivning av produkten
- Instruktioner för användaren
- Rengöring och underhåll
- Tekniska dataInstruktioner för installatören
- Elektrisk anslutning
- Anpassning för olika gastyper
- Inbyggnad
- Alternativ för inbyggnad
- Garanti/Kundtjänst
- Europa-garanti
- Turvallisuuden vuoksi
- Sisältö Laitteen kuvaus
- Ohjeita käyttäjälle
- Puhdistus ja kunnossapito
- Tekniset tiedotOhjeita asentajalle
- Sähköliitäntä
- Eri kaasutyyppien edellyttämät toimenpiteet
- Asentaminen
- Asennusmahdollisuudet
- Takuu
- Euroopan takuu
- Per la Vostra sicurezza
- Indice
- Istruzioni per l'uso
- Pulizia e manutenzione
- Caratteristiche tecniche
- Istruzioni per l'installatore
- Collegamento alimentazione gas
- Collegamento elettrico
- L'incasso nei mobili componibili
- Assistenza e ricambi
- Garanzia/Servizio clienti
- Garanzia europea
- English
- Contents
- Instruction for the User !
- Cleaning and Maintenance
- Instruction for the Installer
- Electrical connection
- Gas connection
- Adaptation to different types of gas
- Building In
- Possibilities for insertion
- Service and original Spare Parts
- European guarantee
- Română
- Cuprins
- Instrucţiuni pentru utilizator
- Curăţarea și întreţinerea
- Instrucţiuni pentru instalator
- Racordarea electrică
- Racordarea la gaz
- Adaptarea la diferitele tipuri de gaz
- Încorporarea
- Posibilităţi de încorporare
- Asistenţă și piese de schimb
- Garanţie/Service


