Binatone FS-404 D: BEFORE USING THE APPLIANCE
BEFORE USING THE APPLIANCE: Binatone FS-404 D
19.Control panel
20.LCD
21.Water inlet
22.Power cord winding attachment
BEFORE USING
THE APPLIANCE
Carefully read this user’s manual.
Remove all packing materials from the appli-
ance.
Thoroughly wash food steamer, in particular,
the parts to be in contact with food (ref. to Main-
tenance and cleaning section).
Before switching on, check whether the voltage
indicated on the appliance complies with the voltage in your house-
hold.
OPERATING INSTRUCTIONS
Food steamer assembly and
operation
1. Install the food steamer base (16) on a rigid,
even heat-insulated surface near a socket and out
of children’s reach.
2. Install removable steam concentrator (13).
3. Fill the tank (14) with water taking note of the water level indica-
tor (17). 850 ml is enough for 1 hour of normal operation of the
food steamer.
Note: Fill the reservoir (14) with cold tap water only. Do
not use other liquids or food dressings!
4. Install the steam condensing tank (12) on the water tank (14).
5. Put the food in the basket(s). When using several baskets, please
remember that foods that cook slowly should be placed in the lower
basket, while fast cooking foods – are placed in upper basket.
6. For cooking bulk and liquid products as well as products oozing
liquids during cooking, use the special rice cup (11) to be installed
in the steam basket.
7. Install the basket (5) on the steam condensing tank (12). When
using two tanks, put the upper basket (3) on the lower basket (5).
When using three baskets, install container (5) on the steam con-
densing tank (12), then put the middle container (4) on top, after
that - ring (10) and upper basket (3). For convenience of assem-
bly, there are installation marks, on the handles. The baskets are
numbered from top to bottom.
8. If the rice cup is used (11), put it into the upper basket.
9. Cover the upper basket with the lid (1).
10.Plug the appliance into the power. The symbols «00:00» will ap-
pear in the display (20). While this symbol is flashing, set the cur-
rent time by using buttons «+» and «-». Confirm the setting by press-
ing «0/I» button. To change time, switch the food steamer to the
6

time resetting mode; to do this, simultaneously press the buttons
«0/I» and «PROG».
11.For quick start, press «0/I» twice. The operation indicator (18)
will light up, an audio signal will sound and the food steamer will
start cooking. The preset time (40 minutes) will appear in the dis-
play (20), and the appliance will start the countdown.
12.If you want to set up another operation time for the food steamer,
press the «0/I» button. The preset time (40 minutes) will appear in
ENGLISH
the display (20). While the time digits are blinking, decrease or
increase it, by using the «+/-» buttons, respectively. Confirm the
setting by pressing the «0/I» button.
13.To cancel a time setting, press «0/I» while cooking. The display
(20) will stop the countdown of cooking time and will return to the
clock mode.
14.Time can be increased or reset while cooking. To do this, press the
«+/-» button the required number of times. Once the set up time
indicators stop blinking, the appliance will start operating in ac-
cordance with the new settings.
15.If the water level approaches the lowest mark, add water in the
reservoir (14) through the water inlet (21).
16.When foods in the upper basket (3) are ready, carefully remove
that basket from the food steamer and cover the remaining
basket(s) with the lid.
Attention: Do not forget that steam can escape from the
appliance during cooking. Be careful and always use oven
gloves to remove the baskets from the food steamer. Always
cover the upper basket with the lid.
17.Upon the expiration of the cooking time the food steamer will turn
off automatically. You will hear an audible warning signal and the
indicator lamp (18) will go out.
Note: While cooking big dishes (chicken, for instance), you
can remove the bottom of the steam basket (8) to increase
the useful capacity of the food steamer (ref. to Fig. B). For
this purpose, push the bottom of the steam container from
below with your left hand and hold the removable bottom
from inside with your right hand, simultaneously releasing
the rim (9) from one of the clamps of the steam container
(7). Release the rim (9) from the remaining three clamps (7)
by pushing it with the right hand thumb (Fig. B). To reinstall
the container bottom, place the rim (9) in the steam con-
tainer (7) clamp from one side. Follow the same procedure
and fix the bottom (8) in the three remaining clamps (7) by
pushing the container bottom toward the center to allow the
clamp (7) to sit under the rim of the steam container (9).
7

Delayed start (up to 24 hours)
The food steamer has a “delayed start” function which allows
you to program the appliance for automatic turn-on and opera-
tion within the required time limits.
1. Press button «PROG» and set the desired delayed time.
2. Press button «PROG» once again. The preset operation time (40
minutes) will appear in the display (20). Adjust time as desired by
pressing the «+/-» buttons.
3. Press the «PROG» button the third time to confirm the program
settings. Icon «Delayed start» will appear in the display (20) (Fig.
C).
4. You can check the details of your settings by pressing «PROG».
Again, the delayed time and cooking time will appear in the dis-
play (20).
5. To cancel the delayed start, press and held the «PROG» button
for 2 seconds.
Insufficient water in the tank audible warning
signal
If water in the tank (14) has been used during the cooking or tem-
perature maintenance, the icon “Add Water” will appear in the dis-
play (20) (Fig. C). Cooking will be suspended, 5 audible signals will
sound and the time to the end of the process will be displayed. When
this happens, it’s necessary to add water via the water inlet (21) and
press «0/I» to complete the procedure. The appliance may not start
immediately as the thermostat needs time for cooling.
Keep warm function
Upon completion of the cooking process, 3 audible signals will
sound. The display (20) will show current time and icon «Tempera-
ture Maintenance» (Fig. C). The food steamer will automatically fol-
low the following operational cycle – for 5 minutes the steamer is off,
then for 2 minutes the steamer is on – this continues until the water in
the tank is finished. Then, the «Temperature Maintenance» icon will
change to the «Add Water» icon.
Cooking
Food (with the exception of frozen vegetables) to be steam cooked
must be completely defrosted. Do not salt products before cooking
and do not use food dressings. Sauces, seasonings and food dress-
ings should be added after cooking. The tables presented below con-
tain recommendations on cooking different products provided that
these products are laid in one layer. If several containers are used,
the cooking time will increase since the same amount of vapor is em-
ployed for a bigger volume of products. If you put products in upper
containers, cooking time shall also be increased.
Do not forget: the further products are away from the heating ele-
ment, the longer the food cooking process will be. Cooking time should
be increased if products are layered in the basket. In this case, all
slices of the product must be either of equal size, or bigger slices must
be laid on the bottom.
To determine the exact cooking time and achieve the desired re-
8

sult, you will need to experiment at first. If you are using a food
steamer for the first time, follow the guidelines written in the tables
or tips on the base (16), checking the degree of food readiness
from time to time.
Always put meat and chicken in the lowest basket this is to prevent
liquid coming into contact with other foods. The liquids gathered in the
steam condensing tank can be used for making the sauce or gravy.
Remember that fish is ready when it is white and flaky. Meat is
ENGLISH
ready when the juices run clear. Cook greens like cabbage, broccoli,
etc., very quickly to keep a good colour and texture.
Keeping an eye on cooking time is necessary. If you noticed that
most of the product in the basket is ready, turn it over using a long
handled spoon and oven gloves. Upon finishing the cooking time, im-
mediately remove the containers from the food steamer, otherwise
the cooking process continues. Put the containers on a dish or food-
tray to let any remaining water disappear. Then serve your foods.
Rice
There are several kinds of rice, so follow the guidelines.
Carefully measure the required amount of rice and water and mix
them in the rice cup (11). Pure sufficient amount of water in the
tank (14). Close the lid and cook.
To cook soft rice, increase the amount of water mixed with rice, in
accordance with the table. To cook firm rice, reduce the amount of
water.
Check when the rice is ready at the minimum time indicated for the
type of rice you are cooking; stir rice more frequently.
While checking and stirring the rice, do not allow water from the
lid (1) to enter the cup (11) as this might affect the quality and
taste of steamed rice.
After rice is cooked, salt, pepper, oil or a bouillon cube may be
added to the rice.
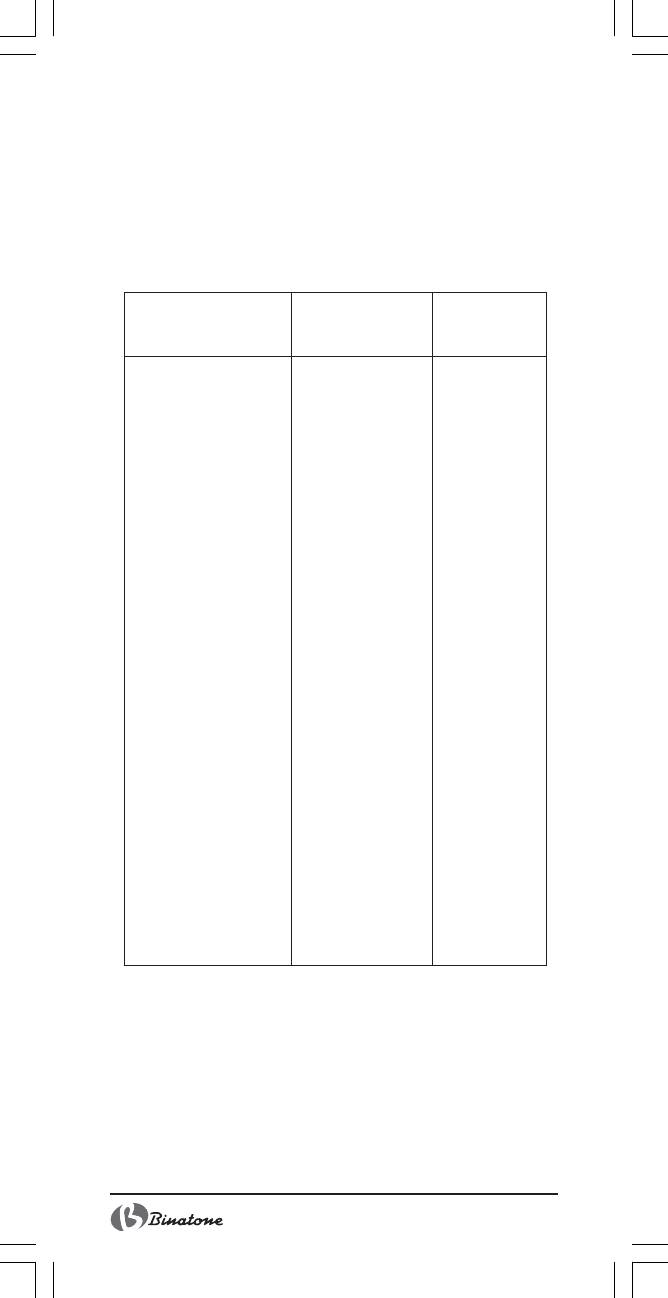
Mix in the rice bowl
Approximate
Type of rice
Rice
Water
cooking time
(cups)
(cups)
(minutes)
Brown
standard
1/2
1
42-45
parboiled
1
1 1/2
45-50
Mixture of wild and
long-grained
standard
1
1 1/2
18-20
fast-cooked
1
1 3/4
16-18
instant
1
1 1/2
12-15
White
round-grained
1
1 1/2
45-50
long-grained
1
1 2/3
50-55
Vegetables
Thoroughly wash and clean vegetables and slice them, if required.
Time required for cooking small slices is less the time required for
cooking big slices.
Quality, quantity, freshness, size/evenness and temperature of
9
frozen vegetables will influence the cooking time. Choose the
amount of water and cooking time at your discretion, bearing in
mind the guidelines shown in the table.
Do not defrost the frozen vegetables before cooking.
Frozen vegetables that give off a lot of liquid during cooking should
be placed in the rice cup (11) and covered with foil for the dura-
tion of the cooking period. Frozen products must be separated
from each other or mixed 10-12 minutes after starting cooking.
Use a fork or a long-handled spoon for this purpose.
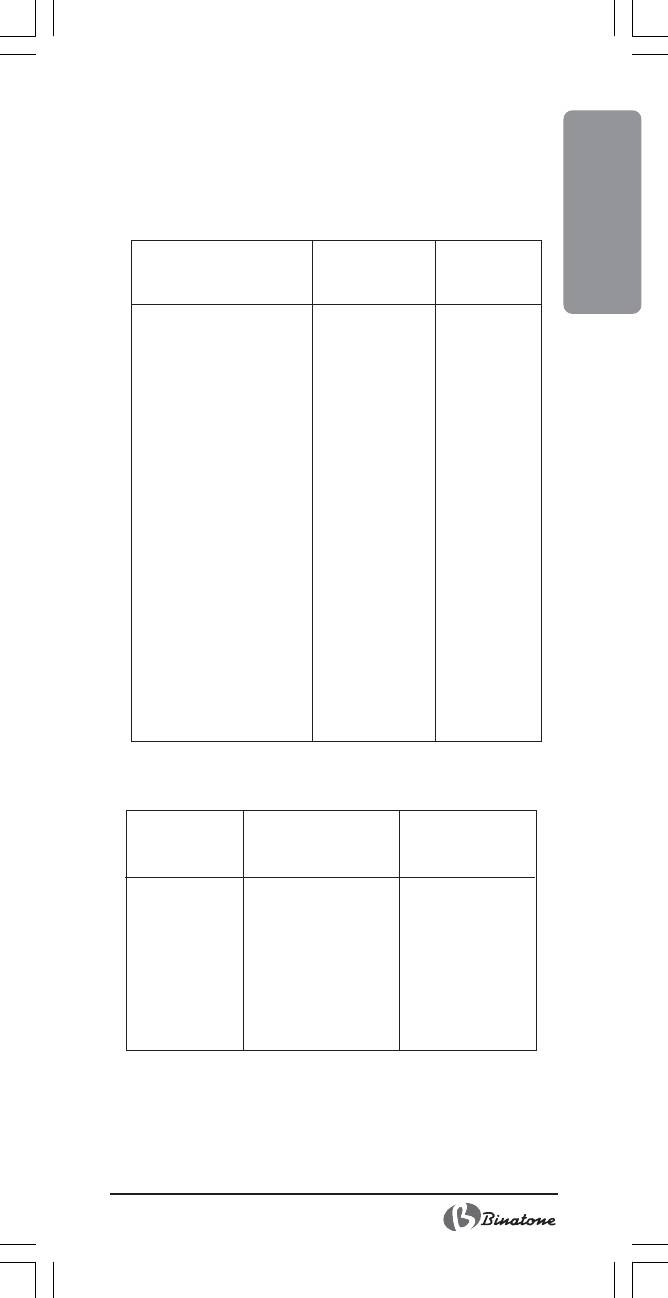
Approximate
Weight/number
Type
cooking time
of pieces
(minutes)
Artichoke, whole
4 whole ones
30-32
with peeled top
Asparagus, sprouts
450 g
12-14
Green beans
230 g
12-14
Oats
450 g
20-22
Beetroot
450 g cut
25-28
Broccoli, sprouts
450 g
20-22
Brussels sprouts
450 g
24-26
Cabbage
450 g cut
16-18
Celery
230 g fine cut
14-16
Cauliflower, whole
450 g
20-22
Aubergine
450 g
16-18
Mushrooms, whole
450 g
10-12
Okra
450 g
18-20
Onions
230 g fine cut
12-14
Parsnip
230 g
8-10
Peas
450 g split
12-13
Sweet peppers, whole
up to 4 medium
12-13
ones (not stuffed)
Potatoes
about 450 g
30-32
Potato, whole
6 small ones
28-30
French turnip
1 medium-sized,
14-16
diced
Spinach
230 g
12-14
Marrow squash
summer yellow
450 g sliced
22-24
and Zucchini
winter Acom
450 g sliced
20-22
and Buttemut
Turnip
450 g
28-30
Frozen vegetables
300 g
25-27
Fish and marine products
Fish and marine products are quick to cook. So, for even cooking,
these products are recommended to be cooked in small quanti-
ties.
Approximate time for cooking fresh or frozen (that has been de-
frosted) marine products and fish are given in the table. Before
cooking, clean and prepare fresh marine products and fish.
10
Since the opening time for shells of mollusks, oysters and mus-
sels is different, check whether shells are open, to prevent
overcooking.
You can also cook fish fillet in the rice cup (11).
Steamed marine products and fish can be served plain or with
butter or margarine and with lemon or with sauce.
Approximate
Weight/number
ENGLISH
Type
cooking time
of pieces
(min)
Shellfish in shells
hard shelled
450 g
10-12
Crab
King crab, legs/claws
230 g
20-22
Lobster
tail
2-4 pieces
16-18
dressed
450-560 g
18-20
whole, fresh
450-560 g
18-20
Mussels (fresh, in shells)
450 g
14-16
Oysters (fresh, in shells)
350 g
18-20
Scallop (fresh)
freshwater (shelled)
450 g
14-16
seawater (shelled)
350 g
18-20
Shrimps
medium, in shells
450 g
10-12
large, in shells
450 g
12-14
FISH
whole
230-340 g
16-18
dressed
230-340 g
14-16
fillet
450 g
10-12
pieces
340 g
10-12
Meat and meat products
Approximate
Weight/number
Type
cooking time
of pieces
(min)
Beef
chop
450 g
28-30
minced steak
450 g
16-18
cutlet
450 g
22-24
Chicken
pieces
450 g (2-4 pieces)
24-26
Lamb
pieces
450 g
26-28
11
Оглавление
- Food Steamer
- A
- SAFETY MEASURES
- SPECIAL SAFETY MEASURES
- BEFORE USING THE APPLIANCE
- MAINTENANCE AND CLEANING
- HELPFUL HINTS
- DISPOSAL
- MESURES DE SECURITE
- MESURES SPECIALES DE SECURITE
- AVANT L’UTILISATION
- ENTRETIEN ET NETTOYAGE
- CONSEILS UTILES
- RECYCLAGE
- SERVICE APRES VENTE
- ÌÅÐÛ ÁÅÇÎÏÀÑÍÎÑÒÈ
- ÑÏÅÖÈÀËÜÍÛÅ ÌÅÐÛ ÁÅÇÎÏÀÑÍÎÑÒÈ
- ÎÏÈÑÀÍÈÅ ÄÅÒÀËÅÉ ÏÐÈÁÎÐÀ
- ÓÕÎÄ È ×ÈÑÒÊÀ
- ÏÎËÅÇÍÛÅ ÑÎÂÅÒÛ
- ÓÒÈËÈÇÀÖÈß
- ÏÎÑËÅÏÐÎÄÀÆÍÎÅ ÎÁÑËÓÆÈÂÀÍÈÅ
- ÏÐÀÂÈËÀ ÁÅÇÏÅÊÈ
- ÑÏÅÖ²ÀËÜͲ ÏÐÀÂÈËÀ ÁÅÇÏÅÊÈ
- ÎÏÈÑ ÄÅÒÀËÅÉ ÏÐÈËÀÄÓ
- ÄÎÃËßÄ ² ×ÈÙÅÍÍß
- ÊÎÐÈÑͲ ÏÎÐÀÄÈ
- ÓÒÈ˲ÇÀÖ²ß


