Acer ASPIRE 5830G – страница 4
Инструкция к Ноутбуку Acer ASPIRE 5830G
43
English
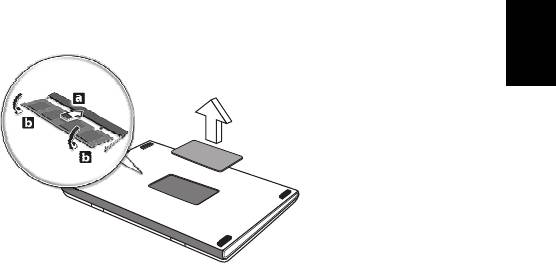
3 (a) Insert the memory module diagonally into the slot, then (b) gently press
it down until it clicks into place.
4 Replace the memory cover and secure it with the screw.
5 Reinstall the battery pack, and reconnect the AC adapter.
6 Turn on the computer.
The computer automatically detects and reconfigures the total memory size.
Please consult a qualified technician or contact your local Acer dealer.

44
English
Enjoying TV with Windows Media
Center
Note: This feature is only available on certain models.
Computers that include Windows Media Center Edition or InstantOn Arcade
may be used to watch TV and to access video content (via an audio/video
connection to an external device, such as a video camera).
Choose your input type
The avdio/video connection may be either a DVB-T digital antenna (for selected
models) or a PAL/SECAM or NTSC connector. Please refer to the appropriate
section:
Watching TV using the optional DVB-T
(digital TV) antenna (for selected models)
DVB-T digital TV is an international standard that is used to transmit terrestrial
television services in digital format. It is gradually replacing analog broadcasts
in many countries. The DVB-T digital antenna can be used with Windows Media
Center to watch local DVB-T digital TV broadcasts on your notebook PC.
45
English
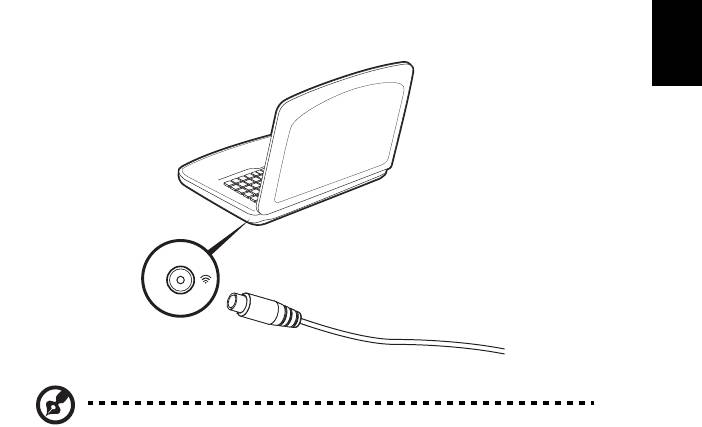
To connect the digital antenna
1 Plug the antenna cable into the RF jack of your computer.
Note: Do not twist or loop the antenna cable. Extend the antenna
cable up to 20 cm to improve signal quality.
Watching TV with an external antenna or
cable socket
You may use conventional TV cables (connected to an external antenna or cable
socket) to watch TV on your computer.
Connecting antenna cables
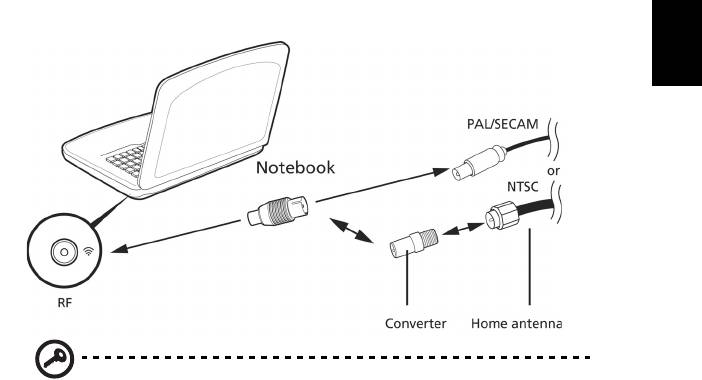
To connect your cables:
1 Plug the antenna connector into the RF jack of your computer.
Notebook
RF
46
English
2 Connect the other end to your TV cable, using the cable converter if
necessary.
Important! Please ensure you use the correct cable system for your
region before attempting to connect the antenna cable.

47
English
BIOS utility
The BIOS utility is a hardware configuration program built into your
computer's BIOS.
Your computer is already properly configured and optimized, and you do not
need to run this utility. However, if you encounter configuration problems, you
may need to run it.
To activate the BIOS utility, press <F2> during the POST while the notebook PC
logo is being displayed.
Boot sequence
To set the boot sequence in the BIOS utility, activate the BIOS utility, then select
Boot from the categories listed at the top of the screen.
Enable disk-to-disk recovery
To enable disk-to-disk recovery (hard disk recovery), activate the BIOS utility,
then select Main from the categories listed at the top of the screen. Find D2D
Recovery at the bottom of the screen and use the <F5> and <F6> keys to set this
value to Enabled.
Password
To set a password on boot, activate the BIOS utility, then select Security from
the categories listed at the top of the screen. Find Password on boot: and use
the <F5> and <F6> keys to enable this feature.
48
English
Using software
Playing DVD movies
Note: This feature is only available on certain models.
When the DVD drive module is installed in the optical drive bay, you can play
DVD movies on your computer.
1 Eject the DVD.
Important! When you launch the DVD player for the first time, the
program asks you to enter the region code. DVD discs are divided
into 6 regions. Once your DVD drive is set to a region code, it will
play DVD disks of that region only. You can set the region code a
maximum of five times (including the first time), after which the
last region code set will remain permanent. Recovering your hard
disk does not reset the number of times the region code has been
set. Refer to the table below for DVD movie region code
information.
2 The DVD movie will automatically play after a few seconds.
Region code Country or region
1 USA, Canada
2 Europe, Middle East, South Africa, Japan
3 Southeast Asia, Taiwan, South Korea
4 Latin America, Australia, New Zealand
5 Former USSR, parts of Africa, India
6 People’s Republic of China
Note: To change the region code, insert a DVD movie of a
different region into the DVD drive. Please refer to the online
help for more information.

49
English
Frequently asked questions
The following is a list of possible situations that may arise during the use of
your computer. Easy solutions are provided for each one.
I turned on the power, but the computer does not start or
boot up.
Look at the power indicator:
• If it is not lit, no power is being supplied to the computer. Check the
following:
• If you are using on the battery, it may be low and unable to power
the computer. Connect the AC adapter to recharge the battery pack.
• Make sure that the AC adapter is properly plugged into the computer
and to the power outlet.
• If it is lit, check the following:
• Is a non-bootable (non-system) disk in the external USB floppy drive?
Remove or replace it with a system disk and press <Ctrl> + <Alt> +
<Del> to restart the system.
Nothing appears on the screen.
The computer’s power management system automatically blanks the screen to
save power. Press any key to turn the display back on.
If pressing a key does not turn the display back on, three things might be
the cause:
• The brightness level might be too low. Press <Fn> + < > (increase) to
adjust the brightness level.
• The display device might be set to an external monitor. Press the display
toggle hotkey <Fn> + <F5> to toggle the display back to the computer.
• If the Sleep indicator is lit, the computer is in Sleep mode. Press and release
the power button to resume.
No audio is heard from the computer.
Check the following:
• The volume may be muted. In Windows, look at the volume control
(speaker) icon on the taskbar. If it is crossed-out, click the icon and deselect
the Mute all option.
• The volume level may be too low. In Windows, look at the volume control
icon on the taskbar. You can also use the volume control buttons to adjust
the volume.
• If headphones, earphones or external speakers are connected to the line-

50
English
out port on the computer, the internal speakers automatically turn off.
I want to eject the optical drive tray without turning on the
power.
There is a mechanical eject hole on the optical drive. Simply insert the tip of a
pen or paperclip into the hole and push to eject the tray.
The keyboard does not respond.
Try attaching an external keyboard to a USB port on the computer. If it works,
contact your dealer or an authorized service center as the internal keyboard
cable may be loose.
The printer does not work.
Check the following:
• Make sure that the printer is connected to a power outlet and that it is
turned on.
• Make sure that the printer cable is connected securely to a USB port and
the corresponding port on the printer.

51
English
I want to restore my computer to its original settings without
recovery CDs.
Note: If your system is the multilingual version, the operating
system and language you choose when you first turn on the
system will be the only option for future recovery operations.
This recovery process helps you restore the C: drive with the original software
content that is installed when you purchased your notebook. Follow the steps
below to rebuild your C: drive. (Your C: drive will be reformatted and all data
will be erased.) It is important to back up all data files before using this option.
Before performing a restore operation, please check the BIOS settings.
1 Check to see if Acer disk-to-disk recovery is enabled or not.
2 Make sure the D2D Recovery setting in Main is Enabled.
3 Exit the BIOS utility and save changes. The system will reboot.
Note: To activate the BIOS utility, press <F2> during POST.
To start the recovery process:
1 Restart the system.
2 While the Acer logo is showing, press <Alt> + <F10> at the same time to
enter the recovery process.
3 Refer to the onscreen instructions to perform system recovery.
Important! This feature occupies 15 GB in a hidden partition on
your hard disk.

52
English
Requesting service
International Travelers Warranty (ITW)
Your computer is backed by an International Travelers Warranty (ITW) that
gives you security and peace of mind when traveling. Our worldwide network
of service centers are there to give you a helping hand.
An ITW passport comes with your computer. This passport contains all you need
to know about the ITW program. A list of available, authorized service centers is
in this handy booklet. Read this passport thoroughly.
Always have your ITW passport on hand, especially when you travel, to receive
the benefits from our support centers. Place your proof-of-purchase in the flap
located inside the front cover of the ITW passport.
If the country you are traveling in does not have an Acer-authorized ITW service
site, you can still get in contact with our offices worldwide. Please visit
www.acer.com.
Before you call
Please have the following information available when you call Acer for online
service, and please be at your computer when you call. With your support, we
can reduce the amount of time a call takes and help solve your problems
efficiently. If there are error messages or beeps reported by your computer,
write them down as they appear on the screen (or the number and sequence in
the case of beeps).
You are required to provide the following information:
Name:
Address:
Telephone number:
Machine and model type:
Serial number:
Date of purchase:

53
English
Troubleshooting
This chapter shows you how to deal with common system problems.
Read it before calling a technician if a problem occurs. Solutions to more
serious problems require opening up the computer. Do not attempt to open
the computer yourself; contact your dealer or authorized service center
for assistance.
Troubleshooting tips
This notebook PC incorporates an advanced design that delivers onscreen error
message reports to help you solve problems.
If the system reports an error message or an error symptom occurs, see "Error
messages" below. If the problem cannot be resolved, contact your dealer. See
"Requesting service" on page 52.
Error messages
If you receive an error message, note the message and take the corrective
action. The following table lists the error messages in alphabetical order
together with the recommended course of action.
Error messages Corrective action
CMOS battery bad Contact your dealer or an authorized service center.
CMOS checksum error Contact your dealer or an authorized service center.
Disk boot failure Insert a system (bootable) disk, then press <Enter>
to reboot.
Equipment
Press <F2> (during POST) to enter the BIOS utility,
configuration error
then press Exit in the BIOS utility to reboot.
Hard disk 0 error Contact your dealer or an authorized service center.
Hard disk 0 extended
Contact your dealer or an authorized service center.
type error
I/O parity error Contact your dealer or an authorized service center.
Keyboard error or no
Contact your dealer or an authorized service center.
keyboard connected

54
English
Error messages Corrective action
Keyboard interface
Contact your dealer or an authorized service center.
error
Memory size
Press <F2> (during POST) to enter the BIOS utility,
mismatch
then press Exit in the BIOS utility to reboot.
If you still encounter problems after going through the corrective measures,
please contact your dealer or an authorized service center for assistance.

55
English
Regulations and safety notices
FCC statement
This device has been tested and found to comply with the limits for a Class B digital device
pursuant to Part 15 of the FCC rules. These limits are designed to provide reasonable
protection against harmful interference in a residential installation. This device generates,
uses, and can radiate radio frequency energy and, if not installed and used in accordance
with the instructions, may cause harmful interference to radio communications.
However, there is no guarantee that interference will not occur in a particular installation.
If this device does cause harmful interference to radio or television reception, which can be
determined by turning the device off and on, the user is encouraged to try to correct the
interference by one or more of the following measures:
• Reorient or relocate the receiving antenna.
• Increase the separation between the device and receiver.
• Connect the device into an outlet on a circuit different from that to which the
receiver is connected.
• Consult the dealer or an experienced radio/television technician for help.
Notice: Shielded cables
All connections to other computing devices must be made using shielded cables to maintain
compliance with FCC regulations.
Notice: Peripheral devices
Only peripherals (input/output devices, terminals, printers, etc.) certified to comply with the
Class B limits may be attached to this equipment. Operation with non-certified peripherals
is likely to result in interference to radio and TV reception.
Caution
Changes or modifications not expressly approved by the manufacturer could void the user's
authority, which is granted by the Federal Communications Commission, to operate this
computer.
Notice: Canadian users
This Class B digital apparatus complies with Canadian ICES-003.
Remarque à l'intention des utilisateurs canadiens
Cet appareil numérique de la classe B est conforme a la norme NMB-003 du Canada.
56
English
Compliant with Russian regulatory certification
Modem notices (only for certain models)
Notice for USA
This equipment complies with Part 68 of the FCC rules. Located on the modem is a label
that contains, among other information, the FCC Registration Number and Ringer
Equivalence Number (REN) for this equipment. Upon request, you must provide this
information to your telephone company.
If your telephone equipment causes harm to the telephone network, the telephone
company may discontinue your service temporarily. If possible, they will notify you in
advance. But, if advance notice is not practical, you will be notified as soon as possible. You
will also be informed of your right to file a complaint with the FCC.
Your telephone company may make changes in its facilities, equipment, operations, or
procedures that could affect the proper functioning of your equipment. If they do, you will
be notified in advance to give you an opportunity to maintain uninterrupted telephone
service.
If this equipment should fail to operate properly, disconnect the equipment from the
phone line to determine if it is causing the problem. If the problem is with the equipment,
discontinue use and contact your dealer or vendor.
Caution: To reduce the risk of fire, use only No. 26 AWG or larger UL Listed
or CSA Certified Telecommunication Line Cord.
TBR 21
This equipment has been approved [Council Decision 98/482/EC - "TBR 21"] for single
terminal connection to the Public Switched Telephone Network (PSTN). However, due to
differences between the individual PSTNs provided in different countries, the approval
does not, of itself, give an unconditional assurance of successful operation on every PSTN
termination point. In the event of problems, you should contact your equipment supplier in
the first instance. For more information about applicable countries, please refer to
"Regulations and safety notices" on page 55.
Notice for Australia
For safety reasons, only connect headsets with a telecommunications compliance label. This
includes customer equipment previously labeled permitted or certified.
Notice for New Zealand
1 The grant of a Telepermit for any item of terminal equipment indicates only that
Telecom has accepted that the item complies with minimum conditions for

57
English
connection to its network. It indicates no endorsement of the product by Telecom,
nor does it provide any sort of warranty. Above all, it provides no assurance that any
item will work correctly in all respects with another item of Telepermitted equipment
of a different make or model, nor does it imply that any product is compatible with all
of Telecom's network services.
2 This equipment is not capable, under all operating conditions, of correct operation at
the higher speeds for which it is designed. Telecom will accept no responsibility
should difficulties arise in such circumstances.
3 Some parameters required for compliance with Telecom's Telepermit requirements
are dependent on the equipment (PC) associated with this device. The associated
equipment shall be set to operate within the following limits for compliance with
Telecom's Specifications:
a There shall be no more than 10 call attempts to the same number within any 30-
minute period for any single manual call initiation, and
b The equipment shall go on-hook for a period of not less than 30 seconds
between the end of one attempt and the beginning of the next call attempt.
4 Some parameters required for compliance with Telecom's Telepermit requirements
are dependent on the equipment (PC) associated with this device. In order to operate
within the limits for compliance with Telecom's specifications, the associated
equipment shall be set to ensure that automatic calls to different numbers are spaced
such that there is not less than 5 seconds between the end of one call attempt and the
beginning of another.
5 This equipment shall not be set up to make automatic calls to Telecom's 111
Emergency Service.
6 This device is equipped with pulse dialing while the Telecom standard is DTMF tone
dialing. There is no guarantee that Telecom lines will always continue to support
pulse dialing.
7 Use of pulse dialing, when this equipment is connected to the same line as other
equipment, may give rise to bell tinkle or noise and may also cause a false answer
condition. Should such problems occur, the user should NOT contact the telecom Fault
Service.
8 This equipment may not provide for the effective hand-over of a call to another
device connected to the same line.
9 Under power failure conditions this appliance may not operate. Please ensure that a
separate telephone, not dependent on local power, is available for emergency use.
LCD pixel statement
The LCD unit is produced with high-precision manufacturing techniques. Nevertheless,
some pixels may occasionally misfire or appear as black or red dots. This has no effect on
the recorded image and does not constitute a malfunction.
Radio device regulatory notice
Note: Below regulatory information is for models with wireless LAN and / or
Bluetooth only.
58
English
General
To prevent radio interference to the licensed service, this device is intended to be operated
indoors.
This product complies with the radio frequency and safety standards of any country or
region in which it has been approved for wireless use. Depending on configurations, this
product may or may not contain wireless radio devices (such as wireless LAN and/or
Bluetooth modules). Below information is for products with such devices.
Declaration of Conformity for EU countries
Hereby, Acer, declares that this notebook PC series is in compliance with the essential
requirements and other relevant provisions of Directive 1999/5/EC.
List of applicable countries
EU member states as of July 2009 are: Belgium, Denmark, Germany, Greece, Spain, France,
Ireland, Italy, Luxembourg, the Netherlands, Austria, Portugal, Finland, Sweden, United
Kingdom, Estonia, Latvia, Lithuania, Poland, Hungary, Czech Republic, Slovak Republic,
Slovenia, Cyprus, Malta, Bulgaria and Romania. Usage is allowed in the countries of
European Union, as well as Norway, Switzerland, Iceland and Liechtenstein. This device
must be used in strict accordance with the regulations and constraints in the country of use.
For further information, please contact local office in the country of use. Please see
ec.europa.eu/enterprise/rtte/ implem.htm for the latest country list.
The FCC RF safety requirement
The radiated output power of the wireless LAN Mini PCI Card and Bluetooth card is far
below the FCC radio frequency exposure limits. Nevertheless, the notebook PC series shall
be used in such a manner that the potential for human contact during normal operation is
minimized as follows:
1 Users are requested to follow the RF safety instructions on wireless option devices
that are included in the user's manual of each RF option device.
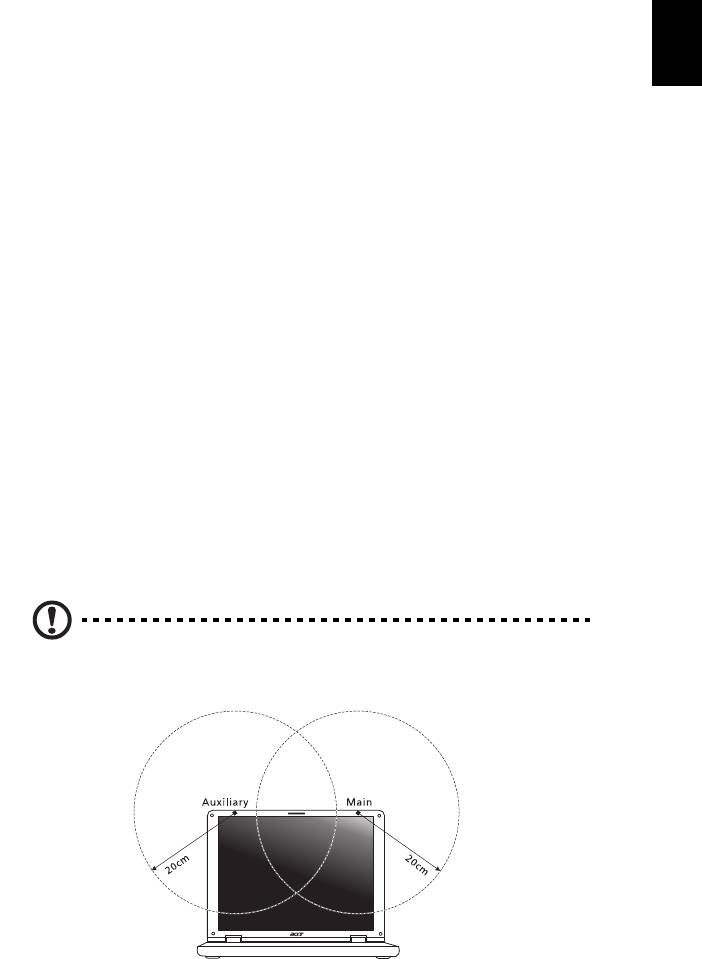
Caution: To comply with FCC RF exposure compliance requirements, a
separation distance of at least 20 cm (8 inches) must be maintained
between the antenna for the integrated wireless LAN Mini PCI Card built in
to the screen section and all persons.

59
English
Note: The wireless Mini PCI adapter implements a transmission diversity
function. The function does not emit radio frequencies simultaneously from
both antennas. One of the antennas is selected automatically or manually
(by users) to ensure good quality radiocommunication.
2 This device is restricted to indoor use due to its operation in the 5.15 to 5.25 GHz
frequency range. FCC requires this product to be used indoors for the frequency
range 5.15 to 5.25 GHz to reduce the potential for harmful interference to co-channel
Mobile Satellite systems.
3 High power radar is allocated as the primary user of the 5.25 to 5.35 GHz and 5.65 to
5.85 GHz bands. These radar stations can cause interference with and/or damage this
device.
4 An improper installation or unauthorized use may cause harmful interference to
radio communications. Also any tampering of the internal antenna will void the FCC
certification and your warranty.
Canada — Low-power license-exempt radio
communication devices (RSS-210)
Exposure of humans to RF fields (RSS-102)
The notebook PC series employs low gain integral antennas that do not emit RF field in
excess of Health Canada limits for the general population; consult Safety Code 6,
obtainable from Health Canada's website at www.hc-sc.gc.ca/rpb.
This device complies with RSS210 of Industry Canada.
This Class B digital apparatus complies with Canadian ICES-003, Issue 4, and RSS-210, No 4
(Dec 2000) and No 5 (Nov 2001).
Cet appareil numérique de la classe B est conforme à la norme NMB-003, No. 4, et CNR-210,
No 4 (Dec 2000) et No 5 (Nov 2001).
"To prevent radio interference to the licensed service, this device is intended to be
operated indoors and away from windows to provide maximum shielding. Equipment (or
its transmit antenna) that is installed outdoors is subject to licensing."
« Pour empêcher que cet appareil cause du brouillage au service faisant l'objet d'une
licence, il doit être utilisé a l'intérieur et devrait être placé loin des fenêtres afin de fournir
un écran de blindage maximal. Si le matériel (ou son antenne d'émission) est installé à
l'extérieur, il doit faire l'objet d'une licence.
Caution: When using IEEE 802.11a wireless LAN, this product is restricted to indoor use due
to its operation in the 5.15- to 5.25-GHz frequency range. Industry Canada requires this
product to be used indoors for the frequency range of 5.15 GHz to 5.25 GHz to reduce the
potential for harmful interference to co-channel mobile satellite systems. High power radar
is allocated as the primary user of the 5.25- to 5.35-GHz and 5.65 to 5.85-GHz bands. These
radar stations can cause interference with and/or damage to this device.
The maximum allowed antenna gain for use with this device is 6dBi in order to comply with
the E.I.R.P limit for the 5.25- to 5.35 and 5.725 to 5.85 GHz frequency range in point-to-
point operation.

60
English
LCD panel ergonomic specifications
Design viewing distance 500 mm
Design inclination angle 0.0°
Design azimuth angle 90.0°
Viewing direction range class Class IV
Screen tilt angle 85.0°
Design screen illuminance
• Illuminance level:
[250 + (250cos
)] lx where = 85°
• Color: Source D65
Reflection class of LCD panel
• Ordinary LCD: Class I
(positive and negative polarity)
• Protective LCD: Class III
Image polarity Both
Reference white:
• Yn
Pre-setting of luminance and color
• u'n
temperature @ 6500K (tested
under BM7)
• v'n
Pixel fault class Class II

Gamme Aspire
Guide utilisateur générique
© 2011 Tous droits réservés.
Guide utilisateur générique de la gamme Aspire
Première publication : 02/2011
Des modifications peuvent être apportées de temps à autre aux informations contenues dans
cette publication sans obligation d’en notifier qui que ce soit. Ces modifications seront
ajoutées aux nouvelles éditions de ce manuel ou dans des documents et publications
complémentaires.
Cette société ne fournit aucune espèce de garantie expresse ou implicite, relative à aucune des
informations contenues dans ce manuel et n’offre notamment aucune garantie d’aucune
sorte quant à la valeur marchande de ce produit ou son adéquation à une application
particulière.
Enregistrez le numéro de série, la date d’achat, et le numéro du modèle dans l’espace prévu
ci-dessous. Le numéro de série et le numéro de modèle sont imprimés sur l’étiquette collée sur
le châssis. Toutes les correspondances concernant cette unité doivent inclure ces informations.
Toute reproduction, mise en mémoire de ce manuel sur un support quelconque, ainsi que
toute transmission, par quelque procédé que ce soit, de manière électronique ou mécanique,
par photocopie ou enregitrement et autres sont interdites sans l’autorisation écrite préalable
d’Acer Incorporated.
Modèle : __________________________________________
No. de série : ______________________________________
Date d’achat : _____________________________________
Lieu d’achat : ______________________________________


