Ridgid RP 330-C: инструкция
Раздел: Электроинструменты
Тип:
Инструкция к Ridgid RP 330-C
RP 330-B
RP 330-C
GB p. 1
DE p. 5
FR p. 9
NL p. 13
IT p. 17
ES p. 21
PT p. 25
SV p. 29
DA p. 33
NO p. 37
FI p. 41
HR p. 45
PL p. 49
RO p. 53
CZ p. 57
HU p. 61
GR p. 65
RU p. 69
TR p. 73
SL p. 77
RIDGE TOOL COMPANY
Tools For The Professional
TM
Ridge Tool Company
1
Tools For The Professional
TM
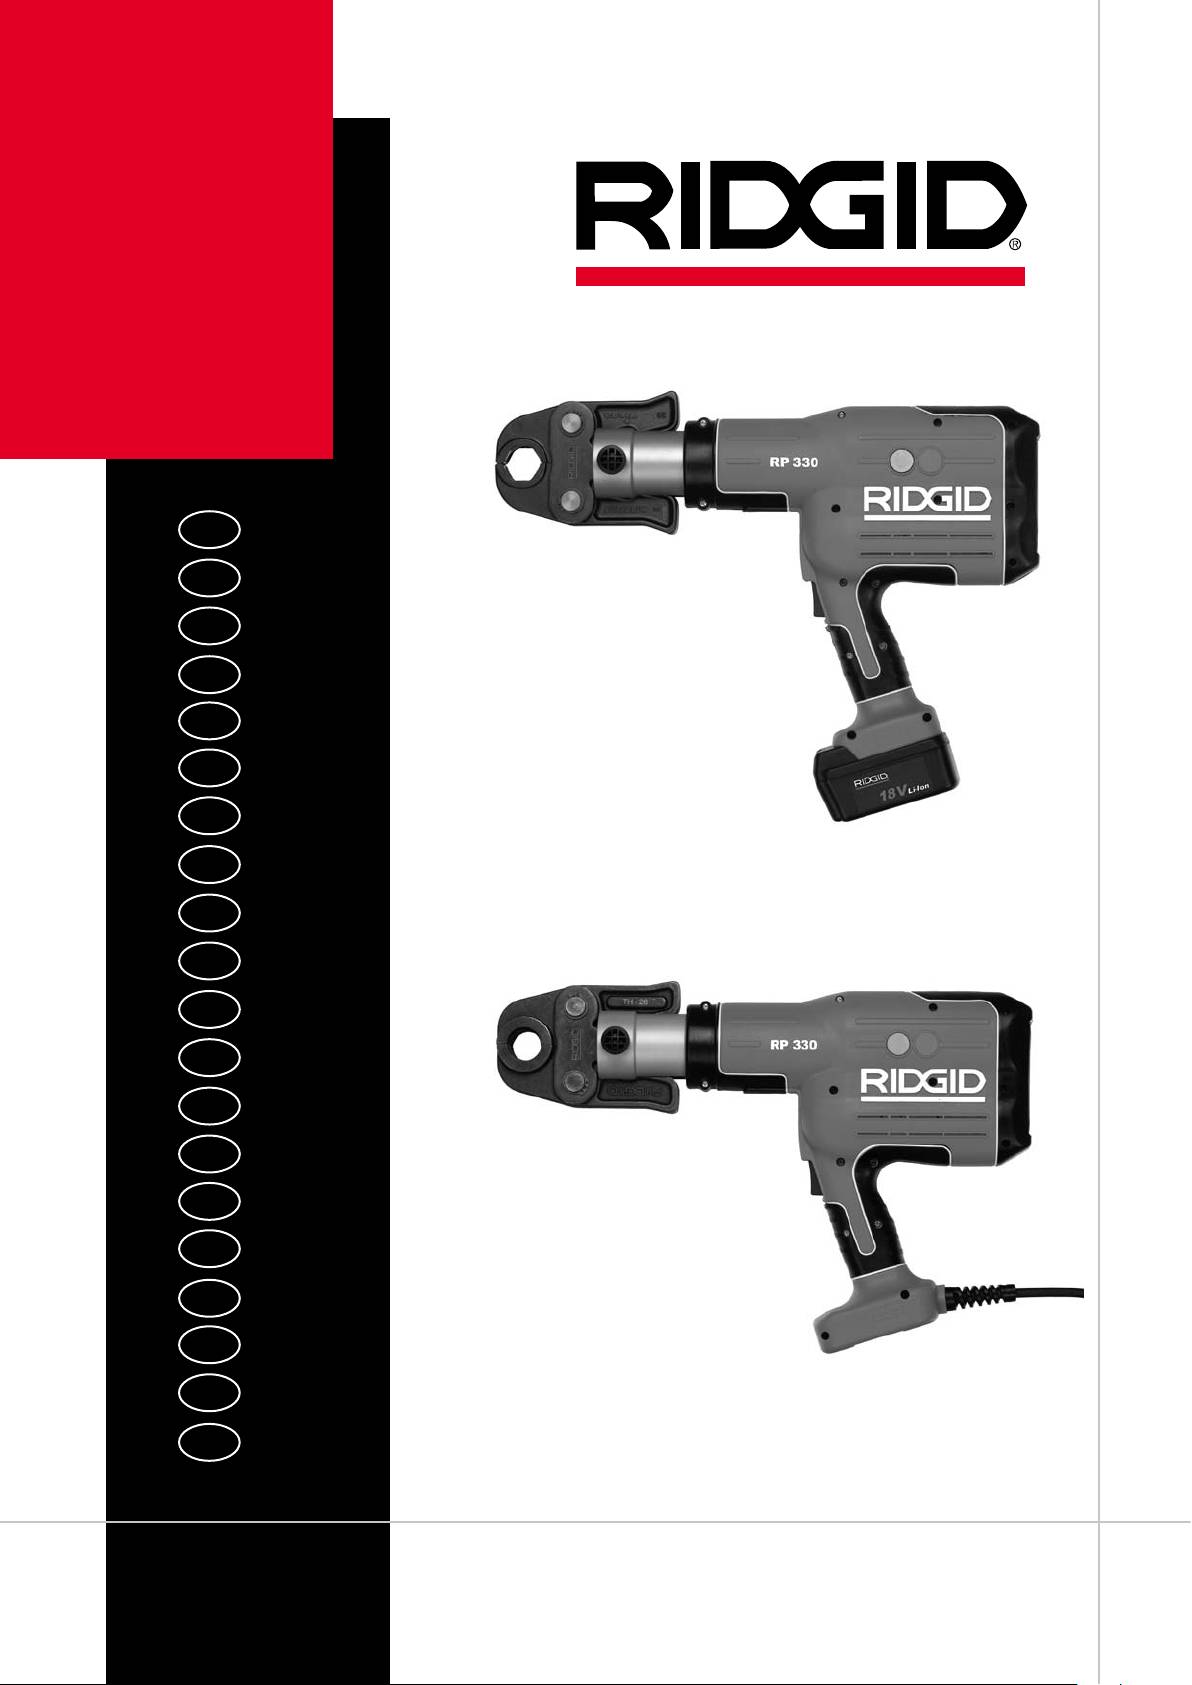
RP 330-B, RP 330-C
2) Electrical safety
GB
Power tool plugs must match the outlet. Never modify the plug in any a.
way. Do not use any adapter plugs with earthed (grounded) power
tools. Unmodied plugs and matching outlets will reduce risk of electric
shock.
RP 330-B, RP 330-C
Avoid body contact with earthed or grounded surfaces, such as pipes, b.
radiators, ranges and refrigerators. There is an increased risk of electric
Operating Instructions
shock if your body is earthed or grounded.
Do not expose power tools to rain or wet conditions. c. Water entering a
power tool will increase the risk of electric shock.
1 General information
Do not abuse the cord.d. Never use the cord for carrying, pulling or
unplugging the power tool. Keep cord away from heat, oil, sharp edges
1.1 Parts of this Operating Manual
or moving parts. Damaged or entangled cords increase the risk of electric
The following are parts of this Operating Manual:
shock.
• RP 330-B/C Pressing Tool
When operating a power tool outdoors, use an extension cord suitable e.
• Press jaws
for outdoor use. Use of a cord suitable for outdoor use reduces the risk of
• Rechargeable battery, suitable for RP 330-B
electri c shock.
The manufacturer’s Operating Manual (see designation on charger and a.
If operating a power tool in a damp location is unavoidable, use f.
rechargeable battery) fully includes the instructions for the rechargeable
a residual current device (RCD) protected supply. Use of an RCD
battery charger and for the supplied rechargeable battery. RIDGID is unable
reduces the risk of electric shock.
to guarantee that these instructions are complete.
3) Personal safety
1.2 Before placing into operation
Stay alert, watch what you are doing and use common sense when a.
It is essential to note the following:
operating a power tool. Do not use a power tool while you are tired
• Check that the consignment is complete and check the
or under the inuence of drugs, alcohol or medication. A moment
consignment for any transport damage
of inattention while operating power tools may result in serious personal
• Follow the safety instructions
injury.
• Follow the Operating Manual
Use personal protective equipment.b. Always wear eye protection.
Protective equipment such as dust mask, non-skid safety shoes, hard hat,
1.3 Studying this Operating Manual
or hearing protection used for appropriate conditions will reduce personal
Study the manufacturer’s Operating Manual for the charger and the
injuries.
rechargeable battery for information on use and charging of the rechargeable
Prevent unintentional starting.c. Ensure the switch is in the off-position
battery. If you are still unclear in respect of any aspects after studying this
before connecting to power source and/or battery pack, picking up or
Operating Manual, please contact the manufacturer for your nearest servicing
carrying the tool. Carrying power tools with your nger on the switch or
agent (see warranty card for addresses).
energising power tools that have the switch on invites accidents.
We are unable to assume any liability for damage and loss or malfunctions
Remove any adjusting key or wrench before turning the power tool d.
resulting from non-compliance with the Operating Manual.
on. A wrench or a key left attached to a rotating part of the power tool may
result in personal injury.
1.4 Illustrations and technical modications
Do not overreach. Keep proper footing and balance at all times.e. This
Illustrations may differ from the actual devices and are not binding on our
enables better control of the power tool in unexpected situations.
part. We reserve the right to make technical modications to the machines
Dress properly. Do not wear loose clothing or jewellery. Keep your hair, f.
without prior announcement in order to meet the demands of rapidly changing
clothing and gloves away from moving parts. Loose clothes, jewellery or
customer needs.
long hair can be caught in moving parts.
If devices are provided for the connection of dust extraction and g.
1.5 Safekeeping
collection facilities, ensure these are connected and properly used.
Please keep this Operating Manual in a safe place.
Use of dust collection can reduce dust-related hazards.
1.6 Further information
4) Power tool use and care
Manufacturer
Do not force the power tool. Use the correct power tool for your a.
Ridge Tool Company
application. The correct power tool will do the job better and safer at the
Elyria, Ohio, USA
rate for which it was designed.
Do not use the power tool if the switch does not turn it on and off. b. Any
Applicable to RP 330-B/C Pressing Tools
power tool that cannot be controlled with the switch is dangerous and must
be repaired.
2 Safety information
Disconnect the plug from the power source and/or the battery pack c.
2.1 General Power Tool Safety Warnings
from the power tool before making any adjustments, changing
WARNING Read all safety warnings and all instructions. Failure
accessories, or storing power tools. Such preventive safety measures
to follow the warnings and instructions may result in electric shock,
reduce the risk of starting the power tool accidentally.
re and/or serious injury. Save all warnings and instructions for
Store idle power tools out of the reach of children and do not allow d.
future reference. The term “power tool” in the warnings refers to your mains-
persons unfamiliar with the power tool or these instructions to operate
operated (corded) power tool or battery-operated (cordless) power tool.
the power tool. Power tools are dangerous in the hands of untrained
users.
1) Work area safety
Maintain power tools.e. Check for misalignment or binding of moving
Keep work area clean and well lit. a. Cluttered or dark areas invite
parts, breakage of parts and any other condition that may affect the
accidents.
power tool’s operation. If damaged, have the power tool repaired
Do not operate power tools in explosive atmospheres, such as in the b.
before use. Many accidents are caused by poorly maintained power tools.
presence of ammable liquids, gases or dust. Power tools create sparks
Keep cutting tools sharp and clean. f. Properly maintained cutting tools
which may ignite the dust or fumes.
with sharp cutting edges are less likely to bind and are easier to control.
Keep children and bystanders away while operating a power tool. c.
Use the power tool, accessories and tool bits etc. in accordance with g.
Distractions can cause you to lose control.
these instructions, taking into account the working conditions and the
work to be performed. Use of the power tool for operations different from
those intended could result in hazardous situation.
2
Ridge Tool Company
Tools For The Professional
TM
RP 330-B, RP 330-C
5) Battery tool use and care
2
Recharge only with the charger specied by the manufacturer.a. A
Vibration level: ............................................................< 2.5 m/s
charger that is suitable for one type of battery pack may create risk of re
Power transmission: .....................................................hydraulic
when used with another battery pack.
Thrust at piston: ..................................................................32kN
Use power tools only when specically designated battery packs.b. Use
Weight, including rechargeable battery: ............................ 4.4kg
of any other battery packs may create a risk of injury and re.
Capacity of lithium-ion
When battery pack is not in use, keep it away from other metal objects, c.
Rechargeable battery: ..............................................18 V/2.2 Ah
like paper clips, coins, keys, nails, screws or other small metal objects,
(Guideline values, subject to modication)
that can make a connection from one terminal to another. Shorting the
battery terminals together may cause burns or a re.
Under abusive conditions, liquid may be ejected from the battery; d.
4. Device description and basic mode of operation
avoid contact. If contact accidentally occurs, ush with water. If liquid
4.1 Basic mode of operation
contacts eyes, additionally seek medical help. Liquid ejected from the
The Pressing Tool operates electro-hydraulically. The hydraulic pump is
battery may cause irritation or burns.
driven by means of an electric motor. The hydraulic uid pressure acts on the
drive piston at one side, and the press rolls (5) are attached to the piston rod
6) Service
of this piston. The press rolls produce the pressing action as the result of the
Have your power tool serviced by a qualied repair person using only a.
force being diverted via the cams of the press jaw (7).
identical replacement parts. This will ensure that the safety of the power
tool is maintained.
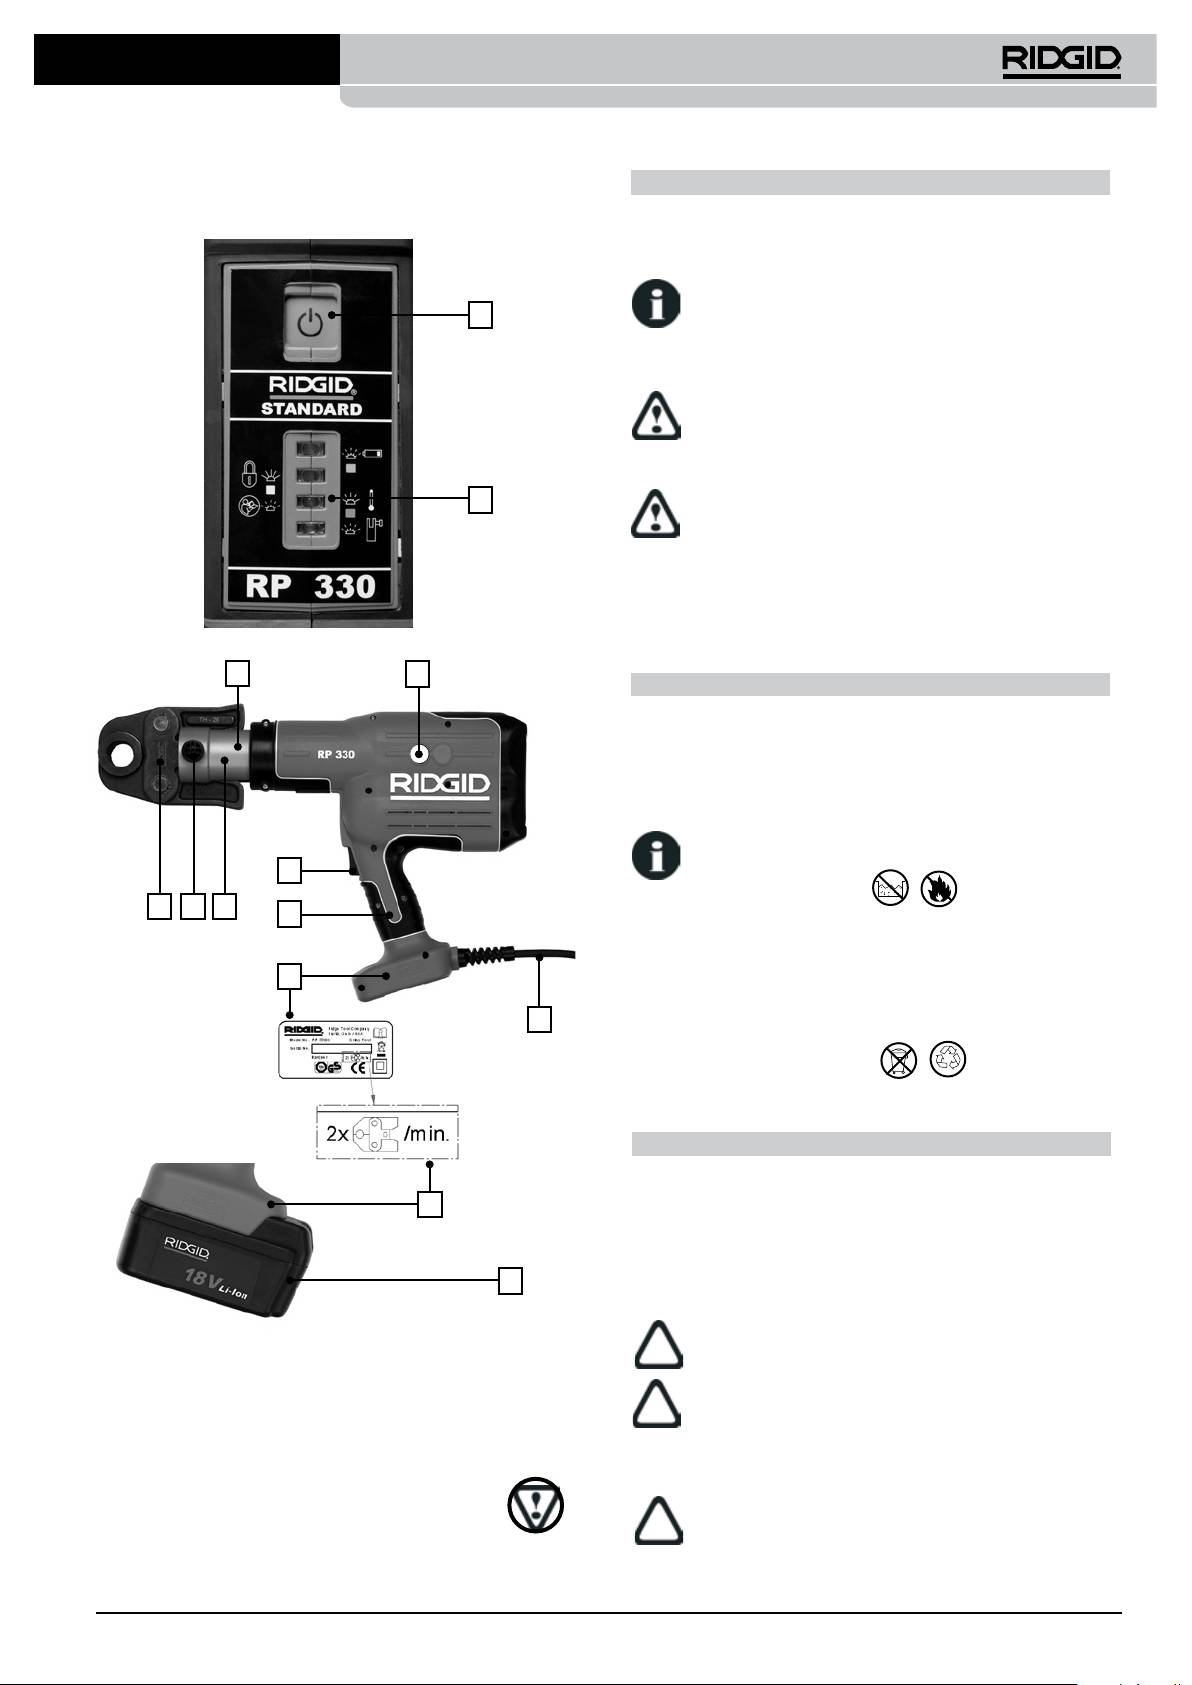
4.2 Electronic monitoring and LED indicators
If it becomes necessary to have the power supply cord replaced, b.
The Pressing Tool is monitored electronically in order to protect against
it must be replaced by the manufacturer or an ofcial service
tampering and in order to ensure perfect pressing results. The status of any
organization so as to avoid safety risks.
malfunctions are indicated by light-emitting diodes (LEDs)(2).
The following are monitored:
2.2 Marked parts of these operating instructions
• Retaining pin
Read and always observe the safety instructions in these operating
• Pressing time
instructions. The safety instructions are marked like this:
• Voltage/rechargeable battery capacity
• Servicing interval
Failing to observe an instruction marked with this sign may lead to
• Operating temperature
serious injury or death.
Status indications after switching on the Pressing Tool
X
Connect the Pressing Tool to the mains
Failing to observe an instruction marked with this sign may damage
Slide the rechargeable battery into the Pressing Tool X
the machine or cause damage to property.
Press the „ON-OFF“ switch (1). X
The LED (2) indicator lights while the „ON-OFF“ switch is pressed in order to
Marks any additional information or special instructions.
check the function of the three LEDs.
„ON-OFF“ switch
The machine can be switched on and off at any time with the „ON-OFF“
Lists
switch (except during a crimp cycle).
When the instructions are simply listed they are marked by a • before the line:
If the machine is not used while it is in ON state, the electronic circuitry
e.g.:
switches the machine to OFF state after 10 minutes.
• 1st line
• 2nd line
4.3 Status indication
Step-by-step instructions (where you have to do some-thing) are marked by
a ash
LED Status Description
X
before the line:
1st step X
Glows Tool ON
2nd step X
Green
230 V: Under voltage; 18 V: Battery too low.
The sequence of the step numbers is binding.
Blinks
Recharge Battery.
3 Technical data
Blinks
Out of temperature range
Red
RP 330-C Pressing Tool
Jaws mountin pin not fully engaged.
Glows
Rated power: ....................................................................670 W
Insert pin.
Voltage: ..............................................................................230 V
Machine is locked - service after 32,000
Mains fuse: .......................................................................... 10 A
Blinks
cycles or after a malfunction.
Insulation type
Yellow
Machine monitoring: ....................................................electronic
Service indicator after 30,000 cycles.
Sound pressure level: ................................................71,5 dB(A)
Glows
Note: Tool will lock after 32,000 cycles.
Sound power level .....................................................82,5 dB(A)
2
Vibration level: ............................................................< 2.5 m/s
Power transmission: .....................................................hydraulic
4.4 Mechanical construction of the Pressing Tool
Thrust at piston: ..................................................................32kN
See explanation on following page
Weight, including cable: .................................................... 4.6 kg
(Guideline values, subject to modication)
5 Field of application
The Pressing Tool with RIDGID Standard Pressing Attachments or other
Standard Pressing Attachments available in the market is suitable for use
RP 330-B Pressing Tool
with all plumbing and heating systems up to size 54mm or even up to 108mm
Rated power: ....................................................................490 W
if the system requires 32kN crimp force. The Pressing Tool with RIDGID
Voltage: ................................................................................18 V
Standard VIEGA Attachtments is suitable for use with all VIEGA plumbing and
Machine monitoring: ....................................................electronic
heating systems up to size 108mm.
Sound pressure level: ................................................71,5 dB(A)
Sound power level .....................................................82,5 dB(A)
Ridge Tool Company
3
Tools For The Professional
TM
RP 330-B, RP 330-C
Mechanical construction of the Pressing Tool
6 Press jaws
6.1 Fitting the press jaws
Pull out the retaining pin (6) X
Slide the press jaw (7) into the slot in the device head X
Slide the retaining pin (6) in fully. X
If the retaining pin has not been slid in fully, the Pressing Tool
cannot be started (electronically monitored safety function).
1
LED indication: green LED lights and red LED blinks.
6.2 Cleaning the press jaws
Always remove the press jaw from the machine before cleaning work.
Clean the press jaws to remove dirt and metallic residue using
solvent. Then spray the entire jaw with a combined lubricant and
corrosion inhibitor.
6.3 Checking the press jaws
Ensure that the press jaw closes fully when pressing.
2
Each time after use, check the press geometry of the press
jaws for damage or signs of wear.
6.4 Inspection and maintenance of the press jaws
Always also return all press jaws, together with the Pressing Tool, to an
authorised servicing agent for inspection and maintenance each time the
Pressing Tool is to be inspected and serviced (see 10.4 Inspection and
maintenance of the Pressing Tool).
5
11
7 Battery
7.1 Battery technology
The Pressing Tool is powered by Li-ion battery technology.
7.2 Battery type
Only BMZ Li-ion batteries 18V (Ref. 8043 ) may be used.
7.3 Charging the battery
The battery may only be charged using a genuine re-charger Type
BC1/1.8 from BMZ. See the charger’s operating instructions.
3
7.4 Safety tips for Li-ion batteries
7 6 4
9
Please note the following safety tips for using Li-ion batteries:
1. Do not crush!
2. Do not heat up or incinerate!
8
3. Do not short circuit!
4. Do not immerse in liquids!
5. Do not charge when ambient temperature is below 5°C!
10
6. Only charge using a genuine recharger Type BC1/1.8 from BMZ!
7.5 Disposal of Li-ion batteries
Batteries must be disposed of in the same way as the Pressing Tool
(see Item 10.3)
Max. 2 pressing operations Size
54 mm per minute
8 Working
Do not start work until you have read and understood this Operating Manual!
8.1 Triggering the pressing operation
8
X
Connect the Pressing Tool to the mains
Slide the charged rechargeable battery into the Pressing Tool X
Press the „ON-OFF“ switch (1). X
Check the LED indicator (2): the green LED must light. X
10
Check that you have inserted the correct press jaw (7). X
8.2 Working
Do not start the Pressing Tool without the press jaw (7) tted.
1. „ON-OFF“ switch
6. Retaining pin
2. LED indicators, green, red and
7. Press jaw
Never press ttings for pipes using an unsuitable press jaw. The
amber
8. Rating plate
pressing result would be unserviceable and the Pressing Tool and
3. Trigger switch
9. Plastic shell
the press jaw could be damaged
4. Device head with press jaw
10. Mains cable/18 V rechargeable
xture, can be turned through
battery
g
see separate
X
Check that the Pressing Tool with the press jaw has been tted correctly
270°
illustration
and at right angles to the pipe axis onto the press tting.
5. Press rolls
11. Emergency Reset
(yellow button)
Please follow the illustrated instructions provided with the press
tting in order to produce a correct press-t connection.
Li - Ion
4
Ridge Tool Company
Tools For The Professional
TM
RP 330-B, RP 330-C
Start the Pressing Tool by pressing the black trigger switch (3) until X
9.3 Disposal
the device enters the automatic cycle. You can then release the trigger
Please send the Pressing Tools to your nearest servicing agent
switch (3) again, and the pressing operation is completed and terminated
(see www.ridgid.eu for addresses) or dispose of it through a recycling
automatically.
company for environment-friendly disposal. Pressing Tools may not be
disposed of as scrap metal or domestic waste.
The pressing operation is performed automatically after the start
of pressing. After the pressing operation, the piston is retracted
10 Cleaning, checks, repairs and inspections
automatically to starting position.
Always disconnect the machine from the mains or remove the
rechargeable battery from the Pressing Tool before carrying out
X
Wait until the work piston has been fully retracted. You can then open the
cleaning work!
press jaw (7) and detach it from the tting.
10.1 Regular cleaning after use
If a power failure occurs suddenly during the pressing operation,
• Clean the press rolls (5) in dry condition and grease them a little.
press Emergency Release Stop to retract the rolls.
• Clean the press jaws to remove dirt and metallic residue using a solvent.
Then spray the entire jaw with a combined lubricant and corrosion inhibitor.
If the Pressing Tool cannot be started despite pressing the trigger
switch, check
Never use liquids (water or chemicals) or damp cloths to clean the
Pressing Tool. The housing outside surface may be cleaned with a
X
whether the electronic system has been activated by pressing the
damp cloth (plastic parts).
„ON-OFF“ switch (1) (at least the green LED must light).
the LED indicators in general. Please refer to Chapter 4.4. for what to X
10.2 Regular checks
do if the red and/or amber LED(s) light(s) or blink(s)
Ensure that the press jaw closes fully when pressing. Each time
whether the rotor of the electric motor is still turning from a previous X
after using the Pressing Tool, check the press geometry of the press
jaws for damage or visible wear.
pressing operation.
Please contact an authorised servicing agent (see www.ridgid.eu for
whether the mains cable is connected to the power supply X
addresses) if malfunctions occur.
whether the rechargeable battery is fully charged X
whether the rechargeable battery has been tted correctly. X
10.3 Repairs
If the Pressing Tool can still not be started, please return it to your nearest
Never perform repair work yourself. Please always send the
authorised servicing agent for inspection and maintenance.
Pressing Tool to an authorised servicing agent (see www.ridgid.eu
for addresses) for servicing or repair.
8.3 Interrupting the automatic pressing operation
Do not tamper with the electrical and electronic systems. If
Piston feed movement is stopped for as long as you release the
problems occur, please contact an authorised servicing agent (see
switch (3) after starting. The rolls can be retracted again with
www.ridgid.eu for addresses).
Emergency Release Stop.
The pressing operation cannot be interrupted during automatic
10.4 Inspection and maintenance of the Pressing Tool (recommended)
pressing (deformation of the tting).
Perfect press-t joints require a fully operable and periodically serviced
Pressing Tool (recommended after 4 years or automatically at 32,000 cycles).
The Pressing Tool should thus be sent to an authorised servicing agent for
9 Storage and disposal
inspection and maintenance if the Service indicator lights. Periodic inspection
9.1 Sensitivity
together with the press jaws (Point 6.4) considerably prolongs the service life
The Pressing Tool /charger must be protected against hard knocks, wet
of the Pressing Tool.
conditions, damp conditions, dirt, dust, extremely low temperatures,
extremely high temperatures, chemical solutions and gases.
The Service indicator (green LED and amber LED blinking) is intended to
draw your attention to the fact that the Pressing Tool requires servicing after
The Pressing Tool features extensive EMC protection. Should
30,000 pressing operations. The Pressing Tool is locked by the electronic
electromagnetic interference switch off the Pressing Tool
monitoring system (yellow LED lights) after 32,000 pressing operations. It
nevertheless, please disconnect the machine from the mains briey
must then be sent to an authorised servicing agent for servicing (see www.
or briey remove the rechargeable battery from the xture. This will generally
ridgid.eu for addresses).
remedy the fault. Otherwise, please eliminate the cause of the interference.
If there is a machine fault, the Pressing Tool is locked immediately by the
9.2 Intermediate storage
electronic monitoring system and it must then be submitted to a servicing
Disconnect the Pressing Tool from the mains or remove the rechargeable
agent for inspection (always read Chapter 4.4).
battery if you do not intend to use the Pressing Tool.
11 After-sales servicing
The rechargeable battery achieves its full theoretical capacity after
Please check www.ridgid.eu or the warranty card for the addresses of
a long period of storage only after fully recharging the battery 1–5
authorised servicing agents.
times.
12 Manufacturer
If the Pressing Tool is not used directly after delivery, please store it in the
original packaging at a dry location.
Ridge Tool Company
Elyria, Ohio
Keep Pressing Tool out of reach of unauthorised persons at dry,
USA www.ridgid.eu
lockable locations!
Pressing Tools that are not used for long periods (6 months or
more) must be cleaned and stored in a dry condition. Also check
the Pressing Tool for operability by conducting the checks in
accordance with Point 10.2 before using the Pressing Tool again.
