Ridgid Power-Spin: инструкция
Раздел: Электроинструменты
Тип:
Инструкция к Ridgid Power-Spin
Power-
Spin
EN
p. 1
FR
p. 9
ES
p. 17
DE
p. 25
NL
p. 33
IT
p. 41
PT
p. 49
SV
p. 57
DA
p. 65
NO
p. 73
FI
p. 81
PL
p. 89
CZ
p. 97
SK
p. 105
RO
p. 113
HU
p. 121
EL
p. 129
HR
p. 139
SL
p. 147
SR
p. 155
RU
p. 163
TR
p. 173
RIDGE TOOL COMPANY

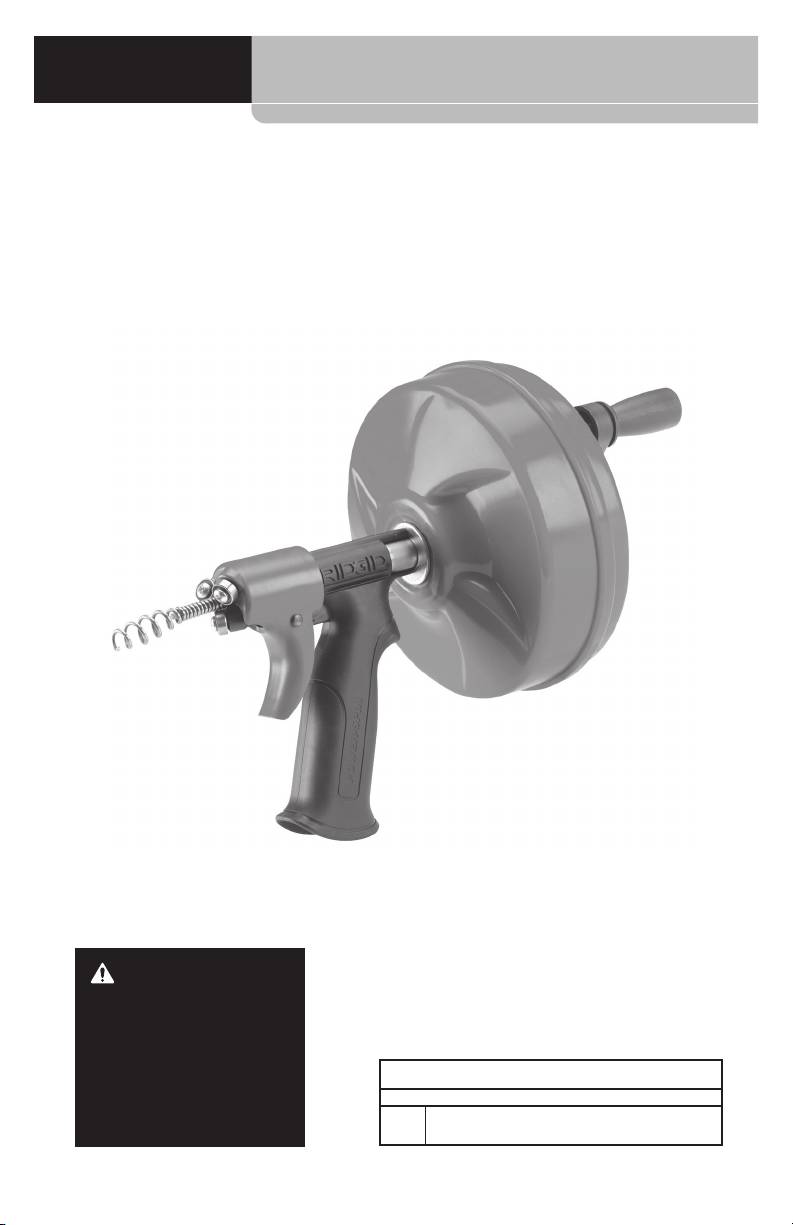
Drain Cleaner
POWER-SPIN®
WARNING!
Read this Operator’s Manual
carefully before using this
tool. Failure to understand
and follow the contents of
this manual may result in
Power-Spin® Drain Cleaner
electrical shock, re and/or
Record Serial Number below and retain product serial number which is located on nameplate.
serious personal injury.
Serial
No.
POWER-SPIN® Drain Cleaner
Contents
Safety Symbols .................................................................................................................................................2
Specic Safety Information .......................................................................................................................3
Drain Cleaner Safety .................................................................................................................................... 3
Description and Specications ................................................................................................................ 3
Description ...................................................................................................................................................... 3
Specications ................................................................................................................................................. 4
Machine Inspection .......................................................................................................................................4
Machine and Work Area Set-Up ..............................................................................................................5
Operating Instructions ................................................................................................................................6
Maintenance Instructions ..........................................................................................................................8
Cleaning ...........................................................................................................................................................8
Installing Replacement Cable .................................................................................................................. 8
To Remove Cable From Drum .............................................................................................................8
To Install Replacement Cable ..............................................................................................................8
Troubleshooting .............................................................................................................................................. 8
Lifetime Warranty .......................................................................................................................Back Cover
*Original Instructions - English
Safety Symbols
In this operator’s manual and on the product, safety symbols and signal words are used to
communicate important safety information. This section is provided to improve understand-
ing of these signal words and symbols.
This is the safety alert symbol. It is used to alert you to potential personal injury hazards.
Obey all safety messages that follow this symbol to avoid possible injury or death.
DANGER
DANGER indicates a hazardous situation which, if not avoided, will result in death
or serious injury.
WARNING
WARNING indicates a hazardous situation which, if not avoided, could result in
death or serious injury.
CAUTION
CAUTION indicates a hazardous situation which, if not avoided, could result in mi-
nor or moderate injury.
NO TICE
NOTICE indicates information that relates to the protection of property.
This symbol means read the operator’s manual carefully before using the equipment.
The operator’s manual contains important information on the safe and proper operation
of the equipment.
This symbol means always wear safety glasses with side shields or goggles when han-
dling or using this equipment to reduce the risk of eye injury.
This symbol indicates the risk of hands, ngers or other body parts being caught,
wrapped or crushed in the drain cleaning cable.
2

POWER-SPIN® Drain Cleaner
operating or handling drain cleaning
Specific Safety
equipment. This will help prevent con-
Information
tamination with toxic or infectious mate-
rial.
WARNING
Do not operate this machine if opera-
This section contains important safety in-
tor or machine is standing in water.
formation that is specific to this tool.
Oper ating machine while in water in-
Read these precautions carefully before
creases the risk of electrical shock.
using the Power-Spin® Drain Cleaner to
Only use drain cleaner to clean drains
reduce the risk of electrical shock or other
of recommended sizes according to
serious personal injury.
these instructions. Other uses or modi-
fying the drain cleaning machine for
SAVE THESE INSTRUCTIONS!
other applications may increase the risk
of injury.
Drain Cleaner Safety
Read and understand these instruc-
Wear leather work gloves. Never grasp
tions, the battery drill instructions
the rotating cable with anything else,
and the instructions for any other
including cloth gloves or a rag. They
equipment used with this tool before
can become wrapped around the cable,
operating. Failure to follow all instruc-
causing hand injuries. Only wear latex or
tions may result in property damage
rubber gloves under leather work gloves.
and/or serious injury.
Do not use damaged gloves.
The EC Declaration of conformity (890-011-
Do not allow the end of cable to stop
320.10) will accompany this manual as a
turn ing while the machine is running.
separate booklet when required.
This can overstress the cable and may
If you have any question concerning this
cause twisting, kinking or breaking of
RIDGID® product:
the cable.
– Contact your local RIDGID distributor.
Position machine within 4" (100 mm)
– Visit www.RIDGID.com or www.ridgid.eu
of the drain inlet or properly support
to nd your local RIDGID contact point.
exposed cable when the distance ex-
ceeds 4" (100 mm). Greater dis tances
– Contact RIDGID Technical Services De-
can cause control problems leading to
part ment at rtctechservices@emer son.
twisting, kinking or breaking of the ca-
com, or in the U.S. and Canada call (800)
ble.
519-3456.
Do not wear loose clothing or jewelry.
Keep your hair and clothing away from
Description and
moving parts. Loose clothing, jewelry
Specifications
or hair can be caught in moving parts.
Always use appropriate personal pro-
Description
tective equipment while handling
The RIDGID® Power-Spin® Drain Cleaner will
and using drain cleaning equipment.
1
clean drain lines up to 1
/
2
" (40 mm) in di-
Drains may contain chemicals, bacte-
ameter and up to 25' (7,6 m) in length such
ria and other substances that may be
as bathroom and kitchen sinks, bathtub
toxic, infectious, cause burns or other
and shower drains. It features 25' (7,6 m) of
issues. Appropriate personal protec-
1
durable
/
4
" (6 mm) MAXCORE® cable that
tive equipment always includes safety
is positive ly retained in the drum to pre-
glasses and leather work gloves in
vent cable pullout. It is equipped with an
good condition, and may include equip-
AUTOFEED® that advances and retrieves
ment such as latex or rubber gloves, face
the cable with just the pull of a trigger. The
shields, goggles, protective clothing, res-
Power-Spin can be operated either manually
pirators and steel toed footwear.
or driven with a battery powered drill with a
Practice good hygiene. Use hot, soapy
maximum speed of 500 rpm.
water to wash hands and other body
The Power-Spin is not recommended for use
parts exposed to drain contents af-
with toilets.
ter handling or using drain cleaning
equipment. Do not eat or smoke while
3
POWER-SPIN® Drain Cleaner
Recommended Line
Machine Inspection
Cable Size
Size & Reach
WARNING
Line Size Reach
Before each use, inspect your drain clean-
1
1
/
4
" (6 mm) Cable Up to 1
/
2
"
25' (7,6 m)
ing machine and correct any problems to
reduce the risk of serious injury from elec-
(40 mm)
tric shock, twisted or broken cables, chemi-
cal burns, infections and other causes and
Specifications
prevent drain cleaner damage.
1
Drum Capacity......... 25' (7,6 m) of
/
4
"
1. Clean any oil, grease or dirt from all
(6 mm) Diameter
equipment, including handles and con-
MAXCORE Cable
trols. This aids inspection and helps
prevent the machine or control from
Drum Speed................ Maximum 500 RPM
slipping from your grip. Clean any debris
Weight.......................... 4.7 lbs. (2,1 kg)
from the cable and drum.
2. Inspect the drain cleaner for the follow-
NO TICE
ing items:
This machine is made to clean
drains. If properly used it will not damage a
drain that is in good condition and properly
designed, constructed and maintained. If the
binding parts
drain is in poor condition, or has not been
properly designed, constructed and main-
trigger and drum
tained, the drain cleaning process may not
be eective or could cause damage to the
-
drain. The best way to determine the condi-
ing label (see Figure 2.)
tion of a drain before cleaning is through vi-
If any problems are found, do not use
sual inspection with a camera. Improper use
the drain cleaner until the problems
of this drain cleaner can damage the drain
have been repaired.
cleaner and the drain. This machine may not
clear all blockages.
3. Inspect cable for wear and damage –
Look for:
the cable (cable is made from round
wire and prole should be round).
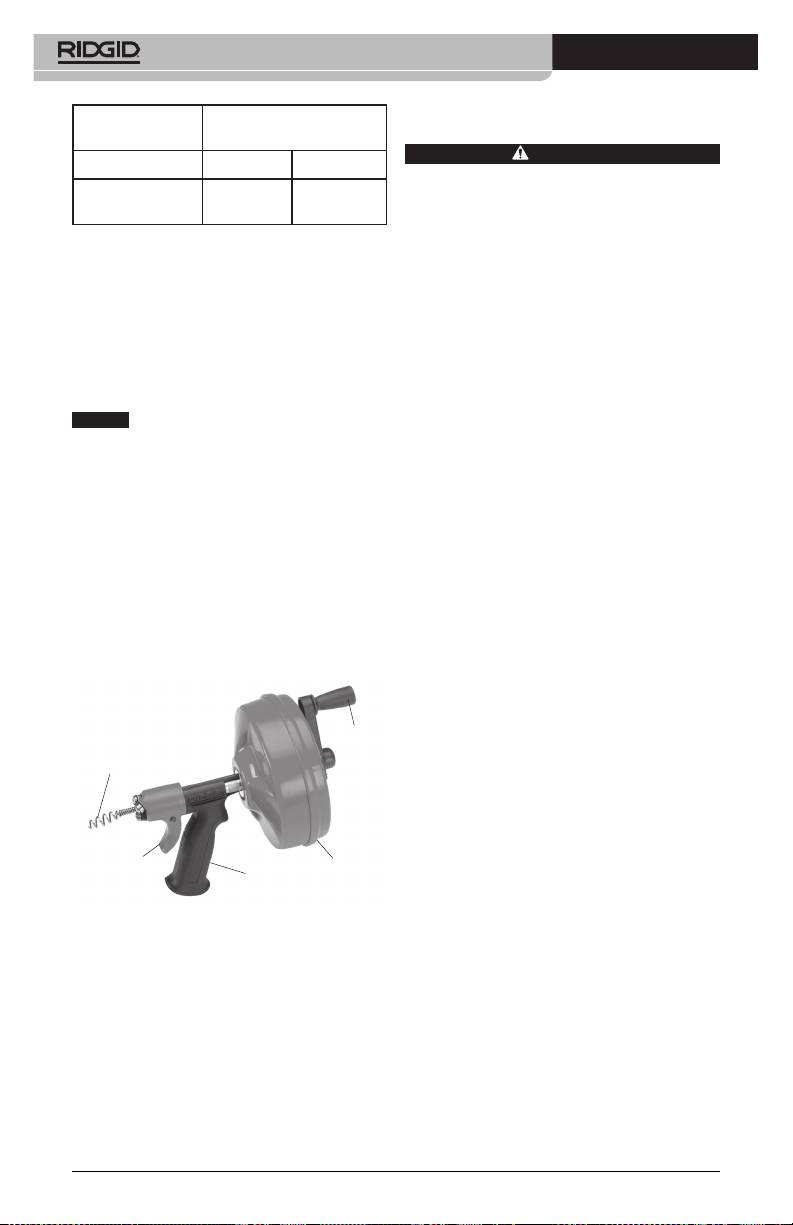
Crank
Cable End
(slight kinks up to 15 degrees can be
straightened).
-
ing the cable has been deformed by
stretch ing, kinking or run in REVERSE.
Trigger
Drum
Handle
or exposure to drain chemicals.
All of these forms of wear and damage
Figure 1 – Power-Spin
weaken the cable and make cable twist-
ing, kinking or breaking more likely dur-
ing use. Replace worn and damaged
cable before using drain cleaner.
4. If using the Power-Spin Drain Cleaner
with a Battery Power Drill, inspect the
drill per it’s instructions. Make sure that
the drill is in good operating condition
and the switch controls the drill opera-
tion. Conrm that the drill turns at less
than 500 rpm.
4

POWER-SPIN® Drain Cleaner
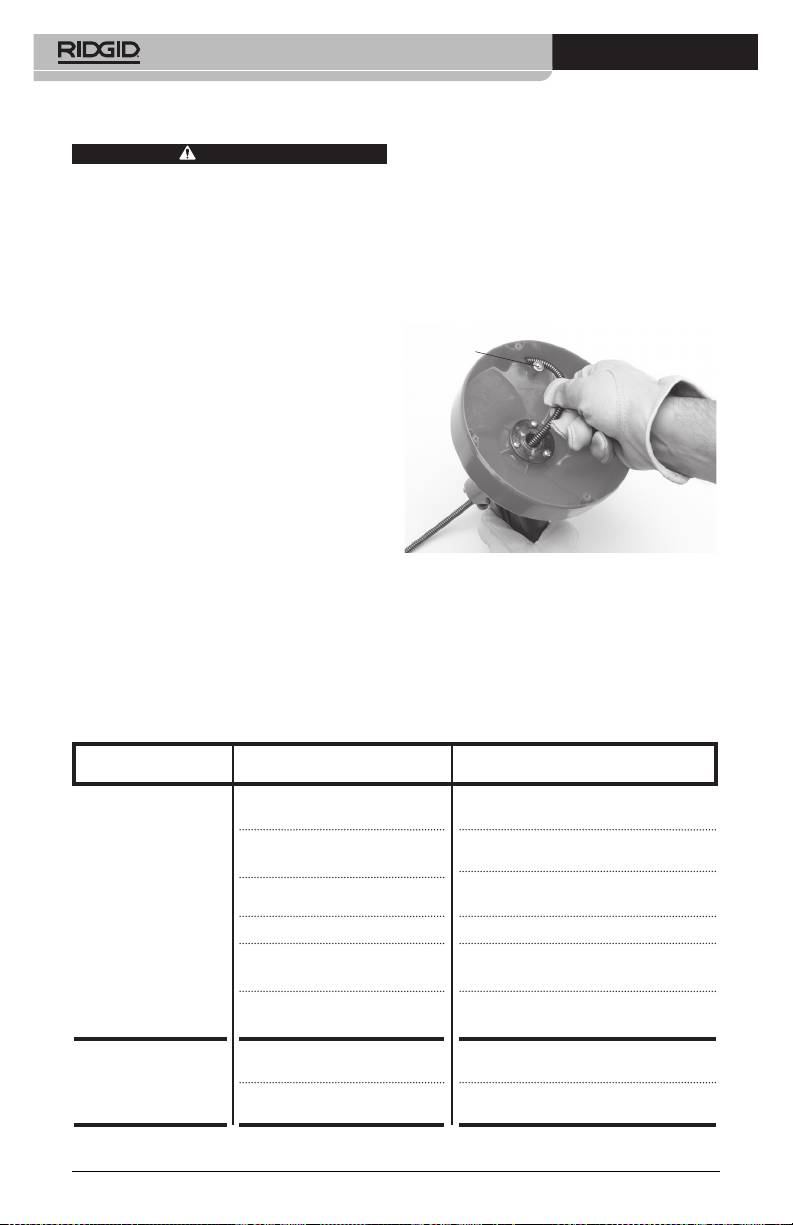
7. If using the Power-Spin with a battery
Machine and Work Area
powered drill, remove the crank from the
Set-Up
back of the drum by pressing the tabs
on the either side (See Figure 2). Securely
WARNING
attach the chuck of the drill to the drum
Set up the drain cleaning machine and work
shaft.
area according to these procedures to re-
duce the risk of injury from electric shock,
twisted or broken cables, chemical burns,
Warning Label
infections and other causes, and prevent
drain cleaner damage.
Always wear safety glasses, leather gloves,
and other appropriate protective e quip-
ment when setting up your drain cleaner.
For extra protection from chemicals and
Drum Shaft
bacteria on the machine and in the work
area, wear latex, rubber or other liquid bar-
rier gloves under the leather gloves.
1. Check work area for:
Figure 2 – Removing Crank Handle From
Power-Spin
-
chine and operator. Do not use the
8. If needed, take appropriate steps to ac-
machine while standing in water. If
cess the drain to be cleaned.
needed, remove the water from the
work area.
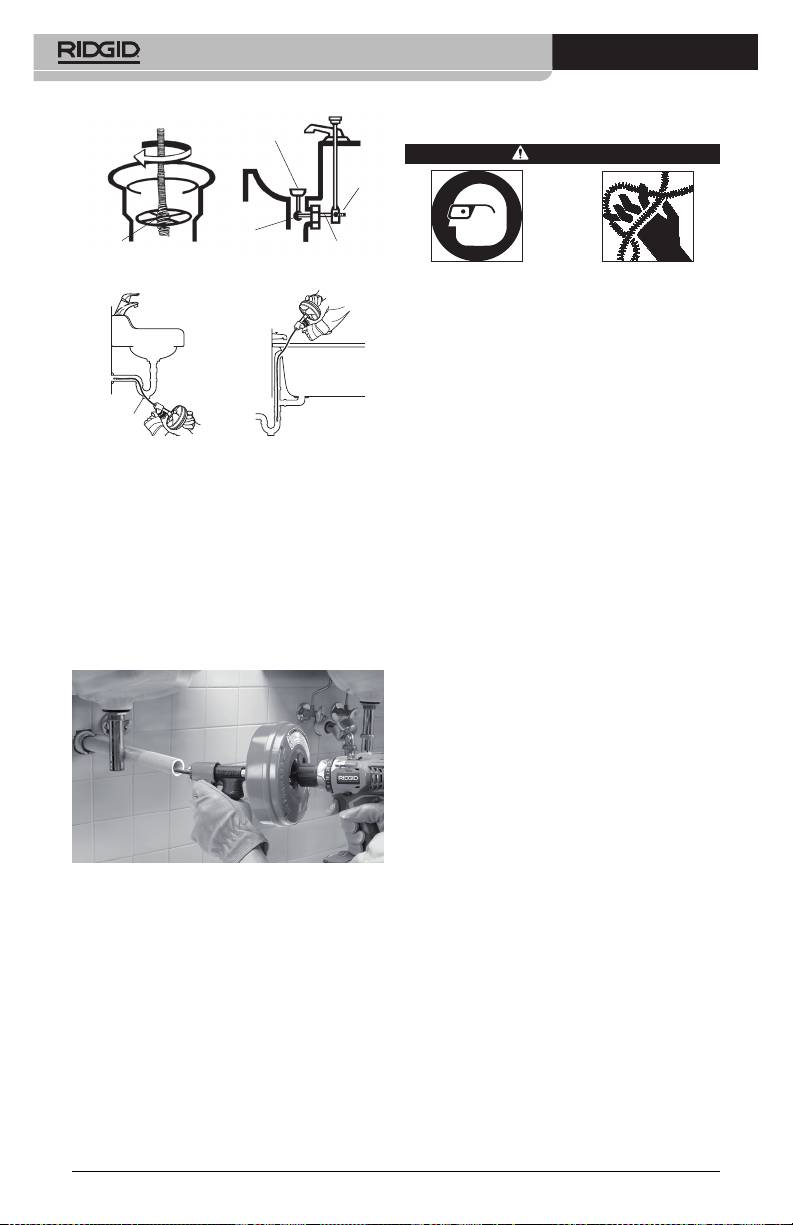
threaded through the cross hairs in the
2. Inspect the drain to be cleaned. If pos-
drain (See Figure 3).
sible, determine the access point(s) to
the drain, the size(s) and length(s) of the
Remove lift rod and drain plug (See Fig-
drain, distance to mainlines, the nature
ure 4). Be sure to place a container un-
of the blockage, presence of drain clean-
der the clean out or trap to catch any
ing chemicals or other chemicals, etc. If
water that may come out.
chemicals are present in the drain, it is
important to understand the specic
safety measures required to work around
may need to be removed (See Figure
those chemicals. Contact the chemical
5.) Be sure to place a container under
manufacturer for required information.
the clean out or trap to catch any water
that may come out.
3. Determine the correct drain cleaning
equipment for the application. The Pow-
er-Spin is made for:
the drain, this will damage the cable.
1
/
2
"(40 mm) lines up to 25'
1
mechanism to access the drain (See Fi-
(7,6 m) long with
/
4
"(6 mm) cable.
gure 6).
can be found by consulting the Ridge
Tool Catalog, on line at www.RIDGID.
com or by calling RIDGID Tech nical
Services at 800-519-3456.
4. Make sure machine has been properly
inspected.
5. If needed, place protective covers in the
work area. The drain cleaning process
can be messy.
6. If using the Power-Spin by hand, make
sure that the crank is present and rmly
attached.
5
POWER-SPIN® Drain Cleaner
Drain Plug
Operating Instructions
WARNING
Set
Screw
Cap Nut
Cross
Hairs
Lift Rod
Figure 3
Figure 4
Always wear eye protection to protect your
eyes against dirt and other foreign objects.
When cleaning drains that might contain
hazardous chemicals or bacteria, wear ap-
propriate protective equipment, such as
goggles, face shields or respirators, to pre-
vent burns and infections. For extra protec-
Clean-out
tion from chemicals and bacteria on the
Plug
machine and in the work area, wear latex,
Figure 5 Figure 6
rubber or other liquid barrier gloves under
the leather gloves.
9. Determine if the Power-Spin can be
Follow operating instructions to reduce the
placed within 4" (100 mm) of the drain
risk of injury from twisted or broken cables,
opening. If not, the drain opening will
cable ends whipping around, machine tip-
need to be extended using similar size
ping, chemical burns, infections and other
pipe and ttings so that the Power-Spin
causes.
can be placed within 4" (100 mm) of the
1. Make sure that the work area is free of
drain opening (See Fi gure 7). Improper
bystanders and other distractions.
cable support can allow the cable to kink
or twist and damage the cable/xture or
2. Assume a proper operating position that
injure the operator.
will allow
over reaching.
used).
or less from the drain opening.
This will help maintain control of the
cable and machine.
3. Pull cable out of the drum and push into
drain as far as it will go. At least one foot
of cable must be in the drain so that the
Figure 7 – Example of Extending Drain
cable will not come out and whip around
to Within 4" (100 mm) of Drain
when the cable starts turning.
Opening
4. If using a battery powered drill, conrm
set to low speed (less than 500 rpm) and
with dry hands insert the battery, but do
not place you nger on the drill switch
yet.
5. Make sure that the drain cleaner is within
4" (100 mm) of the drain opening, and
maintain that distance throughout the
cleaning process. This helps to prevent
twisting and kinking of the cable.
6
POWER-SPIN® Drain Cleaner
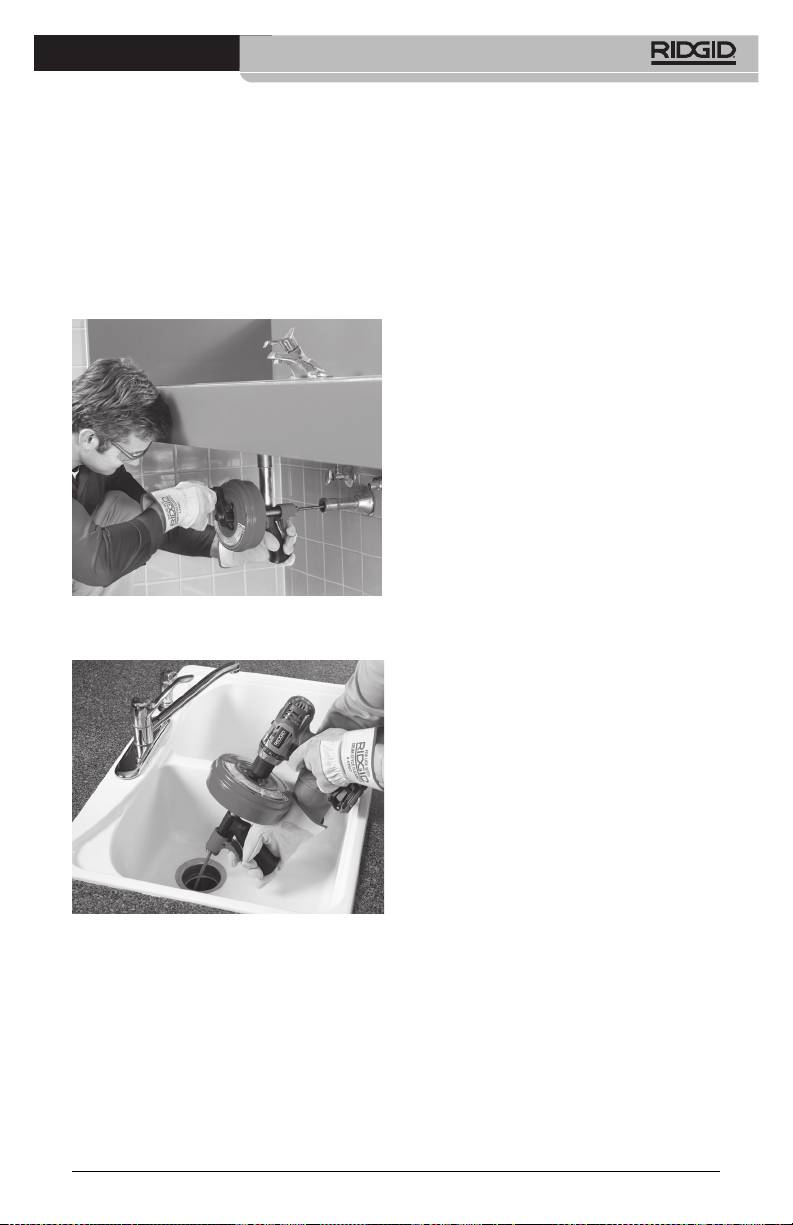
6. Place one hand on the drain cleaner han-
8. Continue to advance the cable until the
dle with one or two ngers on the trig-
resistance is encountered. Carefully work
ger and the other hand on the drill grip
the cable through the blockage. Do not
or the crank.
force the cable – if the cable stops turn-
ing, it is not cleaning the drain. It may
7. Turn the drum clockwise (as marked with
be necessary to spin the cable without
an arrow on the back of the drum, see
advancing it, or advancing the cable
Figure 2) If using the Power-Spin manu-
very slowly. This will help to break up the
ally, use the crank (see Figure 8). If using
blockage.
a drill, operate it in the forward direction.
To feed the cable into the drain, squeeze
9. If the cable becomes stuck in the block-
the trigger rmly.
age, do not continue turning the drum.
Continuing to turn the drum may cause
the cable to twist and kink. It may be
necessary to back the cable out of the
blockage by turning the drum in reverse.
In some cases, it may be possible to pull
the cable and the blockage out of the
drain by hand. If this is done, be careful
to not damage the cable. Remove the
blockage from the cable, feed cable back
into the drum, and continue cleaning
the drain as detailed above.
10. Once the blockage is broken up and
drain.
11. Continue to clean the rest of the drain.
Figure 8 – Power-Spin Used By Hand
Pay attention to how far the cable has
gone. Do not overrun the cable into a
larger drain. This can cause the cable to
knot up or cause other damage.
12. Once the drain has been cleaned,
turn the drum counterclockwise while
squeezing the drain cleaner trigger to
retract the cable. Pay close attention, as
the cable may lodge in a blockage while
being retracted.
13. Release the drain cleaner trigger and
stop turning the drum when the end of
the cable nears the drain opening. Do
not pull the cable end from drain while
it is rotating. The cable can whip around
and could cause serious injury.
14. Several passes through a line are recom-
mended for complete cleaning. If need-
Figure 8A – Power-Spin Powered By Battery
ed, repeat the above procedure.
Drill
15. Pull any remaining cable from the line by
hand and push the cable into the drum.
7
POWER-SPIN® Drain Cleaner
2. To make cable installation easier, com-
Maintenance Instructions
pletely uncoil new cable before proceed-
ing. Use caution when removing the ca-
WARNING
ble from the package. The cable is under
Always wear safety glasses and leather
tension and could strike the user.
gloves when performing any maintenance.
3. Insert about 12" (0,3 m) of cable through
Drill should be removed from drain cleaner
the front rollers and guide tube into the
before any maintenance is performed.
drum.
4. Push end of cable into holder and under
Cleaning
clamp screw and washer. Tighten clamp
Cable, drum and AUTOFEED should be thor-
screw (see Figure 9).
prevent the damaging eects of chemicals
Clamp Screw
and sediment. Clean exterior as needed with
hot soapy water and/or disinfectants. Drain
drum by tipping forward after every use and
cleaning.
Installing Replacement Cable
To Remove Cable From Drum
1. Pull out excess cable from drum.
2. Remove 4 screws on back of drum.
3. Loosen clamp screw and pull end of old
cable from drum and discard.
Figure 9 – Installing Cable End Into Holder
To Install Replacement Cable
1
1. Replacement
/
4
" (6 mm) x 25' (7,6 m)
5. Replace drum back and retighten the 4
MAXCORE® cables are available under
screws.
catalog number 42163.
6. Feed cable into drum.
Troubleshooting
PROBLEM POSSIBLE REASONS SOLUTION
Cable kinking or
Cable is being forced Do Not Force Cable! Let the auger do
breaking.
the work.
1
Cable used in incorrect pipe
Do not use in lines over 1
/
2
" (40 mm).
diameter.
Use reverse only if cable gets caught in
Motor switched to reverse
pipe or to retract cable.
Cable exposed to acid. Clean cables routinely.
Cable worn out or damaged. If cable is worn or damaged, replace it.
Cable not properly supported. Support cable properly, see instructions.
Cable won’t feed. Cable bearings are dirty or
Clean cable and bearings with hot, soapy
greasy.
water.
AUTOFEED not fully engaged. Be aware and squeeze trigger harder.
8
Оглавление
- POWER-SPIN®
- Power-Spin
- Power-Spin®
