Ridgid K-40: инструкция
Раздел: Электроинструменты
Тип:
Инструкция к Ridgid K-40
K-39
K-40
GB p. 1
DE
p. 7
FR
p. 14
NL
p. 21
IT p. 28
ES
p. 35
PT
p. 42
SV
p. 49
DA
p. 55
NO
p. 62
FI p. 68
HR
p. 75
PL p. 81
RO
p. 89
CZ
p. 95
HU
p. 102
GR
p. 109
RU
p. 117
RIDGE TOOL COMPANY
K-39, K-39B, K-40
Battery/Charger Safety (K-39 only)
GB
WARNING: Before using battery charger, read all instructions and cautionary
markings on (1) battery charger, (2) battery pack, and (3) K-39B.
K-39, K-39B, K-40
• Use only the charger which accompanies your product or a direct
Operating Instructions
replacement. Do not substitute any other charger. May result in bat-
tery damage and/or serious injury.
• Charge only RIDGID No. BP12 rechargeable batteries. Other types of
batteries may burst causing personal injury and damage.
General Safety Information
Do not disassemble charger or operate the charger if it had received
WARNING! Read these instructions
a sharp blow, been dropped or otherwise damaged in any way.
and the accompanying safety booklet
Replace damaged cord or plugs immediately. Incorrect reassembly or
carefully before using this equipment. If
damage may result in electric shock or fi re.
• Do not recharge battery in damp or wet environment. Do not expose
you are uncertain about any aspect of using this
charger to rain or snow. If battery case is cracked or otherwise
tool, contact your RIDGID distributor for more
damaged, do not insert into charger. Battery short or fi re may result.
information.
• Charge battery cartridge in temperatures above 4°C (40°F) and
below 41°C (105°F). Store tool and battery pack in locations where
Failure to understand and follow all instructions
temperatures do not go below 4°C (40°F) or will not exceed 49°C
may result in electric shock, fi re, and/or serious
(120°F). Allow battery pack to return to room temperature before
attempting to charge. Improper care of batteries may result in battery
personal injury.
leakage, electrical shock or burns.
• Battery leakage may occur under extreme usage or temperature
SAVE THESE INSTRUCTIONS!
conditions. Avoid contact with skin and eyes. The battery liquid is
caustic and could cause chemical burns to tissues. If liquid comes in
contact with skin, wash quickly with soap and water, then with lemon
Drain Cleaner Safety
juice or vinegar. If the liquid contacts your eyes, fl ush them with water for
• Never grasp a rotating cable with a rag or loose fi tting cloth glove. It
a minimum of 10 minutes and seek medical attention.
could become wrapped around the cable and cause serious injury. Only
• Place charger on fl at non-fl ammable surfaces and away from fl am-
wear RIDGID drain cleaning gloves.
mable materials when recharging battery pack. The charger and
• Do not overstress cables. Overstressing cables may cause twisting or
battery pack heat during charging. Carpeting and other heat insulating
kinking and result in serious injury.
surfaces block proper air circulation which may cause overheating of the
• Position machine within one foot of inlet. Greater distances can result
charger and battery pack. If smoke or melting of the case are observed
in cable twisting or kinking.
unplug the charger immediately and do not use the battery pack or
• Do not use tool if switch is broken. Any tool that cannot be controlled
charger.
by the switch is dangerous and must be repaired.
• When batteries are not in tool or charger, keep them away from
• Machine is designed for one person operation. Operator must control
metal objects. For example, to protect terminals from shorting DO NOT
switch and cable.
place batteries in a tool box or pocket with nails, screws, keys, etc. Fire
• Do not operate machine in reverse (REV). Operating machine in
or injury may result.
reverse can result on cable damage and is only used to back tool out of
• Do not put batteries into fi re or expose to high heat. They may
an obstruction.
explode causing serious injury.
• Do not place this tool in water. Water entering the motor housing will
increase the risk of electrical shock.
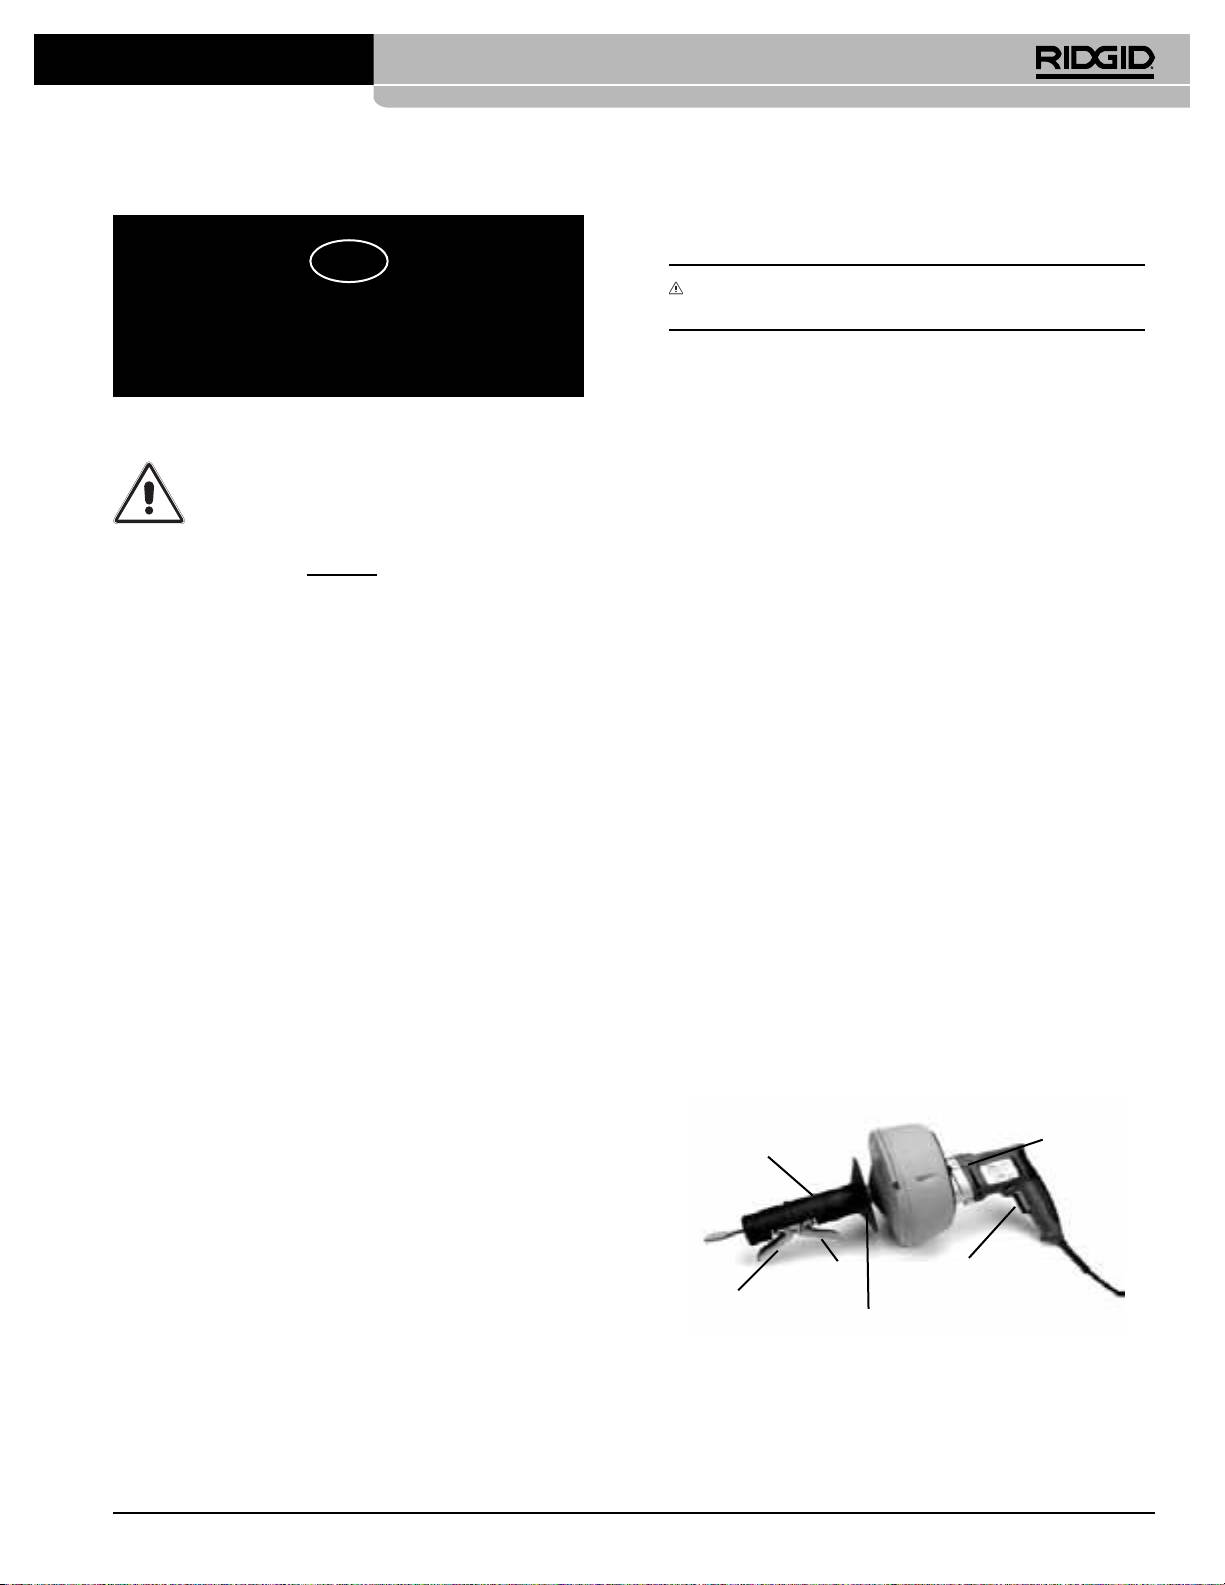
FORWARD/
REVERSE
• Only use the K39/K-39B or K-40 to clean lines 3/4” to 21/2” in dia-
Hand Grip
Button
meter. Follow instructions on proper use of the drain cleaner. Other
uses or modifying this drain cleaner for other applications may increase
the risk of injury.
• Be careful when cleaning drains where cleaning compounds have
been used. Avoid direct contact with skin and eyes. Serious burns
can result from some drain cleaning compounds.
REVERSE
Variable Speed Switch
Autofeed Lever
FORWARD
Autofeed Lever
Slide Action Chuck
Figure 1 – K-39AF Drain Cleaner
Ridge Tool Company
1
K-39, K-39B, K-40
Description, Specifi cations and
K-39, K-40 specifi cations, standard
equipment and accessories: see
Standard Equipment
catalog
Description
Drain Cleaner Inspection
The RIDGID model K-39 AF, K-39 AF Battery and K-40 are hand-held drain
cleaners designed to clean 3/4” to 21/2” drain lines in kitchens, bathrooms
and utility rooms.
WARNING: To prevent serious injury, inspect your Drain Cleaning Machine.
The following inspection procedures should be performed before each use.
The K-39 electric powered tool is a double-insulated design equipped with
polarized plug. Double insulation eliminates the need for the three-wire
1. Make sure the Drain Cleaning Machine is unplugged.
grounded power cord and grounded supply system.
2. Electrical components:
K-39 / K-40 Drain Cleaner:
The slide-action chuck grips the cable so that it can be forced into the blockage
Inspect the power cord and plug for damage. If the plug has been
as the drum continues to spin.
modifi ed or if the cord is damaged, do not use the Drain Cleaner until
the cord has been replaced.
The autofeed unit automatically feeds and retrieves the cable thereby
K-39 Battery Charger:
eliminating the need for manual control.
Inspect the power cord and plug for damage. If the cord or plug is dam-
aged, do not use the charger until the cord is replaced. Inspect charger
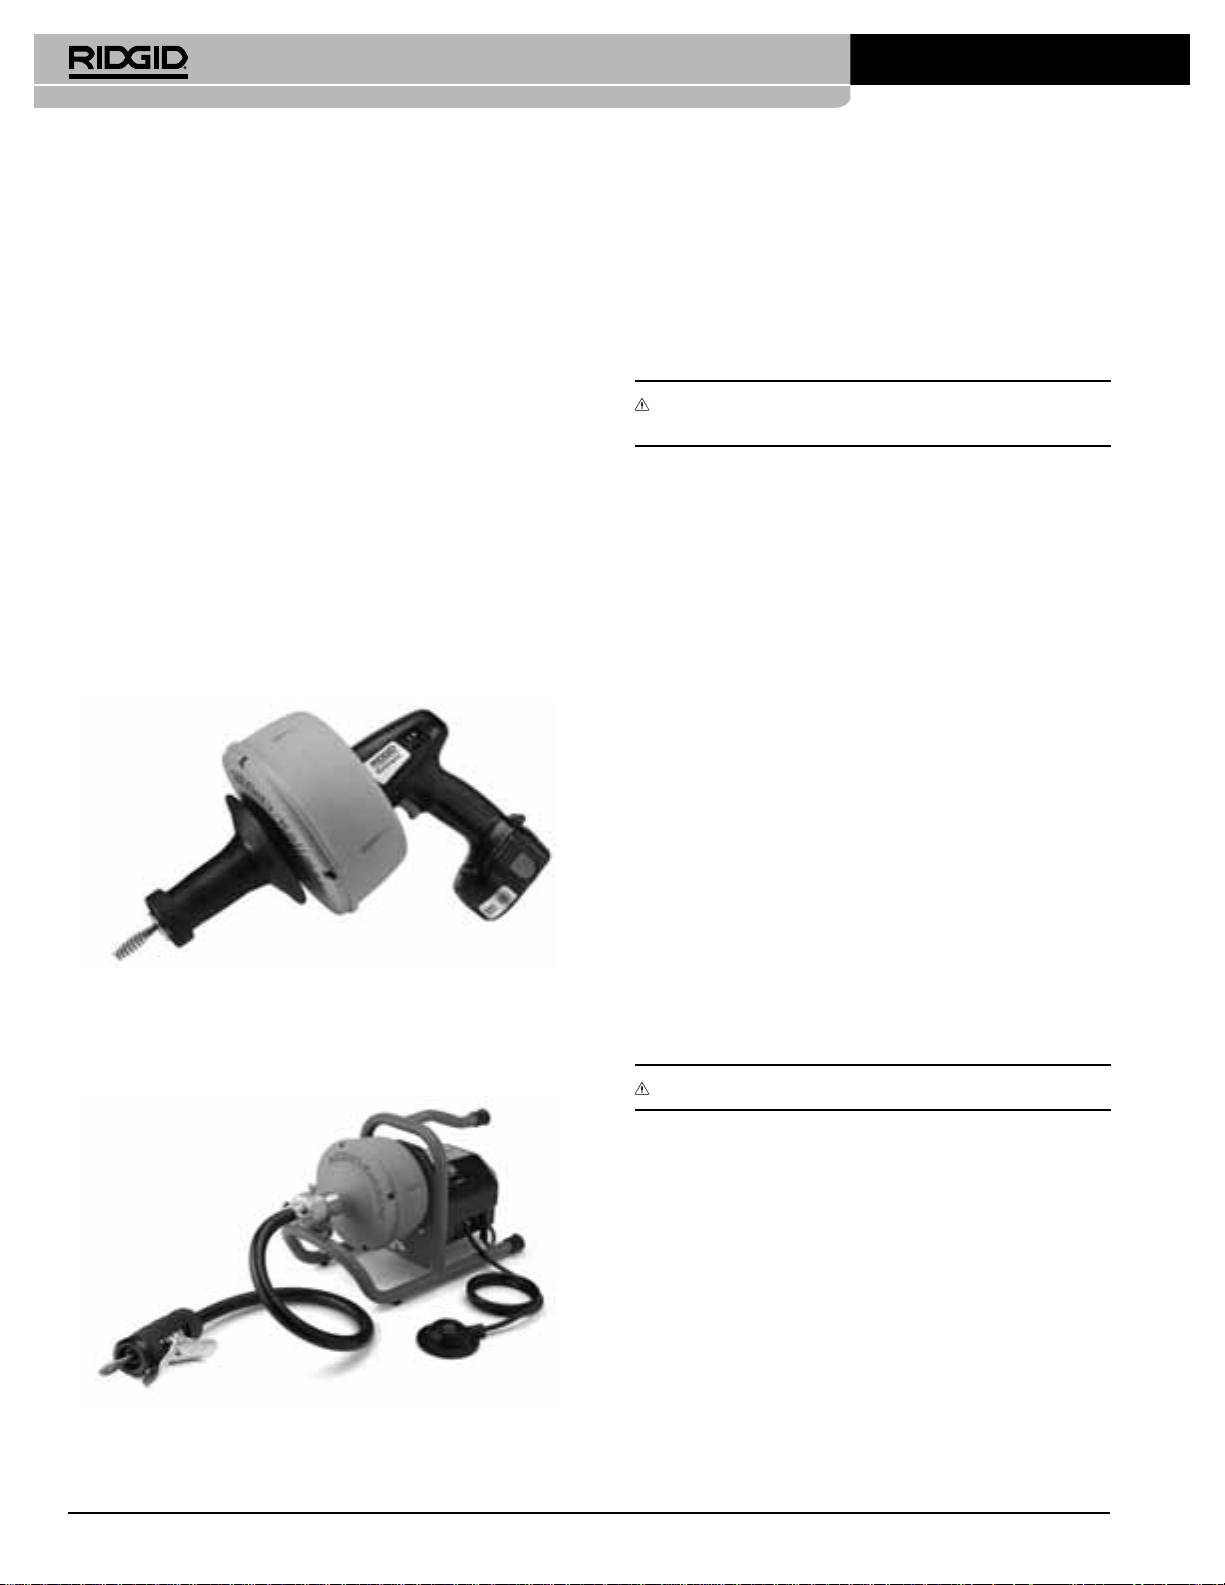
The Model K-39B (Figure 2) battery powered version eliminates the need for a
for damage. Do not use charger if it has received a sharp blow, been
power outlet or extension cord at the point of application. It is offered with the
dropped or otherwise damaged.
slide-action chuck and the autofeed assembly.
3. Inspect the Drain Cleaning Machine for any broken, missing, misaligned
or binding parts as well as any other conditions which may affect the
safe and normal operation of the machine. If any of these conditions are
present, do not use the Drain Cleaning Machine until any problem has
been repaired.
4. Lubricate the Drain Cleaner and the autofeed unit, if necessary, accor-
ding to the Maintenance Instructions.
5. Use accessories that are designed for your drain cleaner and meet
the needs of your application. The correct accessories allow you to do
the job successfully and safely. Accessories suitable for use with other
equipment may be hazardous when used with this drain cleaner.
6. Clean any oil, grease or dirt from all equipment handles and controls.
This reduces the risk of injury due to a tool or control slipping from your
grip.
7. Inspect cables and couplings for wear and damage. Cables should be
Figure 2 – K-39B Drain Cleaner
replaced when they become severely worn or corroded. A worn cable can
The RIDGID K-40 drain cleaner (Figure 3) is designed to clean 30-75mm lines.
be identifi ed when the outside coils become fl at or having several kinks
The K-40 is equiped with a guide hose and double action autofeed for easy
throughout the cable.
access to confi ned spaces.
WARNING: Worn or damaged cables can break causing serious injury.
Figure 3 –K-40 Drain Cleaner
2
Ridge Tool Company

K-39, K-39B, K-40
Drain Cleaner and Work Area
Urinal Clog Setup:
1. Remove urinal from wall. Place a bucket under drain to catch any backed
Set-Up
up water. Clean out any debris that may be stuck in urinal. Trying to clean
drain through urinal may damage porcelain.
WARNING: To prevent serious injury, proper set-up of the drain cleaner and
2. Follow operating instructions below to clean drain.
work area is required. The following procedures should be followed to set-up
the K-39, K-40 and K-39B.
K-39 Battery Charger Setup
K-39, K-40 Drain Cleaner:
Battery Charging Procedure:
1. Check work area for:
WARNING: Before using the battery charger, read all the instructions
• Adequate lighting.
included with the battery and charger.
• No fl ammable liquids, vapors or dust that may ignite.
• Clear path to the electrical outlet that does not contain any sources of
1. Locate the charger so the cord and charger will not be stepped on,
heat or oil, sharp edges or moving parts that may damage electrical
tripped over or be subjected to damage. Do not expose charger to wet
cord.
environment such as rain or snow.
• Dry place for operator.
2. Charge battery cartridge in temperatures above 4°C (40°F) and below
2. Make sure trigger is not engaged (K-39).
41°C (105°F). Store tool and battery cartridge in location where tempera-
3. Plug the Drain Cleaner into the electrical outlet, making sure to position
tures do not exceed 49°C (120°F) or go below 4°C (40°F). Allow battery
the power cord along the clear path selected earlier. If the power cord
pack to return to room temperature before attempting to charge.
does not reach the outlet, use an extension cord in good condition.
3. Plug the battery charger into the proper A/C voltage source.
WARNING: To avoid electrical shock and electrical fi res, never use an
WARNING: To avoid electric shock and electrical fi res, never use an
extension cord that is damaged or does not meet the following requirements:
extension cord that is damaged or does not meet the following requirements:
• The cord is rated for outdoor use if being used outdoors.
• The cord has pins on line plug that are similar in size and shape to
• The cord has suffi cient wire thickness (1.5 mm² up to 30m). If the wire
those of the plug on the charger.
thickness is too small, the cord may overheat, melting the cord’s insu-
• The cord is rated for outdoor use if being used outdoors
lation or causing nearby objects to ignite.
• The cord has suffi cient wire thickness (1.5mm² up to 30m). If the wire
thickness is too small, the cord may overheat, melting the cord’s insu-
WARNING: To reduce risk of electrical shock, keep all electrical connections
lation or causing nearby objects to ignite.
dry and off the ground.
4. Before inserting battery pack, remove protective cap then insert battery
pack into charger.
5. When battery cartridge is inserted, the charger’s green indicator will
begin to “BLINK”. This indicates that the battery is receiving a fast
Sink Clog Setup:
charge. Fast-charging will automatically stop when the battery pack is
1. First, remove the sink’s P-trap by unscrewing it at both ends. Remember
fully charged.
to place a bucket under the sink to catch backed up water. Clean out any
When the indicator light stops “ BLINKING” (and becomes a steady green
debris that may be stuck in the P-trap.
light) fast charging is complete.
2. Place the K-39, K-40 close to the drain pipe that is coming out of the wall
When you begin the charging process of the battery pack, a steady green
and follow the operating instructions.
light could also mean the battery pack is too hot or too cold.
The purpose of the light is to indicate that the battery pack is fast-charg-
ing. It does not indicate the exact point of full charge. The light will stop
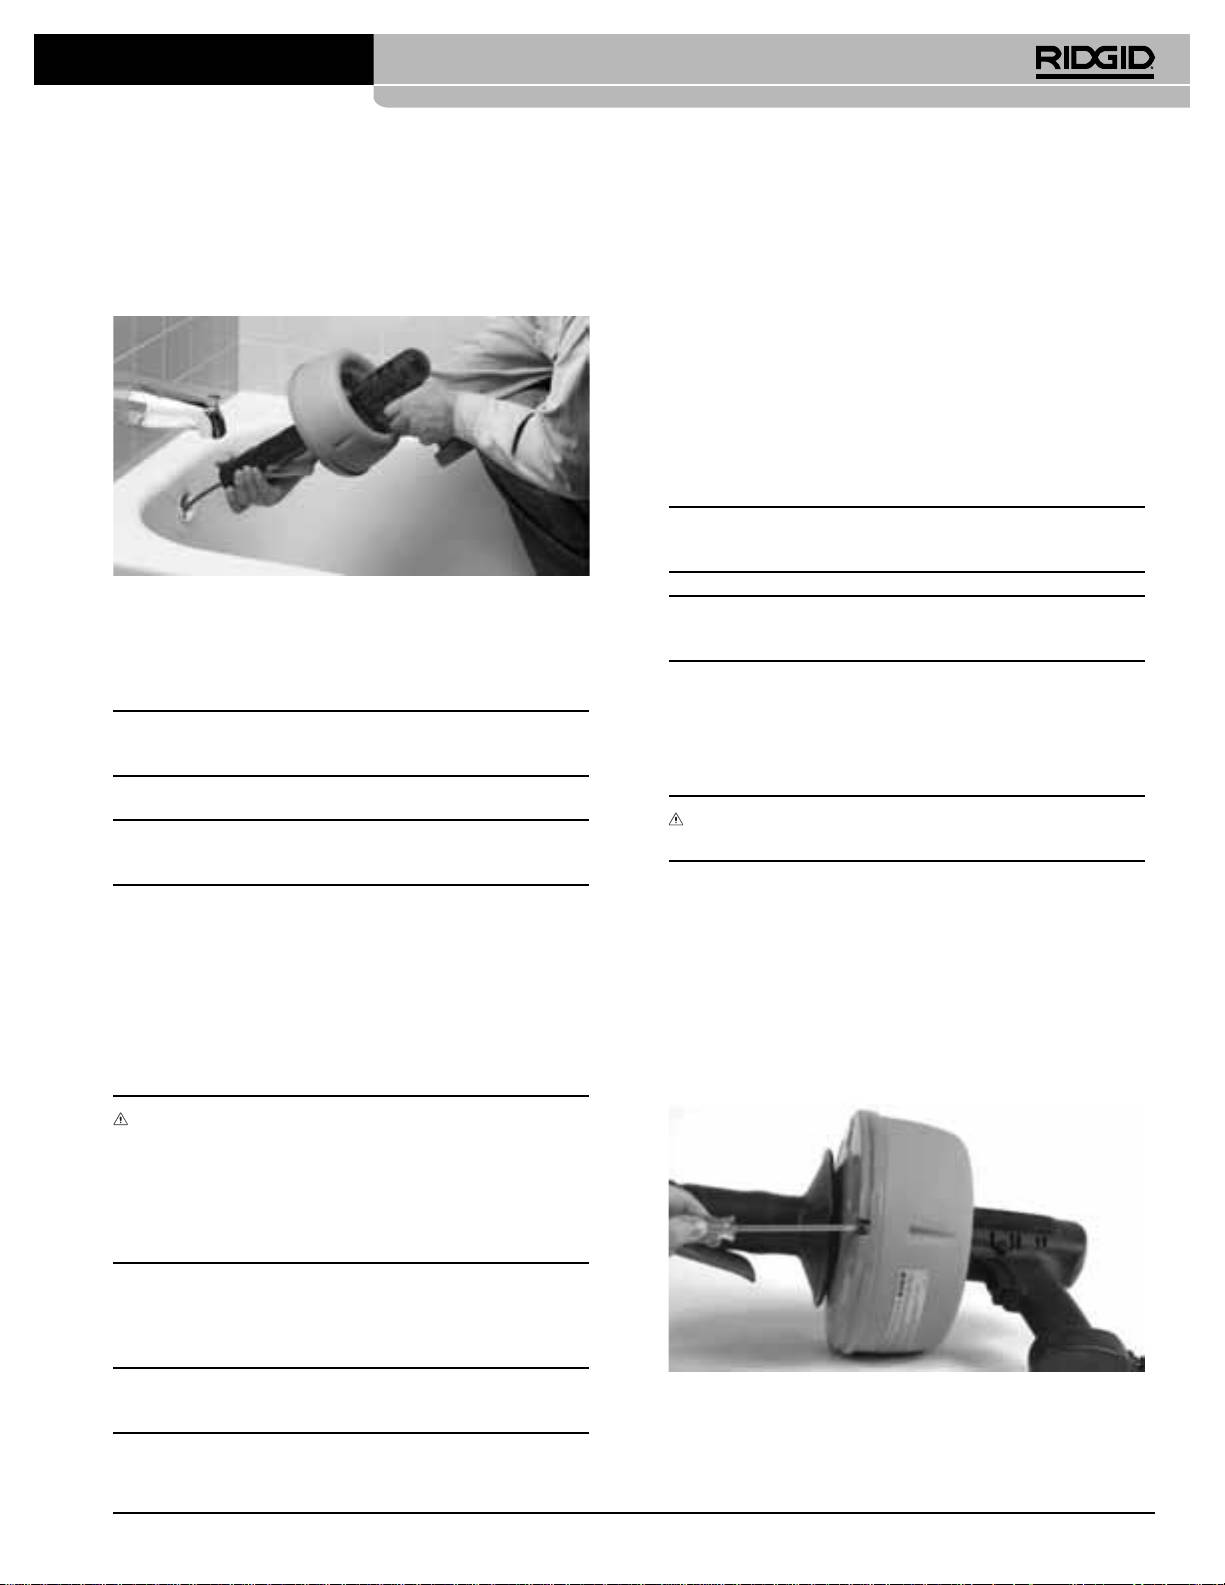
Bathtub Clog Setup:
blinking in less time if the battery pack was not completely discharged.
When the battery pack is fully charged, unplug the charger (unless you’re
1. Remove the tub’s overfl ow cover plate. Pull out all of the stopper linkage
charging another battery pack) and slip the battery pack back into the tool
in order to expose the open hole.
handle.
To prevent fi re or injury when batteries are not in tool or charger, always
CAUTION: DO NOT run the machine through the drain in the bottom of the
place protective cap onto end of battery pack.
tub. ALWAYS go through the tub’s overfl ow.
2. Place the K-39, K-40 close to the overfl ow opening and follow the operat-
ing instructions.
Ridge Tool Company
3
K-39, K-39B, K-40
Operating Instructions
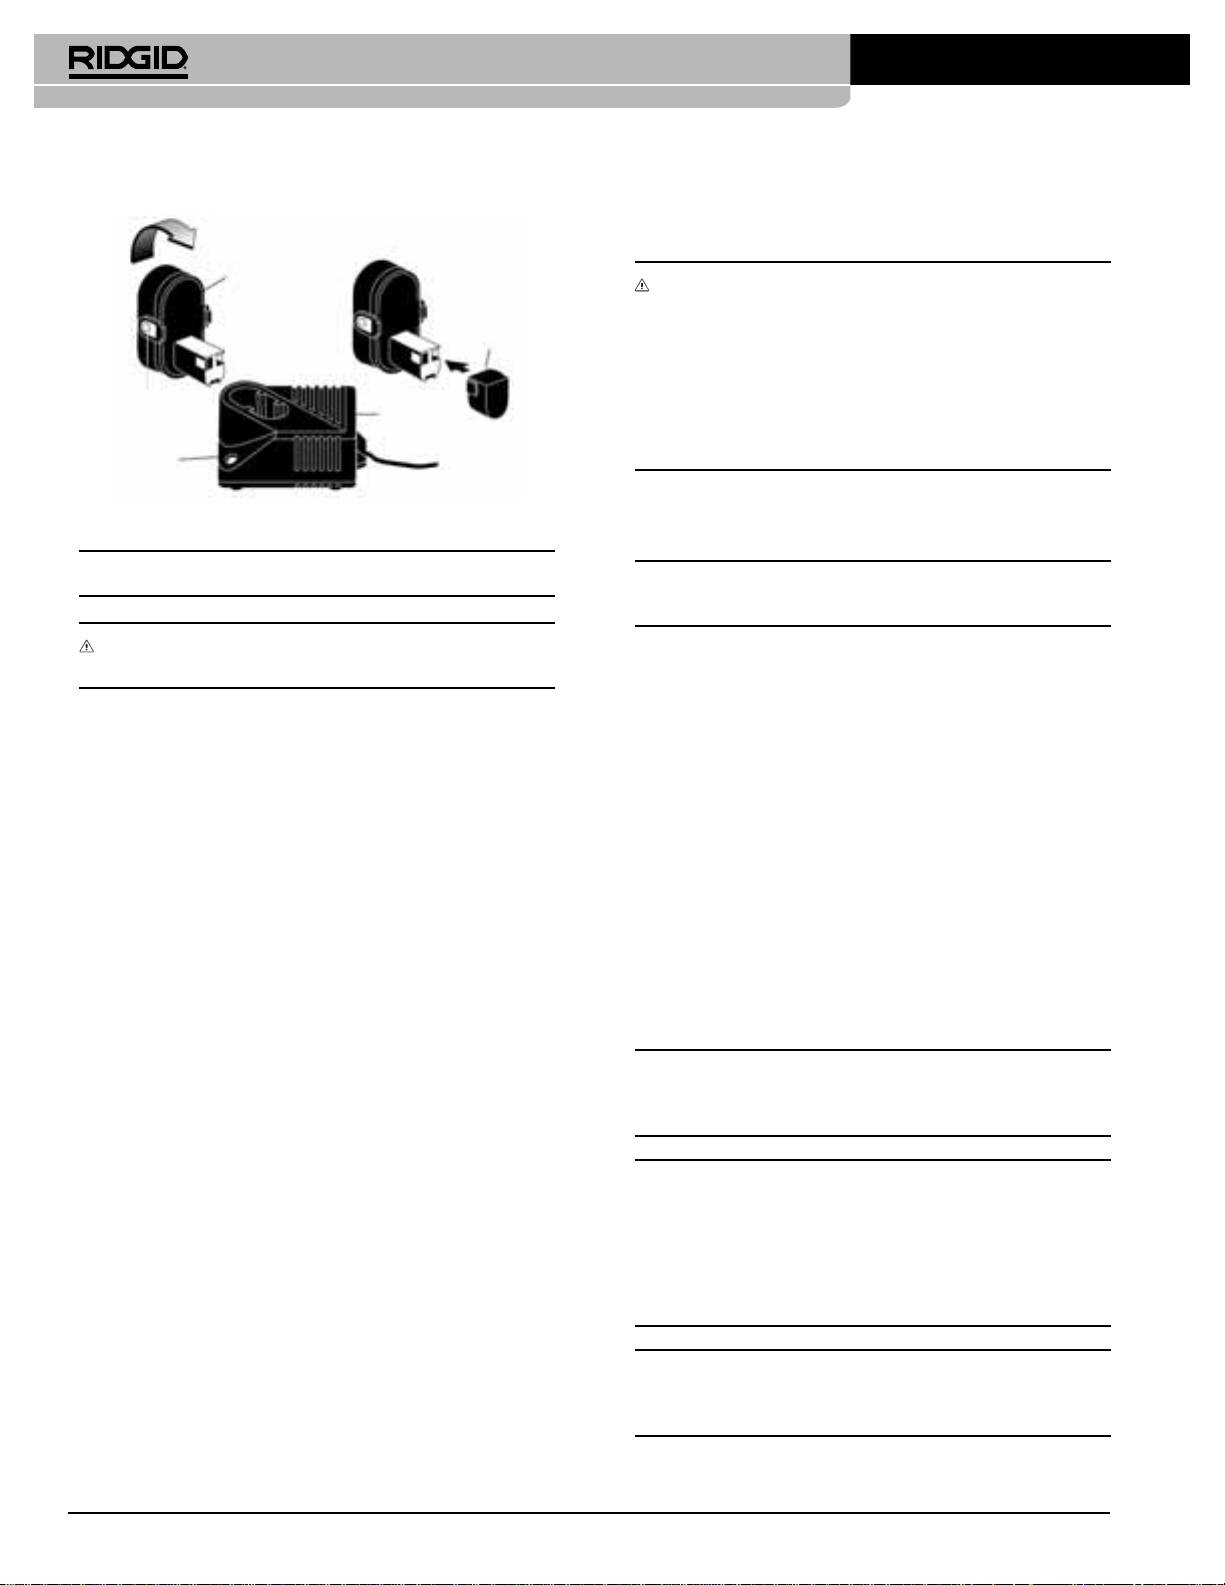
Battery Pack
WARNING: Only wear RIDGID drain cleaning gloves. Never grasp a
rotating cable with a rag or loose fi tting cloth glove that may become wrapped
Protective
around the cable causing serious injury.
Cap
Always wear eye protection to protect your eyes against dirt and other foreign
objects. Wear rubber soled, non-slip shoes.
Be very careful when cleaning drains where chemical compounds have
Battery
Release Tabs
Charger
been used. Avoid direct contact of the skin and especially the eyes and facial
area as serious burns can result. Rinse hands thoroughly after contact with
Indicator
chemical compounds.
Light
Figure 4 – Charging Battery Pack
Controls
NOTE! Charging time will be approximately one hour.
CAUTION: Know the location and function of all controls before using this
drain cleaner.
WARNING: Charge only RIDGID-type batteries. Other types of batteries
Slide-Action Chuck (K-39)
may burst causing personal injury.
Pull hand grip REARWARD and it locks into engaged position to grip cable.
5. After charging, unplug the charger from the power source.
This action locks the cable so it can be forced into blockage as the drum
continues to spin. This also does not allow the cable to be forced back into
the drum when meeting resistance (Figure 5). Push hand grip FORWARD to
Important Charging Notes
disengage and draw cable out of or into cable canister.
1. The battery pack accepts only about 80% of its maximum capacity with
its fi rst few charge cycles. However, after the fi rst few charge cycles, the
Variable Speed Switch (K-39)
battery will charge to full capacity.
Operate at any speed from 0 to maximum 450 RPM, 700 RPM for the cordless
2. The charger was designed to fast charge the battery only when the bat-
version. The speed is controlled by the pressure you apply to the trigger. Apply
tery temperature is between 4°C (40°F) and 41°C (105°F).
more pressure to increase speed and release pressure to decrease speed.
3. A substantial drop in operating time per charge may mean that the bat-
tery pack is nearing the end of its life and should be replaced.
FORWARD/REVERSE Button
4. If you anticipate long periods (i.e. a month or more) of non-use of your
tool, it is best to run your tool down until it is fully discharged before stor-
The FORWARD/REVERSE Button, located above the variable speed trigger
ing your battery pack. After a long period of storage, the capacity at fi rst
switch, changes rotation of cable. For clockwise rotation (normal), push button
recharge will be lower. Normal capacity will be restored in two or three
to left (FORWARD) position. For counterclockwise rotation, push button to
charge/discharge cycles. Remember to unplug charger during storage
right (REVERSE) position.
period.
5. If battery does not charge properly:
CAUTION: Power unit must be completely stopped before moving FORWARD/
A. Check for voltage at outlet by plugging in some other electrical de-
REVERSE switch. REVERSE position is used only when removing cable from
vice.
an obstruction.
B. Check to see if outlet is connected to a light switch which turns power
“OFF” when lights are turned off.
C. Check battery pack terminals for dirt. Clean with cotton swab and alco-
hol if necessary.
NOTE! While using the K-39 AF and K-40 AF, you do not need to reverse
D. If you still do not get proper charging, take or send tool, battery pack
the direction of the power source to retrieve the cable (this is valid for
and charger to your Ridge Tool Service Center.
K39 AF version January 2007 and K-40 AF version August 2007). Simply
use the reverse lever on the autofeed. However, if you do get stuck in an
obstruction or need to “unscrew” out of something put the unit in reverse. With
K-39 Battery Drain Cleaner
the K-40 with single action autofeed, you need to inverse the motor direction
to retrieve the cable.
1. Release battery pack from tool by pressing on both sides of the battery
release tabs and pull downward. To insert battery, align battery and slide
battery pack into tool until it locks into position. Do not force.
2. Check work area for:
CAUTION: Putting an AF unit in reverse will change the rotation of the cable
• Adequate lighting
and therefore switch the autofeed direction levers (forward will become
• Dry place for operator.
reverse and vice versa).
• Flammable liquids, vapors or dust that may ignite.
4
Ridge Tool Company
K-39, K-39B, K-40
9. Completely release trigger just prior to cable or tool emerging from drain
Cleaning Drain Line
opening. Retrieve by hand as cable or tool may contain debris and splash
1. Insert cable into drain opening by hand as far as possible before turning
work area.
machine on. Leave approximately 6” of cable between drain opening and
nose of machine (Figure 5).
Special Procedures
Reverse Operation
If cable/blade gets hung up in obstruction, release trigger switch and let motor
come to a complete stop before reversing.
Place FORWARD/REVERSE button in REVERSE position. Press trigger
switch only until cable/blade is free of obstruction. Release trigger switch
immediately.
CAUTION: Only run machine in REVERSE if relieving blade from a
blockage.
Figure 5 – Keep Distance Between Drain Opening and Nose of Drain
Gun to 6” or Less
NOTE! When motor direction is in reverse; autofeed directional levers will be
reversed, (FORWARD will become REVERSE and vise versa).
2. Be sure machine FORWARD/REVERSE button is in the FORWARD
position.
As soon as cable/blade is free and motor has stopped, return FORWARD/
3. Squeeze trigger and be sure entire cable is spinning before continuing.
REVERSE button to FORWARD position.
NOTE! The K-39 autofeed cannot be used while the hand grip chucking
mechanism is engaged. Be sure the hand grip is pushed forward all the way.
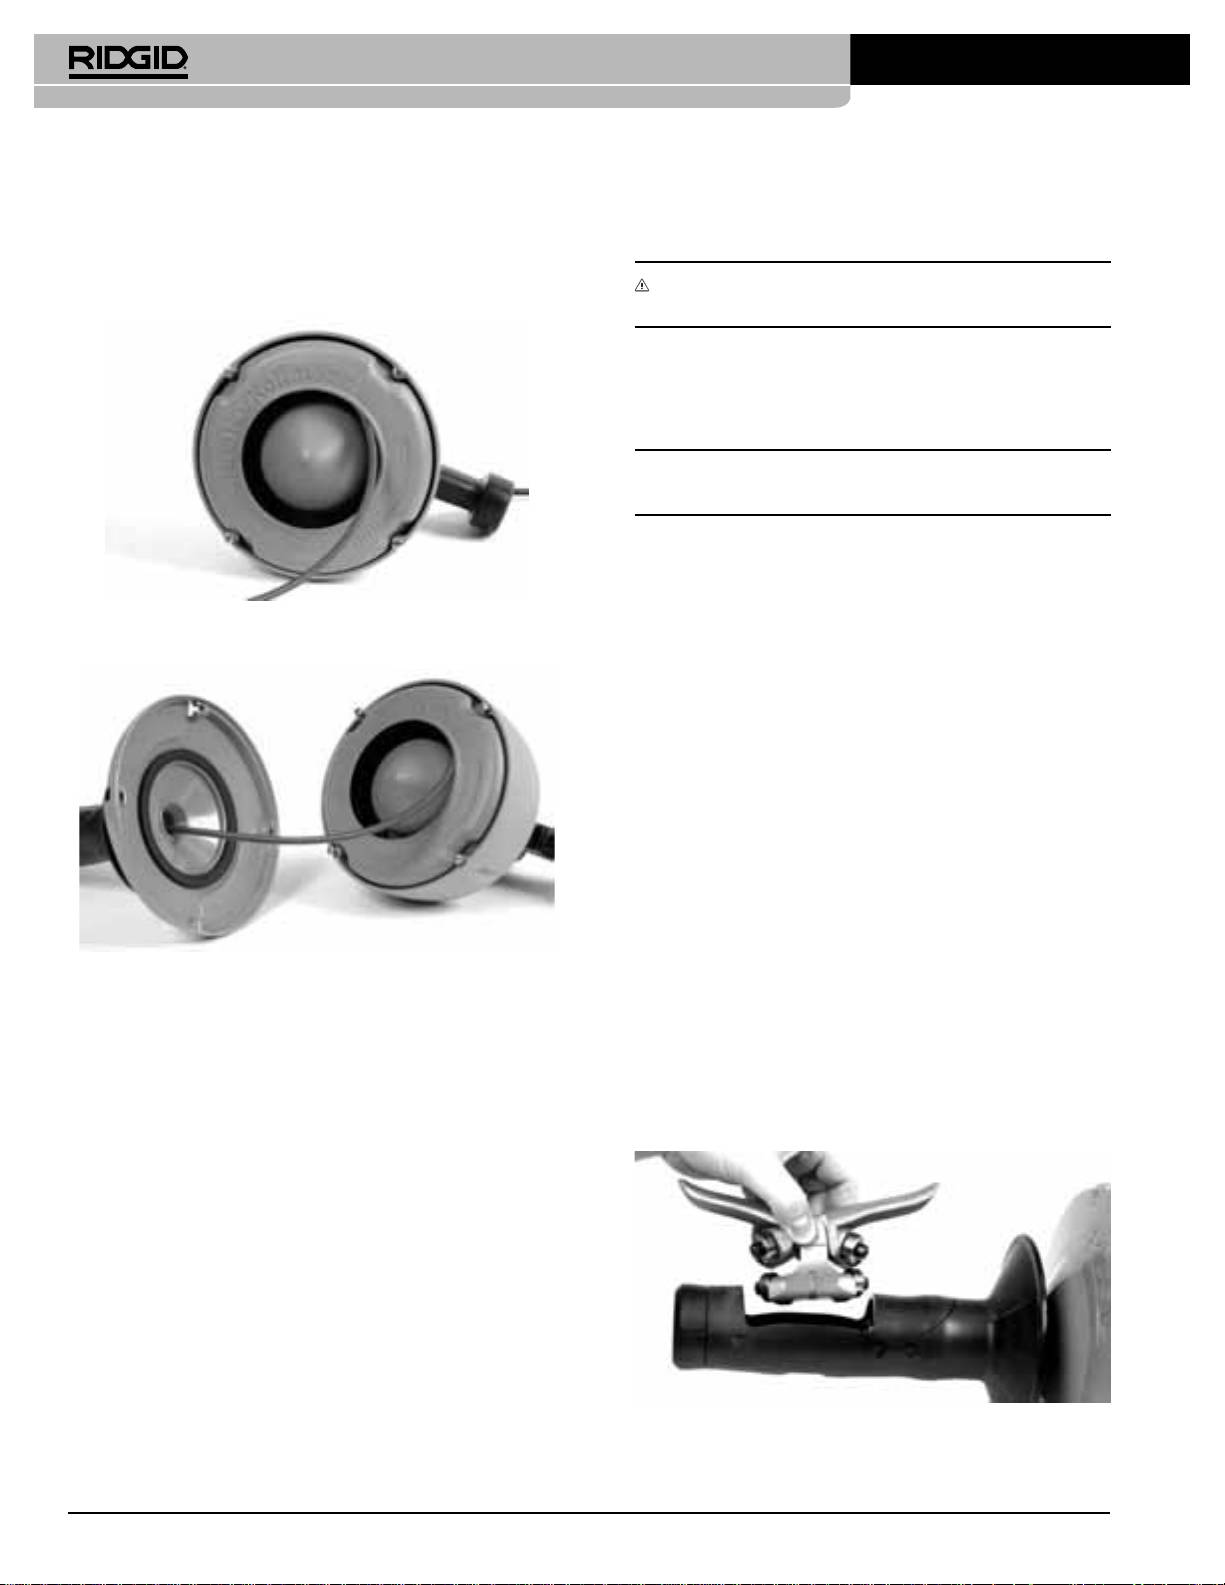
Loading Cable Into Cable Canister
4. Depress the forward autofeed lever to feed cable into drain.
WARNING: Make sure machine is unplugged from power source before
NOTE! Know how long your run of pipe is prior to cleaning. Running too much
loading cable.
cable can damage your equipment and the cable.
Your K-39, K-39B and K-40 is supplied with an inner drum that fi ts snugly
5. Feed cable into drain until obstruction is encountered or cable begins to
inside the cable canister that allows easy change-out of cable. K-39 Models
bind up.
that include extra cable as standard equipment come with an inner drum for
6. K-39: Release the forward autofeed lever and back the cable up using
each cable. To utilize the inner drum feature:
the reverse autofeed lever. Then use the forward lever to again feed the
1. Pull hand grip forward to the disengaged position.
cable to remove the obstruction a piece at a time. Continue this back and
2. Loosen the four (4) screws that hold the canister front half to the back
forth until you have broken through the obstruction.
half. Loosen each screw 3 (three) full turns (Figure 6).
K-40: reverse the machine direction to retrieve the cable. Then reverse
3. Separate the canister front half from the back half by twisting apart.
again to forward the cable. Repeat till you have broken through the
4. Lift the inner drum, with cable, out of its cradled fi t.
obstruction.
5. Fit the new inner drum into the canister’s back half and draw about a foot
of cable out of the inner drum (Figure 7).
WARNING: Do not allow tension to build up in the cable. This will happen if
the cutting tool hits a snag and stops turning but the motor and cable continue
to rotate. Torque builds until the cable suddenly twists, potentially wrapping
around your hand or arm. This can happen quickly and without warning, so
proceed slowly and carefully as you feed the cable into the drain. If tool gets
hung up in an obstruction, refer to Reverse Operating Instructions in the
“Special Procedures” section.
7. Once drain is open and fl owing, continue feeding additional cable with
autofeed to clean rest of drain.
8. To retrieve cable, simply depress the reverse autofeed lever (K-39) or pull
the cable back by hand (K-40).
NOTE! K-39: There is no need to reverse the motor direction to retrieve the
Figure 6 – Loosen Four (4) Screws From Back Half of Canister About
cable. Simply depress the reverse autofeed lever.
Three (3) Full Turns
Ridge Tool Company
5
K-39, K-39B, K-40
6. Pass the exposed cable head through the front half assembly, align the
Maintenance Instructions
front half with the back half of the canister, and rotate drum front to lock
into position. Tighten the screws.
7. For K-39 AF, you will need to pull up on both the FORWARD and
WARNING: Make sure machine is unplugged from power source before
REVERSE autofeed levers to fi t bulb of cable through autofeed.
performing maintenance or making any adjustment.
Drain Cleaner
1. Cables should be thoroughly fl ushed with water after each use to prevent
damaging effects of drain cleaning compounds. Use RIDGID Cable Rust
Inhibitor or an equivalent oil.
NOTE! When not in use, store cables indoors to prevent deterioration by the
elements.
Cables should be replaced when they become severely corroded or worn. A
worn cable can be identifi ed when outside coils of cables become fl at.
2. Use a clean cloth to wipe the unit off. Oil, grease and other substances
may cause deterioration.
Figure 7A – When Loading Cable Into an Inner Drum, Wind the Cable in
Certain cleaning agents and solvents damage plastic parts. Some of
Clockwise
these are: gasoline, carbon tetrachloride, chlorinated cleaning solvents,
ammonia and household detergents that contain ammonia. Avoiding use
of these and other types of cleaning agents minimizes the probability of
damage.
3. Regularly drain the inner drums of any captured liquid. Simply hold the
machine nose down and drain excess liquid each time the machine is
used.
4. Store the unit where it is cool and dry.
About once a year, return your K-39 to the nearest RIDGID Authorized Service
Center for the following:
• Parts cleaned and inspected.
• Relubricated with fresh lubricant.
• Electrical system tested.
• All repairs.
Figure 7B – Pass Exposed Cable Through Front Half and Reassemble
to Back Half of Canister
Autofeed
A drop of grease to the following areas once a month will extend the life of the
autofeed unit and keep it well maintained:
• Pivot arm/spring location.
The autofeed will accumulate dirt, grease and debris over time. Periodically
remove the autofeed unit and clean.
Figure 8
6
Ridge Tool Company
