Ridgid 918I: инструкция
Раздел: Электроинструменты
Тип:
Инструкция к Ridgid 918I
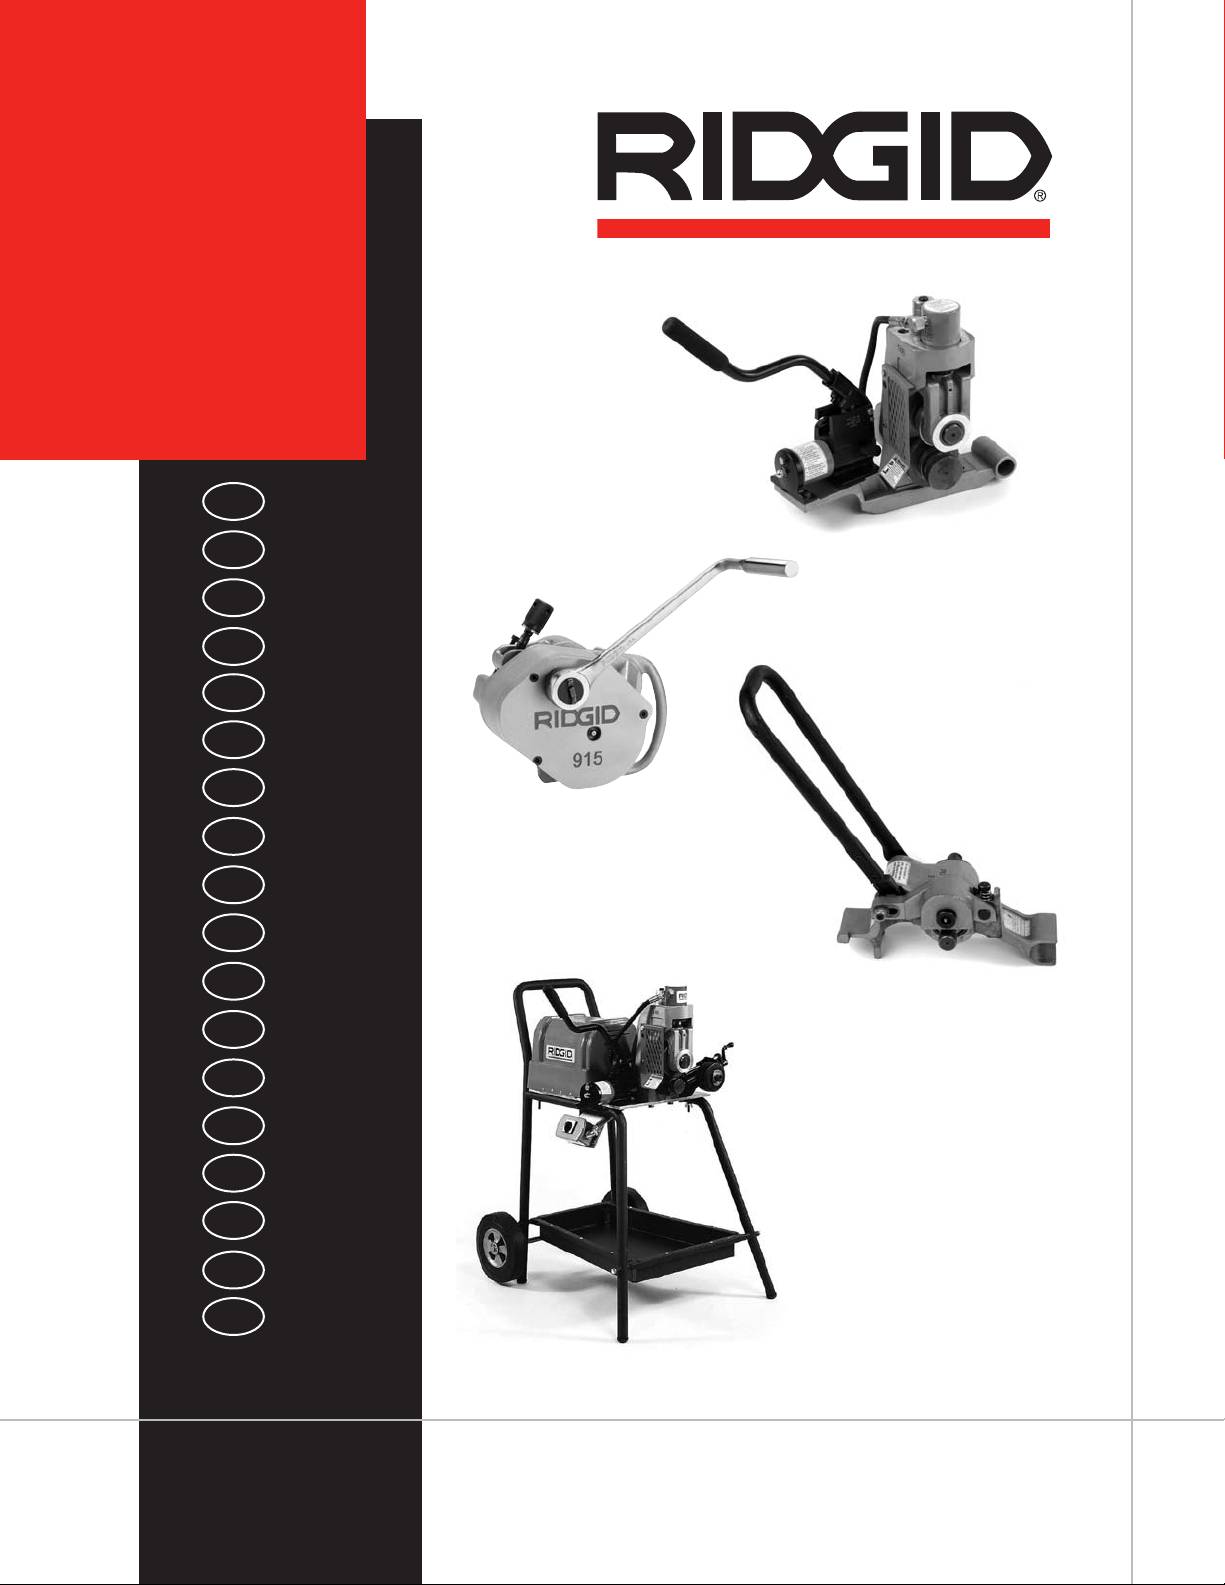
915
916
918
918I
GB p. 1
DE p. 5
FR p. 11
NL p. 17
IT p. 23
ES p. 28
PT p. 33
SV p. 38
DA p. 42
NO p. 47
FI p. 51
HR p. 56
PL p. 61
RO p. 66
CZ p. 71
HU p. 76
GR p. 81
RU p. 87
Figures p. 93
RIDGE TOOL COMPANY
915, 916, 918, 918I
6. Use recommended accessories. Use of other accessories may increase
the risk of injury. Refer to Operator’s Manuals for recommended
GB
accessories.
7. Do not use if machine switches are broken.
915, 916, 918, 918I
Installing
915 916 918 918I
Operating Instructions
Fig. 1 Fig. 2 - 300
Fig. 5 - 300
Fig. 37 - stand assembly
Fig. 3 - 535
Fig. 6 - 1822
Fig. 38 - 918I
Fig. 4 - 1233
Fig. 7 - 1233
WARNING! Read these instructions
Fig. 8 - 1224
and the accompanying safety booklet
carefully before using this equipment. If
Operating the 915, 916, 918, 918I Rollers Groovers
you are uncertain about any aspect of using this
Pipe Preparation
tool, contact your RIDGID distributor for more
1. Pipe ends must be cut square. Do not use cutting torch.
2. Pipe out-of-roundness must not exceed the total O.D. tolerance listed in
information.
groove specifi cations. Table 1.
3. All internal or external weld beads, fl ash or seams must be ground fl ush
Failure to understand and follow all instructions
at least 2 inches back from pipe end.
may result in electric shock, fi re, and/or serious
Note: Do not damage gasket seat area when grinding.
personal injury.
Pipe/Tubing Length
The following chart lists the minimum length of pipe or tubing to be grooved
SAVE THESE INSTRUCTIONS!
and the maximum length to be grooved without pipe stands.
SPECIFICATIONS
See RIDGID catalog.
Groovable Pipe Lengths - Inches
Nom.
Min.
Max.
Nom.
Min.
Max.
Transport and handling
Size
Length
Length
Size
Length
Length
Lift the machine using the hand holds provided.
1
8
36
4
8
36
Machine set-up
1 1/4
8
36
4 1/2
8
32
915
1 1/2
8
36
5
8
32
This machine is designed for roll grooving of pipe by hand.
2
8
36
6 O.D.
8
30
We strongly recommend that it NOT be modifi ed and/or used for any
2 1/2
8
36
6
8
28
application other than for which it was intended including use with any
3
8
36
8
8
24
powered equipment.
3 1/2
8
36
10
8
24
12
8
24
916, 918, 918I
This machine is designed for roll grooving pipe using the specifi ed RIDGID
Pipe Set-Up
threading machines, power drives and accessories. We strongly recommend
1. Pipe or tubing longer than the specifi ed maximum lengths listed in the
that it NOT be modifi ed and/or used for any application other than for which
chart must be supported with 2 pipe stands. The pipe support should be
it was intended including the use of other power equipment. Place machine
located 3/4 of pipe length from roll groover.
away from doors or passageways and ensure that the total work area can be
2. Raise upper groove roll housing.
viewed from the operating position. Use barriers to keep people away. Do
915
not use machine in wet or humid conditions. Check that machine voltage is
Open groove roll from drive roll by turning depth adjustment screw
the same as the power supply. Ensure machine footswitch operates correctly
(Fig. 32).
and machine switch is in “0” position before connecting to power supply. The
916
footswitch allows full control of the machine which will only operate when the
Raise feed handle (Fig. 10).
pedal is depressed. For your safety ensure that the footswitch operates freely
918,
918I
and position it so that all controls can be easily reached.
Place pump release lever in “RETURN” position (toward operator)
(Fig. 11).
General Roll Groover Safety
3. Square pipe and pipe support to roll groover making sure pipe is fl ush
1. Keep hands away from grooving rolls. Fingers could get caught between
against drive roll fl ange (Fig. 12).
grooving and drive rolls.
4. Level pipe by adjusting pipe stand (Fig. 13).
2. Set up Groover on a fl at, level surface. Be sure the machine, stand and
5. Slightly offset pipe and pipe stand approx. 1/2° away from or toward
Groover are stable and will not tip over.
operator as directed below:
3. Be sure Groover is properly secured to the power drive. Carefully follow
Note: If running machine in “FORWARD”, offset pipe 1/2° away from
the set up instructions.
operator (Fig. 14).
4. The Roll Groover is designed for roll grooving pipe and tubing. Do not
Note: If running machine in “REVERSE”, offset pipe 1/2° toward
use for any other purpose.
operator (Fig. 15).
5. Properly support pipe with pipe stand.
Ridge Tool Company
1

915, 916, 918, 918I
Adjusting Roll Groove Depth
Changing Grooving Roll Sets
Note: Due to differing pipe characteristics, a test groove should always be
915
made when setting up or changing pipe sizes. The index depth adjustment
1. Remove cap screw on drive roll and separate the drive roll from the
knob must be reset for each diameter of pipe/tube.
output shaft and remove stabilizer pads. Loosen set screw to remove
groove roll (Fig.35).
915
2. Reverse procedure with the correct groove set. Check thrust washer
1. Tighten depth adjustment to fi x groover on pipe. Do not overtighten.
(Fig. 36).
2. Set depth adjustment screw (Fig. 33) to give correct depth (see Fig 34).
916
916
1. Loosen depth adjustment screw and remove set screw and spring
1. Lift feed handle.
(Fig. 21a, b, c).
2. Fully loosen depth adjustment screw.
2. Remove groove roll shaft and groove roll (Fig. 22, 23, 24, 25).
3. Tighten depth adjustment screw as shown in Fig. 16.
3. Install new drive shaft.
4. Back off depth adjustment knob as shown in chart.
4. Reverse procedure with correct groove set.
918, 918I
918, 918I
1. Advance the upper groove roll by placing the pump release lever in
1. Fully raise upper roll assembly and loosen set screw in grooving roll
“ADVANCE” position (away from operator) and pump the handle until the
(Fig. 26).
upper roll contacts the outside diameter of the pipe to be grooved.
2. Remove groove roll shaft and groove roll (Fig. 27).
2. Turn down the indexed depth adjustment knob (clockwise) until it stops
3. Lock spindle and remove retaining nut (Fig. 28).
against the top of the machine (Fig. 17).
4. Remove drive shaft (Fig. 29).
3. Back off the depth adjustment knob (Fig. 18).
5. Install new drive shaft.
6. Lock spindle and tighten retaining nut (Fig. 30).
Forming the Groove Roll
915
Changing Grooving Roll Sets 1”, 1 1/4”-1 1/2”
1. Rotate depth adjustment by approximately one revolution.
1. Perform steps 1-6 above with the appropriate drive shaft.
2. Move ratchet to rotation socket and turn to advance 915 around pipe.
2. Tighten draw bolt (Fig. 31).
3. Stop after one revolution and repeat steps 1 and 2 until depth stop is
3. Replace the upper groove roll and tighten the groove roll set screw
reached.
(Fig. 26, 27).
4. Check depth of groove and adjust depth stop as required. Further
grooves with the same pipe will be made to the same depth.
Maintenance
5. Loosen feed screw to open the 915.
Inspect all parts regularly and replace rolls when worn. Lubricate bearings with
multi purpose grease. For all other service and maintenance take machine to
916, 918, 918I
a RIDGID authorised service center.
1. Press on footswitch to start machine and apply a steady pressure to the
feed handle/hydraulic pump handle.
2. Keep pressure on pipe with right hand to prevent pipe being fed out of
the rolls.
3. Continue applying a steady pressure until groove depth stop is reached.
4. Do not over-feed. Allow one full revolution before increasing pressure on
rolls to prevent overload.
5. Stop machine and check depth of groove. Adjust depth stop as required.
Further grooves with the same pipe will be made to the same depth.
6. Raise handle (916) or release pressure (918) and remove pipe.
Always check the completed groove with a fi tting before installation.
Pipe Stabilizer/Nipple Bracket
This stabiliser is designed to work on 2 1/8”- 12” pipe. It can only be mounted
on 300 power drive and 918I bases that have the 3 mounting holes.
1. Align bracket on mounting holes (Fig. 19 - a, b).
2. Install and tighten bolts.
3. With pipe correctly positioned tighten stabiliser roll until it contacts the
pipe. Tighten one further turn (Fig. 20).
Warning: Do not use for lengths of pipe shorter than 8”.
2
Ridge Tool Company

915, 916, 918, 918I
Table 1. Standard Roll Groove Specifi cations
Note: All Dimesions are in inches.
Nom.
Pipe
T
A
B
C
D
D
Pipe
Diameter
Min.
Gasket
Groove
Groove
Nom.
Min.
Size
Wall
Seat
width
Diameter
Groove
Groove
O.D. Tol.
ThK.
± .030
± .030
O.D. Tol.
Depth
Depth
1 1.315 +.016
.065 .625 .281 1.190 +.000
.063 .047
-.031
-.015
1 1/4 1.660 +.016
.065 .625 .281 1.535 +.000
.063 .047
-.031
-.015
1 1/2 1.900 +.016
.065 .625 .281 1.775 +.000
.063 .047
-.031
-.015
2 2.375 ± .024 .065 .625 .344 2.250 +.000
.063 .051
-.015
2 1/2 2.875 ± .029 .083 .625 .344 2.720 +.000
.078 .063
-.018
3 3.50 ± .035 .083 .625 .344 3.344 +.000
.078 .060
-.018
3 1/2 4.00 ± .040 .083 .625 .344 3.834 +.000
.083 .063
-.020
4 4.50 ±.045 .083 .625 .344 4.334 +.000
.083 .060
-.020
5 5.563 ± .056 .109 .625 .344 5.395 +.000
.084 .056
-.022
6 6.625 ± .060 .109 .625 .344 6.455 +.000
.085 .052
-.022
8 8.625 ± .086 .109 .750 .469 8.441 +.000
.092 .049
-.025
10 10.75 ± .108 .134 .750 .469 10.562 +.000
.094 .040
-.027
12 12.75 ± .128 .165 .750 .469 12.531 +.000
.110 .045
-.030
Table 2. Pipe Maximum and Minimum Wall Thickness
Pipe Size Carbon Steel or Aluminium Pipe or Tube Stainless Steel Pipe or Tube PVC/CPVC Pipe
Wall Thickness Wall Thickness Wall Thickness
Min. Max. Min. Max. Min. Max.
1” .065 .133 .065 .133 .133 .133
1 1/4” .065 .140 .065 .140 .140 .191
1 1/2” .065 .145 .065 .145 .145 .200
2” .065 .154 .065 .154 .154 .154
2 1/2” .083 .203 .083 .188 .203 .276
3” .083 .216 .083 .188 .216 .300
3 1/2” .083 .226 .083 .188 .226 .318
4” .083 .237 .083 .188 .237 .337
5” .109 .258 .109 .188 .258 .375
6” .109 .280 .109 .188 .280 .432
8” .109 .322 .109 .188 .322 .322
10” .134 .307 .134 .188 .365 .365
12” .165 .330 .165 .188 .406 .406
Ridge Tool Company
3

915, 916, 918, 918I
Table 3. Troubleshooting
MALFUNCTION PROBABLE CAUSE CORRECTIVE ACTION
1. Rolled groove too narrow or too wide. a. Incorrect size of grooving and driving rolls.
a. Install correct size of grooving and driving rolls.
b. Mismatched grooving and driving rolls.
b. Match grooving and driving rolls.
c. Grooving roll and/or driving roll worn.
c. Replace worn roll.
2. Rolled groove not perpendicular to pipe axis. a. Pipe length not straight.
a. Use straight pipe.
b. Pipe end not square with pipe axis.
b. Cut pipe end square.
3. Pipe will not track while grooving. a. Pipe not level.
a. Adjust stand to level pipe.
b. Pipe axis not offset 1/2 degree from driving roll
b. Offset pipe 1/2 degree. (See Fig.14, 15)
axis.
c. See set-up instructions.
c. Pipe axis not offset in the correct direction.
d. Level groover.
d. Groover not level.
e. Tighten feed screw with ratchet for every
e. Feed Screw not tight. (915)
revolution.
4. Pipe drifts back and forth
a. Pipe length not straight.
a. Use straight pipe.
on driving roll axis while grooving.
b. Pipe end not square with pipe axis.
b. Cut pipe end square.
5. Pipe rocks from side to side
a. Pipe end fl attened or damaged.
a. Cut off damaged pipe end.
on driving roll while grooving.
b. Hard spot in pipe material or weld seams
b. Use high quality pipe of uniform hardness.
harder than pipe.
c. Power drive rotating pipe too fast.
c. Reduce speed - shift to low speed or use
RIDGID 36 rpm 300, 535, 1233, 1224 or 1822
Power Drive.
d. Pipe support stand rollers not in correct
d. Position pipe stand rollers for pipe size being
location for pipe size.
used.
e. Grooving Roll feed rate too slow. (915)
e. Hand feed Grooving Roll into pipe faster.
6. Groover will not roll groove in pipe. a. Pipe wall maximum thickness exceeded.
a. Check pipe capacity chart.
b. Wrong rolls.
b. Install correct rolls.
c. Adjustment nut not set.
c. Set depth.
d. Power drive does not supply required
d. Use RIDGID No. 300, 535, 1224, 1233
minimum torque.
or 1822 Power Drive.
7. Groover will not roll groove to specifi cation. a. Maximum pipe diameter tolerance exceeded.
a. Use correct diameter pipe.
b. Mismatched grooving and driving rolls.
b. Use correct set of rolls.
c. Pipe material too hard.
c. Replace pipe.
d. Adjustment screw not set. (915/916)
d. Set depth.
8. Pipe slips on driving roll. a. Driving roll knurling plugged with metal or worn
a. Clean or replace driving roll.
fl at.
9. Groover will not rotate pipe while grooving. a. Grooving Roll hand feed rate too slow
a. Hand feed Grooving Roll into pipe faster.
(915/916).
b. Power drive does not supply minimum
b. Use RIDGID No. 300, 535, 1224, 1233 or
required torque.
1822 Power Drive.
c. Chuck not closed on drive shaft fl ats.
c. Close chuck.
10. Power Drive & Groover tend to tip. a. Not enough support for pipe. a. Use (2) pipe stands for all lengths over 36”.
11. Pump not delivering oil, cylinder does not
a. Pump release valve open.
a. Close release valve.
advance.
b. Low oil in reservoir.
b. Check oil lever per instructions.
(918 only)
c. Dirt in pump body.
c. Requires service by qualifi ed technician.
d. Seats worn or not seating.
d. Requires service by qualifi ed technician.
e. Too much oil in reservoir.
e. Check oil level per instructions.
12. Pump handle operates with “spongy” action.
a. Air trapped in system.
a. Position ram lower than pump by tipping the
(918 only)
machine on its side opposite the operator.
Extend and return the cylinder piston several
times to permit air to return to the pump
reservoir.
b. Too much oil in reservoir.
b. Check oil level per instructions.
13. Cylinder extends only partially.
a. Pump reservoir is low on oil.
a. Fill and bleed system.
(918 only)
b. Depth and adjustment set incorrectly.
b. Follow depth adjustment instructions.
14. Pipe end fl ares or forms bell shape when
a. Operator is advancing grooving rolls too fast.
a. Slow down pumping action. Refer to proper
grooving.
operating instructions.
(918 only)
b. Pipe not level.
b. Adjust stand to level pipe with groover.
4
Ridge Tool Company
")