Ridgid SeeSnake: инструкция
Раздел: Электроинструменты
Тип:
Инструкция к Ridgid SeeSnake
Оглавление
- Транспортировка и погрузо- разгрузочные работы Техника безопасности Общие сведения Технические характеристики
- Подготовка к работе и работа с прибором Установка/замена направляющих Техническое обслуживание
- Цветной прибор SeeSnake Системы видеоконтроля
- Приборная коробка цветного видеоприбора
- Компоненты приборной коробки цветного видеоприбора
- Питание системы Функции и управление видеомонитором с помощью кнопочного пульта Регулировка изображения видеомонитора
- Установка параметров меню Параметры меню Контакты вспомогательного гнезда
- ЖК дисплей с дисководом DVD
- Работа ЖК дисплея с дисководом DVD
- Завершение записи DVD диска Запись звука
- Воспроизведение Редактирование свойств диска Регуляторы видеомонитора Стирание диска
- Параметры настройки DVDR Черно-белый прибор SeeSnake
- Снятие/установка батарейки Режим редактирования Сообщения, которые могут появляться на дисплее Поля меню
- Поиск и устранение неисправностей
- ЗАПИСЬ:
- Технические характеристики приборной коробки
- Рис. 1
- Рис. 2 Рис. 3 Рис. 4
- Рис. 5 A-B-C Рис. 6 Рис. 7
GB p. 1
DE p.
16
FR p.
33
NL p.
50
IT p. 67
ES p.
84
PT p.
100
SV p.
116
DA p.
132
NO p.
148
FI p. 164
HR p.
180
PL p. 195
RO p.
212
CZ p.
229
HU p.
246
GR p.
262
RU p.
279
RIDGE TOOL COMPANY
Tools For The Professional
TM
®
SeeSnake

Ridge Tool Company
1
Tools For The Professional
TM
®
SeeSnake
Use and Care
GB
Store in cool, dry place. Such measures reduce the risk of
electrical shock and prolong battery life.
®
SeeSnake
NOTE: Colour Video ToolCase batteries should be fully
charged, and internal compartment completely dry, prior to
Operating Instructions
closing the case for storage.
WARNING! Read these instructions
Protect against excessive heat. This product should be
and the accompanying safety booklet
situated away from heat sources such as radiators, heat
registers, stoves or other products (including ampliers) that
carefully before using this equipment.
produce heat.
If you are uncertain about any aspect of using
this tool, contact your RIDGID distributor for
Safety
more information.
Ground machine. Always plug the cord into a properly
Failure to understand and follow all instructions
grounded supply socket protected with a residual current
may result in electric shock, re, and/or serious
device having a trip current of maximum 30 mA. Do not
personal injury.
attempt to open the camera housing or monitor. Doing
so will void the warranty and is potentially dangerous.
Do not use the equipment in potentially explosive
WARNING! An improperly grounded electrical outlet can
atmospheres.
cause electrical shock and/or severely damage equipment.
Always check work area for a properly grounded electrical
outlet. Presence of a three-prong or GFCI outlet does not
Battery Safety
insure that the outlet is properly grounded. If in doubt have
the outlet inspected by a licensed electrician.
Batteries explode in re! Do not burn batteries for any
reason.
Dispose of properly. Please take to recycling center. Lead
General
acid batteries contain compounds, which are harmful to the
environment.
Specications
Always disconnect the battery prior to shipping or
transporting in an aircraft.
The SeeSnake/Mini-SeeSnake is designed for use as a pipe
If battery requires replacement, use only specied size and
inspection tool. We strongly recommend that it NOT be
type.
modied and/or used for any other application. Physical
characteristics and capacity: see Fig. 2.
Set up and operation
A SeeSnake consists of a reel (with push cable and camera
head) and a monitor system.
• Install wheels on to cable drum (SeeSnake only) (Fig 3).
• Check that camera head and spring (Fig 4) pull from drum
All Colour (BW) monitor systems (monitor VCR, LCD DVD
without restriction.
and Toolcase) can be used with all colour (BW) reels (mini +
• Unwrap the power/signal cable from the cable drum and
regular).
plug into socket on the front of the monitor (Fig 5A).
• Raise and lock sun shield in position on monitor (Fig 6)
Transport and handling
and plug line cord into power socket (Toolcase can also
be battery powered).
Avoid shocks or violent movements.
• Switch on monitor and check that picture is clear.
• The power switch will glow steadily when a video signal is
detected from the camera.

2
Ridge Tool Company
Tools For The Professional
TM
®
SeeSnake
• If the camera is not plugged in or there is a problem with
Colour SeeSnake
its connection, the light on the power switch will blink in
an S-O-S pattern (3 short/3 long/3 short).
• If the power switch is glowing steadily but you don’t see
Capacity
an image, the monitor may be turned o.
- Regular SeeSnake: 50 - 300 mm, max. 99 m length
• Adjustments for brightness, contrast and a control for
the LED brightness are located on the monitor. These
- Mini SeeSnake: 40 - 200 mm, max. 61 m length
adjustments should be made when the camera is in the
pipe.
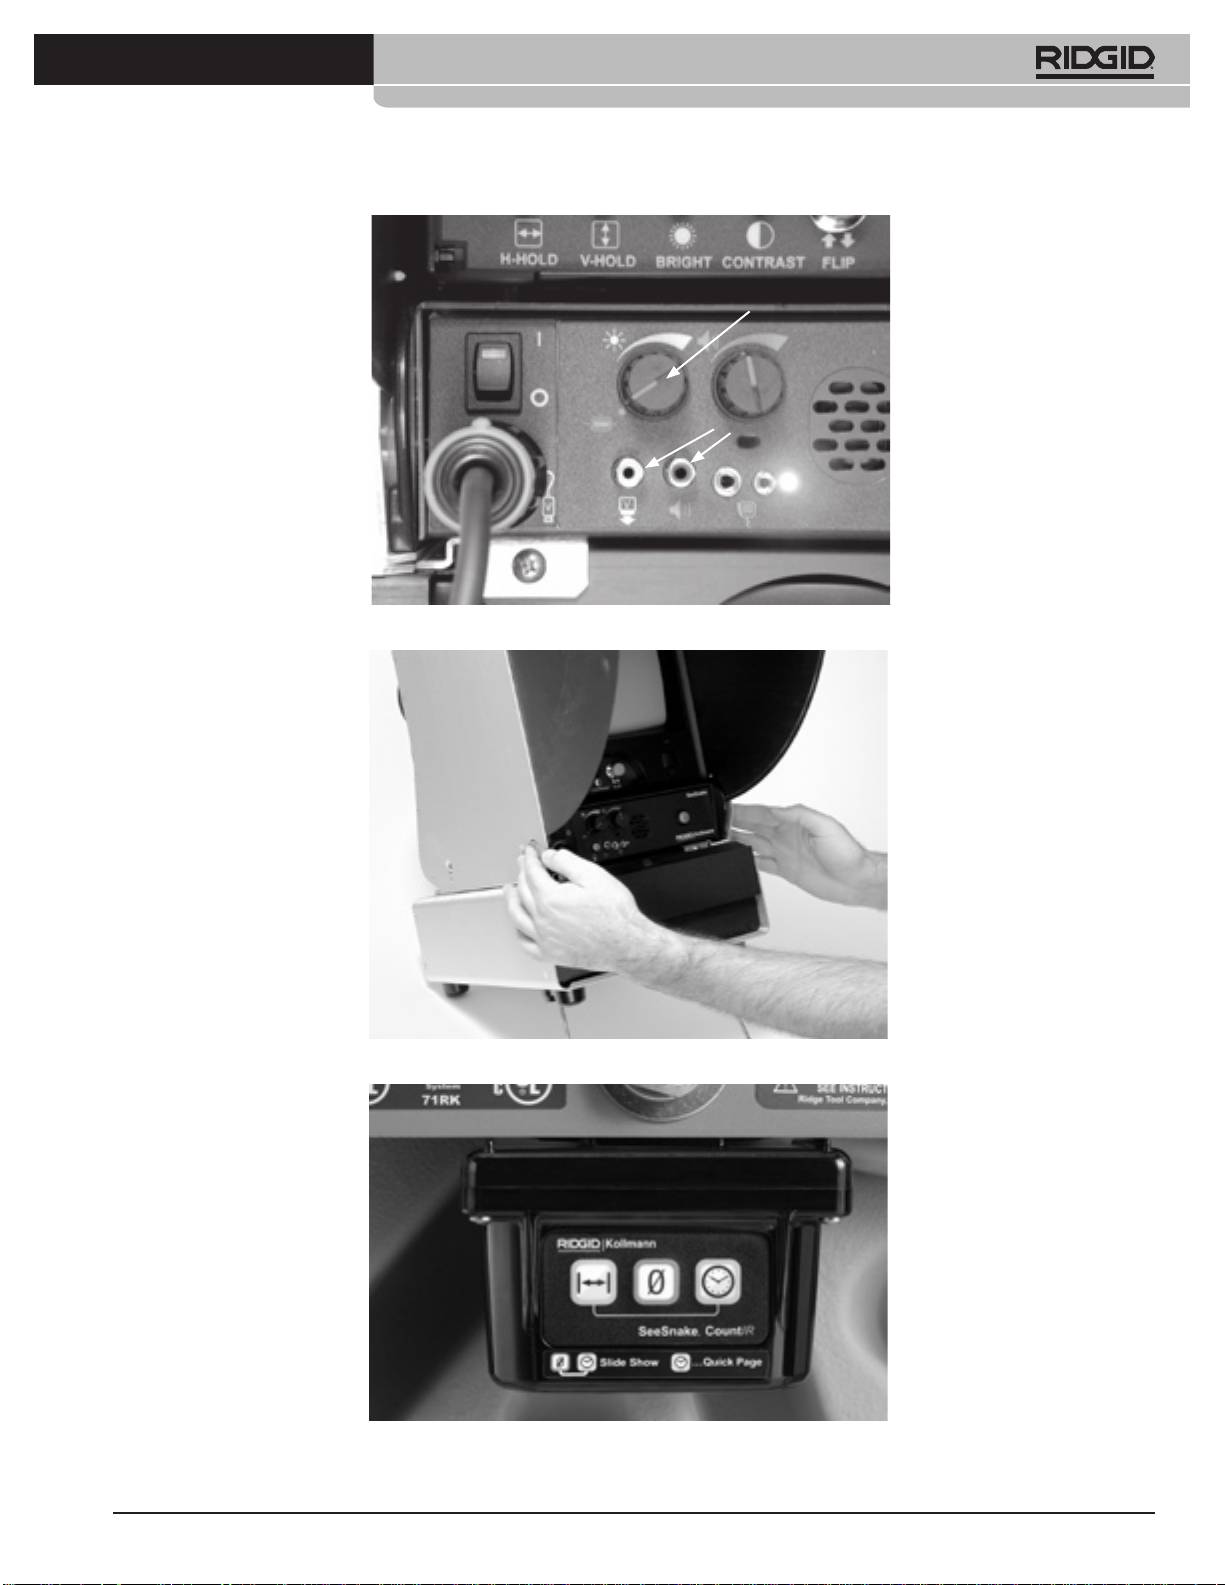
• When the camera is in the pipe, adjust the LEDs of the
Monitor Systems
camera head using the dimmer knob (Fig. 5C).
Set up:
• Feed camera head into drain by pushing the cable and
check the progress by watching the picture on the
Activating the FleXmitter: turn the dimmer/FleXmitter knob
monitor.
to the far left position. (See Fig. 5C) The LED on the power
• Use rubber grip-type gloves for better grip.
supply will ash when the transmitter is activated and there
• Clean lens in clear water before using camera.
may be interference on the monitor.
• Do not force or kink the push cable. Avoid any sharp edges.
The camera and cable may be damaged by abrasion or by
Mon VCR (BW or Colour)
forcing or striking obstacles.
• Keep water owing if possible to reduce friction and help
System components: Monitor + VCR
keep camera clean.
See Fig. 1 for system components
• Do not let cable fold back on itself.
Tip: - When you let water ow into the pipe, you can easily
see the downside of the pipe. This will help you to see
The VCR is powered by switching the unit on, you don’t have
the way the camera head is oriented into the pipe.
to use the VCR power button.
- Don’t push the cable while holding your hands too
far from the entry point. This may kink the cable and
possibly damage it, especially when you arrive at a
dicult turn. When arriving at a dicult point push the
camera further in distances of 30-40 cm.
When the inspection is nished, pull the cable from the pipe
while holding a cloth wrapped around it to remove the dirt
and feed it into the cable drum. Do not use the drum to “wind
in” the cable. Thoroughly rinse the camera head and spring
before stowing away in the drum.
• Do not use solvents or other harsh cleaners.
Mounting/Changing Guides
Slip guide over spring and secure in place with metal snap
ring. Ball guides and Roller Dolly (SeeSnake) are xed by
pushing metal clips.
Maintenance
Keep the cable clean and check for cuts. Clean cable drum
by ushing with water - note drain plug. Wipe monitor with
dry cloth.
NOTE: do not ll the drum with water and lay the reel on its
side, this may damage the internal slip ring.

Ridge Tool Company
3
Tools For The Professional
TM
®
SeeSnake
Video recording
Colour Toolcase
To record you can use the record button on the VCR or the
large red (Record / Record Stop) button.
Description and Specications
NOTE: when you use the two dierent recording buttons (big
The Colour Video ToolCase can operate o either AC or DC
red button/button on VCR) then keep in mind that they don’t
external power sources as well as an internal battery that
work together. This means if you push the one button, the
allows you to operate the SeeSnake system when external
other won’t “know” what the other one did. E.g. if you push
power is unavailable or inconvenient. The unit has a built-in
record on the VCR, then to stop recording you have to push
charging circuit and a 3-colour lamp that gives you a visual
the big red button twice.
indication of the battery’s status.
Front panel Audio/Video dubbing jacks allow you to play,
You can record audio via the “hands free” microphone on the
record, or copy tapes from an external video device.
unit itself or with the handheld microphone.
An on-board microprocessor gives you advanced functionality
Make sure the Volume/Audio O knob is not in the audio o
and control, including:
position. This knob can be anywhere in the red band area.
If you don’t want to record audio turn the volume/audio o
On-screen display of audio recording status, battery life,
knob counterclockwise until it snaps into the OFF position.
Mini SeeSnake transmitter operation, VCR function, monitor
picture adjustment, and the system setup menu.
When you use the “hands free” microphone a red light will
be illuminated when activated. Simply speak towards the
Power-save mode turns o the VCR when it has been idle for
unit (the light then will ash brighter). When you use the
a pre-selected amount of time to help conserve power. This
handheld microphone the light will not be illuminated until
option can be enabled from the System Setup Menu.
you activate it.
Monitor power switch lets you turn o the monitor while the
rest of the system remains on (while locating, for example) to
NOTE: the audio LED on the left side of the hands free
extend battery life.
microphone has three settings:
Auto power-o prevents unintentional battery discharge by
interrupting system power when the monitor is lowered to
1. OFF: Volume/audio knob in position OFF or handheld
its stowed position.
microphone plugged in and not activated. No audio will
be recorded.
Auto-power transfer prevents system reset and loss of
2. DIM: Unit is ready to record, but not picking up strong
distance measurements by instantly switching to/from
audio signal.
the internal battery whenever an external power source is
3. BRIGHT RED: Unit is recording strong audio signal
connected or disconnected.
with hands free microphone or activated handheld
LANC port controls an external LANC video device from
microphone.
the keypad. (Many 8mm, Hi- 8(tm), Digital8(tm) and MiniDV
camcorders) Allows simultaneous recording of inspections
with the built-in VCR and an external device.
NOTE: For specications see Appendix A.
4
Ridge Tool Company
Tools For The Professional
TM
®
SeeSnake
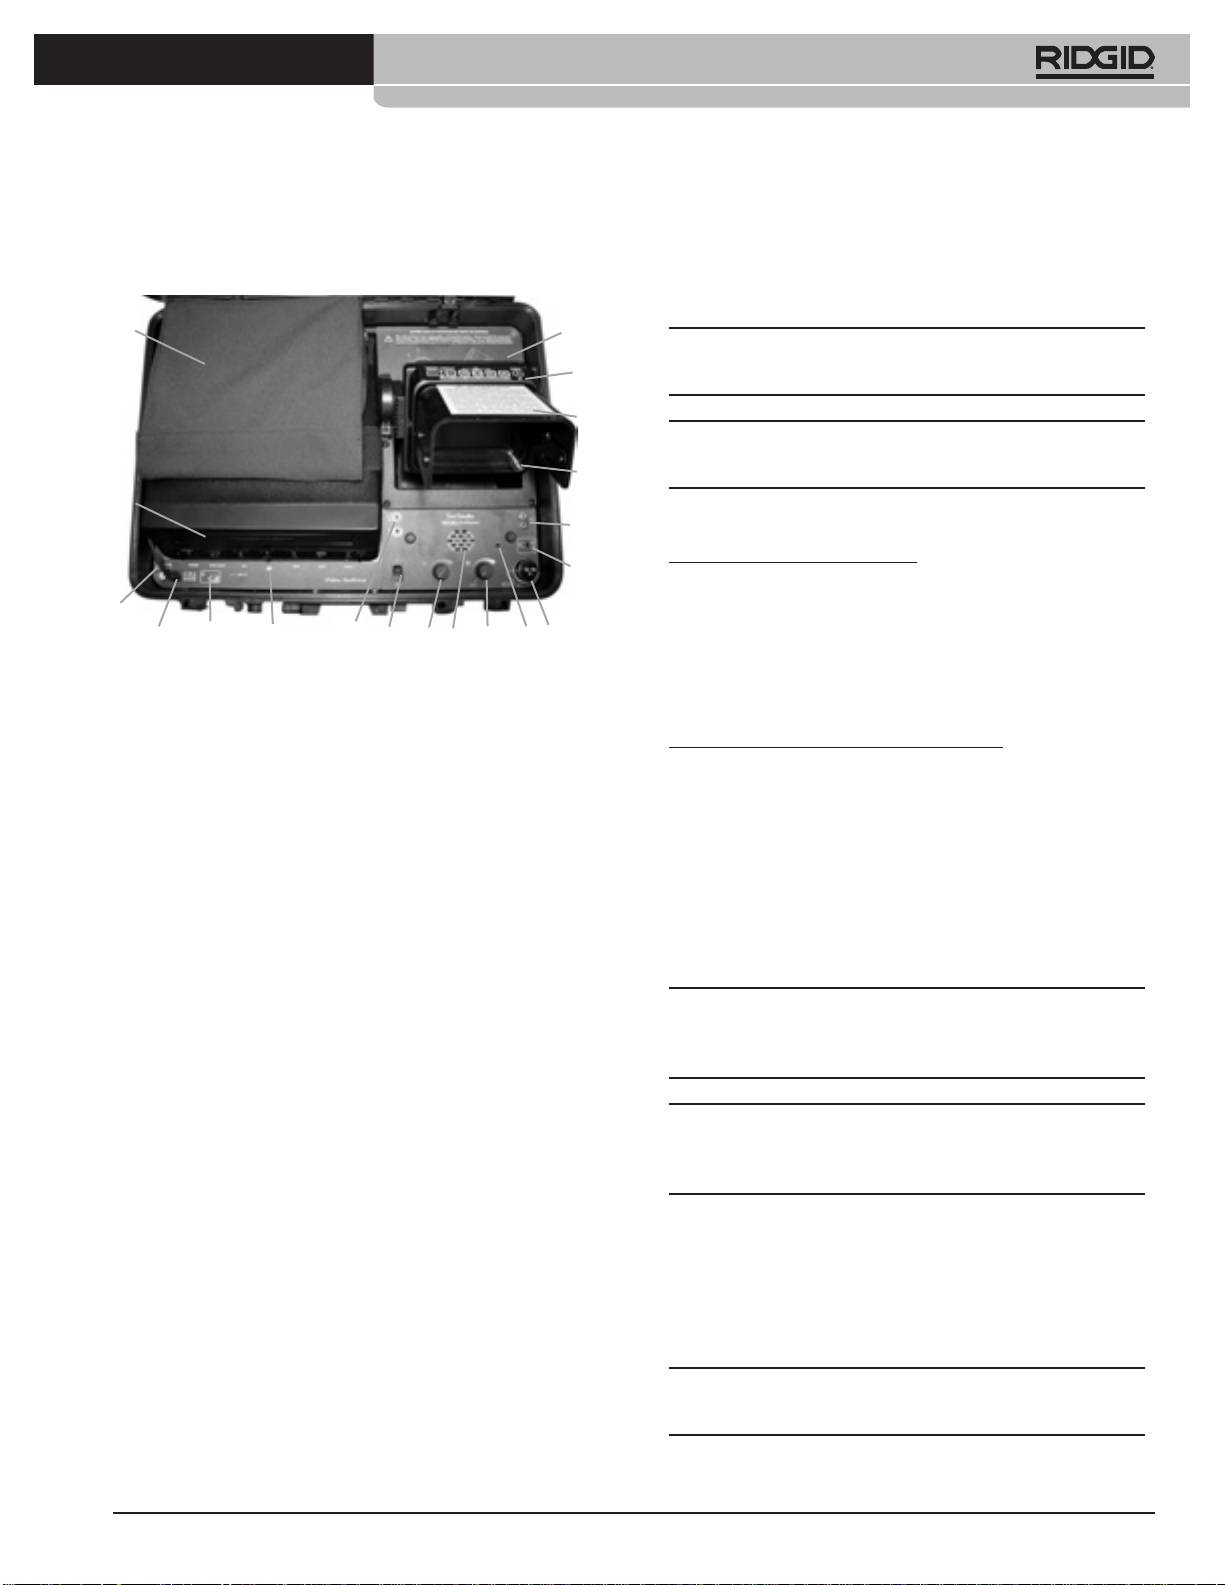
Colour Video Toolcase Components
NOTE: A battery that has been fully discharged during normal
use will be fully charged in approximately six hours.
1+2
3
4
CAUTION: The lid MUST be open during charging to vent
potentially explosive gases.
5
The Battery Status Lamp indicates the battery’s condition:
6
When running on internal battery power
17
7
Flash red slowly: Unit is running on battery power
Flash red quickly: Battery getting low
8
Nearly solid red: Battery extremely low, connect to external
16
power source. Unit may not operate
15
18
14
19 13 12 20 11 9
10
correctly.
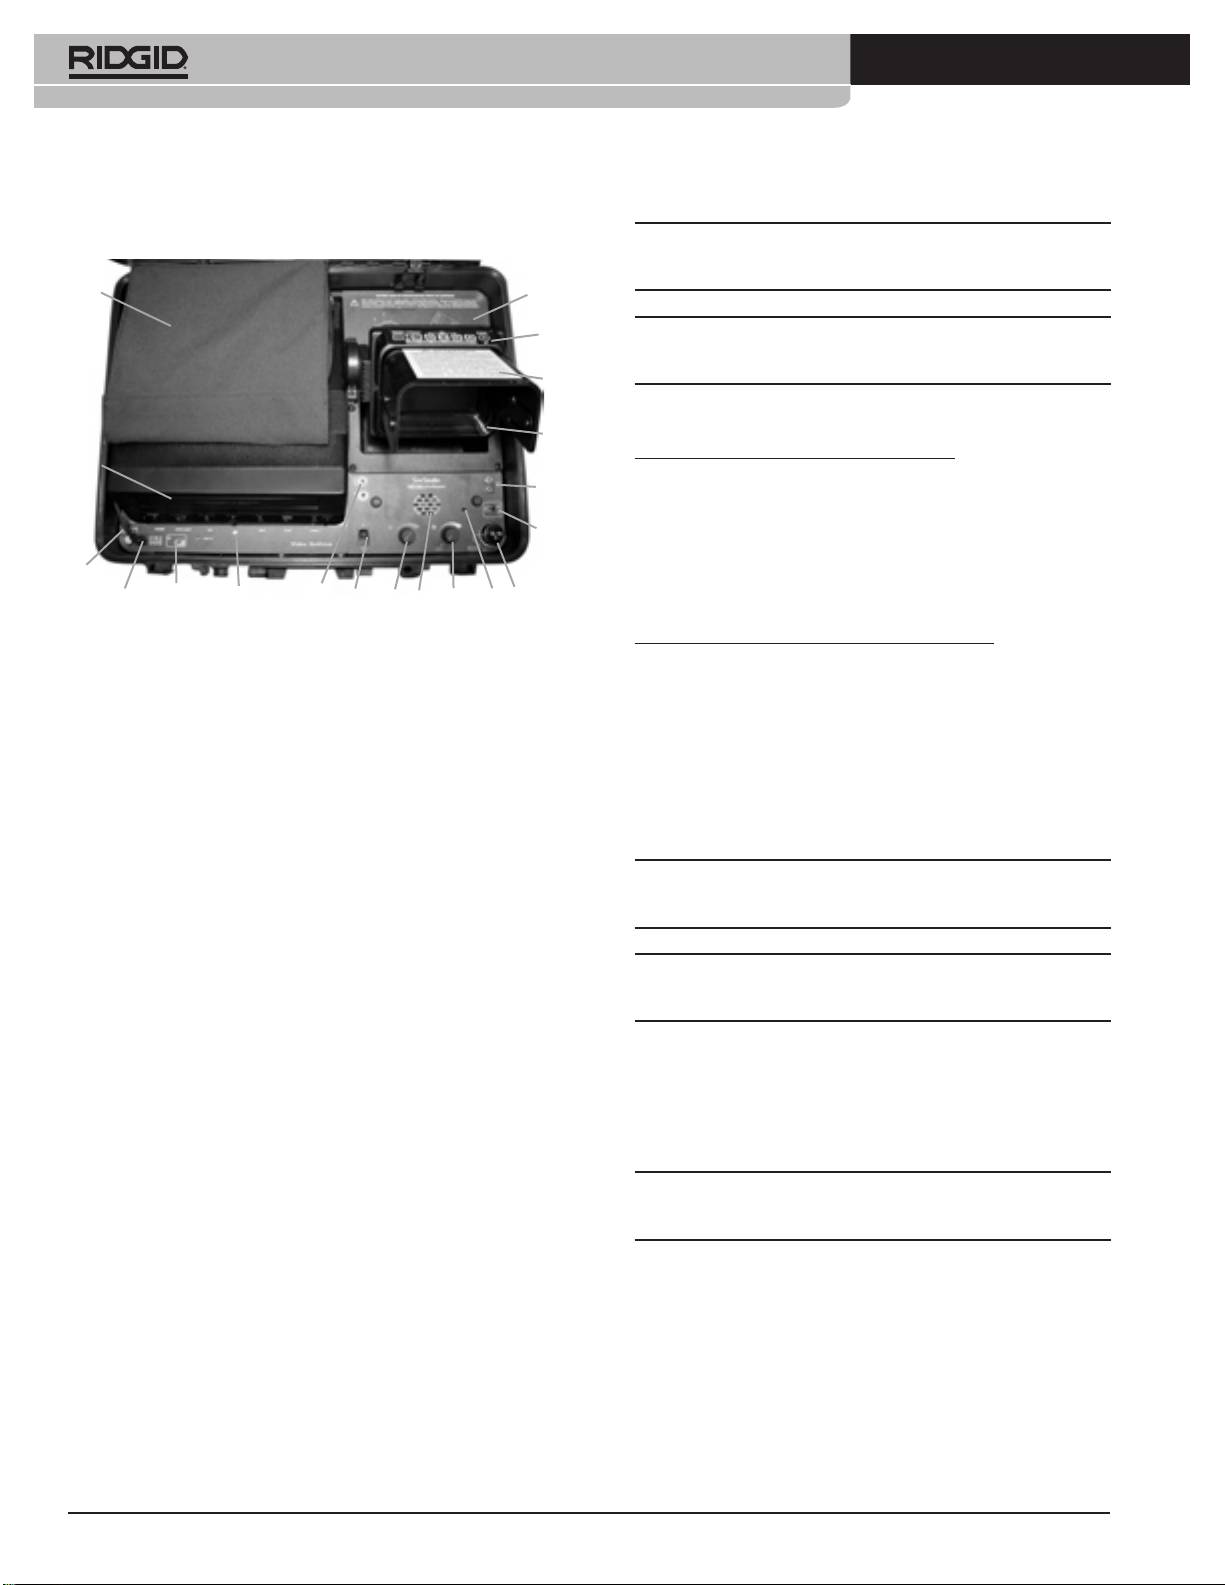
1 + 2 Power supply / accessory pocket - Removable pocket - 3
While connected to an external Power Supply
Battery compartment - 4 Monitor keypad / Control interface -
5 Wrap-around sun shade - 6 Colour LCD monitor - 7 Remote
Orange: Battery is charging.
microphone jack - 8 Auxiliary jack - 9 Built-in microphone
Green: Battery is fully charged.
- 10 SeeSnake system cable connection - 11 Dimmer /
Transmitter knob - 12 Volume control / Audio o - 13 Power
Red: Battery/Wiring problem (If the battery is properly
switch - 14 LANC jack - 15 External power jack - 16 Fuse - 17
connected the battery may have reached the end
VCR - 18 Battery status lamp - 19 Audio / Video dubbing jacks
of its service life and needs to be replaced. Call your
- 20 Speaker
RIDGID distributor for diagnostic help and battery
replacement information.
Preparing the System For Use
NOTE: If the red LED illuminates immediately after installing
Connecting the Battery
the battery, verify that the terminals are wired correctly.
For safety, your Colour Video ToolCase is shipped with the
battery disconnected. Before using the unit for the rst time
you will need to connect the battery. Likewise you should
WARNING! Never store the Colour Video ToolCase with a
disconnect the battery prior to shipping or transporting on
discharged battery. Damage to the battery may occur.
an aircraft.
To connect the battery:
Powering the System
• Remove the four screws holding the plastic pocket
underneath the LCD monitor and lift the pocket out of
To turn the Colour Video ToolCase on, raise the monitor from
the panel.
its stowed position and press the power switch.
• Remove the rubber caps from the ends of the battery.
• Connect the red power lead to the positive (red) battery
NOTE: The unit will not turn on if the monitor is in its stowed
terminal and the black power lead to the negative (black)
position.
battery terminal.
• Replace the rubber caps and push the battery back into
place, being careful not to pinch the wiring.
Recording: see also section with the Mon VCR.
• Replace the plastic pocket and screws.
Charging the Battery
The battery’s charge should be refreshed before using it for
the rst time. To charge the battery, use the AC power cord
inside the pocket on top of the VCR.
Ridge Tool Company
5
Tools For The Professional
TM
®
SeeSnake
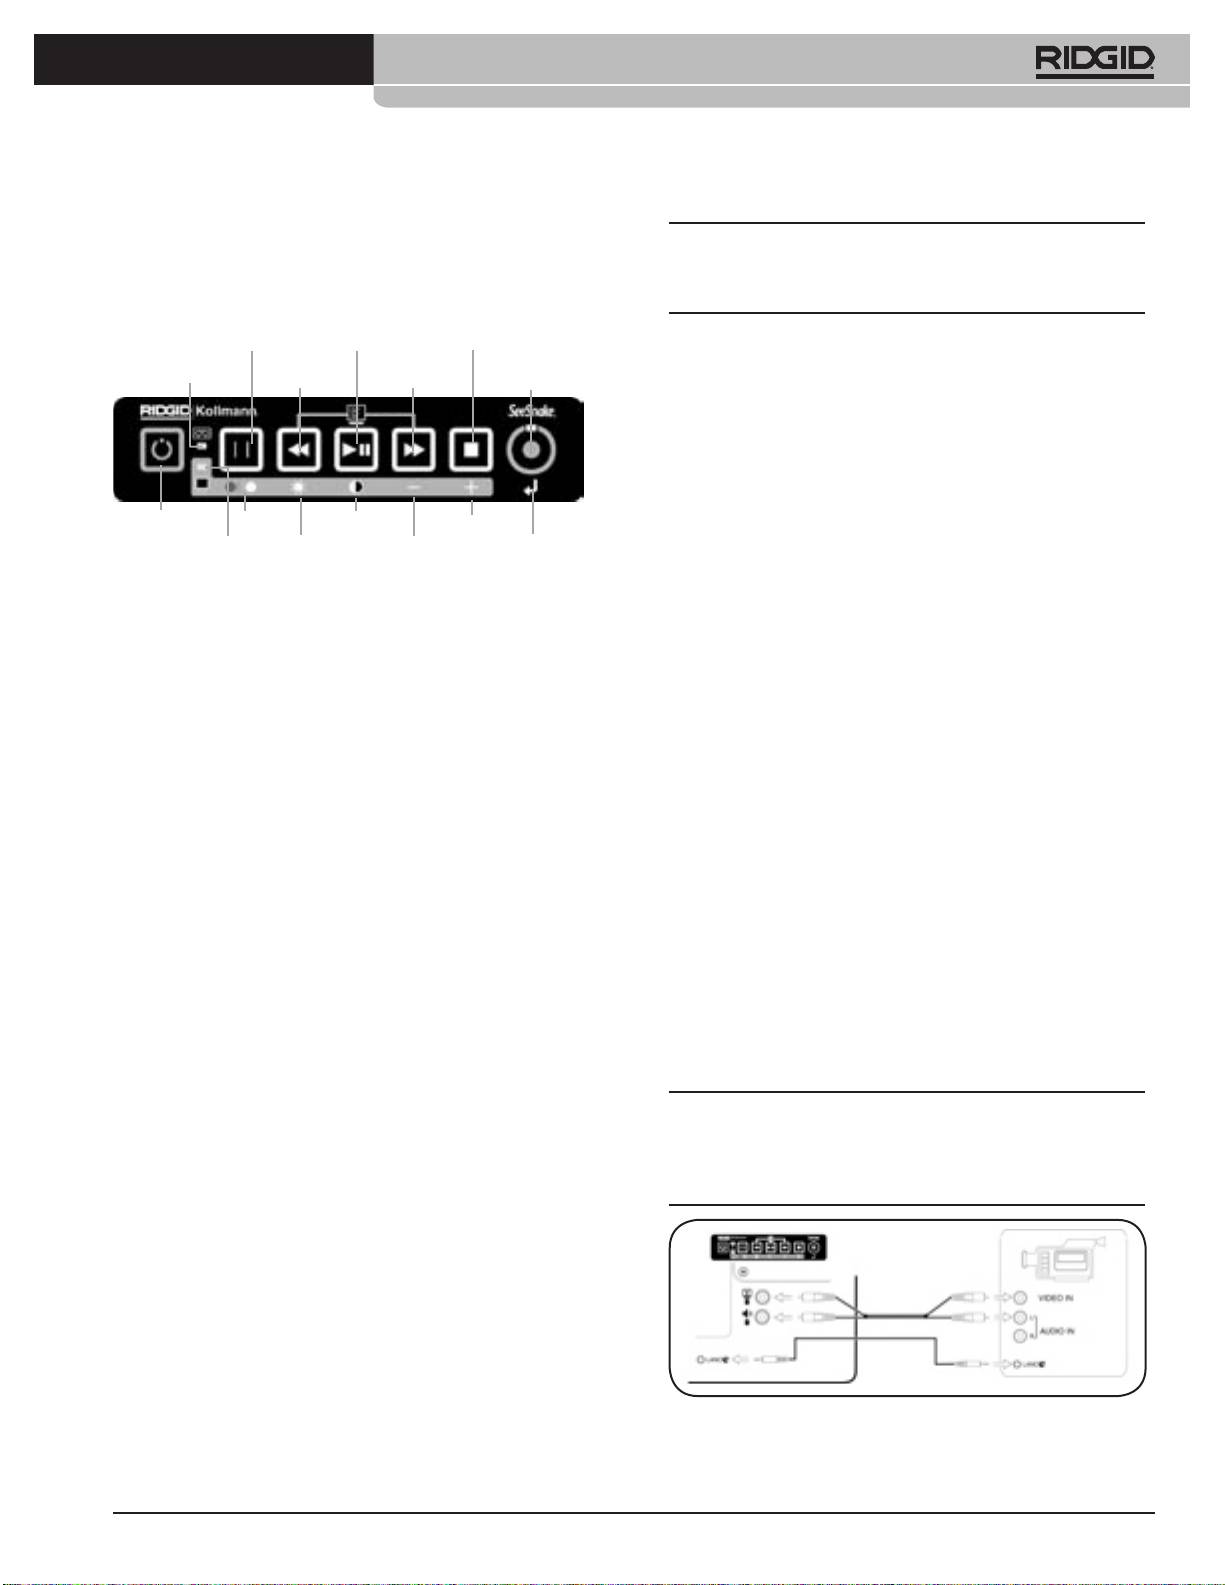
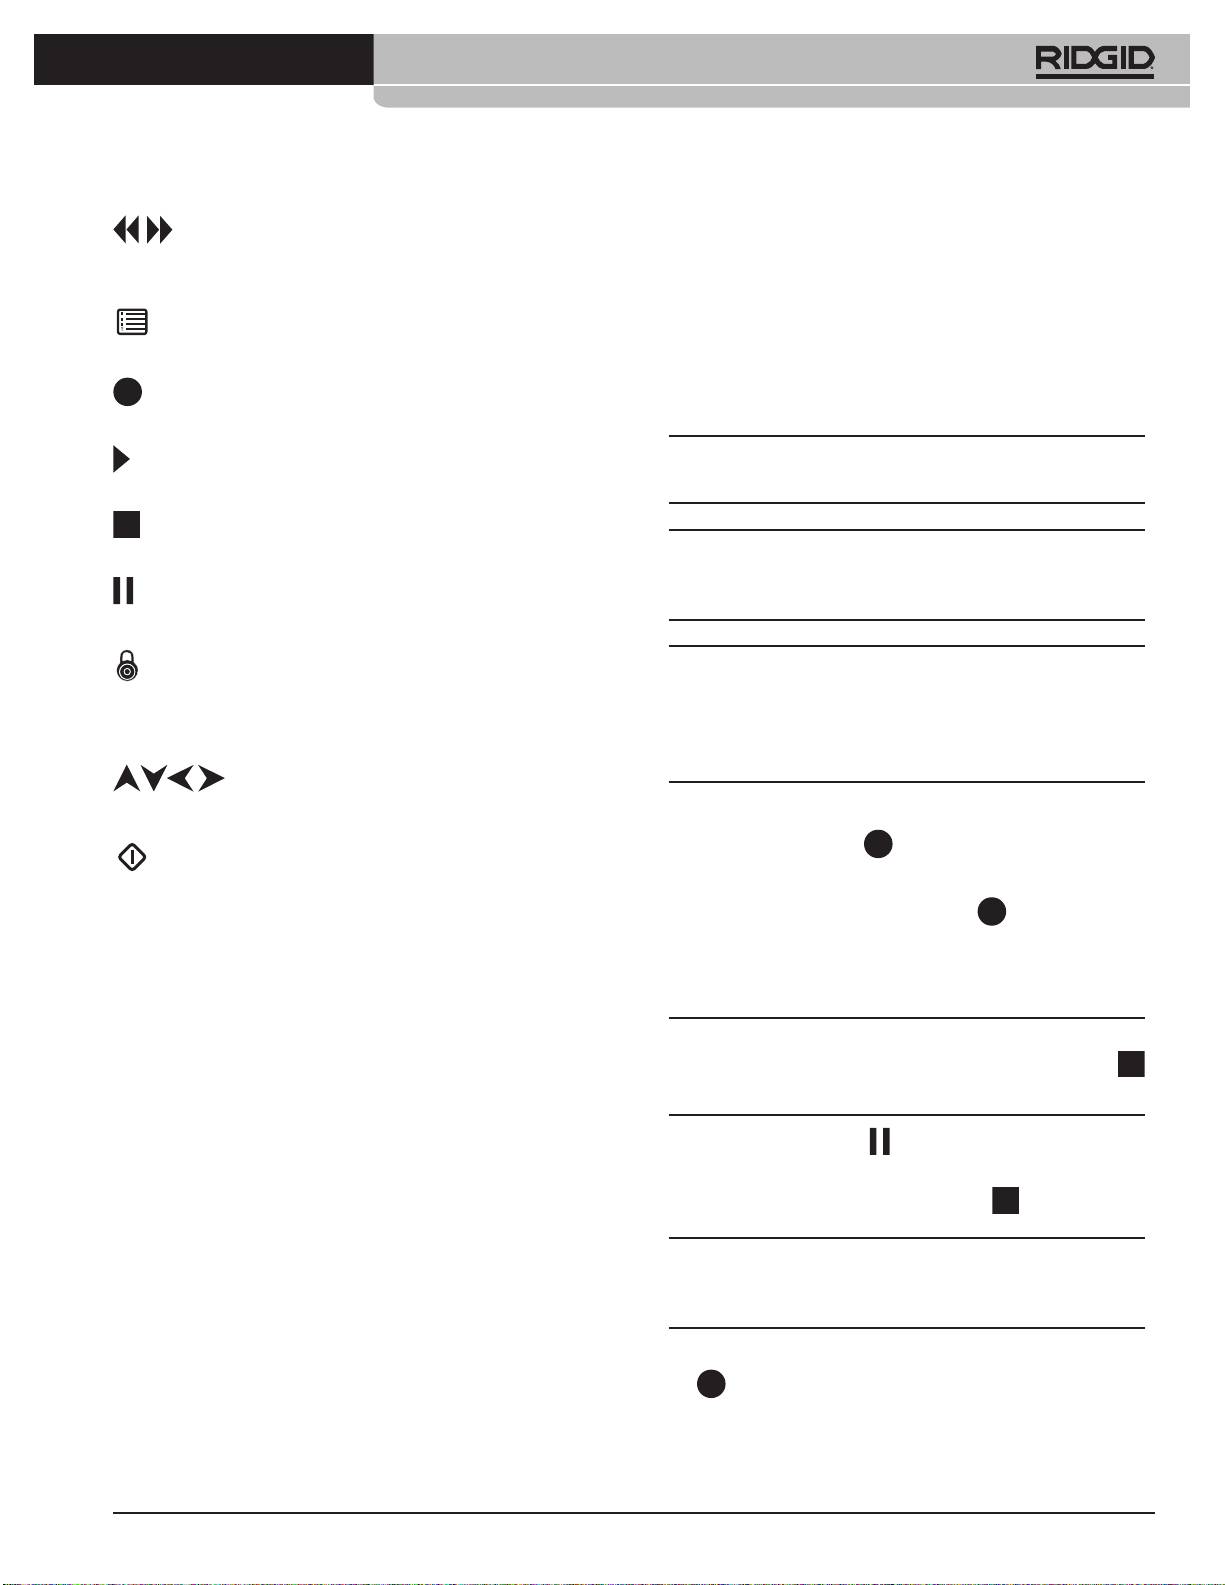
Monitor Keypad Functions and Controls
NOTE: In monitor mode if no buttons are pressed for
The keypad on top of the LCD monitor has three modes of
7 seconds the system will automatically switch back to VCR
operation:
mode.
VCR/Monitor
Play/Pause Button Stop Button
Mode Button
Rewind
Fast Forward
One Touch
VCR Mode Lamp
Setting the Menu Options
Button
Button
Record Button
To enter menu mode, press and release the Fast Forward and
Rewind buttons simultaneously.
To move through the menu choices, press the Play button.
To scroll through the choices for the menu item you want to
Monitor On/O
Colour Contrast Increase
change, press either the Fast Forward or Rewind button.
Monitor Mode Lamp Brightness Decrease Return
To exit the menu settings and accept your changes,
press and release the Fast Forward and Rewind buttons
• VCR Mode - control the built-in VCR and/or an optional
simultaneously.
Lanc-controlled recording device. (Many 8mm, Hi-8(tm),
Digital8(tm) and MiniDV camcorders)
Menu Options
• Monitor Mode - adjust the monitor’s image
• Restore factory defaults - Resets all options to factory
• System Setup Mode - access the system setup menu
default settings.
VCR Mode Lamp - when lit, the keypad buttons operate the
• VCR function display - Determines how VCR functions
VCR.
(Record, Play, Fast-Forward/ Rewind, Stop) are displayed
on the monitor.
Monitor Mode Lamp - when lit, the keypad buttons adjust
• VCR power save - Automatically turns the VCR OFF if it has
the monitor’s image, as indicated by the symbols on the gray
been idle for a userselectable amount of time. VCR will
strip.
turn ON automatically when you press a function key on
the keypad.
Monitor On/O Button - turns only the monitor o and
• Transmitter Enable - When ON, the Dimmer/Transmitter
on while the rest of the system stays on. Functions in VCR
knob can activate the Mini SeeSnake In-Line Transmitter.
Mode.
When OFF, transmitter activation is disabled.
One Touch Record Button - starts and pauses recording. To
• Calibrate ToolCase - Performs a self-calibration for
start recording press once. To pause recording press again.
accurate VCR function display. If the LCD monitor does
not correctly display the state of the VCR, calibration may
Play/Pause Button - Plays video recorded on the VCR. If
correct the problem. A blank tape with 10 minutes of
pressed while playing or recording, either function will be
available recording time will be necessary.
paused.
NOTE: The Colour video toolcase will only control the record
Adjusting the Monitor’s Image
and stop functions of the external device. You MUST use
the Monitor keypad to start and stop recording on both
Press and hold the VCR/Monitor Mode button until the
recorders or the external deck will not respond.
Monitor Mode Lamp is lit. (Two seconds)
The glowing Monitor Mode Lamp will let you know you are
in monitor adjust mode.
To adjust the brightness, contrast or colour, press the button
above the appropriate symbol on the gray bar. Use the
buttons above the “+” or “-” symbols to adjust.
To exit monitor mode, press and hold the VCR/Monitor
Mode button for two seconds.
Controlling an External Video Recorder from the Colour
Video ToolCase
6
Ridge Tool Company
Tools For The Professional
TM
®
SeeSnake
LCD DVD monitor
LCD DVD monitor components: see Fig. 1
Sun shade/protective door
To open the sun shade depress the orange release buttons
on each side of the unit while gently pressing in on the lower
corners of the door with your thumbs. The sunshade must
be opened before you can open the bottom door to expose
the VCR.
Copying and/or Viewing Video Between an External Video
Device and the Colour Video ToolCase
NOTE: The top door must be open before the bottom door
can be opened.
Auxiliary Jack Pinout
1 - Video
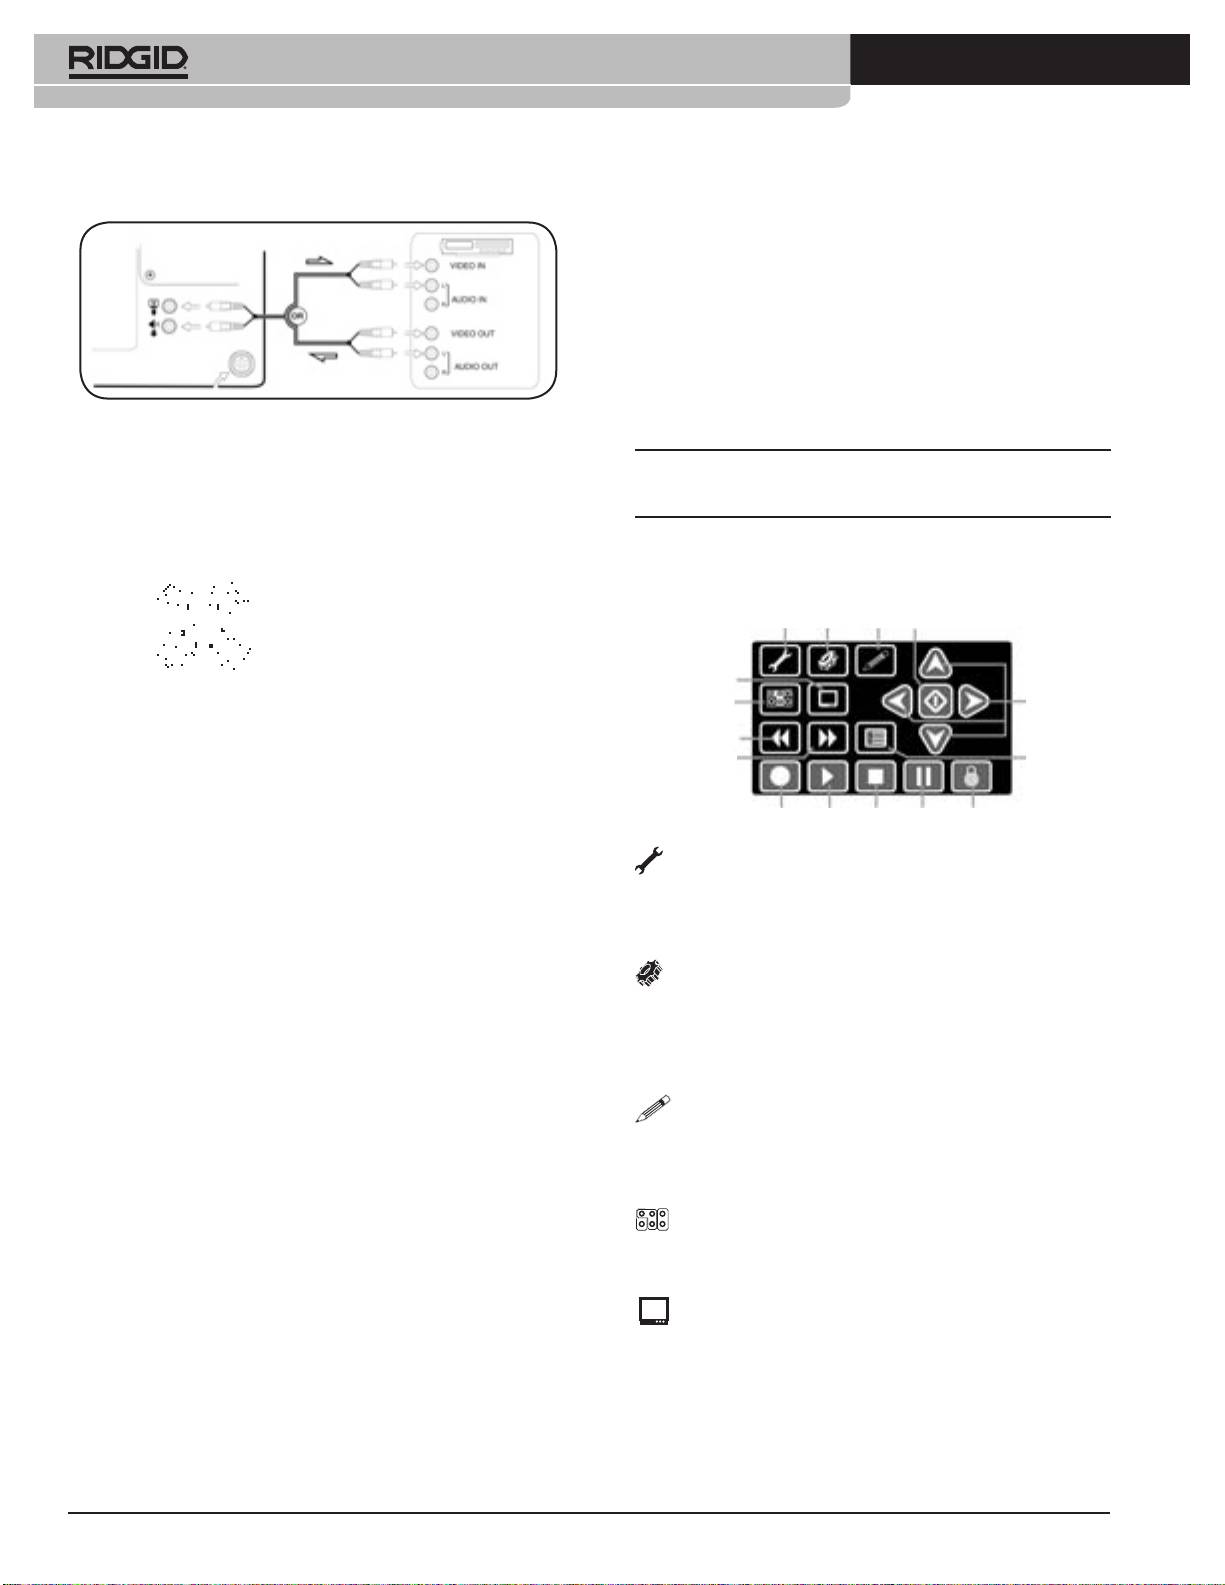
DVD Control Keypad
2 - Record Status
3 - +120VOG
Tools
Setup
Edit Enter/Select
4 - Audio
5 - GND
6 - Power Override
Display
Directional
Source
Arrows
*Nominal Voltage. Power O: 20mA max; Power On: 500mA
Fast
with camera disconnected
Reverse
Fast
Menu
Forward
Record
Play Stop Pause
Finalize
Tools — Pressing the Tools Key brings up a screen of
options to erase or nalize the current DVD. (You can also
access the “Finalize” option directly through the Finalize
Key).
Setup — The Setup Key will bring up menus to set up
user preferences for Video, Clock, Time and Date, an Auto-
Sleep feature and a Defaults Restore option. Setup will also
access sub-menus for setting Playback, Recording, Audio,
and tuner preferences.
Edit — The Edit Key brings up options for editing a
currently-playing title on the current DVD. Options include
renaming, setting protection ON or OFF, and enabling
overwrite of the disc.
Source — The Source Key lets you select from input
choices. The source selection for the LCD Monitor+DVD
should always be set to “SCART” for correct operation.
Display — The Display Key toggles a Status Bar at
the top of the screen ON or OFF. The Status Bar shows the
current media, the current status of the unit, and current
data source. It will display a circle with a line through it when
a chosen action is not possible (such as when still processing
a previous command).
Ridge Tool Company
7
Tools For The Professional
TM
®
SeeSnake
LCD Monitor+DVD Operation
Reverse/Forward — These keys set the DVDR to
playing fast-forward or fast-reverse to locate a particular
scene.
Recording
Menu — This key will bring up the DVD Chapter Menu
Recording Setup
of available recordings.
Open the disc tray and insert a blank, recordable DVD. The
system will automatically Quick-Prepare discs in DVD-R,
Record — Press once to start recording input from the
DVD+R or DVD+RW formats.
camera on to a DVD.
NOTE: If the tilt stand is used, insert the DVD disc carefully, as
Play — Press to playback a selected chapter from the
it may slide o the tray if dropped onto the tray.
current DVD or to resume playing if paused.
Stop — Press to stop recording, to stop playback of the
current DVD, or to exit the chapter menu.
NOTE: Use only DVD-R, DVD-RW, DVD+R, or DVD+RW discs
to record. DVD-R discs are the most universally compatible
Pause — Press once to pause playback or to pause
for playing on other machines.
recording. Press a second time to resume.
Finalize — When recording is completed, press the
NOTE: If you have inserted a DVD-RW disc, a window will
Finalize Key to complete the disc so that it will be compatible
appear oering an option to do a Quick Preparation or a Full
for playback in other DVD players. You can also access the
Preparation. The Quick Preparation is faster, but will require
“Finalize” option through the Tools Key.
nalizing the disc after recording to it, before it can be played
on other DVD players.
Directional Arrows — Use these navigation
keys to move among choices on a selection screen.
Recording
1. Press the Record Key .
Select/Enter — Use the Select Key after you have
highlighted a choice from a selection screen to activate that
The DVDR will begin recording the display as shown on the
choice.
monitor. Pressing the Record Key twice
in succession will
limit the recording to 30 minutes. For each additional key
press, another 30 minutes is added to the record time, up to a
Video Input Setup
maximum of six hours or the limit of the media and format.
The Status Bar at the top of the screen shows the DVDR’s
input source. If it not displaying “SCART”, press the keypad’s
NOTE: Recording cannot be started from within the playback
“Source” Key to display options for the DVDR’s input source.
chapter menu. To exit playback mode, press the Stop Key
Use the arrow keys to select “SCART”, and press the Select Key
.
to implement your choice.
If the DVDR is powered down using the DVDR’s own power
2. Press the Pause Key to suspend recording, press it
switch, before disconnecting the plug, settings will be saved
again to resume recording.
the next time you start the LCD Monitor+DVD and will not
need to be repeated every time you start the system.
3. To stop recording, press the Stop Key .
NOTE: By default, the system is in SP mode and recording will
stop automatically when the disc is full, or after two hours of
recording, whichever happens rst.
4. After the recording is stopped, pressing the Record Key
again will start a new recording session, creating a
separate chapter on the target disc.
8
Ridge Tool Company
Tools For The Professional
TM
®
SeeSnake
Finalizing a DVD
IMPORTANT!
To nalize a disc, press the Finalize Key
. This will bring up
NOTE: For Best Results:
a choice screen with the option to Exit or to Finalize the disc.
1. Use only DVD+R,+R/W, DVD-R or -R/W media. DVDR is
1. The “Go!” command should be highlighted; if it is, press
the most universally compatible with other DVD players.
Using other media may result in discs which cannot be
played on other systems.
the Select Key
.
2. Keep media clean and in protective sleeves. Hold DVDs
2. Finalization will begin. When the process is complete,
by edges and do not lay on surfaces unprotected. Avoid
scratches.
highlight the Exit option and press the Select Key
.
3. Always remember to nalize the disc if you want it to be
NOTE: Finalizing a disc is necessary when you want to be
playable on other devices. See Table 1 for types of discs
able to play the discs on other DVD players.
which require nalization. Failure to nalize the disc will
make it unplayable in other systems.
The following table claries media capabilities, and shows
4. Do not drop or move unit while recording.
which media require nalization.
5. Do not use in conditions colder than 5°C or warmer than
40°C.
Recording
Disc
Finalization
After
6. Do not allow moisture into the unit or the remote
Finalization
control.
DVD-R Required No
7. If power is lost while recording the current recording will
DVD-RW Full
Not
NA
not be saved. If the disc has no prior recordings on it,
Preparation
Required
the disc will not be able to make new ones after a power
Quick
Required Yes
loss.
Preparation
DVD+R Required No
Recording Audio
DVD+RW Not Required NA
Audio is recorded through the built-in microphone in front
of the LCD Monitor+DVD unit. The microphone is sensitive
Table 1: Finalization for Various Media
enough to record comments made in the vicinity of the unit
during recording.
Playback
NOTE: If you do not wish to capture audio during recording,
1. To playback from a DVD disc you have recorded to, after
turn the volume control to OFF.
recording has stopped, press the Play Key . A menu of
the les and chapters which have been created on the disc
will appear. By default, chapters will be ve minutes long.
(Thus, a 1-hour recording will have twelve chapters).
2. Arrow to the desired le and chapter to start the playback.
Press the Select Key
or the Play Key .
3. To pause during playback, press the Pause Key ; press
it again to resume playback.
4. To stop playback, press the Stop Key once; this will
Audio Volume Knob
stop the playback and mark the stop position. Pressing
the Play Key
will resume playback from the marked
Stop position.
Ridge Tool Company
9
Tools For The Professional
TM
®
SeeSnake
Source Menu: Cycles through available source settings
5. To quit the playback entirely, press the Stop Key a
for the display: Video 1, Video 2, S-Video, or PC.
second time.
On-Screen Display Menu: Controls horizontal and
Erasing a Disc
vertical position and display duration.
Discs of the DVD+RW or DVD-RW types can be written to,
Setup Menu: Controls options for auto-power, resetting
erased and overwritten. DVD-R and DVD+R discs can be
system defaults, and selecting NTSC or PAL system
written to once.
displays.
1. To erase a disc, press the Tools Key . A menu will
The Down button highlights menu choices and goes down
appear oering two options: Erase or Finalize.
the list of choices in a menu.
Decrease will lower the value of a setting (e.g., Brightness)
NOTE: Do not choose the Erase option if you have not backed
when a menu is displayed.
up desired les on the disc.
Increase will raise the value of a setting (e.g., Brightness)
when a menu is displayed.
2. To erase the disc, use the arrow keys to highlight the
Source will cycle through the available Source settings as
“Erase” option and press the Select Key . When erasure
listed under the Source menu above. From within a Menu,
is complete, select the Exit option to exit the menu.
pressing the Source button will exit to the normal display.
Editing Disc Properties
DVDR Setup Options
A recorded disc is organized into les, each of which may
have multiple chapters.
The DVDR Setup Key accesses six catagories for dening
preferences for the system (System, Language, Playback,
Press the Edit Key
during playback of a disc to access
Recording, Audio, and TV Tuner).
choices for editing the properties of the disc les and
By arrowing down to one of the categories, and then arrowing
chapters. These choices include:
right you will see sub-menus and options displayed. You can
• Setting the le name.
then select the options by highlighting them and pressing
• Setting the le’s protected status, which prevents or
the Select Key
.
allows editing or overwriting.
• Setting the overwrite protection for individual les,
NOTE: The default settings for the system can be used
which prevents or allows new les to be written over the
directly, except for the Data Source setting described below,
old one.
which must be changed to “SCART”, the system will revert to
TV setting if the System option to Reset Defaults is used.
• Erasing a le.
Monitor Controls
Recording
The LCD Monitor has six buttons along the front of it: Power,
The Recording menu provides options for setting recording
Menu, Down, Decrease, Increase, and Source.
modes. Using a 4.7GB recordable and writeable DVD the
DVDR will store more data (with lower playback quality) or
less data (with higher playback quality) depending on the
mode (Table 2).
Mode Denition Record Time
Power turns the monitor ON or OFF.
HQ High-Quality 1 hour
Menu brings up a series of menus which congure the
SP Standard Play 2 hours
monitor display.
LP Long Play 3 hours
Picture Menu: Controls the brightness, contrast, hue
EP Extended Play 4 hours
saturation, tint, and sharpness of the display picture.
SLP Super-Long Play 6 hours
Record Mode Capacities

10
Ridge Tool Company
Tools For The Professional
TM
®
SeeSnake
The system is set by default to Standard Play.
Title: title is factory set to RIDGID Kollmann but can be
changed to any title up to 18 characters. Press edit to scroll
The Recording menu also lets you set a value for chapter
through the letters and symbols.
length when recording. The default value is 5 minutes, and
it can be changed to make chapters of 10, 15, 20, 25 or
Cable length: Important
: Press distance and clock at the
30 minutes. Chapter marking occurs while recording but
same time to edit SeeSnake type
does not interrupt the recording process.
and cable length.
Select the actual push cable
Black & White SeeSnake
length for your SeeSnake.
The selection for length is from
15 to 100 metres in 1-metre
Capacity
increments.
- Regular SeeSnake: 50 to 300 mm, max. 99 m length
SeeSnake
- Mini SeeSnake: 40 to 150 mm, max. 61m length
System: Select type of SeeSnake system, either Mini or
Standard.
Operation
Battery removal/installation
1. The CountIR uses a single Lithium CR-2032, 3 volt
See section colour Mon VCR.
battery.
2. The battery is located inside the CountIR.
CountIR (Fig. 7)
3. When the battery is removed all of the Edit menu elds
and system setting are lost and will need to be individually
All SeeSnake reels are equipped with a CountIR. The
reentered. The battery should last for approximately
CountIR measures the distance the camera is in the pipe.
5 years.
4. Before inserting a new CR-2032 battery make sure the
Key pad usage
polarity is correct.
The CountIR has three buttons
A. Distance: the distance is displayed in the lower right
Insert the battery such that the (+) side of the battery is
hand corner of screen.
towards the top of the battery holder (this is also towards the
To remove distance reading press once, press again to
center of the CountIR.
show distance reading.
B. Zero: Resets distance reading to zero.
C. Clock: Displays date and time. Press to choose both, one
Possible display messages
or none displayed. Press and hold to display optional title
Error 1: Displayed when the CountIR reads a distance
eld.
which is beyond limits.
These limits could be less than zero or a length that
is 12 m greater than what the system is congured
Edit mode
for.
Press distance and clock simultaneously to get into edit
Error 2: Displayed when the system memory is not set
mode.
up. This can occur when the battery needs to be
A. Distance: Functions as edit button. Press to cycle through
replaced.
available options.
No Video: Displayed when the camera is disconnected. Once
B. Zero: Functions as next button. Press to move to next
the camera is reconnected, the screen is restored.
eld.
C. Clock: Functions as exit button. Press to exit from edit
mode, saving any changes made.
Menu elds
Time: 12 hr (AM/PM) or 24 hr
Date: mm/dd/yy or dd/mm/yy
Units: feet or metres
Ridge Tool Company
11
Tools For The Professional
TM
®
SeeSnake
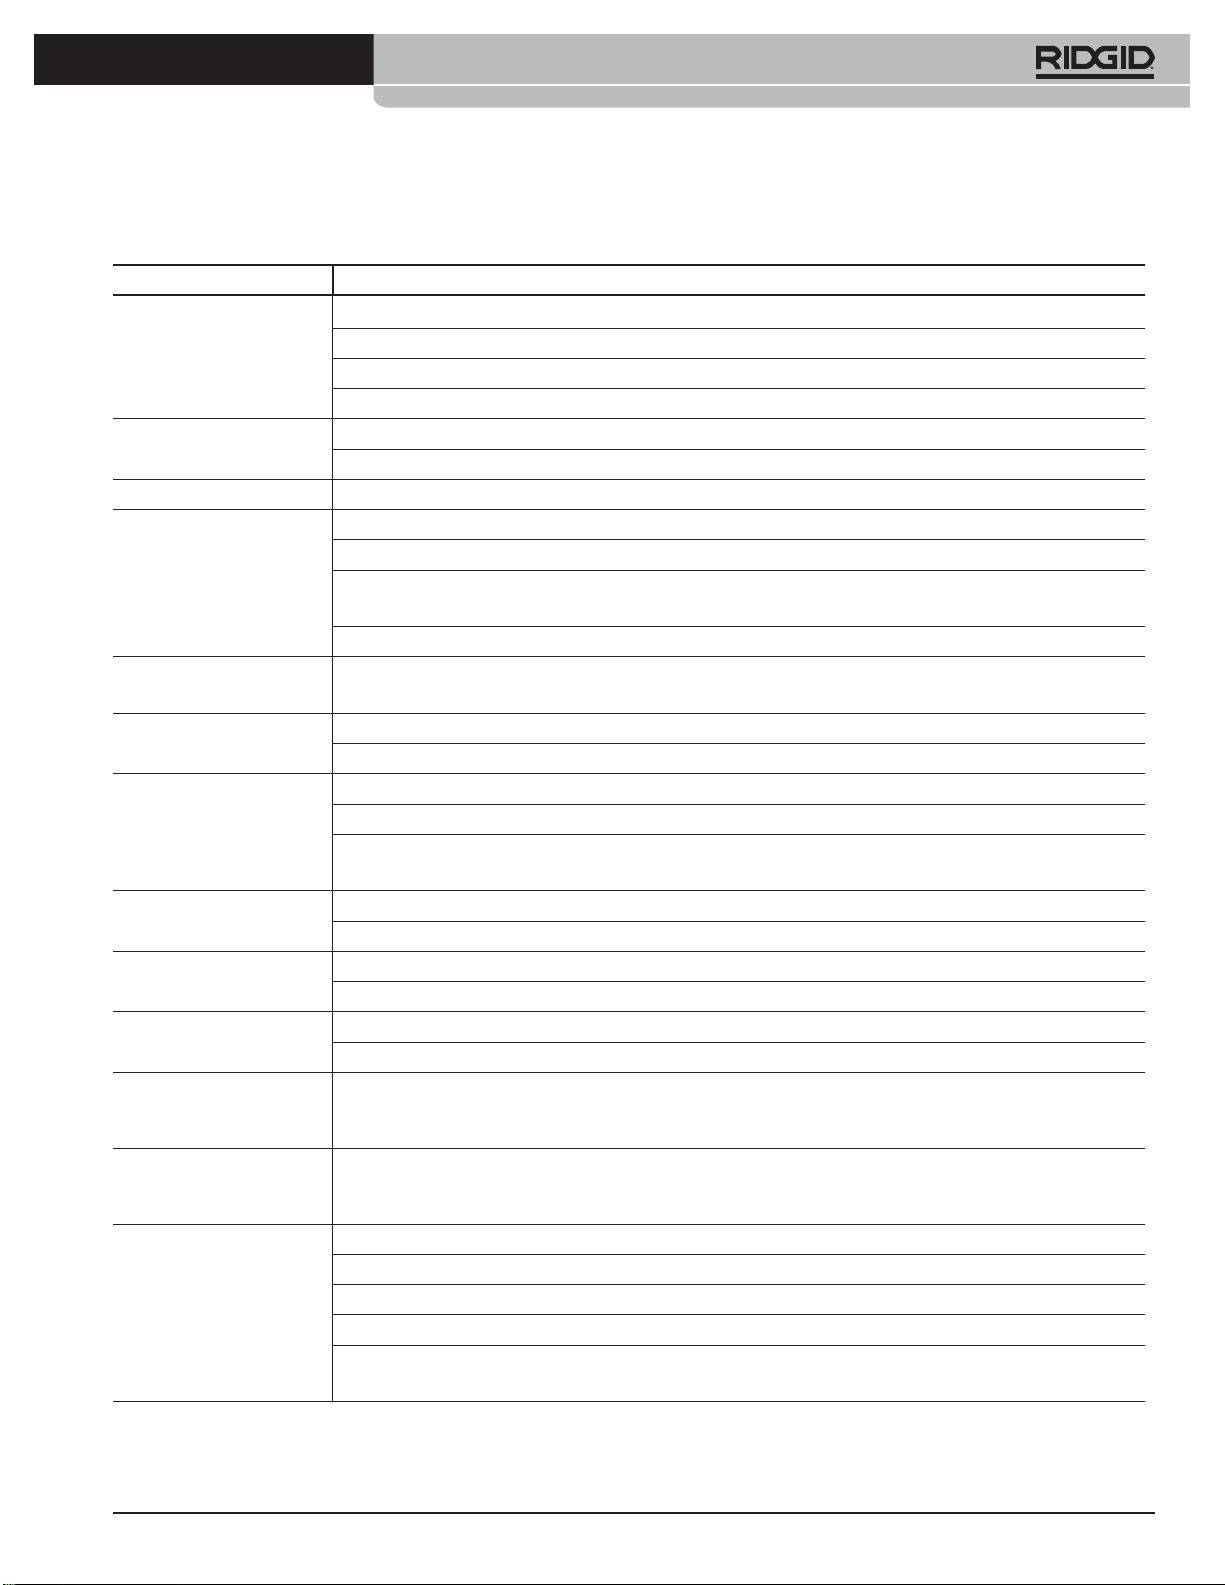
Troubleshooting
PROBLEM PROBABLE FAULT LOCATION
DISPLAY:
Check that source for the video is set to AV-2 Rear (U.S.) or SCART (EU).
No image on screen.
Check that the system is powered on and the GFCI block on the power plug does not need resetting.
Make sure a compatible disc is in the DVD player.
Check connections between display screen and video jack.
Image shown with
Check that the DVD being played back is not scratched.
“noise”.
Check that power and data cables for the display unit are rmly connected in the correct jacks.
“Snow” on screen. Verify correct video input setting SCART is selected.
Camera lights on, but no
LCD Monitor Power is OFF.
video appears
LCD Monitor Contrast and/or Brightness is improperly set.
Break in Video carrying conductor (pin socket #3) between monitor and camera (Power Switch Lamp
ashes S-O-S).
Fault with Camera or LCD Monitor.
Horizontal stripes on
Mini-SeeSnake Transmitter is activated (Power Switch Lamp ashes with steady pattern).
monitor screen
Garbled or Jumbled
Fault within camera, cables or monitor power supply (Power Switch Lamp ashes S-O-S).
Video
Horizontal or vertical hold needs adjustment.
No Video,
check battery.
No Camera lights
Colour Video ToolCase power is OFF.
SeeSnake System Cable not fully plugged in, or loose connection in system (Power Switch Lamp
ashes S-O-S).
Video, But no lights Dimmer turned Down.
Fault within Camera head, LED section.
White Screen Monitor Contrast and/or Brightness is improperly set.
Camera exposed to excessive light.
Noisy picture during
VCR video head needs cleaning. (Use a standard “head cleaner” cassette.)
VCR playback
VCR tracking not properly set. (Use Remote Control to adjust.)
VCR cannot be
VCR Auto-Repeat has been activated. Make sure the Auto-Repeat is o.
controlled.
Buttons do not respond.
DVD Screen Saver
Press any keypad key (except Record) to exit Screen Saver mode.
displays instead of
camera view.
RECORDING:
Check that a recordable disc is in the DVDR disc tray.
Cannot record.
Check that the disc has been formatted for recording.
Check that the disc is not full.
Check that the disc has not been nalized, protected or used for recording in another DVD recorder.
Record failures can be caused by damaged or lower quality discs. Try again with another disk prior to
contacting Ridge Tool Company, Technical Service Department.
12
Ridge Tool Company
Tools For The Professional
TM
®
SeeSnake
Recording does not
This may be due to a disc preparation process, which lasts a short time when rst recording to
start immediately when
DVD+R and DVD+RW discs.
pressing RECORD.
Check there is a recordable disc in the disc tray and that it has not been previously nalized or used
for recording on a dierent DVD recorder.
AUDIO:
Check setting of volume control during playback.
No sound in playback.
If volume control was set to OFF rather than low during recording, no audio will have been captured.
Verify the microphone LED is lit during recording.
Check audio cable connections.
Ensure the remote control is not being used to send commands to the DVDR. Use the built-in keypad
instead.
Ensure PAUSE key has not been pressed.
Distorted sound during
Check audio plugs are well-seated. Clean audio plugs if necessary.
playback.
Ensure audio cables are not damaged.
Feedback during
Ensure the remote control is not being used to send commands to the DVDR. Use the built-in keypad
playback.
instead.
PLAYBACK:
If the disc has not been nalized it may require nalization.
Cannot playback a disc
Check that there is recording on the disc to play back.
on this recorder.
Check that the disc in the disc tray is a playable disc.
Check that the disc is right side up.
Check that cables between DVDR and display are well-connected.
Appendix A
Specications Toolcase
Display: ................. 1/4 VGA (320 x 240) 960 pixels horizontal
Video Format: ................................................................................ PAL
Input Power: ....................... 100-240VAC, 47-63Hz/12-15VDC/
Internal Power Source: .......................... Internal rechargeable
....................................................................sealed lead acid battery
Weight: ..................................................................................... 13.6 kg
Length: ................................................................................... 47.0 cm
Width: ..................................................................................... 36.8 cm
Height: .................................................................................... 20.3 cm
Battery Rating: ............................................................ 7.0 Amp Hrs.
Battery LifeApproximately: ....................... 300 to 1000 cycles,
.............................................................................. depending on use
Battery Operating Time: ..... Approximately 2.5hrs to 4.5hrs,
.............................................................................. depending on use
Angle stops of LCD: ............... 22.5°, 45°, 67°, 90°, 112.5°, 135°
Operating Temp: ........................................................... 5°C to 35°C
VCR Resolution: ................................................................ 220 HTVL
Ridge Tool Company
13
Tools For The Professional
TM
®
SeeSnake
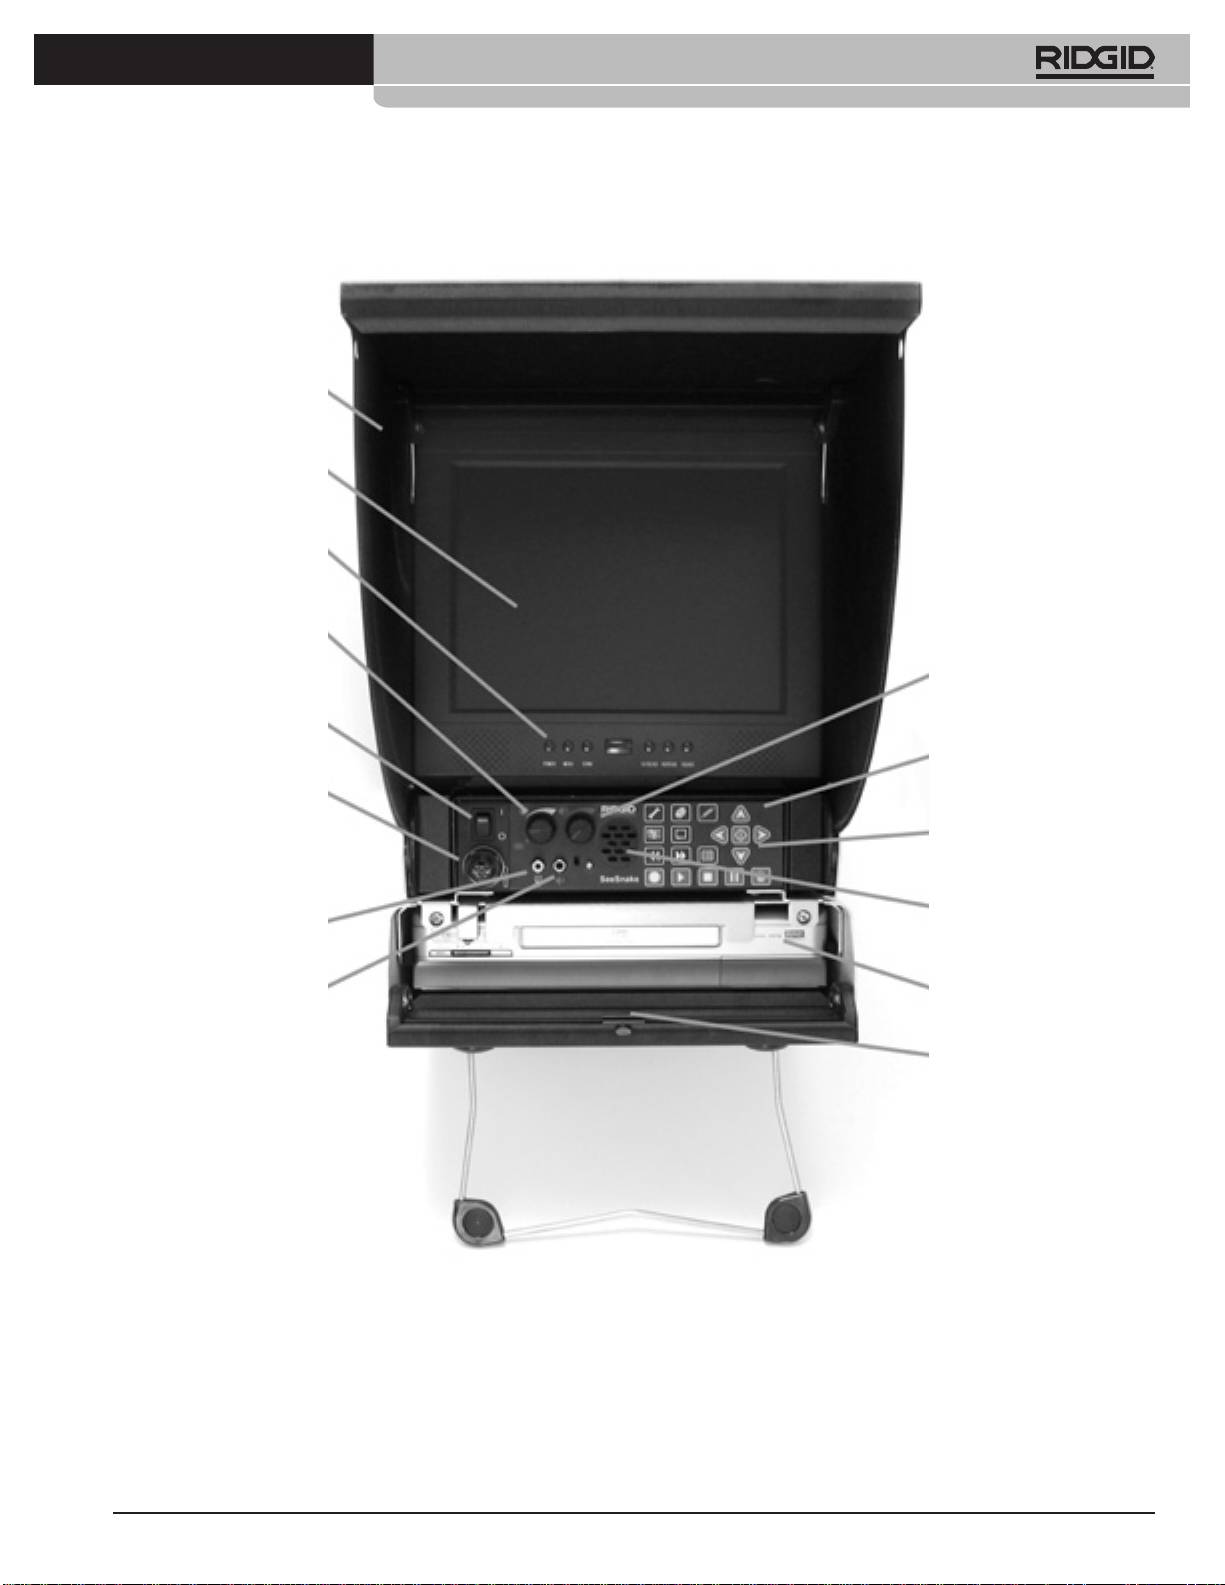
Sun Shade
Monitor
Monitor Controls
Dimmer/Transmitter Knob
Volume Control/Audio O
Power Button
Power Supply Unit
Connector for interconnect
cord
DVD Control Keypad
Hands Free
Video Out Jack
Microphone/Speaker
Audio Out Jack
DVDR Unit
Pen Clip
Fig. 1
14
Ridge Tool Company
Tools For The Professional
TM
®
SeeSnake
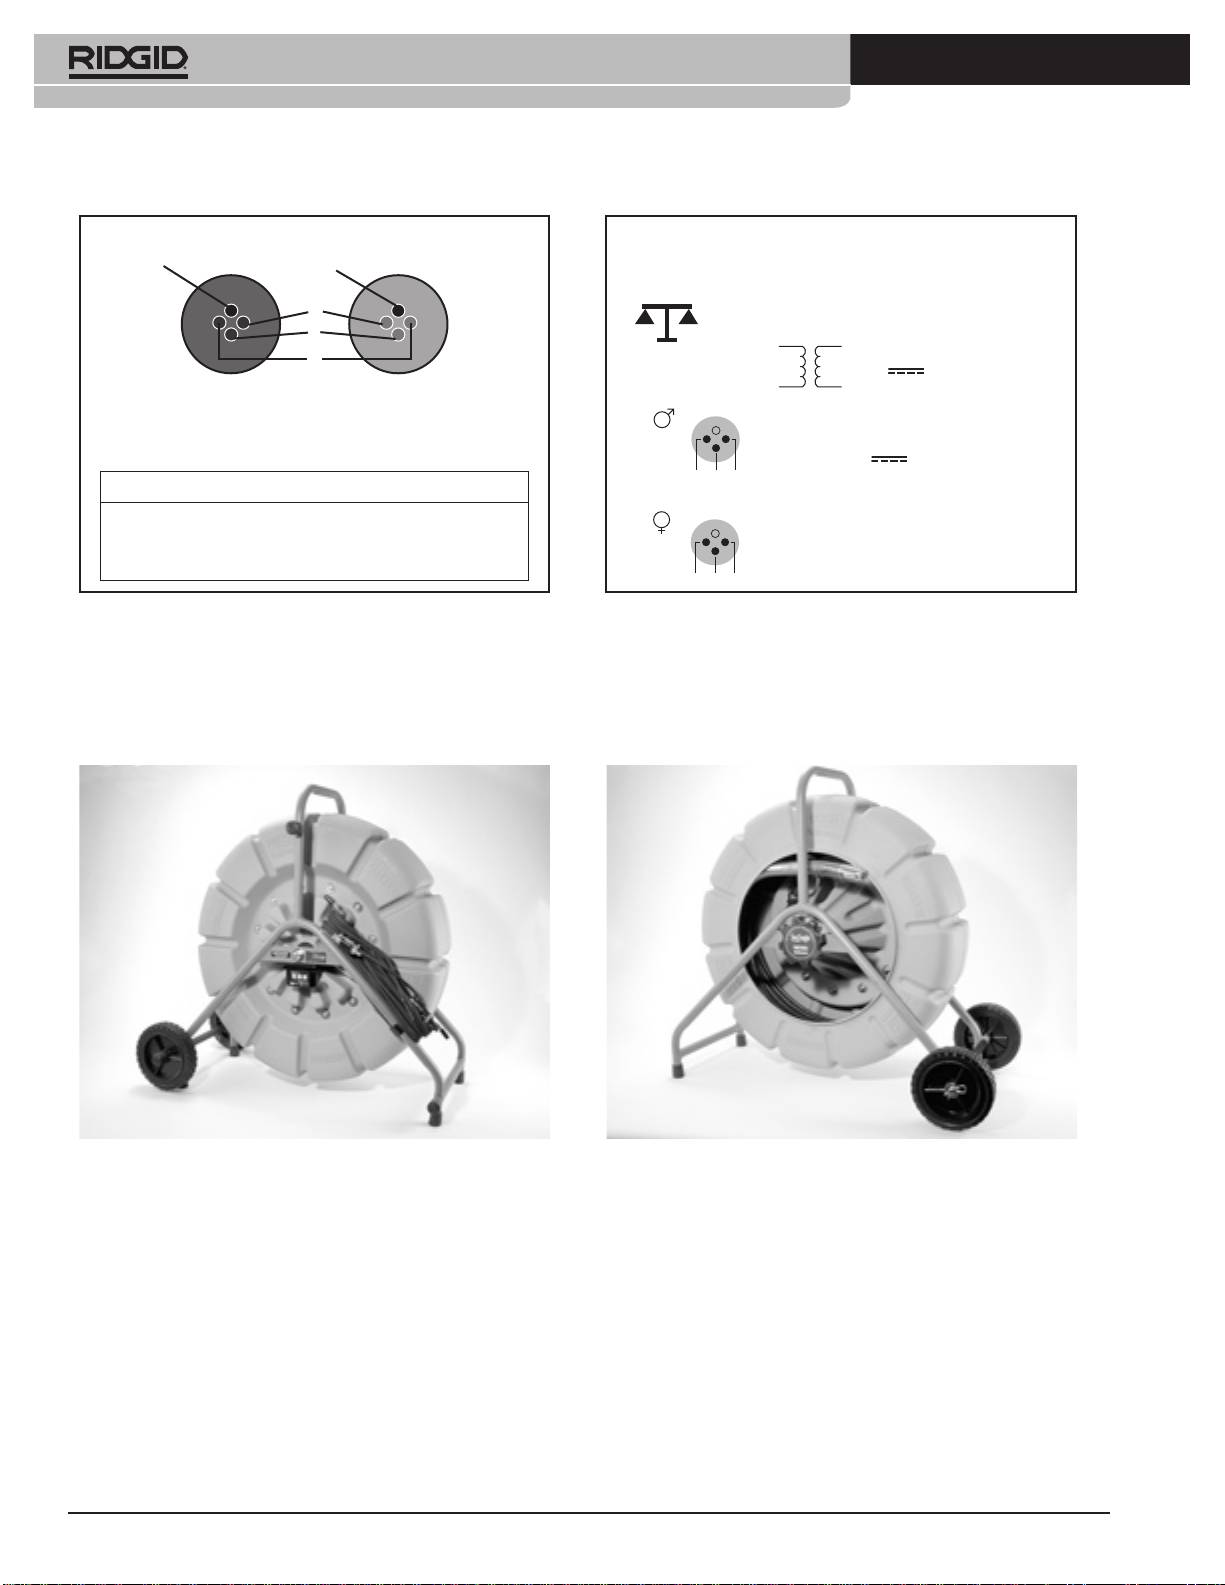
Guide Pin
Guide Socket
32 mm- 305 mm (1 1/4” NB - 12” NB)
L max 99 m
1
2
19.5 kg/11 kg
3
230 V~50 Hz 12 V
Male Connector Pins
Female Connector
Systems Cable
Sockets (Connector for
1 0 V
Systems Cable)
2 12 V
3 2 1
Pin/Socket Function
3 Video
1 .....................................................Neutral
2
.....................................................+12 VDC
3
.....................................................Video Signal
1 2 3
Fig. 2
Fig. 3
Fig. 4
Ridge Tool Company
15
Tools For The Professional
TM
®
SeeSnake
C
B
A
Fig. 5 A-B-C
Fig. 6
Fig. 7
16
Ridge Tool Company
Tools For The Professional
TM
®
SeeSnake
Transport und Handhabung
DE
Erschütterungen oder heftige Stöße vermeiden.
®
SeeSnake
Benutzung und Pege
Kühl und trocken lagern. So wird die Gefahr elektrischer
Bedienungsanleitung
Schläge gemindert und die Lebensdauer von Batterie/Akku
erhöht.
WARNUNG! Lesen Sie diese Anwei-
sungen und die begleitende Sicher-
HINWEIS:
Colour Video Toolcase Akku sollte vollständig
geladen werden, das innere Fach muss völlig trocken sein,
heitsbroschüre sorgfältig, bevor Sie
bevor das Gehäuse zwecks Lagerung geschlossen wird.
dieses Gerät benutzen. Bei Unklarheiten
wenden Sie sich bitte an Ihre RIDGID Vertriebs-
Vor übermäßiger Wärme schützen. Das Produkt sollte von
stelle, die Sie näher informiert.
Hitzequellen, wie Radiatoren, Wärmespeichern, Öfen oder
anderen Produkten (einschließlich Verstärkern), die Wärme
Unkenntnis und Nichtbefolgung der
produzieren, ferngehalten werden.
Anweisungen können zu elektrischen
Schlägen, Feuer und/oder schweren Verlet-
Sicherheit
zungen führen.
Gerät erden. Das Netzkabel nur an eine Schukosteckdose
mit einem auf max. 30 mA eingestellten Schutzschalter
WARNUNG! Eine unsachgemäß geerdete Steckdose
anschließen. Kameragehäuse und Monitor nicht önen.
kann elektrische Schläge verursachen und/oder Geräte
Durch ein nicht autorisiertes Önen erlischt die Garantie
schwer beschädigen. Überprüfen Sie grundsätzlich,
und Sie können sich gegebenfalls selbst in Gefahr bringen.
ob im Arbeitsbereich eine korrekt geerdete Steckdose
Verwenden Sie das Gerät nicht in einer potentiell explosiven
vorhanden ist. Eine Steckdose mit drei Kontakten oder
Umgebung.
mit Erdschlusssicherung ist keinerlei Gewähr für eine
ordnungsgemäße Erdung. Wenn Zweifel bestehen, lassen
Sie die Steckdose von einem qualizierten Elektriker
Akkusicherheit
überprüfen.
Batterien explodieren im Feuer! Batterien dürfen auf
keinen Fall verbrannt werden.
Allgemeines
Ordnungsgemäß entsorgen. Bitte zu einer Recyclingstelle
bringen. Bleiakkus enthalten Bestandteile, die schädlich für
Technische Daten
die Umwelt sind.
Vor dem Transport und der Lagerung immer Batterie/
SeeSnake/Mini-SeeSnake ist für die Verwendung als
Akku entfernen.
Leitungsinspektionsgerät vorgesehen. Wir empfehlen
dringend, es NICHT zu verändern und/oder für andere Zwecke
Wenn die Batterie/Akku ausgetauscht werden muss, immer
zu verwenden. Physische Eigenschaften und Kapazität: Siehe
der vorgeschriebenen Größe und des vorgeschriebenen Typs
Abb. 2.
verwenden.
Eine SeeSnake besteht aus einer Trommel (mit Schubkabel
und Kamerakopf) und einem Monitorsystem.
Vorbereitung und Betrieb
Alle Farb- (SW) Monitorsysteme (Monitor Videorecorder, LCD
• Die Räder an der Kabeltrommel anbringen (nur SeeSnake)
DVD und Toolcase) können mit allen Farb- (s/w) Trommeln
(Abb. 3).
(Mini + Standard) verwendet werden.
• Überprüfen, ob Kamerakopf und Feder (Abb. 4) sich ohne
Schwierigkeiten aus der Trommel ziehen lassen.
• Strom-/Systemkabel von der Kabeltrommel abrollen und
an die Buchse vorne am Monitor anschließen (Abb. 5A).

Ridge Tool Company
17
Tools For The Professional
TM
®
SeeSnake
• Sonnenschutz am Monitor anheben und einrasten
Montage/Wechsel für Führungen
(Abb. 6) und Netzkabel an Steckdose anschließen
(Toolcase kann auch mit Akku betrieben werden).
Führung über die Feder schieben und mit Metallsprengring
• Monitor einschalten und überprüfen, ob das Bild klar ist.
sichern. Kugelführungen und Rollwagen (SeeSnake) werden
• Der Hauptschalter leuchtet permanent, wenn ein
durch Verschieben von Metallclips befestigt.
Videosignal von der Kamera erkannt wird.
• Wenn die Kamera nicht angeschlossen ist oder wenn
Wartung
ein Verbindungsproblem vorliegt, blinkt die Leuchte im
Hauptschalter in der S-O-S-Folge (3 kurz/3 lang/3 kurz).
Halten Sie das Kabel sauber und achten Sie auf Schnitte.
• Wenn der Hauptschalter ständig leuchtet, Sie jedoch kein
Reinigen Sie die Kabeltrommel mit ießendem Wasser -
Bild sehen, ist der Monitor möglicherweise abgeschaltet.
beachten Sie den Ablaufstopfen. Wischen Sie den Monitor
• Die Regler für Helligkeit, Kontrast, sowie ein Einstellknopf
mit einem trockenen Tuch ab.
für die LED-Helligkeit benden sich am Monitor. Diese
Einstellungen sollten vorgenommen werden, wenn die
Kamera sich in der Leitung bendet.
HINWEIS:
Die Trommel darf nicht mit Wasser gefüllt und
• Stellen Sie, wenn die Kamera sich in der Leitung bendet,
dann auf die Seite gelegt werden, dadurch kann den innen
die LEDs des Kamerakopfes mit dem Dimmerknopf ein
liegenden Schleifring beschädigt werden.
(Abb. 5C).
• Schieben Sie den Kamerakopf mit dem Kabel in die
Leitung und prüfen Sie die Bewegung anhand des
Colour SeeSnake
Monitorbildes.
• Benutzen Sie aufgeraute Gummihandschuhe, um die
Kapazität
Grigkeit zu verbessern.
• Reinigen Sie vor Benutzung der Kamera das Objektiv mit
- Standard SeeSnake: 50 - 300 mm, max. 99 m Länge
klarem Wasser.
- Mini SeeSnake: 40 - 200 mm, max. 61 m Länge
• Das Kabel darf nicht gewaltsam geschoben oder geknickt
werden. Meiden Sie scharfe Kanten. Kamera und Kabel
können, durch Abrieb, durch gewaltsames Bewegen oder
Monitorsysteme
durch Schlagen gegen Hindernisse geschädigt werden.
• Halten Sie nach Möglichkeit den Wasseruss aufrecht,
Vorbereitung:
um die Reibung zu reduzieren und die Kamera sauber zu
Aktivieren des FleXmitter: Drehen Sie den Dimmer-/
halten.
FleXmitter Knopf ganz nach links. (Siehe Abb. 5C) Die LED am
• Achten Sie darauf, dass das Kabel nicht einknickt.
Netzteil blinkt, wenn der Transmitter aktiviert wird, auf dem
Tipp: - Wenn Sie Wasser in die Leitung laufen lassen,
Monitor wird eventuell eine leichte Störung angezeigt.
können Sie problemlos stromabwärts blicken. Auf
diese Weise können Sie leichter erkennen, wie der
Kamerakopf in der Leitung ausgerichtet ist.
Monitor VCR (SW oder Farbe)
- Sorgen Sie beim Schieben des Kabels dafür, dass
Systemkomponenten: Monitor + Videorecorder
Ihre Hände nicht zu weit vom Eintrittpunkt entfernt
Systemkomponenten siehe Abb. 1
sind. Dadurch kann das Kabel knicken und eventuell
beschädigt werden, insbesondere, wenn Sie an eine
Biegung gelangen. Wenn Sie an eine schwierige
Der Videorekorder wird durch Einschalten des Gerätes mit
Stelle gelangen, schieben Sie die Kamera um jeweils
Strom versorgt, Sie müssen dazu nicht den Hauptschalter
30-40 cm weiter.
des Videorekorders benutzen.
Wenn die Inspektion abgeschlossen ist, ziehen Sie das Kabel
aus der Leitung, legen Sie dabei ein Tuch um das Kabel,
um den Schmutz zu entfernen, und schieben Sie es in die
Kabeltrommel. Benutzen Sie die Trommel nicht, um das
Kabel “aufzuwickeln”. Spülen Sie Kamerakopf und Feder vor
dem Verstauen in der Trommel gründlich ab.
• Benutzen Sie keine Lösungsmittel oder andere aggressive
Reiniger.

18
Ridge Tool Company
Tools For The Professional
TM
®
SeeSnake
Videoaufnahme
Colour Toolcase
Zum Aufzeichnen können Sie die Aufnahmetaste direkt
am Videorekorder oder die große rote Taste (Aufnahme/
Aufnahmestopp) benutzen.
Beschreibung und technische Daten
Der Colour Video Toolcase kann mit externen Wechselstrom-
HINWEIS:
Wenn Sie die beiden verschiedenen
oder Gleichstromquellen betrieben werden, oder aber über
Aufnahmetasten (große rote Taste/Taste auf dem
den Akku, der Ihnen die Benutzung des SeeSnake Systems
Videorekorder) benutzen, beachten Sie, dass sie nicht
erlaubt, wenn eine externe Stromversorgung nicht verfügbar
zusammen funktionieren. Das heißt, wenn Sie die eine
oder schwer zu erreichen ist. Das Gerät hat einen eingebauten
Taste drücken, “weiß” die andere nicht, das eine Aktivität
Ladestromkreis und eine 3-Farblampe, die Ihnen den Status
stattgefunden hat. Wenn Sie zum Beispiel auf dem
der Batterie optisch anzeigt.
Videorekorder Aufnahme gedrückt haben, müssen Sie
zum Beenden der Aufnahme zweimal die große rote Taste
Audio-/Video-Anschlussbuchsen auf der Gerätevorderseite
drücken.
ermöglichen Ihnen das Abspielen, Aufzeichnen oder das
Kopieren von externen Videogeräten.
Audioaufnahmen können Sie mit dem Freisprechmikrofon
Ein eingebauter Mikroprozessor bietet Ihnen erweiterte
am Gerät selbst oder mit dem Handmikrofon machen.
Funktionen und Steuermöglichkeiten, darunter:
Vergewissern Sie sich, dass der Lautstärke-/Audio-Aus-Knopf
On-Screen-Display von Audioaufnahmestatus, Akku-
sich nicht in der Audio-O-Position bendet. Dieser Knopf
lebensdauer, Mini SeeSnake Transmitterbetrieb, Video-
kann sich in irgendeiner Position im roten Bereich benden.
rekorderfunktion, Einstellung des Monitorbildes und
Wenn Sie keinen Audioton aufnehmen möchten, drehen Sie
System-Setup-Menü.
den Lautstärke-/Audio-Aus-Knopf gegen den Uhrzeigersinn,
Stromsparmodus schaltet den Videorekorder ab, wenn er
bis er mit einem Klicken die Aus-Position erreicht.
über eine vorher festgelegte Zeit nicht aktiv war, um Energie
Wenn Sie das Freisprechmikrofon benutzen, leuchtet bei
zu sparen. Diese Option kann vom System-Setup-Menü aus
Aktivierung eine rote Leuchte. Sprechen Sie einfach in
aktiviert werden.
Richtung des Gerätes (das rote Licht blinkt dann heller).
Monitorhauptschalter ermöglicht das Abschalten des
Wenn Sie das Handmikrofon benutzen, leuchtet das Licht
Monitors, während der Rest des Systems eingeschaltet bleibt
erst bei Aktivierung des Mikrofons.
(zum Beispiel beim Lokalisieren), um die Lebensdauer des
Akkus zu erhöhen.
HINWEIS: Die Audio-LED links neben dem Freisprechmikro-
Automatische Abschaltung verhindert ein
fon hat drei Einstellungen:
unbeabsichtigtes Entladen des Akkus durch Unterbrechung
der Systemversorgung, wenn der Monitor in die Transport-
1. AUS: Lautstärke-/Audio-Aus-Knopf in Position AUS oder
und Lagerposition gesenkt wird.
Handmikrofon angeschlossen und nicht aktiviert. Eine
Audioaufnahme erfolgt nicht.
Automatische Umschaltung der Stromversorgung
2. LEUCHTET SCHWACH: Das Gerät ist aufnahmebereit,
verhindert ein System-Reset und den Verlust von
empfängt aber kein starkes Audiosignal.
Entfernungsmessungen durch sofortiges Umschalten auf
3. LEUCHTET GRELLROT: Das Gerät empfängt ein starkes
Akkubetrieb wenn eine externe Stromquelle angeschlossen
Audiosignal über das Freisprechmikrofon oder das
oder abgeklemmt wird.
aktivierte Handmikrofon.
LANC Port zur Steuerung eines externen LANC Videogerätes
von der Tastatur aus. (Viele 8mm, Hi- 8(tm), Digital8(tm)
und MiniDV Camcorders) Erlaubt simultane Aufnahmen
von Inspektionen mit dem eingebauten Videorekorder und
einem externen Gerät.
HINWEIS:
Technische Daten siehe Anhang A.
Ridge Tool Company
19
Tools For The Professional
TM
®
SeeSnake
Laden des Akkus
Komponenten des Colour Video
Die Batterie sollte vor der ersten Benutzung geladen werden.
Toolcase
Benutzen Sie zum Laden des Akkus das Wechselstromkabel
im Fach oben am Videorekorder.
1+2
3
HINWEIS:
Das Laden einer im normalen Betrieb vollständig
4
entladenen Batterie dauert etwa sechs Stunden.
5
VORSICHT: Der Deckel MUSS beim Laden oen sein, um
6
potentiell explosive Gase entweichen zu lassen.
17
Die Akkustatusleuchte zeigt den Zustand des Akkus an:
7
Beim Betrieb mit internen Akku
8
Rot, langsam blinkend: Das Gerät läuft im Akkubetrieb
16
Rot, schnell blinkend: Akku wird schwächer
15
18
14
19 13 12 20 11 9
10
1+ 2 Stromversorgung / Zubehörfach - Abnehmbares Fach
Fast dauernd rot: Akku extrem schwach, an eine externe
- 3 Akkufach - 4 Monitortastatur / Steuerungsschnittstelle - 5
Stromquelle anschließen. Das Gerät
Sonnenblende - 6 Farb-LCD-Monitor - 7 Buchse für externes
arbeitet unter Umständen nicht korrekt.
Mikrofon - 8 Hilfsbuchse - 9 Eingebautes Mikrofon - 10
Bei Anschluss an eine externe Stromquelle
SeeSnake Systemkabelanschluss - 11 Dimmer-/ Transmitter-
Knopf - 12 Lautstärkeregler / Audio aus - 13 Hauptschalter
Orange: Akku wird geladen.
- 14 LANC-Buchse - 15 Buchse für externe Stromversorgung -
Grün: Akku ist vollständig geladen.
16 Sicherung - 17 Videorekorder - 18 Akkustatusleuchte - 19
Audio-/Video-Eingangsbuchsen - 20 Lautsprecher
Rot: Akku-/Kabelproblem (wenn der Akku korrekt
angeschlossen ist, hat der Akku unter Umständen
das Ende ihrer Lebensdauer erreicht und muss
Vorbereiten des Systems für die Benutzung
ersetzt werden.) Bitten Sie Ihren RIDGID Händler
um Diagnosehilfe und um Informationen über den
Anschließen des Akkus
Austausch des Akkus.
Aus Sicherheitsgründen wird Ihr Colour Video Tooldcase mit
abgeklemmtem Akku ausgeliefert. Vor der ersten Benutzung
HINWEIS:
Wenn die rote LED sofort nach dem Einsetzen
des Gerätes müssen Sie des Akkus anschließen. Auch sollten
des Akkus aueuchtet, prüfen Sie, ob die Pole korrekt
Sie vor dem Transport und Lagerung immer dan Akku
angeschlossen sind.
abklemmen.
Anschließen des Akkus:
• Entfernen Sie die vier Schrauben, mit denen das
WARNUNG! Lagern Sie den Colour Video Toolcase niemals
Kunststofach unter dem LCD-Monitor befestigt ist und
mit entladener Akku. Der Akku kann dabei beschädigt
heben Sie das Fach aus der Blende.
werden.
• Entfernen Sie die Gummikappen von den Enden des
Akkus.
• Schließen Sie die rote Zuleitung an den Pluspol (rot) des
Einschalten des Systems
Akkus an und die schwarze Zuleitung an den Minuspol
(schwarz) des Akkus an.
Heben Sie zum Einschalten des Colour Video Toolcase den
• Bringen Sie die Gummikappen wieder an und schieben
Monitor aus der Lagerposition an und drücken Sie den
Sie den Akku wieder an ihre Position, klemmen Sie dabei
Hauptschalter.
die Kabel nicht ein.
• Bringen Sie das Kunststofach und die Schrauben wieder
HINWEIS: Das Gerät wird nicht eingeschaltet, wenn der
an.
Monitor sich in der Lagerposition bendet.
Aufnahmen: Siehe auch Abschnitt über Mon VCR.
