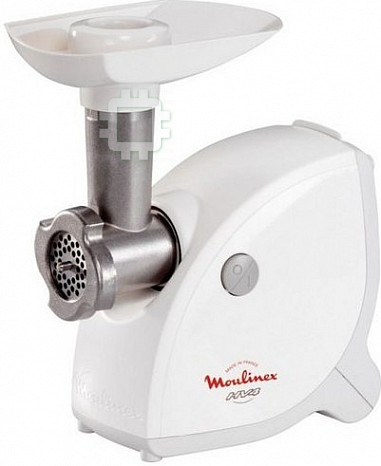
Moulinex HV 4 ME41513E: инструкция
Раздел: Бытовая, кухонная техника, электроника и оборудование
Тип: Мясорубка
Характеристики, спецификации
Инструкция к Мясорубке Moulinex HV 4 ME41513E
EN
p 1 – p 8
LT
p 9 – p 16
LV
p 17 – p 24
ET
p 25 – p 32
PL
p 33 – p 40
RU
p 41 – p 49
UK
p 50 – p 58
HU
p 59 – p 66
CS
p 67 – p 74
SK
p 75 – p 82
BS
p 83 – p 90
BG
p 91 – p 99
HR
p 100 – p 107
RO
p 108 – p 115
SR
p 116 – p 123
SL
p 124 – p 131
EN
LT
LV
ET
PL
RU
UK
HU
CS
SK
BS
BG
HR
RO
SR
SL
www.moulinex.com
Réf. 2643049A
Notice_2643049A:Mise en page 1 29/10/10 16:23 Pagea1
!#
8><496026F7<4A>@<B286//L
<?2/j.?=>6=>.B25
%<j6@285B59.169;68A
Sestavine za testo za kibbé:
280=,U6:D,<0.2-?<2?7,D/<:-75090;`094.0U%:7
Sestavine za omako:
625:2?<>,U`:;066:<4,9/<,U=><:64i0=9,U5?`90b74.06:<?D0U%:7;:;0<
0=:<,D<0b4>09,6:=0!,@,`=0675,79469,80=>4>0889,=>,@06+80754>080=:49-?<2?7%:74>049;?=>4>0
>0=>:=>,>49,37,/908?<:
"-746:@,9506<:274.64--J9,=0675,79469,80=>4>0/:/,>0664--J&0=>:/,5>0@=0675,7946492,:-746?5>0@6<:27:>,6:
/,9,<:-:@09,90=0>08,7:@:/0
#<4;<,@,:8,60?845>0`:;066:<4,9/<,:=?`4>02,D@;:5948;,;4<50849:/><2,5>074=>0h0=09:7?;4>049=><4>0
h0=09496:<4,9/0<6?3,5>0/:849?>49,8,53908:295?@;:9@4D@4`548<:-:8"/=>,@4>0
:2?<>496:<?D:D80`,5>0=6?;,59,>:;:=:74>049;:;:;<,5>0(=0D745>0@09:;:=:/:=6:D4.0/47:D8,5394847?
695,84#:i,6,5>0/,80`,94.,D,@<09,>:D8,95`,5>08:i:295, 0/6?3,9508;,D4>0/,=05:2?<>90D,=?`49,
;:90@
:/,5>0i0=09496:<4,9/0<<:274.064--J/:/,5>0i0D849?>
Različica
<:274.07,36:>?/49,/0@,>0DD80=5:i0-?7049870>02,80=,64=>05:;<0/>08;:;<,b474@:75?D906,5D<94;49450
%&$
:.75;<>6/72=206B<
<?2/2j.?=>6=>.B2:6;
i.?8A5.;7.:6;
Sestavine:
274=>9,>02,>0=>, U26?3,90<4-0,74/48750902,7:=:=, U></:6?3,945,5.4 U`:;066:;<, Ui0-?74 U2
=:750902,8,=7,@8,539436:.6,3 U"750
!,80=>4>0889,=>,@069,=0675,7946$,D<0b4>0i0-?7:9,6:=:@495:=><0=4>0@=0675,7946#<,b4>09,8,53908
:295?@;:9@4D8,7::75,%3<,94>0
+80754>08,7:<4-09,>:54/:/,5>0;<,b09:i0-?7:8,=7:6:;0<49`0;<0:=>,7:<4-:
4=>9,>:>0=>:<,D@,75,5>0/,-:/:6,5>,96:<,D<0b4>02,9,6<:20=6:D,<.08,74D/:6,5@0746:;:=:/:
#0i4.:;<0/3:/9::2<05>09,R=>
!,@=,66<:29,7:b4>08,7:9,/0@,492,D,;:294>0>,6:/,D@450>0<:-:@0
#?=>4>0@;0i4.4/:849?>>,6:/,;:<5,@45:
Recepti:
Pomnite: Pri receptih, kjer morate sekljati z zvišano močjo (približno 500 W), naprave ne uporabljajte več kot 20
sekund.
Primer recepta (z nastavkom s srednje velikimi luknjami 4,7 mm A4a):
Ovčetina z grahom
2:@i0>490U2D/<:-750902,2<,3,U28:60U.7@:/0U=<0/950@0746,i0-?7,U=><:6,i0=9,U%:7
;:;0<
(;:=:/4D80`,5>0=0=0675,9:8,=:498:6:9,>:;,/:/,5,5>0@:/:>,6:/,/:-4>03:8:209:80`,94.:#<4b24>0
9,;<,@:4909,6:80<9:/:/,5,5>0D80=9,;7:`i:>0<;:i,=4;:>4=6,5>080`,94.:=6:D4@<,>=;:>4=946:8C
$,D<0b4>0i0-?7:i0=094980=:9,8,53906:=09,>:;,543/:/,5>0=0=0675,908?80=?
(;:=:/:D745>074><,@:/0/:/,5>054=:7;:;0<499,>:`080`,94.:
?3,5>0?<:;<48,95`08:295?;:6<45>06:=0D,i906,/4>4
131
Notice_2643049A:Mise en page 1 29/10/10 16:23 Pagea4
Notice_2643049A:Mise en page 1 29/10/10 16:23 Pagea7

Notice_2643049A:Mise en page 1 29/10/10 16:23 Pagea8

Thank you for choosing an appliance from the Moulinex range.
EN
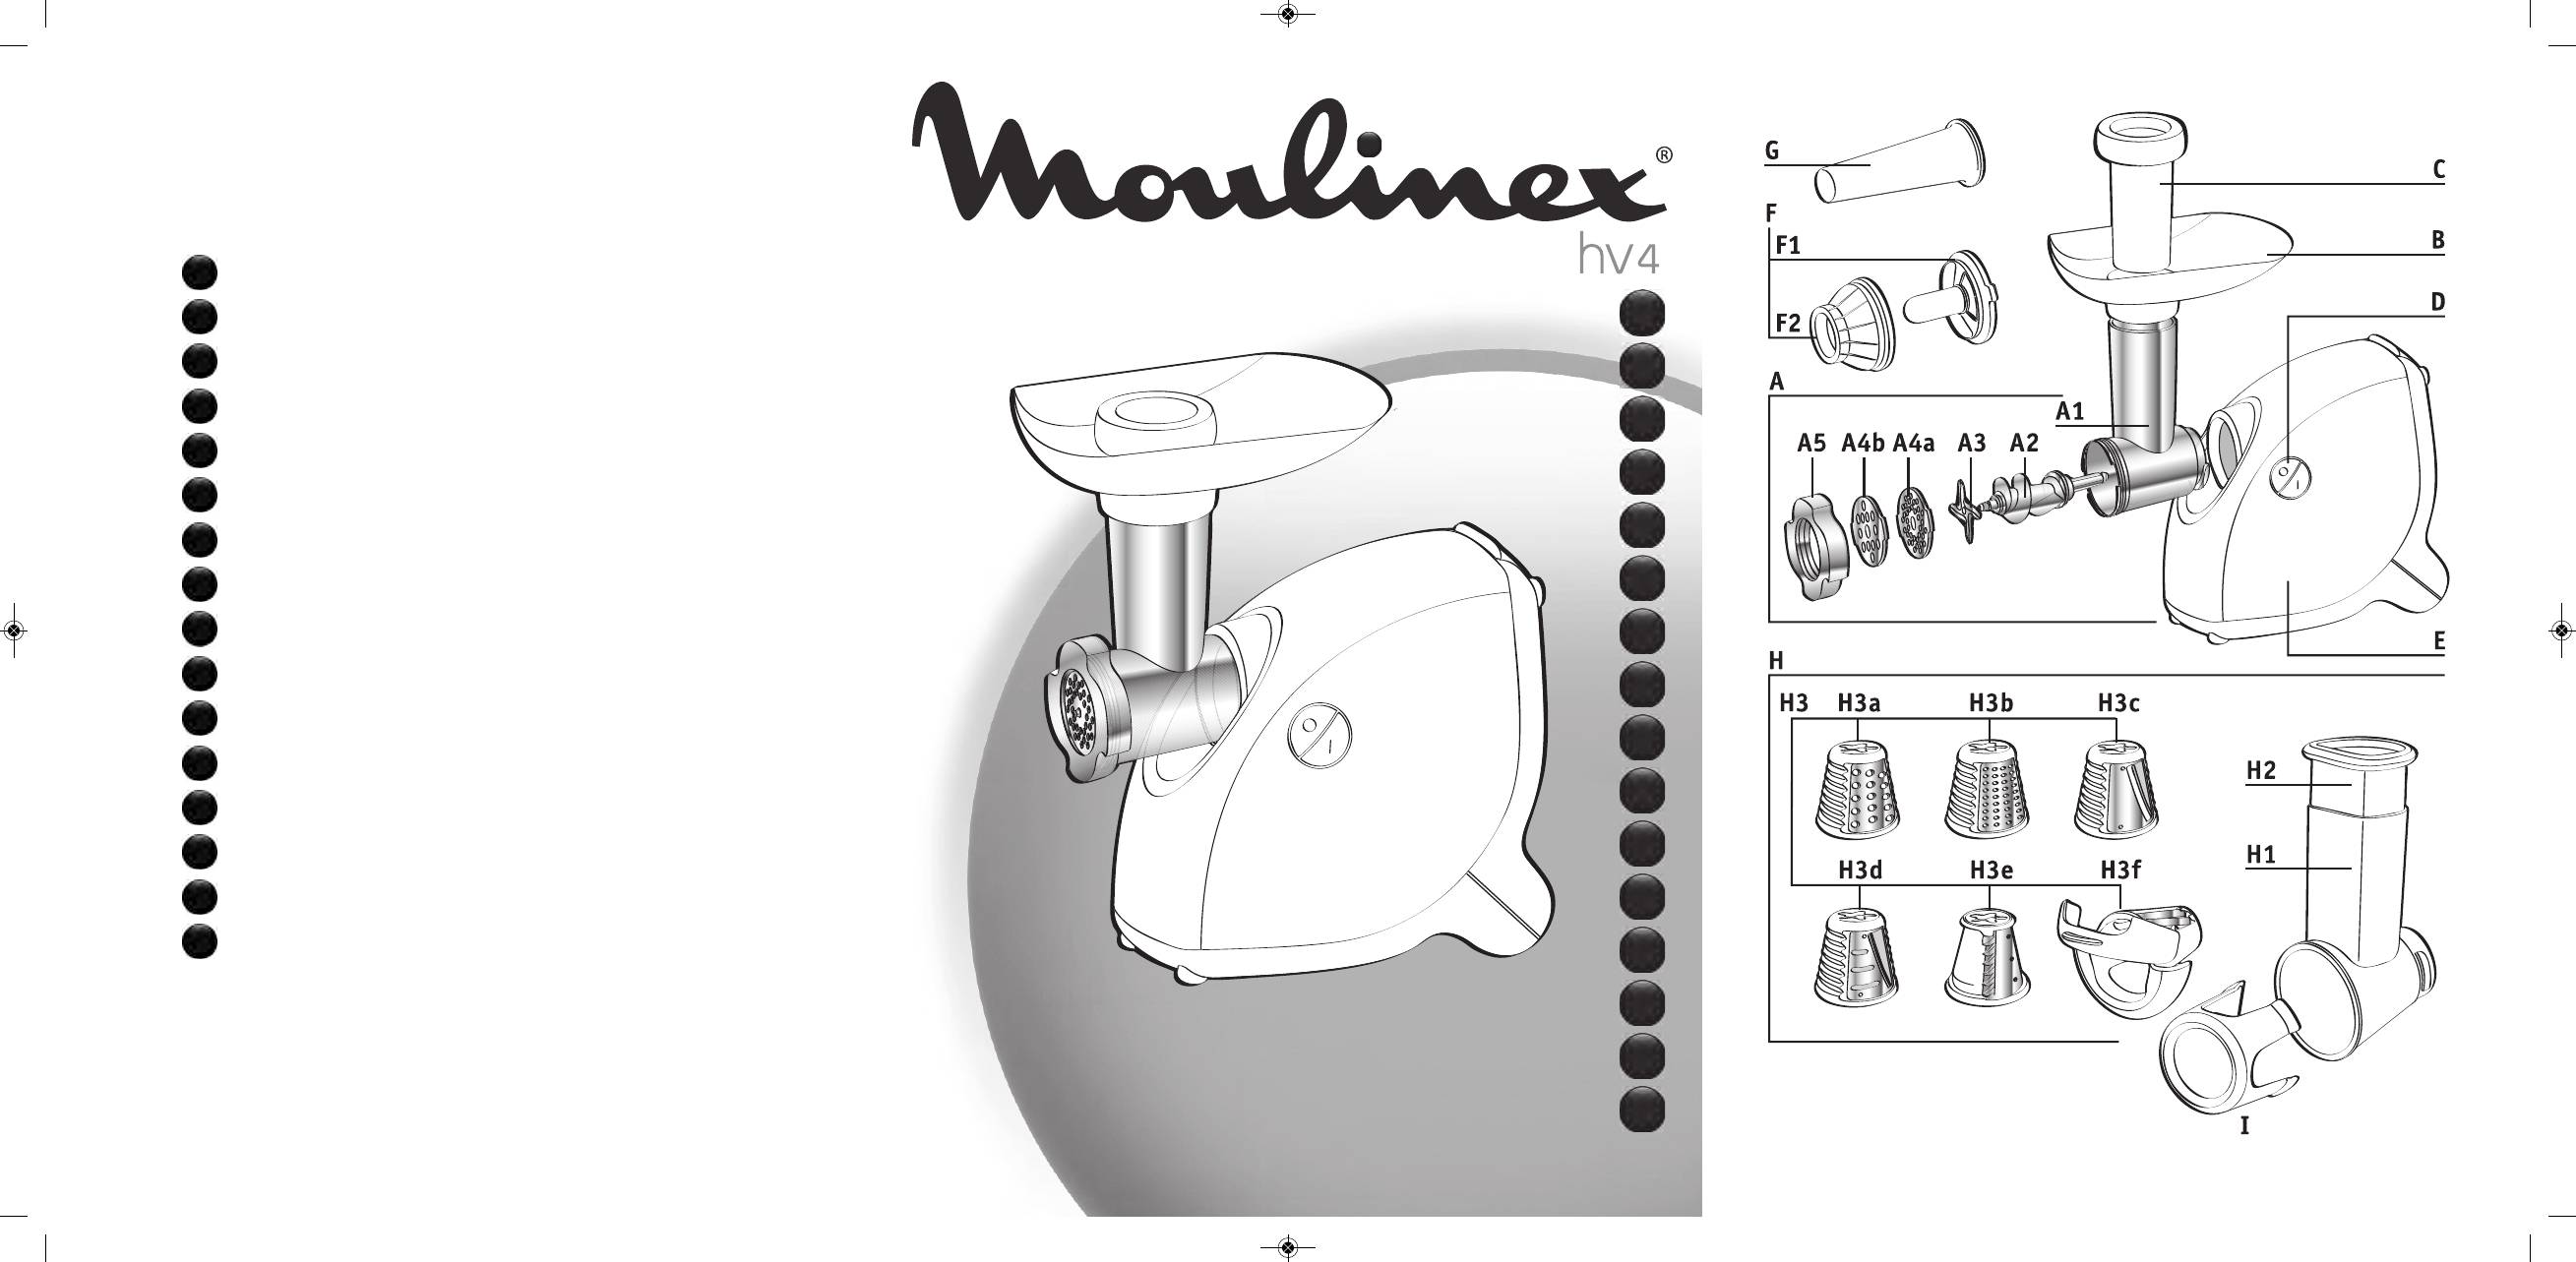
DESCRIPTION:
A Removable mincer head
A1 Aluminium body
A2 Feed screw
A3 Self-sharpening stainless steel cutter
A4 Screens
A4a Medium hole screen
(4.7 mm) fine mincing
A4b Large hole screen
(7.5 mm) coarse mincing
A5 Aluminium nut
B Removable tray
C Meat pusher
D Start/stop button
E Motor unit
F KEBBE attachment
F1 KEBBE making end
F2 Ring
G Sausage filler tube
H Vegetable cutter
H1 Cone storage unit/feed tube
H2 Pusher
H3 Cones
H3a Coarse grater cone (red)
H3b Fine grater cone (orange)
H3c Coarse slicer cone (dark green)
H3d Fine slicer cone (light green)
H3e Chip slicer cone
H3f Dicer attachment
I Storage attachment
SAFETY INSTRUCTIONS:
- Read the instructions carefully.
- Before first using your appliance, note that any use that does not conform to the instructions for use absolves
Moulinex from any liability.
- This appliance is not intended for use by persons (including children) with reduced physical, sensory or mental
capabilities, or lack of experience and knowledge, unless they have been given supervision or instruction
concerning use of the appliance by a person responsible for their safety
- Children must be supervised to ensure that they do not play with the appliance.
- Check that the power rating of your appliance corresponds to your electrical supply.
- Any connection fault invalidates the guarantee.
- This product has been designed for domestic use only. Any commercial use, inappropriate use or failure to comply
with the instructions, the manufacturer accepts no responsibility and the guarantee will not apply.
- Use your appliance on a flat, stable, heat resistant, clean and dry surface.
- Never let long hair, scarves or ties dangle over attachments during operation.
- Unplug your appliance as soon as you have finished using it, when you clean it and when you fit or remove
attachments.
- Do not use your appliance if it does not work correctly or if it has been damaged. In such cases, contact a Moulinex
approved service centre (see the list in the service booklet).
1
Notice_2643049A:Mise en page 1 29/10/10 16:23 Page1

- Any intervention other than normal cleaning and maintenance by the customer must be carried out by a Moulinex
approved service centre.
- If the cord is damaged, do not use the appliance. In order to avoid any risk, have the cord replaced by an approved
Moulinex service centre (see the list in the service booklet).
- Do not place the appliance, the supply cord or the plug in water or any other liquid.
- Do not leave the supply cord within reach of children.
- The supply cord should never be near to or in contact with hot surfaces, near to a heat source or sharp edges.
- Do not leave the appliance unattended whilst in operation.
- For your own safety, only use the Moulinex accessories and spare parts suitable for your appliance.
- For your safety, this appliance complies with applicable standards and laws:
Low Voltage Directive
Electromagnetic Compatibility
Environment
Materials in contact with foodstuffs.
- Do not use your appliance for more than 14 minutes.
BEFORE FIRST USE
Wash all accessories in soapy water. Rinse, and carefully dry them straight away.
The screen and the cutter must remain greased. Coat them with oil.
Do not use your product when empty if the screens are not greased.
ATTENTION: The blades of the cones are extremely sharp; handle the cones with precaution, always holding them
by the plastic parts.
USING YOUR APPLIANCE FOR THE FIRST TIME:
MINCER HEAD (A):
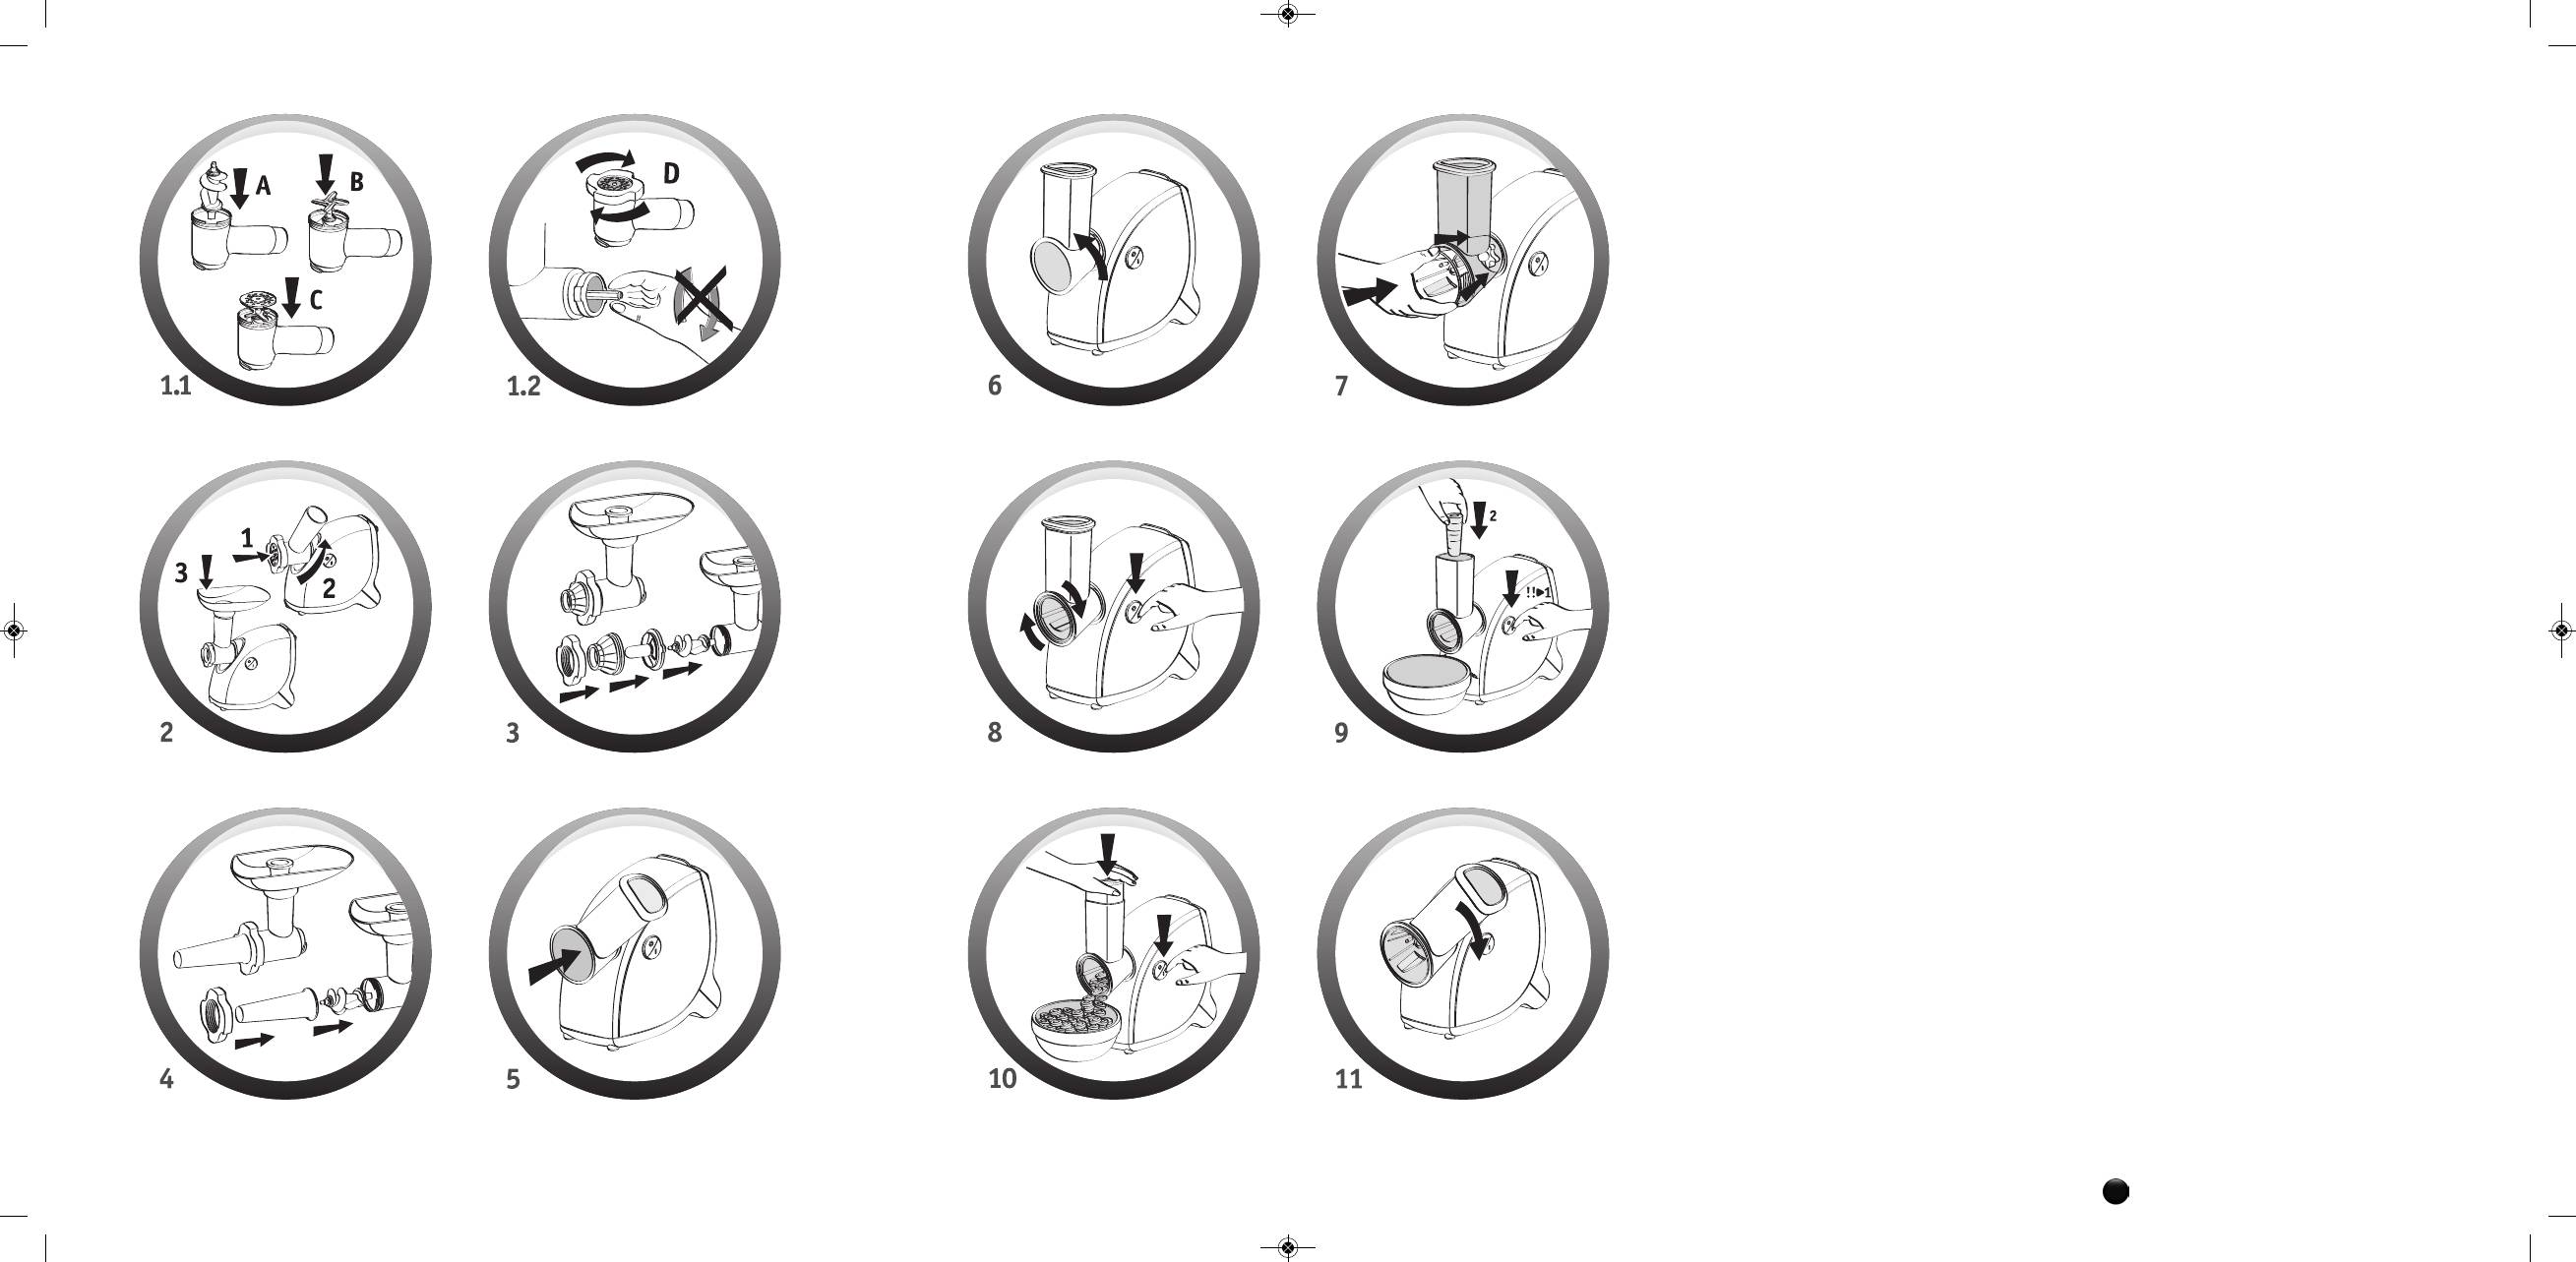
Assembling the mincer head (diagrams 1.1 and 1.2)
Hold the body A1 by the feed tube, with the wider opening uppermost. Insert the feed screw A2 (long shaft first) into
the body A1.
Fit the stainless steel cutter A3 on the short shaft that protrudes from the feed screw A2 with the cutting edges facing
outwards. Fit the screen of your choice on the cutter A3, locating the two lugs in the corresponding two notches in
the body A1.
Screw tight (without locking) the nut A5.
Fitting the mincer head to the appliance (diagram 2):
Facing the unplugged motor unit E, insert the mincer head with the feed tube inclined to the right.
Line up the two pins of the mincer head with the two notches of the motor unit.
Push the mincer head home into the motor unit E and then turn the feed tube to the left until it comes to a stop (the
feed tube should now be vertical).
Engage the removable tray B with the lugs on the mincer head feed tube.
Plug the appliance in; it is ready to use.
Use:
Prepare the entire quantity of foodstuffs to be minced, removing bones and gristle. Cut the meat into pieces (approxi-
mately 2 cm x 2 cm).
Place a bowl beneath the mincer head.
Press position “1” of button D to start the appliance, place the pieces of meat on the tray and slide them one by one
into the feed tube with the help of the pusher C.
Never push in the feed tube with the fingers or any other implement.
Tip:
At the end of the operation, you can feed a few pieces of bread into the feed tube to clear any meat remaining in the
machine.
KEBBE ATTACHMENT
Fitting (diagram 3):
Insert the feed screw A2 into the body A1 of the mincer head. Fit the kebbe making head F1, locating the lugs in the
2
Notice_2643049A:Mise en page 1 29/10/10 16:23 Page2

corresponding notches in the body A1.
Position the ring F2 on the kebbe making head, then screw the nut A5 tight.
Place the head thus assembled on the motor unit as indicated in diagram 2.
Note: this attachment is used without screen or cutter.
SAUSAGE FILLER TUBE (G)
This attachment, which fits to the mincer head, enables you to produce all sorts of sausages that you can season to
your own taste.
Fitting (diagram 4)
Insert the feed screw A2 into the body A1 of the mincer head A. Position the filler tube G, then the nut A5, and
tighten firmly. Place the head thus assembled on the motor unit E as indicated in diagram 2.
Note: this attachment is used without screen or cutter.
Use:
Important: this attachment should only be used after you have minced the meat, added the seasoning and thoroughly
mixed the filling.
After having soaked the sausage skin in lukewarm water to make it supple, thread it onto the filler tube G, leaving 5 cm
at the end (which you close by making a knot with a tie). Start the appliance, feed the mincer with mince and guide
the sausage skin as it fills up.
Note: this job is easier with two people, one to feed the appliance with mince, and the other to control the filling
of the sausage skin.
Make the sausages the required length by pinching and turning the sausage skin.
To make a good quality sausage, take care to avoid trapping air when filling and make the sausages 10 to 15 cm long
(separate the sausages by using a tie to make a knot).
VEGETABLE CUTTER (H)
Fitting (diagram 5 and 6):
Facing the motor unit, which should be unplugged, insert the storage unit H1 inclined to the right, aligning the ears
on the storage unit with the openings on the motor unit E. Insert the stem protruding from the storage unit H1 into
the shaft of the motor unit E. Turn the feed tube of the storage unit H1 to the left until it reaches the stop.
Use:
• Select the cone corresponding to the required use.
• Place the selected cone in the opening at the front of the storage unit H1. The cone must be inserted fully into the
guide (fig.7).
• Connect the appliance.
• Press once or twice on the start/stop button (D) to lock the cone (fig. 8).
• Insert the foodstuffs into the feed tube of the storage unit H1 (fig.9) and push the foodstuff with the help of the
pusher H2 (fig.10).
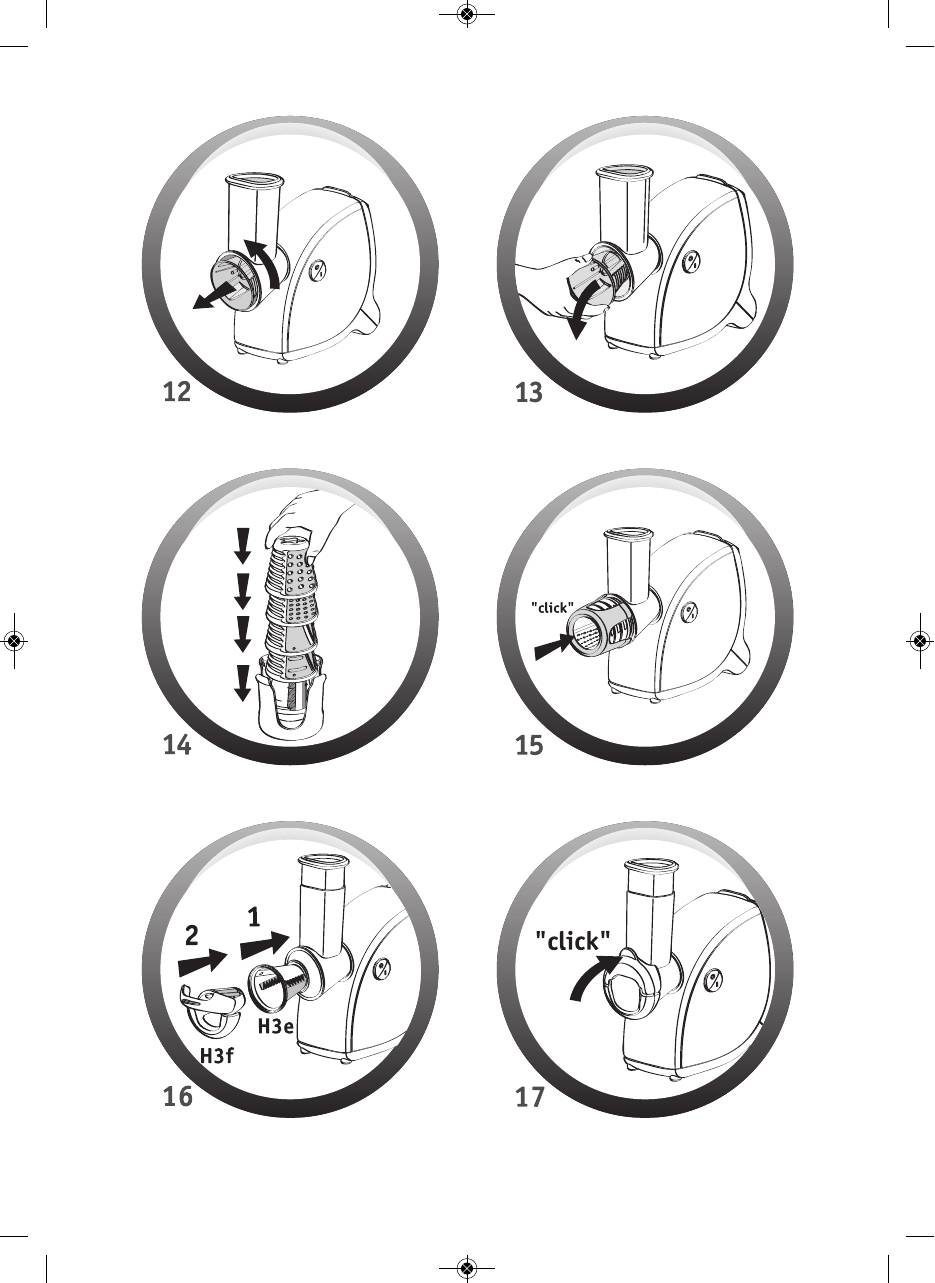
• To change cone, turn the storage unit H1 by a quarter turn to the right, then turn it back to the vertical position
(fig. 11 and 12). Then remove the cone (fig. 13).
Fitting the dicer attachment:
• Place the chip slicer cone in the opening at the front of the storage unit H1. The cone must be inserted fully into the
guide (fig.16).
• Next fit the dicer attachment with the safety hinge open, centring the safety hinge in relation to the storage unit
feed tube (fig.16).
• Check that the dicer attachment ring is correctly clipped to the base of the storage unit (fig.17).
• Close the safety hinge onto the storage unit (fig.17).
• Use the dicer function by inserting ingredients via the feed tube of the storage unit.
• Remove the dicer attachment by pulling the tab on the top of the safety hinge.
Tip: to make it easier to unlock the safety hinge H3f, simultaneously lift upwards and pull the tab to the front
with one finger (fig.18).
ATTENTION: Before using the appliance, ensure that the cone is correctly positioned on the guide.
3
Notice_2643049A:Mise en page 1 29/10/10 16:23 Page3
Use the cone recommended for each food type:
Coarse grater cone
Fine grater cone H3b
Coarse slicer cone H3c
Fine slicer cone H3d
* Dicer cone H3e/H3f
H3a (red)
(orange)
(dark green)
(dark green)
(yellow)
Carrots x x x x x (raw only)
Courgettes x x x x x (raw only)
Potatoes x x x x (raw only)
Cucumber x x x (raw only)
Pepper x x x
Onions x x x (raw only)
Beetroot x x x (raw only)
Cabbage (white/red) x x
Apples x x x (raw only)
Chinese radish x (raw only)
Celeriac x (raw only)
Banana x
Gruyère x x x x x
Chocolate x x
Coconut x
To achieve good results:
The ingredients that you use must be firm in order obtain satisfactory results and to avoid any build up of foodstuff in
the storage unit. Do not use the appliance to grate or slice foodstuffs that are too hard, such as sugar or pieces of meat.
Cut the foodstuffs into pieces to insert them more easily into the feed tube of the storage unit.
RECIPES
CONES
PREPARATION INGREDIENTS ADVICE
Dark green cone
Gratin dauphinois
800 g potatoes – 250 ml milk – 200 ml li-
Slice the potatoes with the coarse slicer
(for 4 people)
quid cream – 1 clove of garlic – 2 egg
cone (H3c). Arrange the slices in a
yolks – 100 g gruyère – salt and pepper
greased oven-proof dish that has been
rubbed with the clove of garlic. In a large
bowl, mix the egg yolks, milk and liquid
cream. Pour this mixture over the
potatoes. Season and sprinkle with
COARSE SLICER
gruyère grated with the coarse grater
cone (H3a). Cook in the oven at 200 °C.
(H3c)
Light green cone
Greek salad
1 cucumber – 2 large tomatoes – 1 red
Slice the cucumber in fine slices with the
(for 4 people)
pepper – 1 green pepper – 1 medium
fine slicer cone (H3d). Cut the peppers in
onion – 200 g feta cheese – 50 g black
half and remove the seeds. Thinly slice
olives (optional) –
the peppers and the onion. Cut the
FINE SLICER
4 tablespoons oil – 1 lemon – 30 g fresh
tomatoes and feta into small dice. In a
herbs (choice of: basil, parsley, mint,
salad bowl, mix all these ingredients and
coriander)
add the olives. Prepare the dressing by
(H3d)
mixing the oil with the juice of the lemon.
Combine carefully and sprinkle the salad
with the chopped fresh herbs.
Red cone
Gratin du soleil
6 small courgettes –
Grate the courgettes and potatoes with
(for 6 people)
2 potatoes – 1 onion – 1 cup cooked rice –
the coarse grater cone (H3a). Thinly slice
COARSE GRATER
1 egg – 1 glass of milk – 150 g gruyère -
the onion with the coarse slicer cone
(H3a)
butter
(H3c). Brown all the vegetables in butter.
In an oven-proof dish, alternate a layer of
vegetables, a layer of cooked rice and
another of vegetables. Add the milk
beaten with
the egg; season. Sprinkle with grated
gruyère and knobs of butter. Cook in the
oven at 180 °C.
4
Notice_2643049A:Mise en page 1 29/10/10 16:23 Page4

Orange cone
Coleslaw
¼ white cabbage – 2 carrots – 3 tables-
Thinly slice the white cabbage with the
(for 4 people)
poons mayonnaise – 3 tablespoons liquid
coarse slicer cone (H3c) and grate the
cream – 2 tablespoons vinegar –
carrots with the fine grater cone (H3b).
2 tablespoons sugar
Mix them in a salad bowl. Prepare the
dressing by mixing the mayonnaise,
liquid cream, oil, vinegar and sugar.
Dress the grated vegetables with the
sauce, then combine and leave to stand
FINE GRATER
in the refrigerator for one hour.
(H3b)
Yellow cone
Russian Vinaigrette 400 g beetroot – 300 g carrots – 400 g
Cut the potatoes, beetroot, carrots,
potatoes –
onions and cucumbers into dice with the
200 g cabbage –
dicer cone (H3e/H3f).
Dicer cone
200 g cucumber (marinated or salted) –
Steam the potatoes, beetroot and carrots.
150 g onions – 100 g tinned peas – salt –
Mix the cooked vegetables and add the
2 tablespoons oil
cabbage, peas, onion and cucumber. Add
(H3e / H3f)
salt and oil.
Leave the vinaigrette to stand in the
refrigerator for an hour.
CLEANING:
• Always disconnect the appliance before cleaning the motor unit E.
• Do not submerge the motor unit, nor put it under running water. Clean the motor unit with a damp cloth. Dry it
carefully.
1) Meat mincer attachments:
- Turn the mincer head A to the right and pull it towards you to remove it from the motor unit E.
- To dismantle the mincer head A, remove the pusher C and the tray B, unscrew the nut A5, remove the screen A4,
the cutter A3 and the screw A2.
- Handle cutting parts with care.
– Wash all parts with hot soapy water, rinse and wipe carefully.
- Do not put the mincer head A in the dish washer (this applies to the body A1, screw A2, nut A5, cutter A3, and
screens A4).
2) Vegetable cutter attachments:
• The storage unit (H1), the pusher (H2), the cones (H3a, H3b, H3c, H3d, H3e, H3f) and the storage attachment
(I) may be put in the top basket of the dish washer, using the "ECO" or "LIGHTLY SOILED" programme.
• Handle the cones with care, as the blades of the cones are extremely sharp.
• In the case of colouration of the plastic parts by foodstuffs such as carrots, rub with a cloth soaked in cooking oil,
then proceed with normal cleaning.
STORAGE:
All of the cones (H3a, H3b, H3c, H3d, H3e) can be stored on the appliance.
Stack the 5 cones (fig.14) and slide them into the opening at the front of the storage unit H1. The storage
attachment I clips to the opening at the front of the storage unit H1 (fig.15).
WHAT TO DO IF YOUR APPLIANCE DOES NOT WORK
Check the electrical connection.
If your appliance still does not work, contact a Moulinex approved service centre(see the list in the service booklet).
END-OF-LIFE ELECTRICAL OR ELECTRONIC PRODUCTS
Think of the environment!
Your appliance contains valuable materials which can be recovered or recycled
Leave it at a local civic waste collection point or to an approved service centre.
5
Notice_2643049A:Mise en page 1 29/10/10 16:23 Page5

RECIPES
Meat balls
4 people – Preparation 20 min.
Cooking time: 10 - 15 min.
Ingredients:
1 kg beef – 1 onion – 1 clove of garlic – 2 slices of black bread soaked in milk – 2 eggs – 1 potato – Flour –
Salt, pepper
1. For this recipe, select a cut of beef with a low fat content. Feed the meat into the mincer with the slices of bread.
2. Slice the onion with the fine slicer cone (H3d) and grate the garlic and potato with the fine grater cone (H3b).
3. Mix the minced meat with the bread, sliced onion, garlic and potato.
4. Add the eggs, the freshly ground black pepper and the salt, and form into balls.
5. Roll the meatballs in the flour and fry them in oil.
Chicken and mushroom meatballs
4 people – Preparation 50 min.
Cooking time: 10 - 15 min.
Ingredients:
200 g chicken breast – Salt, pepper – 1 egg – 10 g dried mushrooms – 1 onion – 30 g oil – 1 egg – Breadcrumbs –
Salt, pepper
1. Mince the chicken breast in the meat mincer. Season the mince and mix it well with the egg.
2. Add the milk and mix carefully until the mixture becomes crumbly. Divide it into portions.
3. Soak the mushrooms for a while then cook them in boiling water. Once cooked, cut them into little pieces. Slice
the onion with the fine slicer cone (H3d), then fry it. Mix the chopped mushrooms with the onion.
4. Spread out each portion of the mince mixture to make a thin paste and put a little of the mushroom mixture in
the middle. Fold the edges of the paste together to form a meatball.
5. Soak the meatballs in beaten egg and roll them in breadcrumbs, then fry them in oil.
Mini-meatballs with mustard sauce
4 people – Preparation 1 hour
Cooking time: 16 min.
Standing time: 30 minutes in refrigerator
Ingredients:
800 g beef – 1 large onion – 2 cloves of garlic – 1 bunch of parsley – 1 egg – 2 tablespoons of oil – 3 tablespoons of
mustard – 300 ml 22% fat cream – Salt, pepper
1. Peel the onion and slice it with the fine slicer cone (H3d), and grate the garlic with the coarse grater cone
(H3a).
2. Wash, dry and chop the parsley.
3. Mince the beef in the mincer, then mix the mince with the onion, garlic, parsley and egg in a large bowl. Season.
Leave the mince to stand in the refrigerator for 30 minutes.
4. Form round meatballs with the mince and fry them in oil for 6 minutes, turning them from time to time. Beat the
cream with the mustard and pour the mixture into the pan containing the meatballs. Reduce the heat, cover and
cook for 10 minutes.
Potato soup with meatballs
4 people – Preparation 30 min.
Cooking time: 20 - 25 min.
Ingredients:
500 g minced beef – 700 g potatoes – 250 g carrots – 250 g onions – 3 tablespoons of breadcrumbs – 2 - 3 bay leaves
– Salt – Freshly ground black pepper – Peppercorns
1. The quantities indicated above correspond to a 4 litre saucepan. Peel and cut the potatoes and onions into dice
with the dicer cone (H3e / H3f). Grate the carrots with the coarse grater cone (H3a).
2. Mince the beef with the mincer head, then mix the mince with the breadcrumbs in a large bowl. Season. Stir
again.
3. Form meatballs with the minced meat.
4. Put the potatoes, onions and carrots into boiling water. Season and bring to the boil. Add the meatballs and cook
for 15 to 20 minutes.
Add the bay leaves 5 minutes before the end of cooking.
6
Notice_2643049A:Mise en page 1 29/10/10 16:23 Page6

Oven baked potato pudding
4 people – Preparation 30 min.
Cooking time: 45 min.
Ingredients:
400 g minced beef – 1 kg potatoes – 2 eggs – 2 glasses of milk – 1 clove of garlic –1.5 tablespoons of butter –
2 tablespoons of oil – Salt, pepper
1. Clean, wash and dry the potatoes. Cut them with the fine grater cone (H3d).
2. Mince the beef with the mincer head and fry it in oil in a frying pan for 5 minutes.
3. Rub the inside of an oven-proof dish with garlic, then grease it with a little of the butter.
4. Arrange two-thirds of the potatoes and the minced meat in alternating layers. Season, then add the remaining
potatoes.
5. Beat the eggs with the warm milk and pour the resulting mixture over the potatoes. Add the rest of the butter.
Cook in the oven for 45 minutes at medium temperature.
SAMOSAS
4 people – Preparation: 40 min.
Cooking time: 35 min.
Ingredients:
250 g puff pastry – 350 g beef – 1 onion – 2 eggs – Paprika – Powdered cinnamon and ginger – Parsley – Coriander –
Chervil – Sugar – 60 g butter – Olive oil
1. Fit the 4.7 mm screen to the mincer. Cut the onion in 8, then mince it with the mincer head. Heat 4 tablespoons of
olive oil in a frying pan, then add the onion. Allow it to sweat on a low heat without browning. Put to one side.
2. Mince the beef. Brown it on a low heat with the onion for 10 minutes. Put to one side.
3. Chop the herbs with the mincing head. Then add them to the frying pan with salt and pepper, half a teaspoon of
paprika, a pinch of ginger and a small teaspoon of cinnamon.
4. Next incorporate the beaten eggs, stir and remove from the heat.
5. Roll out the puff pastry quite thinly. Cut into 10 cm squares. Butter the edge of each square.
6. Put a little spoonful of stuffing on each square. Roll them up, pinching the ends.
7. Fry the samosas in boiling water. Once fried, leave them to stand for a little while on kitchen paper. Sprinkle them
with sugar and cinnamon. Serve very hot.
Variant:
Fit the 4.7 mm screen to the mincer. Mince a little meat. Cut the onion in 8, then mince it with the mincer head.
Add a little more meat, then the herbs, then the rest of the meat. Beat the eggs, and incorporate them into the
stuffing with salt and pepper, half a teaspoon of paprika, a pinch of ginger and a small teaspoon of cinnamon. Mix
well. Repeat steps 5 to 7.
LAHMA BI AJEEN
(stuffed focaccia)
4 people – Preparation: 20 min.
Cooking time: 45 min. – 1 h
Ingredients:
300 g pizza dough – 300 g beef or lamb – 4 ripe tomatoes –1 onion – 1 dried red pepper – Fresh tarragon, mint and
thyme – 1 lemon – Sugar – Milk – Olive oil
1. Mix the dough with a spoonful of oil and half a glass of milk, and form into a ball. Cover and leave to rise for
1 hour.
2. Fit the 4.7 mm screen to the mincer. Mince a little meat. Cut the onion in 8, then mince it with the mincer head.
Mince a little more meat, then the herbs, then the rest of the meat.
3. Heat 3 tablespoons of olive oil in a frying pan, then add the mixture. Incorporate the finely chopped tomatoes,
salt and pepper, and a teaspoon of sugar. Leave to cook for 10 minutes.
4. While stirring, add a small glass of water mixed with lemon juice.
5. Add the pepper. Cover and cook on a low heat for 20 minutes. Remove the lid and reduce for a little while.
Remove from the heat and leave to cool.
6. Preheat the oven to 220 °C (mark 6/7).
7. Cut four discs from the dough. Top with stuffing and fold.
8. Cook for 10 minutes in the oven. Serve immediately.
Variant:
Use tomato purée instead of fresh tomatoes.
7
Notice_2643049A:Mise en page 1 29/10/10 16:23 Page7

KIBBE BI LABAN
(kibbe meatballs with yoghurt)
6 people – Preparation: 1 h
Standing time: 1 hour in refrigerator
Ingredients for the kibbe:
400 g beef – 1 glass (180 g) of bulghur (cracked wheat) – Salt
Ingredients for the sauce: – 1 kg yoghurt – 1 bunch of coriander – 4 cloves of garlic –3 tablespoons of cornflour – Salt,
pepper
1. Cut the meat in 4 pieces. Fit the 4.7 mm screen to the mincer. Mince the meat, at the same time adding the bulghur.
Add salt, then leave the mixture to stand in the refrigerator for 1 hour.
2. To form the kibbe meatballs: fit the kibbe attachment to the meat mincer. Feed the mixture through the mincer,
closing the meatball by sealing the ends with a little water.
3. To prepare the sauce: wash the bunch of coriander, sponge it dry with kitchen paper and remove the leaves. Peel and
crush the garlic. Brown the garlic and coriander leaves in a frying pan for 1 to 2 minutes on low heat. Put to one
side.
4. Beat the yoghurt and cornflour together, then season. Pour the yoghurt and cornflour mix into a saucepan through
a fine sieve. Bring the mixture to the boil, then reduce the heat. Cook carefully, stirring so that the yoghurt does
not stick.
5. Add the garlic and coriander. Poach the kibbe meatballs for 10 minutes.
Variant:
You can also stuff the meatballs (with a mixture of onion and minced meat, browned in a little oil with a few pine nuts.)
PIROJKI
small fish pasties)
4 people – Preparation: 25 min.
Cooking time: 10 - 15 min.
Ingredients:
250 g puff pastry – 300 g cooked fish or smoked salmon – 2 hard boiled eggs – 1 bunch of dill – 2 onions –
100 g salted butter, in small cubes – Oil
1. Fit the 4.7 mm screen to the mincer. Cut the onions into 8 and mince them with the mincer head. Brown them on a
low heat in a frying pan with a little oil. Put to one side.
2. Mince a little fish, then the cooked onion, butter and dill, and finally the rest of the fish.
3. Roll out the puff pastry quite thinly, and cut out discs with a glass or small bowl of the desired size.
4. Preheat the oven to 210 °C (mark 6).
5. Place a little stuffing on each pastry disc and fold the pastry over, sealing the edges.
6. Cook for 10 to 15 minutes in the oven until golden brown.
Recipe:
N. B.: For the recipes requiring high power (approximately 500 W), the use time of the appliance must not
exceed 20 seconds.
Example recipe (with medium hole screen 4.7 mm A4a):
Lamb with split peas:
150 g lamb – 45 g split peas – 30 g flour –150 ml water –1 medium onion – 2 cloves of garlic – Salt, pepper
In a container mix the split peas and flour, then add the water gradually to obtain a smooth mixture. Start the
appliance and gradually pour the mixture onto the tray, while gently pushing the preparation into the feed tube with
the pusher C.
Cut the onion, garlic and meat into small pieces and add them to the mince.
Pour 800 ml water into a saucepan, season and add the preparation.
Simmer over a low heat for 1 hour, skim and cover.
8
Notice_2643049A:Mise en page 1 29/10/10 16:23 Page8


