GBC H535 Laminator: инструкция
Раздел: Техника
Тип:
Инструкция к GBC H535 Laminator
Instruction Manual
Manuel d’utilisation
쮕
Bedienungsanleitung
Manuale d’istruzioni
Gebruiksaanwijzing
Manual de instrucciones
Manual de Instruções
Bruksanvisning
ཚ
Instrukcja obsługi
CZ
Návod k obsluze
먙
Használati útmutató
RUS
Руководство по
ксплуaтaции
GBC5137 HeatSeal H535 Manual EU 20/12/05 17:15 Page 1

English 4
Français 8
Deutsch 12
Italiano 16
Nederlands 20
Español 24
Português 28
Svenska 32
Polski
36
Česky
40
Magyar
44
Pyccкий
48
GBC5137 HeatSeal H535 Manual EU 20/12/05 17:15 Page 2
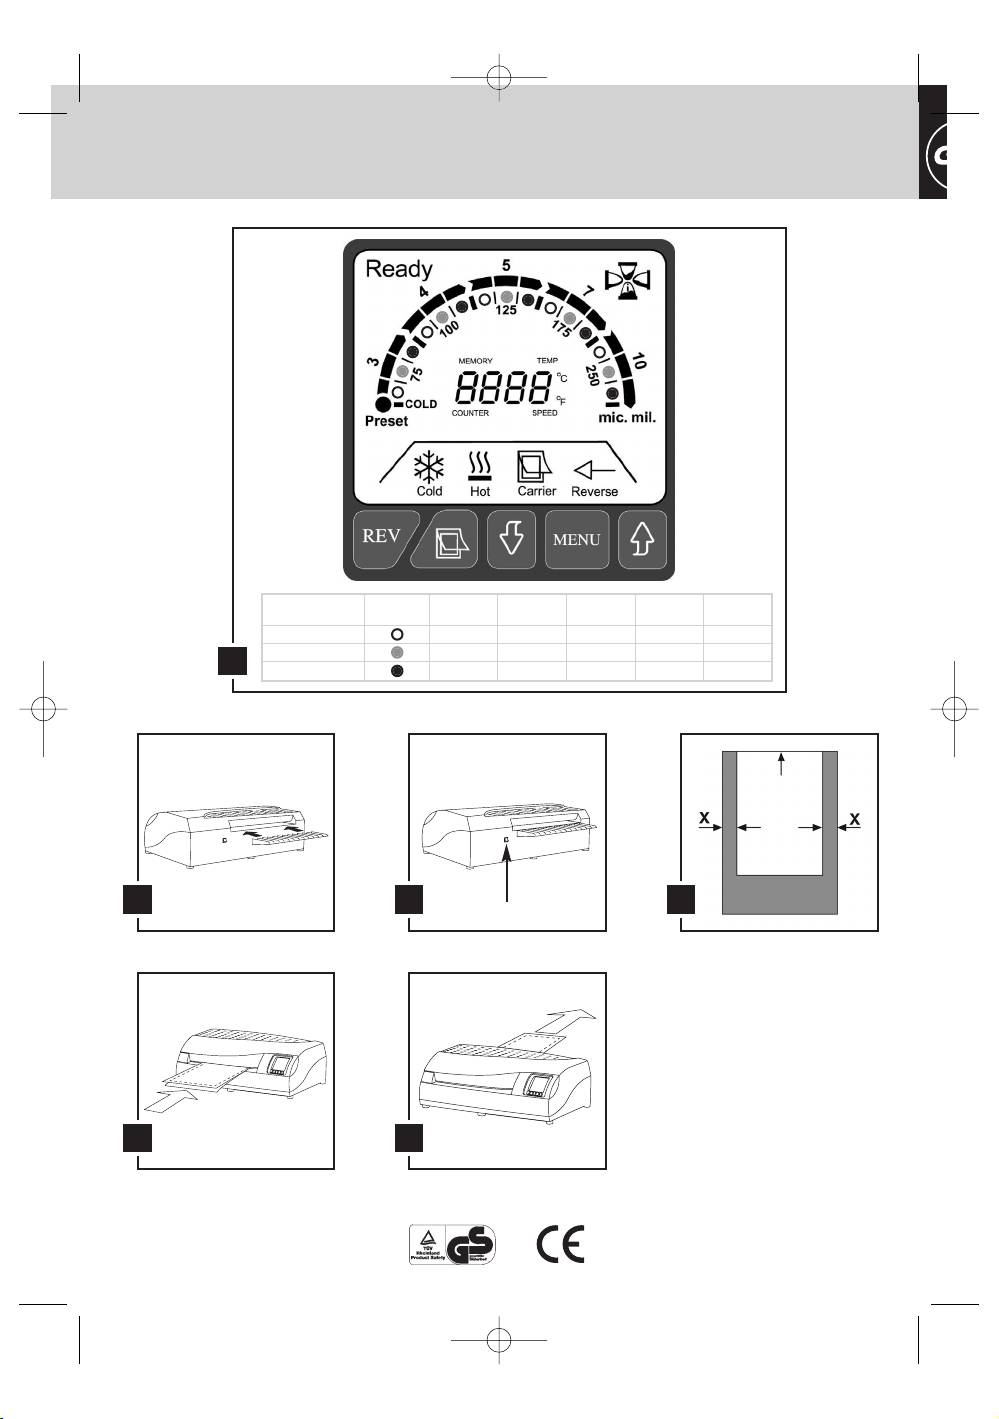
Section 2 x 75 mic. 2 x 100 mic. 2 x 125 mic. 2 x 175 mic. 2 x 250 mic.
Total 150 Total 200 Total 250 Total 350 Total 500
Copy Paper 75 mic. 100 mic. 125 mic. 175 mic. 250 mic.
Brochure Paper 75 mic. 100 mic. 125 mic. 175 mic. 250 mic.
1
Photo Paper 75 mic. 100 mic. 125 mic. 175 mic. 250 mic.
3
42
5
6
4
GBC5137 HeatSeal H535 Manual EU 20/12/05 17:15 Page 3
Safety instructions
General safeguards
YOUR SAFETY AS WELL AS THE SAFETY OF OTHERS IS IMPORTANT
• Use the unit only for its intended purposes.
TO GBC. IN THIS INSTRUCTION MANUAL AND ON THE PRODUCT ARE
• Do not place anything in the throat opening of the unit other than
IMPORTANT SAFETY MESSAGES. READ THESE MESSAGES CAREFULLY.
pouches/documents.
THE SAFETY ALERT SYMBOL PRECEDES EACH SAFETY
• Place unit on a secure, stable work area to prevent the unit from
MESSAGE IN THIS INSTRUCTION MANUAL.
falling and possibly causing personal injury and damage to the unit.
THIS SYMBOL INDICATES A POTENTIAL PERSONAL
• Follow all warnings and instructions marked on the unit.
SAFETY HAZARD THAT COULD HURT YOU OR OTHERS,
• The socket outlet shall be installed near the equipment and shall be
AS WELL AS CAUSE PRODUCT DAMAGE OR PROPERTY
easily accessible.
DAMAGE.
THE FOLLOWING WARNING IS FOUND ON THE BOTTOM OF THE
PRODUCT IN SEVERAL LANGUAGES.
Electrical safeguards
WARNING
• The unit must be connected to a supply voltage corresponding to the
electrical rating.
Ꮨ
Electrical shock hazard.
Do not open. No user
• Unplug the unit before moving it, or when it is not in use for an
servicable parts inside.
extended period of time.
Refer servicing to qualified
• Do not operate with a damaged supply cord or plug, if it is damaged,
service personnel.
or malfunctions.
This safety message means that you could be seriously hurt or killed if
• Do not overload electrical outlets beyond their capacity; fire or
you open the product and expose yourself to hazardous voltage.
electrical shock could result.
• The unit is intended for indoor use only.
• Do not spill liquid of any kind on this product.
Important safeguards
• Close supervision is required when this product is used near
children.
WARNING: FOR YOUR PROTECTION DO NOT CONNECT
THE POUCH LAMINATOR TO ELECTRICAL POWER UNTIL
YOU READ THESE INSTRUCTIONS COMPLETELY. KEEP
THESE INSTRUCTIONS IN A CONVENIENT LOCATION
Cleaning
FOR FUTURE REFERENCE. TO GUARD AGAINST INJURY,
THE FOLLOWING BASIC SAFETY PRECAUTIONS MUST
Caution: Unplug this product before cleaning.
BE OBSERVED IN THE SET-UP AND USE OF THIS
PRODUCT.
• Wipe exterior only with a damp cloth. Do not use detergents or
solvents.
Special notice
Service
Thank you, for your recent purchase of a GBC Pouch Laminator. Your
new laminator may emit a slight odour during the initial stage of
• Do not attempt to service or repair the pouch laminator yourself.
operation. It is normal and will diminish after several hours of
Unplug the unit and contact an authorized GBC service
operation.
representative for any required repairs.
4
GBC5137 HeatSeal H535 Manual EU 20/12/05 17:15 Page 4
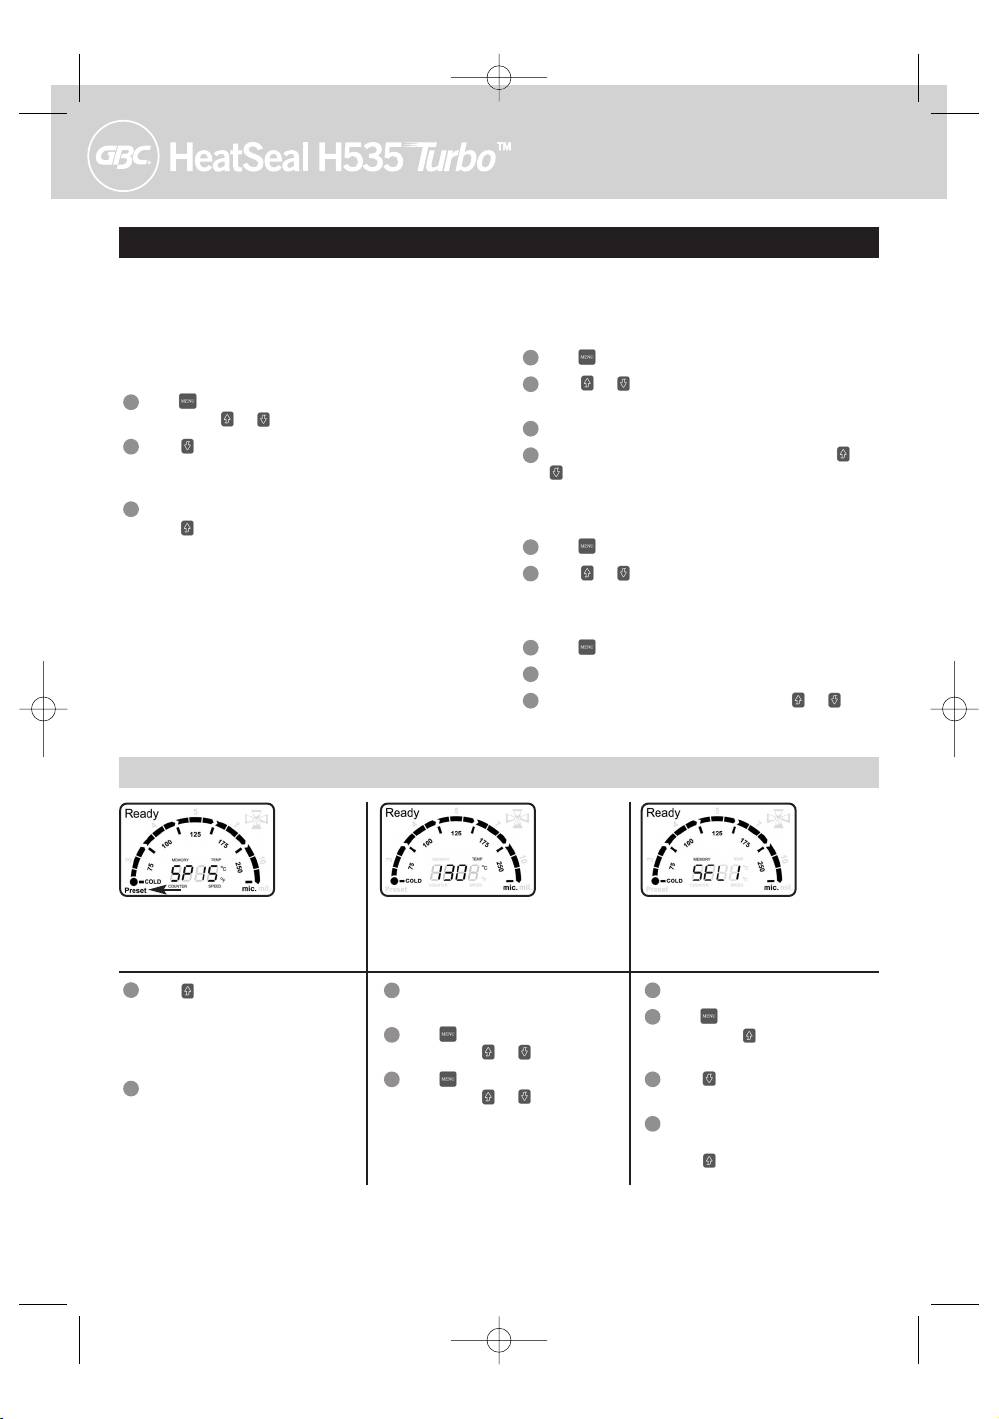
Important: Before operating your new laminator, assemble the exit tray to the rear of the machine and lock it in place (fig. 2).
Standard use
Operation, hot lamination
Operation
1
(preset mode)
The following buttons appear on the product:
1
Connect the laminator power plug to a power outlet.
Reverse
2
Press the power switch on the back of the laminator to turn on
the machine (fig. 3). An audible beep will be heard, the “Preset”,
Carrier laminating operation
“COLD”, and “Ready” symbol will show.
3
The machine defaults on cold laminating.
The major selection menu
4
To select different pouch size and laminating object for hot
laminating, check the Laminating Guide for best selection (fig. 1).
Increase a function value
5
If the machine is not in the Preset mode, press button to
choose Preset mode and “Preset” symbol shows (fig. 1).
Decrease a function value
6
Under Preset mode, press or button to select the preset
mode you check from the lamination guide. The 15 modes can
laminate pouches of thickness from 75 micron to 250 micron.
The following icons and texts can appear on the display:
Whatever the thickness, section 1 is for Copy Paper, section 2
is for Brochure Paper and section 3 for Photo Paper. As one of
Warm-up: The hourglass rotates when the laminator is
warming up. When laminator is ready, the icon disappears.
the 15 Preset laminating modes is selected, the machine begins
warming up. The speed and temperature will adapt
Ready: to signal that the machine is ready to laminate.
automatically to the mode you selected. Please note that
you can also change the temperature and speed manually (see
next page).
Reverse
7
As the machine warms up, the hourglass in the top right corner
rotates (fig. 1).
Cold laminating
8
When the machine is ready to laminate, the hourglass disappears,
the “Ready” symbol shows up (fig. 1).
Hot laminating
9
Insert the document into the pouch. Please note that it has to be
correctly centered into the pouch (fig. 4).
Preset: 15 preset operation modes
10
Gently insert the document sealed side of pouch first into
laminator (fig. 5).
Carrier laminating
11
Pouch will exit from the machine into the support tray (fig. 6).
DO NOT LAMINATE AN EMPTY POUCH.
Operation, cold lamination
1
Turn on the machine: it defaults on the cold laminating mode.
The cold function symbol will show to indicate the machine is
ready for cold laminating.
2
If the machine has been previously performed under hot
laminating, use to choose Preset mode and use to
adjust the Preset mode to cold function. Wait for the machine to
cool down before the cold laminating symbol shows. Sometimes
the cool down process could last for as long as one hour
depending on the previously set temperature.
5
GBC5137 HeatSeal H535 Manual EU 20/12/05 17:15 Page 5
Advanced use
Control Panel LCD
The following information is displayed on the LCD:
Memory/Selection Setting Mode
Temperature Manual Setting Mode
To save a specific speed and temperature to one of the five memory
1
Press to choose TEMP mode when TEMP shows.
sets (SEL 1, SEL 2, SEL 3, SEL 4, and SEL 5).
2
Press or to increase and decrease temperature by 5°C.
1
Press until you are in memory mode: ‘SEL 1’ appears on the
Temperature can be adjusted to 160°C.
display. Press or to select another memory number
3
Wait until the Ready symbol appears for ready to laminate.
2
Press for a longer time to save the current speed and
4
To switch the temperature unit between °C and °F, press and
temperature to the memory number you selected. When saving is
simultaneously. The temperature value and temperature unit
successful, MEMORY symbol blinks and the machine beeps.
will change accordingly.
3
To use a memory, select a memory number (see point 1) and
Speed Manual Setting Mode
press for a longer time. When the memory number is
selected, the machine beeps and the temperature appears on the
1
Press to choose SPEED mode.
display. The machine then is loaded with the set temperature and
2
Press or to set a new speed. There are many speed
speed and begins warming up or cooling down.
settings.
Please note the 5 memories by default are:
SEL 1: Copy Paper 75 mic.
Counter Mode
SEL 2: Brochure Paper 75 mic.
1
Press to choose COUNTER mode.
SEL 3: Photo Paper 75 mic.
SEL 4: Copy Paper 125 mic.
2
The current counter number shows up.
SEL 5: Brochure Paper 125 mic.
3
The initial counter number is 0000. Press either or to
reset the counter number to 0000.
Quick laminating guide
1. Preset Mode
2. Manual Mode
3. Selection/Memory Mode
(to change speed and temperature manually):
(to save specific temperature and speed
in memory):
a
Press to select pouch thickness
a
Select one of the preset modes (see point
a
Select either a preset or manual mode
(=mic.) and appropriate paper type
1)
b
Press until ‘SEL 1’ appears on the
(section). Speed and temperature adapt
b
Press until temperature appears on
display. Press to select another
automatically to selection. The machine
display. Press or to modify it.
memory number.
warms up.
c
Press until speed (SP) appears on
c
Press for longer time to save current
b
When the machine is warm, ready
display. Press or to modify it.
mode to selected memory number.
symbol appears on display and you can
laminate.
d
To use a saved memory, select the
memory number (see point b) and
press for a longer time.
6
GBC5137 HeatSeal H535 Manual EU 20/12/05 17:15 Page 6
Carrier Function
Reverse Function
for clearing jams or removing pouches
This function should only be used when using a carrier (folded
during laminating
cardboard that protects the pouches).
Tip: It is preferable to use a carrier (item number: EK04000 for
1
Press and hold down button momentarily, the rollers will
A4, EK03000 for A3) in case you laminate non-standard
reverse and document will return from the front entry. The
document sizes.
Reverse icon will show when the button is pressed.
1
Press function button and the Carrier icon shows up to
2
When is released the machine will continue in previously
indicate carrier laminating operation.
selected forward run position.
2
The machine will automatically begin warming up, cooling down,
or adjusting the speed for carrier operation if necessary.
Auto Shut Off
3
Similar to carrierless laminating, there are 15 Preset modes of
carrier laminating. Expect the carrier icon and different preset
setting values, all the other functions remain the same as the
1
When the machine is not operated for an hour, the machine will
carrierless operation.
automatically shut off itself to protect the machine and save the
electricity.
4
To go back to the carrierless operation, press again.
2
5 minutes before auto shut off, the machine starts beeping
intermittently and the LCD panel starts blinking until the machine
is fully shut down.
3
To turn on the machine after auto shot off, the power switch is
required to switch back to “OFF” and switched to “ON” again to
restart the machine.
4
Please note that the machine will auto shut off in case of motor
failure.
Specifications
GBC HeatSeal 535
Electrical
220V-240V / 50Hz / 5 Amps / 1140W
Machine Dimensions (W x L x H)
594 x 282 x 152mm
Machine Weight
9.65 Kg
Maximum Pouch Width
A3
Maximum Pouch Thickness
2x250 mic (Total 500)
Maximum Thru-put Thickness
2.5mm
Operating Speed
1000 mm/min
Warm-Up Time
5 minutes
Guarantee
Operation of this machine is guaranteed for two years from date of
required. Repairs or alterations made by persons not authorised by GBC
purchase, subject to normal use. Within the guarantee period, GBC will
will invalidate the guarantee. It is our aim to ensure that our products
at its own discretion either repair or replace the defective machine free
perform to the specifications stated. This guarantee does not affect the
of charge. Defects due to misuse or use for inappropriate purposes are
legal rights which consumers have under applicable national legislation
not covered under the guarantee. Proof of date of purchase will be
governing the sale of goods.
Register this product online at www.gbceurope.com
7
GBC5137 HeatSeal H535 Manual EU 20/12/05 17:15 Page 7
