Bowers & Wilkins DB1: инструкция
Раздел: Бытовая, кухонная техника, электроника и оборудование
Тип: Микрофон
Инструкция к Микрофону Bowers & Wilkins DB1

Subwoofer
DB1
II12275 Issue 7
B&W Group Ltd
B&W Group (UK Sales)
SubApp is a trademark of B&W Group Ltd.
Dale Road
T +44 (0) 1903 221 500
THX is a registered trademark of THX Ltd.
Worthing West Sussex
E uksales@bwgroup.com
Copyright © B&W Group Ltd. E&OE
BN11 2BH England
Printed in China.
B&W Group North America
T +44 (0) 1903 221 800
T +1 978 664 2870
F +44 (0) 1903 221 801
E marketing@bwgroupusa.com
info@bwgroup.com
www.bowers-wilkins.com
B&W Group Asia Ltd
T +852 3 472 9300
E info@bwgroup.hk

Welcome and thank you for choosing
Bienvenue, et merci d’avoir choisi Bowers &
Willkommen bei Bowers & Wilkins. Der Firmengründer
Bowers & Wilkins. Our founder, John Bowers,
Wilkins. Notre fondateur, John Bowers, était convaincu
John Bowers war der Meinung, dass ein wunderschönes
believed that imaginative design, innovative engineering
qu’une conception imaginative, une construction
Design, eine innovative Konstruktion und ausgeklügelte
and advanced technology were keys that could unlock
innovante et une technologie avancée étaient les clés
Technologien die Schlüssel zu Audio-Entertainment der
the enjoyment of audio in the home. His belief is one that
capables de révolutionner le plaisir de l’écoute de la
Extraklasse in Ihrem Zuhause sind. Wir teilen seine Meinung
we continue to share and inspires every product we design.
musique chez soi. C’est une philosophie que nous
und jedes von uns entwickelte Produkt basiert darauf.
The DB1 is a highly capable product that rewards
continuons à développer aujourd’hui, et qui inspire
Der DB1 ist ein sehr leistungsstarkes Produkt, so dass
thoughtful installation and setup so we suggest that you
chaque nouvel appareil que nous concevons.
Installation und Setup gut durchdacht werden müssen. Wir
take a little time to read this manual before you begin the
Le DB1 est un produit qui nécessite quelques
empfehlen daher, sich ein wenig Zeit zu nehmen und diese
installation and setup process. Continue to page 4
précautions pour son installation et ses réglages
Bedienungsanleitung vor der Installation und dem Setup zu
parfaits, et c’est pourquoi nous vous conseillons de
lesen. Forsetzung auf Seite 24
prendre un peu de temps pour lire ce manuel avant que
de débuter son installation et ses réglages.
Suite page 14
Bienvenido y gracias por elegir Bowers & Wilkins.
Bem-vindo e obrigado por ter escolhido Bowers
Grazie per avere acquistato lo DB1 e benvenuto
John Bowers, nuestro fundador, estaba firmemente
& Wilkins. O nosso fundador, John Bowers, acreditava
tra i clienti Bowers & Wilkins. Il nostro fondatore,
convencido de que el diseño imaginativo, la ingeniería
que o design criativo, projecto inovador e tecnologia
John Bowers, riteneva che un design fantasioso,
innovadora y la tecnología avanzada eran las claves
avançada eram a chave que podia abrir a apreciação
l’ingegnerizzazione innovativa e le tecnologie avanzate
a la hora de llevar el disfrute del sonido a la intimidad
do som doméstico. A sua visão é a que continuamos
fossero punti chiave nell’ascolto della musica
del hogar. Una creencia que seguimos compartiendo
a partilhar e que inspira cada um dos produtos que
nell’ambiente domestico. Questa sua losoa continua
y que inspira todos y cada uno de los productos que
fabricamos.
ad essere seguita da tutti noi ancora oggi, ed ispira ogni
diseñamos.
O DB1 é um equipamento de elevado desempenho
prodotto che progettiamo.
Si se instala y configura adecuadamente, el DB1
que benecia de uma instalação e conguração
Il DB1 è un prodotto dalle straordinarie
es un producto extraordinariamente capaz, por lo que
cuidada, por isso sugerimos que reserve alguns
caratteristiche, necessita pertanto di molta attenzione
le sugerimos que dedique un poco de su tiempo a leer
minutos para a leitura deste manual antes de iniciar o
nell’installazione e nella fase di impostazione iniziale,
este manual antes de iniciar el proceso de instalación y
processo de instalação e conguração. Siga para a
perciò consigliamo di leggere attentamente questo
puesta a punto de su nuevo producto. Encontrará más
página 44
manuale prima di iniziare queste operazioni. Continua
información sobre el DB1 y el resto de nuestra gama de
a pagina 54
productos en nuestro sitio web www.bowers-wilkins.
com. Continúa en la página 34
www.bowers-wilkins.com
Добро пожаловать и благодарим вас за
Welkom en dank voor het kiezen van Bowers
Välkommen och tack för att du valt
приобретение активного сабвуфера компании
& Wilkins. Onze oprichter John Bowers, was ervan
Bowers & Wilkins. Vår grundare, John Bowers, ansåg
Bowers & Wilkins.
overtuigd dat een fantasievol ontwerp, innovatieve
att fantasifull design, uppnningsrik ingenjörskonst
Наш основатель, Джон Бауэрс, верил в то, что
techniek en moderne technologie de sleutels vormden
och avancerad teknik är vad som behövs för att
творческий подход в проектировании, новаторская
tot muziekbeleving thuis. Het is deze overtuiging waar
göra ljudåtergivning hemma underhållande. Vi delar
конструкция и передовые технологии смогут открыть
we nog steeds van uitgaan en die de inspiratie vormt
fortfarande hans åsikter och de inspirerar varje produkt
людям путь к подлинному звучанию в доме. Мы
voor elk product dat we ontwerpen.
vi utformar.
продолжаем разделять его веру, и она вдохновляет нас
De DB1 is een zeer effectief product dat een
DB1 är en synnerligen kompetent produkt som
при проектировании всех новых продуктов.
zorgvuldige installatie en opstelling verdient en daarom
tjänar på noggrann installation och inställning så vi
DB1 – это продукт с большими возможностями,
raden we u aan even de tijd te nemen deze handleiding
föreslår att du ägnar en liten stund åt att läsa denna
вознаграждающий тех, кто вдумчиво устанавливает и
door te lezen voordat u aan de installatie en opstelling
manual innan du påbörjar installationen och gör några
настраивает его, поэтому мы предлагаем вам уделить
begint. Lees verder op pagina 64
inställningar. Fortsätt på sida 74
немного времени на прочтение инструкции, прежде
чем приступать к инсталляции. Более подробная
информация по DB1 и другим нашим продуктам
доступна на нашем веб-сайте: www.bowers-wilkins.com
Продолжение на стр. 84
欢迎并感谢你选购 Bowers & Wilkins 产品
Bowers & Wilkins製品をお買い上げいただき、あり
我们的创办人John Bowers先生相信充满想象的设计、
がとうございます。B&Wの創業者であるJohn Bowers
创新的工程和先进的技术是开启家庭音响娱乐大门的重
は、創意に富んだデザインと革新的な工業技術、そして
要元素。我们依然坚持着他的信念,并赋予我们所有产品
先進技術が、家庭でもオーディオを充分に楽しむ鍵であ
设计灵感。
ると信じていました。現在でも彼の信念はB&Wで共有
されており、この信念はB&Wが設計するすべての製品
DB1是一款功能卓越的产品,并深入考虑到它的安装和
に命を吹き込んでいます。
设置,因此我们建议在开始安装和设置过程前,请花一些
DB1は、念入りな設置や設定を行う価値のある、
时间阅读本手册。有关DB1和我们所有其它产品的更多信
非常に高性能な製品です。設置・設定を開始する前に、
息,请浏览我们的网站:www.bowers-wilkins.com
このマニュアルをお読みください。DB1およびB&W
第 94 页(续)
のその他の製品に関する詳細は、Webサイト
(www.bowers-wilkins.com)をご覧ください。
104ページに続く

ENGLISH
1. The DB1 Active Subwoofer
Introduction
Safety
Adjustable Input Sensitivity and Level
Setup Presets
Before connecting and operating this mains powered
The DB1 provides input sensitivity options that enable
The DB1 incorporates ve setup memory locations
apparatus, please read carefully and observe the
its optimum matching with source electronics, and
where groups of setup parameters can be congured,
Important Safety Instructions in the accompanying
variable gain control to match its volume level with that
stored and recalled. The setup parameters that can be
leaet.
of the main speakers. With all the levels of DB1 set to
congured and stored are:
their default value of 0dB, the subwoofer has the THX
®
Performance
standard sensitivity of 109dB spl at 1m for an input of
• Input selection
The DB1 active subwoofer offers very high
1V rms. See Section 6.3 for more.
• Input level
performance low frequency reproduction for either
• Impact Equalisation
multi-channel home theatre or conventional stereo
Polarity Inversion
• User (graphic) Equalisation
audio systems. It incorporates a compressive set of
The DB1 provides optional polarity inversion that
• Low-pass lter (engaged or not)
features that enhance its versatility and enable its
enables compensation for the polarity inversion
performance to be nely tuned to the listening room
occasionally found in electronics. See Section 6.3 for
Setup presets enable different DB1 performance
and type of installation. These features are briey
more.
characteristics easily to be selected for different types
described in the following paragraphs:
of program material or different listening occasions.
Impact Equalisation
See Section 6.4 for more.
Control and User Interface
The DB1 incorporates a preset equalisation option that
The DB1 can be set up and operated either from its
can enhance the low frequency impact of audio visual
Room Correction Equalisation
front panel controls or using the Bowers & Wilkins
material. See Section 6.4 for more.
The Bowers & Wilkins SubApp™ program, together
SubApp™ setup and optimisation application running
with the measuring hardware supplied, can be used to
on a PC. SubApp™ is downloadable from our web
Graphic Equalisation
automatically optimise the performance of DB1 to the
site – www.bowers-wilkins.com – and operation is
The DB1 incorporates a ve-band, half-octave graphic
acoustic characteristics of your listening environment.
described in its help le.
equaliser that enables its acoustic performance to
be modied to suit the characteristics of the listening
Multiple Inputs
room. See Section 6.4 for more.
The DB1 provides an unbalanced mono input, an
unbalanced stereo input and a balanced mono input.
The stereo and one mono input can be connected
simultaneously and selected for use independently.
The balanced and unbalanced mono inputs cannot be
connected simultaneously or used independently. See
Section 5 for more.
4
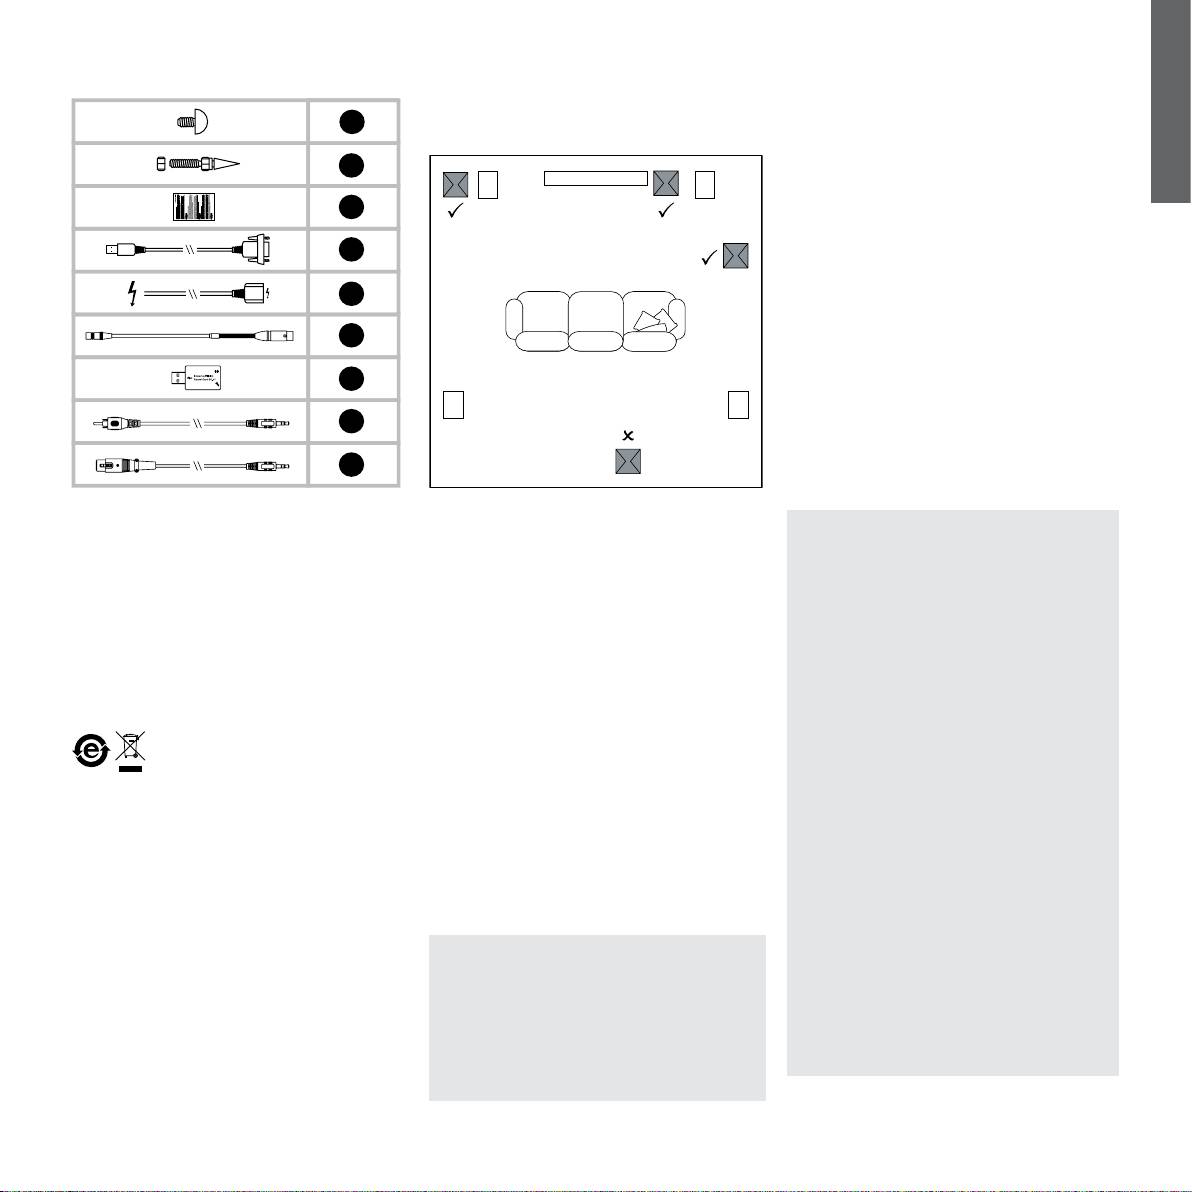
2. Unpacking your DB1 Subwoofer
3. Positioning your DB1 Subwoofer
ENGLISH
4
4
1
1
1
1
1
1
1
The DB1 is heavy and we strongly suggest that it is
The DB1 may be used free-standing on the oor or be
Note: Like all speakers, the proximity of room
unpacked close to its nal working position by two
installed into custom built furniture.
boundaries affects the sound of a subwoofer. Bass
people working together.
volume increases as more surfaces come into close
The positioning of a subwoofer is generally less critical
proximity. The more boost gained from the room, the
The table above illustrates the component parts that
than for full-range speakers. Furthermore, the DB1 is
lower the volume can be set and the less hard the
are packed with the subwoofer. In the unlikely event
also more versatile than most subwoofers in terms of
subwoofer has to work.
that anything is missing please in the rst instance
positioning thanks to its on-board equalisation and
contact the retailer from whom you purchased the
optimisation system that can compensate to some
Note: The orientation of the DB1 connection and
subwoofer.
extent for less than ideal positioning. Section 6.4
control panels with respect to its drive units may be
describes use of the equalisation system.
changed if desired by turning the amplifier module
Remove the protective lm from the front of the display.
by 90°. When shipped, the subwoofer’s drive unit
Best results, however, will be obtained if the DB1 is
panels are oriented at 90° to the connection and
Environmental Information
placed between the left and right speakers or in the
control panels. There may be situations, however,
All Bowers & Wilkins products are
vicinity of one of them. Placing a subwoofer to the side,
when the connection and control panels are best
designed to comply with international
but still to the front of the listeners is an acceptable
oriented to be on the same plane as the drive units;
directives on the Restriction of Hazardous
compromise if domestic considerations dictate, but we
the subwoofer installed in custom made furniture
Substances (RoHS) in electrical and electronic
recommend you avoid placing the subwoofer behind
that provides little side clearance for example.
equipment and the disposal of Waste Electrical
the listeners. If two DB1 subwoofers are to be used it
To change the orientation, first carefully turn the
and Electronic Equipment (WEEE). These symbols
is best to position one near the left speaker and one
subwoofer on to its top, making sure when turned
indicate compliance and that the products must be
near the right speaker. The diagram above illustrates
that it rests on a surface that will not damage its
appropriately recycled or processed in accordance
subwoofer positioning.
finish. To release the amplifier module use a 15mm
with these directives. Consult your local waste disposal
spanner to unscrew the four foot location posts.
authority for guidance.
Note: Using two subwoofers in a single installation
Once the posts are unscrewed the amplifier module
can improve performance by maintaining stereo
may be turned through 90°. It does not matter which
separation to the lowest frequencies, averaging
way it is turned but if it is returned to its previous
the effects of low frequency room resonances and
position it should be turned back the way it came.
enabling a higher maximum volume level. In the case
With the amplifier module in its new position the foot
of two subwoofers used in a 2-channel audio system,
posts can be replaced and tightened.
stereo separation will only be improved if each
channel has its own subwoofer located close to the
appropriate satellite speaker.
5
ENGLISH
4. DB1 Feet
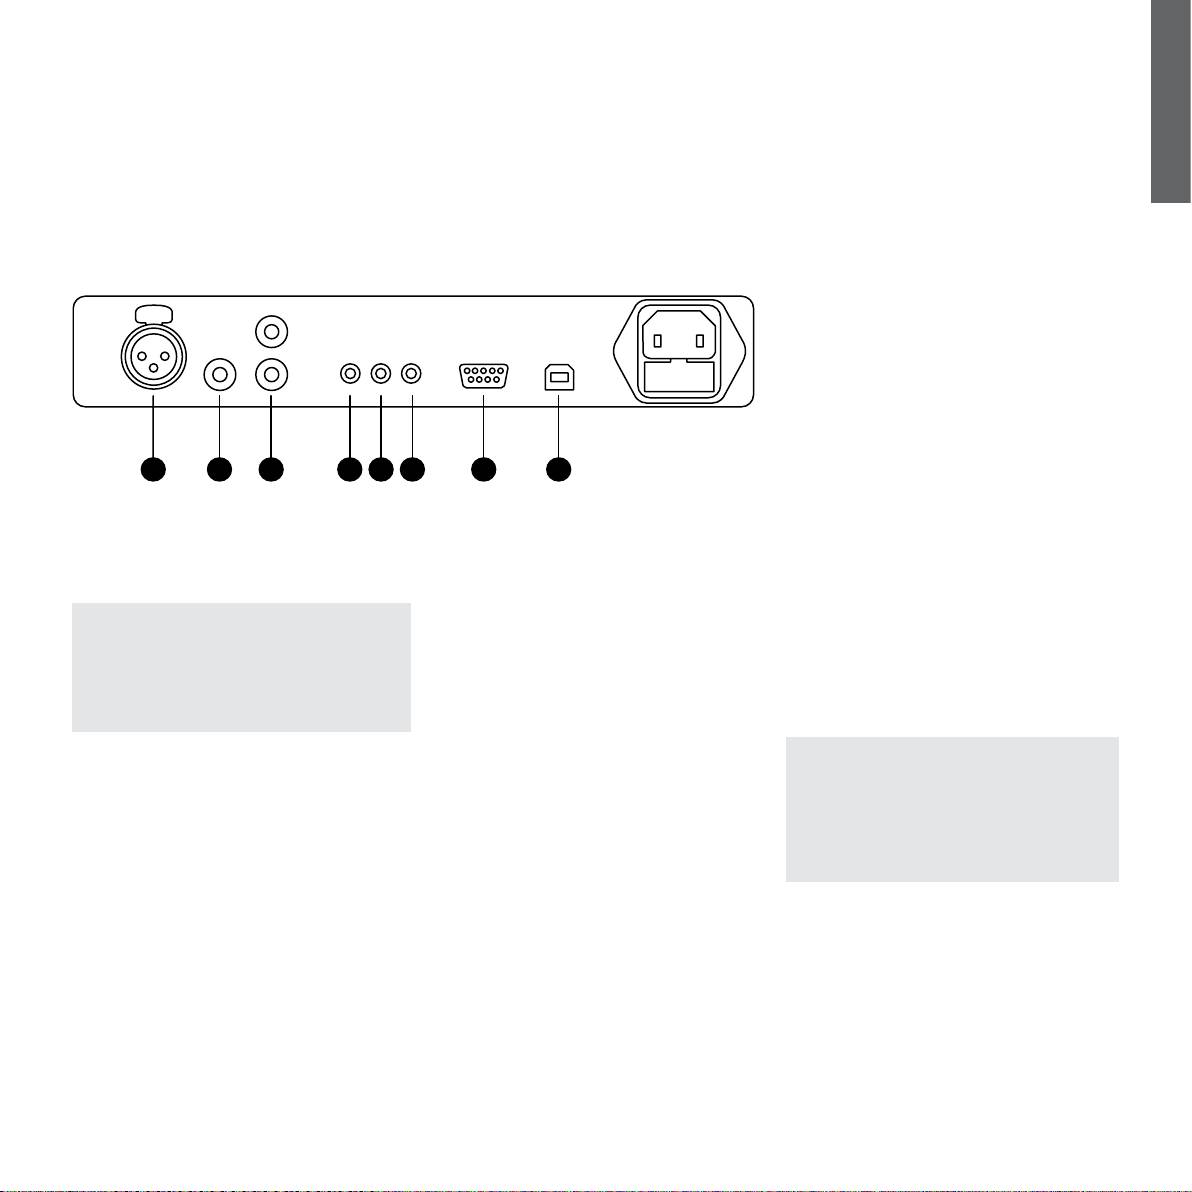
5. DB1 Connections
The DB1 can be tted with either rubber or spike feet
Once the spike or rubber feet are tted, the DB1 can
The DB1 requires connection to the mains supply and
– both are supplied in the accessory pack. We would
be turned back on to its feet. Take care not to allow the
an input signal. A variety of different power cables may
recommend that the spike feet are used whenever
entire weight of the subwoofer to rest at an angle on
be packed with your DB1. Use the one appropriate for
possible. The spike feet are designed to pierce carpet
one or two spike feet as it is turned. Also take care that
the mains outlet socket in your territory.
and rest on the oor beneath both to protect the carpet
careless handling of the subwoofer with spikes tted
from indentation and to provide the subwoofer with a
does not cause injury.
The DB1 accommodates three types of signal input.
solid foundation.
Their applications and socket types are described
If the subwoofer rocks when placed on the oor in its
in the following paragraphs. It is possible to connect
Note: Spike feet can be used on delicate non-
nal position, or the thickness of carpet means that the
to the stereo input and one of the mono inputs
carpeted floors by standing the spikes on coins.
spike points do not reach the under-oor, adjust the
simultaneously as the DB1 enables mono or stereo
relevant feet until the DB1 is supported rmly without
input selection to be stored and recalled within setup
To t either the spike or rubber feet, the DB1 must rst
rocking. When adjustment is complete, tighten all the
presets. Section 6 describes the use of setup presets
be carefully turned upside-down. Make sure when
lock nuts against the underside of the subwoofer using
and the diagram right illustrates the DB1 connection
turned that the subwoofer rests on a surface that will
a 10mm spanner.
panel.
not damage its nish. Fit either the spike or rubber
feet by screwing them into the four screw holes in the
DB1 underside. In both cases, initially screw the lock
nuts fully onto the thread of the feet before screwing
them into the DB1. Hand tighten the feet. The diagram
above illustrates tting spike or rubber feet.
6
ENGLISH
1 2 3 4 5 6
7
8
1. Input 1 – Balanced mono, XLR input socket
In addition to the mains and signal input sockets the
7. RS-232 – 9-pin D connector
The DB1 balance mono input is intended for use with
DB1 connection panel carries the following further
The RS-232 interface connector enables the
preampliers or audio-visual processors that provide a
sockets.
connection of a PC running the Bowers & Wilkins
balanced mono audio output.
SubApp™ software application. The RS232 interface
4. Trigger 1 – 3.5mm jack input socket
also enables the DB1 to be incorporated in remote
Note: Balanced connection, where negative,
The Trigger 1 socket enables wired remote control of
control home automation systems. Your Bowers &
positive and ground signals are carried on separate
the DB1 switch on and standby function.
Wilkins retailer will be able to provide more information
wires, is common in professional and some high-end
RS232 based home automation systems.
domestic audio equipment. Balanced connection is
5. Trigger 2 – 3.5mm jack input socket
inherently more resistant to interference and noise
The Trigger 2 socket enables wired remote control of
8. USB 2.0 – USB slave socket
than unbalanced connection.
DB1 preset selection.
The USB socket enables DB1 internal software to be
updated.
2. Input 2 – Unbalanced mono, RCA Phono input
6. Remote IR - 3.5mm jack input socket
socket
The Remote IR (infra-red) socket enables fully wired
Note: DB1 software may be updated from time to
The DB1 unbalanced mono input is intended for use
remote control of the DB1 via an outboard IR sensor
time. You can check whether your DB1 software is
with preampliers or audio-visual processors that
and repeater.
up to date by selecting “About” from the setup home
provide an unbalanced mono audio output.
menu, noting the installed version and checking if
Your Bowers & Wilkins retailer will be able to provide
there is a later version available on the DB1 support
3. Input 3 – Unbalanced stereo, RCA Phono input
more information on IR control.
page at www.bowers-wilkins.com.
sockets
The DB1 unbalanced stereo input is intended for use
with preampliers or audio-visual processors that
provide a stereo unbalanced audio output.
Use an appropriate high quality interconnect cable to
connect to the required input or inputs.
7

ENGLISH
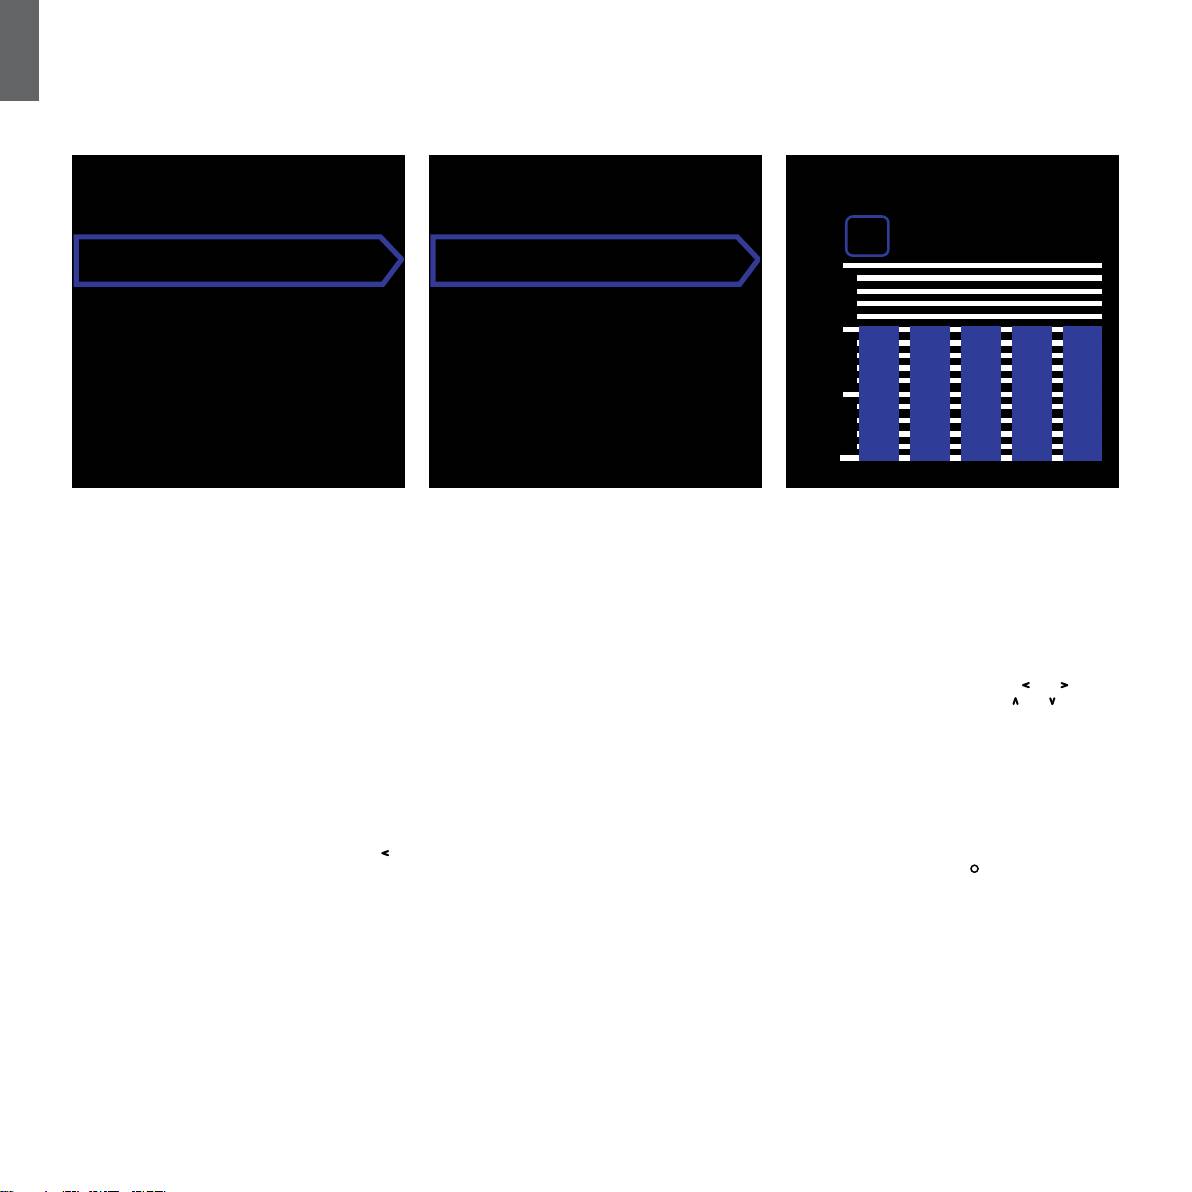
6.1. The DB1 User Interface6. DB1 Switch On and Setup
Preset 1
Preset 1
Movies
Volume Trim
Volume Trim
0dB
0dB
This Section of the manual covers setup and control of
In the screen shot above, the name 'Movies' has been
In setup mode, the DB1 front panel user interface is
the DB1 using its front panel buttons and display. Use
added to Preset 1. You can add a name of up to 10
based on navigation around hierarchical menus and
of the SubApp™ PC application is described in the
characters to any or all of the 5 Presets, but only using
the selection of options. The selected menu item is
program’s internal help le.
the SubApp™ PC program.
indicated by a coloured outline, which is normally blue.
A red outline indicates that a Preset parameter
Once the DB1 is positioned in the listening room
In normal operational mode the DB1 front panel
has been adjusted but not saved.
and connected to power and signal cables it can be
buttons behave as follows:
switched on from its standby button. When switched
The ve navigation buttons behave as follows:
on, the DB1 standby indicator changes from red to
Accesses rst the manual Preset
blue, the last preset used will be recalled and the
selection screen and subsequently
Selects the next menu item up or increases a
screen illustrated above will be displayed.
toggles between that and the Volume
parameter setting.
Trim adjustment screen.
Out of the box, the display screen will show that Preset
Selects the next menu item down or
1 is selected and that the Volume Trim is set at 0dB.
Accesses rst the Volume Trim
decreases a parameter setting.
The Volume Trim function has a range of +/-6dB and is
adjustment screen and subsequently
Returns to the previous menu screen without
intended to provide occasional on-the-y adjustment
toggles between that and the manual
saving changes.
and does not affect the volume setting stored within
Preset selection screen.
any preset. If the DB1 is switched to standby and on
Advances to the next menu screen if the
Increases Volume Trim or selects next
again, the Volume Trim is reset to 0dB.
outline has a signpost shape, indicating a
Preset on the appropriate screen.
subsequent menu screen. The current setting
When the DB1 setup is complete and it is returned
Decreases Volume Trim or selects
of the parameter is also shown within the
to normal operational mode, the Volume Trim can
previous Preset on the appropriate
outline.
be adjusted and Preset selected as described in
screen.
section 6.1.
Saves changes and returns to the previous
Press and hold to enter the DB1
menu. Pressing and holding the
button
The DB1 will almost certainly require some setup
setup mode.
at any time will enter or exit the DB1 Setup
changes in order to operate correctly in your system
Mode.
and to be tuned to your personal preference. To enter
DB1 setup mode press and hold the button.
The DB1 Graphic Equaliser menus, found within the
Preset setup routine, have a slightly different format
to the other interface menus. In this graphic equaliser
screen the and buttons select the band centre
frequency and the up and down arrow buttons adjust
the level of the selected frequency.
8

6.2. DB1 Initial Setup
ENGLISH
Setup
Display
Dim
On/Off Manual
Trigger 2 Out
Audio
About
When the DB1 enters setup mode it will display the
If Auto is selected the DB1 will switch on automatically
Audio
setup Home Menu illustrated above.
when an input audio signal is detected and off
The Audio option in the setup home page provides
following a specied time after the input signal stops.
access to all the DB1 audio setup parameters. Select
The four menu items provide the following functions:
The automatic switch-off delay time can be set in the
Audio to move on to the next setup stage.
subsequent menu by pressing the button when Auto
Display
is highlighted. Accessing the delay time will also select
About
By default, the display is set to go dim after 30
Auto as the switching method.
Displays the DB1 model number and internal software
seconds of button inactivity to reduce visual distraction
version.
in normal operation. Alternatively, it may be set to go
If Trigger 1 is selected, 12V at the Trigger 1 input will
off altogether. As soon as a button is pressed, the
switch the DB1 on and 0V will switch it off. To proceed
display becomes fully bright and is always bright in
with DB1 setup, ensure that the On/Off parameter is
setup mode.
initially set to Manual.
On/Off
Trigger 2
In this context, Off refers to the Standby condition. The
Enables DB1 presets to be selected in turn by a
function may be set to Manual, Auto(matic), or via the
12V control signal on the Trigger 2 input. Selecting
Trigger 1 input. The default is Manual.
In engages this control feature and selecting Out
disengages it. Out should be selected if your DB1 is
To fully disconnect the DB1 from mains
integrated within an RS232 home automation system.
power, it is necessary to switch off the
The default is Out.
mains outlet socket or withdraw the
mains plug.
Pressing the button while In is highlighted sets
Trigger 2 as the switching mode and allows the user
If Manual is selected, the DB1 front panel standby
to select which Presets correspond to 12V and 0V at
button or an RS232 home automation system must be
the Trigger 2 input. If In is the selected mode, Preset
used to switch between on and off.
switching via the front panel buttons in normal mode is
then disabled. The default presets are Preset 1 for 0V
and Preset 2 for 12V.
9

ENGLISH
6.3. DB1 Audio Setup
Audio
Room EQ
In
Inputs
Low-Pass
Presets
It will help to have audio playing through the DB1 and
Source Output Level DB1 Sensitivity
The default Gain is 0dB and you should use this
associated system while undertaking the audio setup
as the starting point. Once the DB1 is working,
0.5V (or less) +6dB
procedure.
listen carefully to a variety of music program
1.0V 0dB
material and adjust the setting if necessary. It is
Selecting Audio from the DB1 setup Home Menu will
important to listen to a variety of music because
2.0V (or more) -6dB
display the menu illustrated above.
a Gain setting that sounds correct on one
piece may sound either too loud or too quiet on
If the LED on the front panel ashes red on loud
The four menu items provide the following functions:
another. Listen at a realistic volume level as the
passages, this indicates input overload. If that
perception of musical balance varies with volume
happens, select the next lowest sensitivity and
Room EQ
level. The aim is to nd a Gain setting appropriate
raise the Gain by 6dB to compensate. Most
Enables any room correction equalisation produced
to the majority of material.
source equipment has an output level of 1V so the
following in-room response analysis by the SubApp™
default is 0dB.
PC application to be applied. The default equalisation
Note: Remember that it is always possible
curve is at, so if either no equalisation curve has
temporarily to adjust the DB1 volume using the
Setting the Gain
been uploaded to the DB1, or a valid curve has been
Volume Trim function.
Setting the DB1 Gain balances the output level
uploaded, select In. Only select Out if a previously
of the subwoofer with the other speakers in the
uploaded curve is invalidated by the DB1’s position in
Note: If it proves difficult to find the appropriate
system. If your DB1 is to be used in a home
the room having been changed. The default is In.
subwoofer/main speaker balance adjusting the
theatre system in which it is connected to the LFE
low-pass filter phase may be beneficial.
output of an audio visual processor, the balance
Inputs
between the DB1 and the other speakers will
Enables the Sensitivity, Gain and Polarity of the
Selecting the Polarity
be adjusted when the processor’s speaker level
Mono (balanced and unbalanced) and Stereo inputs
The DB1 signal Polarity may be selected
setup procedure is carried out. In this case the
to be congured. If only one input is connected in your
independently for each input. In the majority
DB1 Gain should be set at 0dB. The default is
installation it is not necessary to congure both.
of cases the polarity should be set to Normal.
0dB.
However, if the power ampliers feeding the main
Setting the Sensitivity
speakers invert the signal, select Inverted. The
For a DB1 used to enhance the low frequency
Separate adjustment for Sensitivity and Gain
default is Normal.
performance of conventional stereo speakers,
enables the DB1’s signal to noise performance
the Gain parameter must be set by ear. In this
to be optimised. Set the Sensitivity rst to reect
application, you will need to congure a Low-
the specied output level of the source electronics
Pass lter to avoid response overlap between the
as shown in the following table:
DB1 and your main speakers. You should do this
before assessing the correct gain level. See the
Low-Pass section below.
10

ENGLISH
Low-Pass
Selecting User provides the option of specifying
Select Phase to adjust the phase integration of the
Enables the DB1’s low-pass lter characteristics to be
a custom low-pass lter. Select User if your main
DB1 and the main speakers. Adjusting the phase can
specied. The characteristics of a subwoofer low-pass
speakers are not Bowers & Wilkins or if you are not
be useful to overcome audible problems of integration
lter dene how the subwoofer integrates with the main
using the PC SubApp™ program. The low-pass lter
between subwoofer and main speakers, usually with
speakers in the system.
User parameters are Freq(uency), Slope and Phase.
room acoustics at their source. Set the Phase initially
Select Freq to set the low-pass cut-off frequency of
to 0° for the 24dB/Octave option and 180° for the
Note: In home-theatre systems, where the subwoofer
the lter to match the high-pass –6dB cut-off frequency
12dB/octave. Compare these settings with the other
is connected to an LFE (low frequency effects)
of the main speakers. For Bowers & Wilkins speakers,
options on a variety of music with signicant bass
output, no low-pass filter is required because filtering
this can be found in the technical specication under
content and choose the option that gives the fullest
is inherent in the home theatre signal decoding.
Frequency Range. If the specication of your
bass. The default is 0°.
speakers only quotes a –3dB frequency, multiply
The low-pass lter menu options are User and
this by 0.6 for closed-box systems and by 0.7 for
Speaker. Although you may use the buttons and
vented-box (reex) systems to get a close enough
display to select the Speaker option, you cannot
approximation to the –6dB frequency. The default is
congure it here and the default is a at response (ie
80Hz.
no lter), indicated by the word None. However, if
the main speakers to be used with your DB1 are an
Select Slope to set the low-pass lter slope of the
existing Bowers & Wilkins model, you may congure
lter to match the high-pass roll-off slope of the main
the Speaker option using the SubApp™ program by
speakers. If the slope is not given in the speaker’s
selecting your speakers from a drop-down menu. The
specication, select 24db/Octave if the main speakers
Speaker low-pass lter gives a more accurate blend
have a “reex port” and 12dB/Octave if they do not.
between the DB1 and your main speakers than can be
The default is 24dB/octave as the majority of Bowers
achieved with the User option. The default is User.
& Wilkins speakers are vented-box types.
11
ENGLISH
6.4. Presets
Presets
Edit Preset
User EQ
20 28 40 56 80
Load
Input Mono
5
Edit
Level 0dB
0
Save
Sys EQ Flat
-5
User EQ
Last Preset
1
Low-Pass
Out
-10
DB1 presets enable setups appropriate for different
Edit Menu
Edit Menu cont'd
types of program material or listening situations to be
stored and easily recalled. We recommend that you
Input: Enables the preset to specify either the mono
Sys(tem) EQ: Enables the preset to specify either
take the time to setup one or more presets.
or stereo DB1 input. The default is mono.
Impact or Flat equalisation. The default is Flat.
Selecting Presets from the Audio Menu will display the
Level: Enables the preset to specify a DB1 volume
User EQ: Enables the preset to specify custom
Presets menu illustrated above.
level different from that set to balance the inputs. The
equalisation parameters dened by adjustment of the
default is 0dB.
subsequent graphic equaliser menu. The default is all
The three menu items provide the following functions:
bands set to 0dB.
Low-Pass: Enables the preset to specify that the DB1
Load
low-pass lter is either In or Out of circuit. A preset
To adjust the graphic equaliser, use the and
Loads one of the ve presets for editing.
congured for use with home theatre program material
buttons to select a frequency and the and buttons
via DB1 connection to an AV processor LFE output
to adjust the level of the selected frequency.
Edit
should not have a low-pass lter engaged. The default
Adjusting the graphic equaliser can help overcome
Enables the parameters shown in the following
is Out.
room acoustic problems that result in unbalanced
columns to be changed.
or inconsistent subwoofer performance. Aim for a
relatively gentle use of graphic equalisation rather than
As you make adjustments, the outline around the
extreme differences between adjacent frequencies.
selected menu item will change from blue to red to
indicate that the changes have not been saved and will
Setup Complete
be discarded if you exit the Preset menu using the
Conguring setup presets completes the DB1 setup
button.
procedure. Press and hold the button to return the
DB1 to normal operational mode.
Save
Saves the edited preset parameters to a specied
location, overwriting the preset data previously stored.
Saving causes the menu item outline to revert to blue.
Last Preset
This non-selectable label Indicates the number of
the last Preset accessed for either a Load or a Save
operation.
12

7. In Use
8. Restoring factory default settings
9. Aftercare
ENGLISH
Once set up the DB1 should require little adjustment.
If the your DB1 has been previously used and you wish
The DB1 cabinet surfaces will usually only require
However, if it is moved within the listening room or
to return it to its default state this can be done through
dusting. We recommend you use the cloth supplied
if large items of furniture are introduced, its Gain
the following procedure:
with the product. If you wish to use an aerosol or other
and User EQ will need adjustment. If you have
cleaner, apply the cleaner onto the cloth, not directly
programmed the Room EQ, this will also require
i) With the DB1 in Standby mode (Standby indicator
onto the product and test a small area rst, as some
re-measurement. Please remember that the DB1 is
is Red), press and hold the
button until the indicator
cleaning products may damage some of the surfaces.
capable of volume levels that have the potential to
ashes (after approximately 2 seconds). Release the
Avoid products that are abrasive, or contain acid, alkali
damage your and others’ hearing. If in any doubt
button.
or anti-bacterial agents. Do not use cleaning agents
reduce the volume. If the DB1 is overloaded, its
on the drive units. Avoid touching the drive units as
standby indicator will ash red.
ii) Now press and hold the button, again until the
damage may result.
indicator ashes. Release the button.
The performance of your DB1 may change subtly
Whenever Bowers & Wilkins speakers are nished
during the initial listening period. If it has been stored
iii) The indicator will switch to white while the DB1
in real wood, the nest veneers are selected and
in a cold environment, the damping compounds and
settings return to their defaults and switch to red
treated with an ultra-violet resistant lacquer to
suspension materials of the drive units will take some
(normal Standby mode) again when the process is
minimise changes in colour over time. Nevertheless,
time to recover their correct mechanical properties.
complete.
like all natural materials, the veneer will respond to
The drive unit suspension will also loosen up during
its environment and a degree of colour change is to
the rst hours of use. The time taken for the speaker to
be expected. Colour differences may be rectied by
achieve its intended performance will vary depending
exposing all the veneer surfaces equally and evenly
on previous storage conditions and how it is used.
to sunlight until the colour is uniform. This process
As a guide, allow up to a week for the temperature
can take several days or even weeks, but may be
effects to stabilise and 15 hours of average use for
accelerated by careful use of an ultra-violet lamp.
the mechanical parts to attain their intended design
Wood veneered surface should also be kept away from
characteristics.
direct sources of heat such as radiators and warm air
vents in order to minimise the possibility of the wood
veneer cracking.
13

1. L’enceinte de sous-grave active DB1
Introduction
FRANÇAIS
Sécurité
Sensibilité d’entrée et niveau réglables
Préréglages
Avant de brancher sur l'alimentation secteur et de
La DB1 possède une sélection de sa sensibilité
La DB1 propose cinq mémoires de préréglages, dans
faire fonctionner l'appareil, veuillez lire et respecter
d’entrée, qui lui permet une adaptation parfaite avec
lesquelles peuvent être réglés puis mémorisés et
les consignes de sécurité dans la brochure
toutes les sources électroniques, et un contrôle de
rappelés des groupes de paramètres différents. Les
d'accompagnement.
gain réglable pour l’adaptation de son volume sonore
paramètres qui peuvent être réglés puis mémorisés
avec celui des enceintes principales. Tous les niveaux
sont :
Performance
de la DB1 étant réglés sur leur valeur par défaut 0 dB,
L’enceinte de sous-grave active DB1 offre de
l'enceinte de sous-grave présente une sensibilité THX
®
• Sélection d’entrée
très hautes performances pour la reproduction
standard de 109 dB pour 1 m et une entrée de niveau
• Niveau d’entrée
des fréquences graves, dans un système Home
1 V RMS. Voir la section 6.3 pour de plus amples
• Egalisation des impacts
Cinema multicanal comme sur une chaîne stéréo
détails.
• Egalisation graphique (réglée par l’utilisateur)
conventionnelle. Il utilise un grand nombre de fonctions
• Filtre passe-bas (activé ou non)
qui améliorent sa souplesse d’utilisation et permettent
Inversion de polarité
à ses performances de s’adapter parfaitement à toutes
La DB1 intègre une possibilité optionnelle d’inversion
Ces différents préréglages permettent d’adapter très
les pièces d’écoute et tous les types d’installation.
de sa polarité, pour compenser l’inversion de polarité
facilement les performances de la DB1 à différentes
Ces fonctions sont brièvement décrites dans les
créée par certaines électroniques. Voir la section 6.3
sources, ou différents types d’écoute. Voir la section
paragraphes suivants :
pour de plus amples détails.
6.4 pour de plus amples détails.
Interface utilisateur des commandes
Egalisation des impacts
Egalisation de correction de salle
La DB1 peut être réglée et utilisée soit à partir de son
La DB1 intègre une présélection d’égalisation pour
L'application SubApp™ de Bowers & Wilkins, associée
panneau de commandes frontal, soit via l’application
augmenter l’impact des fréquences les plus graves sur
avec le système de mesure fourni, peut être utilisée
de réglage et optimisation Bowers & Wilkins SubApp™
les programmes audiovisuels. Voir la section 6.4 pour
pour optimiser automatiquement les performances de
pour ordinateur PC. SubApp™ est téléchargeable
de plus amples détails.
la DB1 par rapport aux caractéristiques acoustiques
depuis notre site Internet – www.bowers-wilkins.com,
réelles de votre environnement.
le fonctionnement étant décrit dans le chier d'aide
Egalisation graphique
joint.
La DB1 intègre un égaliseur graphique sur 5 bandes,
en demi-octave, an de pouvoir modier ses
Entrées multiples
performances acoustiques en fonction de chaque
La DB1 propose une entrée mono asymétrique,
pièce d’écoute. Voir la section 6.4 pour de plus amples
une entrée stéréo asymétrique et une entrée mono
détails.
symétrique. Les entrées mono et stéréo peuvent être
branchées simultanément, puis sélectionnées ensuite
indépendamment. Les entrées mono asymétrique
et symétrique ne peuvent être branchées ni utilisées
simultanément. Voir la section 5 pour de plus amples
détails.
14
2. Déballage de votre enceinte de sous-grave DB1
3. Installation de votre enceinte DB1
4
4
FRANÇAIS
1
1
1
1
1
1
1
La DB1 est lourde et nous vous recommandons
La DB1 peut être simplement posée sur le sol, ou
possède sa propre enceinte de sous-grave,
vivement de la déballer près de son lieu d’installation
encastré dans un meuble spécialement fabriqué pour
placée le plus près possible de l’enceinte satellite
nale, de préférence avec deux personnes.
elle.
correspondante.
Le tableau ci-dessus indique tous les éléments
L’installation d’une enceinte de grave est généralement
Note : Comme avec toutes les enceintes, la
présents dans l’emballage avec l’enceinte de grave.
moins critique que celle d’enceintes large bande. De
proximité des murs de la pièce affecte le son produit
Si vous constatiez l’absence de l’un d’entre eux,
plus, la DB1 est plus simple à installer que la plupart
par une enceinte de sous-grave. Le volume du grave
prévenez immédiatement le revendeur chez qui vous
des autres caissons de grave, grâce à son égalisation
augmente si les surfaces présentes à proximité
avec achetez l’enceinte.
intégrée et au système d’optimisation capable de
sont nombreuses. Plus le volume sonore est ainsi
compenser d’éventuelles pertes de grave, par rapport
augmenté par la pièce, plus faible est le réglage de
Retirez le lm protecteur devant l'afcheur.
à une position idéale dans la pièce. La section 6.4
volume nécessaire, et plus facile est le travail de
décrit l’utilisation du système d’égalisation.
l’enceinte de sous-grave.
Information concernant l’environnement
Tous les produits Bowers & Wilkins
Cependant, les meilleurs résultats sont obtenus
Note : L’orientation des prises et du panneau de
sont fabriqués avec le respect des
quand la DB1 est placée entre les deux enceintes
commandes de la DB1 ; par rapport à ses haut-
directives internationales concernant la
gauche et droite, ou près de l’une d’entre elles. Placer
parleurs, peut être modifiée si désiré, en tournant
restriction sur l’utilisation de substances dangereuses
l’enceinte sur un côté de la pièce, mais devant les
le module d’amplification de 90°. Il peut cependant
Restriction of Hazardous Substances (RoHS) dans les
auditeurs, reste un compromis acceptable si des
y avoir certains cas où il vaut mieux conserver les
équipements électriques et électroniques, et sur leur
considérations domestiques l’imposent, mais nous
prises et les commandes sur le même plan que
mode de traitement Waste Electrical and Electronic
vous recommandons d’éviter d’installer la DB1 derrière
les haut-parleurs ; si l’enceinte de sous-grave est
Equipment (WEEE). Ces symboles indiquent leur
les auditeurs. Si deux enceintes DB1 sont utilisées, leur
installée dans un meuble, par exemple, cela facilite
compatibilité totale, et la possibilité de leur recyclage
position la meilleure est d’en positionner l’une près de
l’accès général. Pour modifier cette orientation,
ou traitement dans le respect de ces directives.
l’enceinte de gauche, et l’autre près de l’enceinte de
retournez tout d’abord soigneusement l’enceinte
Consultez le service de récupération des déchets
droite. Le diagramme ci-dessus illustre la position de
de sous-grave en vous assurant que la finition
dans votre zone géographique pour de plus amples
l’enceinte de sous-grave.
d’aucune de ses surfaces ne soit endommagée.
informations.
Pour dévisser le module amplificateur, utilisez une
Note : L’utilisation de deux enceintes de sous-
clé de 15 mm pour dévisser les quatre pieds. Une
grave dans la même installation peut améliorer
fois ceux-ci dévissés, le module amplificateur peut
les performances, en maintenant la séparation
être tourné de 90°. Le sens de pivotement utilisé n’a
stéréophonique jusque dans les fréquences les plus
pas d’importance, mais il faudra utiliser exactement
basses, en limitant les effets des résonances dans
le sens inverse si vous souhaitez le replacer dans sa
la pièce tout en permettant un niveau sonore plus
position initiale. Une fois le module installé dans la
élevé. Dans le cas d’une utilisation de deux enceintes
position voulue, revissez fermement les quatre pieds.
de sous-grave dans une installation 2 canaux, la
séparation stéréo sera améliorée si chaque canal
15

4. Pieds de la DB1
5. Branchements de la DB1
FRANÇAIS
La DB1 peut être équipée au choix de pieds en
Une fois les pointes ou les pieds xés, la DB1 peut
La DB1 nécessite d’être branché sur une alimentation
caoutchouc ou de pointes – les deux étant fournis
être retournée sur ceux-ci. Assurez-vous que le poids
secteur et un signal d’entrée. Plusieurs câbles secteur
en accessoires. Nous vous recommandons d’utiliser
total de l’enceinte ne repose pas sur un seul ou deux
peuvent se trouver dans l’emballage. Utilisez celui qui
les pointes partout où cela est possible. Ces pointes
pieds pendant cette opération. Prenez également soin
possède une prise appropriée par rapport aux prises
sont conçues pour transpercer la moquette, prenant
de ne pas vous blesser si ce sont les pointes qui sont
secteur de votre pays.
ainsi appui directement sur le sol, évitant de déchirer
utilisées.
le revêtement de sol tout en garantissant une liaison
La DB1 peut recevoir trois types de signaux d’entrée.
parfaite.
Si l’enceinte n’est pas stable sur le sol dans sa position
Leur application et les prises correspondantes sont
nale, ou si l’épaisseur de la moquette empêche
décrites dans le paragraphe suivant. Il est possible
Note : on peut aussi utiliser les pointes sur des
l’enceinte de reposer réellement sur le sol, réglez les
de brancher simultanément une entrée mono et une
moquettes fragiles en intercalant entre celles-ci des
pieds correspondants jusqu’à ce que la DB1 soit
entrée stéréo, car la DB1 est capable de sélectionner
pièces de monnaie.
parfaitement stable et non bancale. Lorsque ce réglage
une entrée différente via ses préréglages différents,
est terminé, revisser les écrous contre le dessous de
mémorisés puis rappelés à la demande. La section 6
Pour xer les pointes ou les pieds en caoutchouc, la
l’enceinte, en utilisant une clé de 10 mm.
décrit l’utilisation de ces préréglages et le schéma ci-
DB1 doit tout d’abord être soigneusement retournée.
dessus montre le panneau de branchement de la DB1.
Assurez-vous de ne pas endommager ses surfaces
externes pendant cette opération. Vissez les pieds ou
les pointes dans les quatre letages prévus à cet effet
sous l’enceinte DB1. Dans les deux cas, commencez
d’abord par visser complètement les écrous à la base
de chaque pied, avant que de visser ceux-ci dans
la DB1. Vissez fermement chaque pied. L’illustration
ci-dessus montre la xation des pointes ou des pieds
en caoutchouc.
16
5. Branchements de la DB1
FRANÇAIS
1 2 3 4 5 6
7
8
1. Entrée 1 — Mono symétrique, prise d’entrée
En plus des prises de l’alimentation secteur et du
7. RS-232 — prise D 9 broches
XLR
signal d’entrée, le panneau de branchement de la DB1
La prise d’interface RS-232 permet la connexion sur
L’entrée mono symétrique de la DB1 est conçue pour
supporte les prises suivantes.
un ordinateur PC équipé de l’application SubApp™
être utilisée avec des préamplicateurs ou processeurs
de Bowers & Wilkins. Elle permet également
audiovisuels équipés d’une sortie mono symétrique.
4. Trigger 1 — prise d’entrée jack 3,5 mm
d’intégrer la DB1 à un système général automatisé
La prise Trigger 1 permet de brancher un câble de
de télécommande de l’installation par un ordinateur.
Note : Le standard symétrique, utilisant des
télécommande pour l’allumer ou la mettre en veille
Votre revendeur agréé Bowers & Wilkins vous donnera
conducteurs séparés pour les signaux négatif, positif
(standby) via un autre appareil.
toutes les informations complémentaires nécessaires
et de masse, est commun sur les équipements
sur le rôle de cette prise RS-232.
professionnels et quelques appareils grand public
5. Trigger 2 — prise d’entrée jack 3,5 mm
haut de gamme. Une telle liaison symétrique présente
La prise Trigger 2 permet de brancher un câble de
8. USB 2.0 — prise esclave USB
une meilleure immunité contre les parasites externes
télécommande pour sélectionner un des préréglages
La prise USB permet de mettre à jour le logiciel interne
et le bruit qu’une liaison asymétrique.
de la DB1.
de fonctionnement de la DB1.
2. Entrée 2 — Mono asymétrique, prise d’entrée
6. Remote IR — prise d’entrée jack 3,5 mm
Note : Le logiciel interne de la DB1 peut être mis
RCA Phono
La prise Remote IR (infrarouge) permet de récupérer la
à jour régulièrement. Vous pouvez vérifier que le
L’entrée mono asymétrique de la DB1 est conçue pour
télécommande intégrale par infrarouge de la DB1 via
logiciel de fonctionnement de votre DB1 est à jour
être utilisée avec des préamplicateurs ou processeurs
un capteur ou un répéteur infrarouge externe.
en sélectionnant « About » depuis le menu d’accueil
audiovisuels équipés d’une sortie mono asymétrique.
des réglages (Home), noter la version installée puis
Votre revendeur agréé Bowers & Wilkins vous donnera
aller vérifier s’il s’agit bien de la dernière version
3. Entrée 3 — Stéréo asymétrique, prises d’entrée
toutes les informations complémentaires nécessaires
disponible sur la page Support de la DB1 de
RCA Phono
pour ce mode de commande IR.
www.bowers-wilkins.com.
L’entrée stéréo asymétrique de la DB1 est conçue pour
être utilisée avec des préamplicateurs ou processeurs
audiovisuels équipés d’une sortie stéréo asymétrique.
Utilisez un câble de liaison de haute qualité pour relier
la ou les entrées concernées.
17
