Bowers & Wilkins CT700 SERIES CT7.4 LCRS: инструкция
Раздел: Бытовая, кухонная техника, электроника и оборудование
Тип: Микрофон
Инструкция к Микрофону Bowers & Wilkins CT700 SERIES CT7.4 LCRS
CT700 Series
CT7.3 LCRS
CT7.4 LCRS
CT7.5 LCRS
Installation Manual
&IGURE
&IGURE
&IGUREB
M
M
IN
IN
O
LC S E
.EUTRIK
3PEAKON
#ONNECTOR
.,&#
&IGURE
&IGURE
&IGURE
&IGUREA
&IGURE
&IGURE
&IGUREB
M
M
IN
IN
O
LC S E
.EUTRIK
3PEAKON
#ONNECTOR
.,&#
&IGURE
&IGURE
&IGURE
&IGUREA

7105 CT7X IM Inner Iss3.qxd 11/9/08 9:23 am Page 1
Contents
English
Русский
Installation manual ........2
Руководство по
Limited Warranty...........3
эксплуатации ............25
Ограниченная
Français
гарантия....................27
Manuel d’utilisation.......4
Garantie limitée.............6
"esky
Návod k pouãití..........28
Deutsch
Záruka .......................30
Bedienungsanleitung.....7
Garantie .......................9
Polski
Instrukcja
Español
uÃytkownika ...............31
Manual de
Gwarancja .................33
instrucciones ..............10
Garantía limitada.........12
.......................34
Português
.......................35
Manual de instalação ..13
Garantia limitada.........15
.......................36
Italiano
.......................37
Manuale di istruzioni ...16
Garanzia limitata .........18
Nederlands
EU Declaration of
Installatie Handleiding .19
Conformity..................40
Garantie .....................21
Response Charts........41
Ελληνικά
Technical
Οδηγίεσ
Specifications .......42–44
εγκατάστασησ .........22
Περιορισµένη
εγγύηση....................24

7105 CT7X IM Inner Iss3.qxd 11/9/08 9:23 am Page 2
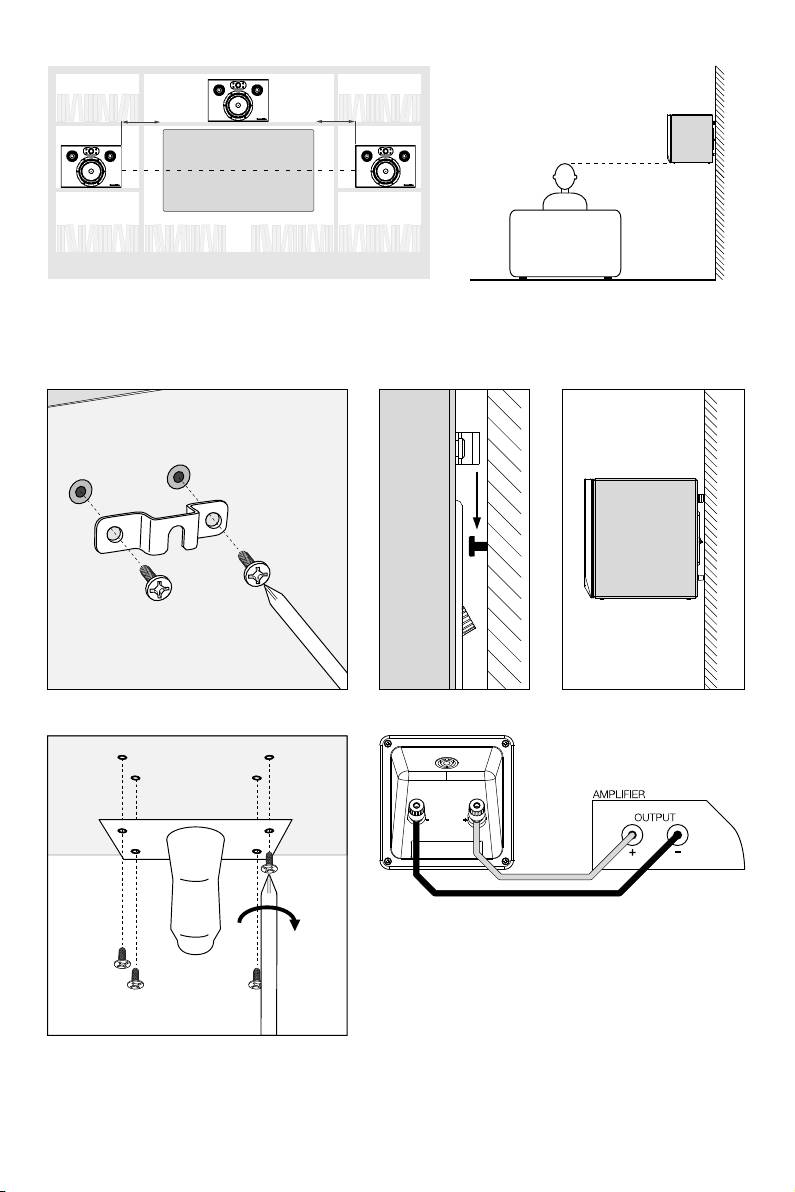
Wall Brackets:
English
The speakers incorporate 4 M6 tapped inserts in their
back panels for attachment of the two brackets
Installation manual
supplied. Always use both brackets. Use the supplied
M6 bolts to attach the brackets to the back of the
Dear customer,
speaker. The two supplied adhesive rubber spacers can
Thank you for choosing Bowers & Wilkins. Please read
be used to cushion the speaker against the wall.
this manual fully before unpacking and installing the
Figure 3 illustrates use of the brackets. Before using the
product. It will help you to optimise its performance.
brackets ensure that the wall and fixings are capable of
B&W maintains a network of dedicated distributors in
supporting the weight of the speaker. B&W can accept
over 60 countries who will be able to help you should
no liability for any failure of wall and/or fixings.
you have any problems your dealer cannot resolve.
Ball-joint Brackets:
Environmental Information
The speakers incorporate 4 M6 tapped inserts in their
All B&W products are designed to comply
undersides that enable the speakers to be wall-
with international directives on the
mounted using adjustable ball-joint style mounting
Restriction of Hazardous Substances
brackets designed for 127mm x 69.9mm (5 in x 2.75 in)
(RoHS) in electrical and electronic equipment and the
mounting hole centres. Your dealer or local B&W
disposal of Waste Electrical and Electronic Equipment
distributor will be able to advise you on the selection of
(WEEE). These symbols indicate compliance and that
appropriate brackets.
the products must be appropriately recycled or
To attach a ball-joint style bracket to a CT700 Series
processed in accordance with these directives. Consult
speaker first securely attach the socket plate to the
your local waste disposal authority for guidance.
underside of the speaker. Figure 4 illustrates this
procedure.
Carton Contents
Check in the carton for:
Once the socket plate is attached to the speaker, the
assembly may be connected to the ball component
4 Adhesive rubber feet
attached to the wall. Ensure that the manufacturer’s
2 Adhesive rubber spacers
instructions for attaching the bracket to the wall are
2 Port plugs
®
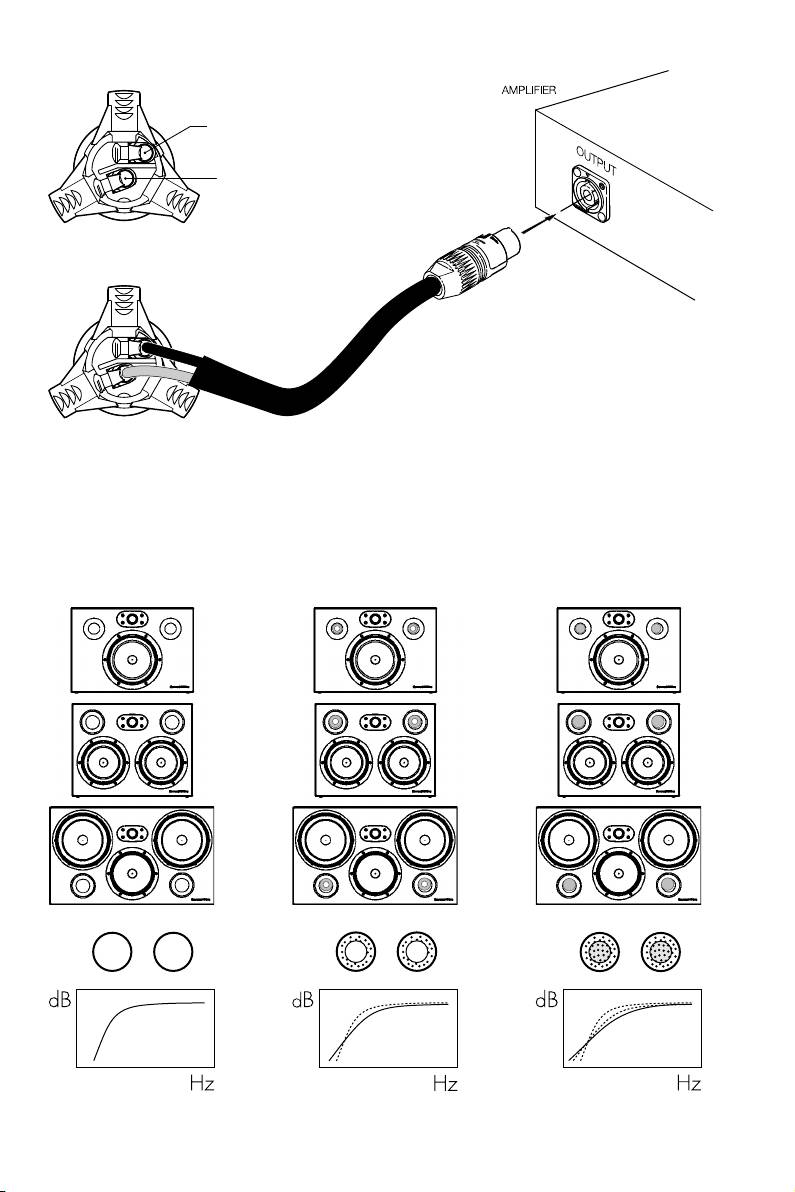
followed correctly and that the wall and fixings are
1 Speakon
plug
capable of supporting the weight of the speaker. B&W
2 Wall brackets
can accept no liability for any failure of wall and/or
4 M6 bolts
fixings.
Speaker Installation
Regardless of the style of installation take care when
CT700 Series speakers can either be installed within
lifting the speakers into position. They are unwieldy and
existing or custom designed home theatre system
heavy and best handled by two people working
cabinets, or wall mounted using a variety of brackets.
together.
If the speakers are to be installed within a cabinet it is
The black fabric grilles are attached by magnets and
important to ensure that it is capable of carrying their
may be removed if desired. Take care not to touch the
weight and that it is structurally sound. Significant
drive units when removing or replacing the grilles.
vibration of the cabinet panels may seriously affect the
Speaker Positioning
subjective performance of the speakers. Figure 1
illustrates the installation of three CT700 Series
CT700 Series speakers used for the front left and
speakers in a home theatre cabinet showing the
right channels in a home theatre system should be
recommended dimensions between the speakers and
positioned one either side of the screen on the
space around them.
horizontal centre-line. They should be within
approximately 0.5m (20 in) of the sides of the screen
Adhesive rubber feet are supplied for attachment to the
to help keep the sound image in scale with the visual
underside of the speakers in order both to protect the
image. See Figures 1 and 2.
cabinet finish and to reduce vibration. Attach one
adhesive foot at each underside corner of the speakers.
A CT700 Series speaker used for the centre channel in
a home theatre system should be positioned centrally
If gaps wider than approximately 20mm (3/4 inch)
either directly above or below the screen. In the case
remain around a speaker when it has been installed in a
of acoustically transparent screens, the centre channel
cabinet, the acoustic performance will be improved if
speaker should be positioned centrally behind the
the gaps are filled. Use carefully cut pieces of
screen.
upholstery or acoustic foam to fill the gaps as far back
as is practical and flush with the front panel of the
CT700 Series speakers used for the surround
speaker. Only use foam with an appropriate fire safety
channels in a home theatre system should be
rating.
positioned above and to either side or behind the
listening position.
CT700 Series speakers can also be wall mounted using
one of two methods.
2
