Nokia 6260 silver: 2. Get started
2. Get started: Nokia 6260 silver
Get started
2. Get started
6. Press down until the cover locks into place.
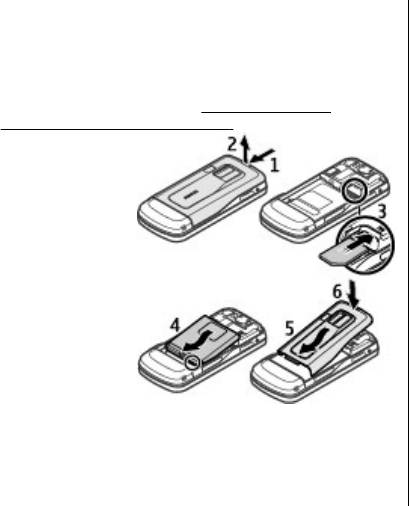
Install SIM card and battery
Always switch the device off and disconnect the charger
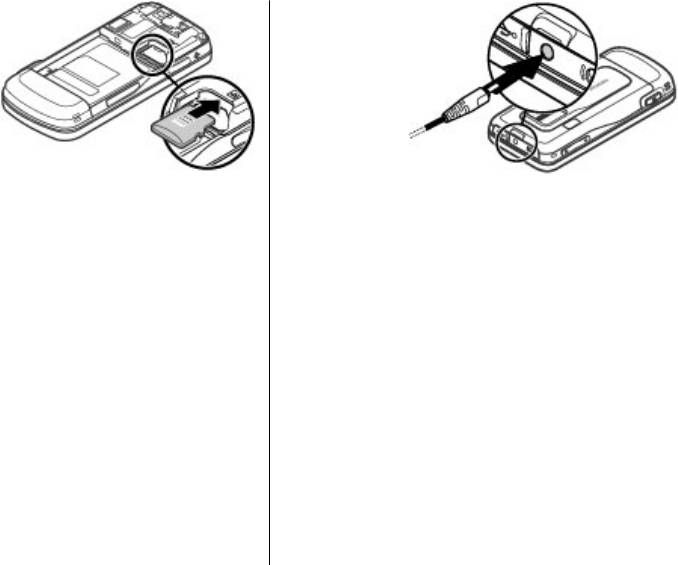
Insert a microSD card
before removing the battery.
Use only compatible microSD cards approved by Nokia for
This phone is intended for use with a BL-5F battery. Always
use with this device. Nokia uses approved industry
use original Nokia batteries.
See "Nokia battery
standards for memory cards, but some brands may not be
authentication guidelines", p. 51.
fully compatible with this device. Incompatible cards may
The SIM card and
damage the card and the device and corrupt data stored
its contacts can be
on the card.
easily damaged by
You phone supports microSD cards of up to 8 GB.
scratches or
1. Remove the back cover.
bending, so be
careful when
2. Remove the battery.
handling,
3. Insert the card into the microSD card slot with the
inserting, or
contact surface facing down, and press it until it locks
removing the
into place.
card.
4. Replace the battery.
1. Push the
5. Replace the back cover.
release button.
2. Remove the
back cover.
3. Insert the SIM
card into the slot with the contact surface facing down.
4. Observe the battery contacts, and insert the battery.
5. Replace the back cover.
© 2008 Nokia. All rights reserved.12
Get started
2. Connect the
charger to the
device.
3. When the
battery is
fully charged,
disconnect
the charger
from the
device, then
from the wall
Remove the microSD card
outlet.
1. Remove the back cover of the device.
You also may charge the battery with a USB cable with
2. Remove the battery.
power from a computer.
3. Press the microSD card slightly to release the lock, and
1. Connect the USB cable to the USB port of a computer
pull the card out.
and to your device.
2. When the battery is fully charged, disconnect the USB
Charge the battery
cable.
Your battery has been precharged, but the charging levels
If the battery is completely discharged, it may take several
may vary.
minutes before the charging indicator appears on the
1. Connect the charger to a wall outlet.
display or before any calls can be made.
The charging time depends on the charger used. Charging
a BL-5F battery with the AC-8 charger takes approximately
1 hour 30 minutes while the phone is in the home screen
mode.
© 2008 Nokia. All rights reserved. 13
Get started
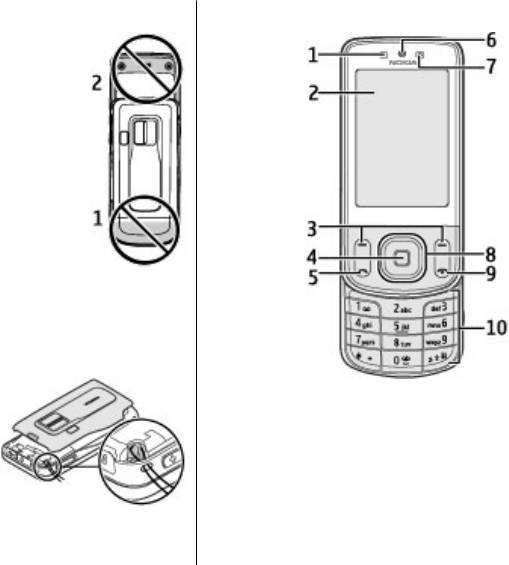
Antenna
Keys and parts
Your device may have internal and external
antennas. As with any radio transmitting
device, avoid touching the antenna area
unnecessarily while the antenna is
transmitting or receiving. Contact with
such an antenna affects the
communication quality and may cause the
device to operate at a higher power level
than otherwise needed and may reduce
the battery life.
The figure shows the antenna area marked
in grey.
Strap
1. Remove the back cover.
2. Attach a strap, and tighten it.
3. Replace the back cover.
1 — Light sensor
2 — Display
3 — Left and right selection keys
4 — Middle selection key
5 — Call key
6 — Earpiece
7 — Front camera
© 2008 Nokia. All rights reserved.14
Get started
8 — Navi™ key; hereafter referred to as scroll key
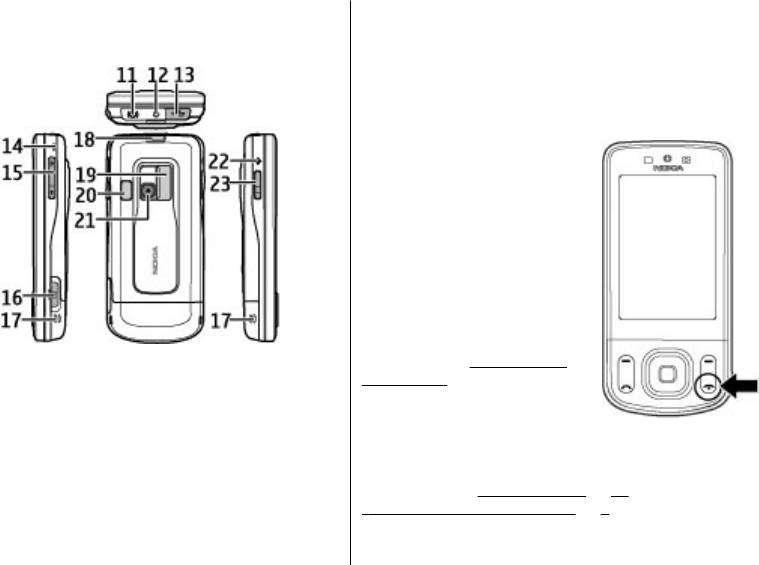
20 — Camera flash
9 — End/Power key
21 — Camera lens
10 — Keypad
22 — GPS symbol (no functionality)
23 — Navigator key
Switch the phone on and off
To switch the phone on or off,
press and hold the power key.
If the phone prompts for a PIN
code, enter the code (displayed as
****).
If the phone prompts you for the
time and date, enter the local
time, select the time zone of your
location in terms of the time
difference with respect to
Greenwich Mean Time (GMT), and
11 — Nokia AV Connector (2.5 mm)
enter the date.
See "Date and
time", p. 32.
12 — Charger connector
When you switch on your phone
13 — Micro USB cable connector
for the first time, you may be
14 — Strap eyelet
prompted to get the
15 — Volume key
configuration settings from your service provider
(network service). For more information, select Connect
16 — Camera key
to support. See
"Configuration", p. 34, and
17 — Loudspeaker
"Configuration setting service", p. 9.
18 — Back cover release button
19 — Camera lens cover
© 2008 Nokia. All rights reserved. 15
Get started
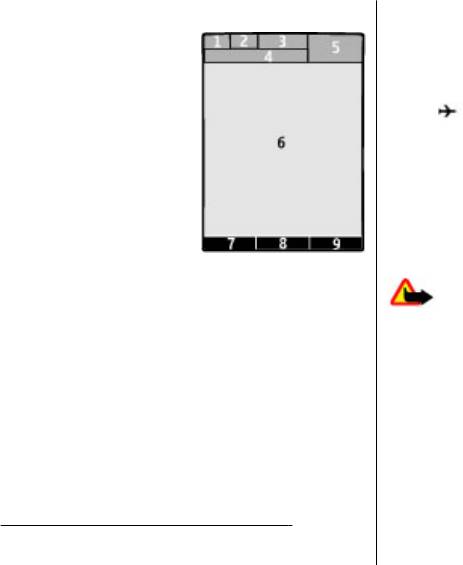
Display
Flight mode
Use flight mode in radio sensitive environments — on
board aircraft or in hospitals — to deactivate all radio
frequency functions. You still have access to offline games,
the calendar, and phone numbers. When flight mode is
active,
is displayed.
To activate or set up flight mode, select Menu >
Settings > Profiles > Flight > Activate or
Personalise.
To deactivate flight mode, select any other profile.
Make an emergency call in flight mode
Enter the emergency number, press the call key, and when
Exit flight profile? is displayed, select Yes.
1 — Network type indicator and signal strength of the
cellular network
Warning: With the flight profile you cannot make
2 — Battery charge status
or receive any calls, including emergency calls, or use
3 — Indicators
other features that require network coverage. To make
calls, you must first activate the phone function by
4 — Name of the network or the operator logo
changing profiles. If the device has been locked, enter the
5 — Clock
lock code.
6 — Display
If you need to make an emergency call while the device is
7 — Function of the left selection key
locked and in the flight profile, you may be also able to
enter an official emergency number programmed in your
8 — Function of the scroll key
device in the lock code field and select 'Call'. The device
9 — Function of the right selection key
will confirm that you are about to exit flight profile to start
You can change the function of the left and right selection
an emergency call.
key.
See " Left and right selection keys ", p. 32.
© 2008 Nokia. All rights reserved.16


