Melissa 246-021: INTRODUCTION SAFETY MEASURES KEY TO THE KITCHEN SCALE’S PARTS WALL MOUNTING OF THE KITCHEN SCALE PREPARING THE KITCHEN SCALE Setting the clock USE Weighing Weighing with the tare function Conversion between grams and ounces.
INTRODUCTION SAFETY MEASURES KEY TO THE KITCHEN SCALE’S PARTS WALL MOUNTING OF THE KITCHEN SCALE PREPARING THE KITCHEN SCALE Setting the clock USE Weighing Weighing with the tare function Conversion between grams and ounces.: Melissa 246-021
Table of contents
- INTRODUCTION SAFETY MEASURES KEY TO THE KITCHEN SCALE’S PARTS WALL MOUNTING OF THE KITCHEN SCALE PREPARING THE KITCHEN SCALE Setting the clock USE Weighing Weighing with the tare function Conversion between grams and ounces.
- Timer REPLACING THE BATTERIES CLEANING INFORMATION ON DISPOSAL AND RECYCLING OF THIS PRODUCT GUARANTEE TERMS IMPORTER
10
INTRODUCTION
To get the most out of your new kitchen scale, please
To get the most out of your new kitchen scale, please
To get the most out of your new kitchen scale, please
read through these instructions carefully before using it
read through these instructions carefully before using it
read through these instructions carefully before using it
for the fi rst time. We also recommend that you keep the
for the fi rst time. We also recommend that you keep the
for the fi rst time. We also recommend that you keep the
for the fi rst time. We also recommend that you keep the
instructions for future reference, so that you can remind
yourself of the functions of your kitchen scale.
SAFETY MEASURES
• Use the kitchen scale for its intended purpose only.
The manufacturer is not responsible for any injury
or damage resulting from incorrect use or handling
(see also Guarantee Terms).
• This kitchen scale is not suitable for commercial or
outdoor use.
• The kitchen scale must not be immersed in water or
any other liquid.
• Do not position very heavy objects on the weighing
platform (max. weighing capacity 2kg), as it can
break off.
• Never try to repair the kitchen scale yourself. If
it needs to be repaired, it should be taken to an
authorised service centre. Please contact the store
where you bought the device for repairs under
guarantee.
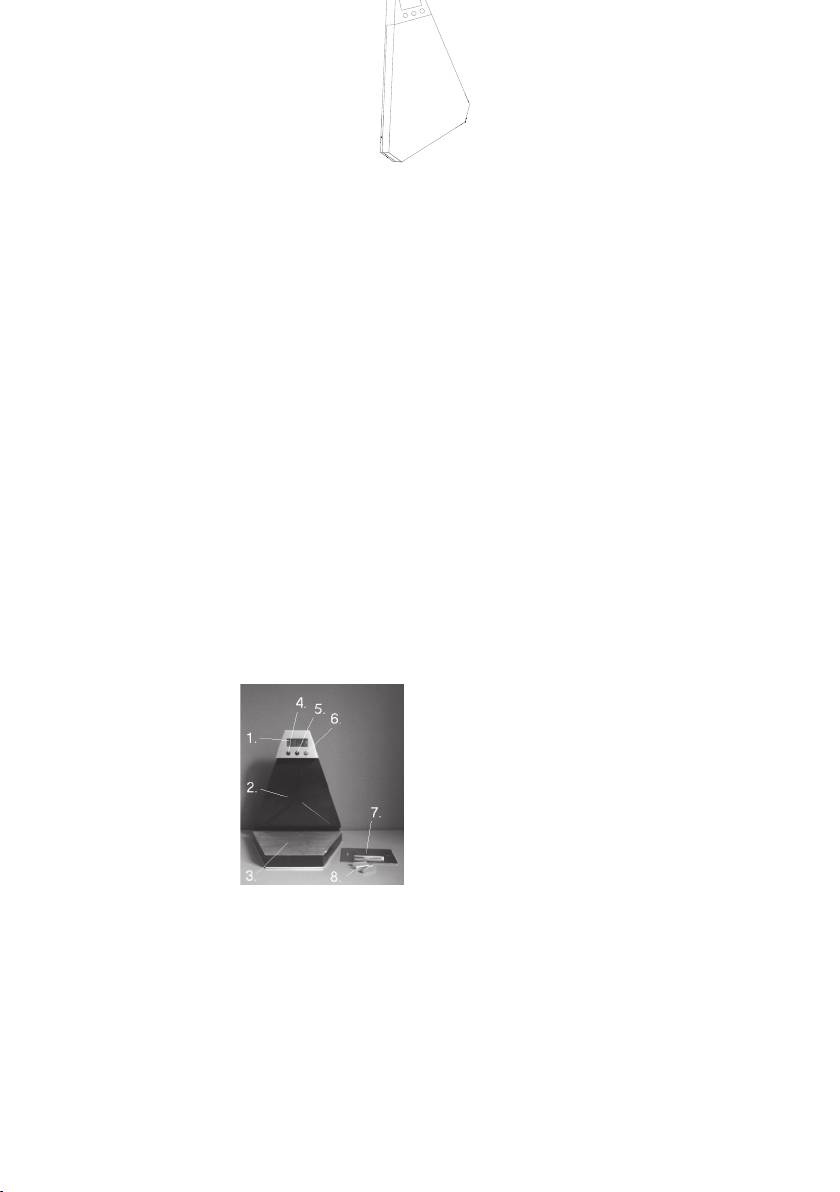
KEY TO THE KITCHEN SCALE’S PARTS
1. Display
2. Upper section
3. Weighing platform
4. ”MODE” button (FUNCTION)
5. “UNIT” button (VALUE)
6. ”ON/TARE” button (ON/TARE)
7. Wall fi tting
8. Screws and screw anchors for wall mounting
WALL MOUNTING OF THE KITCHEN SCALE
1. Open the bag with the wall fi tting (7) as well as the
screws and screw anchors (8) for fi tting.
2. Make sure that the wall is able to carry the scale.
3. Mount the wall fi tting on the wall at the desired
height using the supplied screws and screw anchors
(the curved hole on the fi tting has to point upwards).
Make sure that the fi tting is level.
4. Hang the scale on the wall fi tting by passing the
black square on the rear of the top (2) down over the
broad dowel on the fi tting. Check that the weight is
fi tted correctly.
PREPARING THE KITCHEN SCALE
PREPARING THE KITCHEN SCALE
• Before you can use the kitchen scale, you have to
• Before you can use the kitchen scale, you have to
dismount the battery cover on the back of the top,
and remove the plastic strip which protrudes from
the battery. Close the cover.
• The kitchen scale will switch on automatically, and
the display (1) shows 0:00. The minutes will fl ash,
and the time can be set as described in the section
“Setting of the Clock” below.
o The minutes will stop fl ashing if you do not set
the time now. The time can be set at any time, as
described below.
Setting the clock
1. Press and hold the button “MODE”, until the
minutes start to fl ash. In the top right part of the
display, “TM” will be shown.
2. Press button ”UNIT” (5) to set the minutes, and then
shortly press button “MODE”. The hours will now
start fl ashing.
3. Press button ”UNIT” to set the hours, and then
shortly press button “MODE”.
4. The clock has now been set.
Caution! This is a 24-hour clock.
Caution! Each time you press one of the buttons, a
beep is heard. If you hold down the button “UNIT”,
the numbers will change fast and without beeps.
USE
Weighing
1. Flip down the lower part.
2. Switch the kitchen scale on using the “ON/TARE”
(6) button. The display will switch on and show the
message ”HELO” for a moment. When the scale
displays ”0”, it is ready for use.
3. Place what you wish to weigh on the weighing
platform (3).
4. If you try to weigh something that weighs more than
2 kg, the display will show ”Err”. The scale can only
weigh items up to 2 kg.
5. When the scale has not been used for a while, it will
automatically change over to displaying the time.
Weighing with the tare function
The scale has a practical tare (zeroing function), which
you can use if you want to weigh something (e.g. fl our)
in a container or similar.
1. Place the container on the weighing platform.
2. The weight of the container will now be shown.
Press the button ”ON/TARE””. The scale will be
reset, and ”TARE” will be shown on the left hand
side of the display.
3. You can now weigh out the required quantity in the
container.
4. Every time “ON/”TARE” is pressed, the scale will be
reset.
Conversion between grams and ounces.
You can switch between grams (g) and ounces (oz) or
vice versa using the “UNIT” button. The chosen unit of
weight will be shown in the bottom right of the display.
