Stiebel Eltron SB AC с 08.06.2009: inStAllAtion inStAllAtion8. Installation
inStAllAtion inStAllAtion8. Installation: Stiebel Eltron SB AC с 08.06.2009
www.StieBel-eltron.CoM
SB S | SB AC |
17
EN
G
L
IS
H
inStAllAtion inStAllAtion 8. Installation
8.1 transport
!
SB 302 S and SB 402 S
To prevent damage and soiling, we recommend
removing the cylinder casing for transportation to the
installation location.
8.2 Installation site
Always install the appliance in a room free from the risk of frost
and near to the draw-off point, and secure the appliance to the
floor.
8.3 Installation
8.3.1 Fitting the cold water connection and the safety
assembly
Carry out all water connection and installation work
in accordance with regulations.
»
Place the cylinder in its final location and align it vertically.
»
Fit the cold water inlet pipe with the safety assembly. Bear in
mind that, depending on the static pressure, you might also need
a pressure reducing valve (see chapter “Special accessories /
Safety assembly and pressure reducing valve”).
SB 302 S and SB 402 S
26
�0
2�
09
�0
03
5
1
2
1 Cold water connection
2 Cold water supply pipe
»
Connect the cold water supply directly to the cylinder or with the
connecting pipe routed between the cylinder feet.
»
During fitting, counterhold the fitting with a spanner (size 36).
»
Check the rigidity of the connecting pipe and secure it further
if required.
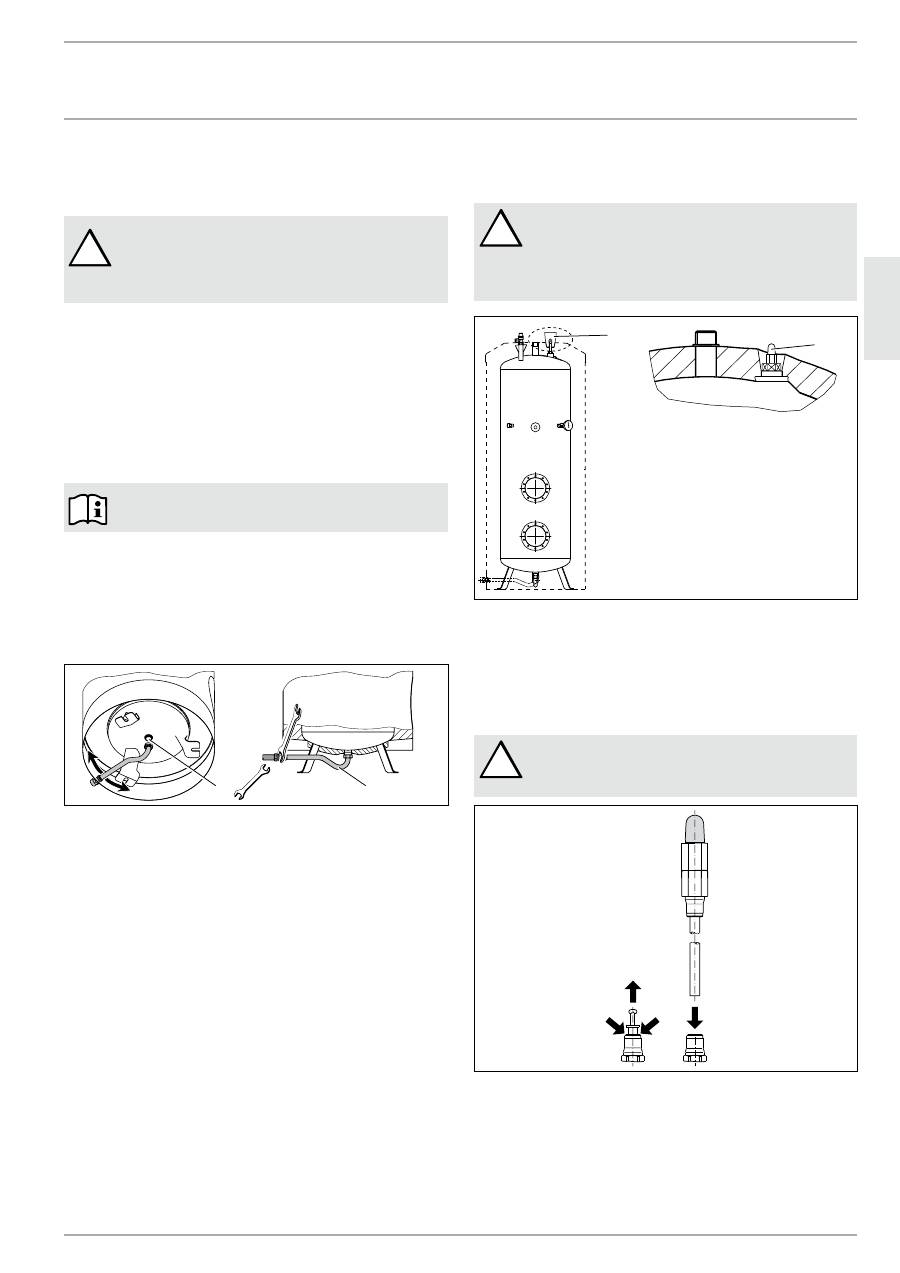
8.3.2 Checking/fitting the signal anode
SB 302 S and SB 402 S
!
Risk of damage
The appliance must not be operated without a
consumption indicator or with a damaged one,
otherwise water will leak out once the anode is
depleted.
26
�0
2�
09
�0
04
6
1
2
1 Transport protection
2 Signal anode with consumption indicator
»
Remove the transport protection.
»
Check the consumption indicator for transport damage.
SB 602 ac and SB 1002 ac
!
Risk of damage
When operating the cylinder without consumption
indicator, leave the plug in the threaded hole.
26
�0
2�
09
�0
03
1
»
Pull the plug out by simultaneously pushing the pressure ring
down.
»
Push in the open pipe end of the consumption indicator until it
bottoms out.
»
Affix the label “Signal anode information” in a clearly visible
position on the thermal insulation.
Оглавление
- inhAlt | Bedienung AllgeMeine hinweiSe 1. Allgemeine Hinweise
- Bedienung SiCherheit
- Bedienung wAS tun wenn ...
- inStAllAtion SiCherheit6. Sicherheit
- inStAllAtion MontAge8. Montage
- inStAllAtion MontAge
- inStAllAtion erStinBetrieBnAhMe9. Erstinbetriebnahme
- inStAllAtion teChniSChe dAten15. Technische Daten
- inStAllAtion teChniSChe dAten
- Germany Kundendienst und Garantie
- Germany Umwelt Und recyclinG
- ContentS | operAtion generAl inforMAtion 1. General information
- operAtion SAfety
- inStAllAtion SAfety6. Safety
- inStAllAtion inStAllAtion8. Installation
- inStAllAtion inStAllAtion
- inStAllAtion CoMMiSSioning9. Commissioning
- inStAllAtion SpeCifiCAtion15. Specification
- inStAllAtion SpeCifiCAtion
- Warranty | EnvironmEnt and rEcycling
- tABle deS MAtièreS | utiliSAtion reMArqueS générAleS 1. Remarques générales
- utiliSAtion SéCurité
- utiliSAtion que fAire Si ... ?
- inStAllAtion SéCurité6. Sécurité
- inStAllAtion MontAge8. Montage
- inStAllAtion MontAge
- inStAllAtion preMière MiSe en ServiCe9. Première mise en service
- inStAllAtion donnéeS teChniqueS15. Données techniques
- inStAllAtion donnéeS teChniqueS
- inStAllAtion | gArAntie | environneMent et reCyClAge donnéeS teChniqueS
- Garantie | environnement et recyclaGe
- inhoud | Bediening AlgeMene inStruCtieS 1. Algemene instructies
- Bediening veiligheid
- Bediening wAt Moet u doen AlS ...
- inStAllAtie veiligheid6. Veiligheid
- inStAllAtie MontAge8. Montage
- inStAllAtie MontAge
- inStAllAtie eerSte ingeBruiKnAMe9. Eerste ingebruikname
- inStAllAtie teChniSChe gegevenS15. Technische gegevens
- inStAllAtie teChniSChe gegevenS
- inStAllAtie teChniSChe gegevenSinStAllAtie | gArAntie | Milieu en reCyCling teChniSChe gegevenS
- garantie | Milieu en recycling
- щие указания
- хника безопасности
- хника безопасности
- нтаж
- рвый ввод в эксплуатацию
- хнические характеристики
- Гарантия
