Stiebel Eltron SB AC с 08.06.2009: inStAllAtion inStAllAtion
inStAllAtion inStAllAtion: Stiebel Eltron SB AC с 08.06.2009
18
| SB S | SB AC
www.StieBel-eltron.CoM
inStAllAtion inStAllAtion
8.3.3 Preparing the DHW circulation line connection, if
applicable
»
You can fit a DHW circulation line to the DHW circulation
connection, or you can use the thermometer connection where
appropriate (see chapter “Specification / Dimensions and
connections”).
SB 302 S and SB 402 S
Fit the cylinder casing before making the water
connection and, if necessary, the DHW circulation line
or the flanged immersion heater.
The plinth trim should be fitted after the tightness
check.
»
If you install a DHW circulation line on the DHW circulation
connection, cut an opening in the cylinder casing for the DHW
circulation line near the connection (indentation in the foam).
»
Remove the thermal insulation near the connection.
»
Route the DHW circulation line through the opening in the
cylinder casing and fit the DHW circulation line.
»
Insulate the connection for the DHW circulation line.
»
Insert the 1/2” adaptor supplied with flat gasket and an extension.
»
Cover the hole in the cylinder casing with the adhesive rose
supplied.
SB ac
With this appliance type the thermal insulation must be
fitted before connecting a DHW circulation line:
Extend the DHW circulation connection to approx.
150 mm. Fit the thermal insulation. For this, observe
chapter "Fitting the thermal insulation".
Fit the DHW circulation line.
8.3.4 Fitting the thermal insulation
The thermal insulation is available as accessory (see chapter
“Appliance description / Accessories”).
»
Fit the thermal insulation according to the instructions supplied.
For this, ensure that there is enough space for the installation
task.
SB 602 ac and SB 1002 ac
»
Insert the anode indicator extension through the hole in the
cover plate.
8.3.5 Fitting special accessories
SB AC: The polystyrene cap in the lower flange aperture
is also designed to position the thermal insulation
correctly above the flange apertures. If you fit the
special accessories into the lower flange aperture,
then push the polystyrene cap into the upper flange
aperture.
»
Install the special accessories in accordance with the operating
and installation instructions supplied.
»
Close the flange apertures with an indirect coil, flanged
immersion heater, dummy flange or threaded immersion heater.
Maintain the DC separation towards the cylinder.
8.3.6 Fitting the water connection and the safety assembly
Carry out all water connection and installation work
in accordance with regulations.
»
Flush the line thoroughly.
»
Install the DHW outlet line.
»
Size the drain so that water can drain off unimpeded when the
safety valve is fully opened. The safety valve discharge aperture
must remain open to the atmosphere.
»
Fit the discharge pipe of the safety assembly with a constant
slope.
»
Observe the information in the safety assembly installation
instructions.
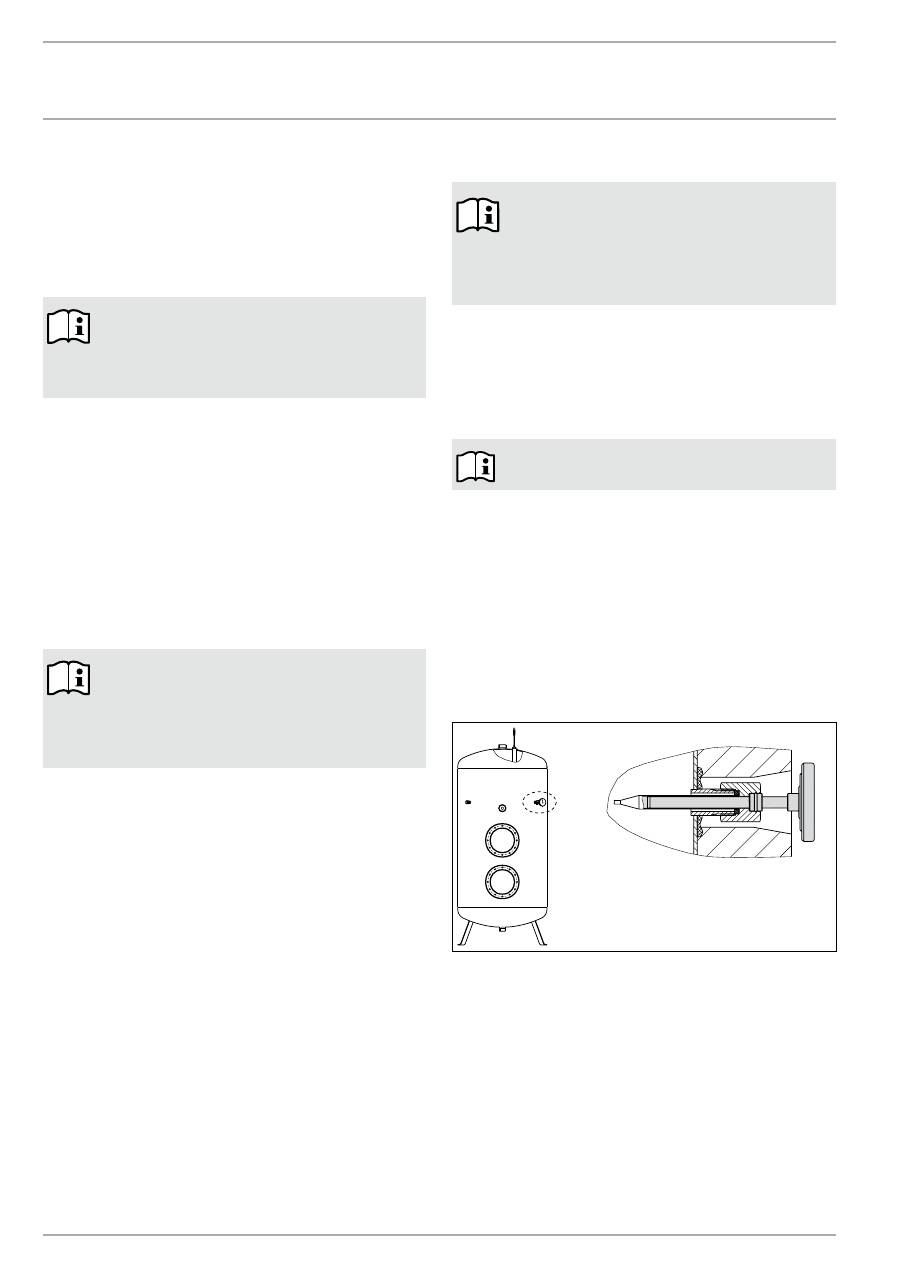
8.3.7 Fitting the thermometer
26
�0
2�
09
�0
04
6
»
Insert the thermometer as far as it will go and align it.
Оглавление
- inhAlt | Bedienung AllgeMeine hinweiSe 1. Allgemeine Hinweise
- Bedienung SiCherheit
- Bedienung wAS tun wenn ...
- inStAllAtion SiCherheit6. Sicherheit
- inStAllAtion MontAge8. Montage
- inStAllAtion MontAge
- inStAllAtion erStinBetrieBnAhMe9. Erstinbetriebnahme
- inStAllAtion teChniSChe dAten15. Technische Daten
- inStAllAtion teChniSChe dAten
- Germany Kundendienst und Garantie
- Germany Umwelt Und recyclinG
- ContentS | operAtion generAl inforMAtion 1. General information
- operAtion SAfety
- inStAllAtion SAfety6. Safety
- inStAllAtion inStAllAtion8. Installation
- inStAllAtion inStAllAtion
- inStAllAtion CoMMiSSioning9. Commissioning
- inStAllAtion SpeCifiCAtion15. Specification
- inStAllAtion SpeCifiCAtion
- Warranty | EnvironmEnt and rEcycling
- tABle deS MAtièreS | utiliSAtion reMArqueS générAleS 1. Remarques générales
- utiliSAtion SéCurité
- utiliSAtion que fAire Si ... ?
- inStAllAtion SéCurité6. Sécurité
- inStAllAtion MontAge8. Montage
- inStAllAtion MontAge
- inStAllAtion preMière MiSe en ServiCe9. Première mise en service
- inStAllAtion donnéeS teChniqueS15. Données techniques
- inStAllAtion donnéeS teChniqueS
- inStAllAtion | gArAntie | environneMent et reCyClAge donnéeS teChniqueS
- Garantie | environnement et recyclaGe
- inhoud | Bediening AlgeMene inStruCtieS 1. Algemene instructies
- Bediening veiligheid
- Bediening wAt Moet u doen AlS ...
- inStAllAtie veiligheid6. Veiligheid
- inStAllAtie MontAge8. Montage
- inStAllAtie MontAge
- inStAllAtie eerSte ingeBruiKnAMe9. Eerste ingebruikname
- inStAllAtie teChniSChe gegevenS15. Technische gegevens
- inStAllAtie teChniSChe gegevenS
- inStAllAtie teChniSChe gegevenSinStAllAtie | gArAntie | Milieu en reCyCling teChniSChe gegevenS
- garantie | Milieu en recycling
- щие указания
- хника безопасности
- хника безопасности
- нтаж
- рвый ввод в эксплуатацию
- хнические характеристики
- Гарантия
