Stiebel Eltron SB AC с 08.06.2009: inStAllAtie MontAge8. Montage
inStAllAtie MontAge8. Montage: Stiebel Eltron SB AC с 08.06.2009
www.StieBel-eltron.CoM
SB S | SB AC |
39
N
e
de
rl
aN
ds
inStAllAtie MontAge 8. Montage
8.1 transport
!
SB 302 S en SB 402 S
Voor het transport naar de opstelplaats is het aan te
bevelen de boilerommanteling te verwijderen zodat
ze niet vuil wordt of beschadigd raakt.
8.2 Montageplaats
Monteer het toestel altijd in een vorstvrije ruimte in de buurt van
het aftappunt en bevestig het toestel op de vloer.
8.3 Montage
8.3.1 Koudwateraansluiting en veiligheidsgroep monteren
Voer alle werkzaamheden voor wateraansluiting en
installatie uit conform de voorschriften.
»
Zet de boiler op zijn plaats en lijn het toestel verticaal uit.
»
Monteer de koudwatertoevoerleiding met de veiligheidsgroep.
Merk op dat u daarvoor, afhankelijk van de statische druk,
eventueel ook een reduceerafsluiter nodig heeft (zie hoofdstuk
“Speciaal toebehoren/veiligheidsgroep en reduceerafsluiter”).
SB 302 S en SB 402 S
26
�0
2�
09
�0
03
5
1
2
1 Koudwateraansluiting
2 Koudwater-aansluitbuis
»
Sluit de koudwateraansluiting rechtstreeks aan of monteer de
aansluitbuis tussen de voeten.
»
Bij het vastschroeven houdt u tegen met een sleutel (sleutelmaat
36).
»
Controleer de stabiliteit van de aansluitbuis en zet de aansluitbuis
eventueel extra vast.
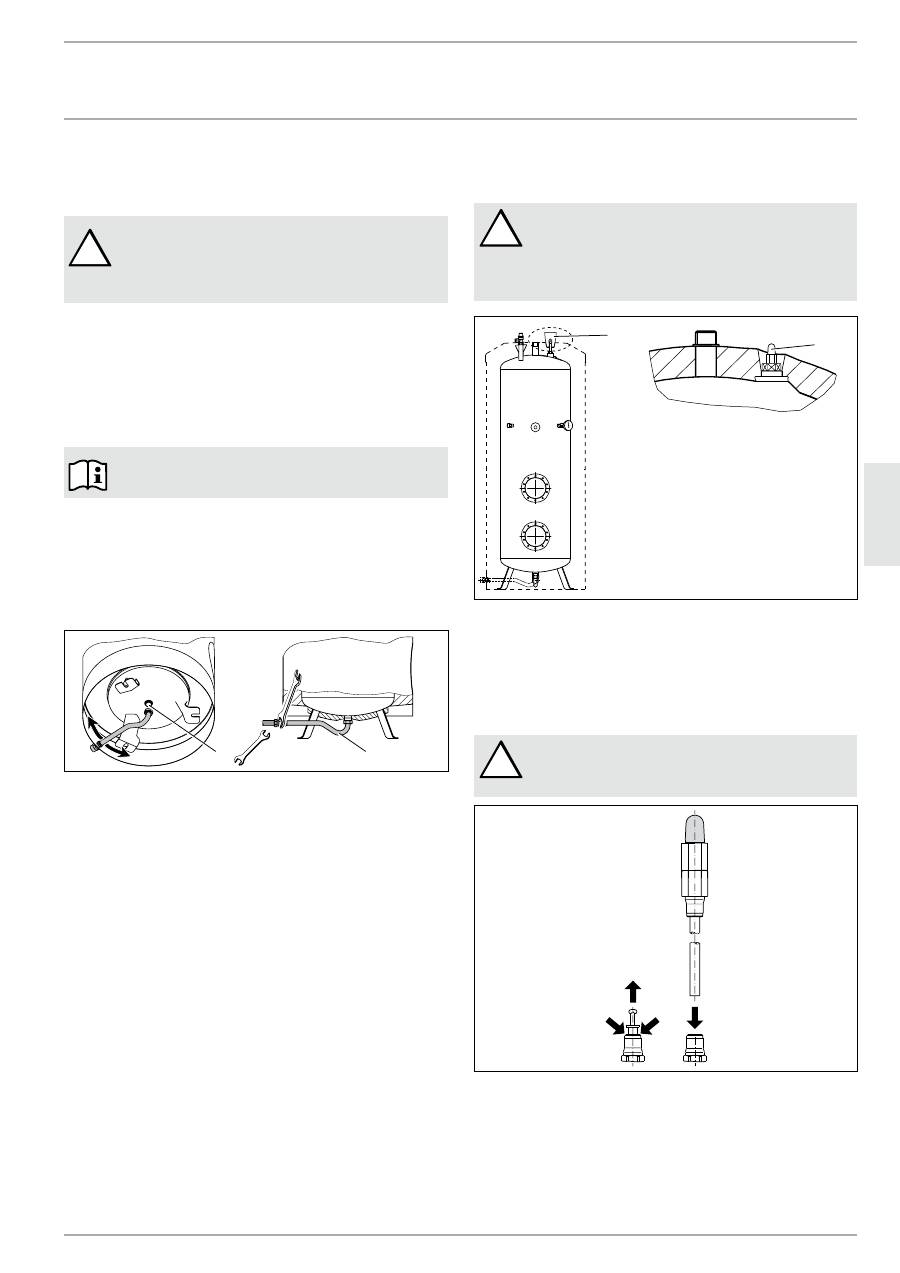
8.3.2 Signaalanode controleren / monteren
SB 302 S en SB 402 S
!
Gevaar voor beschadiging!
Het toestel mag niet gebruikt worden zonder
verbruiksindicator of als de verbruiksindicator
beschadigd is, want als de anode versleten is, zou er
water naar buiten komen.
26
�0
2�
09
�0
04
6
1
2
1 Transportbeveiliging
2 Verbruiksindicator signaalanode
»
Verwijder de transportbeveiliging.
»
Controleer de verbruiksindicator op transportschade!
SB 602 ac en SB 1002 ac
!
Gevaar voor beschadiging!
Bij werking zonder verbruiksindicator moet de dop in
de schroefkoppeling blijven.
26
�0
2�
09
�0
03
1
»
Trek de afsluitdop uit door tegelijk de drukring omlaag te duwen.
»
Schuif het open buisuiteinde van de verbruiksindicator tot tegen
de aanslag in.
»
Bevestig de sticker “Aanwijzing signaalanode” goed zichtbaar
op de isolatie.
Оглавление
- inhAlt | Bedienung AllgeMeine hinweiSe 1. Allgemeine Hinweise
- Bedienung SiCherheit
- Bedienung wAS tun wenn ...
- inStAllAtion SiCherheit6. Sicherheit
- inStAllAtion MontAge8. Montage
- inStAllAtion MontAge
- inStAllAtion erStinBetrieBnAhMe9. Erstinbetriebnahme
- inStAllAtion teChniSChe dAten15. Technische Daten
- inStAllAtion teChniSChe dAten
- Germany Kundendienst und Garantie
- Germany Umwelt Und recyclinG
- ContentS | operAtion generAl inforMAtion 1. General information
- operAtion SAfety
- inStAllAtion SAfety6. Safety
- inStAllAtion inStAllAtion8. Installation
- inStAllAtion inStAllAtion
- inStAllAtion CoMMiSSioning9. Commissioning
- inStAllAtion SpeCifiCAtion15. Specification
- inStAllAtion SpeCifiCAtion
- Warranty | EnvironmEnt and rEcycling
- tABle deS MAtièreS | utiliSAtion reMArqueS générAleS 1. Remarques générales
- utiliSAtion SéCurité
- utiliSAtion que fAire Si ... ?
- inStAllAtion SéCurité6. Sécurité
- inStAllAtion MontAge8. Montage
- inStAllAtion MontAge
- inStAllAtion preMière MiSe en ServiCe9. Première mise en service
- inStAllAtion donnéeS teChniqueS15. Données techniques
- inStAllAtion donnéeS teChniqueS
- inStAllAtion | gArAntie | environneMent et reCyClAge donnéeS teChniqueS
- Garantie | environnement et recyclaGe
- inhoud | Bediening AlgeMene inStruCtieS 1. Algemene instructies
- Bediening veiligheid
- Bediening wAt Moet u doen AlS ...
- inStAllAtie veiligheid6. Veiligheid
- inStAllAtie MontAge8. Montage
- inStAllAtie MontAge
- inStAllAtie eerSte ingeBruiKnAMe9. Eerste ingebruikname
- inStAllAtie teChniSChe gegevenS15. Technische gegevens
- inStAllAtie teChniSChe gegevenS
- inStAllAtie teChniSChe gegevenSinStAllAtie | gArAntie | Milieu en reCyCling teChniSChe gegevenS
- garantie | Milieu en recycling
- щие указания
- хника безопасности
- хника безопасности
- нтаж
- рвый ввод в эксплуатацию
- хнические характеристики
- Гарантия
