Karcher HKS 100 LM: Operation
Operation: Karcher HKS 100 LM
Check regulator fluid
Operation
Who may perform maintenance?
Note: The speed can only be set easily
Danger
Operator
when the interior cleaner is completely
Risk of injury on account of the escaping
Work designated with the sign “Opera-
filled with regulator fluid. Only fill in the
water jet that could be hot!
tor” may only be carried out by persons
same regulator fluid; mixing with other reg-
– Only use the interior cleaner in closed
who have been instructed in the safe
ulator fluids or contained air lead to jerky
containers.
operation and maintenance on the high
revolutions.
– Only insert the interior cleaner into a
pressure plant.
container or switch it into another con-
Maintenance contract
tainer while the separate high pressure
pump is turned off.
In order to guarantee a reliable operation
Place interior cleaner onto container
og the equipment, we success, you signed
and lock it.
a maintenance agreement. Please refer to
Connect the high pressure pump to the
you local Kärcher service department.
interior cleaner via a high pressure
Maintenance intervals
hose.
– monthly or after 200 operating hours
Open the cleaning liquid supply.
Switch on the separate high pressure
Maintenance Works
pump.
Insert the interior cleaner into the vice
Check whether all screws are fastened
with the regulator screw pointing up.
Shutting down
tightly (operator).
Turn out the regulator screw.
Check drive parts (operator).
Note: Flush the interior cleaner for 30 sec-
Fill in regulator fluid.
Check regulator fluid (operator).
onds without adding detergents prior to
Turn the nozzle holder slowly by hand
shutting it down. This will avoid crusting
Remove nozzle holder
(5 to 10 minutes) until regulator fluid
and adhesion and thus premature wear of
Note: The chart shows the interior cleaners
drains. Immediately replace the regula-
the seals.
with the order no. 3.632-030 and 3.632-
tor fluid. Turn the nozzle holder until it is
Switch off the separate high pressure
032. The interior cleaners with the order no.
completely filled with regulator fluid.
pump.
3.632-035 and 3.632-049 do not have a
Then, the regulator fluid will no longer
Shut off the cleaning liquid supply.
counter weight and no protective cap.
drain.
Remove the interior cleaner from the
Turn in the regulator screw.
container.
Troubleshooting
Storage
Troubleshooting notes
몇 Caution
Risk of injury and damage! Note the weight
Danger
of the appliance in case of storage.
Risk of accident while working on the unit!
During all tasks:
Transport
Remove voltage from and secure high
몇 Caution
pressure pump at the main switch.
Risk of injury and damage! Observe the
Shut off the cleaning liquid supply.
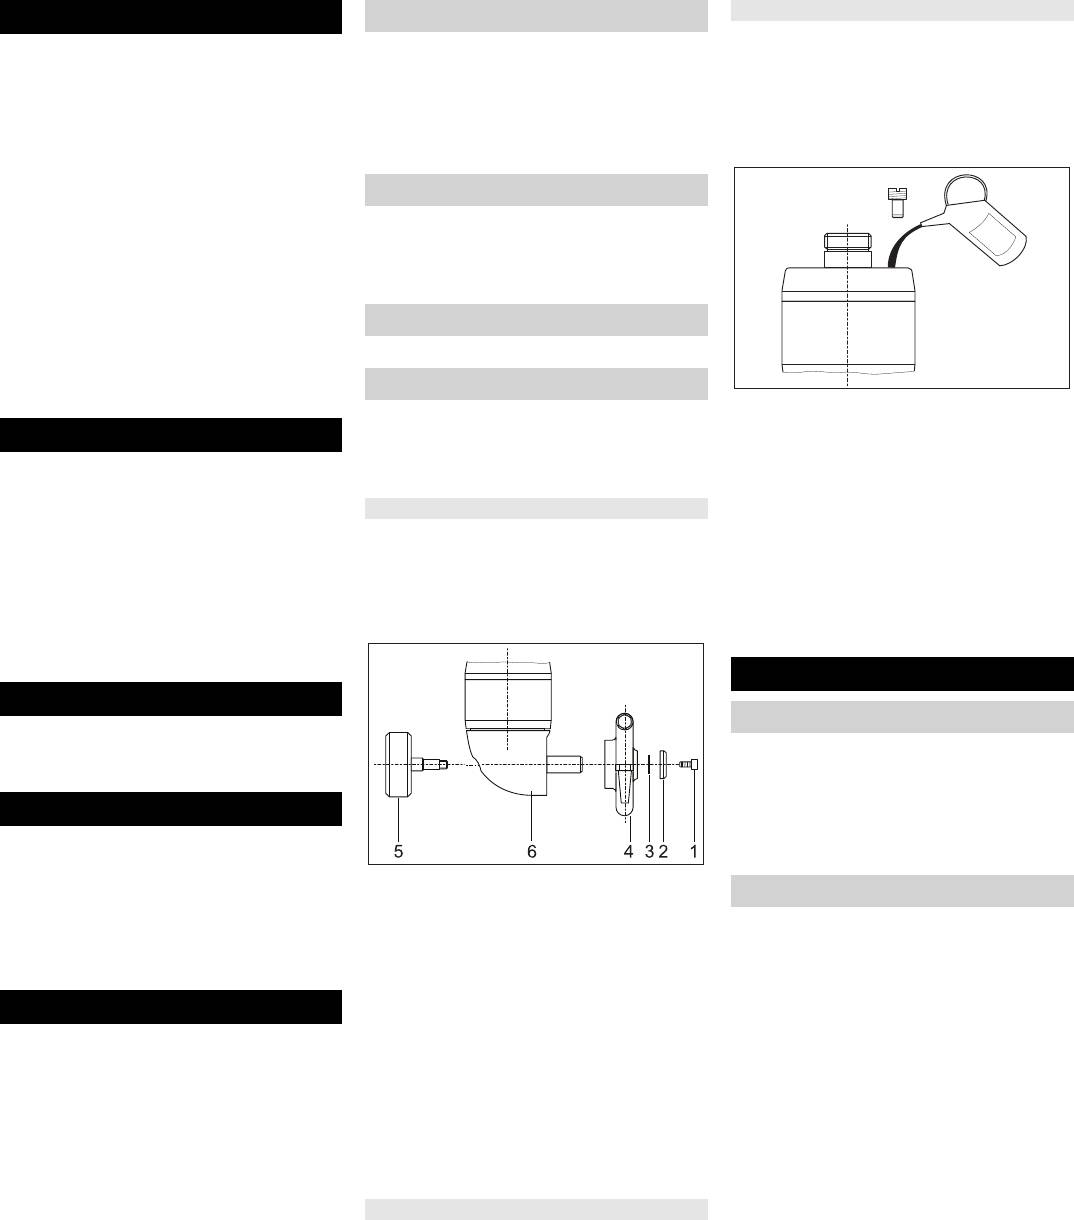
1 Screw
weight of the appliance when you transport
Who may remedy faults?
2 Shoulder disc
it.
3 Balancing disc
Who may remedy faults?
When transporting in vehicles, secure
4 Nozzle-holder
Operator
the appliance according to the guide-
5 Counterweight
Work designated with the sign “Opera-
lines from slipping and tipping over.
6 Protective cover
tor” may only be carried out by persons
Maintenance and care
Loosen the screw.
who have been instructed in the safe
Remove the shoulder disc and the bal-
operation and maintenance on the high
The basis for a safe operational plant is
ancing discs.
pressure plant.
regular maintenance.
Pull off the nozzle holder.
Customer Service
Use only original parts of the manufacturer
Only for appliances order nos. 3.632-
Work designated with the sign “Cus-
or part suggessted by him, such as
030 and 3.632-032: Unscrew the coun-
tomer Service” may only be done by the
– replacement and wear parts
terweight and remove the protective
fitters of Kärcher Customer Service.
– Accessory parts
cover.
– Fuel
Clean the bevel wheels.
– Detergent
Install nozzle holder
Danger
Risk of accident while working on the unit!
Only for appliances order nos. 3.632-
During all tasks:
030 and 3.632-032: Attach the protec-
Remove voltage from and secure high
tive cover and screw on counterweight.
pressure pump at the main switch.
Install the nozzle holder.
Shut off the cleaning liquid supply.
Insert the shoulder disc and the balanc-
ing discs.
Attach the screw.
- 11
25EN
Оглавление
- Sicherheitshinweise
- Technische Daten
- Inbetriebnahme
- Bedienung
- Zubehör EG-Konformitätserklärung
- Proper use Safety instructions
- Technical specifications
- Start up
- Operation
- Accessories EC Declaration of Conformity
- Utilisation conforme
- Caractéristiques techniques
- Mise en service
- Utilisation
- Accessoires Déclaration de conformité CE
- Uso conforme a destinazione Norme di sicurezza
- Dati tecnici
- Messa in funzione
- Uso
- Accessori Dichiarazione di conformità
- Veiligheidsinstructies
- Technische gegevens
- Inbedrijfstelling
- Bediening
- Toebehoren EG-conformiteitsverklaring
- Uso previsto
- Datos técnicos
- Puesta en marcha
- Manejo
- Accesorios Declaración de conformidad CE
- Innehållsförteckning
- Tekniska data
- Idrifttagning
- Handhavande
- Tillbehör Försäkran om EU-
- Символы в руководстве по Назначение
- Технические данные
- Начало работы
- Управление
- Помощь в случае неполадок
- Принадлежности Заявление о соответствии
- Biztonsági tanácsok
- Műszaki adatok
- Üzembevétel
- Használat
- Tartozékok EK konformitási nyiltakozat
- Użytkowanie zgodne z
- Dane techniczne
- Uruchamianie
- Obsługa
- Akcesoria Deklaracja zgodności UE


