Melissa 640-139: KEY TO THE VACUUM CLEANER’S PREPARING THE VACUUM CLEANER PARTS USE
KEY TO THE VACUUM CLEANER’S PREPARING THE VACUUM CLEANER PARTS USE: Melissa 640-139
Table of contents
- INTRODUCTION SAFETY MEASURES
- KEY TO THE VACUUM CLEANER’S PREPARING THE VACUUM CLEANER PARTS USE
- FILTERS Important!
- CLEANING ENVIRONMENTAL TIPS Motor protection filter GUARANTEE TERMS Exhaust filter IMPORTER TRANSPORT AND STORAGE
640046_IM 15/08/05 9:11 Side 19
KEY TO THE VACUUM CLEANER’S
PREPARING THE VACUUM CLEANER
PARTS
• Attach the hose (4) to the vacuum cleaner by
inserting it into the hose connector (7) until
you hear a click. To remove the hose, press
the buttons at the side of the hose and pull it
out of the hose connector.
• Fit the telescopic tube (3) into the other end
of the hose, and attach the floor nozzle (1) to
the end of the tube.
•You can adjust the length of the telescopic
tube by pushing the locking mechanism (2)
down and pulling on the bottom section of
the tube until it reaches a suitable length.
When parking, shorten the tube as far as
possible.
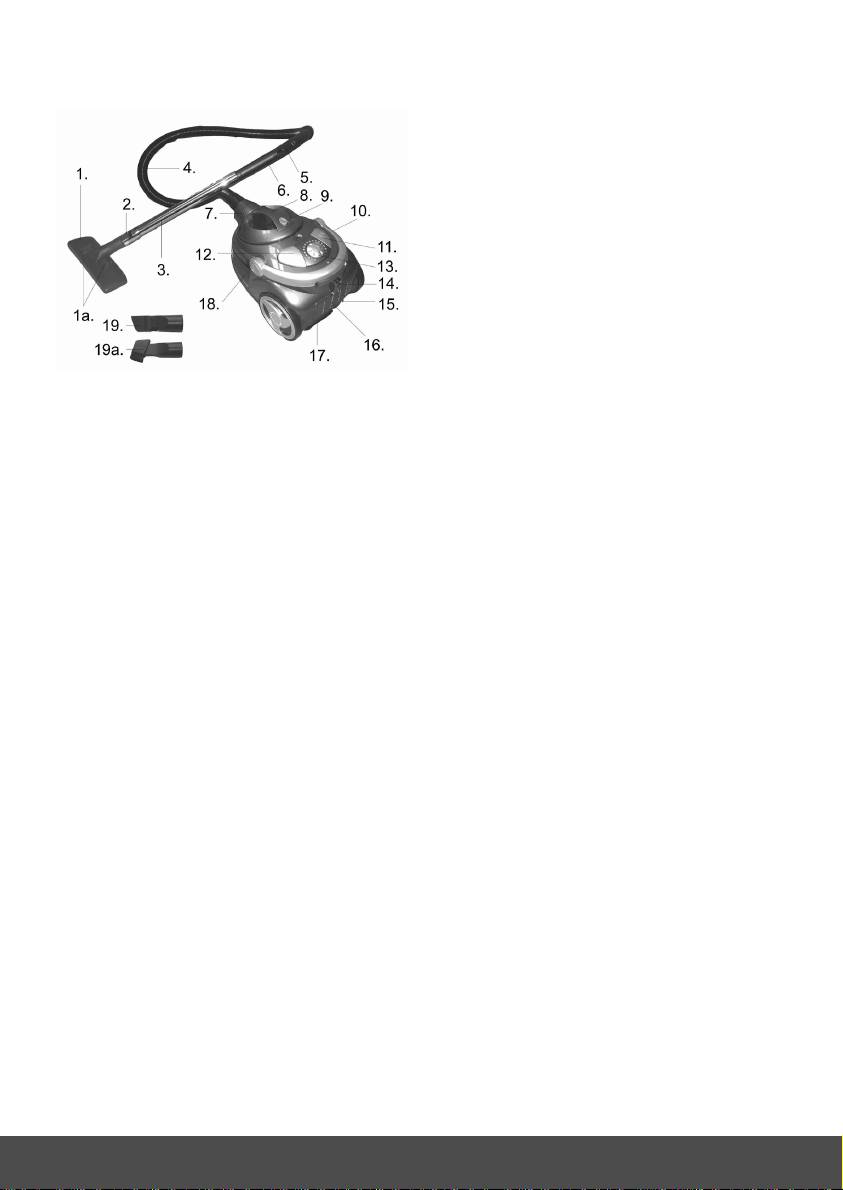
1. Floor nozzle
• The vacuum cleaner’s combination nozzle
1a. Brush change button
(19) is used for particular vacuuming tasks
2. Locking mechanism
(see under Use). Remove the floor nozzle
3. Telescopic tube
and fit the combination nozzle to the end of
4. Hose
the telescopic tube.
5. Air valve
USE
6. Handle
• Pull the cord (15) out of the vacuum cleaner.
7. Hose connector
The cord must not be pulled out any further
8. Dust container
than the red mark. Plug in and switch the
9. Release button
power on.
10. Carrying handle
•Press the on/off button (12) to start and stop
11. Button for automatic cord rewind
the vacuum cleaner.
12. On/Off button
• While in use, the suction strength can be
13. Button for controlling suction strength
regulated by opening and closing the air
14. Parking holder
valve (5) on the handle at the end of the
15. Cord and plug
hose.
16. Exhaust filter
• The suction strength can also be adjusted
electronically using the button for controlling
17. Holder for combination nozzle
suction strength (13). Suction strength
18. Window for dust container
increases when the button is turned towards
19. Combination nozzle
"Max", and reduces when it is turned
19a. Combination nozzle, extended
towards "Min".
19
