Melissa 3-in-1 Espresso and Coffee Maker 245-039: INTRODUCTION SAFETY MEASURES KEY
INTRODUCTION SAFETY MEASURES KEY: Melissa 3-in-1 Espresso and Coffee Maker 245-039
Table of contents
- INTRODUCTION SAFETY MEASURES KEY
- Flushing through USE Setting the clock Setting the timer function Making ordinary coffee Making espresso Frothing of milk Drip tray
- CLEANING Daily cleaning Descaling Descaling the espresso maker Descaling the coffee maker INFORMATION ON DISPOSAL AND RECYCLING OF THIS PRODUCT GUARANTEE TERMS IMPORTER
INTRODUCTION
To get the most from your new combined coffee and espresso maker, please read
through these instructions carefully before using it for the first time. We also
recommend that you keep the instructions for future reference, so that you can
remind yourself of the functions of the appliance.
SAFETY MEASURES
Normal use of the appliance
•
Incorrect use of the appliance may cause personal injury and damage to the
appliance.
•
Use the appliance for its intended purpose only. The manufacturer is not
responsible for any damage resulting from incorrect use or handling (see also the
‘Guarantee Terms’ section).
•
Use only accompanying accessories or those recommended by the manufacturer.
•
The appliance may only be connected to 230 V, 50 Hz.
•
The appliance or cord must not be submerged in water or any other liquid.
•
Do not touch the appliance with wet hands.
•
Never leave the appliance unattended when in use and keep an eye on children.
•
Never put hot or boiling water in the reservoir. Use cold water only. Ensure the
appliance is switched off when filling with water.
•
The water level in the reservoir must be between the MAX and MIN marks on the
water level gauge on the side of the reservoir.
•
Never use the brewing function or the frothing function for more than one minute
at a time, and do not use them at the same time.
•
The metal parts get very hot during use. Touch the plastic parts and handles only.
•
Do not remove the filter holder while brewing espresso, as you may be scalded by
hot water and steam spraying out.
•
The appliance should never be switched on unless it contains water or descaler.
•
Do not leave the coffee pot standing on the switched-on hotplate when it is
empty.
•
Freshly-brewed coffee and cappuccino steam are extremely hot. Take care to
avoid scalding yourself or others.
•
This appliance is not suitable for commercial or outdoor use.
•
An espresso maker functions best if it is used at least once a week. If it is not
used for prolonged periods, the water tubes may clog up; this is due to the
mineral content of the water and its reaction with the material. It is very important
to ensure that the appliance is completely dry before packing it away for any
length of time.
Positioning the appliance
•
Always place the appliance at a safe distance from heat sources such as ovens,
cooking rings or similar.
•
Do not cover the appliance.
•
The appliance must not be placed anywhere with an ambient temperature around
or below freezing point (0 °C). If the water in the reservoir freezes, it may damage
the appliance.
•
Do not allow the cord to hang over the edge of a table/counter, and keep it away
from hot objects and naked flames.
Cord, plug and mains socket
•
If the appliance, cord or plug is damaged, it must be inspected and, if necessary,
repaired by an authorised repair engineer, otherwise there is a risk of electric
shock. Never try to repair the appliance yourself.
•
Remove the plug from the socket if the appliance is not to be used for a
prolonged period.
•
Avoid pulling the cord when removing the plug from the socket. Instead, hold the
plug.
•
The cord must not be twisted or wound around the appliance.
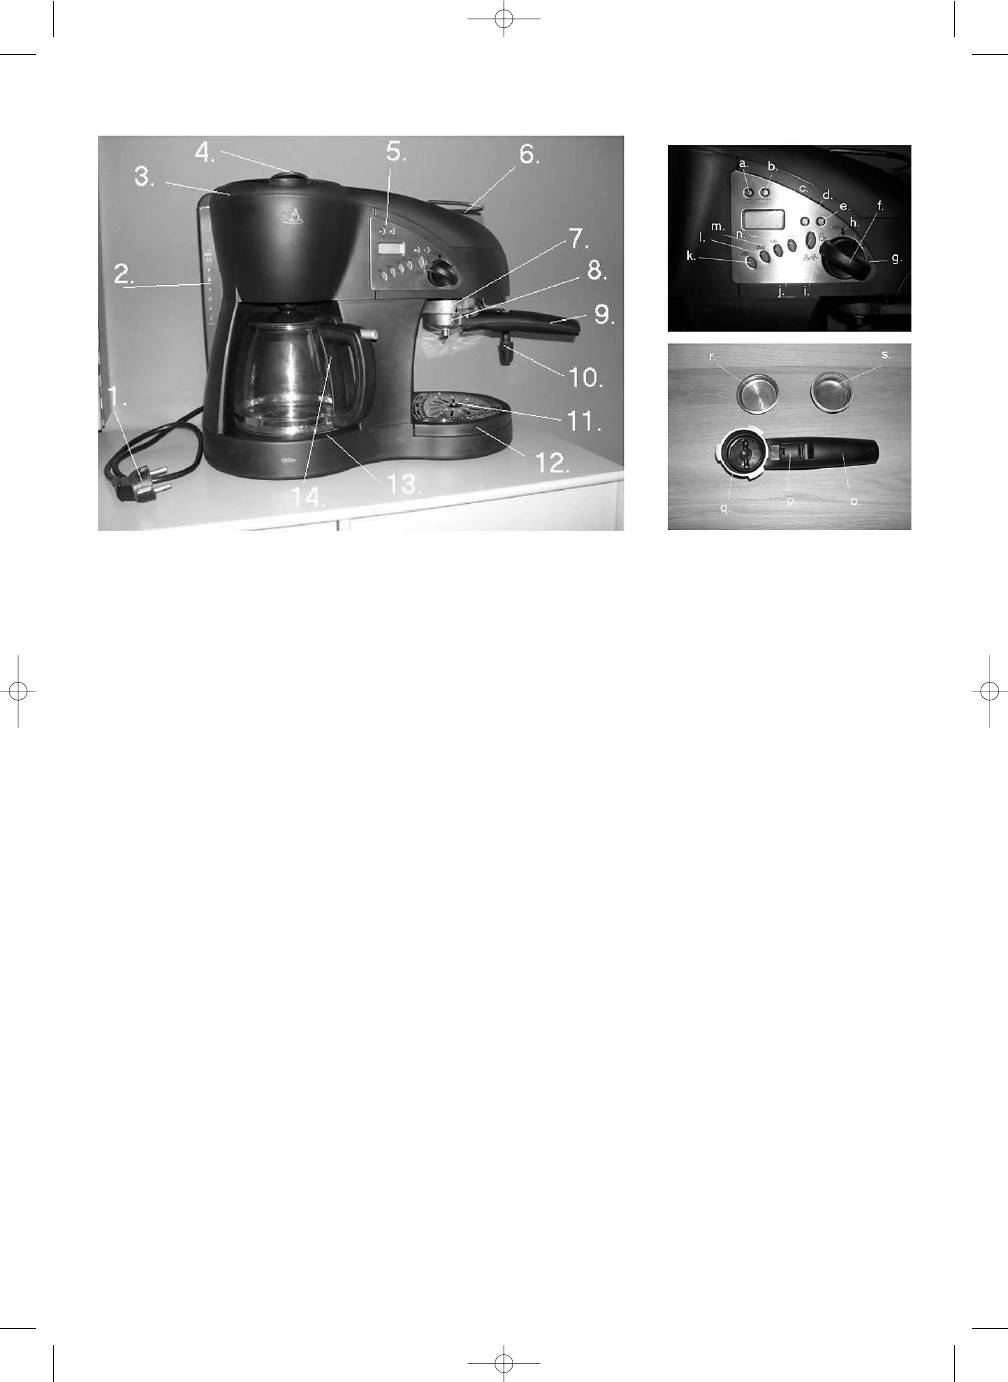
KEY
1. Power cord
2. Water reservoir with water level gauge
3. Filter element with drip stop function (not visible on picture)
4. Cover for water reservoir
5. Control panel
a. Red indicator light (coffee brewing)
b. Yellow indicator light (timer function)
c. Display
d. Green indicator light (espresso brewing)
e. Orange indicator light (heating element)
f.
Function selector for espresso brewing
g. Frothing position
h. Off position (OFF)
i.
Brewing position
j.
On/Off button for espresso brewing
k. Button for setting hours (HR)
l.
Button for setting minutes (MIN)
m. On/Off button for coffee brewing (ON)
n. Programming button (PROG)
6. Cup warmer
7. Brewing head
8. Filter holder
o. Handle
p. Support flap
q. Filter holder
r.
Filter for one cup
s. Filter for two cups
9. Handle
10. Steam nozzle with rubber tip
11. Grid
12. Drip tray
13. Hotplate
14. Coffee pot
PRIOR TO FIRST USE
Each individual appliance is checked at the factory, but for safety’s sake, after
unpacking the appliance, you should check carefully that it has not been damaged
during transport.
Place the appliance on a flat, stable surface, such as a kitchen counter.
14
UK
245039_IM 24/02/06 9:48 Side 14
