Karcher KMR 1250 B: Transport Maintenance and care
Transport Maintenance and care: Karcher KMR 1250 B
Maintenance by Customer Service
Transport
Maintenance and care
Maintenance to be carried out after 8 oper-
Caution
General notes
ating hours:
Risk of injury and damage! Observe the weight
Î Carry out initial inspection.
– Maintenance work may only be carried
of the appliance when you transport it.
Maintenance to be carried out every 100
out by approved customer service out-
When transporting in vehicles, secure the
operating hours
lets or experts in this field who are famil-
appliance according to the guidelines from
Maintenance to be carried out every 200
iar with the respective safety
slipping and tipping over.
operating hours
regulations.
몇 Warning
Maintenance to be carried out every 300
– Mobile appliances used for commercial
operating hours
The appliance must be secured against
purposes are subject to safety inspec-
slippage during transport.
Note
tions according to VDE 0701.
Î Turn ignition key to "0" and remove it.
In order to safeguard warranty claims, all
Î Lock parking brake.
Cleaning
service and maintenance work during the
Î Secure the appliance at the transport eye-
warranty period must be carried out by the
몇 Warning
lets using tension belts, ropes or chains.
authorised Kärcher Customer Service in
Risk of damage! Do not clean the appliance
Î Secure the wheels of the machine with
accordance with the maintenance booklet.
wheel chocks.
with a water hose or high-pressure water jet
(danger of short circuits or other damage).
Maintenance Works
Cleaning the inside of the machine
Preparation:
Danger
Î Park the sweeper on an even surface.
Risk of injury! Wear dust mask and protec-
Î Turn ignition key to "0" and remove it.
tive goggles.
Î Lock parking brake.
Î Open the device hood.
General notes on safety
Î Clean machine with a cloth.
Î Clamp off the minus pole of the battery
Î Blow through machine with com-
to avoid formation of sparks and pre-
pressed air.
vent the device from starting.
Î Close cover.
Danger
Note
External cleaning of the appliance
Risk of injury! Always apply the safety bar
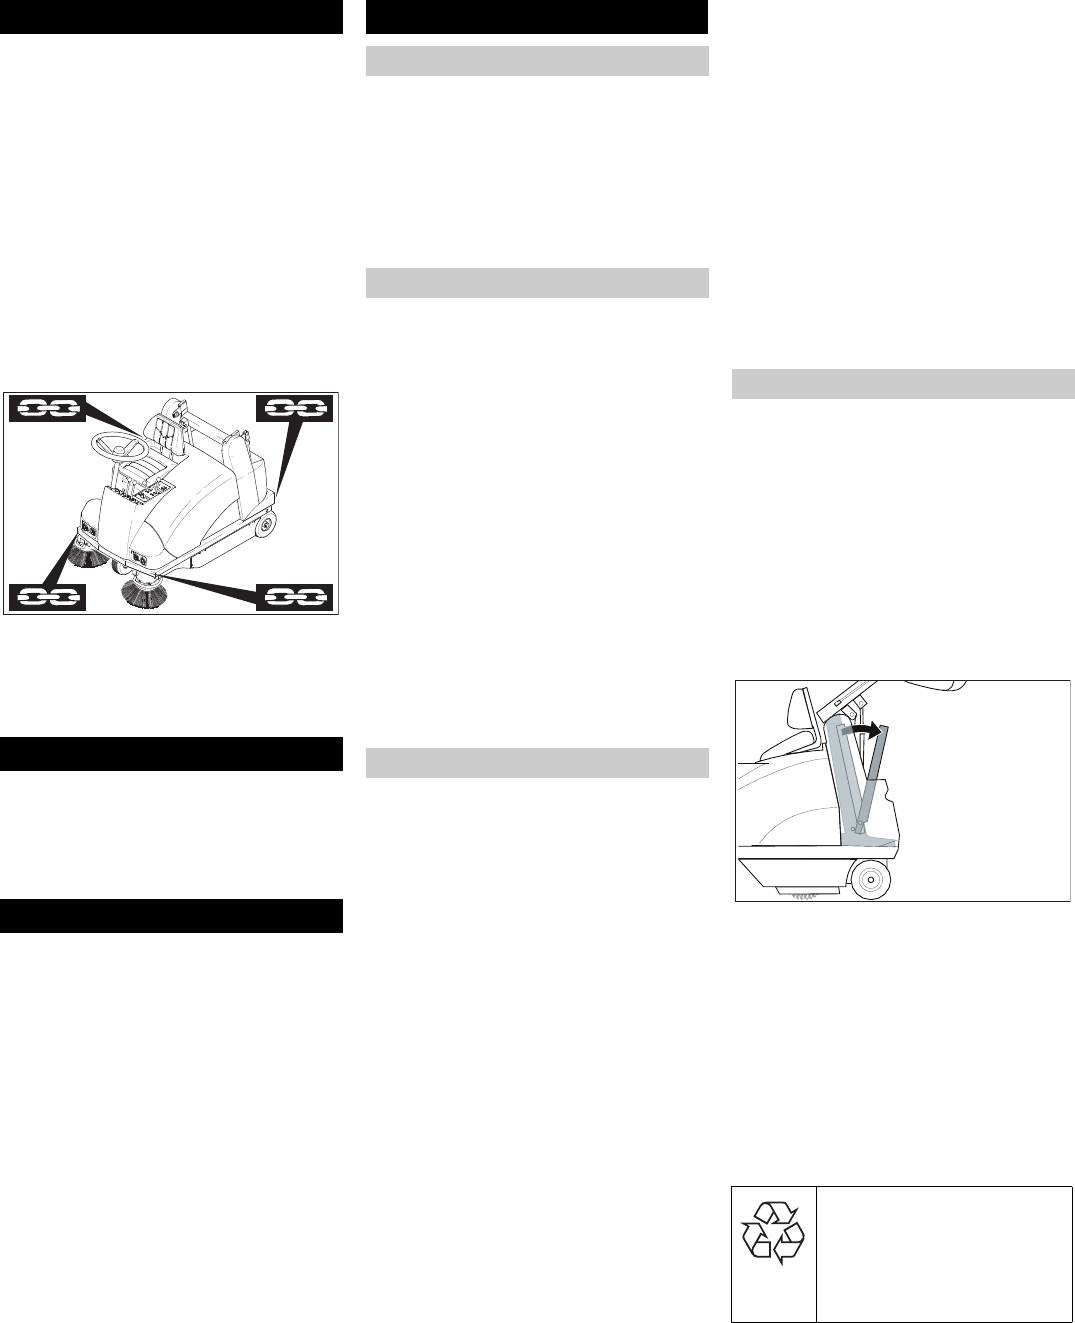
Observe markings for fixing points on base
Î Clean the machine with a damp cloth
when the waste container is raised.
frame (chain symbols). When loading or
which has been soaked in mild detergent.
unloading the machine, it may only be op-
Note
erated on gradients of max. 18%.
Do not use aggressive cleaning agents.
Storing the device
Maintenance intervals
Caution
Note
Risk of injury and damage! Note the weight
The elapsed-time counter shows the timing
of the appliance in case of storage.
of the maintenance intervals.
This appliance must only be stored in inte-
Maintenance by the customer
rior rooms.
Daily maintenance:
Shutdown
Î Use the safety bar for emptying from a
Î Check engine oil level.
height.
Î Check air filter.
If the sweeper is going to be out of service
Î Check tyre pressure.
Danger
for a longer time period, observe the follow-
Î Check the sweeping roller and the side
ing points:
Risk of injury due to engine overrun. Once
brush for wear and wrapped belts.
Î Park the sweeper on an even surface.
the engine has been switched off, wait for 5
Î Check dust filter.
Î Raise the roller brush and the side-
seconds. Stay well clear of the working
brushes to prevent the bristles from be-
Î Check function of all operator control el-
area for this time.
ing damaged.
ements.
– Allow the machine sufficient time to cool
Î Turn ignition key to "0" and remove it.
Weekly maintenance:
down before carrying out any mainte-
Î Check leakage and functioning of all hy-
Î Lock parking brake.
nance and repair work.
draulic components.
Î Lock the sweeper to ensure that it does
– Do not touch any hot parts, such as the
Î Check for smooth running of the Bow-
not roll off.
drive motor and exhaust system.
den cables and the moveable parts
Î Fill fuel tank and close fuel cock.
Maintenance following wear:
Please do not release engine
Î Change engine oil.
Î Replace sealing strips.
oil, fuel oil, diesel and petrol
Î Unscrew spark plugs and pour approx.
3 cm
3
Î Replace roller brush.
of oil into the spark plug holes.
into the environment Protect
Î Replace side brush.
Crank the engine several times before
the ground and dispose of used
replacing the spark plug. Screw in the
Note
oil in an environmentally-clean
spark plug.
For description, see section on Mainte-
manner.
Î Clean the inside and outside of the
nance work.
sweeper.
Follow the instructions in Maintenance
Î Park the machine in a safe and dry
Manual 5.950-533!
place.
Note
Î Disconnect battery.
Where maintenance is carried out by the
Î Charge battery approx. every 2 months.
customer, all service and maintenance
Close fuel cock
work must be undertaken by a qualified
Î Open the device hood.
specialist. If required, a specialised Kärch-
Î Push lever in "OFF" direction.
er dealer may be contacted at any time.
Î Close cover.
22 EN
- 7
Safety notes regarding the batteries
Installing and connecting the battery
Check the tyre pressure
Please observe the following warning notes
Î Open the device hood.
Î Park the sweeper on an even surface.
when handling batteries:
Î Insert battery in battery mount.
Î Connect air pressure testing device to
tyre valve.
Observe the directions on the
Î Screw on mounts on battery base.
battery, in the instructions for
Î Connect pole terminal (red cable) to
Î Check air pressure and adjust if re-
use and in the vehicle operat-
positive pole (+).
quired.
ing instructions!
Î Connect pole terminal to negative pole
Î Set air pressure for the front and rear
(-).
tyres at 6 bar.
Wear an eye shield!
Note
Manually clean the dust filter
Before removing the battery, make sure
The filter can also be cleaned manually in
that the negative pole lead is disconnected.
addition to the automatic interval.
Keep away children from acid
Check that the battery pole and pole termi-
Note
and batteries!
nals are adequately protected with pole
During operations, the dust filter should be
grease.
shaken and cleaned every 15-30 minutes
Charging battery
depending on the amount of collected dust.
Risk of explosion!
Danger
Î Stop the machine.
Risk of injury! Comply with safety regula-
Î Set the lever to "wet" sweeping operations.
tions on the handling of batteries. Observe
Î Briefly press the dust filter cleaning switch.
the directions provided by the manufacturer
The dust filter is cleaned for approx. 10 sec-
Fire, sparks, open light, and
of the charger.
onds.
smoking not allowed!
Danger
Î Set the lever to "dry" sweeping operations.
Charge the battery only with an appropriate
Check engine oil level and top up, if re-
charger.
quired
Danger of causticization!
Î Disconnect battery.
Danger
Î Unscrew all cell caps.
Risk of burns!
Î Connect positive terminal cable from
Î Allow engine to cool down.
the charger to the positive pole connec-
First aid!
Î Wait for at least 5 minutes after switch-
tion on the battery.
ing off the engine before checking the
Î Connect negative terminal cable from
engine oil fill level.
the charger to the negative pole con-
Î Open the device hood.
nection on the battery.
Warning note!
Î Plug in mains connector and switch on
charger.
Î Charge battery using lowest possible
level of charging current.
Disposal!
Î Screw in cell caps.
Note
When the battery is charged, first remove
Do not throw the battery in the
the charger from the mains and then dis-
dustbin!
connect it from the battery.
Check fluid level in the battery and ad-
Î Pull out oil dipstick.
just if required
Î Wipe off oil dipstick and insert.
몇 Warning
Î Pull out oil dipstick.
Danger
Regularly check the fluid level in acid-filled
Î Read the value of the oil level.
Risk of explosion! Do not put tools or similar
batteries.
– The oil level must lie between “MIN“
on the battery, i.e. on the terminal poles
– The acid in a fully charged battery has a
and “MAX“ marking.
and cell connectors.
specific weight of 1.28 kg/l at a temper-
– Add motor oil if the oil level is below the
Danger
ature of 20 °C.
"MIN" marking.
Risk of injury! Ensure that wounds never come
– The acid in a partially discharged bat-
– Do not fill oil above the "MAX" marking.
into contact with lead. Always clean your hands
tery has a specific weight between 1.00
Î Fill engine oil in the opening of the oil
after having worked with batteries.
and 1.28 kg/l.
dip stick.
Danger
– The specific weight of the acid must be
Oil grade: see Technical Data
Risk of fire and explosion!
uniform in all cells.
Î Insert the oil dip again.
– Smoking and naked flames are strictly
Î Unscrew all cell caps.
Î Wait at least 5 minutes.
prohibited.
Î Take a sample from each cell using the acid
Î Check engine oil level.
– Rooms where batteries are charged
tester.
must have good ventilation because
Change the engine oil
Î Put the acid sample back into the same cell.
highly explosive gas is emitted during
Danger
Î Where fluid level is too low, top up cells to
charging.
Risk of burns due to hot oil!
the mark provided with distilled water.
Danger
Î Ready a catch bin for appr. 1.5 litre oil.
Î Charge battery.
Danger of causticization!
Î Allow engine to cool down.
Î Screw in cell caps.
– Rinse thoroughly with lots of clear water
Î Open the device hood.
if acid gets into the eye or comes in con-
tact with the skin.
– Then consult a doctor immediately.
– Wash off the acid If it comes in contact
with the clothes.
- 8
23EN
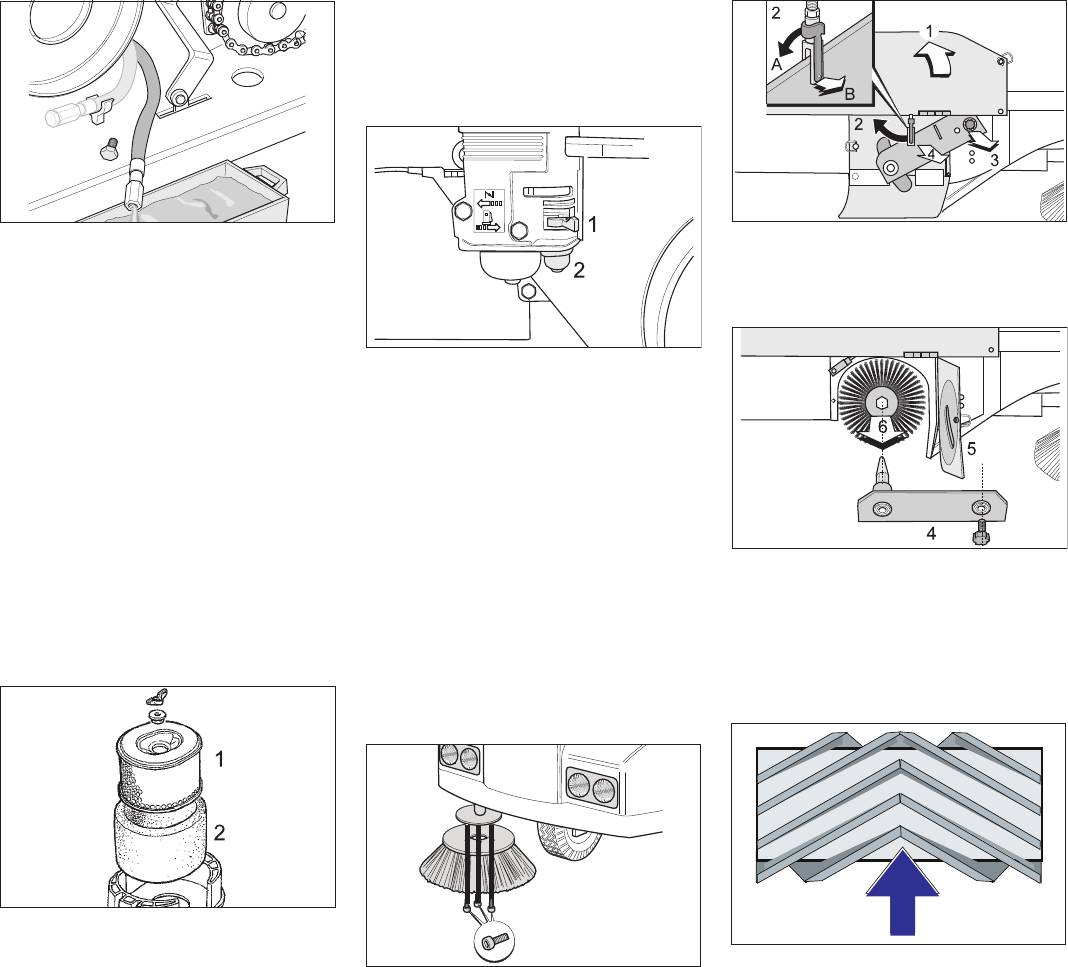
Clean fuel filter cup
Danger
Risk of fire and explosion!
– Smoking and naked flames are strictly
prohibited.
Î Remove the oil drain hose from the
Î Open right side-flap (1).
holder.
Î Loosen the safety bolts at the lower end of
Î Unscrew oil drain plug.
the fork (2) and tilt the drawbar to the rear.
Î Pull out oil dipstick.
Î Loosen knurled-head screw (3).
Î Drain off oil.
Î Screw in the oil drain screw along with
Î Set fuel valve to “OFF” (1).
the new washer.
Î Add O-ring to the fuel filter cup (2).
Î Insert the oil drain hose in the holder.
Î Do not wash the fuel cup with non-in-
Î Fill engine oil in the opening of the oil
flammable or flame-retarding solvents.
dip stick.
Let dry thoroughly.
Oil grade: see Technical Data
Î Insert fuel filter cup and tighten.
Î Insert the oil dip again.
Î Set fuel valve to “ON”.
Î Wait at least 5 minutes.
Î Check for leaks.
Î Check engine oil level.
Check hydraulic unit
Î Remove roller brush arm (4).
Cleaning and replacing the fuel filter
Î Do visual inspection. Infom oil loss to
Î Open roller brush flap (rotating lock) (5).
Danger
hydraulic unit, cylinder or hoses to
Î Draw out the roller brush (6).
Never use petrol or cleaning solutions with low
Kärcher Customer Service.
Î Turn in the adjustment screw of the roller
infllamation point to clean the filter inserts.
Replacing side brush
brush in clockwise direction (-) up to the
Î Open the device hood.
Î Park the sweeper on an even surface.
stop.
Î The side-brushes lift up.
Î Assemble it back in the reverse sequence.
Î Turn ignition key to "0" and remove it.
Î Unscrew wing nut.
Î Remove the paper inlay and the foam
Installation position of roller brush in direc-
inlay and check them.
Î Loosen the fastening screws.
tion of travel
Î Insert cleaned or new inlays.
Î Remove the wiper blade.
Note
Î Screw on wing nut.
Î Fix in the new wiper blade.
When installing the new roller brush, en-
Paper inlay (1)
Checking roller brush
sure correct positioning of the bristle as-
Î Clean paper inlay or replace if too dirty.
Î Park the sweeper on an even surface.
sembly.
– Cleaning: Blow out the paper inlay from
the inside using compressed air or
Î Raise roller brush.
Note
knock it on a hard surface. Do not brush
Î Turn ignition key to "0" and remove it.
Once the new roller brush has been in-
it off because the dirt will get pressed
Î Secure the machine with wheel chock(s) to
stalled, the sweeping track must be read-
into the fiber.
prevent it from rolling away.
justed.
Foam insert (2)
Î Lock parking brake.
Check and adjust roller brush sweeping
Î Clean foam insert.
Î Remove belts or cords from roller brush.
track
– Cleaning: Wash the foam insert in a so-
Î Check tyre pressure.
Replacing roller brush
lution made of household detergent and
Î Switch off dust suction; set the lever to
Replacement is due if a visible deteriora-
warm water. Rinse the accessories and
"wet" sweeping operations.
tion in sweeping performance caused by
let dry thoroughly. Then dip the insert in
Î
Raise roller brush.
bristle wear is evident.
clean engine oil and press out excess
Î The side-brushes lift up.
Î Park the sweeper on an even surface.
oil. If there is too much oil in the insert,
Î Drive sweeper on to a smooth, even
Î Lower roller brush.
the motor will let out smoke during first
surface covered with a visible layer of
Î Turn ignition key to "0" and remove it.
dust or chalk.
start.
Î Secure the machine with wheel
Î Lower roller brush (central position) and
chock(s) to prevent it from rolling away.
allow it to briefly rotate.
Î Lock parking brake.
Î Raise roller brush.
Î Open bulk waste flap.
Î Drive machine backwards.
Î Check sweeping mirror.
24 EN
- 9
Î Set the ground clearance of the sealing
Replacing electric bulb
strip to 1-5 mm.
Î Stop the machine.
Î Screw on new sealing strip.
Î Turn ignition key to "0" and remove it.
Side sealing strips
Î Unscrew the fasteners of the sealing
strips.
Î Remove sealing strips.
Î Insert new sealing strips.
Î Adjust sealing strips.
Î Set the ground clearance of the sealing
The sweeping track should have an even
strip to 1-3 mm.
rectangular shape which is between 30 and
Î Screw on new sealing strips.
50 mm wide.
Replacing dust filter
Note
Danger
Î Loosen the fasteners of the columns.
The shape of the sweeping track must not
Empty waste container before replacing
Î Remove column (1).
be trapezoidal. If so, consult Customer
dust filter. Wear a dust mask when working
Î Loosen the screw between the struts of
Service.
around the dust filter. Observe safety regu-
the lamp holder of the defective head-
Adjust sweeping track:
lations on the handling of fine particulate
lights.
Note
material.
Î Turn the diffusing lens of the defective
Only for "Fine tuning" mode.
headlamp in the anti-clockwise direc-
Note
Î Open the device hood.
tion by approx. 1/4 rotation (2) and take
A clear deposit of dust at the air exit of the
out the reflector housing (3).
blower is an indicator that the dust filter has
Î Take out the bulb.
not been inserted correctly or is defective.
Î Insert new bulb.
Î Insert the reflector housing from the bottom
into the column and fasten it by turning ap-
prox. 1/4 rotation in the clockwise direction.
Ensure that it has locked in properly; the let-
ters HALOGEN must be clearly legible on
the headlights glass in a horizontal manner
(4).
Enlarging sweeping track:
Î Turn in the screw between the struts of
Î Turn the adjustment screw in an anti-
the lamp holder.
clockwise direction (+).
Î Fasten the column.
Î Raise waste container up to the half (1).
Reducing sweeping track:
Replacing fuses
Î Turn the adjustment screw in a clock-
Î Open catches (2).
wise direction (-).
Î Tilt the filter box towards the front and
Note
Adjusting and replacing sealing strips
remove it (3).
Only use fuses with identical safety ratings.
Note
Replace damaged or worn out sealing
strips immediately.
Î Park the sweeper on an even surface.
Î Raise roller brush.
Î Turn ignition key to "0" and remove it.
Î Secure the machine with wheel
chock(s) to prevent it from rolling away.
Î Lock parking brake.
Î Fold up the handle (4), pull it out and
Î Open the device hood.
turn it by 90° (lock).
Î Replace defective fuses.
Î Remove filter cartridge (5).
Note
Î Insert new filter cartridge; bolts must
Multiple defect of the same fuse indicates a
have been inserted into the holes (6).
technical defect in the electrical system. In-
Î Reset handle in the starting position
form Kärcher Customer Service.
and lock it. Check correct position of
the filter.
Î Insert filter box and lock it.
Front sealing strip
Î Unscrew fasteners of sealing strip.
Î Remove the sealing strip.
Î Screw on new sealing strip.
Note
The front sealing strip cannot be adjusted.
Rear sealing strip
Î Unscrew fasteners of sealing strip.
Î Remove the sealing strip.
Î Screw on the new sealing strip.
Î Adjust sealing strip.
- 10
25EN
Оглавление
- Symbole auf dem Gerät
- Bestimmungsgemäße Verwendung
- Geräteelemente
- Vor Inbetriebnahme
- Transport
- Hilfe bei Störungen
- Technische Daten
- Garantie CE-Erklärung
- Symbols on the machine
- Proper use
- Device elements
- Before Startup
- Transport Maintenance and care
- Troubleshooting
- Specifications
- Warranty CE Declaration
- Symboles sur l'appareil
- Utilisation conforme
- Éléments de l'appareil
- Avant la mise en service
- Transport
- Assistance en cas de panne
- Données techniques
- Garantie
- Símbolos del manual de
- Función Uso previsto
- Elementos del aparato
- Antes de la puesta en marcha
- Manejo
- Parada
- Ayuda en caso de avería
- Datos técnicos
- Garantía Declaración CE
- Σύμβολα στο εγχειρίδιο
- Λειτουργία Χρήση σύμφωνα με τους
- Στοιχεία συσκευής
- Πριν τη θέση σε λειτουργία
- Χειρισμός
- Αποθήκευση της συσκευής
- Φροντίδα και συντήρηση
- Αντιμετώπιση βλαβών
- Τεχνικά χαρακτηριστικά
- Εγγύηση Δήλωση συμμόρφωσης CE
- Символы в руководстве по
- Использование по
- Элементы прибора
- Перед началом работы
- Транспортировка
- Помощь в случае неполадок
- Технические данные
- Гарантия Заявление о соответствии требованиям CE
- Simboli na napravi
- Namenska uporaba
- Elementi naprave
- Pred zagonom
- Transport
- Shranjevanje stroja
- Pomoč pri motnjah
- Tehnični podatki
- Garancija CE izjava
- Symboly na prístroji
- Používanie výrobku v súlade s jeho určením
- Prvky prístroja
- Pred uvedením do prevádzky
- Odstavenie
- Pomoc pri poruchách
- Technické údaje
- Záruka Vyhlásenie CE
- Simboli na uređaju
- Namjensko korištenje
- Sastavni dijelovi uređaja
- Prije prve uporabe
- Transport Njega i održavanje
- Otklanjanje smetnji
- Tehnički podaci
- Jamstvo CE izjava
- Символи в Упътването за
- Функция Употреба по
- Елементи на уреда
- Преди пускане в
- Обслужване
- Спиране от експлоатация
- Помощ при неизправности
- Технически данни
- Гаранция СЕ – декларация


