Melissa 271-105: INTRODUCTION IMPORTANT SAFETY MEASURES OVERVIEW OF FUNCTIONS Control panel: Remote control: Indicator lights: ASSEMBLY: USE: Speed: Timer: Oscillation: Breeze functions:
INTRODUCTION IMPORTANT SAFETY MEASURES OVERVIEW OF FUNCTIONS Control panel: Remote control: Indicator lights: ASSEMBLY: USE: Speed: Timer: Oscillation: Breeze functions:: Melissa 271-105
Table of contents
- INTRODUCTION IMPORTANT SAFETY MEASURES OVERVIEW OF FUNCTIONS Control panel: Remote control: Indicator lights: ASSEMBLY: USE: Speed: Timer: Oscillation: Breeze functions:
- “Natural” breeze function: CLEANING THE GUARANTEE DOES NOT APPLY IMPORTER
INTRODUCTION
To get the best out of your fan, please read these instructions carefully
before using it for the first time.
We also recommend that you keep the instructions for future reference, so
that you can remind yourself of the functions of the fan.
IMPORTANT SAFETY MEASURES
•
Please ensure that the voltage of the fan corresponds to the mains
voltage.
•
Use the fan only for the purpose(s) defined in the user guide.
•
Never insert your fingers, pencils or other objects through the cage
during operation.
•
Switch the fan off before moving or cleaning it.
•
The fan should be set up on a stable and level surface to avoid it
being knocked over.
•
Do not expose the fan to excessive heat or humidity, as this can
cause damage to the electrical components.
•
Do not immerse in any form of liquid.
•
It is not advisable to expose people, in particular babies and the
elderly, to a continuous stream of cold air.
•
The fan should be kept out of the reach of children.
•
Ensure that the cable does not get caught beneath the device, in
drawers, behind shelves etc.
•
Do not run the cable under carpets, rugs, etc.
•
Ensure the cable is kept away from busy areas to avoid anyone
tripping over it.
•
Do not use if the device or cable becomes damaged. Take it to a
specialist for repair.
•
For indoor use only.
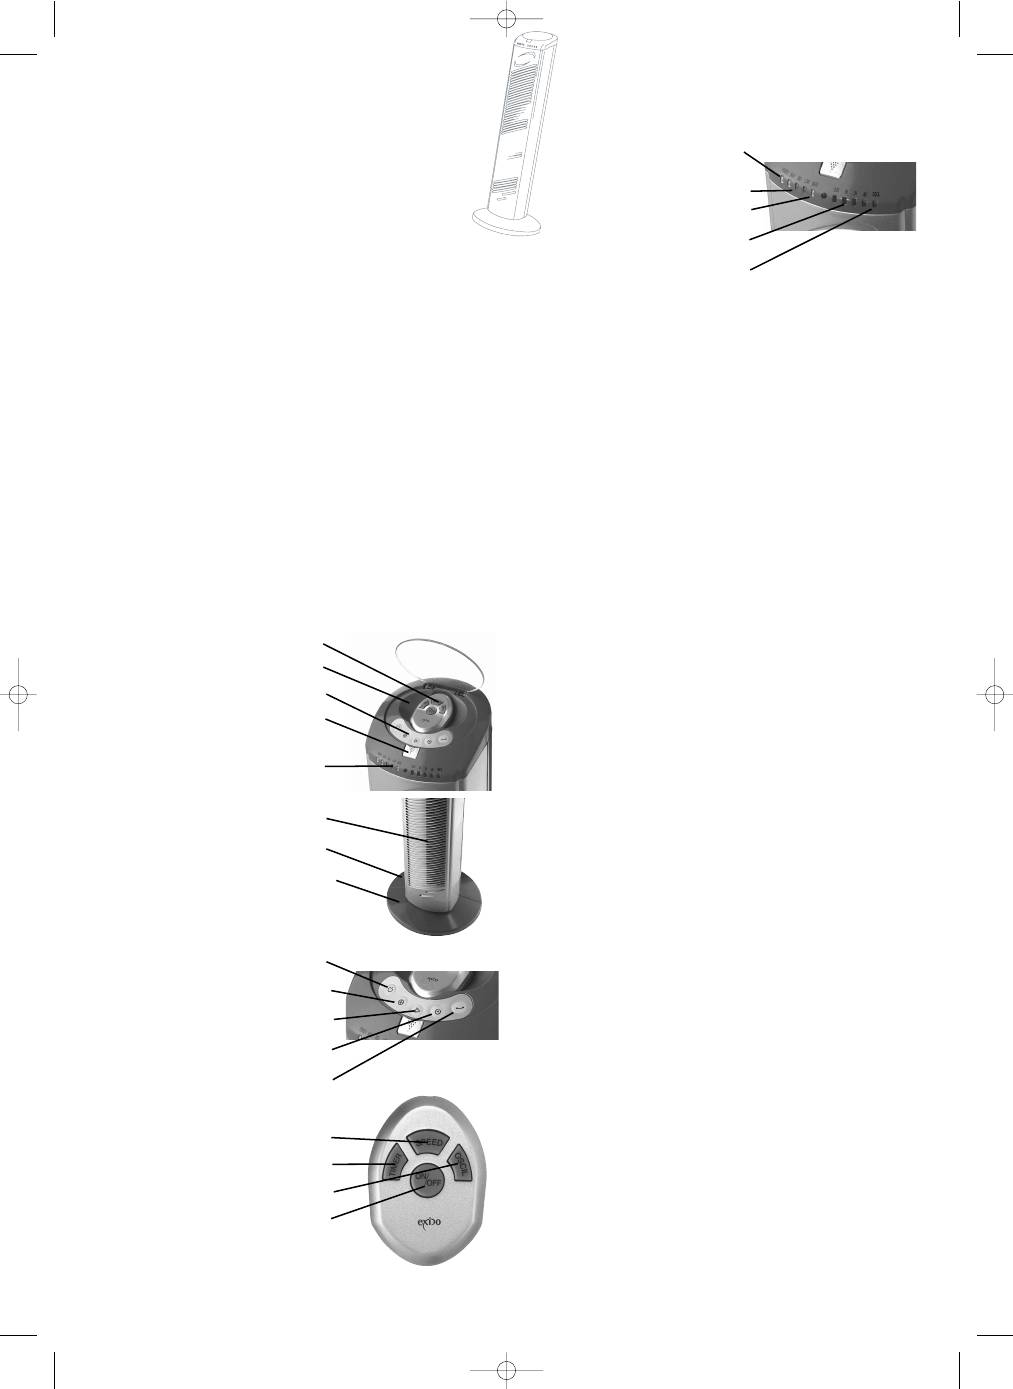
OVERVIEW OF FUNCTIONS
1. Fan
2.
Rear base part
3.
Front base part
4.
Storage space for remote control
5.
Button for opening cover
6. Remote
control
7. Control
panel
8. Indicator
lights
Control panel:
9. On/off
button
10. Speed selection button
11. Breeze function selector
12. Timer function selector
13. Oscillation
butto
Remote control:
14. Timer function selector
15. Speed selection button
16. Oscillation
selector
17. On/off
button
Indicator lights:
18. On/off indicator ”POWER”
19. 3 speed indicators (“HI” = high,
“MED” = medium, “LOW” = low)
20. Breeze function indicator
”MADE”
21. 4 timer function indicators
22. Oscillation indicator ”OSCIL”
ASSEMBLY:
1.
Place the fan on a table (never place the fan upside down - the cover
can be broken)
2.
Place the rear base part over the two black rings under the bottom of
the fan (guide the cord through the cord channel on the bottom of the
rear base part).
3.
Place the front base part over the rear base part.
4.
Attach the two base parts using the two accompanying wing nuts,
which are screwed into the 2 holes in the centre of the base part (the
fan will shake a little even if the nuts are correctly tightened. This is
necessary for the fan to be able to work).
5.
Turn the fan the right way up and plug it in.
6.
To use the remote control, insert 2 AAA batteries (not included).
Remove the battery cover, insert the batteries and replace the cover
again. If the remote control stops working after a time, try replacing
the batteries.
USE:
Use the on/off button on the panel or the remote control to turn the fan on
and off.
The cover for the remote control and the panel is opened by pressing the
button (5) down.
Speed:
Select the speed using the speed selector button on the panel or remote
control (the fan must be on before the speed can be selected).
Pressing the button repeatedly will alternate between the 3 speed options.
Timer:
Press the timer button a number of times to select whether the fan is to
turn off automatically after a set time.
An interval ranging from 0.5 hours to 7.5 hours can be selected.
Press the button until the required time is indicated on the indicator lights
(0.5H = 0.5 hours, 1H = 1 hour, 2H = 2 hours and 4H = 4 hours).
Example: If all 4 lights are lit, the interval is 0.5 + 1 + 2 + 4 = 7.5 hours.
The indicator lights will then be lit and gradually go off as time passes,
indicating approximately how much time is left until the fan switches off
automatically.
Oscillation:
The fan can swing from side to side by using the oscillation button on the
panel or remote control.
Press the button to start oscillation and again to stop it.
Breeze functions:
The fan has 2 breeze settings: “Natural” and “Night”.
Both breeze functions are similar to a natural breeze, with the air speed
varying all the time.
Both breeze functions take the selected speed as their starting point.
The breeze functions can be combined with the timer function.
Press the breeze function selector to choose between the 2 breeze
functions and no breeze.
When the fan is operating at constant speed (without breeze), the breeze
function indicator does not light up.
When “natural” breeze function is selected, the breeze indicator light is red.
When the “night” breeze function is selected, the breeze function light is
green.
NB! When the fan is in one of the breeze functions, the on/off indicator
goes on and off.
10
UK
4.
5.
6.
7.
8.
1.
2.
3.
9.
10.
11.
12.
13.
14.
15.
16.
17.
18.
19.
20.
21.
22.
271105_IM 06/01/05 14:27 Side 10
