Acer TRAVELMATE P653-V – страница 2
Инструкция к Ноутбуку Acer TRAVELMATE P653-V
1
English
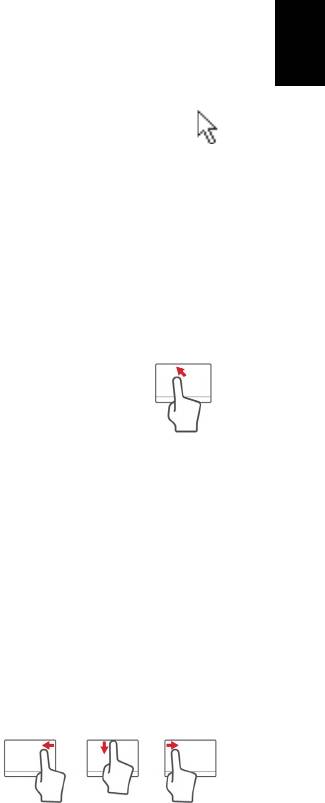
Touchpad
Touchpad basics
The touchpad controls the arrow (or 'cursor') on the screen. As you slide
your finger across the touchpad, the cursor will follow this movement.
Press the left or right side of the button located beneath the touchpad to
perform selection and execution functions. These two areas are similar to
the left and right buttons on a mouse. Tapping on the touchpad is the
same as clicking the left side of the button.
Note: The touchpad is sensitive to finger movement; the lighter the
touch, the better the response.
Please keep the touchpad and your fingers dry and clean.
The cursor is controlled by some basic gestures:
• Single-finger slide: Slide a finger across the touchpad to
move the cursor.
• Single-finger tap: Lightly tap the touchpad with your finger, to
perform a 'click', which will select or start an item. Quickly
repeat the tap to perform a double tap or 'double click'.
• Drag: Press and hold the left side of the selection button, or tap twice
anywhere on the touchtap, then slide a second finger across the
touchpad to select all items in an area.
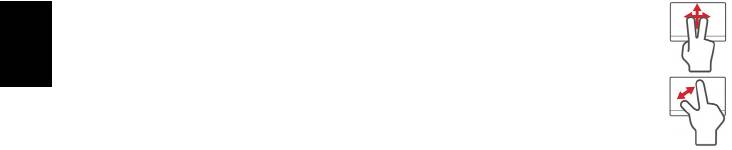
Touchpad gestures
Windows 8 and many applications support touchpad gestures that use
one or more fingers.
Note:
Support for touchpad gestures depends on the active application.
These allow you to control applications with a few simple gestures, such as:
• Swipe in from edge: Access Windows tools
by swiping into the center of the touchpad
from the right, top or left.
• Swipe in from right edge: Toggle the charms.
• Swipe in from top edge: Toggle the app commands.
• Swipe in from left edge: Switch to the previous app.
2
Touchpad
English
• Two-finger slide: Swiftly scroll through web pages,
documents and playlists by placing two fingers on the
touchpad and moving both in any direction.
• Two-finger pinch: Zoom in and out of photos, maps and
documents with a simple finger-and-thumb gesture.

3
English
Using the keyboard
The keyboard has full-sized keys and an embedded numeric keypad,
separate cursor, lock, Windows, function and special keys.
Lock keys and embedded numeric keypad
Note: Information in this section may not apply to your computer.
The keyboard has three lock keys which you can toggle on and off.
Lock key Description
When Caps Lock is on, all alphabetic characters typed
Caps Lock
are in uppercase.
When Num Lock is on, the embedded keypad is in
numeric mode. The keys function as a calculator
Num Lock
(complete with the arithmetic operators +, -, *, and /).
<Fn> + <F11>
Use this mode when you need to do a lot of numeric data
entry. A better solution would be to connect an external
keypad.
When Scroll Lock is on, the screen moves one line up or
Scroll Lock
down when you press the up or down arrow keys
<Fn> + <F12>
respectively. Scroll Lock does not work with some
applications.
The embedded numeric keypad functions like a desktop numeric keypad.
It is indicated by small characters located on the upper right corner of the
keycaps. To simplify the keyboard legend, cursor-control key symbols are
not printed on the keys.
Desired access Num Lock on Num Lock off
Number keys on
Type numbers in a normal
embedded keypad
manner.
Cursor-control keys
Hold <Shift> while using
Hold <Fn> while using
on embedded
cursor-control keys.
cursor-control keys.
keypad
Hold <Fn> while typing
Type the letters in a
Main keyboard keys
letters on embedded
normal manner.
keypad.
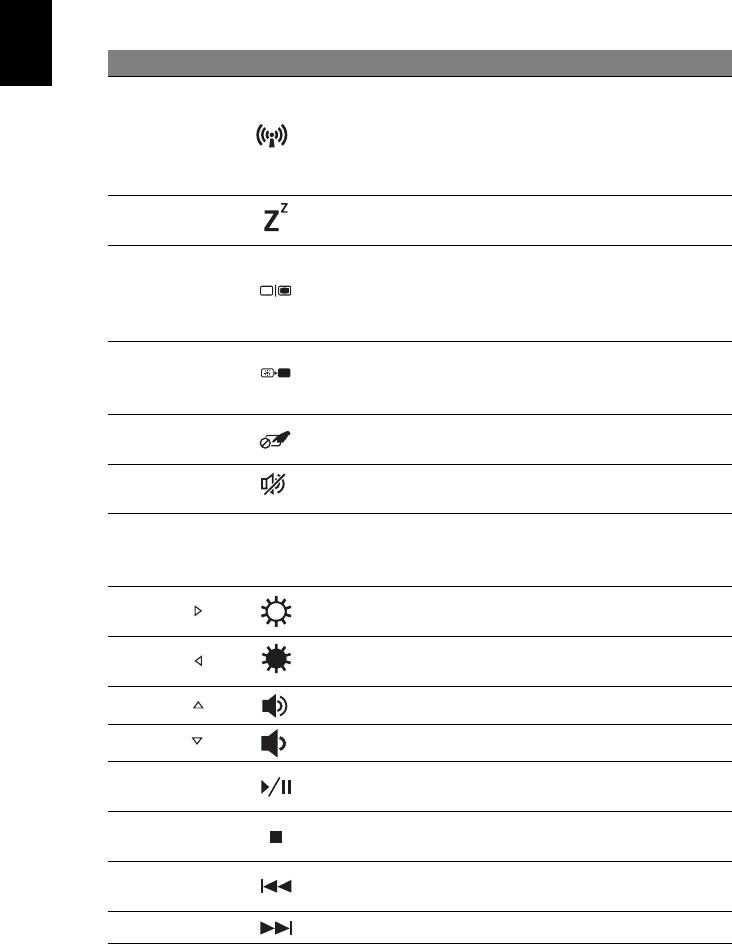
Hotkeys
The computer employs hotkeys or key combinations to access most of the
computer's controls like screen brightness and volume output.
4
Using the keyboard
English
To activate hotkeys, press and hold the <Fn> key before pressing the
other key in the hotkey combination.
Hotkey Icon Function Description
Enables / disables the
computer's communication
Communication
<Fn> + <F3>
devices. (Communication
key
devices may vary by
configuration.)
Puts the computer in Sleep
<Fn> + <F4> Sleep
mode.
Switches display output
between the display screen,
<Fn> + <F5> Display toggle
external monitor (if connected)
and both.
Turns the display screen
<Fn> + <F6> Display off
backlight off to save power.
Press any key to return.
Turns the built-in touchpad on
<Fn> + <F7> Touchpad toggle
and off.
<Fn> + <F8> Speaker toggle Turns the speakers on and off.
Turns the embedded numeric
<Fn> + <F11> NumLk
keypad on or off (only for
certain models).
Increases the screen
<Fn> + < > Brightness up
brightness.
Decreases the screen
<Fn> + < > Brightness down
brightness.
<Fn> + < > Volume up Increases the sound volume.
<Fn> + < > Volume down Decreases the sound volume.
<Fn> +
Play or pause a selected media
Play/Pause
<Home>
file.
<Fn> +
Stop playing the selected
Stop
<Pg Up>
media file.
<Fn> +
Return to the previous media
Previous
<Pg Dn>
file.
<Fn> + <End> Next Jump to the next media file.

5
English
Windows keys
The keyboard has two keys that perform Windows-specific functions.
Key Description
Pressed alone it returns to the Start screen.
Windows key
It can also be used with other keys for special
functions, please check Windows Help.
This key has the same effect as clicking the right
Application
mouse button; it opens the application's context
key
menu.
6
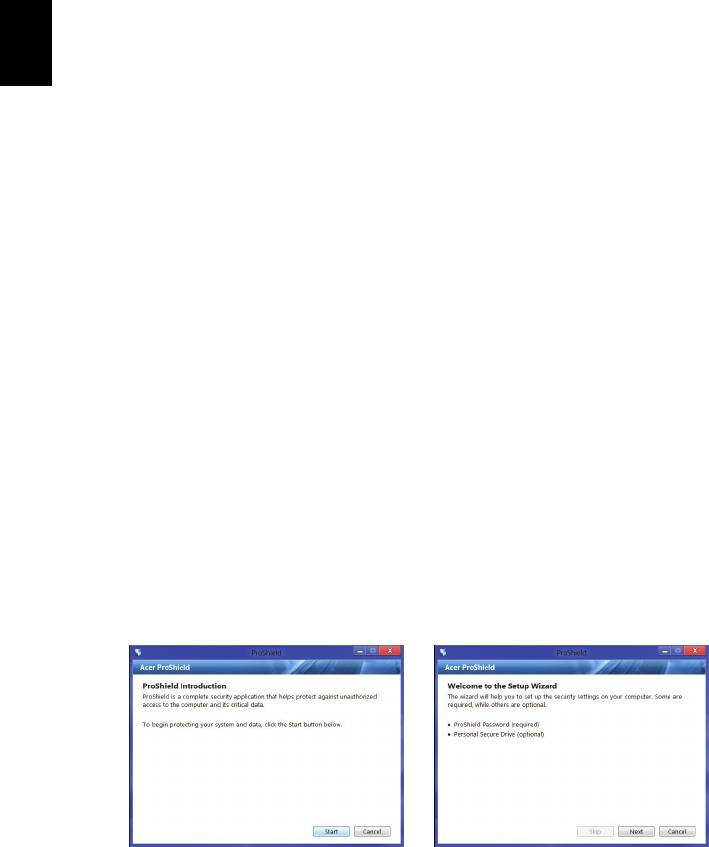
Acer ProShield (Only for certain models)
Acer ProShield (Only for certain models)
English
Overview
An all-in-one security solution, Acer ProShield provides an embedded
security solution to address the following points of vulnerability:
• Securing the device against unauthorized access
• Protecting local storage
• Securing the network
Acer ProShield includes five modules that will secure your device from
unauthorized access and intrusion.
• Credential Manager - Password, Fingerprint registration (if your PC has
a fingerprint scanner), Online accounts configuration
• Pre-Boot Authentication - Boot sequence and device security
• Data Protection - Personal secure drive, file and folder encryption
• Data Removal - File shredder
• Information - About this software
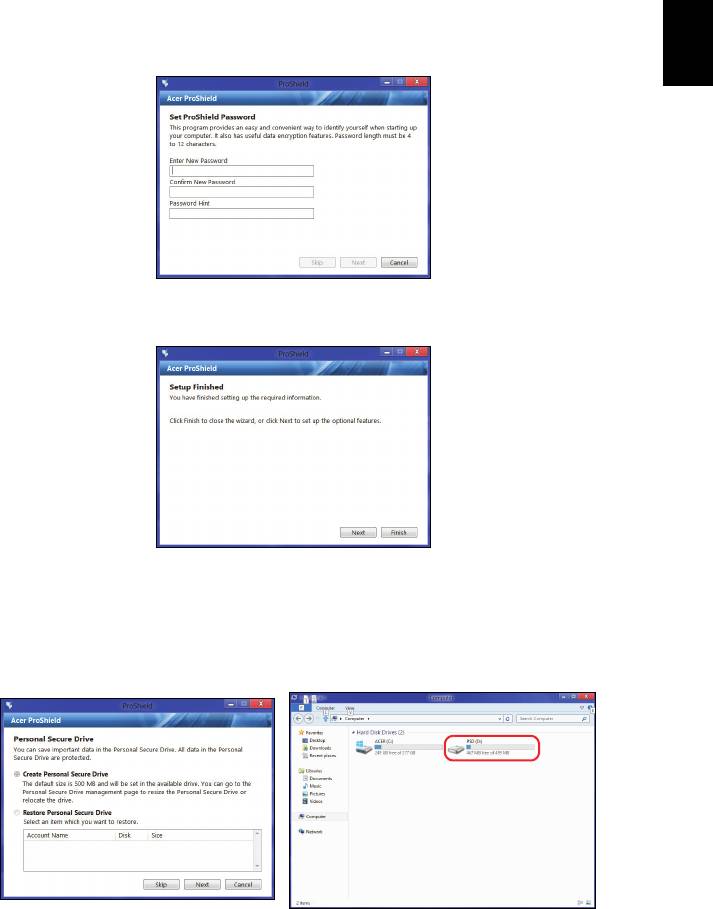
Setting up ProShield
The first time you run ProShield, you will be led through a setup wizard
that allows you to set up the parameters for ProShield. Click Start to
begin. You will be required to set a password, and can choose to create a
Personal Secure Drive.
7
English
Note: Select a password that you will remember, but is difficult to
guess. Do not use words that can be found in a dictionary. It is
advisable to use a combination of letters and numbers.
Once you have set a password, you can click Next to proceed to setting
up a Personal Secure Drive or click Finish to exit the wizard.
Personal Secure Drive
The Personal Secure Disk (PSD) is a secure section of your hard disk
where you can save files. You can only get access to the PSD via
password or fingerprint authentication.

8
Acer ProShield (Only for certain models)
Once setup is finished, you can go to the ProShield Console to manage
your computer or make changes to the settings.
English
Use the menu in the left-hand pane to make changes.
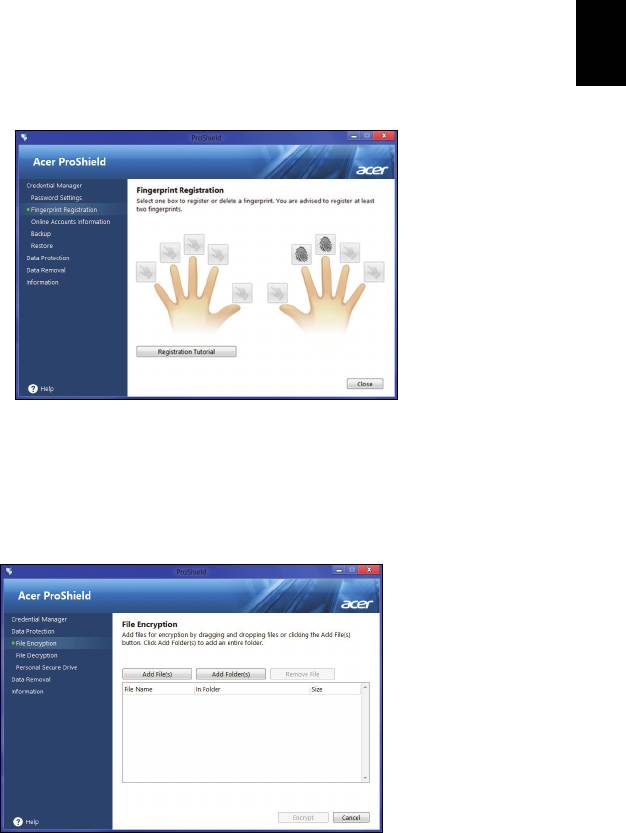
Credential Manager
Here you can set and manage your credentials, including Pre-boot
authentication.
You can change your ProShield and Windows passwords, register
fingerprints, manage online account information, and back up or restore
credential information.
9
English
Fingerprint Registration*
* (only if your PC has a fingerprint scanner)
You can use a fingerprint scanner to secure your PC from unauthorized
access. Register two or more fingerprints that can then be used to access
your PC during start up, instead of your password.
Click Registration Tutorial for more information.
Data Protection
Here you can select files for encryption or decryption, and manage your
Personal Secure Drive.
10
Acer ProShield (Only for certain models)
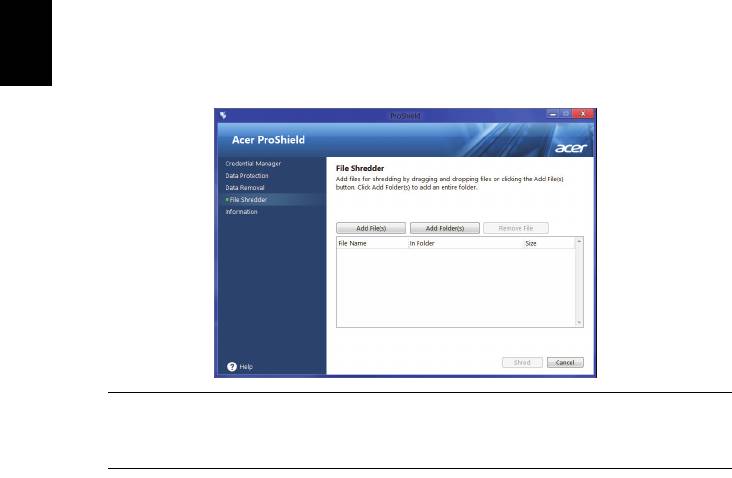
Data Removal
Here you can select files to be completely removed from the hard disk.
English
The File Shredder overwrites the data to make recovering the data
impossible.
Warning: Make sure you select only the information you want to
shred. Once you have shredded a file or folder, it is impossible to
recover the data.
11
English
Acer Office Manager
Note: Only for selected models.
Acer Office Manager is a monitoring and assent management tool that
allows MIS staff to remotely manage and update computers. There are
two components to this software package: Acer Office Manager Console
and Acer Office Manager Client.
Acer Office Manager Console
The Console application allows you to manage connected clients from a
single computer. To start the Console in Windows 8, simply start typing
"Office Manager Console". Alternatively, in Desktop mode, select Acer
Office Manager Console.
The first time you run the Console, you will be asked to set up a password,
and an email address for notifications.
Note: The password should be from 8 to 31 characters long and must
include at least one digit, one capital letter and one lower-case letter.
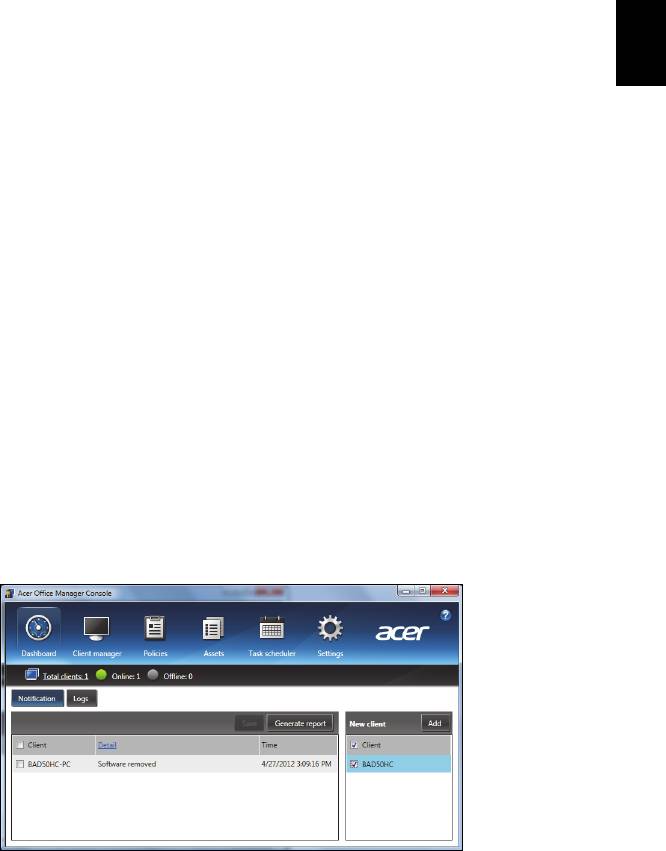
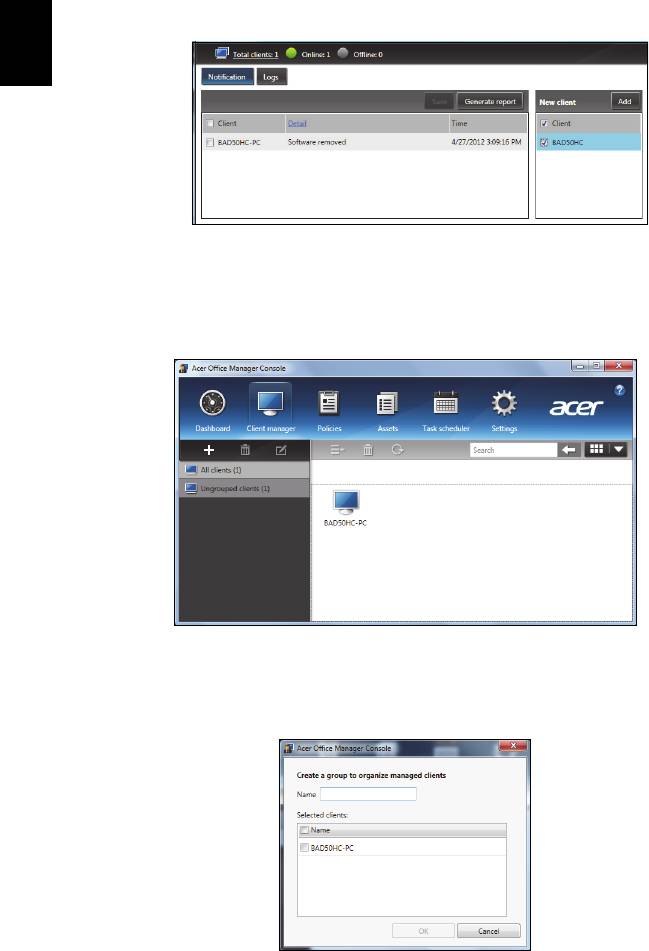
Dashboard
Once you have completed the setup steps, you will be shown the
Dashboard, where you can view the total number of connected clients, the
online clients and offline clients. You can also add a client by selecting a
client under New client and clicking the Add button.
Tip: Select Client under New client to select all the found clients.
In the Notification area you can see any notifications received for the
managed clients, including information such as hardware or software
12
Acer Office Manager
English
being removed, if the.client has been in use, or if it has been off-line, for
longer than the defined time.
Client manager
On the Client manager page you can view all the clients being managed
from the Console. Double-click an icon to view the system information for
that client.
You can also group clients together for easier management. For example,
you can create a group for admin staff and another for sales staff. To
create a group and add clients to the group, click the + symbol above the
list of clients.
13
English
Note: Each client can only be assigned to one group.
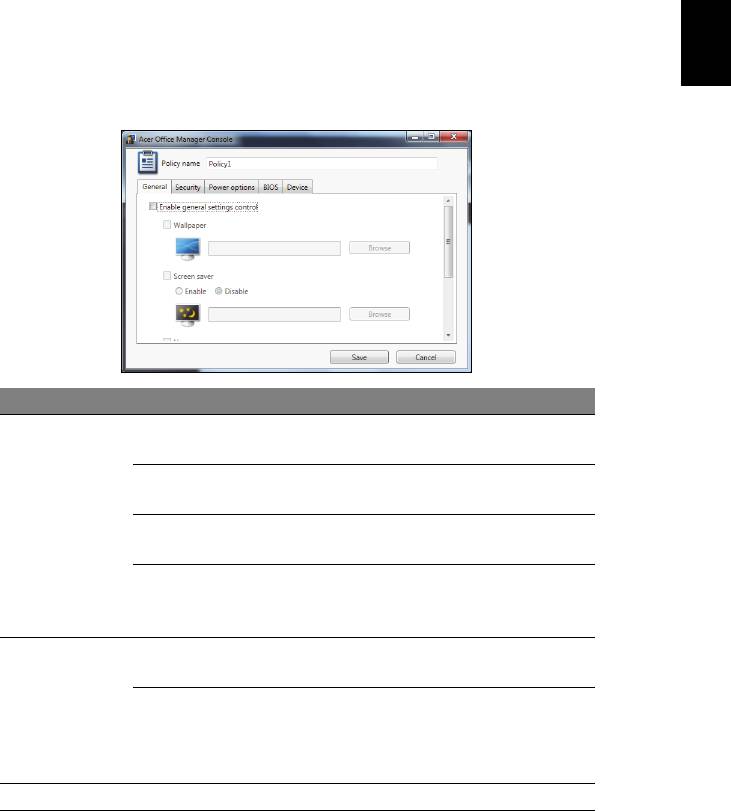
Policies
You can set policies to apply to selected clients or groups of clients. Click
the + symbol to add a new policy.
Tab Item Function
Set a wallpaper that will be applied
Wallpaper
to all clients.
Set a screen saver that will be
Screen saver
applied to all clients.
General
Set which home page Internet
Homepage
Explorer will open when launched.
Enable or disable AutoPlay for
Enable AutoPlay
external devices or CD- / DVD-
ROMs
Enable IE
Define Internet Explorer security
security settings
settings.
Set policies for user passwords,
Security
Enable user
such as minimum password
account policy
strength, password validity, and
lockout parameters.
Power options Define power settings.
14
Acer Office Manager
English
Tab Item Function
Set a BIOS Supervisor password. If
BIOS Supervisor
a password already exists, you will
password
need to enter it before you can
change it.
Set a BIOS User password. If a
password already exists, you will
BIOS
BIOS User
need to enter it or the Supervisor
password
password before you can change
the User password.
Change boot
Change the order of devices used to
sequence
boot the system.
settings
Enable or disable devices on
Device
notebook computers.
Note: The items in the Device tab are not supported for desktop
computers. If you set a policy that includes items in this tab, and
deploy the policy to a desktop computer, the settings will be ignored.
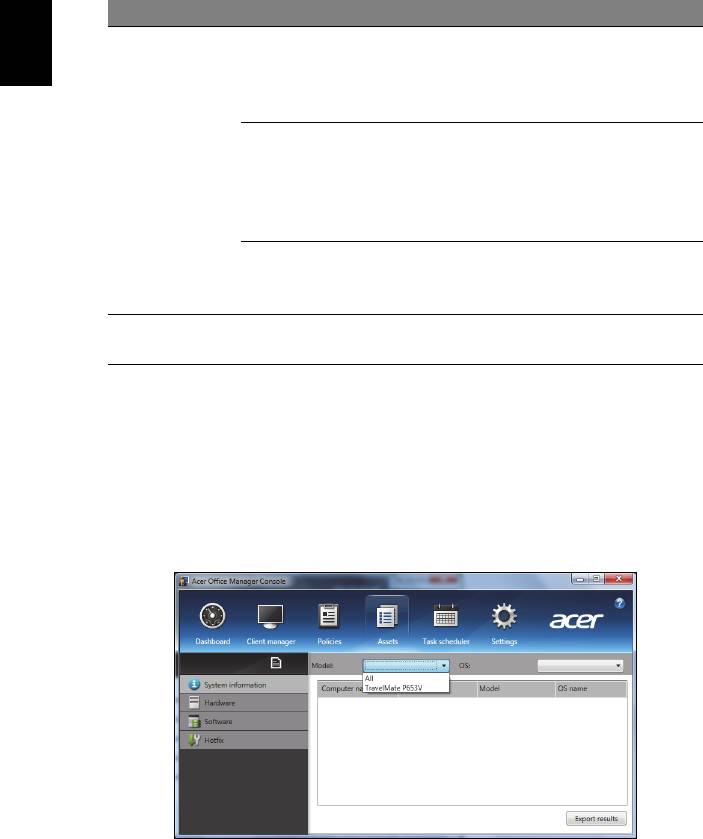
Assets
The Assets page gives you a quick overview of the managed clients and
the hardware and software for each system. You can also see which
Hotfixes have been applied to each system.
Select the system model from the Model drop-down menu. You can then
further refine the search by operating system via the OS drop-down menu.
The discovered clients will be listed.
15
English
If you wish to export the results as an Excel spreadsheet, click Export
results or the icon. You will be asked where to save the file and for a
file name.
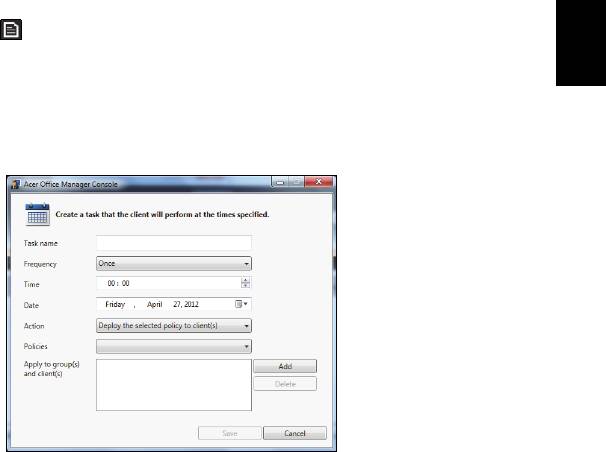
Task scheduler
On the Task scheduler page, you can set a schedule to deploy selected
policies on a regular basis. Click the + symbol to add a new task.
You will need to enter a Task name, select the Frequency, Time, Date,
Action, the Policies to be deployed (if appropriate) and the group(s) or
client(s).
Once you have entered the necessary information, click Save.
16
Acer Office Manager
English
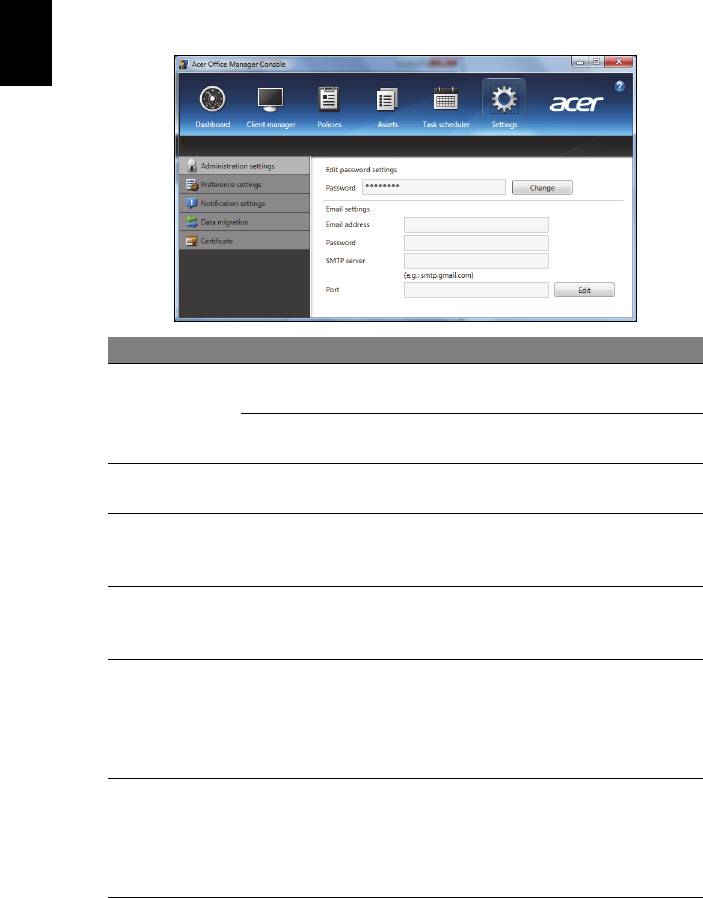
Settings
On the Settings page, you can change your settings as desired.
Tab Item Function
Edit password
Change your Acer Office Manager
Administration
settings
Console password
settings
Set up an email account to receive
Email settings
email notifications.
Preference
Set up your program launch and
settings
lock preferences.
Set up what time-related
Notification
notifications should show on the
settings
Dashboard.
Export your Acer Office Manager
Data migration
Console settings for use on another
machine.
Create a certificate that you can
import to another machine.
Create new
Certificate
Certificates ensure that the client
certificate
can only be managed from a single
console.
Import a certificate from another
machine. This will allow the console
Import certificate
to manage a remote client that has a
trusted relationship with another
console.

17
English
Recovery
If you are having trouble with your computer, and the frequently asked
questions (see page 53) do not help, you can 'recover' your computer - i.e.
return it to an earlier state.
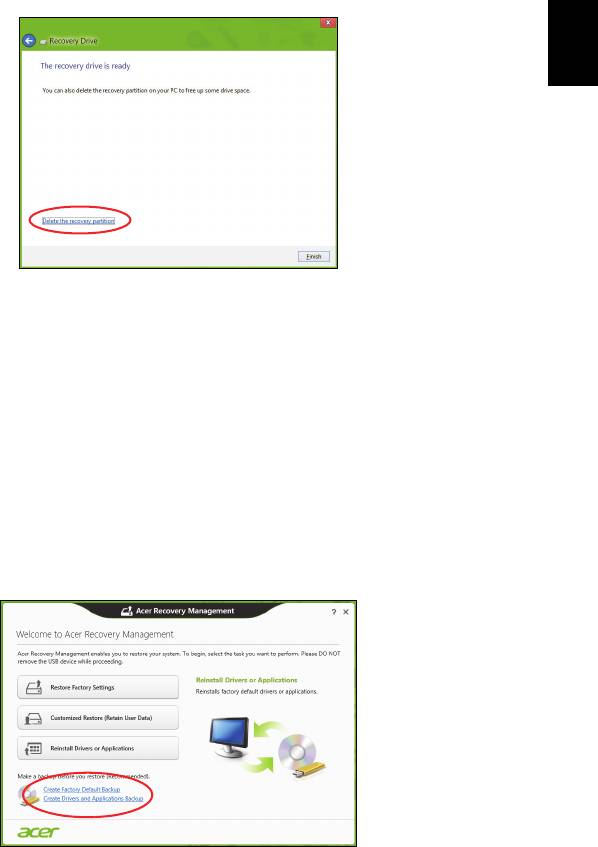
This section describes the recovery tools available on your computer. Acer
provides Acer Recovery Management, which allows you to create a
recovery backup, a drivers and applications backup, and to start recovery
options, either using Windows tools, or the recovery backup.
Note: Acer Recovery Management is only available with a pre-
installed Windows operating system.
Important: We recommend that you create a Recovery Backup
and Drivers and Applications Backup and as soon as possible.
In certain situations a full recovery will require a USB recovery
backup.
Creating a recovery backup
To reinstall from a USB storage drive, you must first create a recovery
backup. The recovery backup includes the entire original contents of your
computer’s hard drive, including Windows and all factory-loaded software
and drivers. Using this backup will restore your computer to the same
state as when you purchased it, while giving you an option to retain all
settings and personal data.
Note:
Make sure you have a USB drive with a capacity of at least 16 GB.
1. From Start, type 'Recovery' and then click Acer Recovery
Management in the list of apps.
18
Recovery
English
2. Click Create Factory Default Backup. The Recovery Drive window
opens.
Make sure Copy contents from the recovery partition to the recovery
drive is selected. This provides the most complete and safest recovery
backup.
3. Plug in the USB drive then click Next.
• Make sure your USB drive has enough capacity before continuing.
The recovery backup requires at least 16 GB of storage
4. You will be shown the backup progress on the screen.
5. Follow the process until it completes.
6. After creating the recovery backup, you can choose to delete the
recovery information on your computer. If you delete this information,
you can only use the USB recovery backup to restore your computer, if
you lose or erase the USB drive, you cannot restore your computer.
19
English
7. Unplug the USB drive and label it clearly.
Important: Write a unique, descriptive label on the backup, such
as 'Windows Recovery Backup'. Make sure you keep the backup
in a safe place that you will remember.
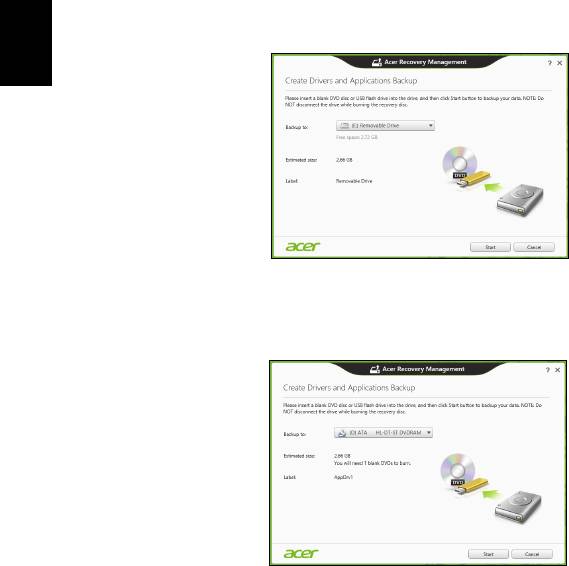
Creating a drivers and applications backup
To create a Drivers and Applications Backup, that contains the factory-
loaded software and drivers needed by your computer, you may use either
a USB storage drive or, if your computer features a DVD recorder, one or
more blank recordable DVDs.
1. From Start, type 'Recovery' and then click Acer Recovery
Management in the list of apps.
2. Click Create Drivers and Applications Backup.
Plug in the USB drive or insert a blank DVD into the optical drive, then
click Next.
20
Recovery
English
• If you are using a USB drive, make sure your USB drive has enough
capacity before continuing.
• If using DVDs, it will also show the number of blank, recordable discs
you will need to complete the recovery discs. Make sure that you
have the required number of identical, blank discs.
3. Click Start to copy files.You will be shown the backup progress on the
screen.
4. Follow the process until it completes:
• If you are using optical discs, the drive ejects each disc as it
completes burning it. Remove the disc from the drive and mark it with
a permanent marker.
If multiple discs are required, insert a new disc when prompted, then
click OK. Continue until the process is complete.
• If you are using a USB drive, unplug the drive and label it clearly.
Important: Write a unique, descriptive label on each backup,
such as 'Drivers and Applications Backup'. Make sure you keep
the backup in a safe place that you will remember.
- 1
- 2
- 3
- 4
- 5
- 6
- 7
- 8
- 9
- 10
- 11
- 12
- 13
- 14
- 15
- 16
- 17
- 18
- 19
- 20
- 21
- 22
- 23
- 24
- 25
- 26
- 27
- 28
- 29
- 30
- 31
- 32
- 33
- 34
- 35
- 36
- 37
- 38
- 39
- 40
- 41
- 42
- 43
- 44
- 45
- 46
- 47
- 48
- 49
- 50
- 51
- 52
- 53
- 54
- 55
- 56
- 57
- 58
- 59
- 60
- 61
- 62
- 63
- 64
- 65
- 66
- 67
- 68
- 69
- 70
- 71
- 72
- 73
- 74
- 75
- 76
- 77
- 78
- 79
- 80
- 81
- 82
- 83
- 84
- 85
- 86
- 87
- 88
- 89
- 90
- 91
- 92
- 93
- 94
- 95
- 96
- 97
- 98
- 99
- 100
- 101
- 102
- 103
- 104
- 105
- 106
- 107
- 108
- 109
- 110
- 111
- 112
- 113
- 114
- 115
- 116
- 117
- 118
- 119
- 120
- 121
- 122
- 123
- 124
- 125
- 126
- 127
- 128
- 129
- 130
- 131
- 132
- 133
- 134
- 135
- 136
- 137
- 138


