Acer ASPIRE E1-471G – страница 4
Инструкция к Ноутбуку Acer ASPIRE E1-471G
40
English
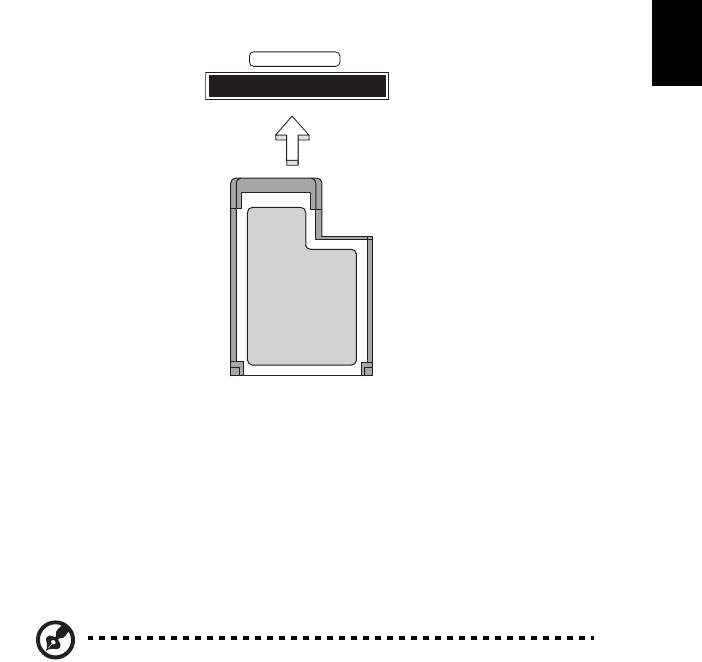
Inserting an ExpressCard
Insert the card into the slot and push gently until it clicks into position.
Ejecting an ExpressCard
Before ejecting an ExpressCard:
1 Exit the application using the card.
2 Left-click the remove hardware icon on the taskbar and stop the card operation.
3 Push the card gently into the slot and release to pop out the card. Then pull the
card free from the slot.
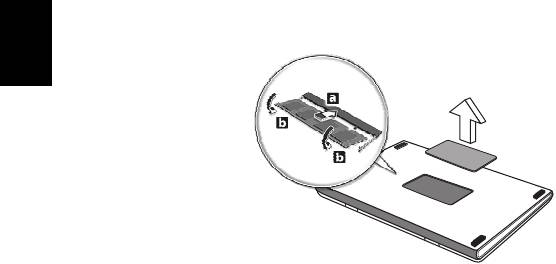
Installing memory
Note: Information in this section may not apply to your computer.
Follow these steps to install memory:
1 Turn off the computer, unplug the AC adapter (if connected) and remove the
battery pack. Then turn the computer over to access its base.
2 Remove the screws from the memory cover; then lift and remove the memory
cover.
EXPRESS CARD
41
English
3 (a) Insert the memory module diagonally into the slot, then (b) gently press it
down until it clicks into place.
4 Replace the memory cover and secure it with the screw.
5 Reinstall the battery pack, and reconnect the AC adapter.
6 Turn on the computer.
The computer automatically detects and reconfigures the total memory size. Please
consult a qualified technician or contact your local Acer dealer.

42
English
Enjoying TV with Windows Media
Center
Note: This feature is only available on certain models.
Computers that include Windows Media Center Edition or InstantOn Arcade may be
used to watch TV and to access video content (via an audio/video connection to an
external device, such as a video camera).
Choose your input type
The audio/video connection may be either a DVB-T digital antenna (for selected
models) or a PAL/SECAM or NTSC connector. Please refer to the appropriate
section:
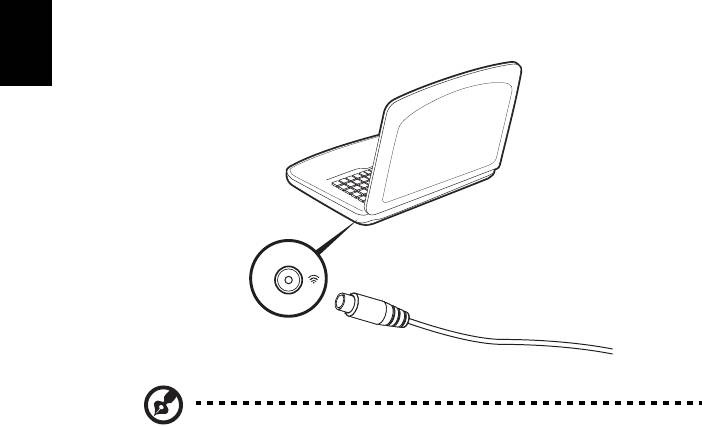
Watching TV using the optional DVB-T (digital
TV) antenna
(for selected models)
DVB-T digital TV is an international standard that is used to transmit terrestrial
television services in digital format. It is gradually replacing analog broadcasts in
many countries. The DVB-T digital antenna can be used with Windows Media
Center to watch local DVB-T digital TV broadcasts on your notebook PC.
43
English
To connect the digital antenna
1 Plug the antenna cable into the RF jack of your computer.
Note: Do not twist or loop the antenna cable. Extend the antenna
cable up to 20 cm to improve signal quality.
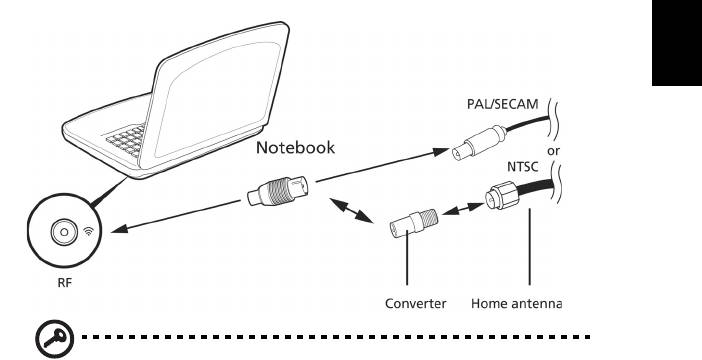
Watching TV with an external antenna or cable
socket
You may use conventional TV cables (connected to an external antenna or cable
socket) to watch TV on your computer.
Connecting antenna cables
To connect your cables:
1 Plug the antenna connector into the RF jack of your computer.
Notebook
RF
44
English
2 Connect the other end to your TV cable, using the cable converter if necessary.
Important! Please ensure you use the correct cable system for your
region before attempting to connect the antenna cable.
BIOS utility
The BIOS utility is a hardware configuration program built into your
computer's BIOS.
Your computer is already properly configured and optimized, and you do not need to
run this utility. However, if you encounter configuration problems, you may need to
run it.
To activate the BIOS utility, press <F2> during the POST while the notebook PC logo
is being displayed.
Boot sequence
To set the boot sequence in the BIOS utility, activate the BIOS utility, then select
Boot from the categories listed at the top of the screen.
Password
To set a password on boot, activate the BIOS utility, then select Security from the
categories listed at the top of the screen. Find Password on boot: and use the
<F5> and <F6> keys to enable this feature.
45
English
Using software
Playing DVD movies
Note: This feature is only available on certain models.
When the DVD drive module is installed in the optical drive bay, you can play DVD
movies on your computer.
1 Eject the DVD.
Important! When you launch the DVD player for the first time, the
program asks you to enter the region code. DVD discs are divided into
6 regions. Once your DVD drive is set to a region code, it will play
DVD disks of that region only. You can set the region code a maximum
of five times (including the first time), after which the last region code
set will remain permanent. Recovering your hard disk does not reset
the number of times the region code has been set. Refer to the table
below for DVD movie region code information.
2 The DVD movie will automatically play after a few seconds.
Region code Country or region
1 USA, Canada
2 Europe, Middle East, South Africa, Japan
3 Southeast Asia, Taiwan, South Korea
4 Latin America, Australia, New Zealand
5 Former USSR, parts of Africa, India
6 People’s Republic of China
Note: To change the region code, insert a DVD movie of a different
region into the DVD drive. Please refer to the online help for more
information.
46
English
Using a Bluetooth connection
Bluetooth is a technology enabling you to transfer data wirelessly over short
distances between many different types of devices. Bluetooth-enabled devices
include computers, cell phones, tablets, wireless headsets, and keyboards.
To use Bluetooth, you must ensure the following:
1. Bluetooth is enabled on both devices.
2. Your devices are "paired" (or connected).
Enabling and disabling Bluetooth
The Bluetooth adapter must be enabled on both devices. For your computer, this
may be an external switch, a software setting, or a separate Bluetooth dongle
plugged into the computer’s USB port (if no internal Bluetooth adapter is available).
Note: Please check your devices owner’s manual to determine how to
turn on its Bluetooth adapter.
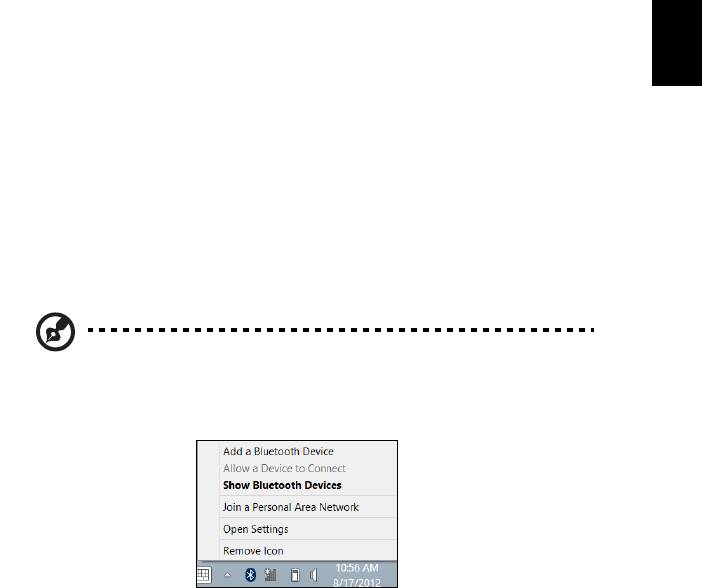
Then, from the notification area, click the Bluetooth icon, and select Open Settings.
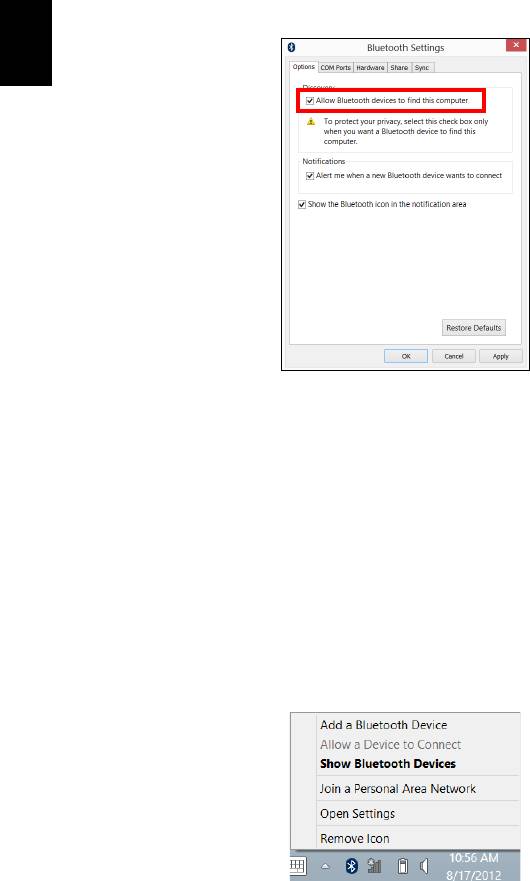
47
English
Select the Allow Bluetooth devices to find this computer check box, click Apply,
and then click OK.
The Bluetooth adapter in your computer is now enabled and ready for you to add
Bluetooth devices.
To disable your computer’s Bluetooth adapter, do the following:
1. Press the Windows key
+ <W> and then type Wireless.
2. In the results, click on Wireless.
3. Click the toggle under Bluetooth to enable/disable it.
Adding a Bluetooth device
Every new device must first be "paired" with your computer’s Bluetooth adapter. This
means it must first be authenticated for security purposes. You only need to pair
once. After that, simply turning on the Bluetooth adapter of both devices will connect
them.
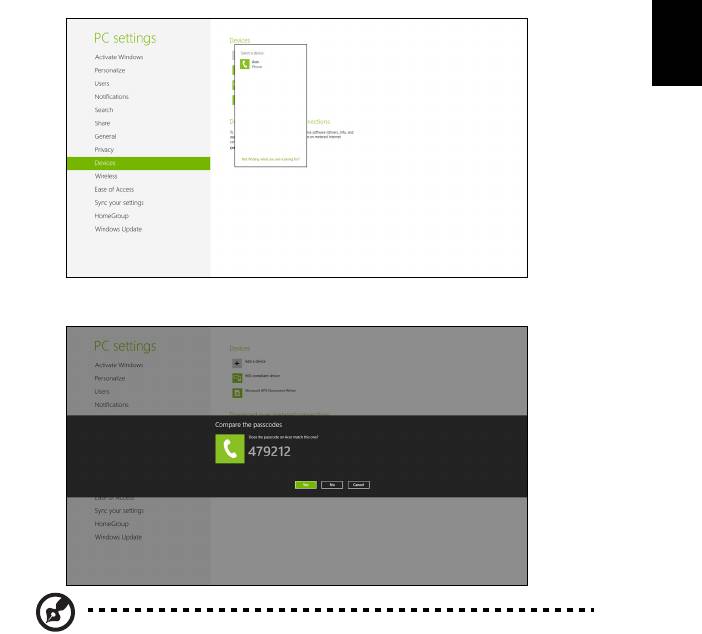
From the notification area, click the Bluetooth icon, and select Add a Bluetooth
Device.
48
English
Click on the device you want to add.
A code displays on your computer, which should match the code displayed on your
device. Select Yes. Then, accept the pairing from your device.
Note: Some devices using older versions of the Bluetooth technology
require both devices to enter a PIN. In the case of one of the devices
not having any inputs (as in a headset), the passcode is hardcoded
into the device (usually "0000" or "1234"). Consult your device’s user
manual for more information.
Your device will show up in the list of devices if it was successfully paired. Open the
Control Panel and under Hardware and Sound click on View devices and
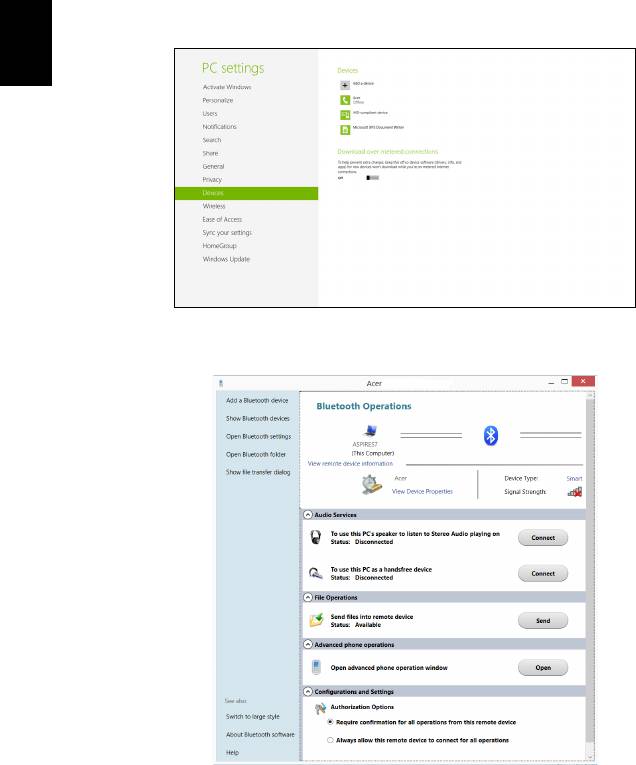
49
English
printers. Right cilck on your device and select Advanced Operations > Connect to
operation window.
The operation window enables you to play music and audio from your device
through your computer, send files to your device and change Bluetooth settings.

50
English
Troubleshooting
This chapter shows you how to deal with common system problems.
Read it before calling a technician if a problem occurs. Solutions to more serious
problems require opening up the computer. Do not attempt to open the computer
yourself; contact your dealer or authorized service center For assistance.
Troubleshooting tips
This notebook PC incorporates an advanced design that delivers onscreen error
message reports to help you solve problems.
If the system reports an error message or an error symptom occurs, see "Error
messages" below. If the problem cannot be resolved, contact your dealer. See
"Requesting service" on page 53.
Error messages
If you receive an error message, note the message and take the corrective action.
The following table lists the error messages in alphabetical order together with the
recommended course of action.
Error messages Corrective action
CMOS battery bad Contact your dealer or an authorized service center.
CMOS checksum error Contact your dealer or an authorized service center.
Disk boot failure Insert a system (bootable) disk, then press <Enter> to
reboot.
Equipment
Press <F2> (during POST) to enter the BIOS utility,
configuration error
then press Exit in the BIOS utility to reboot.
Hard disk 0 error Contact your dealer or an authorized service center.
Hard disk 0 extended
Contact your dealer or an authorized service center.
type error
I/O parity error Contact your dealer or an authorized service center.
Keyboard error or no
Contact your dealer or an authorized service center.
keyboard connected
Keyboard interface
Contact your dealer or an authorized service center.
error

51
English
Error messages Corrective action
Memory size mismatch Press <F2> (during POST) to enter the BIOS utility,
then press Exit in the BIOS utility to reboot.
If you still encounter problems after going through the corrective measures, please
contact your dealer or an authorized service center for assistance.

52
English
Frequently asked questions
The following is a list of possible situations that may arise during the use of your
computer. Easy solutions are provided for each one.
I turned on the power, but the computer does not start or
boot up.
Look at the power indicator:
• If it is not lit, no power is being supplied to the computer. Check the following:
• If you are using on the battery, it may be low and unable to power the
computer. Connect the AC adapter to recharge the battery pack.
• Make sure that the AC adapter is properly plugged into the computer and
to the power outlet.
• If it is lit, check the following:
• Is a non-bootable (non-system) disk in the external USB floppy drive?
Remove or replace it with a system disk and press <Ctrl> + <Alt> + <Del>
to restart the system.
Nothing appears on the screen.
The computer’s power management system automatically blanks the screen to save
power. Press any key to turn the display back on.
If pressing a key does not turn the display back on, three things might be
the cause:
• The brightness level might be too low. Press <Fn> + < > (increase) to adjust
the brightness level.
• The display device might be set to an external monitor. Press the display toggle
hotkey <Fn> + <F5> to toggle the display back to the computer.
• If the Sleep indicator is lit, the computer is in Sleep mode. Press and release
the power button to resume.
No audio is heard from the computer.
Check the following:
• The volume may be muted. In Windows, look at the volume control (speaker)
icon on the taskbar. If it is crossed-out, click the icon and deselect the Mute all
option.
• The volume level may be too low. In Windows, look at the volume control icon
on the taskbar. You can also use the volume control buttons to adjust the
volume.
• If headphones, earphones or external speakers are connected to the line-out
port on the computer, the internal speakers automatically turn off.

53
English
I want to eject the optical drive tray without turning on the power.
There is a mechanical eject hole on the optical drive. Simply insert the tip of a pen or
paperclip into the hole and push to eject the tray.
The keyboard does not respond.
Try attaching an external keyboard to a USB port on the computer. If it works,
contact your dealer or an authorized service center as the internal keyboard cable
may be loose.
The printer does not work.
Check the following:
• Make sure that the printer is connected to a power outlet and that it is turned
on.
• Make sure that the printer cable is connected securely to a USB port and the
corresponding port on the printer.
Requesting service
International Travelers Warranty (ITW)
Your computer is backed by an International Travelers Warranty (ITW) that gives you
security and peace of mind when traveling. Our worldwide network of service
centers are there to give you a helping hand.
An ITW passport comes with your computer. This passport contains all you need to
know about the ITW program. A list of available, authorized service centers is in this
handy booklet. Read this passport thoroughly.
Always have your ITW passport on hand, especially when you travel, to receive the
benefits from our support centers. Place your proof-of-purchase in the flap located
inside the front cover of the ITW passport.
If the country you are traveling in does not have an Acer-authorized ITW service site,
you can still get in contact with our offices worldwide. Please visit
www.acer.com.
Before you call
Please have the following information available when you call Acer for online
service, and please be at your computer when you call. With your support, we can
reduce the amount of time a call takes and help solve your problems efficiently. If
there are error messages or beeps reported by your computer, write them down as
they appear on the screen (or the number and sequence in the case of beeps).
You are required to provide the following information:
Name: __________________________________________
Address: ________________________________________
Telephone number: _______________________________

54
English
Machine and model type: ___________________________
Serial number: ___________________________________
Date of purchase: _________________________________

55
English
FREQU
Tips and hints for using Windows 8
We know this is a new operating system that will take some getting used to, so we've
created a few pointers to help you get started.
Three concepts you might want to keep in mind
1. Start
The Start button is no longer available; you can launch apps from the Start screen.
2. Tiles
Live tiles are similar to thumbnails of the apps.
3. Charms
Charms allow you to perform useful functions, such as sharing content, turning off
your PC or changing settings.
How do I access the charms?
Move the cursor to the upper or lower right-hand corner of the screen to access the
charms, or press the Windows key + <C>.
How do I get to Start?
Press the Windows key on the keyboard; press the Windows key + <C> and click
Start; or move the cursor to the lower left-hand corner of the screen and click Start.
How do I jump between apps?
Move the cursor to the left-hand edge of the screen to view thumbnails of apps that
are currently running.
You may also press the Windows key + <Tab> to open and scroll through the current
apps.
How do I turn off my computer?
Press the Windows key + <C>, click Settings > Power and select the action you'd
like to take. Alternatively, from Desktop, click Acer Power Button and select the
action you'd like to take.
Why is there a new interface?
The new interface for Windows 8 is designed to work well with touch input. Windows
Store apps will automatically use the whole screen and don't require closing in the
traditional way. Windows Store apps will be displayed on Start using live-tiles.

56
English
What are ’live tiles?’
Live tiles are similar to thumbnails of the apps that will be updated with new content
whenever you're connected to the Internet. So, for example, you can view weather
or stock updates without needing to open the app.
How do I unlock my computer?
Press the any key and click on a user account icon to unlock the computer. If your
account has a password set, you will need to enter the password to continue.
How do I personalize my computer?
You can personalize Start with a different background image or by arranging the tiles
to suit your personal needs.
To change the background, press the Windows key + <C> and click Settings >
Change PC settings > Personalize. Click Start screen at the top of the page and
select a color and image.
How do I move tiles?
Click and hold a tile to select it, then drag it to the place on Start that you want it to
appear. Other tiles will be moved to accommodate the tile in its new location.
Can I make tiles bigger or smaller?
Right-click on a tile, then select Smaller or Larger from the menu that appears at
the bottom of the screen.
How do I personalize the Lock screen?
You can personalize the lock screen with a different image or to show you quick
status and notifications to suit your personal needs.
To change the background, press the Windows key + <C> and click Settings >
Change PC settings > Personalize. Click Lock screen at the top of the page and
select the image and apps you would like to see on the lock screen.
So, how do I close an app?
Move the cursor to the top of the screen and click and drag the window downwards
to close the app.
You can close apps from the thumbnails on the left-hand edge of the screen by right-
clicking on a thumbnail and selecting Close.
Can I change the screen resolution?
From Start, start typing ’Control Panel’ to open Search and display the results; click
Control Panel > Adjust screen resolution.

57
English
I want to use Windows in the way that I'm used to - give
me my desktop back!
From Start click the Desktop tile to see a traditional desktop. You can pin apps you
frequently use to the taskbar to easily open them.
If you click an app that is not a Windows Store app, Windows will automatically open
the app using Desktop.
Where are my apps?
From Start, simply start typing the name of the app you would like to open, and
Search will automatically open and list results.
To view the complete list of apps, press the space bar or the Menu key and click All
apps.
How do I make an app appear on Start?
If you're in All apps and you want to make an app appear on Start, you can select the
app and right-click on it. Select Pin to Start from the menu that appears at the
bottom of the screen.
How do I remove a tile from Start?
Right-click the tile and click Unpin from Start from the menu that appears at the
bottom of the screen.
How do I make an app appear on my taskbar in Desktop?
If you're in All apps and you want to make an app appear on the taskbar in Desktop,
you can select the app and right-click on it. Select Pin to taskbar from the menu that
appears at the bottom of the screen.
How do I install apps?
You can download Windows Store apps from Store. You will need to have a
Microsoft ID to purchase and download apps from Store.
I can't find apps like Notepad and Paint! Where are they?
From Start you can simply start typing the name of the app you're looking for to open
Search and list the results. Alternatively, open All apps and scroll to ’Windows
Accessories’ to see the list of legacy programs.
What is a Microsoft ID (account)?
A Microsoft account is an email address and password that you use to sign in to
Windows. You can use any email address, but it is best if you choose the one you
already use to communicate with friends and sign in to your favorite websites. When
you sign in to your PC with a Microsoft account, you'll connect your PC to the people,
files, and devices you care about.

58
English
Do I need one?
You do not need a Microsoft ID to use Windows 8, but it makes life easier because
you can sync data across different machines you sign in to using a Microsoft ID.
How do I get one?
If you've already installed Windows 8 and didn't sign in with a Microsoft account or
you don't have a Microsoft account and want to get one, press the Windows key +
<C> and click Settings > Change PC settings > Users > Switch to a Microsoft
account, and follow the onscreen instructions.
How do I add a favorite to Internet Explorer?
Internet Explorer 10 doesn't have traditional favorites, instead you can pin shortcuts
to Start. Once you have the page open, right-click anywhere on the page to open the
menu at the bottom of the screen. Click Pin to Start.
How do I check for Windows updates?
Press the Windows key + <C> and click Settings > Change PC settings >
Windows Updates. Click Check for updates now.
Where can I get more information?
For more information please visit:
• Windows 8 tutorials: www.acer.com/windows8-tutorial
• Support FAQs: www.acer.com/support

59
English
Regulations and safety notices
FCC statement
This device has been tested and found to comply with the limits for a Class B digital
device pursuant to Part 15 of the FCC rules. These limits are designed to provide
reasonable protection against harmful interference in a residential installation. This
device generates, uses, and can radiate radio frequency energy and, if not installed
and used in accordance with the instructions, may cause harmful interference to
radio communications.
However, there is no guarantee that interference will not occur in a particular
installation. If this device does cause harmful interference to radio or television
reception, which can be determined by turning the device off and on, the user is
encouraged to try to correct the interference by one or more of the following
measures:
• Reorient or relocate the receiving antenna.
• Increase the separation between the device and receiver.
• Connect the device into an outlet on a circuit different from that to which the
receiver is connected.
• Consult the dealer or an experienced radio/television technician for help.
Notice: Shielded cables
All connections to other computing devices must be made using shielded cables to
maintain compliance with FCC regulations.
Notice: Peripheral devices
Only peripherals (input/output devices, terminals, printers, etc.) certified to comply
with the Class B limits may be attached to this equipment. Operation with non-
certified peripherals is likely to result in interference to radio and TV reception.
Caution
Changes or modifications not expressly approved by the manufacturer could void
the user's authority, which is granted by the Federal Communications Commission,
to operate this computer.
Notice: Canadian users
This Class B digital apparatus complies with Canadian ICES-003.
")


