HP DF770: Copying and Deleting Pictures
Copying and Deleting Pictures: HP DF770
Copying and Deleting Pictures
English
Copying pictures onto frame internal memory
From an external memory device: Insert an external memory device with pictures
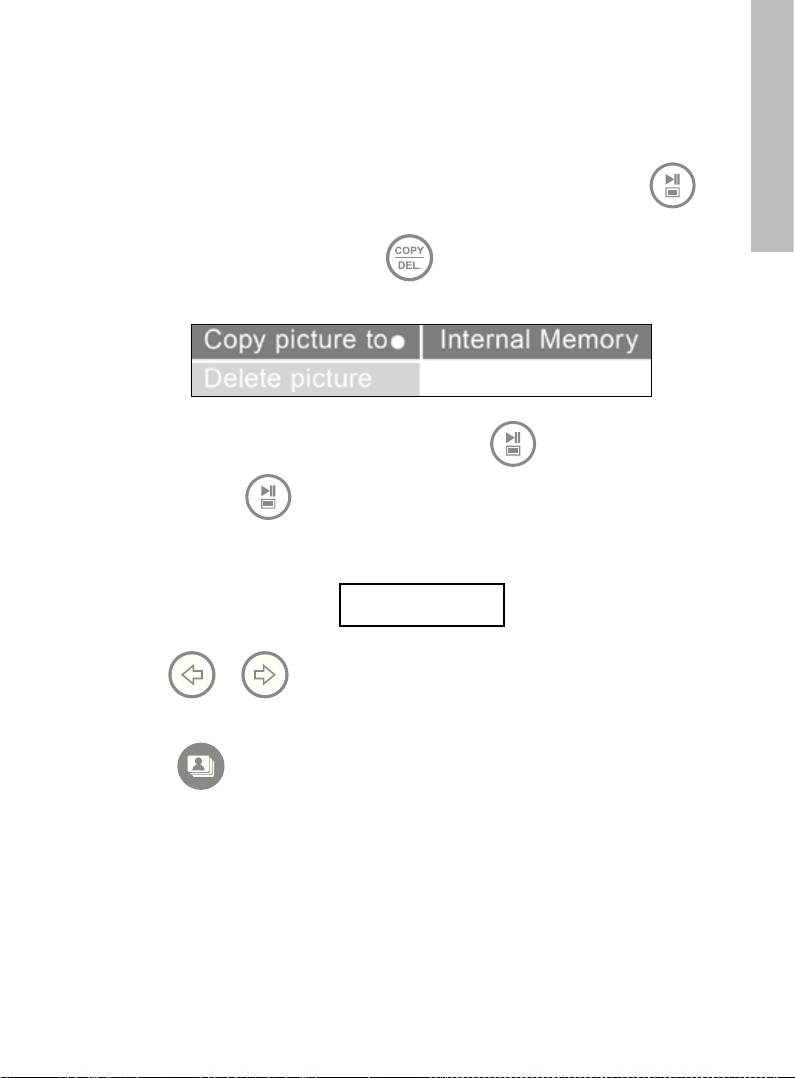
you wish to copy. A slideshow of these pictures will begin shortly. Press
once to enter photo browse mode or twice to enter thumbnail mode. Select the
picture you wish to copy and press to display the copy/delete menu as
shown below.
‘Copy picture to’ will be highlighted in blue. Press to display Internal
Memory. Press again to copy the desired picture onto the frame’s
internal memory. A Finished text box will be displayed indicating the picture is
now in the internal memory as illustrated below.
Finished
Use or to select another picture and repeat above step to copy to
internal memory.
Press to resume slideshow.
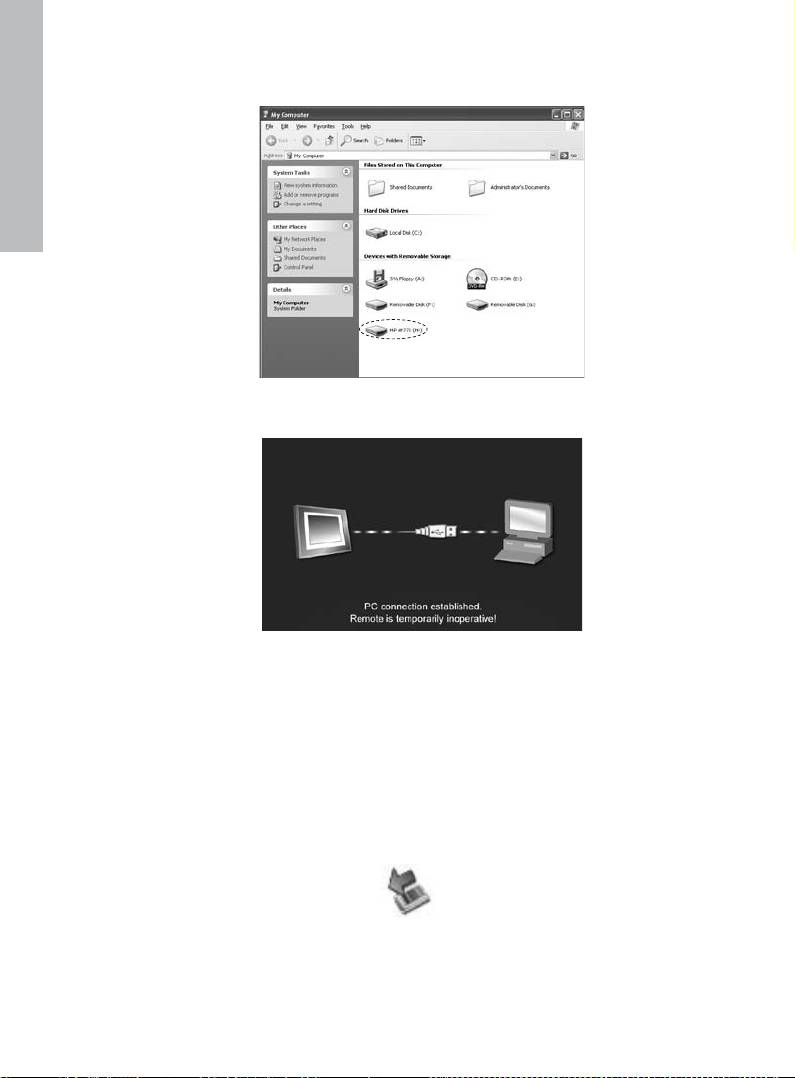
From a PC/laptop: For the first connection, it is recommended to remove all
external memory sources.
Power on the HP Digital Picture Frame. Connect the HP Digital Picture Frame to
your Windows™ 2000 (with service pack 4 or greater), Windows™ XP (with
Service Pack 2 or greater), or Windows™ Vista PC/notebook by using the USB
cable provided with the product. 3 new drive letters should appear in Windows
Explorer. These new drive letters represent the Digital Picture Frame’s internal
memory, memory card slot 1, and memory card slot 2. (see illustration below):
14
English
The digital picture frame will display the graphic below:
1 of the 3 new drive letters is the HP Digital Picture Frame’s internal memory and
labeled HP df770. Drive letter assignment MAY vary from PC to PC.
Use standard Windows™ explorer file copy and paste procedures to move
content onto the frame’s internal memory.
To check the picture frame's available memory, right click on the HP df770
drive letter and select Properties. A properties menu will appear displaying the
available/free space (in Mega Bytes [MB]).
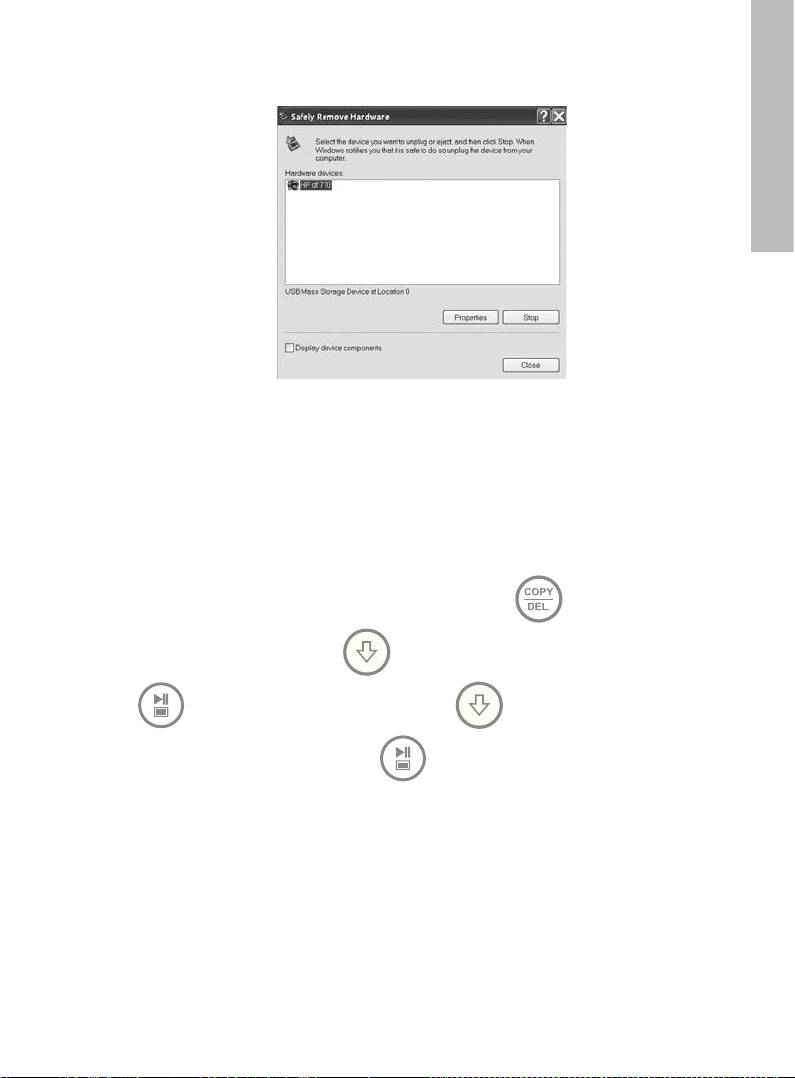
When finished copying pictures, disconnect the PC/laptop by double-clicking on
the Safely Remove Hardware icon in the lower right on the screen of the
PC/Laptop. This will display the menu as illustrated below.
15
English
Highlight the HP df770 drive and then click on the Stop button. After
notification, unplug the USB 2.0 cable from both the PC/Laptop and the
picture frame.
Deleting pictures from internal or external memory
Before deleting a picture or pictures, it is important to select the desired memory
source (see Selecting a Memory Source section for details).
Select the desired picture to be deleted and press the button to display
the copy/delete menu. Press to highlight ‘Delete picture’ text. Press
to display the YES and NO text. Use to highlight the desired
action. If YES is highlighted, press to delete the desired picture from
memory. The picture will disappear and the next picture (if additional pictures are
available) will be displayed.
If the frame is connected to a PC or laptop as previously described in Copying
pictures - From a PC/laptop section, pictures can be deleted using standard
Windows™ explorer file delete procedures.
16
Оглавление
- FCC Compliance Statement
- Table of Contents
- What’s in the Box
- Getting Started
- Remote Control
- Initial Setup
- Setup Menu
- Key Features
- Selecting a Memory Source
- Picture Options
- Picture Rotate and Zoom
- Copying and Deleting Pictures
- Music Playback
- Video Playback
- Calendar and Clock Display
- Specications - df770
- Frequently Asked Questions
- Cleaning and Care Tips
- Getting Help
- Table des matières
- Qu’est-ce qu’il y a dans la boîte?
- Pour commencer
- Télécommande
- Configuration initiale
- SETUP MENU (MENU CONFIGURATION)
- Fonctionnalités principales
- Sélection d’une source mémoire
- Options des photos
- Zoom et rotation d’image
- Copie et suppression des photos
- Lecture de la musique
- Lecture vidéo
- Affichage du calendrier et de l’horloge
- Spécications – df770
- Questions Fréquemment Posées
- Astuces pour le nettoyage et la maintenance
- Obtenir de l’aide
- Tabla de contenidos
- ¿Qué hay en la caja?
- Primeros pasos
- Mando a distancia
- Configuración inicial
- Menú Conguración
- Características principales
- Seleccionar una fuente de memoria
- Opciones de imágenes
- Giro y Zoom de imágenes
- Copiar y eliminar imágenes
- Reproducción de música
- Reproducción de vídeo
- Pantalla Calendario y reloj
- Especicaciones - df770
- Preguntas más frecuentes
- Consejos para la limpieza y cuidados
- Obtener ayuda
- Índice
- O que está incluído na embalagem?
- Para Iniciar
- Controlo Remoto
- Configuração Inicial
- SETUP MENU (MENU DE INSTALAÇÃO)
- Principais Características
- Seleccionar uma Fonte de Memória
- Opções de Foto
- Girar e Aplicar Zoom na Foto
- Copiando e Excluindo Fotos
- Reprodução de Música
- Reprodução de Vídeo
- Exibição de Relógio e Calendário
- Especicações - df770
- Perguntas Mais Freqüentes
- Sugestões de Limpeza e Cuidados
- Obter Ajuda
- Sommario
- Contenuto della confezione
- Operazioni preliminari
- Telecomando
- Configurazione iniziale
- Setup Menu (congurazione)
- Funzionalità principali
- Selezione di una sorgente di memoria
- Opzioni delle immagini
- Zoom e rotazione delle immagini
- Copia ed eliminazione delle immagini
- Riproduzione della musica
- Riproduzione dei video
- Visualizzazione dell’orologio e del calendario
- Caratteristiche tecniche - df770
- Domande frequenti
- Suggerimenti per la pulizia e la cura del prodotto
- Assistenza
- Inhaltsverzeichnis
- Was ist in der Schachtel?
- Einstieg
- Fernbedienung
- Erste Einstellungen
- Setup Menu (Menü "Einrichten")
- Hauptmerkmale
- Wählen Sie eine Speicherquelle aus
- Bildoptionen
- Bild drehen und verkleinern/vergrößern
- Kopieren und Löschen von Bildern
- Musik Wiedergabe
- Video Wiedergabe
- Kalender- und Uhrzeitanzeige
- Spezikationen - df770
- Häug gestellte Fragen
- Reinigungs- und Wartungstipps
- Hier erhalten Sie Hilfe
- Inhoudsopgave
- Wat zit er in de doos?
- Aan de slag
- Afstandsbediening
- Eerste instellingen
- SETUP MENU (MENU INSTELLINGEN)
- Belangrijkste kenmerken
- Een geheugenbron selecteren
- Beeldopties
- Foto’s draaien en inzoomen op foto’s
- Foto’s kopiëren en verwijderen
- Muziek afspelen
- Video afspelen
- Agenda & klokweergave
- Specicaties- df770
- Veelgestelde vragen
- Reiniging en onderhoud
- Hulp
- Innehållsförteckning
- Kartongens innehåll
- Komma igång
- Fjärrkontroll
- Grundinställningar
- SETUP MENU [Menyn Inställningar]
- Huvudfunktioner
- Välja en minneskälla
- Bildalternativ
- Rotera och zooma in på bilder
- Kopiera och ta bort bilder
- Spela upp musik
- Spela upp video
- Visa klocka och kalender
- Specikationer - df770
- Vanliga frågor
- Rengöring och underhållstips
- Ytterligare hjälp
- Содержание
- Комплектация
- Подготовка к работе
- Пульт дистанционного управления
- Начальные установки
- Меню SETUP MENU (Настройка)
- Основные функции
- Выбор запоминающего устройства
- Настройка изображения
- Поворот и увеличение масштаба изображения
- Копирование и удаление фотографий
- Воспроизведение музыки
- Воспроизведение видеозаписей
- Отображение календаря и часов
- Технические характеристик модели df770
- Вопросы и ответы
- Советы по чистке и уходу
- Техническая поддержка
- Table of Contents
- Kutuda Neler Var?
- Başlarken
- Uzaktan Kumanda
- Başlangıç Ayarı
- SETUP MENU (AYAR MENÜSÜ)
- Önemli Özellikler
- Bir Bellek Kaynağı Seçmek
- Resim Seçenekleri
- Resim Döndürme ve Zum
- Resimleri Kopyalamak ve Silmek
- Müzik Çalma
- Video Oynatma
- Takvim ve Saat Ekranı
- Teknik Özellikler - df770
- Sıkça Sorulan Sorular
- Temizlik ve Bakım Tavsiyeleri
- Yardım Almak
- Spis treści
- Zawartość opakowania
- Na początek
- Pilot zdalnego sterowania
- Ustawienia wstępne
- SETUP MENU (MENU USTAWIEŃ)
- Najważniejsze cechy
- Wybór pamięci źródłowej
- Opcje obrazu
- Obrót i powiększenie obrazu
- Kopiowanie i usuwanie obrazów
- Odtwarzanie muzyki
- Odtwarzanie lmów wideo
- Wyświetlanie kalendarza i zegara
- Dane techniczne - df770
- Często zadawane pytania (FAQ)
- Pomoc
- 目錄
- 內容物
- 入門指南
- 遙控器
- 初始設定
- Setup Menu (設定選單)
- 主要功能
- 選擇一個記憶體裝置來源
- 相片選項
- 旋轉與放大相片
- 複製與刪除相片
- 音樂播放
- 視訊播放
- 月曆與時鐘顯示
- 規格 - df770
- 常見問答集
- 清潔和保養的秘訣
- 取得協助
- 목차
- 패키지 내용물
- 시작하기
- 리모콘
- 초기 설정
- 설정 메뉴
- 주요 특성
- 메모리 선택
- 사진 옵션
- 사진 회전 및 확대
- 사진 복사 및 삭제
- 음악 재생
- 동영상 재생
- 달력 및 시계 디스플레이
- 사양 - df770
- 자주 묻는 질문
- 유지 및 관리 팁
- 지원 서비스
