Acer TravelMate 5600: Your Acer notebook tour
Your Acer notebook tour: Acer TravelMate 5600

11
English
Your Acer notebook tour
After setting up your computer as illustrated in the Just for Starters... poster,
let us show you around your new Acer notebook.
Front view
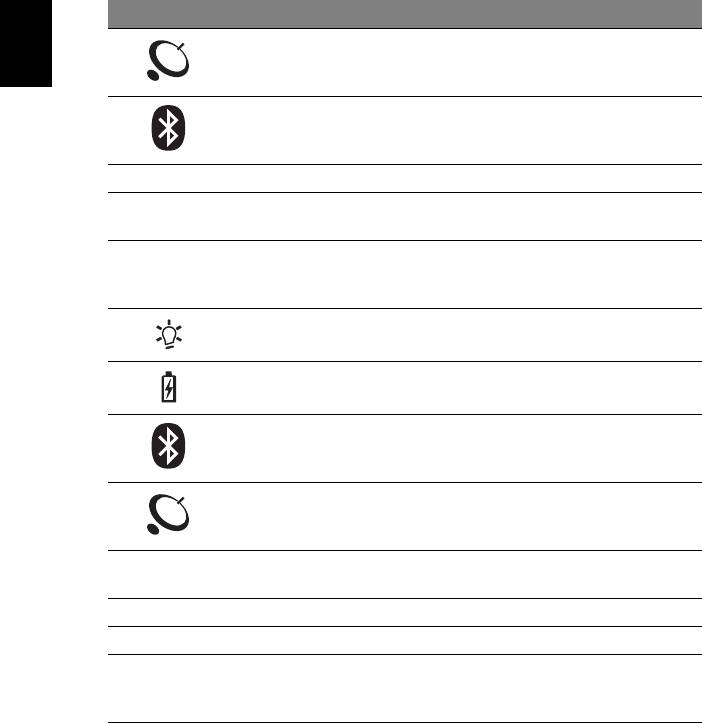
# Icon Item Description
1 Display screen Also called Liquid-Crystal Display (LCD),
displays computer output.
2 Status indicators Light-Emitting Diodes (LEDs) that light up to
show the status of the computer's functions
and components.
12
# Icon Item Description
3 Wireless
Enable/disables the wireless function.
communication
Indicates the status of wireless LAN
English
button
communication.
4Bluetooth
Enable/disables the Bluetooth function.
communication
Indicates the status of Bluetooth
button
communication.
5 Microphone Internal microphone for sound recording.
6 Touchpad Touch-sensitive pointing device which
functions like a computer mouse.
7 Click buttons (left,
The left and right buttons function like the
center and right)
left and right mouse buttons; the center
button serves as a 4-way scroll button.
8 Power indicator Indicates the computer's power status.
9 Battery indicator Indicates the computer's batttery status.
10 Bluetooth
Indicates the status of Bluetooth
communication
communication.
indicator
11 Wireless
Indicates the status of wireless LAN
communication
communication.
indicator
12 Palmrest Comfortable support area for your hands
when you use the computer.
13 Keyboard For entering data into your computer.
14 Power button Turns the computer on and off.
15 Easy-launch
Buttons for launching frequently used
buttons
programs. See "Easy-launch buttons" on
page 22 for more details.
13
English
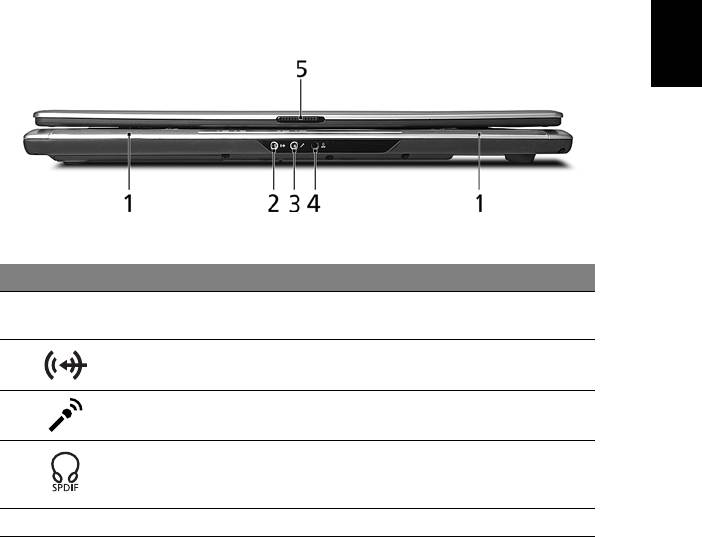
Closed front view
# Icon Item Description
1 Speakers Left and right speakers deliver stereo
audio output.
2 Line-in jack Accepts audio line-in devices (e.g., audio
CD player, stereo walkman).
3 Microphone-in jack Accepts input from external
microphones.
4 Headphones/speaker/
Connects to audio line-out devices (e.g.,
line-out jack with
speakers, headphones).
S/PDIF support
5 Latch Locks and releases the lid.
14
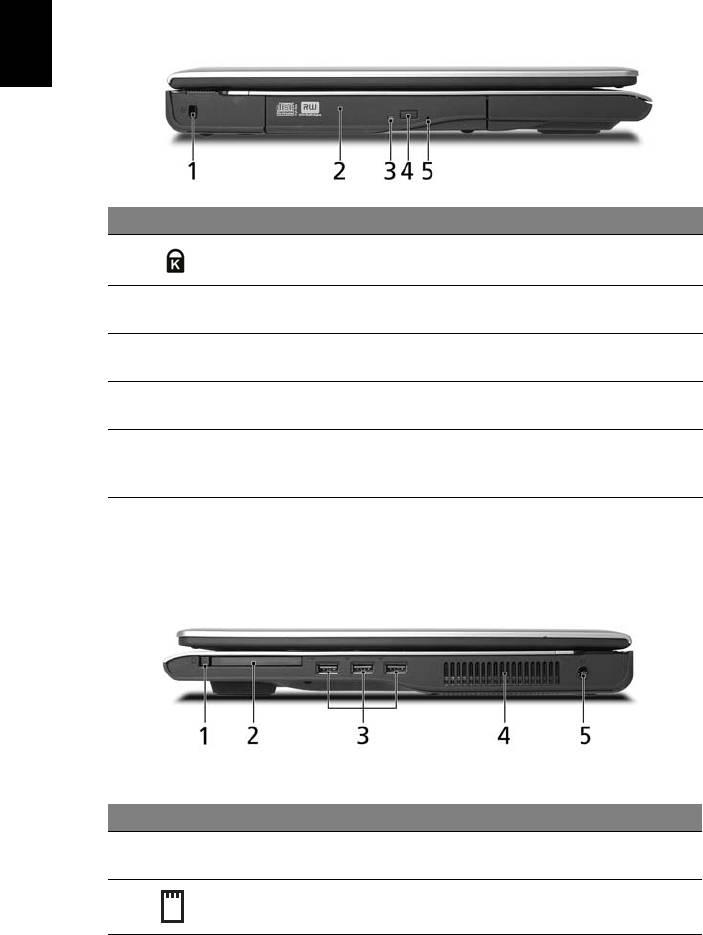
Left view
English
# Icon Item Description
1 Kensington lock
Connects to a Kensington-compatible
slot
computer security lock.
2 Optical drive Internal optical drive; accepts CDs or DVDs
(slot-load or tray-load depending on model).
3 Optical disk access
Lights up when the optical drive is active
indicator
(location depends on model).
4 Optical drive eject
Ejects the optical disk from the drive
button
(location depends on model).
5 Emergency eject
Ejects the optical drive tray when the
hole
computer is turned off
(location depends on model).
Right view
# Icon Item Description
1 PC Card slot eject
Ejects the PC Card from the slot.
button
2 PC Card slot Accepts one Type II PC Card.
15
English
# Icon Item Description
3 Three USB 2.0
Connect to USB 2.0 devices (e.g., USB mouse,
ports
USB camera).
4 Ventilation slots Enable the computer to stay cool, even after
prolonged use.
5 DC-in jack Connects to an AC adapter.
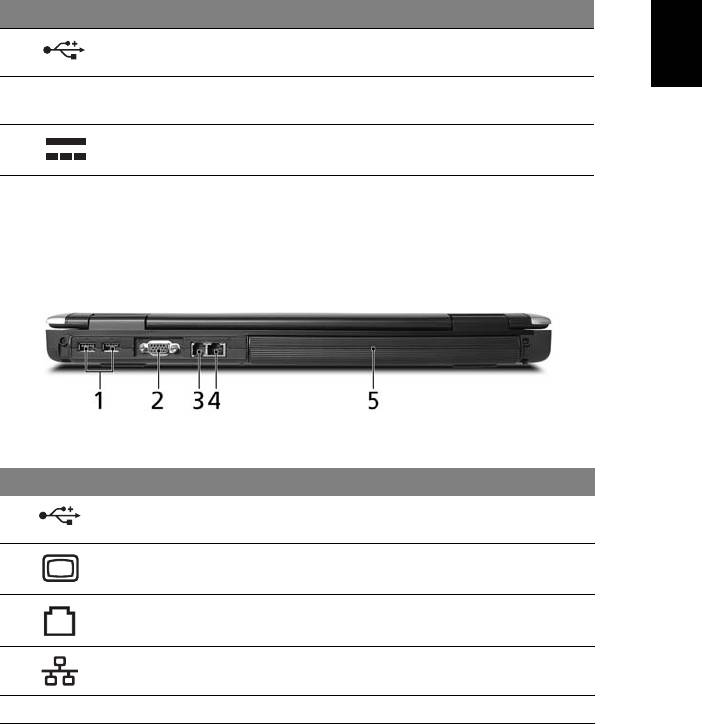
Rear view
# Icon Item Description
1 Two USB 2.0 port Connects to USB 2.0 devices (e.g., USB
mouse, USB camera).
2 External display
Connects to a display device (e.g., external
(VGA) port
monitor, LCD projector).
3 Modem (RJ-11) port Connects to a phone line.
4 Ethernet (RJ-45)
Connects to an Ethernet 10/100-based
port
network.
5 Battery Powers the computer.
16
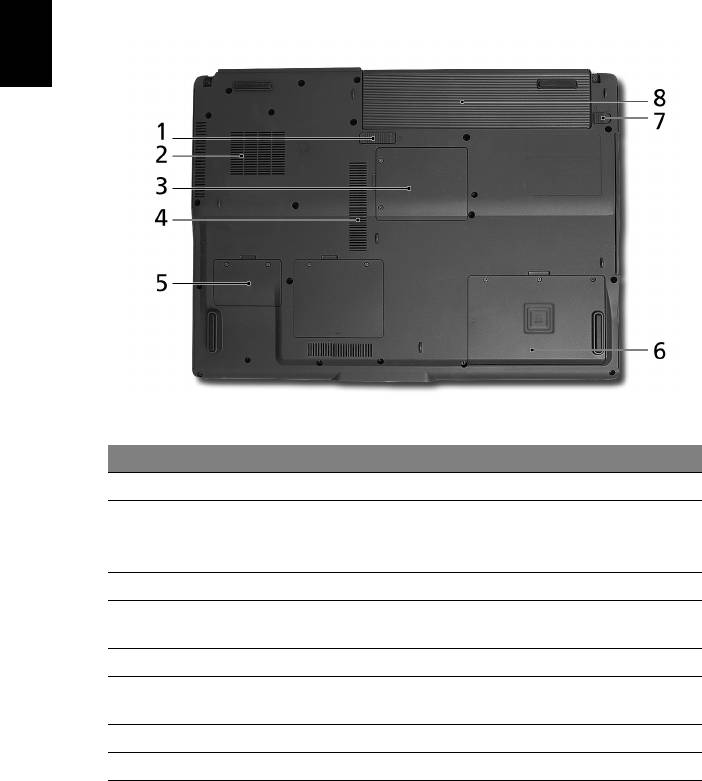
Base view
English
# Item Description
1 Battery release latch Releases the battery for removal.
2 Cooling fan Helps keep the computer cool.
Note: Do not cover or obstruct the opening of
the fan.
3 Mini PCI card bay Houses the computer's Mini PCI card.
4 Ventilation slots Enable the computer to stay cool, even after
prolonged use.
5 Memory compartment Houses the computer's main memory.
6 Hard disk bay Houses the computer's hard disk (secured with
screws).
7 Battery lock Locks the battery in position.
8 Battery bay Houses the computer's battery pack.
Оглавление
- User's Guide
- Disposal instructions
- First things first
- Acer Empowering Technology
- Your Acer notebook tour
- Specifications
- Indicators
- Easy-launch buttons
- Touchpad
- Using the keyboard
- Ejecting the optical (CD or DVD) drive tray
- Audio
- Using the system utilities
- Frequently asked questions
- Taking your notebook PC with you
- Securing your computer
- Expanding through options
- Power management
- Regulations and safety notices
- Index
